目录
准备工作
ES8.9.1 + kibana8.9.1 + IK的版本最好要对应上!!!
ES
es8.9.1:
https://artifacts.elastic.co/downloads/elasticsearch/elasticsearch-8.9.1-windows-x86_64.zip
es历史版本下载页面:
https://www.elastic.co/cn/downloads/past-releases#elasticsearch
Kibana
kibana8.9.1:
https://artifacts.elastic.co/downloads/kibana/kibana-8.9.1-windows-x86_64.zip
kibana历史版本下载页面:
Past Releases of Elastic Stack Software | Elastic
IK
IK8.9.0(ik没有8.9.1的版本,但是可以通过修改配置文件适配8.9.1的es):
IK历史版本下载页面:
https://github.com/infinilabs/analysis-ik/tags
安装
es
将压缩包解压后放到你想放置的位置就行。
修改配置文件(config/elasticsearch.yml):
# 开放远程访问
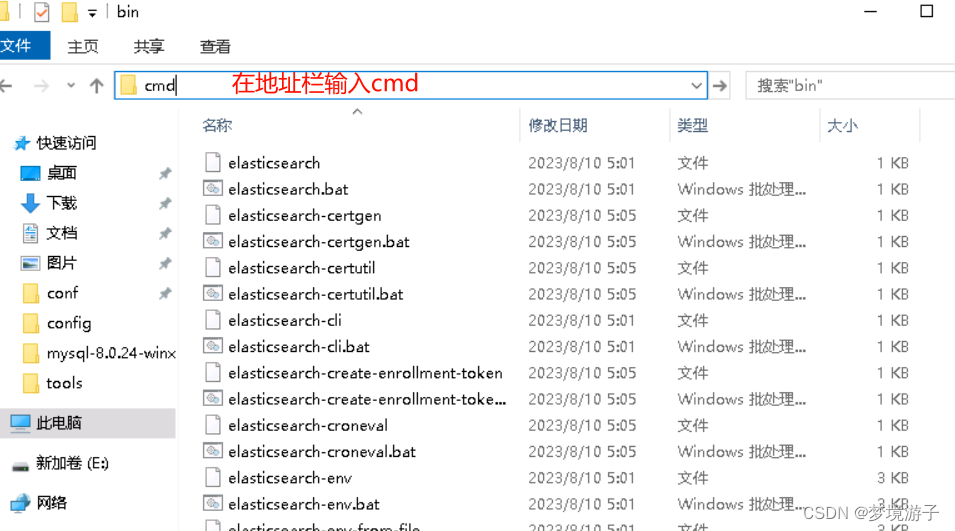
network.host: 0.0.0.0接着进入bin目录,在地址栏里输入cmd回车:
# 切换到utf-8编码
chcp 65001

# 运行es的脚本
elasticsearch.bat
在第一次运行完成后会弹出elastic用户的密码和token信息(配置kibana将会用到),注意只有第一次弹出!!!
关键信息位置如下两个地方,自行找到对应的位置:
密码:
Password for the elastic user (reset with `bin/elasticsearch-reset-password -u elastic`):
xxxxxxxxxxxxxxxx
token:
Copy the following enrollment token and paste it into Kibana in your browser (valid for the next 30 minutes):
xxxxxxxxxxxxxxxxxx
es访问测试
浏览器访问
https://127.0.0.1:9200访问如果提示什么不安全链接,忽略即可,页面中应该会有更多选项的按钮,选择继续访问即可。
然后就会要你输入账号密码,账号是elastic,密码就是cmd窗口中弹出的信息(就是上面说的首次启动会弹出的信息),假如你没记下来,可以通过以下命令重置下密码:
elasticsearch-reset-password -u elastic如果重置失败了,尝试下把es服务运行起来后再去运行命令。
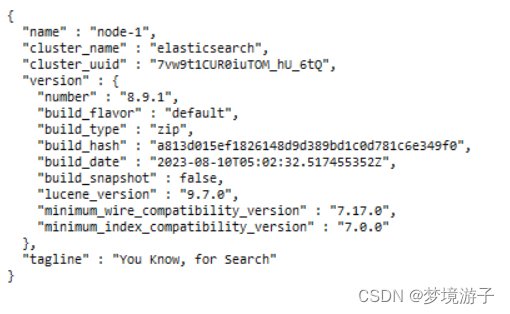
访问成功了会弹出版本信息,如:
将es安装为系统服务
进入es的bin目录,然后在地址栏中输入cmd,在黑窗口中执行。
命令如下:
# 安装为系统服务(必须先运行这个命令安装)
elasticsearch-service.bat install
# 将es移出系统服务
elasticsearch-service.bat remove
# 启动es服务
elasticsearch-service.bat start
# 停止es服务
elasticsearch-service.bat stop
# 打开es服务管理器
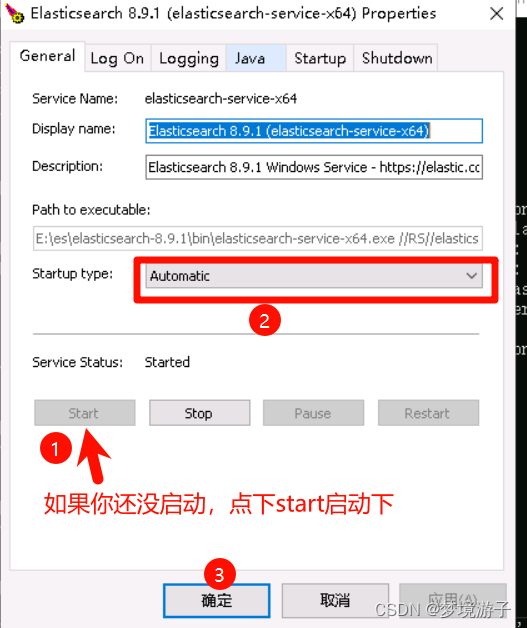
elasticsearch-service.bat manager在安装好之后如果你需要设置自动运行,那么你需要运行下elasticsearch-service.bat manager,在弹出的窗口中设置为跟我的一样的即可:
Kibana
解压后放到你想放置的位置即可。
修改配置文件(config/kibana.yml):
# 开放远程访问
server.host: 0.0.0.0
配置es
进入bin目录后在地址栏输入cmd,然后在黑窗口中输入以下命令:
kibana-setup接着会提示你要输入token,这个token就是前面说的es首次启动时弹出的关键信息其中之一。
如果你没有记录,或者是前面的token过期了,可以通过进入es的bin目录中在地址栏打开cmd,输入以下命令创建新的token:
elasticsearch-create-enrollment-token -s kibana然后将token输入后kibana就会自行去配置了。
运行kibana
双击kibana.bat即可运行。
访问测试
浏览器访问
http://127.0.0.1:5601账户名elastic,密码跟前面的一致,其实这个账户密码就是es的登录账户和密码。
IK
将压缩包解压后放在es中的plugins位置即可。然后停止es服务再启动即可。
测试ik分词器的两种模式:
GET _analyze
{
    "analyzer": "ik_smart",
    "text": "我是中国人"
}

GET _analyze
{
    "analyzer": "ik_max_word",
    "text": "我是中国人"
}
补充
如果需要修改elastic的密码只需要在kibana发请求:
POST /_security/user/elastic/_password
{
    "password": "123456"
}