目录
- [1. 作者介绍](#1. 作者介绍)
- 2.百度API介绍与获取
-
- [2.1 API介绍](#2.1 API介绍)
- [2.2 注册账号并获取API Key](#2.2 注册账号并获取API Key)
- 3.完整实验代码,测试结果
-
- [3.1 调用API](#3.1 调用API)
- 3.2框出主体部分,并标注标签和置信度
- [3.3 测试结果](#3.3 测试结果)
1. 作者介绍
邓富贵,男,西安工程大学电子信息学院,2023级研究生
研究方向:机器视觉与人工智能
电子邮件:dengfugui226@163.com
吴天禧,女,西安工程大学电子信息学院,2023级研究生,张宏伟人工智能课题组
研究方向:模式识别与智能系统
电子邮件:230411046@stu.xpu.edu.cn
2.百度API介绍与获取
2.1 API介绍
应用程序编程接口(英语:Application Programming Interface,简称:API),是一些预先定义的函数。
目的:让应用程序开发人员得以调用一组例程功能,而无须考虑其底层的源代码为何、或理解其内部工作机制的细节。
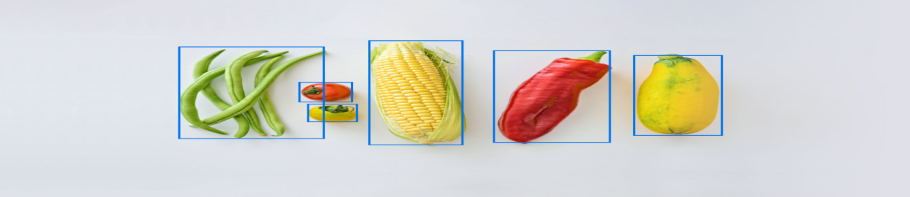
图像多主体检测API:检测出图片中多个主体的坐标位置,并给出主体的分类标签和标签的置信度得分,共计16大类,可用于图片打标、裁剪出对应主体进行二次开发。其效果图如下。
2.2 注册账号并获取API Key
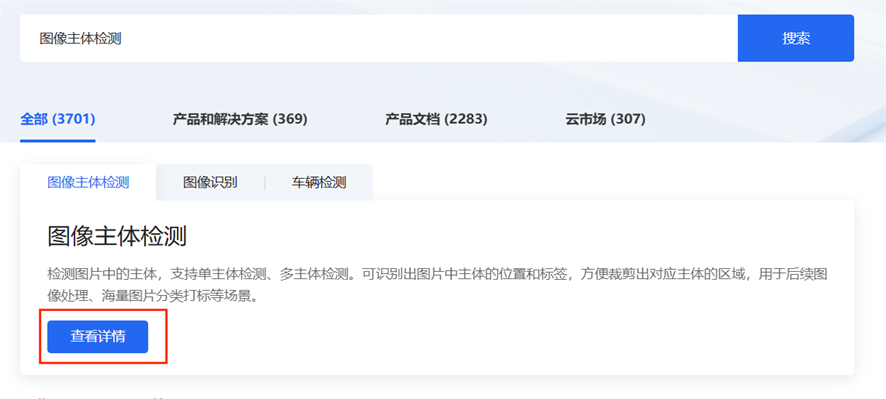
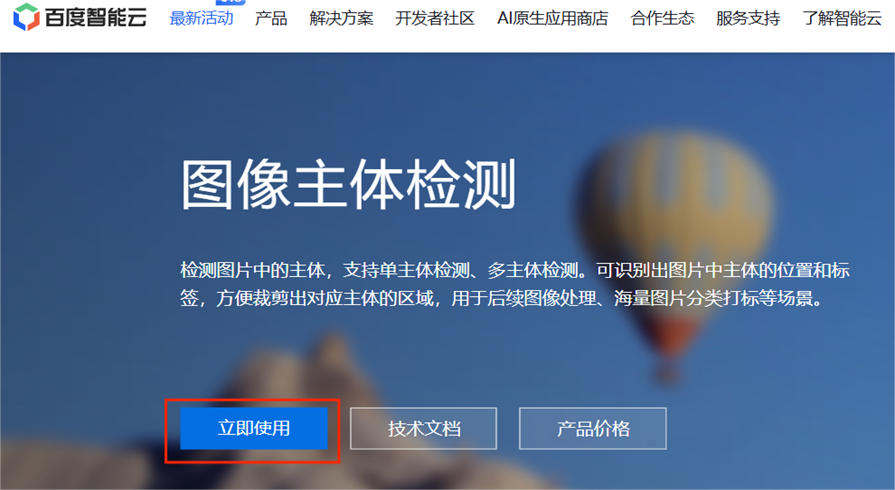
(1)注册百度智能云账号,进入官网首页,搜索图像主体检测,点击

(2)跳转后点击查看详情
(3)跳转后点击立即使用
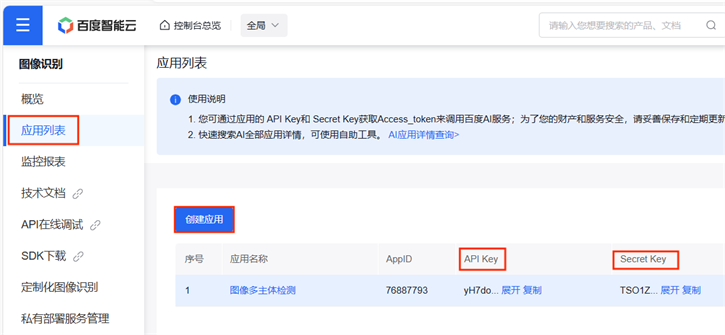
(4)跳转后点击应用列表,接着点击创建应用,获取你的API Key 和 Secret Key
3.完整实验代码,测试结果
3.1 调用API
python
import requests
import base64
import cv2
import numpy as np
from PIL import Image, ImageDraw, ImageFont
import numpy as np
from translate import Translator
API_KEY = "你的API_KEY"
SECRET_KEY = "你的SECRET_KEY"
def get_access_token():
"""
使用 AK,SK 生成鉴权签名(Access Token)
:return: access_token,或是None(如果错误)
"""
url = "https://aip.baidubce.com/oauth/2.0/token"
params = {"grant_type": "client_credentials", "client_id": API_KEY, "client_secret": SECRET_KEY}
return str(requests.post(url, params=params).json().get("access_token"))
request_url = "https://aip.baidubce.com/rest/2.0/image-classify/v1/multi_object_detect"
# 二进制方式打开图片文件
f = open(r'C:\Users\86185\1.jpg', 'rb')
img = base64.b64encode(f.read())
params = {"image":img}
access_token = get_access_token()
request_url = request_url + "?access_token=" + access_token
headers = {'content-type': 'application/x-www-form-urlencoded'}
response = requests.post(request_url, data=params, headers=headers)
if response:
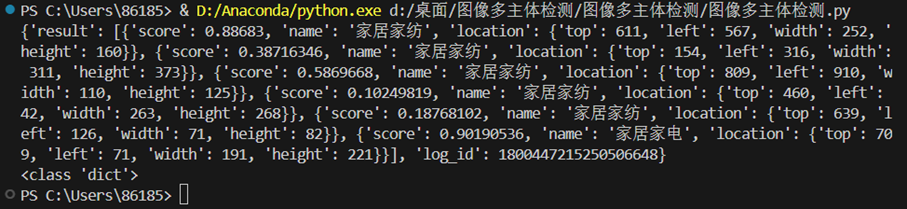
print (response.json())
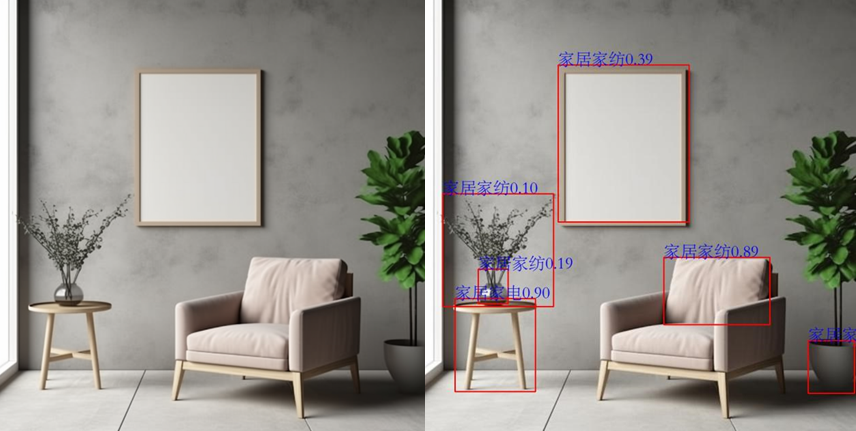
print(type(response.json()))3.2框出主体部分,并标注标签和置信度
python
def cv2ImgAddText(img, text, left, top, textColor, textSize=20):
    if (isinstance(img, np.ndarray)):  # 判断是否OpenCV图片类型
        img = Image.fromarray(cv2.cvtColor(img, cv2.COLOR_BGR2RGB))
    # 创建一个可以在给定图像上绘图的对象
    draw = ImageDraw.Draw(img)
    # 字体的格式
    fontStyle = ImageFont.truetype(
        "STSONG.TTF", textSize, encoding="utf-8")
    # 绘制文本
    draw.text((left, top), text, textColor, font=fontStyle)
    # 转换回OpenCV格式
    return cv2.cvtColor(np.asarray(img), cv2.COLOR_RGB2BGR)

def draw_bounding_boxes(image_path, detections):
    """
    在图片上绘制边界框,基于检测结果。
    :param image_path: 图片文件的路径。
    :param detections: 检测结果列表,每个结果包含分数、名称和位置信息。
    """
    # 加载图片
    image = cv2.imread(image_path)
    if image is None:
        print("未找到图片")
        return
    # 遍历检测结果并绘制
    for detection in detections['result']:
        score = detection['score']  # 置信度
        name = detection['name']    # 名称
        top = detection['location']['top']  # 上边界
        left = detection['location']['left']  # 左边界
        width = detection['location']['width']  # 宽度
        height = detection['location']['height']  # 高度

        # 在检测到的主体周围绘制红色矩形框
        cv2.rectangle(image, (left, top), (left + width, top + height), (0, 0, 255), 2)
        # 在矩形框上方添加文本(名称和置信度)
        image = cv2ImgAddText(image, f"{name}{score:.2f}", left, top - 40, textColor = (0, 0, 255), textSize = 40)  # 添加
        # cv2ImgAddText(图像, 文字内容, 字体左边开始位置, 字体上面开始位置, (R, G, B), 字体大小)
    # 显示结果图像
    cv2.namedWindow('检测结果', 0)
    cv2.imshow("检测结果", image)
    cv2.waitKey(0)
    cv2.destroyAllWindows()
    # 可选:将结果保存到文件
    cv2.imwrite("detections_output.jpg", image)
# 示例检测数据
detections = response.json()
# 调用函数,传入图片路径和检测数据
draw_bounding_boxes(r'C:\Users\86185\1.jpg', detections)
3.3 测试结果