文章目录
- 前言
- 一、JSON转换库对比
- 二、YYModel性能优化
- 三、YYModel的使用
- 四、架构分析
-
- [YYClassInfo 剖析](#YYClassInfo 剖析)
- 五、流程剖析
-
- [转换前准备工作 -- 将JSON统一成NSDictionary](#转换前准备工作 – 将JSON统一成NSDictionary)
- [将NSDictionary 转换为Model对象](#将NSDictionary 转换为Model对象)
- 提取Model信息
- 使用NSDictionary的数据填充Model
- 总结
前言
先前写了JSONModel的源码阅读笔记,同时在之前了解到YYModel也是一个JSON转模型的第三方库,而且性能极高,许多公司都在使用这个模版,而且无侵入性,因此想阅读一下YYModel的源码并且与JSONModel对比找出其性能高的原因
一、JSON转换库对比
- 性能测评
首先我们来看一下同类开源库的性能对比
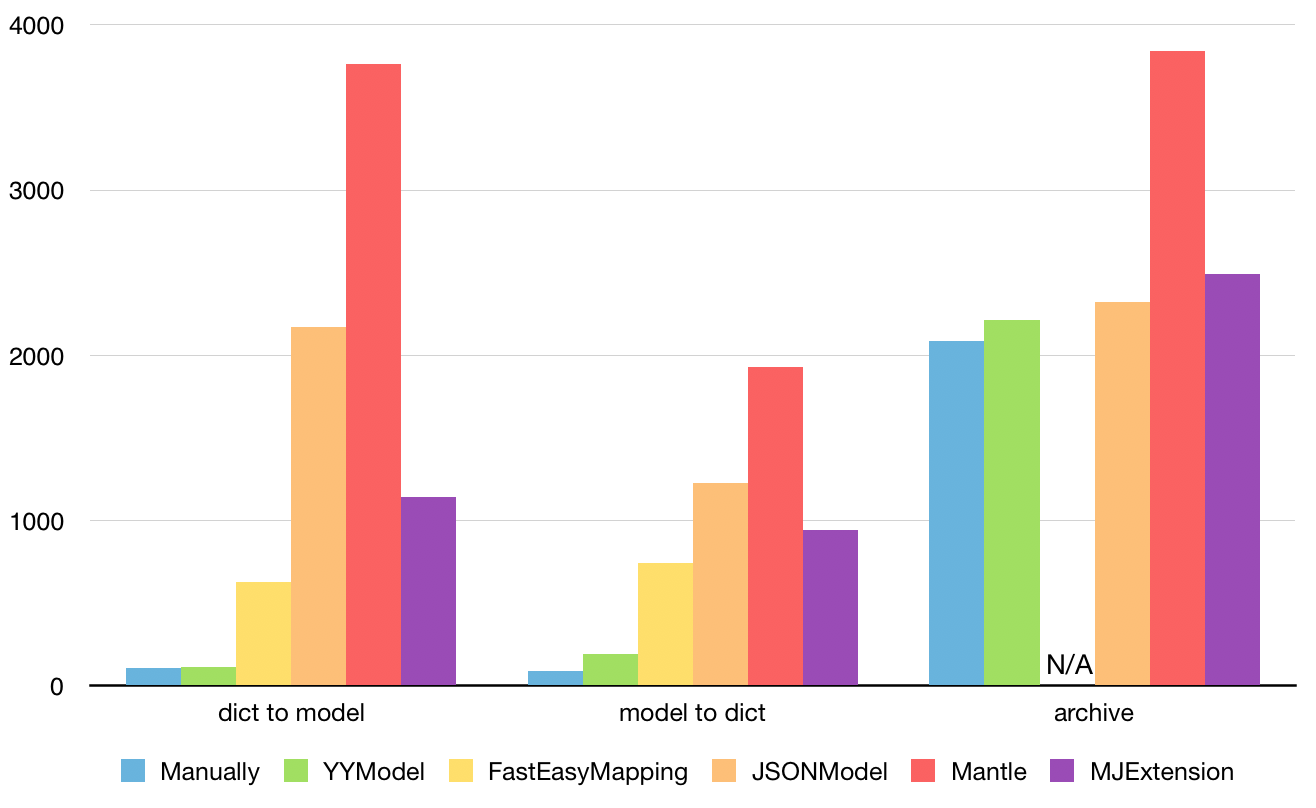
YYModel是一个序列化与反序列化库,说直白就是一个将JSON形式的数据转换为具体类型的对象,以及具体类型的对象转换为NSDictionary的库
对比完了性能,我们来看一下库的容错性 - 容错性
容错性主要是测试在默认情况下,当JSON格式错误时,Model框架是否会产生错误结果或造成Crash。
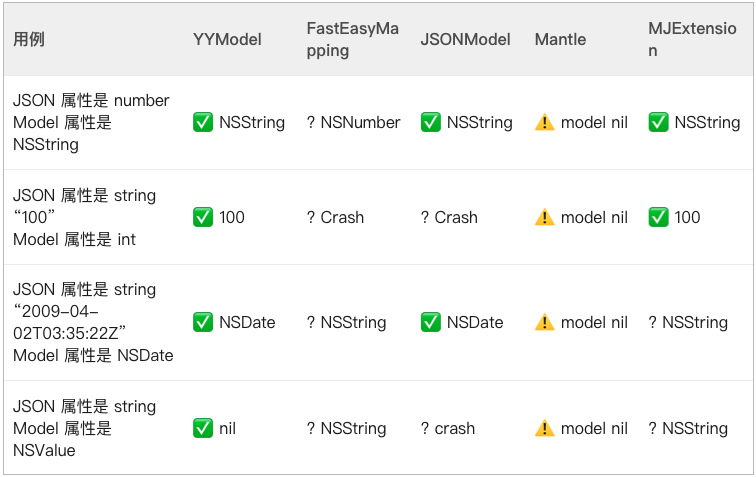
YYModel库会自动进行错误类型检查,如果检查到不匹配的类型会自动赋值为nil - 无侵入性
Mantle和JSONModel都需要Model继承自某个基类,灵活性稍差,但功能丰富。
例如使用Mantle:
bash
// 假设你的模型需要继承MTLModel
@interface User : MTLModel <MTLJSONSerializing>
@property (nonatomic, copy) NSString *name;
@property (nonatomic, copy) NSString *email;
@end

@implementation User

+ (NSDictionary *)JSONKeyPathsByPropertyKey {
    return @{
        @"name": @"name",
        @"email": @"email_address"
    };
}

@end这需要我们的Model类必须继承自MTLModel
YYModel、MJExtension 都是采用 Category 方式来实现功能,比较灵活,无侵入。
bash
#import "YYModel.h"

@interface User : NSObject
@property (nonatomic, copy) NSString *name;
@property (nonatomic, copy) NSString *email;
@end

@implementation User
@end

// 使用YYModel进行JSON解析
User *user = [User yy_modelWithJSON:@"{\"name\": \"John\", \"email\": \"john@example.com\"}"];
二、YYModel性能优化
- 缓存
Model JSON转换过程中需要许多类的元数据,我们可以通过CFDictionaryCreateMutable方法将这个数据存入缓存,需要使用的时候直接拿出,就不用重复解析类
类的元数据包括:
- 属性信息:
• 属性的名称、类型、访问权限等。
• 属性是否可选、默认值等信息。
• 特定于JSON映射的信息,例如属性与JSON键之间的映射关系。
- 方法信息:
• 类中定义的方法,特别是设置(setter)和获取(getter)方法,这些对于属性的读写至关重要。
- 类型信息:
• 类型信息帮助转换过程中正确处理数据类型,例如将JSON中的字符串转换为日期对象或整数。
- 继承信息:
• 类的继承结构,了解一个类是否继承自另一个类,这在处理多态或类继承时特别重要。
这一点在JSONModel中也有体现,不过在JSONModel中是将缓存作为关联对象存入全局Map的
- 避免KVC
如果阅读过JSONModel的源码我们就会知道JSONModel是通过KVC将相应的JSON数据赋值给属性的,使用起来十分方便,但是如果考虑性能的话,Getter与Setter方法的性能要优于KVC,因此在YYModel中是通过Getter与Setter方法进行赋值的,这样会有比较大的性能提升 - 避免多余的内存管理方法
使用__unsafe_unretained会比使用__strong与__weak属性的性能更好,至于这里是为什么,暂时还不是很能理解,后面学习了Strong与weak的底层原理会补上 - 尽量用纯 C 函数、内联函数
使用纯 C 函数可以避免 ObjC 的消息发送带来的开销。
例如,YYModel在处理键值映射和类型转换时,会用到如YYClassIvarInfo、YYClassMethodInfo这样的C结构体来存储有关ivar和方法的信息,然后通过纯C函数来操作这些结构体,避免了频繁的ObjC方法调用。像YYClassMethodInfo这样的结构体都是对Runtime底层数据的封装,这点后面会讲
- 减少遍历的循环次数
在JSON和Model转换前,Model的属性个数和JSON的属性个数都是已知的,这时选择数量较少的那一方进行遍历,会节省很多时间。
以下给出源代码中的体现
bash
//    这里的条件判断比较了模型元数据中记录的映射键的数量 (_keyMappedCount) 和传入字典中的键的数量。这个判断的目的是为了选择一个更高效的遍历策略:
//        •    如果模型的映射键数量多于或等于字典的键数量,那么遍历字典可能更高效。
//        •    否则,遍历模型的所有属性可能更加合适。
    if (modelMeta->_keyMappedCount >= CFDictionaryGetCount((CFDictionaryRef)dic)) {
        CFDictionaryApplyFunction((CFDictionaryRef)dic, ModelSetWithDictionaryFunction, &context);
        // 处理一些嵌套的属性
        if (modelMeta->_keyPathPropertyMetas) {
            CFArrayApplyFunction((CFArrayRef)modelMeta->_keyPathPropertyMetas,
                                 CFRangeMake(0, CFArrayGetCount((CFArrayRef)modelMeta->_keyPathPropertyMetas)),
                                 ModelSetWithPropertyMetaArrayFunction,
                                 &context);
        }
        if (modelMeta->_multiKeysPropertyMetas) {
            CFArrayApplyFunction((CFArrayRef)modelMeta->_multiKeysPropertyMetas,
                                 CFRangeMake(0, CFArrayGetCount((CFArrayRef)modelMeta->_multiKeysPropertyMetas)),
                                 ModelSetWithPropertyMetaArrayFunction,
                                 &context);
        }
    } else {
        CFArrayApplyFunction((CFArrayRef)modelMeta->_allPropertyMetas,
                             CFRangeMake(0, modelMeta->_keyMappedCount),
                             ModelSetWithPropertyMetaArrayFunction,
                             &context);
    }
三、YYModel的使用
首先基本的Model与JSON的相互转换肯定没有问题
例如我们想输出date


直接赋值即可

但是当我们属性是容器类时,我们需要返回容器类中所需的数据类型,因为容器类如 NSArray 或 NSDictionary 是类型无关 的(即它们可以包含任何类型的对象)。如果不明确指定容器中元素的类型,YYModel 无法决定将 JSON 中的数据转换为何种类型的对象
也就是在上面定义的模型中如果我们需要访问容器类属性,我们需要定义如下方法指定容器类属性的类型
bash
#import "TestYYModel.h"
@implementation TestYYModel
// 必须要在这个方法中告诉数组类型
+ (NSDictionary *)modelContainerPropertyGenericClass { // 容器类属性没有注明元素属性所属类别
    return @{@"stories" : [Story class], @"top_stories" : [TopStory class]};
}
@end
紧接着便可以访问容器类属性及容器类属性内的元素
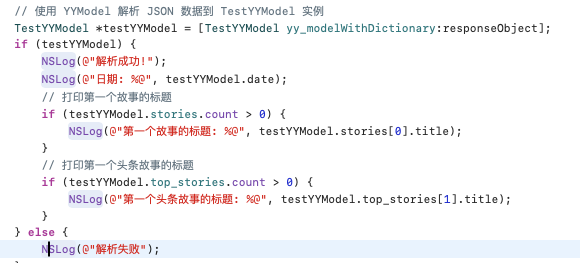

同时在源码中也告诉我们需要调用modelContainerPropertyGenericClass方法来制定容器内元素的类型
bash
   // 获取容器的元素对象,存储到genericMapper key为属性名 value为该容器类里面元素的类型
    NSDictionary *genericMapper = nil;
    if ([cls respondsToSelector:@selector(modelContainerPropertyGenericClass)]) {
        genericMapper = [(id<YYModel>)cls modelContainerPropertyGenericClass];
        if (genericMapper) {
            NSMutableDictionary *tmp = [NSMutableDictionary new];
            [genericMapper enumerateKeysAndObjectsUsingBlock:^(id key, id obj, BOOL *stop) {
                if (![key isKindOfClass:[NSString class]]) return;
                Class meta = object_getClass(obj);
                if (!meta) return;
                if (class_isMetaClass(meta)) {
                    //key为属性名 value为该容器类里面元素的类型
                    tmp[key] = obj;
                } else if ([obj isKindOfClass:[NSString class]]) {
                    Class cls = NSClassFromString(obj);
                    if (cls) {
                        tmp[key] = cls;
                    }
                }
            }];
            genericMapper = tmp;
        }
    }
更加详细的使用可以看YYModel作者的README
YYModel
四、架构分析
在讲解源码之前我们再来看一下YYModel的架构
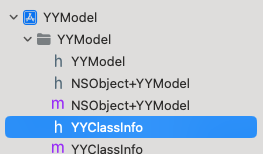
整个YYModel加起来只有那么多文件,是一个十分轻量级的模型转换库
我们大致将其分为两个模块
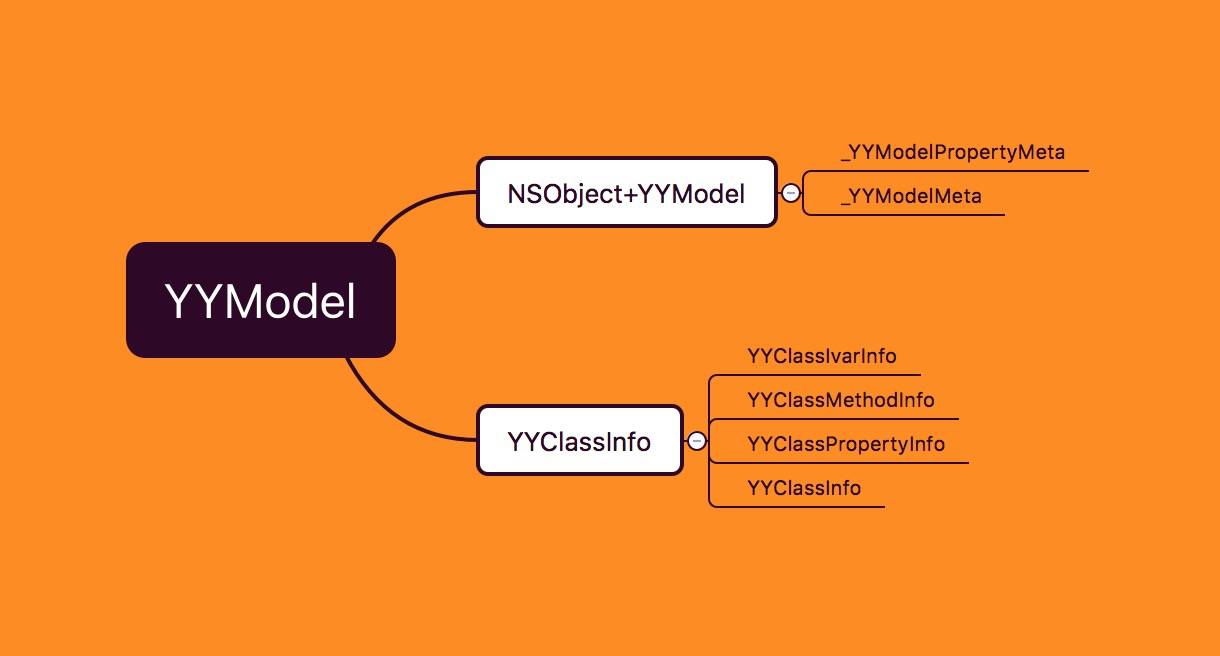
YYClassInfo主要将Runtime 层级的一些结构体封装到NSObject层级以便调用。NSObject+YYModel主要负责处理转换的逻辑以及提供接口
这里面转换的逻辑基本上都是用到了YYClassInfo中封装的Runtime结构体
YYClassInfo 剖析
首先来剖析一下YYClassInfo
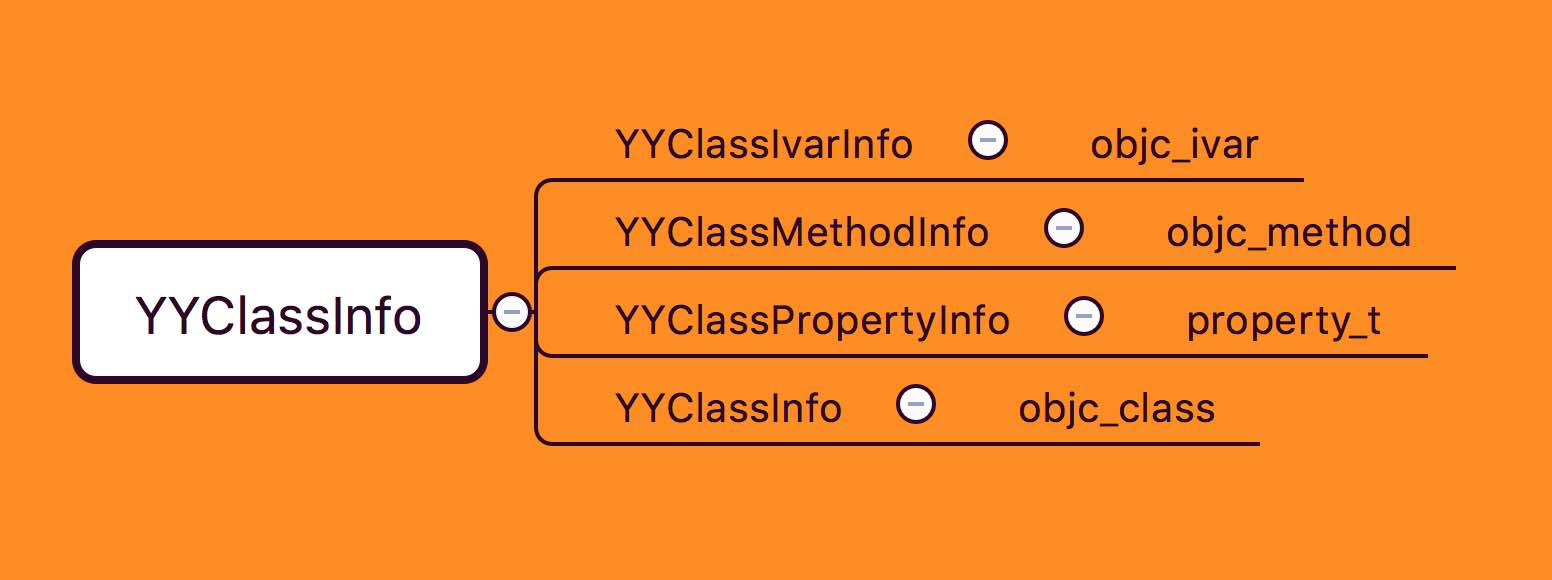
我们刚才说了它是底层Runtime结构体的封装,它将 Runtime 层级的一些结构体封装到 NSObject 层级以便调用,这就减少了NSObject+YYModel的代码处理逻辑
来看一个表格,这个表格直观表现出了ClassInfo封装的结构体所对应的Runtime底层结构体
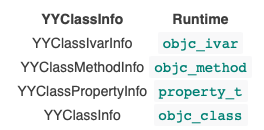
YYClassIvarInfo 看做是作者对 Runtime 层 objc_ivar 结构体的封装,objc_ivar 是 Runtime 中表示变量的结构体。
- YYClassIvarInfo
bash
@interface YYClassIvarInfo : NSObject
@property (nonatomic, assign, readonly) Ivar ivar; ///< 变量,对应 objc_ivar
@property (nonatomic, strong, readonly) NSString *name; ///< 变量名称,对应 ivar_name
@property (nonatomic, assign, readonly) ptrdiff_t offset; ///< 变量偏移量,对应 ivar_offset
@property (nonatomic, strong, readonly) NSString *typeEncoding; ///< 变量类型编码,通过 ivar_getTypeEncoding 函数得到
@property (nonatomic, assign, readonly) YYEncodingType type; ///< 变量类型,通过 YYEncodingGetType 方法从类型编码中得到

- (instancetype)initWithIvar:(Ivar)ivar;
@end- objc_ivar
bash
struct objc_ivar {
    char * _Nullable ivar_name OBJC2_UNAVAILABLE; // 变量名称
    char * _Nullable ivar_type OBJC2_UNAVAILABLE; // 变量类型
    int ivar_offset OBJC2_UNAVAILABLE; // 变量偏移量
#ifdef __LP64__ // 如果已定义 __LP64__ 则表示正在构建 64 位目标
    int space OBJC2_UNAVAILABLE; // 变量空间
#endif
}
YYClassPropertyInfo 是作者对 property_t 的封装,property_t 在 Runtime 中是用来表示属性的结构体。
- YYClassPropertyInfo
bash
@interface YYClassPropertyInfo : NSObject
@property (nonatomic, assign, readonly) objc_property_t property; ///< 属性
@property (nonatomic, strong, readonly) NSString *name; ///< 属性名称
@property (nonatomic, assign, readonly) YYEncodingType type; ///< 属性类型
@property (nonatomic, strong, readonly) NSString *typeEncoding; ///< 属性类型编码
@property (nonatomic, strong, readonly) NSString *ivarName; ///< 变量名称
@property (nullable, nonatomic, assign, readonly) Class cls; ///< 类型
@property (nullable, nonatomic, strong, readonly) NSArray<NSString *> *protocols; ///< 属性相关协议
@property (nonatomic, assign, readonly) SEL getter; ///< getter 方法选择器
@property (nonatomic, assign, readonly) SEL setter; ///< setter 方法选择器

- (instancetype)initWithProperty:(objc_property_t)property;
@end- property_t
bash
struct property_t {
    const char *name; // 名称
    const char *attributes; // 修饰
};
至于剩下的封装大家有兴趣可以下去看,这里就不再赘述了
五、流程剖析
对于模型转换库,本质上的功能就是实现JSON与Model的相互转换,因而我们从这个思路入手,来逐步分析YYModel是如何进行JSON to Model的
转换前准备工作 -- 将JSON统一成NSDictionary
将JSON结构转换为Model是通过yy_modelWithJSON方法转换的,这里的json可以是NSString,NSData,NSDictionary
bash
+ (nullable instancetype)yy_modelWithJSON:(id)json;这个方法会将Json数据统一转换为NSDictionary,再调用yy_modelWithDictionary将NSDictionary转换为Model返回。
bash
+ (instancetype)yy_modelWithJSON:(id)json {
    //将所有类型的数据都转换为NSDictionary类型
    NSDictionary *dic = [self _yy_dictionaryWithJSON:json];
    //将NSDictionary类型转换为model
    return [self yy_modelWithDictionary:dic];
}
bash
+ (NSDictionary *)_yy_dictionaryWithJSON:(id)json {
    if (!json || json == (id)kCFNull) return nil;
    NSDictionary *dic = nil;
    NSData *jsonData = nil;
    if ([json isKindOfClass:[NSDictionary class]]) {
        dic = json;
    } else if ([json isKindOfClass:[NSString class]]) {
        jsonData = [(NSString *)json dataUsingEncoding : NSUTF8StringEncoding];
    } else if ([json isKindOfClass:[NSData class]]) {
        jsonData = json;
    }
    //不论传入的json是NSDictionary,NSString还是NSData都将结果都转换为dic
    if (jsonData) {
        dic = [NSJSONSerialization JSONObjectWithData:jsonData options:kNilOptions error:NULL];
        if (![dic isKindOfClass:[NSDictionary class]]) dic = nil;
    }
    return dic;
}
这一步没什么好介绍的,与其他第三方库的流程基本相同,接下来的步骤比较重要
将NSDictionary 转换为Model对象
这一步是通过yy_modelWithDictionary完成的,在这一步中我们干了几件事情,这里概括下
- 对Model类进行分析,提取出Model类中的所有属性
- 同时创建一个元数组,用来存放属性中的各种信息例如属性类型以及修饰符,这样后面验证类型等操作时就可以直接根据元数组进行验证
- 将JSON数据映射到Model对象中
bash
+ (instancetype)yy_modelWithDictionary:(NSDictionary *)dictionary {

    if (!dictionary || dictionary == (id)kCFNull) return nil;
    if (![dictionary isKindOfClass:[NSDictionary class]]) return nil;

    Class cls = [self class];
    //获取当前类的属性
    _YYModelMeta *modelMeta = [_YYModelMeta metaWithClass:cls];
    if (modelMeta->_hasCustomClassFromDictionary) {
        //根据dictionary来决定最后的cls
        cls = [cls modelCustomClassForDictionary:dictionary] ?: cls;
    }

    // 上面是获取当前类有哪些属性,哪些方法,以及实例方法,相当于建立了一个模版,
    // 就比方说我们定义了一个类,到上面为止,我们知道了它有a,b,c三个属性,每个属性的类型分别是NSString,NSInteger,BOOL 仅此而已,
    // 下面要做的就是创建出一个当前类的对象,并将传进来的字典里面的值赋给它的每个元素。这个在yy_modelSetWithDictionary中实现的。
    NSObject *one = [cls new];
    if ([one yy_modelSetWithDictionary:dictionary]) return one;
    return nil;
}
提取Model信息
提取Model的信息是在这一个方法中完成的
bash
_YYModelMeta *modelMeta = [_YYModelMeta metaWithClass:cls];我们先来看一下_YYModelMeta这个类
bash
@interface _YYModelMeta : NSObject {
    @package
    YYClassInfo *_classInfo;                //Model类的信息
    /// Key:mapped key and key path, Value:_YYModelPropertyMeta.
    NSDictionary *_mapper;                  //所有属性的key和keyPath
    /// Array<_YYModelPropertyMeta>, all property meta of this model.
    NSArray *_allPropertyMetas;            //所有属性的信息
    /// Array<_YYModelPropertyMeta>, property meta which is mapped to a key path.
    NSArray *_keyPathPropertyMetas;        //属于keyPath的属性列表
    /// Array<_YYModelPropertyMeta>, property meta which is mapped to multi keys.
    NSArray *_multiKeysPropertyMetas;     //一个属性多个key的属性列表
    /// The number of mapped key (and key path), same to _mapper.count.
    NSUInteger _keyMappedCount;           //全部属性数量
    /// Model class type.
    YYEncodingNSType _nsType;             //Model类的对象

    //这个类实现覆盖方法的情况
    BOOL _hasCustomWillTransformFromDictionary;
    BOOL _hasCustomTransformFromDictionary;
    BOOL _hasCustomTransformToDictionary;
    BOOL _hasCustomClassFromDictionary;
}
@end
在这个类中包含了属性的信息
bash
NSArray *_allPropertyMetas; //所有属性的信息又包含了属性与key的映射关系
bash
NSDictionary *_mapper; //所有属性的key和keyPath因此我们可以明确字典中的每个key对应的value属性,因而可以正确将NSDictionary中的值映射到Model属性上
bash
+ (instancetype)metaWithClass:(Class)cls {
    if (!cls) return nil;
    static CFMutableDictionaryRef cache;
    static dispatch_once_t onceToken;
    static dispatch_semaphore_t lock;
    //建立缓存
    dispatch_once(&onceToken, ^{
        cache = CFDictionaryCreateMutable(CFAllocatorGetDefault(), 0, &kCFTypeDictionaryKeyCallBacks, &kCFTypeDictionaryValueCallBacks);
        lock = dispatch_semaphore_create(1);
    });
    //通过cls从缓存中取出meta
    dispatch_semaphore_wait(lock, DISPATCH_TIME_FOREVER);
    _YYModelMeta *meta = CFDictionaryGetValue(cache, (__bridge const void *)(cls));
    dispatch_semaphore_signal(lock);
    //如果之前没有缓存过或者缓存的信息需要更新
    if (!meta || meta->_classInfo.needUpdate) {
        //通过cls 创建出一个 _YYModelMeta
        meta = [[_YYModelMeta alloc] initWithClass:cls];
        if (meta) {
            //将新建的_YYModelMeta添加到缓存供下次使用
            dispatch_semaphore_wait(lock, DISPATCH_TIME_FOREVER);
            CFDictionarySetValue(cache, (__bridge const void *)(cls), (__bridge const void *)(meta));
            dispatch_semaphore_signal(lock);
        }
    }
    return meta;
}
接下来我们来逐步分析一下这个创建元数组的方法
- 设置一个缓存存放解析后的类,防止每次使用这个模型时都进行模型类的解析,以优化性能
bash
    static CFMutableDictionaryRef cache; //  缓存对象
    static dispatch_once_t onceToken;
    static dispatch_semaphore_t lock;
    dispatch_once(&onceToken, ^{
        cache = CFDictionaryCreateMutable(CFAllocatorGetDefault(), 0, &kCFTypeDictionaryKeyCallBacks, &kCFTypeDictionaryValueCallBacks);
        lock = dispatch_semaphore_create(1);
});这里对比一下JSONModeel的缓存方式,JSONModel是通过关联对象的形式来缓存属性信息的,而使用CFMutableDictionaryRef会比使用AssociatedObject进行缓存效率更高
bash
    //最后保存所有当前类,JSONModel的所有的父类的属性
    objc_setAssociatedObject(
                             self.class,
                             &kClassPropertiesKey,
                             [propertyIndex copy],
                             OBJC_ASSOCIATION_RETAIN
);- 接着试着访问缓存,查看缓存是否已经存在,如果存在就直接取出不需要重复解析
bash
_YYModelMeta *meta = CFDictionaryGetValue(cache, (__bridge const void *)(cls));- 如果缓存不存在或是需要更新就重建创建一个元数据并且存入缓存
bash
    if (!meta || meta->_classInfo.needUpdate) {
        meta = [[_YYModelMeta alloc] initWithClass:cls];
        if (meta) {
            dispatch_semaphore_wait(lock, DISPATCH_TIME_FOREVER);
            //将新建的_YYModelMeta添加到缓存供下次使用
            CFDictionarySetValue(cache, (__bridge const void *)(cls), (__bridge const void *)(meta));
            dispatch_semaphore_signal(lock);
        }
}接下来就会跳入initWithClass进行元数组的创建
bash
- (instancetype)initWithClass:(Class)cls {
    YYClassInfo *classInfo = [YYClassInfo classInfoWithClass:cls]; // 相当于底层objc_class的封装
    if (!classInfo) return nil;
    self = [super init];

    // Get black list
    // 黑名单
    NSSet *blacklist = nil;
    if ([cls respondsToSelector:@selector(modelPropertyBlacklist)]) {
        NSArray *properties = [(id<YYModel>)cls modelPropertyBlacklist];
        if (properties) {
            blacklist = [NSSet setWithArray:properties];
        }
    }

    // Get white list
    // 白名单
    NSSet *whitelist = nil;
    if ([cls respondsToSelector:@selector(modelPropertyWhitelist)]) {
        NSArray *properties = [(id<YYModel>)cls modelPropertyWhitelist];
        if (properties) {
            whitelist = [NSSet setWithArray:properties];
        }
    }

    // Get container property's generic class
    NSDictionary *genericMapper = nil;
    if ([cls respondsToSelector:@selector(modelContainerPropertyGenericClass)]) {
        genericMapper = [(id<YYModel>)cls modelContainerPropertyGenericClass];
        if (genericMapper) {
            NSMutableDictionary *tmp = [NSMutableDictionary new];
            [genericMapper enumerateKeysAndObjectsUsingBlock:^(id key, id obj, BOOL *stop) {
                if (![key isKindOfClass:[NSString class]]) return;
                Class meta = object_getClass(obj);
                if (!meta) return;
                if (class_isMetaClass(meta)) {
                    tmp[key] = obj;
                } else if ([obj isKindOfClass:[NSString class]]) {
                    Class cls = NSClassFromString(obj);
                    if (cls) {
                        tmp[key] = cls;
                    }
                }
            }];
            genericMapper = tmp;
        }
    }

    // Create all property metas.
    // 创建所有属性元数据,属性元数据的意思就是属性名字,类型,修饰符
    NSMutableDictionary *allPropertyMetas = [NSMutableDictionary new];
    YYClassInfo *curClassInfo = classInfo;
    // 递归查找父类
    while (curClassInfo && curClassInfo.superCls != nil) { // recursive parse super class, but ignore root class (NSObject/NSProxy)
        for (YYClassPropertyInfo *propertyInfo in curClassInfo.propertyInfos.allValues) {
            if (!propertyInfo.name) continue;
            if (blacklist && [blacklist containsObject:propertyInfo.name]) continue;
            if (whitelist && ![whitelist containsObject:propertyInfo.name]) continue;
            _YYModelPropertyMeta *meta = [_YYModelPropertyMeta metaWithClassInfo:classInfo
                                                                    propertyInfo:propertyInfo
                                                                         generic:genericMapper[propertyInfo.name]];
            // meta必须有值并且不在黑白名单并且有setter与getter方法,之所以用setter与getter方法是因为其效率比JOSNMode的KVC更高
            if (!meta || !meta->_name) continue;
            if (!meta->_getter || !meta->_setter) continue;
            if (allPropertyMetas[meta->_name]) continue;
            allPropertyMetas[meta->_name] = meta;
        }
        curClassInfo = curClassInfo.superClassInfo;
    }

    //将所有的类属性都添加到allPropertyMetas
    if (allPropertyMetas.count) _allPropertyMetas = allPropertyMetas.allValues.copy;

    // 建立映射关系,提取映射信息,也就是将modelCustomPropertyMapper对应的value存到对应的映射属性中,例如propertyMeta->_mappedToKey = mappedToKey;

    // 给个例子
//    // Model:
//    @interface Book : NSObject
//    @property NSString *name;
//    @property NSString *test;
//    @property NSString *desc;
//    @property NSString *bookID;
//    @end
//    @implementation Book
//    + (NSDictionary *)modelCustomPropertyMapper {
//        return @{@"name" : @"n",
//                 @"desc" : @"ext.desc",
//                 @"bookID" : @[@"id",@"ID",@"book_id"]};
//    }
//    @end
//    // 经过处理得到以下情况
//    属性name的_mappedToKey = @"n",_mappedToKeyPath = nil,_mappedToKeyArray = nil
//    属性test的_mappedToKey = @"test",_mappedToKeyPath = nil,_mappedToKeyArray = nil
//    属性desc的_mappedToKey = @"ext.desc",_mappedToKeyPath = @[@"ext",@"desc"],_mappedToKeyArray = nil
//    属性bookID的_mappedToKey = @"id",_mappedToKeyPath = nil ,_mappedToKeyArray = @[@"id",@"ID",@"book_id"]

    NSMutableDictionary *mapper = [NSMutableDictionary new];
    NSMutableArray *keyPathPropertyMetas = [NSMutableArray new];
    NSMutableArray *multiKeysPropertyMetas = [NSMutableArray new];

    if ([cls respondsToSelector:@selector(modelCustomPropertyMapper)]) {
        NSDictionary *customMapper = [(id <YYModel>)cls modelCustomPropertyMapper];
        [customMapper enumerateKeysAndObjectsUsingBlock:^(NSString *propertyName, NSString *mappedToKey, BOOL *stop) {
            _YYModelPropertyMeta *propertyMeta = allPropertyMetas[propertyName];
            if (!propertyMeta) return;
            [allPropertyMetas removeObjectForKey:propertyName];

            if ([mappedToKey isKindOfClass:[NSString class]]) {
                if (mappedToKey.length == 0) return;

                propertyMeta->_mappedToKey = mappedToKey;
                NSArray *keyPath = [mappedToKey componentsSeparatedByString:@"."];
                for (NSString *onePath in keyPath) {
                    if (onePath.length == 0) {
                        NSMutableArray *tmp = keyPath.mutableCopy;
                        [tmp removeObject:@""];
                        keyPath = tmp;
                        break;
                    }
                }
                if (keyPath.count > 1) {
                    propertyMeta->_mappedToKeyPath = keyPath;
                    [keyPathPropertyMetas addObject:propertyMeta];
                }
                propertyMeta->_next = mapper[mappedToKey] ?: nil;
                mapper[mappedToKey] = propertyMeta;

            } else if ([mappedToKey isKindOfClass:[NSArray class]]) {

                NSMutableArray *mappedToKeyArray = [NSMutableArray new];
                for (NSString *oneKey in ((NSArray *)mappedToKey)) {
                    if (![oneKey isKindOfClass:[NSString class]]) continue;
                    if (oneKey.length == 0) continue;

                    NSArray *keyPath = [oneKey componentsSeparatedByString:@"."];
                    if (keyPath.count > 1) {
                        [mappedToKeyArray addObject:keyPath];
                    } else {
                        [mappedToKeyArray addObject:oneKey];
                    }

                    if (!propertyMeta->_mappedToKey) {
                        propertyMeta->_mappedToKey = oneKey;
                        propertyMeta->_mappedToKeyPath = keyPath.count > 1 ? keyPath : nil;
                    }
                }
                if (!propertyMeta->_mappedToKey) return;

                propertyMeta->_mappedToKeyArray = mappedToKeyArray;
                [multiKeysPropertyMetas addObject:propertyMeta];

                propertyMeta->_next = mapper[mappedToKey] ?: nil;
                mapper[mappedToKey] = propertyMeta;
            }
        }];
    }

    [allPropertyMetas enumerateKeysAndObjectsUsingBlock:^(NSString *name, _YYModelPropertyMeta *propertyMeta, BOOL *stop) {
        propertyMeta->_mappedToKey = name;
        propertyMeta->_next = mapper[name] ?: nil;
        mapper[name] = propertyMeta;
    }];

    if (mapper.count) _mapper = mapper;
    if (keyPathPropertyMetas) _keyPathPropertyMetas = keyPathPropertyMetas;
    if (multiKeysPropertyMetas) _multiKeysPropertyMetas = multiKeysPropertyMetas;

    _classInfo = classInfo;
    _keyMappedCount = _allPropertyMetas.count;
    _nsType = YYClassGetNSType(cls);
    _hasCustomWillTransformFromDictionary = ([cls instancesRespondToSelector:@selector(modelCustomWillTransformFromDictionary:)]);
    _hasCustomTransformFromDictionary = ([cls instancesRespondToSelector:@selector(modelCustomTransformFromDictionary:)]);
    _hasCustomTransformToDictionary = ([cls instancesRespondToSelector:@selector(modelCustomTransformToDictionary:)]);
    _hasCustomClassFromDictionary = ([cls respondsToSelector:@selector(modelCustomClassForDictionary:)]);

    return self;
}
这段代码十分长,我们同样来逐步分析
- 获取当前类的属性信息
bash
//用于存储类的信息 包括当前类,父类,当前属性,实例变量,方法
YYClassInfo *classInfo = [YYClassInfo classInfoWithClass:cls];
if (!classInfo) return nil;这里看到YYClassInfo是否非常熟悉,往上翻,这就是我们先前说的对Runtime底层结构体的封装,YYClassInfo就是对Runtime底层objc_class结构体的封装
bash
@interface YYClassInfo : NSObject
@property (nonatomic, assign, readonly) Class cls; ///< //当前YYClassInfo 所对应的cls
@property (nullable, nonatomic, assign, readonly) Class superCls; ///< 当前类的父类
@property (nullable, nonatomic, assign, readonly) Class metaCls;  ///< 当前类的meta对象
@property (nonatomic, readonly) BOOL isMeta; ///< 当前类是否是meta类
@property (nonatomic, strong, readonly) NSString *name; ///< 类名
@property (nullable, nonatomic, strong, readonly) YYClassInfo *superClassInfo; ///< 父类信息
@property (nullable, nonatomic, strong, readonly) NSDictionary<NSString *, YYClassIvarInfo *> *ivarInfos; ///< 实例变量信息
@property (nullable, nonatomic, strong, readonly) NSDictionary<NSString *, YYClassMethodInfo *> *methodInfos; ///< 方法信息
@property (nullable, nonatomic, strong, readonly) NSDictionary<NSString *, YYClassPropertyInfo *> *propertyInfos; ///< 属性信息

//.......
@end- 接下来创建ClassInfo这个类,那就跳入
classInfoWithClass
bash
+ (instancetype)classInfoWithClass:(Class)cls {
    if (!cls) return nil;
    //........

    //创建缓存
    dispatch_once(&onceToken, ^{
        classCache = CFDictionaryCreateMutable(CFAllocatorGetDefault(), 0, &kCFTypeDictionaryKeyCallBacks, &kCFTypeDictionaryValueCallBacks);
        metaCache = CFDictionaryCreateMutable(CFAllocatorGetDefault(), 0, &kCFTypeDictionaryKeyCallBacks, &kCFTypeDictionaryValueCallBacks);
        lock = dispatch_semaphore_create(1);
    });
    //获取class信息
    dispatch_semaphore_wait(lock, DISPATCH_TIME_FOREVER);
    YYClassInfo *info = CFDictionaryGetValue(class_isMetaClass(cls) ? metaCache : classCache, (__bridge const void *)(cls));
    //查看是否需要更新,如果需要更新的话则调用info的_update方法
    if (info && info->_needUpdate) {
        [info _update];
    }
    dispatch_semaphore_signal(lock);
    //如果缓存没有则新建后添加到缓存中
    if (!info) {
        info = [[YYClassInfo alloc] initWithClass:cls];
        if (info) {
            dispatch_semaphore_wait(lock, DISPATCH_TIME_FOREVER);
            CFDictionarySetValue(info.isMeta ? metaCache : classCache, (__bridge const void *)(cls), (__bridge const void *)(info));
            dispatch_semaphore_signal(lock);
        }
    }
    return info;
}这里是否也非常熟悉,没错我们有创建了一个缓存,不过我们可以理解为这里的缓存为原始缓存,没有经过过滤,我们的属性需要经过黑白名单的过滤,自定义属性映射,指定容器类属性内元素类型等一系列操作才能得到我们最终存放的元数据的元数组 _YYModelMeta
- 进行黑白名单的过滤
bash
    // Get black list
    // 黑名单
    NSSet *blacklist = nil;
    if ([cls respondsToSelector:@selector(modelPropertyBlacklist)]) {
        NSArray *properties = [(id<YYModel>)cls modelPropertyBlacklist];
        if (properties) {
            blacklist = [NSSet setWithArray:properties];
        }
    }

    // Get white list
    // 白名单
    NSSet *whitelist = nil;
    if ([cls respondsToSelector:@selector(modelPropertyWhitelist)]) {
        NSArray *properties = [(id<YYModel>)cls modelPropertyWhitelist];
        if (properties) {
            whitelist = [NSSet setWithArray:properties];
        }
}- 指定容器属性内元素的类型
如果我们的某个属性是容器对象:比如数组,元素类型这部分其实信息是丢失的。需要我们通过外部方式指定,YYmodel中会通过覆写modelContainerPropertyGenericClass方法,指定某个属性的元素类型。最终存放在genericMapper
在初始化_YYModelPropertyMeta的时候就可以通过属性名key,查到对应的generic。添加到_YYModelProperty中。这里还必须注意每个属性都必须具备getter/Setter 方法。最终将各个属性添加到_allPropertyMetas上。
这里的例子已经在上面的使用里有给出
这里的
generic可以理解为泛型,泛型就是一个没有指定类型的类型,例如数组中的元素可以是任意类型的,那么我们就称数组中元素的类型是泛型,在YYModel中需要我们手动去为泛型指定类型
bash
// 获取容器的元素对象,存储到genericMapper key为属性名 value为该容器类里面元素的类型
NSDictionary *genericMapper = nil;
if ([cls respondsToSelector:@selector(modelContainerPropertyGenericClass)]) {
    genericMapper = [(id<YYModel>)cls modelContainerPropertyGenericClass];
    if (genericMapper) {
        NSMutableDictionary *tmp = [NSMutableDictionary new];
        [genericMapper enumerateKeysAndObjectsUsingBlock:^(id key, id obj, BOOL *stop) {
            if (![key isKindOfClass:[NSString class]]) return;
            Class meta = object_getClass(obj);
            if (!meta) return;
            if (class_isMetaClass(meta)) {
                //key为属性名 value为该容器类里面元素的类型
                tmp[key] = obj;
            } else if ([obj isKindOfClass:[NSString class]]) {
                Class cls = NSClassFromString(obj);
                if (cls) {
                    tmp[key] = cls;
                }
            }
        }];
        genericMapper = tmp;
    }
}- 最后将所有处理后的属性添加到
_allPropertyMetas中
bash
    // Create all property metas.
    // 创建所有属性元数据,属性元数据的意思就是属性名字,类型,修饰符
    NSMutableDictionary *allPropertyMetas = [NSMutableDictionary new];
    YYClassInfo *curClassInfo = classInfo;
    // 递归查找父类
    while (curClassInfo && curClassInfo.superCls != nil) { // recursive parse super class, but ignore root class (NSObject/NSProxy)
        for (YYClassPropertyInfo *propertyInfo in curClassInfo.propertyInfos.allValues) {
            if (!propertyInfo.name) continue;
            if (blacklist && [blacklist containsObject:propertyInfo.name]) continue;
            if (whitelist && ![whitelist containsObject:propertyInfo.name]) continue;
            _YYModelPropertyMeta *meta = [_YYModelPropertyMeta metaWithClassInfo:classInfo
                                                                    propertyInfo:propertyInfo
                                                                         generic:genericMapper[propertyInfo.name]];
            // meta必须有值并且不在黑白名单并且有setter与getter方法,之所以用setter与getter方法是因为其效率比JOSNMode的KVC更高
            if (!meta || !meta->_name) continue;
            if (!meta->_getter || !meta->_setter) continue;
            if (allPropertyMetas[meta->_name]) continue;
            allPropertyMetas[meta->_name] = meta;
        }
        curClassInfo = curClassInfo.superClassInfo;
    }

    //将所有的类属性都添加到allPropertyMetas
if (allPropertyMetas.count) _allPropertyMetas = allPropertyMetas.allValues.copy;- 建立属性信息与JSON数据之间的映射关系
bash
    // 给个例子
//    // Model:
//    @interface Book : NSObject
//    @property NSString *name;
//    @property NSString *test;
//    @property NSString *desc;
//    @property NSString *bookID;
//    @end
//    @implementation Book
//    + (NSDictionary *)modelCustomPropertyMapper {
//        return @{@"name" : @"n",
//                 @"desc" : @"ext.desc",
//                 @"bookID" : @[@"id",@"ID",@"book_id"]};
//    }
//    @end
//    // 经过处理得到以下情况
//    属性name的_mappedToKey = @"n",_mappedToKeyPath = nil,_mappedToKeyArray = nil
//    属性test的_mappedToKey = @"test",_mappedToKeyPath = nil,_mappedToKeyArray = nil
//    属性desc的_mappedToKey = @"ext.desc",_mappedToKeyPath = @[@"ext",@"desc"],_mappedToKeyArray = nil
//    属性bookID的_mappedToKey = @"id",_mappedToKeyPath = nil ,_mappedToKeyArray = @[@"id",@"ID",@"book_id"]

    NSMutableDictionary *mapper = [NSMutableDictionary new];
    NSMutableArray *keyPathPropertyMetas = [NSMutableArray new];
    NSMutableArray *multiKeysPropertyMetas = [NSMutableArray new];

    if ([cls respondsToSelector:@selector(modelCustomPropertyMapper)]) {
        NSDictionary *customMapper = [(id <YYModel>)cls modelCustomPropertyMapper];
        [customMapper enumerateKeysAndObjectsUsingBlock:^(NSString *propertyName, NSString *mappedToKey, BOOL *stop) {
            _YYModelPropertyMeta *propertyMeta = allPropertyMetas[propertyName];
            if (!propertyMeta) return;
            [allPropertyMetas removeObjectForKey:propertyName];

            if ([mappedToKey isKindOfClass:[NSString class]]) {
                if (mappedToKey.length == 0) return;

                propertyMeta->_mappedToKey = mappedToKey;
                NSArray *keyPath = [mappedToKey componentsSeparatedByString:@"."];
                for (NSString *onePath in keyPath) {
                    if (onePath.length == 0) {
                        NSMutableArray *tmp = keyPath.mutableCopy;
                        [tmp removeObject:@""];
                        keyPath = tmp;
                        break;
                    }
                }
                if (keyPath.count > 1) {
                    propertyMeta->_mappedToKeyPath = keyPath;
                    [keyPathPropertyMetas addObject:propertyMeta];
                }
                propertyMeta->_next = mapper[mappedToKey] ?: nil;
                mapper[mappedToKey] = propertyMeta;

            } else if ([mappedToKey isKindOfClass:[NSArray class]]) {

                NSMutableArray *mappedToKeyArray = [NSMutableArray new];
                for (NSString *oneKey in ((NSArray *)mappedToKey)) {
                    if (![oneKey isKindOfClass:[NSString class]]) continue;
                    if (oneKey.length == 0) continue;

                    NSArray *keyPath = [oneKey componentsSeparatedByString:@"."];
                    if (keyPath.count > 1) {
                        [mappedToKeyArray addObject:keyPath];
                    } else {
                        [mappedToKeyArray addObject:oneKey];
                    }

                    if (!propertyMeta->_mappedToKey) {
                        propertyMeta->_mappedToKey = oneKey;
                        propertyMeta->_mappedToKeyPath = keyPath.count > 1 ? keyPath : nil;
                    }
                }
                if (!propertyMeta->_mappedToKey) return;

                propertyMeta->_mappedToKeyArray = mappedToKeyArray;
                [multiKeysPropertyMetas addObject:propertyMeta];

                propertyMeta->_next = mapper[mappedToKey] ?: nil;
                mapper[mappedToKey] = propertyMeta;
            }
        }];
    }
以上代码用于处理多种情况的映射
- 最后填充数据到我们的
_YYModelMeta中
bash
    [allPropertyMetas enumerateKeysAndObjectsUsingBlock:^(NSString *name, _YYModelPropertyMeta *propertyMeta, BOOL *stop) {
        propertyMeta->_mappedToKey = name;
        propertyMeta->_next = mapper[name] ?: nil;
        mapper[name] = propertyMeta;
    }];

    if (mapper.count) _mapper = mapper;
    if (keyPathPropertyMetas) _keyPathPropertyMetas = keyPathPropertyMetas;
    if (multiKeysPropertyMetas) _multiKeysPropertyMetas = multiKeysPropertyMetas;

    _classInfo = classInfo;
    _keyMappedCount = _allPropertyMetas.count;
    _nsType = YYClassGetNSType(cls);
    _hasCustomWillTransformFromDictionary = ([cls instancesRespondToSelector:@selector(modelCustomWillTransformFromDictionary:)]);
    _hasCustomTransformFromDictionary = ([cls instancesRespondToSelector:@selector(modelCustomTransformFromDictionary:)]);
    _hasCustomTransformToDictionary = ([cls instancesRespondToSelector:@selector(modelCustomTransformToDictionary:)]);
    _hasCustomClassFromDictionary = ([cls respondsToSelector:@selector(modelCustomClassForDictionary:)]);
使用NSDictionary的数据填充Model
我们在前面已经创建了_YYModelMeta(存放属性元数据的容器),在这之中我们完成了属性黑白名单的过滤,以及属性名和JSON中字段名的对应关系
接下来我们就可以使用Model 类创建出一个Model,并从JSON (NSDictionary)中取出对应的值,对Model对象进行填充,最后再将生成的model对象返回就完成了整个序列化过程,这部分代码位于yy_modelSetWithDictionary:
bash
- (BOOL)yy_modelSetWithDictionary:(NSDictionary *)dic {
    //.....
    _YYModelMeta *modelMeta = [_YYModelMeta metaWithClass:object_getClass(self)];
    //.....
    //构建context 上下文中包括modelMeta model的各种映射信息,model 要填充的model对象, dictionary 包含数据的字典
    ModelSetContext context = {0};
    context.modelMeta = (__bridge void *)(modelMeta);
    context.model = (__bridge void *)(self);
    context.dictionary = (__bridge void *)(dic);
    //开始将dictionary数据填充到model上,这里最关键的就是ModelSetWithPropertyMetaArrayFunction方法。
    if (modelMeta->_keyMappedCount >= CFDictionaryGetCount((CFDictionaryRef)dic)) {

        CFDictionaryApplyFunction((CFDictionaryRef)dic, ModelSetWithDictionaryFunction, &context);

        if (modelMeta->_keyPathPropertyMetas) {
            CFArrayApplyFunction((CFArrayRef)modelMeta->_keyPathPropertyMetas,
                                 CFRangeMake(0, CFArrayGetCount((CFArrayRef)modelMeta->_keyPathPropertyMetas)),
                                 ModelSetWithPropertyMetaArrayFunction,
                                 &context);
        }

        if (modelMeta->_multiKeysPropertyMetas) {
            CFArrayApplyFunction((CFArrayRef)modelMeta->_multiKeysPropertyMetas,
                                 CFRangeMake(0, CFArrayGetCount((CFArrayRef)modelMeta->_multiKeysPropertyMetas)),
                                 ModelSetWithPropertyMetaArrayFunction,
                                 &context);
        }
    } else {
        CFArrayApplyFunction((CFArrayRef)modelMeta->_allPropertyMetas,
                             CFRangeMake(0, modelMeta->_keyMappedCount),
                             ModelSetWithPropertyMetaArrayFunction,
                             &context);
    }
    //........
    return YES;
}
还是来逐步分析代码
- 将先前解析过的元数组缓存取出
bash
_YYModelMeta *modelMeta = [_YYModelMeta metaWithClass:object_getClass(self)];- 构建上下文,以方便后续对Model进行填充
bash
    //构建context 上下文中包括modelMeta model的各种映射信息,model 要填充的model对象, dictionary 包含数据的字典
    ModelSetContext context = {0};
    context.modelMeta = (__bridge void *)(modelMeta);
    context.model = (__bridge void *)(self);
    context.dictionary = (__bridge void *)(dic);
上下文中的三个数据是我们进行填充的依据:
context.modelMeta存放了属性元数据
context.dictionary中存放了JSON数据
通过这两个数据我们便可以把数据填充到model上
- 判断是JSON数据对象多还是Model中属性多,选择效率更高的遍历方式
bash
//    这里的条件判断比较了模型元数据中记录的映射键的数量 (_keyMappedCount) 和传入字典中的键的数量。这个判断的目的是为了选择一个更高效的遍历策略:
//        •    如果模型的映射键数量多于或等于字典的键数量,那么遍历字典可能更高效。
//        •    否则,遍历模型的所有属性可能更加合适。
    if (modelMeta->_keyMappedCount >= CFDictionaryGetCount((CFDictionaryRef)dic)) {
        CFDictionaryApplyFunction((CFDictionaryRef)dic, ModelSetWithDictionaryFunction, &context);
        // 处理一些嵌套的属性
        if (modelMeta->_keyPathPropertyMetas) {
            CFArrayApplyFunction((CFArrayRef)modelMeta->_keyPathPropertyMetas,
                                 CFRangeMake(0, CFArrayGetCount((CFArrayRef)modelMeta->_keyPathPropertyMetas)),
                                 ModelSetWithPropertyMetaArrayFunction,
                                 &context);
        }
        if (modelMeta->_multiKeysPropertyMetas) {
            CFArrayApplyFunction((CFArrayRef)modelMeta->_multiKeysPropertyMetas,
                                 CFRangeMake(0, CFArrayGetCount((CFArrayRef)modelMeta->_multiKeysPropertyMetas)),
                                 ModelSetWithPropertyMetaArrayFunction,
                                 &context);
        }
    } else {
        CFArrayApplyFunction((CFArrayRef)modelMeta->_allPropertyMetas,
                             CFRangeMake(0, modelMeta->_keyMappedCount),
                             ModelSetWithPropertyMetaArrayFunction,
                             &context);
    }
如果Model对象的属性多于JSON字典中的对象,那么优先遍历字典
bash
if (modelMeta->_keyMappedCount >= CFDictionaryGetCount((CFDictionaryRef)dic))
CFDictionaryApplyFunction((CFDictionaryRef)dic, ModelSetWithDictionaryFunction, &context);
否则优先遍历元数组
bash
else {
        CFArrayApplyFunction((CFArrayRef)modelMeta->_allPropertyMetas,
                             CFRangeMake(0, modelMeta->_keyMappedCount),
                             ModelSetWithPropertyMetaArrayFunction,
                             &context);
}- 进行数据填充
我们在遍历时都调用了这一类函数
bash
CFDictionaryApplyFunction((CFDictionaryRef)dic, ModelSetWithDictionaryFunction, &context);它实际上是对dic,也就是当前JSON所对应的NSDictionary的所有元素,应用
ModelSetWithDictionaryFunction方法,并在每次调用中将context传递进去
接下来我们再一下ModelSetWithDictionaryFunction方法
bash
static void ModelSetWithPropertyMetaArrayFunction(const void *_propertyMeta, void *_context) {
    ModelSetContext *context = _context;
    // 取出字典封装的JSON数据
    __unsafe_unretained NSDictionary *dictionary = (__bridge NSDictionary *)(context->dictionary);
    // // 取出meta属性,目的是为了得到键与setter方法等
    //     _propertyMeta:指向 _YYModelPropertyMeta 的指针,这是一个封装了属性相关信息(如映射的 JSON 键名、键路径、访问器等)的结构体。重要的是存放了映射的JSON键名,这里是通过先前初始化_propertyMeta实现的
    __unsafe_unretained _YYModelPropertyMeta *propertyMeta = (__bridge _YYModelPropertyMeta *)(_propertyMeta);
    if (!propertyMeta->_setter) return;
    id value = nil;

    //通过属性信息里面的key的映射关系拿到字典里面对应的value值。
    if (propertyMeta->_mappedToKeyArray) {
        value = YYValueForMultiKeys(dictionary, propertyMeta->_mappedToKeyArray);
    } else if (propertyMeta->_mappedToKeyPath) {
        value = YYValueForKeyPath(dictionary, propertyMeta->_mappedToKeyPath);
    } else {
        value = [dictionary objectForKey:propertyMeta->_mappedToKey];
    }

    if (value) {
        // 取出模型设置value
        __unsafe_unretained id model = (__bridge id)(context->model);
        ModelSetValueForProperty(model, value, propertyMeta);
    }
}
这一步我们简单分为五步来讲解
- 取出JSON数据
bash
    // 取出字典封装的JSON数据
__unsafe_unretained NSDictionary *dictionary = (__bridge NSDictionary *)(context->dictionary);- 取出元数组数据,也就是Meta数据
bash
    // // 取出meta属性,目的是为了得到键与setter方法等
    //     _propertyMeta:指向 _YYModelPropertyMeta 的指针,这是一个封装了属性相关信息(如映射的 JSON 键名、键路径、访问器等)的结构体。重要的是存放了映射的JSON键名,这里是通过先前初始化_propertyMeta实现的
__unsafe_unretained _YYModelPropertyMeta *propertyMeta = (__bridge _YYModelPropertyMeta *)(_propertyMeta);- 查看是否有setter方法
因为我们是通过setter方法对Model中的属性进行赋值的
bash
if (!propertyMeta->_setter) return;- 取出Value
根据元数组的信息取出JSON字典中对应的Value
bash
    //通过属性信息里面的key的映射关系拿到字典里面对应的value值。
    if (propertyMeta->_mappedToKeyArray) {
        value = YYValueForMultiKeys(dictionary, propertyMeta->_mappedToKeyArray);
    } else if (propertyMeta->_mappedToKeyPath) {
        value = YYValueForKeyPath(dictionary, propertyMeta->_mappedToKeyPath);
    } else {
        value = [dictionary objectForKey:propertyMeta->_mappedToKey];
}- 设置value值
bash
    if (value) {
        // 取出模型设置value
        __unsafe_unretained id model = (__bridge id)(context->model);
        ModelSetValueForProperty(model, value, propertyMeta);
}最后我们来到了ModelSetValueForProperty中使用setter方法设置Value
因为ModelSetValueForProperty十分长,里面的逻辑涉及许多自动类型转换,我们只需要知道里面最后使用了消息发送 objc_msgSend来进行Value值的设置即可
bash
((void (*)(id, SEL, id))(void *) objc_msgSend)((id)model, meta->_setter, value);总结
至此我们终于把YYModel的源码剖析完了,因为笔者去阅读YYModel是为了与JSONModel进行对比,想找出为什么YYModel的性能远远优于JSONModel,为此笔者总结了以下几点
- 首先YYModel十分轻量级,他将Runtime的底层结构体封装了成了方便调用的结构体,减少了代码逻辑
- 同时在YYModel中频繁使用Core Foundation框架中的方法,以为
Core Foundation方法在调用时的性能会优于Foundation框架中的方法,例如使用CFDictionarySetValue进行属性信息的缓存 - 同时在YYModel中经常使用纯C函数,避免了消息发送的开销
- 以及笔者认为使用
CFDictionarySetValue的性能会优于JSONModel中使用关联对象进行数据缓存 - 还有与JSONModel最有区别的一点就是YYModel中使用
setter方法进行了value值的设置而非KVC,这样也提高了性能 - 当然说完性能的优点还有因为YYModel使用了分类,实现了Model的无侵入性,这点十分重要
参考博客:
YYModel 源码解析
iOS JSON 模型转换库评测
YYModel源码详细解析-1
揭秘 YYModel 的魔法 0x02