MacOS中安装并配置Redis
1. 安装 Redis
进入 homebrew 官网,按照给的命令下载 homebrew 。
/bin/bash -c "$(curl -fsSL https://raw.githubusercontent.com/Homebrew/install/HEAD/install.sh)"
接下来,执行命令安装 Redis。
brew install redis
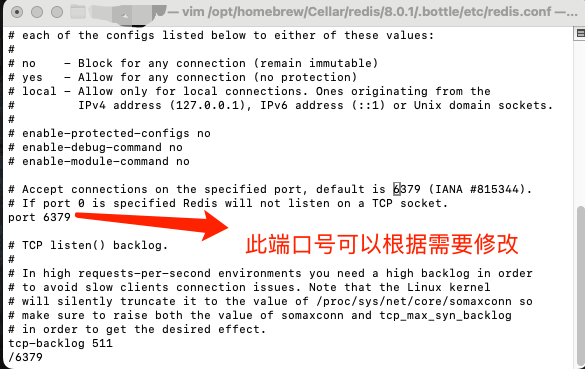
然后使用find / -name "redis.conf"命令查找redis.conf文件的位置,并稍微修改一下,我的MacOS mini4小主机中的redis.conf文件有如下两个路径,修改其中一个都可以:
/opt/homebrew/etc/redis.conf
/opt/homebrew/Cellar/redis/8.0.1/.bottle/etc/redis.conf
先将原文件备份一下,然后再修改:
cd /opt/homebrew/Cellar/redis/8.0.1/.bottle/etc/
mv redis.conf redis.conf.bak
进入 /opt/homebrew/Cellar/redis/8.0.1/.bottle/etc/,然后使用vim打开redis.config,修改配置 daemonize no 将 no 改为 yes 。设置密码:requirepass foobared 将 foobared 改为 123456 。(这一个过程需要用 vim 打开,具体配置由于 Redis 版本不一致,所在的行数也不一样,自己找一下吧。)
接下来,以守护线程的方式启动redis在终端输入如下命令(并指定redis配置文件为:/opt/homebrew/Cellar/redis/8.0.1/.bottle/etc/redis.conf):
redis-server /opt/homebrew/Cellar/redis/8.0.1/.bottle/etc/redis.conf
当然如果我们需要启动多个redis服务器,并指定不同的端口号,可以在/opt/homebrew/Cellar/redis/8.0.1/.bottle/etc/目录下复制拷贝多个redis.conf文件,如redis_6379.conf、redis_6380.conf、redis_6381.conf、redis_6382.conf,然后分别修改Port端口号和文件名中的端口号一致,分别指定配置文件并启动即可,如下所示:
bash
redis-server /opt/homebrew/Cellar/redis/8.0.1/.bottle/etc/redis_6379.conf
redis-server /opt/homebrew/Cellar/redis/8.0.1/.bottle/etc/redis_6380.conf
redis-server /opt/homebrew/Cellar/redis/8.0.1/.bottle/etc/redis_6381.conf
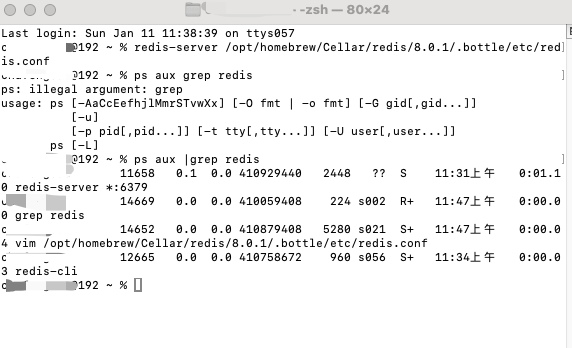
redis-server /opt/homebrew/Cellar/redis/8.0.1/.bottle/etc/redis_6382.conf然后用命令查看redis是否开启:
ps aux | grep redis
2. MacOS 安装 Redis 客户端 Another-Redis-Desktop-Manager 可视化工具
在macOS上安装RedisDesktop(现在常指Another Redis Desktop Manager或RedisDesk),最推荐使用Homebrew Cask(brew install --cask another-redis-desktop-manager),或者直接从官网下载.dmg文件,然后将应用拖到"应用程序"文件夹,解决系统"已损坏"提示时,需在"安全性与隐私"中允许安装。
方法一:使用Homebrew Cask (推荐)
安装Homebrew(如果未安装):在终端输入:
bash
/bin/bash -c "$(curl -fsSL https://raw.githubusercontent.com/Homebrew/install/HEAD/install.sh)"macbook 下使用 brew 安装 another-redis-desktop-manager,安装RedisDesktop:运行命令
bash
brew install --cask another-redis-desktop-manager注意:有些源可能使用redis-desktop-manager,但another-redis-desktop-manager是当前流行且更新的。
接下来连接 Redis (必须保证 Redis 服务处于开启状态)。
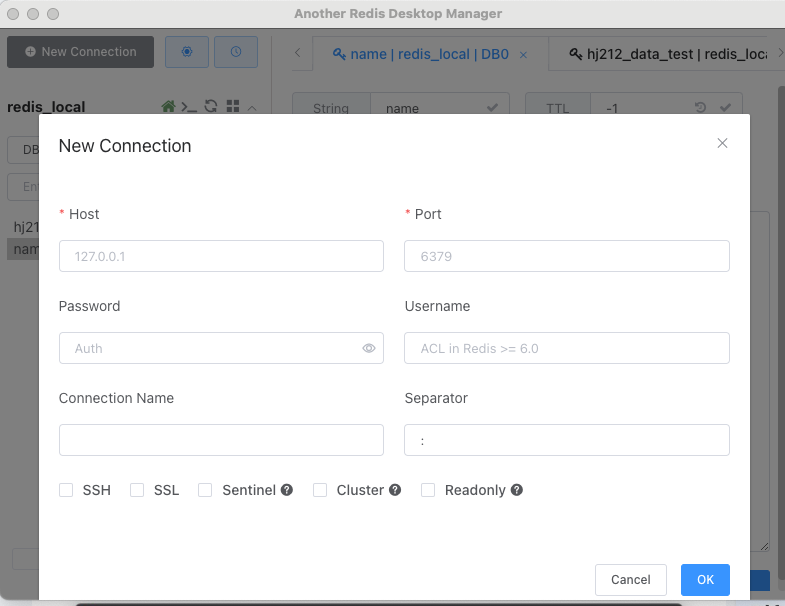
这里我们由于是连接的本机地址,所以Host填127.0.0.1或者localhost,Port端口号填写redis服务器的端口号,默认是6379,密码填写我们之前修改的密码:123456即可。当然端口号可以根据redis.conf配置文件修改,这样我们一台机器上配置不同的Port端口号可以部署配置并启动多个redis服务器,可以做redis集群和数据同步。
根据自己的配置修改一下,然后连接即可。
以下就可以显示出当前 Redis 的配置:

方法二:下载DMG安装包
访问官网:前往Redis Desktop Manager(或Another Redis Desktop Manager)的官方网站或可信下载源.
下载安装包:下载适用于macOS的最新.dmg文件.
安装:双击.dmg文件,将应用图标拖拽到"应用程序"文件夹中.
处理安全提示:如果系统提示"已损坏"或无法打开,前往「系统设置」/「系统偏好设置」>「安全性与隐私」>「通用」,点击"仍要打开"以允许应用运行.
启动与连接
- 启动应用:在"应用程序"中打开RedisDesktop。
- 新建连接:点击左上角的"+"号或"New Connection"按钮.
- 配置连接:
Name:自定义连接名称.
Host:通常为127.0.0.1或localhost.
Port:默认6379.
Authentication:如果设置了密码,输入Password.
4.连接:点击Test测试连接,然后Save保存并连接.