📖ListView的使用
-
- [✅1. 创建ListView](#✅1. 创建ListView)
- [✅2. 创建适配器Adapter](#✅2. 创建适配器Adapter)
- [✅3. 开始渲染数据](#✅3. 开始渲染数据)
主要3步骤:
-
创建ListView
-
创建适配器Adapter,和Adapter对应的视图
-
开始渲染数据
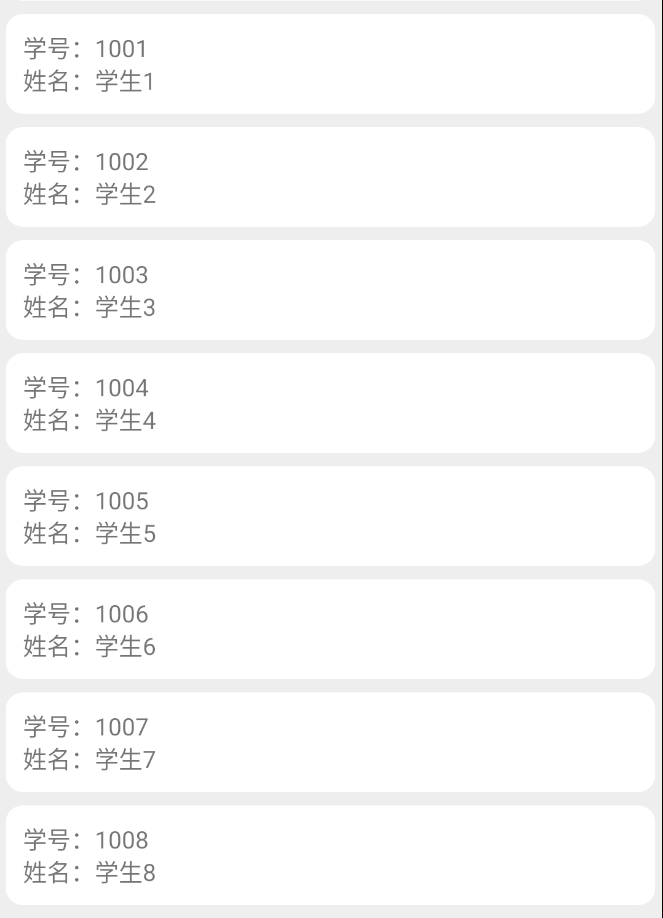
效果图:
✅1. 创建ListView
例如现有DemoActivity页面,对于布局文件activity_demo.xml
1.在activity_demo.xml中创建ListView组件
xml
<?xml version="1.0" encoding="utf-8"?>
<LinearLayout xmlns:android="http://schemas.android.com/apk/res/android"
    xmlns:app="http://schemas.android.com/apk/res-auto"
    xmlns:tools="http://schemas.android.com/tools"
    android:layout_width="match_parent"
    android:layout_height="match_parent"
    android:orientation="vertical"
    tools:context=".DemoActivity">

	<!--创建ListView-->
    <ListView
        android:id="@+id/lv_list"
        android:layout_width="match_parent"
        android:layout_height="wrap_content"
        android:divider="@null" />

</LinearLayout>2.在DemoActivity页面中获取组件
java
private static ListView lv_list;//全局声明

protected void onCreate(Bundle savedInstanceState) {
        super.onCreate(savedInstanceState);
        setContentView(R.layout.activity_demo);
        lv_list = findViewById(R.id.lv_list);//获取视图组件
    }
✅2. 创建适配器Adapter
1.例如创建一个学生适配器StudentListAdapter,并继承BaseAdapter
java
import android.content.Context;
import android.view.LayoutInflater;
import android.view.View;
import android.view.ViewGroup;
import android.widget.BaseAdapter;
import android.widget.TextView;
import com.st.bottomnavigation.R;
import com.st.bottomnavigation.bean.Student;

import java.util.List;

public class StudentListAdapter extends BaseAdapter {
    private Context mContext;//上下文
    private List<Student> studentList;//数据

    //构造方法
    public StudentListAdapter(Context mContext) {
        this.mContext = mContext;
    }

    //设置数据
    public void setData( List<Student> studentList){
        this.studentList = studentList;
    }

    //加载新的数据
    public void addData(List<Student> newData) {
        studentList.addAll(newData);
    }

    @Override
    public int getCount() {
        return studentList.size();
    }

    @Override
    public Object getItem(int i) {
        return studentList.get(i);
    }

    @Override
    public long getItemId(int i) {
        return i;
    }

    @Override
    public View getView(int position, View convertView, ViewGroup viewGroup) {
        ViewHolder holder;

        // 1.推断是不是第一次进来
        if (convertView == null){
            convertView = LayoutInflater.from(mContext).inflate(R.layout.item_stu_listview,null);
            holder = new ViewHolder();
            holder.stuNo = convertView.findViewById(R.id.stuNo);  //
            holder.stuName = convertView.findViewById(R.id.stuName);  //
            convertView.setTag(holder);//标记,能够复用
        }else {
            holder = (ViewHolder) convertView.getTag();
        }

        //2.填充数据
        Student student = studentList.get(position);
        holder.stuNo.setText(student.getStuNo());  //学号
        holder.stuName.setText(student.getStuName());  //姓名

        //3.返回convertView
        return convertView;
    }

    //创建ViewHolder,定义item_stu_listview.xml中的组件
    public final class ViewHolder {
        TextView stuNo;    //
        TextView stuName;  //

    }
}2.创建实体类Student
java
public class Student {
    private String stuNo;
    private String stuName;

    public String getStuNo() {
        return stuNo;
    }

    public void setStuNo(String stuNo) {
        this.stuNo = stuNo;
    }

    public String getStuName() {
        return stuName;
    }

    public void setStuName(String stuName) {
        this.stuName = stuName;
    }
}3.创建对应视图文件item_stu_listview.xml,这里可以定义任意类型组件,文本,下拉框,复选框,单选框,图像等等。
xml
<?xml version="1.0" encoding="utf-8"?>
<LinearLayout xmlns:android="http://schemas.android.com/apk/res/android"
    android:layout_width="match_parent"
    android:layout_height="wrap_content"
    android:background="#eeeeee"
    android:paddingTop="4dp"
    android:paddingBottom="4dp"
    android:paddingLeft="4dp"
    android:paddingRight="4dp"
    android:descendantFocusability="blocksDescendants"
    android:orientation="vertical">

    <LinearLayout
        android:id="@+id/ll_item"
        android:layout_width="match_parent"
        android:layout_height="wrap_content"
        android:paddingBottom="10dp"
        android:paddingTop="10dp"
        android:paddingLeft="10dp"
        android:background="@drawable/shape_background_white"
        android:orientation="vertical">
        <!--第一行-->
        <LinearLayout
            android:layout_width="match_parent"
            android:layout_height="wrap_content"
            android:orientation="horizontal">
            <TextView
                android:layout_width="wrap_content"
                android:layout_height="wrap_content"
                android:text="学号:" />
            <TextView
                android:id="@+id/stuNo"
                android:layout_width="wrap_content"
                android:layout_height="wrap_content"
                android:text="" />
        </LinearLayout>
        <!--第二行-->
        <LinearLayout
            android:layout_width="match_parent"
            android:layout_height="wrap_content"
            android:orientation="horizontal">
            <TextView
                android:layout_width="wrap_content"
                android:layout_height="wrap_content"
                android:text="姓名:" />
            <TextView
                android:id="@+id/stuName"
                android:layout_width="wrap_content"
                android:layout_height="wrap_content"
                android:text="" />
        </LinearLayout>
    </LinearLayout>

</LinearLayout>对应的shape_background_white.xml
xml
<?xml version="1.0" encoding="utf-8"?>
<shape xmlns:android="http://schemas.android.com/apk/res/android" >
    <solid android:color="#FFFFFFFF" />
    <stroke
        android:width="0dp"
        android:color="#999999" />

    <corners android:radius="10dp" />

</shape>
✅3. 开始渲染数据
1.造数据,也可以直接从后端数据库获取的数据
java
   public List<Student> getData(){
        List<Student> list = new ArrayList<>();
        for (int i = 0; i < 10; i++) {
            Student student = new Student();
            student.setStuName("学生"+i);
            student.setStuNo(1000+i+"");
            list.add(student);
        }
        return list;
}2.封装渲染方法showStudentListView
java
    private void showStudentListView(List<Student> studentList) {
        if(studentListAdapter == null) {
            //第一次加载
            studentListAdapter = new StudentListAdapter(this);
            studentListAdapter.setData(studentList);
            lv_list.setAdapter(studentListAdapter);// 设置列表视图的适配器
        }else {
            // 非第一次,更新数据
            studentListAdapter.setData(studentList);
            studentListAdapter.notifyDataSetChanged();
        }
    }
3.调用并显示数据
java
List<Student> studentList = getData();//获取数据
showStudentListView(studentList);//显示数据