1、LVS-DR工作流向分析
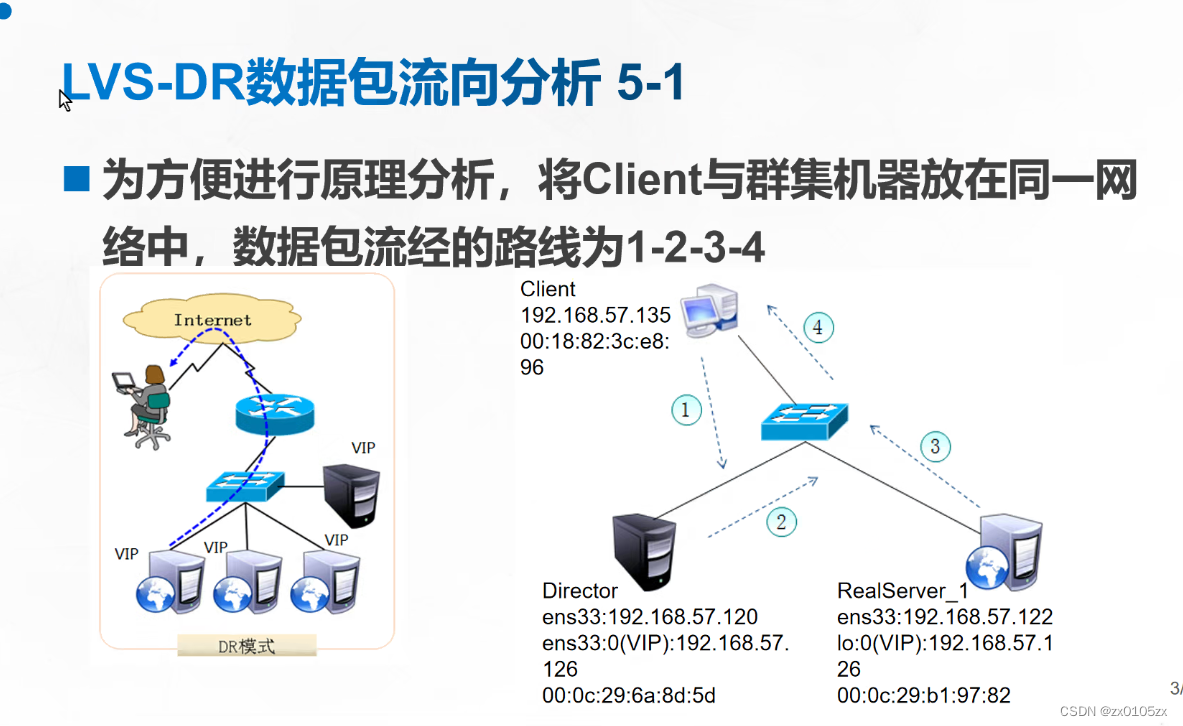
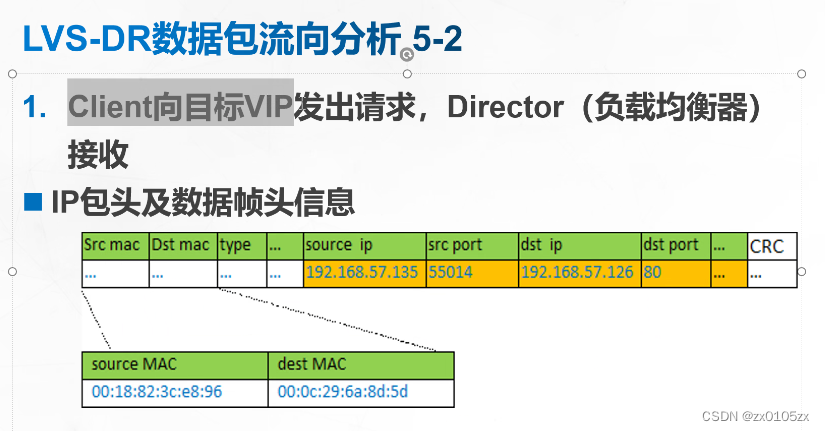
(1)客户端发送请求到 Director Server(负载均衡器),请求的数据报文(源 IP 是 CIP,目标 IP 是 VIP)到达内核空间。
(2)Director Server 和 Real Server 在同一个网络中,数据通过二层数据链路层来传输。

(3)内核空间判断数据包的目标IP是本机VIP,此时IPVS(IP虚拟服务器)比对数据包请求的服务是否是集群服务,是集群服务就重新封装数据包。修改源 MAC 地址为 Director Server 的 MAC地址,修改目标 MAC 地址为 Real Server 的 MAC 地址,源 IP 地址与目标 IP 地址没有改变,然后将数据包发送给 Real Server。
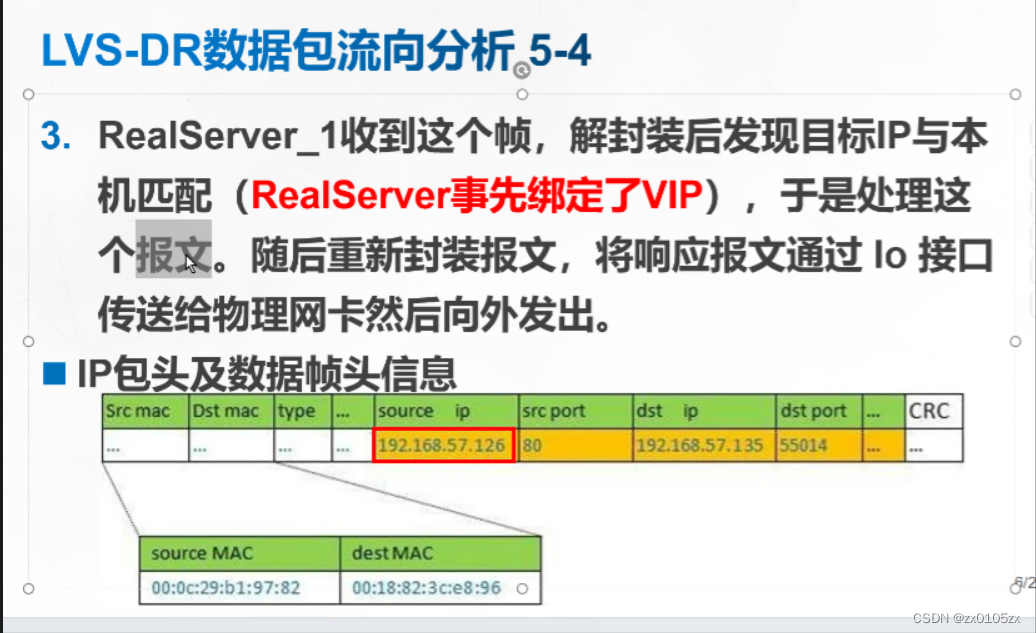
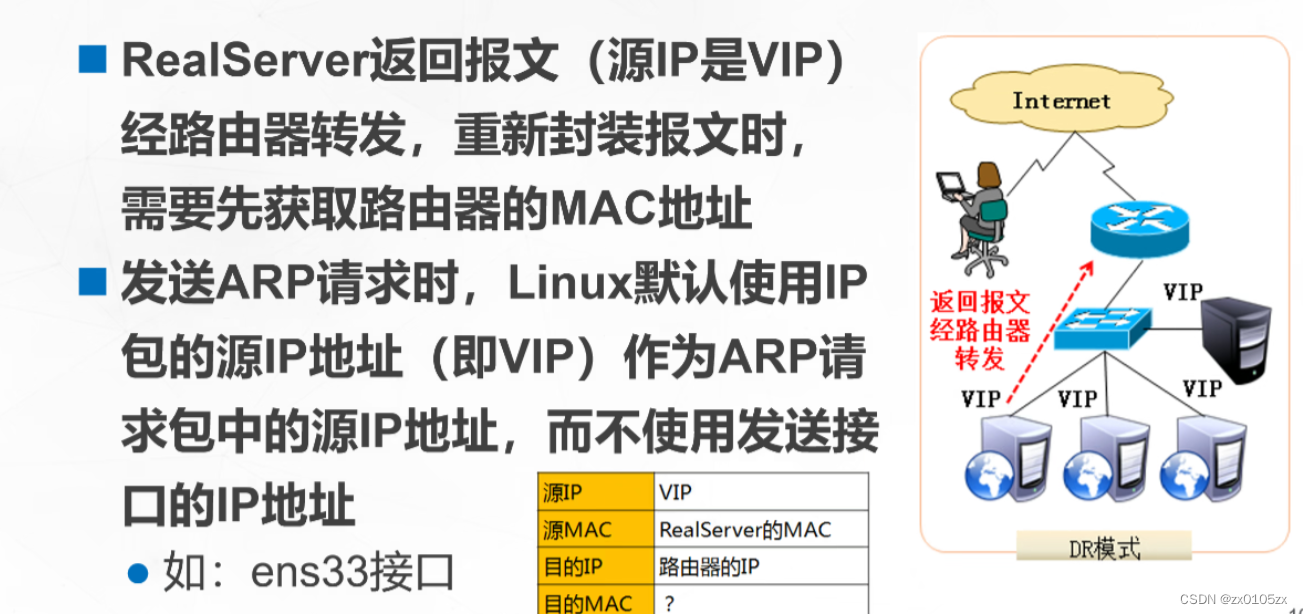
(4)到达 Real Server 的请求报文的 MAC 地址是自身的 MAC 地址,就接收此报文。数据包重新封装报文(源 IP 地址为 VIP,目标 IP 为 CIP),将响应报文通过 lo 接口传送给物理网卡然后向外发出。
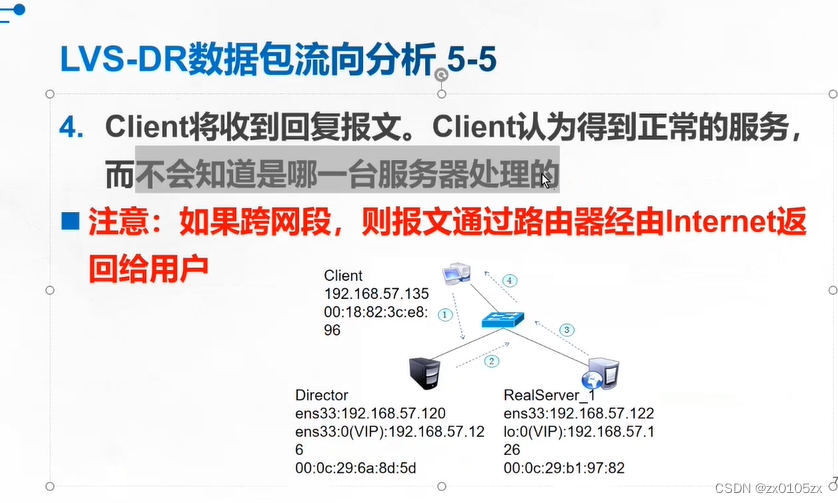
(5)Real Server 直接将响应报文传送到客户端。
2、DR模式的特点
(1)Director Server 和 Real Server 必须在同一个物理网络中。
(2)Real Server 可以使用私有地址,也可以使用公网地址。如果使用公网地址,可以通过互联网对 RIP 进行直接访问。
(3)Director Server作为群集的访问入口,但不作为网关使用。
(4)所有的请求报文经由 Director Server,但回复响应报文不能经过 Director Server。
(5)Real Server 的网关不允许指向 Director Server IP,即Real Server发送的数据包不允许经过 Director Server。
(6)Real Server 上的 lo 接口配置 VIP 的 IP 地址。
3、LVS-DR的ARP问题
(1)IP地址冲突
在LVS-DR负载均衡集群中,负载均衡器与节点服务器都要配置相同的VIP地址。在局域网中具有相同的IP地址,势必会造成各服务器ARP通信的紊乱。
当ARP广播发送到LVS-DR集群时,因为负载均衡器和节点服务器都是连接到相同的网络上,它们都会接收到ARP广播
只有前端的负载均衡器进行响应,其他节点服务器不应该响应ARP广播
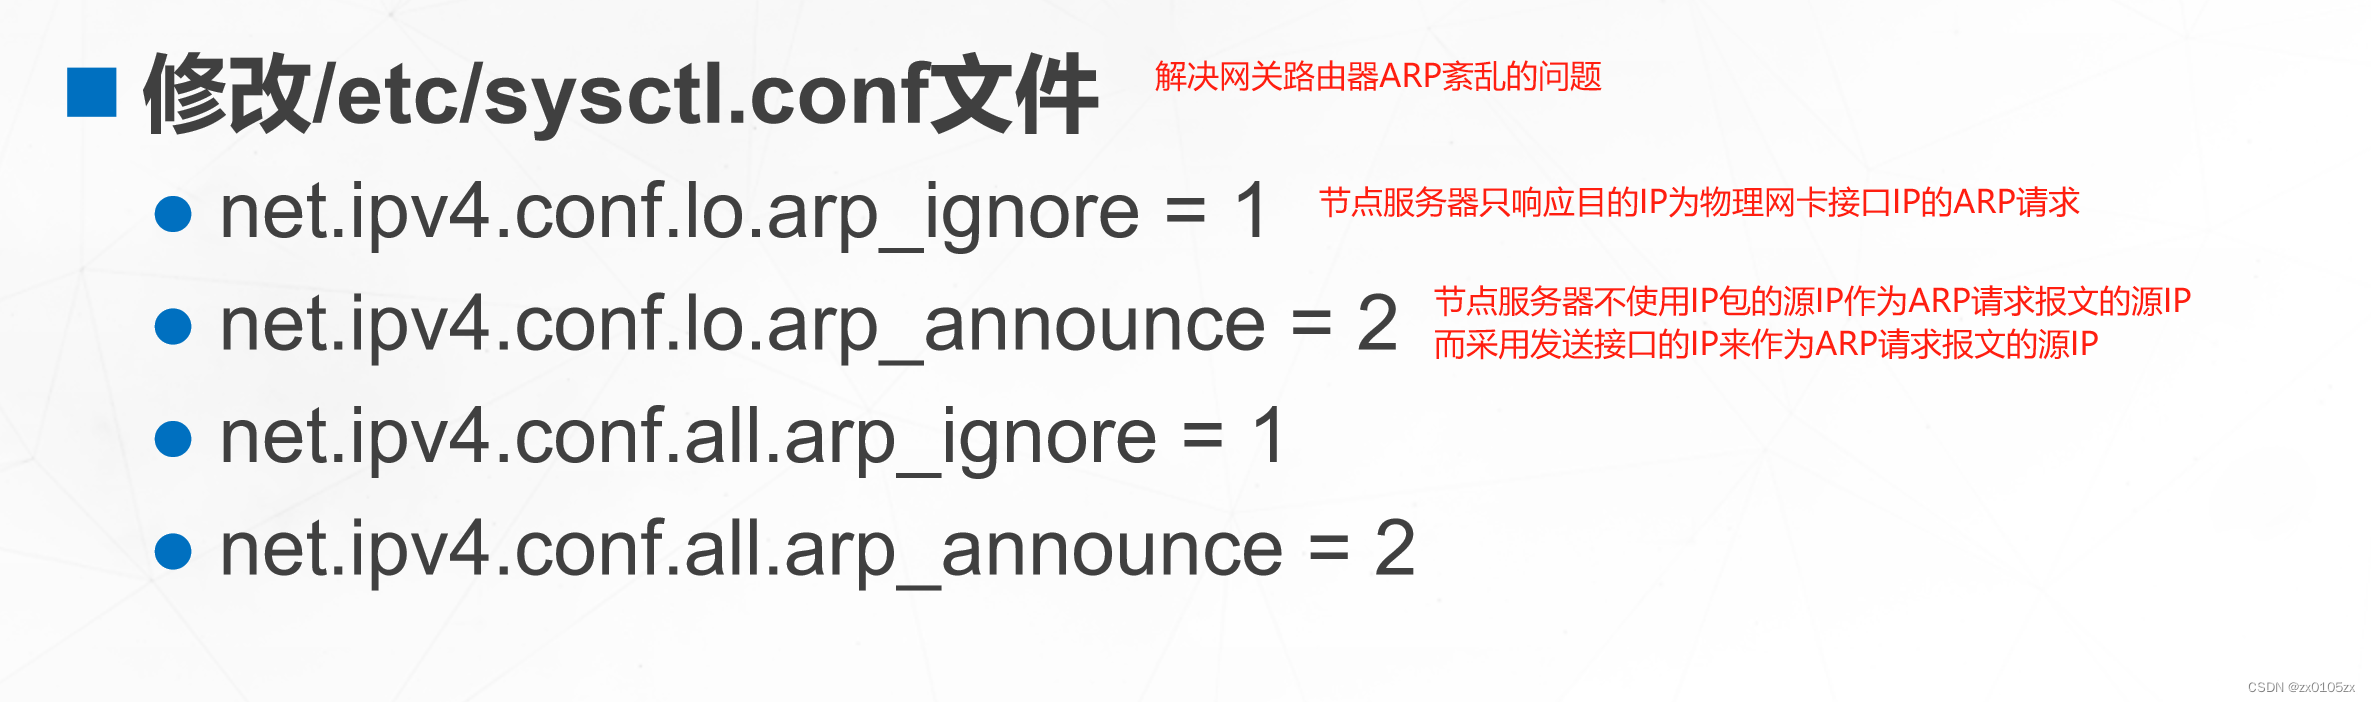
解决方法:

(2)RS响应请求报文

4、部署LVS-DR
准备工具:四台虚拟机
20.0.0.10:做LVS调度器
20.0.0.20 20.0.0.30:做nginx服务器
20.0.0.40:做NFS共享服务器
(1)系统初始化
(2)配置NFS服务器(20.0.0.40)
1)安装软件包
[root@zx4 ~]# yum install -y nfs-utils rpcbind
已加载插件:fastestmirror, langpacks
Loading mirror speeds from cached hostfile
软件包 1:nfs-utils-1.3.0-0.68.el7.2.x86_64 已安装并且是最新版本
软件包 rpcbind-0.2.0-49.el7.x86_64 已安装并且是最新版本
无须任何处理
2)创建共享目录和测试文件
[root@zx4 ~]# mkdir /share/{xy101,xy102} -p
[root@zx4 ~]# ls /share/
xy101  xy102
[root@zx4 ~]# echo '<h1>this is xy101 test web page!</h1>' > /share/xy101/test.html
[root@zx4 ~]# echo '<h1>this is xy102 test web page!</h1>' > /share/xy102/test.html
[root@zx4 ~]# cat /share/xy101/test.html
<h1>this is xy101 test web page!</h1>
[root@zx4 ~]# cat /share/xy102/test.html
<h1>this is xy102 test web page!</h1>
[root@zx4 ~]#
3)共享目录
[root@zx4 ~]# vim /etc/exports
[root@zx4 ~]# systemctl start rpcbind nfs
[root@zx4 ~]# showmount -e
Export list for zx4:
/share/xy102 20.0.0.0/24
/share/xy101 20.0.0.0/24
[root@zx4 ~]#

/share/xy101 20.0.0.0/24(ro)
/share/xy102 20.0.0.0/24(ro)
(2)配置节点服务器(20.0.0.20/30)
1)两台节点服务器域yum安装nginx
[root@zx2 ~]# cd /etc/yum.repos.d/
[root@zx2 yum.repos.d]# ls
local.repo  nginx.repo  repo.bar
[root@zx2 yum.repos.d]# yum -y install nginx

-------------------------------------------------------------------------------------------

[root@zx3 ~]# cd /etc/yum.repos.d/
[root@zx3 yum.repos.d]# ls
local.repo  nginx.repo  repos.bak
[root@zx3 yum.repos.d]# yum -y install nginx
2)两台节点分别挂载共享目录
20.0.0.20
[root@zx2 yum.repos.d]# systemctl start rpcbind
[root@zx2 yum.repos.d]# showmount -e 20.0.0.40
Export list for 20.0.0.40:
/share/xy102 20.0.0.0/24
/share/xy101 20.0.0.0/24
[root@zx2 yum.repos.d]# mount 20.0.0.40:/share/xy101 /usr/share/nginx/html/
[root@zx2 yum.repos.d]# df
文件系统                   1K-块    已用     可用 已用% 挂载点
devtmpfs                 1913504       0  1913504    0% /dev
tmpfs                    1930624       0  1930624    0% /dev/shm
tmpfs                    1930624   21104  1909520    2% /run
tmpfs                    1930624       0  1930624    0% /sys/fs/cgroup
/dev/mapper/centos-root 36805060 5430488 31374572   15% /
/dev/sda1                1038336  191268   847068   19% /boot
tmpfs                     386128      40   386088    1% /run/user/0
/dev/sr0                 4635056 4635056        0  100% /mnt
20.0.0.40:/share/xy101  39301632 4586496 34715136   12% /usr/share/nginx/html
[root@zx2 yum.repos.d]#
20.0.0.30
[root@zx3 yum.repos.d]# systemctl start rpcbind
[root@zx3 yum.repos.d]# showmount -e 20.0.0.40
Export list for 20.0.0.40:
/share/xy102 20.0.0.0/24
/share/xy101 20.0.0.0/24
[root@zx3 yum.repos.d]# mount 20.0.0.40:/share/xy102 /usr/share/nginx/html/
[root@zx3 yum.repos.d]# df
文件系统                   1K-块    已用     可用 已用% 挂载点
devtmpfs                 1913628       0  1913628    0% /dev
tmpfs                    1930648       0  1930648    0% /dev/shm
tmpfs                    1930648   21036  1909612    2% /run
tmpfs                    1930648       0  1930648    0% /sys/fs/cgroup
/dev/mapper/centos-root 36805060 5585836 31219224   16% /
/dev/sda1                1038336  189024   849312   19% /boot
tmpfs                     386132      60   386072    1% /run/user/0
/dev/sr0                 4600876 4600876        0  100% /mnt
20.0.0.40:/share/xy102  39301632 4586496 34715136   12% /usr/share/nginx/html
[root@zx3 yum.repos.d]#
3)配置虚拟IP地址、修改内核参数和添加路由
20.0.0.20
配置虚拟IP
[root@zx2 yum.repos.d]# cd /etc/sysconfig/network-scripts/
[root@zx2 network-scripts]# ls
ifcfg-ens33  ifdown-ppp       ifup-ib      ifup-Team
ifcfg-lo     ifdown-routes    ifup-ippp    ifup-TeamPort
ifdown       ifdown-sit       ifup-ipv6    ifup-tunnel
ifdown-bnep  ifdown-Team      ifup-isdn    ifup-wireless
ifdown-eth   ifdown-TeamPort  ifup-plip    init.ipv6-global
ifdown-ib    ifdown-tunnel    ifup-plusb   network-functions
ifdown-ippp  ifup             ifup-post    network-functions-ipv6
ifdown-ipv6  ifup-aliases     ifup-ppp
ifdown-isdn  ifup-bnep        ifup-routes
ifdown-post  ifup-eth         ifup-sit
[root@zx2 network-scripts]# cp ifcfg-lo ifcfg-lo:0
[root@zx2 network-scripts]# vim ifcfg-lo:0
DEVICE=lo:0
IPADDR=20.0.0.100
NETMASK=255.255.255.255
ONBOOT=yes

[root@zx2 network-scripts]# systemctl restart network
[root@zx2 network-scripts]# ifconfig
ens33: flags=4163<UP,BROADCAST,RUNNING,MULTICAST>  mtu 1500
        inet 20.0.0.20  netmask 255.255.255.0  broadcast 20.0.0.255
        inet6 fe80::528e:8bf:1ac4:282e  prefixlen 64  scopeid 0x20<link>
        ether 00:0c:29:db:f6:a6  txqueuelen 1000  (Ethernet)
        RX packets 364229  bytes 532405430 (507.7 MiB)
        RX errors 0  dropped 0  overruns 0  frame 0
        TX packets 23447  bytes 1580032 (1.5 MiB)
        TX errors 0  dropped 0 overruns 0  carrier 0  collisions 0

lo: flags=73<UP,LOOPBACK,RUNNING>  mtu 65536
        inet 127.0.0.1  netmask 255.0.0.0
        inet6 ::1  prefixlen 128  scopeid 0x10<host>
        loop  txqueuelen 1000  (Local Loopback)
        RX packets 0  bytes 0 (0.0 B)
        RX errors 0  dropped 0  overruns 0  frame 0
        TX packets 0  bytes 0 (0.0 B)
        TX errors 0  dropped 0 overruns 0  carrier 0  collisions 0

lo:0: flags=73<UP,LOOPBACK,RUNNING>  mtu 65536
        inet 20.0.0.100  netmask 255.255.255.255
        loop  txqueuelen 1000  (Local Loopback)

virbr0: flags=4099<UP,BROADCAST,MULTICAST>  mtu 1500
        inet 192.168.122.1  netmask 255.255.255.0  broadcast 192.168.122.255
        ether 52:54:00:ad:f5:42  txqueuelen 1000  (Ethernet)
        RX packets 0  bytes 0 (0.0 B)
        RX errors 0  dropped 0  overruns 0  frame 0
        TX packets 0  bytes 0 (0.0 B)
        TX errors 0  dropped 0 overruns 0  carrier 0  collisions 0

[root@zx2 network-scripts]#
修改内核参数
[root@zx2 network-scripts]# vim ifcfg-lo:0
[root@zx2 network-scripts]# vim /etc/sysctl.conf
[root@zx2 network-scripts]# sysctl -p
net.ipv4.conf.lo.arp_ignore = 1
net.ipv4.conf.lo.arp_announce = 2
net.ipv4.conf.all.arp_ignore = 1
net.ipv4.conf.all.arp_announce = 2
[root@zx2 network-scripts]#

在文件末行添加内容
net.ipv4.conf.lo.arp_ignore = 1
net.ipv4.conf.lo.arp_announce = 2
net.ipv4.conf.all.arp_ignore = 1
net.ipv4.conf.all.arp_announce = 2
添加路由
[root@zx2 network-scripts]# route add -host 20.0.0.100 dev lo:0
[root@zx2 network-scripts]# route -n
Kernel IP routing table
Destination     Gateway         Genmask         Flags Metric Ref    Use Iface
0.0.0.0         20.0.0.2        0.0.0.0         UG    100    0        0 ens33
20.0.0.0        0.0.0.0         255.255.255.0   U     100    0        0 ens33
20.0.0.100      0.0.0.0         255.255.255.255 UH    0      0        0 lo
192.168.122.0   0.0.0.0         255.255.255.0   U     0      0        0 virbr0
[root@zx2 network-scripts]#
20.0.0.30
配置虚拟IP地址
[root@zx3 yum.repos.d]# cd /etc/sysconfig/network-scripts/
[root@zx3 network-scripts]# ls
ifcfg-ens33  ifdown-ppp       ifup-ib      ifup-Team
ifcfg-lo     ifdown-routes    ifup-ippp    ifup-TeamPort
ifdown       ifdown-sit       ifup-ipv6    ifup-tunnel
ifdown-bnep  ifdown-Team      ifup-isdn    ifup-wireless
ifdown-eth   ifdown-TeamPort  ifup-plip    init.ipv6-global
ifdown-ib    ifdown-tunnel    ifup-plusb   network-functions
ifdown-ippp  ifup             ifup-post    network-functions-ipv6
ifdown-ipv6  ifup-aliases     ifup-ppp
ifdown-isdn  ifup-bnep        ifup-routes
ifdown-post  ifup-eth         ifup-sit
[root@zx3 network-scripts]# cp ifcfg-lo ifcfg-lo:0
[root@zx3 network-scripts]# vim ifcfg-lo:0
DEVICE=lo:0
IPADDR=20.0.0.100
NETMASK=255.255.255.255
ONBOOT=yes


[root@zx3 network-scripts]# systemctl restart network
[root@zx3 network-scripts]# ifconfig
ens33: flags=4163<UP,BROADCAST,RUNNING,MULTICAST>  mtu 1500
        inet 20.0.0.30  netmask 255.255.255.0  broadcast 20.0.0.255
        inet6 fe80::6b7a:afda:c16a:b741  prefixlen 64  scopeid 0x20<link>
        ether 00:0c:29:d0:5b:ac  txqueuelen 1000  (Ethernet)
        RX packets 502047  bytes 736333523 (702.2 MiB)
        RX errors 0  dropped 0  overruns 0  frame 0
        TX packets 36367  bytes 2361391 (2.2 MiB)
        TX errors 0  dropped 0 overruns 0  carrier 0  collisions 0

lo: flags=73<UP,LOOPBACK,RUNNING>  mtu 65536
        inet 127.0.0.1  netmask 255.0.0.0
        inet6 ::1  prefixlen 128  scopeid 0x10<host>
        loop  txqueuelen 1000  (Local Loopback)
        RX packets 856  bytes 74928 (73.1 KiB)
        RX errors 0  dropped 0  overruns 0  frame 0
        TX packets 856  bytes 74928 (73.1 KiB)
        TX errors 0  dropped 0 overruns 0  carrier 0  collisions 0

lo:0: flags=73<UP,LOOPBACK,RUNNING>  mtu 65536
        inet 20.0.0.100  netmask 255.255.255.255
        loop  txqueuelen 1000  (Local Loopback)

virbr0: flags=4099<UP,BROADCAST,MULTICAST>  mtu 1500
        inet 192.168.122.1  netmask 255.255.255.0  broadcast 192.168.122.255
        ether 52:54:00:bc:b9:5f  txqueuelen 1000  (Ethernet)
        RX packets 0  bytes 0 (0.0 B)
        RX errors 0  dropped 0  overruns 0  frame 0
        TX packets 0  bytes 0 (0.0 B)
        TX errors 0  dropped 0 overruns 0  carrier 0  collisions 0

[root@zx3 network-scripts]#
修改内核参数
[root@zx3 network-scripts]# vim ifcfg-lo:0
[root@zx3 network-scripts]# vim /etc/sysctl.conf
[root@zx3 network-scripts]# sysctl -p
net.ipv4.conf.lo.arp_ignore = 1
net.ipv4.conf.lo.arp_announce = 2
net.ipv4.conf.all.arp_ignore = 1
net.ipv4.conf.all.arp_announce = 2
[root@zx3 network-scripts]#

在文件末尾添加以下内容
net.ipv4.conf.lo.arp_ignore = 1
net.ipv4.conf.lo.arp_announce = 2
net.ipv4.conf.all.arp_ignore = 1
net.ipv4.conf.all.arp_announce = 2
添加路由
[root@zx3 network-scripts]# route add -host 20.0.0.100 dev lo:0
[root@zx3 network-scripts]# route -n
Kernel IP routing table
Destination     Gateway         Genmask         Flags Metric Ref    Use Iface
0.0.0.0         20.0.0.2        0.0.0.0         UG    100    0        0 ens33
20.0.0.0        0.0.0.0         255.255.255.0   U     100    0        0 ens33
20.0.0.100      0.0.0.0         255.255.255.255 UH    0      0        0 lo
192.168.122.0   0.0.0.0         255.255.255.0   U     0      0        0 virbr0
[root@zx3 network-scripts]#
(3)配置LVS调度器服务器(20.0.0.10)
1)yum安装ipvsadm
[root@zx1 ~]# yum install -y ipvsadm2)开启ipvsadm
[root@zx1 ~]# touch /etc/sysconfig/ipvsadm
[root@zx1 ~]# systemctl start ipvsadm
[root@zx1 ~]# systemctl enable ipvsadm
Created symlink from /etc/systemd/system/multi-user.target.wants/ipvsadm.service to /usr/lib/systemd/system/ipvsadm.service.
[root@zx1 ~]# systemctl status ipvsadm
● ipvsadm.service - Initialise the Linux Virtual Server
   Loaded: loaded (/usr/lib/systemd/system/ipvsadm.service; enabled; vendor preset: disabled)
   Active: active (exited) since 二 2024-06-11 16:49:38 CST; 22s ago
 Main PID: 71701 (code=exited, status=0/SUCCESS)

6月 11 16:49:38 zx1 systemd[1]: Starting Initialise the Linux Virtual Server...
6月 11 16:49:38 zx1 systemd[1]: Started Initialise the Linux Virtual Server.
Hint: Some lines were ellipsized, use -l to show in full.
[root@zx1 ~]#
3)添加模块
[root@zx1 ~]# modprobe ip_vs
[root@zx1 ~]# lsmod | grep ip_vs
ip_vs                 145458  0
nf_conntrack          139264  1 ip_vs
libcrc32c              12644  3 xfs,ip_vs,nf_conntrack
[root@zx1 ~]#
4)添加虚拟IP
[root@zx1 ~]# cd /etc/sysconfig/network-scripts/
[root@zx1 network-scripts]# ls
ifcfg-ens33  ifdown-ppp       ifup-ib      ifup-Team
ifcfg-lo     ifdown-routes    ifup-ippp    ifup-TeamPort
ifdown       ifdown-sit       ifup-ipv6    ifup-tunnel
ifdown-bnep  ifdown-Team      ifup-isdn    ifup-wireless
ifdown-eth   ifdown-TeamPort  ifup-plip    init.ipv6-global
ifdown-ib    ifdown-tunnel    ifup-plusb   network-functions
ifdown-ippp  ifup             ifup-post    network-functions-ipv6
ifdown-ipv6  ifup-aliases     ifup-ppp
ifdown-isdn  ifup-bnep        ifup-routes
ifdown-post  ifup-eth         ifup-sit
[root@zx1 network-scripts]# cp ifcfg-lo ifcfg-ens33:0
[root@zx1 network-scripts]# vim ifcfg-ens33:0
DEVICE=ens33:0
IPADDR=20.0.0.100
NETMASK=255.255.255.255
ONBOOT=yes

[root@zx1 network-scripts]# systemctl restart network
[root@zx1 network-scripts]# ifconfig
ens33: flags=4163<UP,BROADCAST,RUNNING,MULTICAST>  mtu 1500
        inet 20.0.0.10  netmask 255.255.255.0  broadcast 20.0.0.255
        inet6 fe80::947:89f3:4c57:3a9e  prefixlen 64  scopeid 0x20<link>
        ether 00:0c:29:53:65:31  txqueuelen 1000  (Ethernet)
        RX packets 5079  bytes 2261795 (2.1 MiB)
        RX errors 0  dropped 0  overruns 0  frame 0
        TX packets 2721  bytes 320440 (312.9 KiB)
        TX errors 0  dropped 0 overruns 0  carrier 0  collisions 0

ens33:0: flags=4163<UP,BROADCAST,RUNNING,MULTICAST>  mtu 1500
        inet 20.0.0.100  netmask 255.255.255.255  broadcast 20.0.0.100
        ether 00:0c:29:53:65:31  txqueuelen 1000  (Ethernet)

lo: flags=73<UP,LOOPBACK,RUNNING>  mtu 65536
        inet 127.0.0.1  netmask 255.0.0.0
        inet6 ::1  prefixlen 128  scopeid 0x10<host>
        loop  txqueuelen 1000  (Local Loopback)
        RX packets 648  bytes 56232 (54.9 KiB)
        RX errors 0  dropped 0  overruns 0  frame 0
        TX packets 648  bytes 56232 (54.9 KiB)
        TX errors 0  dropped 0 overruns 0  carrier 0  collisions 0

virbr0: flags=4099<UP,BROADCAST,MULTICAST>  mtu 1500
        inet 192.168.122.1  netmask 255.255.255.0  broadcast 192.168.122.255
        ether 52:54:00:8f:c7:54  txqueuelen 1000  (Ethernet)
        RX packets 0  bytes 0 (0.0 B)
        RX errors 0  dropped 0  overruns 0  frame 0
        TX packets 0  bytes 0 (0.0 B)
        TX errors 0  dropped 0 overruns 0  carrier 0  collisions 0

[root@zx1 network-scripts]#
5)修改内核参数
[root@zx1 network-scripts]# vim /etc/sysctl.conf
在文件末行添加内容
net.ipv4.ip_forward = 0
net.ipv4.conf.all.send_redirects = 0
net.ipv4.conf.default.send_redirects = 0
net.ipv4.conf.ens33.send_redirects = 0

[root@zx1 network-scripts]# sysctl -p
net.ipv4.ip_forward = 0
net.ipv4.conf.all.send_redirects = 0
net.ipv4.conf.default.send_redirects = 0
net.ipv4.conf.ens33.send_redirects = 0
[root@zx1 network-scripts]#
6)配置负载分配策略
[root@zx1 network-scripts]# ipvsadm -ln
IP Virtual Server version 1.2.1 (size=4096)
Prot LocalAddress:Port Scheduler Flags
  -> RemoteAddress:Port           Forward Weight ActiveConn InActConn
[root@zx1 network-scripts]# ipvsadm -A -t 20.0.0.100:80 -s rr
[root@zx1 network-scripts]# ipvsadm -a -t 20.0.0.100:80 -r 20.0.0.20:80 -g
[root@zx1 network-scripts]# ipvsadm -a -t 20.0.0.100:80 -r 20.0.0.30:80 -g
[root@zx1 network-scripts]# ipvsadm
IP Virtual Server version 1.2.1 (size=4096)
Prot LocalAddress:Port Scheduler Flags
  -> RemoteAddress:Port           Forward Weight ActiveConn InActConn
TCP  zx1:http rr
  -> 20.0.0.20:http               Route   1      0          0
  -> 20.0.0.30:http               Route   1      0          0
[root@zx1 network-scripts]# ipvsadm -ln
IP Virtual Server version 1.2.1 (size=4096)
Prot LocalAddress:Port Scheduler Flags
  -> RemoteAddress:Port           Forward Weight ActiveConn InActConn
TCP  20.0.0.100:80 rr
  -> 20.0.0.20:80                 Route   1      0          0
  -> 20.0.0.30:80                 Route   1      0          0
[root@zx1 network-scripts]#
(4)验证
关闭两台节点服务器的nginx长连接
[root@zx2 network-scripts]# vim /etc/nginx/nginx.conf
[root@zx2 network-scripts]# systemctl restart nginx
[root@zx2 network-scripts]#

  keepalive_timeout  0;