本文视频版
https://www.bilibili.com/video/BV17ugkePEeN
参考
https://blog.csdn.net/qq_50247813/article/details/136934090
https://gitee.com/nasaa/RuoYi-Vue-cloud
https://www.itsgeekhead.com/tuts/kubernetes-129-ubuntu-22-04-3/
https://kubernetes.io/docs/setup/production-environment/tools/kubeadm/install-kubeadm/
https://github.com/Joxit/docker-registry-ui/issues/140
前置条件
三台虚拟机:
| hostname | ip | 作用 |
|---|---|---|
| node80 | 192.168.10.80 | k8s 节点,控制平面 |
| node81 | 192.168.10.81 | k8s 节点 |
| node82 | 192.168.10.82 | k8s 节点 |
| node84 | 192.168.10.84 | 镜像仓库 |
三台虚拟机都配置了主机名和 ip 的映射,windows 也配置了主机名到 ip 的映射。
三台虚拟机都能访问互联网,最好能访问国外仓库。
安装 k8s
确保 k8s 在启动时加载内核模块 overlay 和 br_netfilter两个内核模块:
shell
printf "overlay\nbr_netfilter\n" >> /etc/modules-load.d/containerd.conf立即加载 overlay 、br_netfilter 内核模块:
shell
modprobe overlay
modprobe br_netfilter
配置 k8s 的网络:
shell
printf "net.bridge.bridge-nf-call-iptables = 1\nnet.ipv4.ip_forward = 1\nnet.bridge.bridge-nf-call-ip6tables = 1\n" >> /etc/sysctl.d/99-kubernetes-cri.conf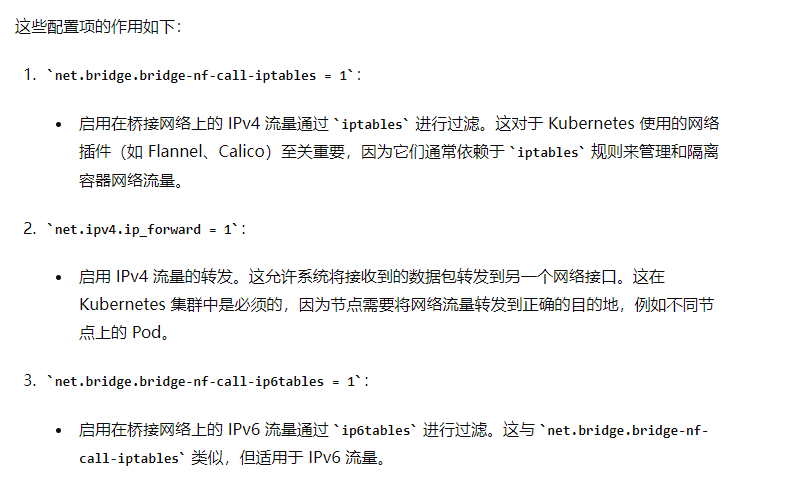
重新加载配置:
shell
sysctl --system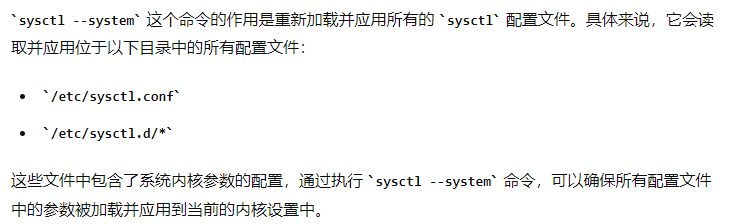
安装 containerd:
shell
wget https://github.com/containerd/containerd/releases/download/v1.7.13/containerd-1.7.13-linux-amd64.tar.gz -P /opt/software/
tar Cxzvf /usr/local /opt/software/containerd-1.7.13-linux-amd64.tar.gz
wget https://raw.githubusercontent.com/containerd/containerd/main/containerd.service -P /etc/systemd/system/
systemctl daemon-reload
systemctl enable --now containerd
安装 runc:
shell
wget https://github.com/opencontainers/runc/releases/download/v1.1.12/runc.amd64 -P /opt/software/
install -m 755 /opt/software/runc.amd64 /usr/local/sbin/runc
安装 cni 网络插件:
shell
wget https://github.com/containernetworking/plugins/releases/download/v1.4.0/cni-plugins-linux-amd64-v1.4.0.tgz -P /opt/software/
mkdir -p /opt/cni/bin
tar Cxzvf /opt/cni/bin /opt/software/cni-plugins-linux-amd64-v1.4.0.tgz
修改 containerd 的配置并重启 containerd:
shell
mkdir -p /etc/containerd
containerd config default | tee /etc/containerd/config.toml
vim /etc/containerd/config.toml
# 修改 SystemdCgroup 配置项的值为 true

systemctl restart containerd
关闭 swap:
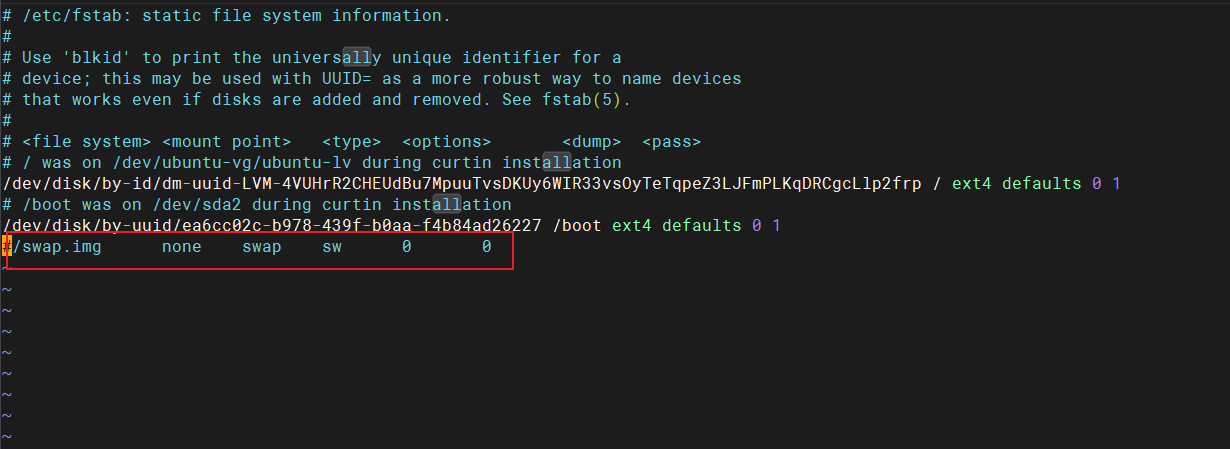
shell
vim /etc/fstab注释掉最后一行:
更新 apt-get 并信任 k8s 官网链接:
shell
apt-get update
apt-get install -y apt-transport-https ca-certificates curl gpg

mkdir -p -m 755 /etc/apt/keyrings
curl -fsSL https://pkgs.k8s.io/core:/stable:/v1.29/deb/Release.key | sudo gpg --dearmor -o /etc/apt/keyrings/kubernetes-apt-keyring.gpg
echo 'deb [signed-by=/etc/apt/keyrings/kubernetes-apt-keyring.gpg] https://pkgs.k8s.io/core:/stable:/v1.29/deb/ /' | sudo tee /etc/apt/sources.list.d/kubernetes.list

apt-get update
重启:
shell
reboot下载 k8s 软件包:
shell
apt-get install -y kubelet=1.29.1-1.1 kubeadm=1.29.1-1.1 kubectl=1.29.1-1.1
apt-mark hold kubelet kubeadm kubectl
apt-mark hold kubelet kubeadm kubectl命令的作用是将kubelet、kubeadm和kubectl这三个软件包标记为"保留"状态。这意味着这些软件包不会被系统自动升级或删除
检查 swap 是否关闭,确保 swap 是 0:
shell
free -m下面这些步骤仅仅需要在控制平面节点执行:
shell
# 这个命令会比较耗时
kubeadm init --pod-network-cidr 10.10.0.0/16 --kubernetes-version 1.29.1 --node-name node80

export KUBECONFIG=/etc/kubernetes/admin.conf

# add Calico 3.27.2 CNI
kubectl create -f https://raw.githubusercontent.com/projectcalico/calico/v3.27.2/manifests/tigera-operator.yaml
wget https://raw.githubusercontent.com/projectcalico/calico/v3.27.2/manifests/custom-resources.yaml
# 将 CIDR 配置为 10.10.0.0/16
vim custom-resources.yaml
kubectl apply -f custom-resources.yaml

# 获取 worker 节点加入到集群的命令
kubeadm token create --print-join-command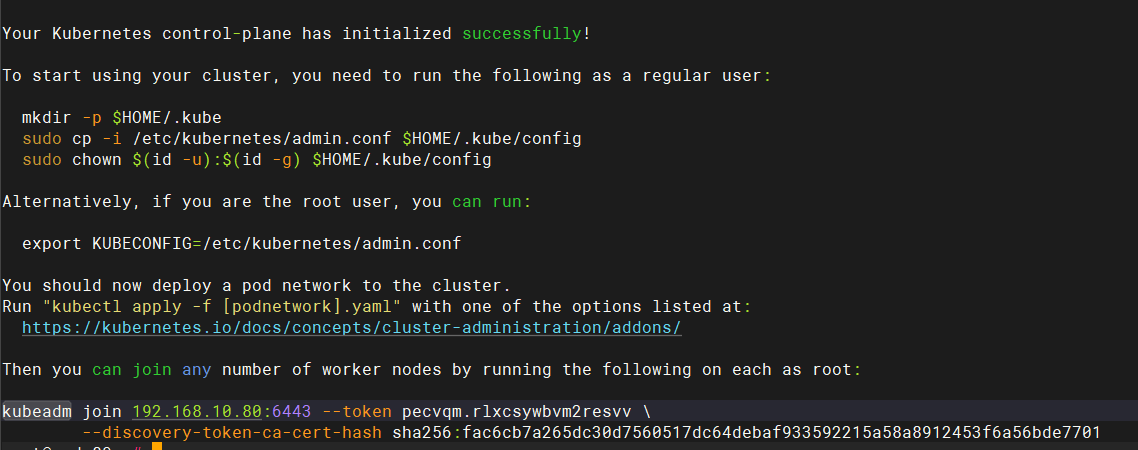
在 worker 节点执行上面获取到的将 worker 节点加入到集群的命令将当前节点加入到 k8s 集群中:
shell
kubeadm join 192.168.10.80:6443 --token pecvqm.rlxcsywbvm2resvv \
        --discovery-token-ca-cert-hash sha256:fac6cb7a265dc30d7560517dc64debaf933592215a58a8912453f6a56bde7701
--pod-network-cidr 明确了 Kubernetes 集群中 Pod 网络的 IP 地址范围
安装镜像仓库 registry
安装 htpasswd 工具:
shell
sudo apt-get update
sudo apt-get install apache2-utils
创建挂载容器的目录以及密码文件:
shell
mkdir -p /docker/volume/registry/auth/
htpasswd -Bc /docker/volume/registry/auth/htpasswd root
# 输入 root 的密码
创建 registry 容器挂载数据的目录:
shell
mkdir -p /docker/volume/registry/data创建 registry 挂载配置文件的目录,并创建配置文件:
shell
mkdir -p /docker/volume/registry/conf
shell
vim /docker/volume/registry/conf/config.yml
yaml
version: 0.1
log:
  level: debug
  fields:
    service: registry
    environment: production
storage:
  filesystem:
    rootdirectory: /var/lib/registry
http:
  addr: :5000
  headers:
    Access-Control-Allow-Origin: ['http://node84:8080','http://192.168.10.84']
    Access-Control-Allow-Methods: ['HEAD', GET', 'OPTIONS', 'DELETE', 'POST', 'PUT']
    Access-Control-Allow-Headers: ['Authorization','Accept']
  http2:
    disabled: false
auth:
  htpasswd:
    realm: basic-realm
    path: /auth/htpasswd
创建 docker 网络:
shell
docker network create registry-net启动 registry 容器:
shell
docker run -d \
  --name registry \
  --network registry-net \
  -v /docker/volume/registry/auth:/auth \
  -v /docker/volume/registry/data:/var/lib/registry \
  -v /docker/volume/registry/conf/config.yml:/etc/docker/registry/config.yml \
  -e REGISTRY_AUTH=htpasswd \
  -e REGISTRY_AUTH_HTPASSWD_REALM="Registry Realm" \
  -e REGISTRY_AUTH_HTPASSWD_PATH=/auth/htpasswd \
  -e REGISTRY_HTTP_SECRET=secretkey \
  -p 5000:5000 \
  registry:2
修改 containerd 的配置,将 registry 的地址添加到镜像仓库列表中:
shell
mkdir -p /etc/containerd/certs.d/node84:5000

tee /etc/containerd/certs.d/node84:5000/hosts.toml << 'EOF'
server = "http://node84:5000"

[host."http://node84:5000"]
  capabilities = ["pull", "resolve", "push"]
  skip_verify = true
EOF

systemctl restart containerd.service
因为我们需要将 docker 上的镜像推送到 registry 中,所以,也需要修改 docker 的配置,添加我们的 registry 镜像仓库的地址。
将 node84 添加到 docker 的安全镜像仓库名单中,避免使用 docker 推送镜像到 registry 中报错,将 "insecure-registries": "192.168.56.10:5000"' 加入到 /etc/docker/daemon.json 中,再使用 systemctl restart docker 重启 Docker 就可以了。
json
{
    "insecure-registries": ["node84:5000"]
}
安装 registry 可视化工具
启动一个 registry-browser 容器并连接到自定义网络:
shell
docker run -d \
  --name registry-browser \
  --network registry-net \
  -e REGISTRY_TITLE="Docker Registry Browser" \
  -e NGINX_PROXY_PASS_URL="http://registry:5000" \
  -e REGISTRY_AUTH="true" \
  -e REGISTRY_AUTH_USER="root" \
  -e REGISTRY_AUTH_PASSWORD="123456" \
  -p 8080:80 \
  joxit/docker-registry-ui:latest
比较老的版本中使用 -e REGISTRY_URL="http://registry:5000" \ 配置 registry 的地址,如果新版本中使用这个配置,在前端会出现 An error occured: Check your connection and your registry must have
Access-Control-Allow-Originheader set tohttp://node84:8080这个异常,需要使用 NGINX_PROXY_PASS_URL 这个配置
访问主机的 8080 端口即可看到 registry 中的镜像。
部署 ruoyi 前后端分离项目
制作后端镜像
编写 Dockerfile 文件:
dockerfile
# 使用官方的 OpenJDK 8 镜像作为基础镜像
FROM openjdk:8-jdk-alpine
# 创建存放上传文件的目录
RUN mkdir -p /opt/project/ruoyi/ruoyi-backend/upload-file-path
# 创建存放日志的目录
RUN mkdir -p /opt/project/ruoyi/ruoyi-backend/logs
# 安装字体文件
RUN mkdir -p /etc/apk/
RUN touch /etc/apk/repositories
RUN echo -e 'https://mirrors.aliyun.com/alpine/v3.6/main/\nhttps://mirrors.aliyun.com/alpine/v3.6/community/' > /etc/apk/repositories
RUN set -xe && apk --no-cache add ttf-dejavu fontconfig
# 设置工作目录
WORKDIR /opt/project/ruoyi/ruoyi-backend
# 将构建好的 JAR 文件复制到容器中
COPY ./ruoyi-admin/target/ruoyi-admin.jar ruoyi-admin.jar
# 暴露应用程序端口
EXPOSE 8080
# 启动应用程序
CMD ["nohup","java","-jar","/opt/project/ruoyi/ruoyi-backend/ruoyi-admin.jar", ">", "/opt/project/ruoyi/ruoyi-backend/logs/nohup.log", "&"]
直接用 idea 连接到我们虚拟机中的 Docker 上,在 idea 中点击 Dockerfile 中的绿色箭头将后端打成镜像。
在虚拟机中查看镜像是否好了:
shell
docker images将打好的后端镜像推送到 registry 中:
shell
#推送后端镜像
#修改镜像tag
docker tag ruoyi-backend:1.0 node84:5000/ruoyi-backend:1.0

# 因为 registry 设置了用户名和密码,所以需要先登录才能推送镜像
docker login -u root -p 123456 node84:5000

#推送到私有镜像仓库中
docker push node84:5000/ruoyi-backend:1.0
制作前端镜像
编写前端的 Dockerfile:
dockerfile
# 使用 Nginx 作为基础镜像
FROM nginx:1.12.2
# 将 nginx.conf 拷贝到容器中
COPY nginx.conf /etc/nginx/nginx.conf
# 创建存放前端编译后代码的目录
RUN mkdir -p /opt/project/ruoyi/ruoyi-front-code
# 将构建好的应用拷贝到 Nginx 的默认 web 目录
COPY dist /opt/project/ruoyi/ruoyi-front-code
# Expose 端口
EXPOSE 80
# 启动 Nginx 服务器
CMD ["nginx", "-g", "daemon off;"]
直接用 webstorm 连接到我们虚拟机中的 Docker 上,在 webstorm 中点击 Dockerfile 中的绿色箭头将后端打成镜像。
在虚拟机中查看镜像是否好了:
shell
docker images将打好的前端镜像推送到 registry 中:
shell
#推送前端镜像
#修改镜像tag
docker tag ruoyi-frontend:1.0 node84:5000/ruoyi-frontend:1.0

# 因为 registry 设置了用户名和密码,所以需要先登录才能推送镜像
docker login -u root -p 123456 node84:5000

#推送到私有镜像仓库中
docker push node84:5000/ruoyi-frontend:1.0
k8s 部署后端
将后端初始化的两个 sql 文件创建为 configmap
将 ruoyi 后端的两个初始化 sql 文件放入 /opt/ruoyi/sql 中:
shell
mkdir -p /opt/ruoyi/sql切换成 k8s 的管理员:
shell
export KUBECONFIG=/etc/kubernetes/admin.conf这种切换方式重启后会失效,可以向 ~/.bashrc 文件末尾添加 export KUBECONFIG=/etc/kubernetes/admin.conf 后,再使用 source ~/.bashrc 使配置永久生效
使用如下命令检查是否切换成功:
shell
kubectl cluster-info创建一个为我们当前机器分配在 default 空间下创建 configmap 权限的配置文件:
yaml
apiVersion: rbac.authorization.k8s.io/v1
kind: Role
metadata:
  namespace: default
  name: configmap-creator
rules:
- apiGroups: [""]
  resources: ["configmaps"]
  verbs: ["create", "update", "patch", "delete"]

---
apiVersion: rbac.authorization.k8s.io/v1
kind: RoleBinding
metadata:
  name: configmap-creator-binding
  namespace: default
subjects:
- kind: User
  name: system:node:node80
  apiGroup: rbac.authorization.k8s.io
roleRef:
  kind: Role
  name: configmap-creator
  apiGroup: rbac.authorization.k8s.io
使这个配置文件生效:
shell
kubectl apply -f role-config.yaml当前节点就有在 default 空间下创建 configmap 的权限了。
根据 ruoyi 后端的初始化 SQL 文件创建 configMap:
注意:sql 文件头部要加上:use ry-vue; SET NAMES utf8;
shell
kubectl create configmap ruoyi-init-sql-config-map --from-file=/opt/ruoyi/sql
# 查看这个 configmap 的详情
kubectl describe configmap/ruoyi-init-sql-config-map
将需要修改的后端配置创建为 configmap
后端的镜像中,application.yaml 配置文件中 MySQL 和 Redis 的地址都是写死的,需要我们根据要求创建在 k8s 中使用的 configMap。
拷贝一份 application.yaml 配置文件,将其中的 ip 地址改为对应 service 的服务名地址:
yaml
# 数据源配置
spring:
    redis:
      # 地址
      host: ruoyi-redis-service
      # 端口,默认为6379
      port: 6379
      # 数据库索引
      database: 0
      # 密码
      password: 123456
      # 连接超时时间
      timeout: 10s
      lettuce:
        pool:
          # 连接池中的最小空闲连接
          min-idle: 0
          # 连接池中的最大空闲连接
          max-idle: 8
          # 连接池的最大数据库连接数
          max-active: 8
          # #连接池最大阻塞等待时间(使用负值表示没有限制)
          max-wait: -1ms
    datasource:
        type: com.alibaba.druid.pool.DruidDataSource
        driverClassName: com.mysql.cj.jdbc.Driver
        druid:
            # 主库数据源
            master:
                url: jdbc:mysql://ruoyi-mysql-service:3306/ry-vue?useUnicode=true&characterEncoding=utf8&zeroDateTimeBehavior=convertToNull&useSSL=false&serverTimezone=GMT%2B8&connectTimeout=1000&socketTimeout=30000&autoReconnect=true&failOverReadOnly=false
                username: root
                password: 123456
            # 从库数据源
            slave:
                # 从数据源开关/默认关闭
                enabled: false
                url:
                username:
                password:
            # 初始连接数
            initialSize: 5
            # 最小连接池数量
            minIdle: 10
            # 最大连接池数量
            maxActive: 20
            # 配置获取连接等待超时的时间
            maxWait: 60000
            # 配置连接超时时间
            connectTimeout: 30000
            # 配置网络超时时间
            socketTimeout: 60000
            # 配置间隔多久才进行一次检测,检测需要关闭的空闲连接,单位是毫秒
            timeBetweenEvictionRunsMillis: 60000
            # 配置一个连接在池中最小生存的时间,单位是毫秒
            minEvictableIdleTimeMillis: 300000
            # 配置一个连接在池中最大生存的时间,单位是毫秒
            maxEvictableIdleTimeMillis: 900000
            # 配置检测连接是否有效
            validationQuery: SELECT 1 FROM DUAL
            testWhileIdle: true
            testOnBorrow: false
            testOnReturn: false
            webStatFilter:
                enabled: true
            statViewServlet:
                enabled: true
                # 设置白名单,不填则允许所有访问
                allow:
                url-pattern: /druid/*
                # 控制台管理用户名和密码
                login-username: ruoyi
                login-password: 123456
            filter:
                stat:
                    enabled: true
                    # 慢SQL记录
                    log-slow-sql: true
                    slow-sql-millis: 1000
                    merge-sql: true
                wall:
                    config:
                        multi-statement-allow: true
根据这个配置文件生成 configMap:
shell
kubectl create configmap ruoyi-admin-config --from-file=/opt/ruoyi/application-k8s.yaml
kubectl describe configmap/ruoyi-admin-config
将 redis 服务的配置 redis.conf 创建为 configmap
下载需要的 redis 对应版本,解压后拷贝 redis.conf 文件,修改配置文件中的如下部分:
shell
# 注释掉 bind 127.0.0.1,bind 用于限制访问 Redis 的机器 ip,直接关掉
# bind 127.0.0.1

# 修改 daemonize no 为 yes,让 Redis 可以后台启动
daemonize yes

# 设置密码
requirepass 123456
根据这个 redis.conf 配置文件生成 configMap:
shell
kubectl create configmap ruoyi-redis-config-map --from-file=/opt/ruoyi/redis.conf
kubectl describe configmap/ruoyi-redis-config-map
将 registry 的用户名和密码创建为 secret
创建一个 secret 用于存储我们的 registry 仓库的用户名和密码,在 k8s 资源编排 yaml 文件中,在 deployment 中使用 imagePullSecrets 字段就可以引用这个 Secret 对象,这样 Kubernetes 就可以在拉取镜像时使用这个 Secret 对象中的认证信息。
shell
kubectl create secret registry-user-pwd-secret \
    --docker-server=http://node84:5000 \
    --docker-username=root \
    --docker-password=123456
containerd 添加 registry 镜像仓库地址
因为我们使用的 registry 是 http 协议,containerd 默认认为是不安全的,需要做如下配置,修改 containerd 的配置,使得 containerd 从 registry 拉取镜像不会报错:

toml
[plugins."io.containerd.grpc.v1.cri".registry.mirrors]
  [plugins."io.containerd.grpc.v1.cri".registry.mirrors."node84:5000"]
    endpoint = ["http://node84:5000"]
注意:上面的 node84 是 registry 的地址,如果 registry 地址不是 node84,两个 node84 都需要更改为你的 registry 的地址,所有 k8s 机器都需要修改
shell
sudo systemctl restart containerd部署后端服务
后端部署的 k8s 资源清单:
yaml
# 数据库
apiVersion: apps/v1
kind: Deployment
metadata:
  name: database
  namespace: default
spec:
  selector:
    matchLabels:
      app: database
  template:
    metadata:
      labels:
        app: database
    spec:
      containers:
        - name: database
          image: mysql:8.0
          env:
            - name: MYSQL_ROOT_PASSWORD
              value: "123456"
            - name: MYSQL_DATABASE
              value: "ry-vue"
          volumeMounts:
            - mountPath: /docker-entrypoint-initdb.d
              name: ruoyi-init-sql
          resources:
            limits:
              memory: "512Mi"
              cpu: "500m"
          ports:
            - containerPort: 3306
      volumes:
        - name: ruoyi-init-sql
          configMap:
            name: ruoyi-init-sql-config-map
      imagePullSecrets:
        - name: registry-user-pwd-secret

---
apiVersion: v1
kind: Service
metadata:
  name: ruoyi-mysql-service
  namespace: default
spec:
  selector:
    app: database
  ports:
    - port: 3306
      targetPort: 3306

---
# redis
apiVersion: apps/v1
kind: Deployment
metadata:
  name: redis
spec:
  selector:
    matchLabels:
      app: redis
  template:
    metadata:
      labels:
        app: redis
    spec:
      containers:
        - name: redis
          image: redis:7.2.0
          resources:
            limits:
              memory: "512Mi"
              cpu: "500m"
          ports:
            - containerPort: 6379
          volumeMounts:
            - mountPath: /usr/local/etc/redis/redis.conf
              name: ruoyi-redis-config
      volumes:
        - name: ruoyi-redis-config
          configMap:
            name: ruoyi-redis-config-map
      imagePullSecrets:
        - name: registry-user-pwd-secret

---
apiVersion: v1
kind: Service
metadata:
  name: ruoyi-redis-service
  namespace: default
spec:
  selector:
    app: redis
  ports:
    - port: 6379
      targetPort: 6379

# ruoyi 后端
---
apiVersion: apps/v1
kind: Deployment
metadata:
  name: ruoyi-java
spec:
  replicas: 2
  selector:
    matchLabels:
      app: ruoyi-java
  template:
    metadata:
      labels:
        app: ruoyi-java
    spec:
      initContainers:
        - name: wait-for-mysql
          image: mysql:8.0
          env:
            - name: MYSQL_ROOT_PASSWORD
              value: "123456"
          command:
            - sh
            - -c
            - |
              set -e
              maxTries=10
              while [ "$$maxTries" -gt 0 ] \
                    && ! mysqladmin ping --connect-timeout=3 -s \
                                    -hruoyi-mysql-service -uroot -p$$MYSQL_ROOT_PASSWORD
              do
                  echo 'Waiting for MySQL to be available'
                  sleep 5
                  let maxTries--
              done
              if [ "$$maxTries" -le 0 ]; then
                  echo >&2 'error: unable to contact MySQL after 10 tries'
                  exit 1
              fi
        - name: wait-for-redis
          image: redis:7.2.0
          env:
            - name: REDIS_PASSWORD
              value: "123456"
          command:
            - sh
            - -c
            - |
              set -e
              maxTries=10
              while [ "$$maxTries" -gt 0 ] \
                    && ! timeout 3 redis-cli -h ruoyi-redis-service -a $$REDIS_PASSWORD ping
              do
                  echo 'Waiting for Redis to be available'
                  sleep 5
                  let maxTries--
              done
              if [ "$$maxTries" -le 0 ]; then
                  echo >&2 'error: unable to contact Redis after 10 tries'
                  exit 1
              fi
      containers:
        - name: ruoyi-java
          image: node84:5000/ruoyi-backend:1.0
          resources:
            limits:
              memory: "512Mi"
              cpu: "512m"
          imagePullPolicy: Always
          ports:
            - containerPort: 8080
          # /app/ruoyi/ 是 dockerfile 中拷贝 jar 包所到的目录
          # springboot 启动时,会从 jar 包所在的目录的 config 子目录中查找配置文件
          volumeMounts:
            - mountPath: /opt/project/ruoyi/ruoyi-backend/config
              name: config
          # 使用 application-k8s.yaml 作为配置文件
          args:
            ["java", "-jar", "ruoyi-admin.jar", "--spring.profiles.active=k8s"]
      volumes:
        - name: config
          configMap:
            name: ruoyi-admin-config
      imagePullSecrets:
        - name: registry-user-pwd-secret
---
apiVersion: v1
kind: Service
metadata:
  name: ruoyi-backend-service
  namespace: default
spec:
  selector:
    app: ruoyi-java
  ports:
    - port: 8080
      targetPort: 8080
根据资源清单部署后端:
shell
kubectl apply -f ruoyi-k8s-backend.yamlk8s 部署前端
将前端的 nginx.conf 创建为 configmap
Nginx 的配置文件:
nginx
server {
  listen       80;
  server_name  localhost;
  charset utf-8;

  location / {
    # dockerfile中WORKDIR目录
    root   /opt/project/ruoyi/ruoyi-front-code;
    try_files $uri $uri/ /index.html;
    index  index.html index.htm;
  }

  location /prod-api/ {
    proxy_set_header Host $http_host;
    proxy_set_header X-Real-IP $remote_addr;
    proxy_set_header REMOTE-HOST $remote_addr;
    proxy_set_header X-Forwarded-For $proxy_add_x_forwarded_for;
    # 后端 service 的 DNS
    proxy_pass http://ruoyi-backend-service.default:8080/;
  }

  error_page   500 502 503 504  /50x.html;
  location = /50x.html {
    root   html;
  }
}
根据 Nginx 配置文件创建 configMap:
shell
kubectl create configmap ruoyi-ui-config --from-file=/opt/ruoyi/nginx.conf
kubectl describe configmap/ruoyi-ui-config
部署前端服务
前端部署的 k8s 资源清单:
yaml
apiVersion: apps/v1
kind: Deployment
metadata:
  name: ruoyi-nginx
spec:
  replicas: 1
  selector:
    matchLabels:
      app: ruoyi-nginx
  template:
    metadata:
      labels:
        app: ruoyi-nginx
    spec:
      initContainers:
        - name: wait-for-ruoyi-backend-service
          image: alpine
          command:
            - sh
            - -c
            - |
              apk add --no-cache curl
              echo "Starting to wait for ruoyi-backend-service..."
              until curl -s -f -m 3 http://ruoyi-backend-service:8080
              do
                echo "Waiting for ruoyi-backend-service...";
                sleep 5;
              done
              echo "ruoyi-backend-service is available now."
      containers:
        - name: ruoyi-nginx
          image: node84:5000/ruoyi-frontend:1.0
          resources:
            limits:
              memory: "512Mi"
              cpu: "512m"
          imagePullPolicy: Always
          ports:
            - containerPort: 80
          volumeMounts:
            - mountPath: /etc/nginx/conf.d
              name: config
      volumes:
        - name: config
          configMap:
            name: ruoyi-ui-config
            items:
              - key: nginx.conf
                path: default.conf
      imagePullSecrets:
        - name: registry-user-pwd-secret

---
apiVersion: v1
kind: Service
metadata:
  name: ruoyi-fronted-service
  namespace: default
spec:
  type: NodePort
  selector:
    app: ruoyi-nginx
  ports:
    - port: 80
      targetPort: 80
      nodePort: 30000
根据资源清单启动前端:
shell
kubectl apply -f ruoyi-k8s-fronted.yaml前端通过 nodePort 暴露出去了,访问任意 k8s 节点的 30000 端口即可访问前端。
遇到的问题
拉取镜像失败
只要出现这种情况:
json
ctr: failed to copy: httpReadSeeker: failed open: failed to do request: Get "https://production.cloudflare.docker.com/registry-v2/docker/registry/v2/blobs/sha256/52/52d2b7f179e32b4cbd579ee3c4958027988f9a8274850ab0c7c24661e3adaac5/data?verify=1719112771-ZRsD38JmAnzgLW0YPDJ4BVoEmvw%3D": dial tcp 162.220.12.226:443: connect: connection refused就是网络不通,需要开代理。
可以使用如下命令测试拉取镜像是否能成功:
shell
sudo ctr images pull docker.io/library/redis:7.2.0可以配置 containerd 使用阿里云的镜像仓库加速:
shell
vim /etc/containerd/config.toml
toml
      [plugins."io.containerd.grpc.v1.cri".registry.mirrors]
        [plugins."io.containerd.grpc.v1.cri".registry.mirrors."node63:5000"]
          endpoint = ["http://node63:5000"]
        [plugins."io.containerd.grpc.v1.cri".registry.mirrors."docker.io"]
          endpoint = ["https://6zemac9k.mirror.aliyuncs.com"]
修改后重启 containerd:
shell
sudo systemctl restart containerd配置完后,拉取镜像的时候并没有从 aliyun 拉取,不知道为什么。
最后我还是选择了使用代理。
拉取前后端镜像失败
containerd 的配置 /etc/containerd/config.toml 中:
plugins."io.containerd.grpc.v1.cri".registry.mirrors
plugins."io.containerd.grpc.v1.cri".registry.mirrors."node63:5000"
endpoint = "http://node63:5000"
plugins."io.containerd.grpc.v1.cri".registry.mirrors."docker.io"
endpoint = "https://6zemac9k.mirror.aliyuncs.com"
registry.mirrors."node63:5000" 之前因为忘了修改,应该要改成现在的 registry 的地址 node63:5000。