斌的招儿
网上教程大多都是官网模板化的教程和文档,这里小斌用自己实际生产环境使用的例子给大家做一个详解。涉及到一整套ansible的使用,对于roles的使用,也仅涉及到tasks和files目录,方便大家快速上手并规范化管理。
0.环境配置
192.168.255.120 Ansible控制机
192.168.255.123 Ansible被控机
1.安装Ansible
作为学习模拟使用,这里就使用yum安装
[root@120 ~]# yum install -y ansible2.配置免密
[root@120 ~]# ssh-keygen

[root@120 ~]# ssh-copy-id root@192.168.255.123
3.配置主机列表
配置主机列表,我们一般会选择在hosts文件中定义,但是面临一个问题,后续管理主机多,不同项目也有可能设计同一台主机,我们每次都要在一个文件里追加追加,极为不便,所以我们单独建一个目录用来管理主机列表。

我们修改一下配置文件里的主机清单位置,指定一个目录,目录下文件以.conf结尾,书写格式于hosts中一致。

4.测试主机连通性
[root@120 ansible]# ansible yzb -m ping
192.168.255.123 | SUCCESS => {
    "ansible_facts": {
        "discovered_interpreter_python": "/usr/bin/python"
    },
    "changed": false,
    "ping": "pong"
}
[root@120 ansible]#
5.生成角色
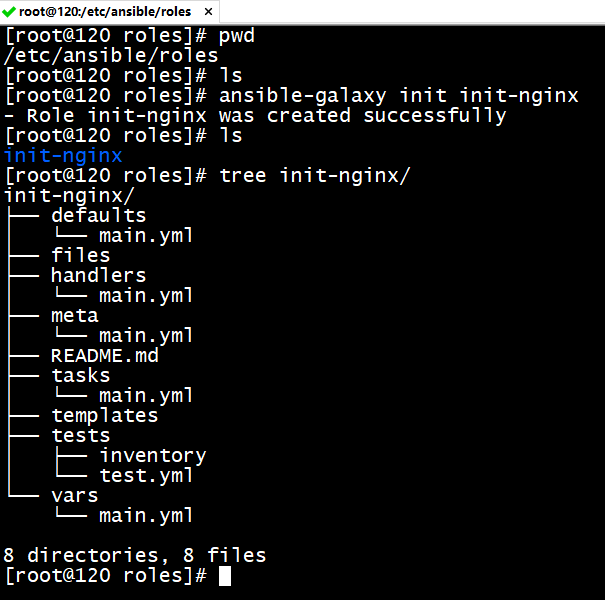
这里不需要手动创建目录和文件,可以借助ansible自带的ansible-galaxy工具。
[root@120 roles]# pwd
/etc/ansible/roles

[root@120 roles]# ls

[root@120 roles]# ansible-galaxy init init-nginx
- Role init-nginx was created successfully

[root@120 roles]# ls
init-nginx

[root@120 roles]# tree init-nginx/
init-nginx/
├── defaults
│   └── main.yml
├── files
├── handlers
│   └── main.yml
├── meta
│   └── main.yml
├── README.md
├── tasks
│   └── main.yml
├── templates
├── tests
│   ├── inventory
│   └── test.yml
└── vars
    └── main.yml

8 directories, 8 files
[root@120 roles]#
我们可以看到使用 ansible-galaxy init 命令创建了一个新角色的框架
6.配置
开头说过了,仅涉及到tasks和files目录,方便大家快速上手并规范化管理。所以它来了:
这里我们以安装nginx为例子,yum没难度是吧,好的,我们用源码安装的形式教学。
1.熟悉源码安装nginx
只有熟悉怎么源码安装nginx,才能编写剧本自动化安装。源码安装其实就四步:
1.包弄上来解压
2.添加补丁
3.编译安装
4.添加systemed管理
2.准备文件

如图,我们看到四个文件,文件作用如下:
-
- nginx.tar.gz:包含nginx源码包和补丁包
- install.sh:内容为将补丁文件应用到源代码文件中,并执行编译安装,写成脚本减少playbook的篇幅
- nginx.conf:nginx的配置文件,如果业务有特殊模块需求,可以提前编写好配置文件发放到目标主机
- nginx.service:nginx的systemed管理文件
nginx.conf
[root@120 files]# cat nginx.conf
pid /usr/local/nginx/nginx.pid;

worker_processes 4;
worker_cpu_affinity 1000 0100 0010 0001;
worker_rlimit_nofile 102400;

events {
    worker_connections 102400;
    multi_accept on;
    use epoll;
}

http {

    vhost_traffic_status_zone;

    log_format json_format '{"timestamp":"$msec",'
        '"time_iso":"$time_iso8601",'
        '"time_local":"$time_local",'
        '"request_time":"$request_time",'
        '"remote_user":"$remote_user",'
        '"remote_addr":"$remote_addr",'
        '"http_x_forwarded_for":"$http_x_forwarded_for",'
        '"request":"$request",'
        '"status":"$status",'
        '"body_bytes_send":"$body_bytes_sent",'
        '"upstream_addr":"$upstream_addr",'
        '"upstream_response_time":"$upstream_response_time",'
        '"upstream_http_content_type":"$upstream_http_content_type",'
        '"upstream_http_content_disposition":"$upstream_http_content_disposition",'
        '"upstream_status":"$upstream_status",'
        '"http_user_agent":"$http_user_agent",'
        '"http_referer":"$http_referer",'
        '"connection":"$connection",'
        '"connection_requests":"$connection_requests",'
        '"scheme":"$scheme",'
        '"host":"$host",'
        '"http_via":"$http_via",'
        '"request_id":"$request_id"}';

    map $time_iso8601 $logdate {
        '~^(?<ymd>\d{4}-\d{2}-\d{2})' $ymd;
        default  'date-not-found';
    }

    # 日志文件名中带有变量时由子进程创建,需要子进程具有目录写入权限
    access_log /ware/logs/nginx/access-$logdate.log json_format;
    error_log /ware/logs/nginx/error.log error;

    server_tokens off;
    sendfile on;
    tcp_nopush on;
    tcp_nodelay on;
    keepalive_timeout 30;
    keepalive_requests 100000;
    client_header_timeout 10;
    client_body_timeout 10;
    client_max_body_size 100m;
    reset_timedout_connection on;
    send_timeout 10;
    include mime.types;
    default_type application/octet-stream;
    charset UTF-8;

    gzip on;
    gzip_vary on;
    gzip_disable "MSIE [1-6].";
    gzip_http_version 1.0;
    gzip_comp_level 4;
    # gzip_static on;
    gzip_min_length 1024;
    gzip_buffers 4 16k;
    gzip_proxied expired no-cache no-store private auth;
    gzip_types text/plain text/css text/javascript application/x-javascript application/xml application/json application/xml+rss;

    open_file_cache max=100000 inactive=20s;
    open_file_cache_valid 30s;
    open_file_cache_min_uses 2;
    open_file_cache_errors on;
    proxy_connect_timeout 75;
    proxy_read_timeout 300;
    proxy_send_timeout 300;
    proxy_buffer_size 64k;
    proxy_buffers 4 64k;
    proxy_busy_buffers_size 128k;
    proxy_temp_file_write_size 128k;

    include /opt/env/nginx/servs/*.upstreams;
    include /opt/env/nginx/servs/http-*.conf;
}

stream {
    include /opt/env/nginx/servs/tcp-*.conf;
}
nginx.service
[root@120 files]# cat nginx.service
[Unit]
Description=nginx - high performance web server
Documentation=http://nginx.org/en/docs/
After=network.target remote-fs.target nss-lookup.target

[Service]
Type=forking
PIDFile=/usr/local/nginx/nginx.pid
ExecStartPre=/usr/local/nginx/sbin/nginx -t -c /usr/local/nginx/conf/nginx.conf
ExecStart=/usr/local/nginx/sbin/nginx -c /usr/local/nginx/conf/nginx.conf
ExecReload=/bin/kill -s HUP $MAINPID
ExecStop=/bin/kill -s QUIT $MAINPID
PrivateTmp=true

[Install]
WantedBy=multi-user.target[root@120 files]# cat install.sh
#!/bin/bash
dir=/server/storage
cd $dir
tar xf nginx.tar.gz
cd /server/storage/nginx
unzip nginx_upstream_check_module.zip
unzip nginx-upstream-fair.zip
unzip nginx-module-vts.zip
unzip ngx_http_substitutions_filter_module.zip
tar zxvf nginx-1.16.1.tar.gz
cd $dir/nginx/nginx-upstream-fair-master
sed -i 's/default_port/no_port/g' ngx_http_upstream_fair_module.c
patch -p1 < $dir/nginx/nginx_upstream_check_module-master/upstream_fair.patch
cd $dir/nginx/nginx-1.16.1
patch -p1 < $dir/nginx/nginx_upstream_check_module-master/check_1.16.1+.patch
cd $dir/nginx/nginx-1.16.1
./configure \
--prefix=/usr/local/nginx \
--with-http_realip_module \
--with-http_ssl_module \
--with-http_addition_module \
--with-http_sub_module \
--with-http_dav_module \
--with-http_gzip_static_module \
--with-http_stub_status_module \
--with-stream \
--with-http_stub_status_module \
--add-module=${dir}/nginx/nginx_upstream_check_module-master \
--add-module=${dir}/nginx/nginx-upstream-fair-master \
--add-module=${dir}/nginx/nginx-module-vts-master \
--add-module=${dir}/nginx/ngx_http_substitutions_filter_module-master
make && make install3.编写剧本
[root@120 tasks]# cd /opt/ansible/roles/init-nginx/tasks

[root@120 tasks]# cat main.yml
---
# tasks file for ./nginx

- name: create nginx dir
  file:
    path: /opt/env/nginx/servs
    state: directory
    owner: root
    group: root
    mode: 0755

- name: create nginx certs
  file:
    path: /opt/env/nginx/certs
    state: directory
    owner: root
    group: root
    mode: 0755

- name: create nginx logs
  file:
   path: /ware/logs/nginx
   state: directory
   owner: root
   group: root
   mode: 0755

- name: modify logs
  shell: chmod -R 777 /ware/logs/nginx


- name: yum install
  yum:
    name: "{{ with_item }}"
    state: latest
  vars:
    with_item:
      - wget
      - zip
      - unzip
      - patch
      - gcc
      - gcc-c++
      - pcre
      - pcre-devel
      - zlib
      - zlib-devel
      - openssl
      - openssl-devel


- name: copy nginx.tar.gz
  vars:
  - item: /server/storage/
  copy:
    src: nginx.tar.gz
    dest: "{{ item }}"
    owner: root
    group: root
    mode: 0644

- name: copy install.sh
  copy:
    src: install.sh
    dest: /server/storage/nginx/
    mode: 755


- name: install nginx
  shell: /server/storage/nginx/install.sh

- name: copy nginx conf
  copy:
    src: nginx.conf
    dest: /usr/local/nginx/conf/nginx.conf
    owner: root
    group: root
    mode: 0644

- name: copy nginx.service
  copy:
    src: nginx.service
    dest: /usr/lib/systemd/system
    owner: root
    group: root
    mode: 0644

- name: daemon reload
  shell: systemctl daemon-reload

- name: enable nginx
  service:
    name: nginx
    enabled: yes

[root@120 tasks]#
7.你写的不对
我们写的playbook都是以hosts开头的,你这直接以具体的task开头,这咋运行?

没错,一般的剧本,都是以上图的格式书写的,但是我们学习Ad-Hoc和roles是干啥的,为了我们的规范化和模块化,要让不同的主机组都能使用一个roles。所以我们需要建一个文件,内容如下:
[root@120 ansible]# cat init-nginx.yml
- hosts: yzb
  remote_user: root
  roles:
    - role: init-nginx
我们单独拉出来一个文件,这样可以使不同的主机组、不同的任务都有单独的配置文件,清晰明了,也实现了roles的复用!
8.执行剧本,完成目标主机nginx安装
ansible-playbook init-nginx.yml