1.1 字符串
// 变量的存储和修改(string number boolean)
// 1. 变量存储
// 1.1 字符串 string 类型
// 注意点1:字符串需要用引号引起来(单引双引号)'字符串' "字符串"
// 注意点2:存储的时候,后面的存的内容,需要和前面的类型对应
let title: string = '巨无霸汉堡'
console.log('字符串title', title)

// 1.2 数字 number 类型
let age: number = 18
console.log('年纪age', age)

// 1.3 布尔 boolean 类型(true真,false假)
let isLogin: boolean = false
console.log('是否登录成功', isLogin)

// 2. 变量的修改
age = 40
console.log('年纪age', age)

// 常量
const PI: number = 3.14
const companyName: string = '华为'
console.log('公司名:', companyName)
console.log('PI:', PI)

// 字符串拼接 + 拼串
let name: string = '吕布'
let age: number = 18
console.log('简介信息:', '姓名' + name)
console.log('简介信息:', '年纪' + age)

// 注意点: + 两边只要有字符串, 就是拼串的作用 (如果两边都是数字, 就是计算求和的作用)
let num1: number = 100
let num2: number = 200
console.log('总数', num1 + num2)


---------------------------------------------
// 模板字符串 `` (支持变量, 更利于字符串拼接)    普通字符串 ''  ""
// let str: string = `hello world`
//
 let name: string = '成小龙'
 let age: number = 18
 let hobby: string = '打拳'
 console.log('简介信息', `姓名: ${name}, 年纪: ${age}岁, 爱好: ${hobby}`)
1.2 数组
// 学生数组
// 语法:
// let 数组名: 类型[] = [数据1, 数据2, 数据3, ... ]

// 1.数组中存储的每个数据,都有自己的编号,编号从0开始(索引)
let names: string[] = ['刘亦菲', '杨颖', '杨幂', '刘诗诗', '伍佰']
console.log('数组names', names)

// 2.利用有序的编号(索引) 取数组的数据
// 取数据:数组名[索引]
console.log('取到了', names[3])

// 3. 数组修改(通过下标)
names[2] = '赵云'
console.log('修改数组', names)

// 4.添加
// 1. 往开头新增 unshift(新增的值)  返回操作后的数组的长度
 songs.unshift('彩虹')
 console.log('返回数组长度', songs.unshift('七里香'))
console.log('数组songs', songs)

// 5. 往结尾新增 push(新增的值)  返回操作后的数组的长度
 songs.push('光辉岁月', '海阔天空')
console.log('数组', songs)

// 6.删除
// 1. 从开头删 shift
 console.log('返回删除的项', songs.shift())
 console.log('返回删除的项', songs.shift())
 console.log('数组', songs)

// 7. 从结尾删 pop
 songs.pop()
 songs.pop()
 songs.pop()
console.log('数组', songs)

// 开头(S): unshift(开头增)  shift(开头删)
// 结尾(P): push(结尾增)  pop(结尾删)

// 8.定义一个数组
let songs: string[] = ['告白气球', '洋葱', '吻别', '双节棍', '曹操']
// splice 在任意位置进行删除或新增内容
// 数组名.splice(操作的起始位置, 删除几个, 新增的项1, 新增的项2, ...)

//  8.1. 删除(任意位置)
// songs.splice(2, 2)
// console.log('数组songs', songs)

//  8.2. 新增(任意位置)
// songs.splice(1, 0, '彩虹') // 新增

//  8.3. 替换(删了一项, 又加了一项)
// songs.splice(1, 1, '彩虹')
// console.log('数组songs', songs)

-----------------------------剩余参数和展开运算符---------------------------
// ...数组名  => 可以收集剩余的参数
function sum (n1: number, n2: number, ...argsArr: number[]) {
  let total: number = n1 + n2
  // 遍历剩余参数, 如果有剩余的参数, 就继续累加
  for (let temp of argsArr) {
    total += temp
  }
  console.log('结果', total)
  return total
}
sum(1, 2)
sum(1, 2, 3, 4)
sum(1, 2, 3, 4, 5, 6)

// ... 展开运算符, 用于数组的平铺合并
let arr1: number[] = [1,2,3]
let arr2: number[] = [4,5,6]
let newArr: number[] = [...arr1, ...arr2]
console.log('最终的数组', newArr)
1.3 函数
// 1. 定义函数 (只是定义了函数,但是没有使用,不会执行内部的代码段)
function star() {
  console.log('五角星', '☆')
  console.log('五角星', '☆☆')
  console.log('五角星', '☆☆☆')
  console.log('五角星', '☆☆☆☆')
  console.log('五角星', '☆☆☆☆☆')
}
// 2. 调用函数(使用函数)
//    函数名()
star()


//3.带返回值对函数
function buy(price: number, num: number) {
  console.log('传入的数据', price, num)
  // 1. 处理数据
  let result: number = price * num
  // 2. 返回结果
  return result
}


//4.函数调用
let apple: number = buy(2, 3)
console.log('苹果', apple)

let banana: number = buy(4, 4)
console.log('香蕉', banana)
// 注意点:形参和实参的数量要统一,一一对应
1.4 箭头函数
//1.构建函数
let buy = (price: number, weight: number) => {
  // 1. 计算数据
  let result: number = price * weight
  // 2. 返回计算的结果
  return result
}
//2.调用函数
let apple: number = buy(2, 3)
console.log('苹果', apple)
1.5 定义接口-对象
// 1. 定义接口
interface Person {
  name: string
  age: number
  weight: number
}

// 2. 基于接口,定义对象
let ym: Person = {
  name: '大幂幂',
  age: 18,
  weight: 90
}

// 3. 获取对象属性值  对象名.属性名
console.log('体重:', ym.weight)
1.6 对象-方法的使用
// 1. 定义接口
interface Person {
  name: string
  age: number
  weight: number

  // ① 定义方法的类型
  sing: (song: string) => void
  dance: () => void
}

// 2. 基于接口,定义对象
let ym: Person = {
  name: '大幂幂',
  age: 18,
  weight: 90,

  // ② 定义方法
  sing: (song: string) => {
    console.log('杨幂说', '我来唱首歌', song)
  },
  dance: () => {
    console.log('杨幂说', '我来跳个舞')
  }
}

// ③ 调用对象里面的方法 (重要!!)
ym.sing('爱的供养')
ym.dance()
1.7 联合类型
// 联合类型还可以将变量值,约定在一组数据范围内进行选择
// 性别:男 女 保密
let gender: 'man' | 'woman' | 'secret' = 'secret'
1.8 枚举
// 1. 定义枚举 (定义常量列表)
enum ThemeColor {
  Red = '#ff0f29',
  Orange = '#ff7100',
  Green = '#30b30e'
}

// 2. 给变量设定枚举类型
let color: ThemeColor = ThemeColor.Orange
console.log('color', color)
2.1.控件-文本框
        Text(this.message)
          .fontSize(40) // 设置文本的文字大小
          .fontWeight(FontWeight.Bolder) // 设置文本的粗细
          .fontColor(Color.Red) // 设置文本的颜色

-------------------------------------------------------------------------
//设置边框
      Text('待完善')
        .fontColor(Color.Red)
        .padding(5)
        .border({
          width: 1, // 宽度(必须)
          color: Color.Red, // 颜色
          style: BorderStyle.Dashed // 样式(实线、虚线、点线)
        })
        .margin({ bottom: 20 })
-------------------------------------------------------------------------
//设置单边框
    Text('单边框')
        .padding(5)
        // 单边框,可以通过 left right bottom top 配置四个方向边框
        .border({
          width: { left: 1, right: 2 },
          color: { left: Color.Red, right: Color.Green },
          style: {
            left: BorderStyle.Dashed,
            right: BorderStyle.Dotted
          }
        })
---------------------------------------------------------------------
 // 添加圆角:
      // 1. .borderRadius(数值) 四个角圆角相同
      // 2. .borderRadius({ 方位词: 值 }) 单独给某个角设置圆角

 Text('添加圆角')
        .width(100)
        .height(60)
        .backgroundColor(Color.Orange)
        // .borderRadius(15) // 通过不同数值,可以设置不同大小的圆角
        // .borderRadius({
        //   topLeft: 10,
        //   topRight: 20,
        //   bottomRight: 30,
        //   bottomLeft: 40
        // })
        .borderRadius({
          topLeft: 20,
          bottomRight: 20
        })
---------------------------------------------------------------------
//添加背景图片
Text('我是内容文本')
        .fontColor(Color.White)
        .width(300)
        .height(200)
        .backgroundColor(Color.Pink)
        // backgroundImage(加载的背景图片, 是否平铺ImageRepeat枚举)
        .backgroundImage($r('app.media.flower'), ImageRepeat.XY )
--------------------------------------------------------------------
//设置背景图片的位置
    // backgroundImagePosition
    // 1. 传入对象, 设置位置坐标,背景图片的左顶点
    //    { x: 坐标值, y: 坐标值 }
    //    注意:坐标值的单位,和宽高的默认单位不同的,显示出来大小会不同
    //
    // 2. Alignment 枚举,设置一些特殊的位置(中央、左顶点...)
    //    Center  TopStart左顶点 TopEnd右顶点 BottomEnd右下...
    Column() {
      Text()
        .width(300)
        .height(200)
        .backgroundColor(Color.Pink)
        .backgroundImage($r('app.media.flower'))
        .backgroundImagePosition({
          x: 400,
          y: 300
        })
        .backgroundImagePosition(Alignment.BottomEnd)
    }
    .padding(20)
  }
------------------------------------------------------
//设置图片位置vp转px
   Text()
        .width('300vp')
        .height('200vp')
        .backgroundColor(Color.Pink)
        .backgroundImage($r('app.media.flower'))
        .backgroundImagePosition({
          x: vp2px(150),
          y: vp2px(100)
        })
---------------------------------------------------------
//设置背景图是否缩放
 Text()
        .width(330)
        .height(200)
        .backgroundColor(Color.Pink)
        .backgroundImage($r('app.media.jd_bg'))
        .backgroundImagePosition(Alignment.Center)
        .backgroundImageSize(ImageSize.Cover)

        // 1. 直接写 宽高尺寸 对象
        // .backgroundImageSize({
        //   width: 150,
        //   // height: 100
        // })

        // 2. 设置 背景尺寸 的枚举 ImageSize
        // (1) Contain: 等比例缩放,展示整张图片,可能会留白
        // (2) Cover: 等比例缩放,让图片铺满整个容器,不会留白,但是有可能会有部分内容显示不全
2.2 控件-行和列
//列
 Column() {

    }
    .width('100%')
    .height('100%')
    .backgroundColor('#ffe8eeee')


//行
     Row() {

            }
            .justifyContent(FlexAlign.SpaceEvenly)
            .width('90%')
            .height(30)
             .onClick(() => {
           router.pushUrl({
          url: "pages/LanguageChoice"
        })
      })
-------------------------------------------------------------------
 // 控制组件间的距离,可以给 Column 设置 { space: 间隙大小 }
    Column({ space: 15 }) {

    }

---------------------------------------------------------------
// 设置排布主方向的对齐方式(主轴)
    // 1. Start  (排布主方向)主轴起始位置对齐
    // 2. Center  主轴居中对齐
    // 3. End     主轴结束位置对齐
    // 4. SpaceBetween 贴边显示,中间的元素均匀分布间隙
    // 5. SpaceAround 间隙环绕  0.5  1  1  1  0.5 的间隙分布,靠边只有一半的间隙
    // 6. SpaceEvenly 间隙均匀环绕,靠边也是完整的一份间隙
    // justifyContent(枚举FlexAlign)  ctrl+p  cmd+p
    // .justifyContent(FlexAlign.Center)
    // .justifyContent(FlexAlign.SpaceBetween)
    // .justifyContent(FlexAlign.SpaceAround)

    .justifyContent(FlexAlign.SpaceEvenly)
2.3控件-输入框
   TextInput({
        placeholder: '请输入密码'
      }).type(InputType.Password)
2.4控件控制-权重
// // layoutWeight 自适应伸缩: 按照[份数权重],分配[剩余空间]
 Text('左侧')
          .layoutWeight(1)
          .height(40)
          .backgroundColor(Color.Pink)
        Text('右侧固定')
          .width(80)
          .height(40)
          .backgroundColor(Color.Orange)
2.5控件-图片显示
      Image($r('app.media.ic_like'))
              .width(12)
              .fillColor('#999')
----------------------------------------------
 Image($r('app.media.position_earphone'))
            .width(20)
            .backgroundColor('#55b7f4')
            .borderRadius(10)
            .padding(3)
            .fillColor(Color.White)
            .margin({ left: 6, right: 6 })
2.6控件-角标
      Badge({
        count: 1,
        position: BadgePosition.RightTop,
        style: {
          fontSize: 14,
          badgeSize: 20,
          badgeColor: '#fa2a2d'
        }
      }) {
        Image($r('app.media.bg_01'))
          .width(100)
      }
2.7 控件-绝对定位
 // position绝对定位:可以控制组件位置,可以实现层叠效果
    // 语法:
    // .position({
    //   x: 50,
    //   y: 50
    // })
    // 特点:
    // 1. 相对于父组件左顶点进行偏移(调整位置)
    // 2. 原本的位置不占了,且可以任意调整位置,不影响其他元素

    // 后面的组件明显层次更高,会盖住前面的组件
    // 需求:不动结构的情况下,调整组件的层级 .zIndex(数字)
    Column() {

      Text('大儿子')
        .width(80)
        .height(80)
        .backgroundColor(Color.Green)
        .zIndex(3)
      Text('二儿子定位')
        .width(80)
        .height(80)
        .backgroundColor(Color.Yellow)
        .position({
          x: 50,
          y: 50
        })
        .zIndex(4)
      Text('三儿子')
        .width(80)
        .height(80)
        .backgroundColor(Color.Orange)
        .zIndex(2)
    }
    .width(300)
    .height(300)
    .backgroundColor(Color.Pink)
2.8 控件-AlertDialog
  AlertDialog.show({
                message: '最小值为1, 不能再减了'
              })
2.9 控件设置-设置字符串,颜色,图片等
//设置文字
$r('app.string.EntryAbility_label')
//设置颜色
$r('app.color.main_text')
2.10 控件-Swiper
  // Swiper 轮播组件的基本使用
      // 1. Swiper 包内容
      // 2. Swiper 设尺寸

    Swiper() {
        Image($r('app.media.ic_swiper_xmyp01'))
        Image($r('app.media.ic_swiper_xmyp02'))
        Image($r('app.media.ic_swiper_xmyp03'))
        Image($r('app.media.ic_swiper_xmyp04'))
      }
      .width('100%')
      .height(150)
      .loop(true) // 开启循环
      .autoPlay(true) // 自动播放
      .interval(5000) // 自动播放间隔
      .vertical(true) // 纵向


---------------------------定制小圆点--------------------------------
      // Swiper 轮播组件的基本使用
      // 1. Swiper 包内容
      // 2. Swiper 设尺寸
      Swiper() {
        Text('1')
          .backgroundColor(Color.Orange)
        Text('2')
          .backgroundColor(Color.Yellow)
        Text('3')
          .backgroundColor(Color.Brown)
      }
      .width('100%')
      .height(200)
      // 常用属性
      .loop(true) // 开启循环
      .autoPlay(true) // 自动播放
      .interval(5000) // 自动播放间隔
      .vertical(false) // 横向/纵向
      // 定制小圆点
      // .indicator(false)
      .indicator(
        Indicator.dot()
          .itemWidth(20)
          .itemHeight(20)
          .color(Color.Black)
          .selectedItemWidth(25)
          .selectedItemHeight(25)
          .selectedColor(Color.White)
      )


---------------------轮播案例------------------------
      // 1. Swiper轮播容器 (填入内容)
      Swiper() {
        Image($r('app.media.1')).objectFit(ImageFit.Cover)
        Image($r('app.media.2')).objectFit(ImageFit.Cover)
        Image($r('app.media.3')).objectFit(ImageFit.Cover)
        Image($r('app.media.4')).objectFit(ImageFit.Cover)
        Image($r('app.media.5')).objectFit(ImageFit.Cover)
      }
      // 2. 设置尺寸
      .width('100%').height('100%')

      // 3. 定制方向和小圆点
      .vertical(true) // 纵向轮播
      .indicator(
        Indicator.dot() // 小圆点样式
          .color(Color.White)
          .selectedColor(Color.Orange)
      )
2.11控件-Scroll
   // 如果希望内容溢出, 能够滚动
      Scroll() {
        Column({ space: 10 }) {
          ForEach(Array.from({ length: 10 }), (item: string, index) => {
            Text('测试文本' + (index + 1))
              .width('100%')
              .height(100)
              .textAlign(TextAlign.Center)
              .backgroundColor(Color.Orange)
              .fontSize(20)
              .fontColor(Color.White)
              .borderRadius(10)
          })
        }
        .padding(10)
        .width('100%')
      }
      .width('100%')
      .height(400)
      .scrollable(ScrollDirection.Vertical)

-------------------------------常用属性----------------------------------
      // 如果希望内容溢出, 能够滚动
      Scroll() {
        Column({ space: 10 }) {
          ForEach(Array.from({ length: 10 }), (item: string, index) => {
            Text('测试文本' + (index + 1))
              .width('100%')
              .height(100)
              .textAlign(TextAlign.Center)
              .backgroundColor(Color.Orange)
              .fontSize(20)
              .fontColor(Color.White)
              .borderRadius(10)
          })
        }
        .padding(10)
        .width('100%')
      }
      .width('100%')
      .height(400)
      .scrollable(ScrollDirection.Vertical) // 设置滚动方向
      .scrollBar(BarState.Auto) // On一直显示 Off一直隐藏 Auto滑动显示
      .scrollBarColor(Color.Blue) // 滚动条颜色
      .scrollBarWidth(5) // 滚动条宽度
      .edgeEffect(EdgeEffect.Spring) // 滑动效果
      .onScroll((x, y) => {
        console.log('已经滑动的距离:', this.myScroll.currentOffset().yOffset)
      })
----------------------------控制器------------------------------------
Button('控制滚动条位置').margin(20)
        .onClick(() => {
//划到某位置
          this.myScroll.scrollEdge(Edge.End)
        })
      Button('获取已经滚动的距离')
        .onClick(() => {
   //当前滑动的位置
          const y = this.myScroll.currentOffset().yOffset
          AlertDialog.show({
            message: `y: ${y}`
          })
        })
2.12 控件-Tabs
//基础用法
Tabs() {
      TabContent() {
        Text('首页内容') // 有且只能一个子组件
      }
      .tabBar('首页') // 配置导航

      TabContent() {
        Text('推荐内容') // 有且只能一个子组件
      }
      .tabBar('推荐')

      TabContent() {
        Text('发现内容') // 有且只能一个子组件
      }
      .tabBar('发现')

      TabContent() {
        Text('我的内容') // 有且只能一个子组件
      }
      .tabBar('我的')
    }

-----------------------------常用属性---------------------------
    Tabs({ barPosition: BarPosition.Start }) {
      TabContent() {
        Text('首页内容') // 有且只能一个子组件
      }
      .tabBar('首页') // 配置导航

      TabContent() {
        Text('推荐内容') // 有且只能一个子组件
      }
      .tabBar('推荐')

      TabContent() {
        Text('发现内容') // 有且只能一个子组件
      }
      .tabBar('发现')

      TabContent() {
        Text('我的内容') // 有且只能一个子组件
      }
      .tabBar('我的')
    }
    .vertical(false) // 调整导航水平或垂直
    .scrollable(false) // 是否开启手势滑动
    .animationDuration(0) // 点击滑动的动画时间
----------------------------基础导航栏-----------------------------
@Entry
@Component
struct Index {
  // 准备状态, 存储激活的索引
  @State selectedIndex: number = 0

  @Builder
  myBuilder (itemIndex: number, title: string, img: ResourceStr, selImg: ResourceStr) {
    // 如果激活的是自己, 图片/文本 都需要调整样式 → 需要区分不同的 tabBar
    Column() {
      Image(itemIndex == this.selectedIndex ? selImg : img)
        .width(30)
      Text(title)
        .fontColor(itemIndex == this.selectedIndex ? Color.Red : Color.Black)
    }
  }

  build() {
    Tabs({ barPosition: BarPosition.End }) {
      TabContent() {
        Text('购物车内容')
      }
      .tabBar(this.myBuilder(0, '购物车', $r('app.media.ic_tabbar_icon_2'), $r('app.media.ic_tabbar_icon_2_selected')))

      TabContent() {
        Text('我的内容')
      }
      .tabBar(this.myBuilder(1, '我的', $r('app.media.ic_tabbar_icon_3'), $r('app.media.ic_tabbar_icon_3_selected')))
    }
    .onChange((index: number) => {
      // console.log('激活的索引', index)
      this.selectedIndex = index
    })
    .animationDuration(0)
    .scrollable(false)
  }
}
-----------------------小米中间有个图片导航栏---------------------------------
@Entry
@Component
struct Index {
  // 准备状态, 存储激活的索引
  @State selectedIndex: number = 0

  @Builder
  myBuilder (itemIndex: number, title: string, img: ResourceStr, selImg: ResourceStr) {
    // 如果激活的是自己, 图片/文本 都需要调整样式 → 需要区分不同的 tabBar
    Column() {
      Image(itemIndex == this.selectedIndex ? selImg : img)
        .width(30)
      Text(title)
        .fontColor(itemIndex == this.selectedIndex ? Color.Red : Color.Black)
    }
  }

  @Builder
  centerBuilder () {
    Image($r('app.media.ic_reuse_02'))
      .width(40)
      .margin({ bottom: 10 })
  }

  build() {
    Tabs({ barPosition: BarPosition.End }) {
      TabContent() {
        Text('首页内容')
      }
      .tabBar(this.myBuilder(0, '首页', $r('app.media.ic_tabbar_icon_0'), $r('app.media.ic_tabbar_icon_0_selected')))

      TabContent() {
        Text('分类内容')
      }
      .tabBar(this.myBuilder(1, '分类', $r('app.media.ic_tabbar_icon_1'), $r('app.media.ic_tabbar_icon_1_selected')))

      // 特殊形状的Tab
      TabContent() {
        Text('活动内容')
      }
      .tabBar(this.centerBuilder())

      TabContent() {
        Text('购物车内容')
      }
      .tabBar(this.myBuilder(3, '购物车', $r('app.media.ic_tabbar_icon_2'), $r('app.media.ic_tabbar_icon_2_selected')))

      TabContent() {
        Text('我的内容')
      }
      .tabBar(this.myBuilder(4, '我的', $r('app.media.ic_tabbar_icon_3'), $r('app.media.ic_tabbar_icon_3_selected')))
    }
    .onChange((index: number) => {
      // console.log('激活的索引', index)
      this.selectedIndex = index
    })
    .animationDuration(0)
    .scrollable(false)
  }
}
2.13控件-List
      // 中间
      List() {
        ForEach(Array.from({ length: 20 }), () => {
          ListItem() {
            Row(){}.width('100%').height(100).backgroundColor(Color.Brown)
          }
          .padding(10)
        })
      }
      .width('100%')
      .layoutWeight(1) // 让容器高度自适应
      .backgroundColor(Color.Orange)
      .listDirection(Axis.Vertical) // 调整主轴方向(横向纵向)
      .lanes(3, 5) // 调整 列数 和 间距
      .alignListItem(ListItemAlign.Center) // 列对齐方式
      .scrollBar(BarState.Auto) // Auto按需自动显示滚动条
      // .divider({
      //   strokeWidth: 3, // 线宽
      //   color: Color.Blue, // 颜色
      //   startMargin: 10, // 左边线距离边缘的间隙
      //   endMargin: 10 // 右边线距离边缘的间隙
      // })
3.1字符串转数字
let str1: string = '1.1'
let str2: string = '1.9'
let str3: string = '1.99a'
let str4: string = 'a'

// 转数字类型
// 1. Number(变量) 原样转数字
console.log('Number', Number(str1)) // 1.1
console.log('Number', Number(str2)) // 1.9
console.log('Number', Number(str3)) // NaN
console.log('Number', Number(str4)) // NaN

// 2. parseInt(变量) 去掉小数部分(取整)
console.log('parseInt', parseInt(str1)) // 1
console.log('parseInt', parseInt(str2)) // 1
console.log('parseInt', parseInt(str3)) // 1
console.log('parseInt', parseInt(str4)) // NaN

// 3. parseFloat(变量) 保留小数部分
console.log('parseFloat', parseFloat(str1)) // 1.1
console.log('parseFloat', parseFloat(str2)) // 1.9
console.log('parseFloat', parseFloat(str3)) // 1.99
console.log('parseFloat', parseFloat(str4)) // NaN
3.2数字转字符串
// 数字通常用于计算, 字符串通常用于展示
let money: number = 10000
// 将数字转字符串, toString()  toFixed()
// 1. 数据.toString() 原样转字符串
console.log('toString:', money.toString())

// 2. 数据.toFixed(保留几位小数)  四舍五入
console.log('toFixed:', money.toFixed())
console.log('toFixed:', money.toFixed(2))
3.3点击事件
     Button('点我,显示对话框')
          .onClick(() => {
            // console.log('消息:', '你好点击事件')
            // 弹个框
            AlertDialog.show({
              message: '你好~ 这是个弹框'
            })
          })
3.5if-else
// 分支语句 - if 语句
// 1. 单分支 (满足条件, 就会执行一段代码)
// if (逻辑条件) {
//   条件成立时执行的代码
// }
// 2. 双分支 (满足条件, 会执行A代码, 不满足条件, 会执行B代码)
// if (逻辑条件) {
//   条件成立时执行的代码
// }
// else {
//   条件不成立时执行的代码
// }

if (score >= 90) {
  console.log('奖励', '一台游戏机')
}
else {
  console.log('惩罚', '写个检讨, 分析出错原因')
}
3.6 switch
switch (fruit) {
  case '苹果':
    console.log('苹果价格:', '2.8元一斤')
    break
  case '香蕉':
    console.log('香蕉价格:', '5.5元一斤')
    break
  case '西瓜':
    console.log('西瓜价格:', '1.5元一斤')
    break
  default:
    console.log('提示:', '尊敬的用户, 该水果不存在')
}
3.7 三元表达式
// 三元条件表达式
// 语法: 条件 ? 条件成立执行的表达式 : 条件不成立执行的表达式

let num1: number = 40
let num2: number = 30

// let max: number = num1 > num2 ? num1 : num2
// console.log('三元条件表达式', max)

let res: number = num1 > num2 ? 3 * 5 : 2 + 6
console.log('三元条件表达式', res)
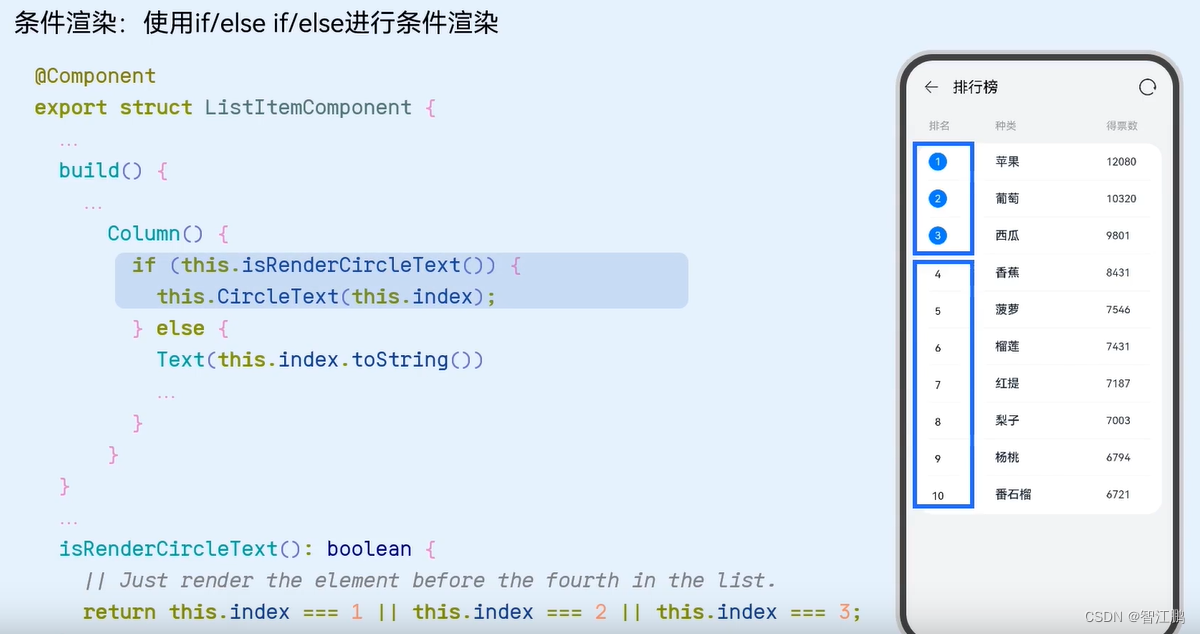
3.8 条件渲染
    // 条件渲染: 不同的条件, 控制不同的UI界面展示
    Column() {
      if (this.age < 18) {
        Text('未成年, 18岁以下')
      }
      else if (this.age < 60) {
        Text('成年人, 18~60岁')
      }
      else {
        Text('老年人, 60+')
      }
      Button('长大').onClick(() => {
        this.age += 5
      })
      Text(`当前年纪: ${this.age}`)
    }
3.9 while循环
let i: number = 1
let sum: number = 0 // 存储累加的结果

while (i <= 10) {
  console.log('需要累加的数字:', i)
  // 每次执行下面这行代码, 就会进行一次累加, 并且更新累加的结果
  sum = sum + i
  i++
}
3.10 for循环
// 1-10的和, 从1开始,循环到10
let sum = 0
for (let i: number = 1; i <= 10; i++) {
  console.log('for', i)
  sum = sum + i // sum += i
}
console.log('求和', sum)


--------------------------------------------
// 退出循环:
// 1. break: 终止整个循环 (后面的循环不执行了)
// 2. continue: 退出当前这一次循环, 继续执行下一次循环 (包子当前这个不吃了, 吃下一个)

for (let i: number = 1; i <= 8; i++) {
  if (i == 5) {
    console.log('拿起了第5个包子, 发现坏了')
    // 当前这次循环不继续执行了, 继续执行下一次循环
    continue
  }
  console.log('吃包子:', `第${i}个`)


-------------------------写法2---------------------------
for (let item of names) {
  console.log('数组中的每一项', item)
}

-------------------------写法3---------------------------
ForEach(this.historyArr, (item: Resp, index: number) => {

  })
8.路由使用
//1.引入路由
import router from '@ohos.router'

//2.使用跳转

   router.pushUrl({
        url: "pages/Show"
      })
9.延迟
//延迟跳转

setTimeout(() => {
      //跳转到数据展示页面
      router.pushUrl({
        url: "pages/Show"
      })
    },2000)
4.1布局-grid布局
 // Grid布局的基本使用: 规则的行列布局中非常常见, 3行4列

 Grid() {
      ForEach([1,2,3,4,5,6,7,8,9,10,11,12], () => {
        GridItem() {
          Column() {

          }
          .width('100%')
          .height('100%')
          .backgroundColor(Color.Green)
          .border({ width: 1 })
        }
      })
    }
    .columnsTemplate('1fr 1fr 1fr 1fr')
    .rowsTemplate('1fr 1fr 1fr')
    .columnsGap(5)
    .rowsGap(5)
    .width('100%')
    .height(500)
    .backgroundColor(Color.Pink)
4.2 Flex布局
    // Flex默认主轴水平往右,交叉轴垂直往下 → Row
    // 1. 主轴方向
    //    direction: FlexDirection.Row / Column
    // 2. 主轴对齐方式
    //    justifyContent: FlexAlign.SpaceAround
    // 3. 交叉轴对齐方式
    //    alignItems: ItemAlign.Stretch / Start / Center / End
    // 单行或者单列的情况,优先还是使用线性布局(本质基于Flex设计的,且还做了性能优化)

    // Flex布局:伸缩布局。当子盒子的总和溢出父盒子,默认进行压缩显示。
    // 4. 换行 wrap
    //    FlexWrap.Wrap 换行
    //    FlexWrap.NoWrap 不换行
    Flex({
      direction: FlexDirection.Column,
      justifyContent: FlexAlign.SpaceBetween,
      alignItems: ItemAlign.Start,
      wrap: FlexWrap.Wrap
    }) {
      Text()
        .width(80).height(80)
        .backgroundColor(Color.Pink)
        .border({ width: 1, color: Color.Blue })
      Text()
        .width(80).height(80)
        .backgroundColor(Color.Pink)
        .border({ width: 1, color: Color.Blue })
      Text()
        .width(80).height(80)
        .backgroundColor(Color.Pink)
        .border({ width: 1, color: Color.Blue })
    }
    .width('100%')
    .height(600)
    .backgroundColor('#5f9a5c')
4.3 层叠布局
    // 层叠布局
    Stack({
      alignContent: Alignment.Bottom
    }) {
      Text('大儿子')
        .width(250)
        .height(250)
        .backgroundColor(Color.Green)
        .zIndex(3)
      Text('二儿子')
        .width(150)
        .height(150)
        .backgroundColor(Color.Orange)
        .zIndex(4)
      Text('三儿子')
        .width(50)
        .height(50)
        .backgroundColor(Color.Yellow)
        .zIndex(5)
    }
    .width(300)
    .height(600)
    .backgroundColor(Color.Pink)
5.1数据-动态渲染
// 1. 定义接口 (每个列表项的数据结构)
interface ImageCount {
  url: string
  count: number
}

@Entry
@Component
struct Index {
  // 2. 基于接口, 准备数据
  @State images: ImageCount[] = [
    { url: 'app.media.bg_00', count: 0 },
    { url: 'app.media.bg_01', count: 1 },
    { url: 'app.media.bg_02', count: 2 },
    { url: 'app.media.bg_03', count: 3 },
    { url: 'app.media.bg_04', count: 4 },
    { url: 'app.media.bg_05', count: 5 }
  ]

  build() {
    Column() {

      Grid() {
        ForEach(this.images, (item: ImageCount, index: number) => {
          GridItem() {
            Badge({
              count: item.count,
              position: BadgePosition.RightTop,
              style: {
                fontSize: 14,
                badgeSize: 20,
                badgeColor: '#fa2a2d'
              }
            }) {
              Image($r(item.url))
                .width(80)
            }
          }
        })
      }
      .columnsTemplate('1fr 1fr 1fr')
      .rowsTemplate('1fr 1fr')
      .width('100%')
      .height(300)
      .margin({ top: 100 })

      Button('立即抽卡')
        .width(200)
        .backgroundColor('#ed5b8c')
        .margin({ top: 50 })

    }
  }
}
5.2 对象转字符串
JSON.stringify(err)6.1 动画-动画特效
// 定义接口 (每个列表项的数据结构)
interface ImageCount {
  url: string
  count: number
}

// 需求1: 遮罩层显隐  透明度opacity 0-1  层级zIndex -1~99
// 需求2: 图片缩放    缩放scale 0-1

@Entry
@Component
struct Index {
  // 基于接口, 准备数据
  @State images: ImageCount[] = [
    { url: 'app.media.bg_00', count: 0 },
    { url: 'app.media.bg_01', count: 1 },
    { url: 'app.media.bg_02', count: 2 },
    { url: 'app.media.bg_03', count: 3 },
    { url: 'app.media.bg_04', count: 4 },
    { url: 'app.media.bg_05', count: 5 }
  ]

  // 控制遮罩的显隐
  @State maskOpacity: number = 0 // 透明度
  @State maskZIndex: number = -1 // 显示层级

  // 控制图片的缩放
  @State maskImgX: number = 0 // 水平缩放比
  @State maskImgY: number = 0 // 垂直缩放比

  build() {
    Stack() {
      // 初始化的布局结构
      Column() {
        Grid() {
          ForEach(this.images, (item: ImageCount, index: number) => {
            GridItem() {
              Badge({
                count: item.count,
                position: BadgePosition.RightTop,
                style: {
                  fontSize: 14,
                  badgeSize: 20,
                  badgeColor: '#fa2a2d'
                }
              }) {
                Image($r(item.url))
                  .width(80)
              }
            }
          })
        }
        .columnsTemplate('1fr 1fr 1fr')
        .rowsTemplate('1fr 1fr')
        .width('100%')
        .height(300)
        .margin({ top: 100 })

        Button('立即抽卡')
          .width(200)
          .backgroundColor('#ed5b8c')
          .margin({ top: 50 })
          .onClick(() => {
            // 点击时, 修改遮罩参数, 让遮罩显示
            this.maskOpacity = 1
            this.maskZIndex = 99
            // 点击时, 图片需要缩放
            this.maskImgX = 1
            this.maskImgY = 1
          })
      }
      .width('100%')
      .height('100%')

      // 抽卡遮罩层 (弹层)
      Column({ space: 30 }) {
        Text('获得生肖卡')
          .fontColor('#f5ebcf')
          .fontSize(25)
          .fontWeight(FontWeight.Bold)
        Image($r('app.media.img_00'))
          .width(200)
          // 控制元素的缩放
          .scale({
            x: this.maskImgX,
            y: this.maskImgY
          })
          .animation({
            duration: 500
          })
        Button('开心收下')
          .width(200)
          .height(50)
          .backgroundColor(Color.Transparent)
          .border({ width: 2, color: '#fff9e0' })
          .onClick(() => {
            // 控制弹层显隐
            this.maskOpacity = 0
            this.maskZIndex = -1
            // 图像重置缩放比为 0
            this.maskImgX = 0
            this.maskImgY = 0
          })
      }
      .justifyContent(FlexAlign.Center)
      .width('100%')
      .height('100%')
      // 颜色十六进制色值,如果是八位,前两位,就是透明度
      .backgroundColor('#cc000000')
      // 设置透明度
      .opacity(this.maskOpacity)
      .zIndex(this.maskZIndex)
      // 动画 animation, 当我们元素有状态的改变,可以添加animation做动画
      .animation({
        duration: 200
      })
    }

  }
}
7. 模块化-导入,导出模块
// 路径: 查找文件时, 从起点到终点的路线
// 相对路径: 从当前文件出发查找目标文件
// → 找上一级 ../
// → 同级目录 ./

// 1. 默认导入
// import result from '../tools/module1'
// import fn from './module2'
// console.log('module1中的数据', JSON.stringify(result))
// fn()

// 2. 按需导入
// import { name1, price, sayHi as sayHello } from '../tools/module3'
// console.log('module3中的数据', name1, price)
// sayHello()

// 3. 全部导入
import * as Module3 from '../tools/module3'
console.log('全部的数据', Module3.name1)
console.log('全部的数据', Module3.price2)
Module3.sayHi()


--------------------------默认导出------------------
interface Person {
  name: string
  age: number
}

// 一个ets文件, 就是一个模块, 每个模块之间独立
let num: number = 10
let person: Person = {
  name: 'jack',
  age: 18
}

// 默认导出 (导出一个值)
export default person

--------------------------按需导出------------------------
// 按需导出
// 多个特性, 逐个 export 按需导出
// export let name1: string = '刘备'
// export let price: number = 9.98
// export let sayHi = () => {
//   console.log('打招呼')
// }

let name1: string = '刘备'
let name2: string = '张飞'
let name3: string = '关羽'

let price: number = 9.98
let price2: number = 10.1

let sayHi = () => {
  console.log('打招呼')
}
let run = () => {
  console.log('跑步')
}

// 一次性将多个特性, 进行导出
export {
  name1, name2, name3,
  price, price2,
  sayHi, run
}
8.0 注解-@Entry

8.1 注解-@Extend 特定组件继承
// @Extend(组件名)
// function 函数名 (参数, 参数2) {
//
// }

@Extend(Text)
function textFn () {
  .fontSize(20)
  .fontWeight(FontWeight.Bold)
}

@Extend(Text)
function bannerItem (bgColor: ResourceColor, msg: string) {
  .textAlign(TextAlign.Center)
  .backgroundColor(bgColor)
  .fontColor(Color.White)
  .fontSize(30)
  .onClick(() => {
    AlertDialog.show({
      message: msg
    })
  })
}


----------------------------调用------------------------------
      Text(this.message)
        .textFn()

      Swiper() {
        Text('1')
          .bannerItem(Color.Orange, '轮播图1号')
        Text('2')
          .bannerItem(Color.Brown, '轮播图2号')
        Text('3')
          .bannerItem(Color.Green, '轮播图3号')
      }
      .width('100%')
      .height(160)
8.2注解-@Styles 通用组件设置值
// 1. 全局定义
@Styles function commonStyles () {
  .width(100)
  .height(100)
}

@Entry
@Component
struct StylesDemo {
  @State message: string = '@styles';
  @State bgColor: ResourceColor = Color.Gray

  // 2. 组件内定义(才能通过this访问到自己的状态)
  @Styles setBg() {
    .backgroundColor(this.bgColor)
    .onClick(() => {
      this.bgColor = Color.Green
    })
  }

  build() {
    Column({ space: 10 }) {
      Text(this.message)
        .fontColor(Color.White)
        .commonStyles()
        .setBg()

      Column() {}
        .commonStyles()
        .setBg()

      Button('按钮')
        .commonStyles()
        .setBg()
    }
    .width('100%')
    .height('100%')
  }


}
8.3注解-@Builder 构建一个全局组件
// 全局 Builder
@Builder
function navItem(icon: ResourceStr, txt: string) {
  Column({ space: 10 }) {
    Image(icon)
      .width('80%')
    Text(txt)
  }
  .width('25%')
  .onClick(() => {
    AlertDialog.show({
      message: '点了' + txt
    })
  })
}


@Entry
@Component
struct BuilderDemo {
  @State message: string = '@Builder';

  @Builder
  navItem(icon: ResourceStr, txt: string) {
    Column({ space: 10 }) {
      Image(icon)
        .width('80%')
      Text(txt)
    }
    .width('25%')
    .onClick(() => {
      AlertDialog.show({
        message: '点了' + txt + this.message
      })
    })
  }

  build() {
    Column({ space: 20 }) {
      Text(this.message)
        .fontSize(30)

      Row() {
        Row() {
          navItem($r('app.media.ic_reuse_01'), '阿里拍卖')
          navItem($r('app.media.ic_reuse_02'), '菜鸟')
          this.navItem($r('app.media.ic_reuse_03'), '巴巴农场')
          this.navItem($r('app.media.ic_reuse_04'), '阿里药房')
        }
      }
    }
    .width('100%')
    .height('100%')
  }

}
8.4 注解-@Component 自定义组件
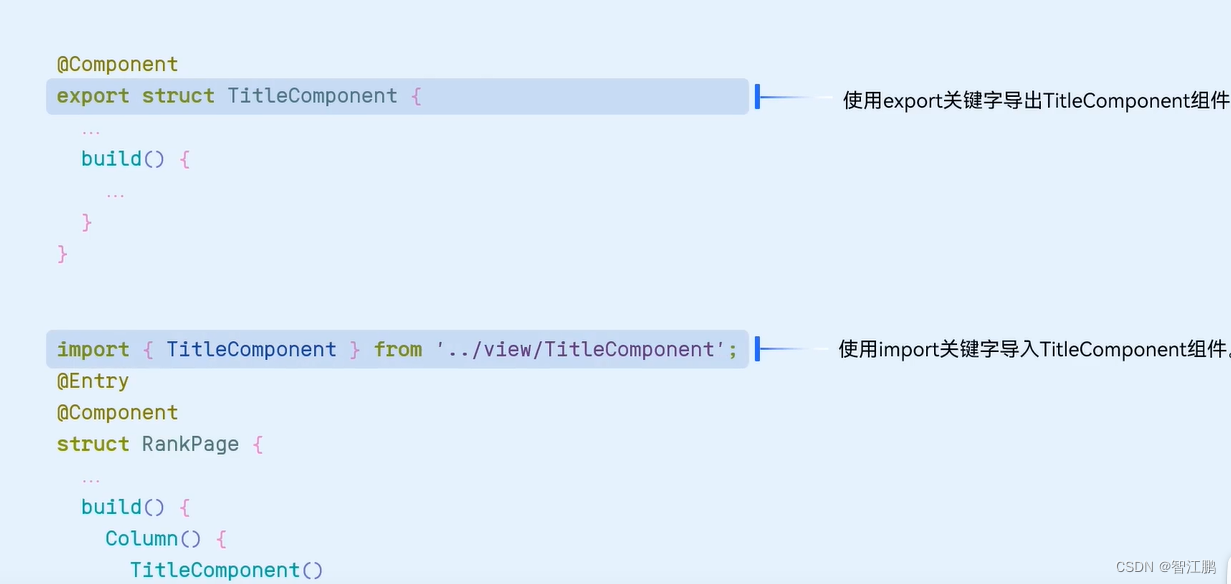
自定义组件生命周期
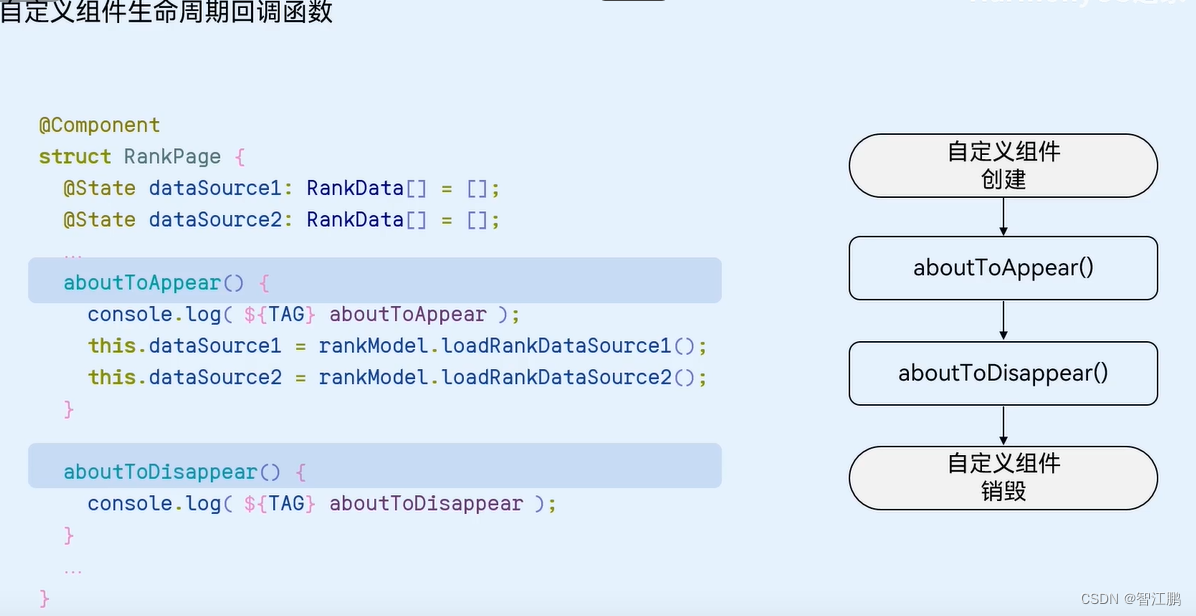
@Component
struct MyCom {
  @State count: number = 1
  build() {
    Row() {
      Text(this.count.toString())
        .fontColor(Color.White)
        .margin(10)
      Button('按钮')
        .onClick(() => {
          this.count++
        })
    }
  }
}

@Component
struct MyHeader {
  build() {
    Row() {
      Text('我是头部')
        .fontColor(Color.White)
    }
      .width('100%')
      .height(50)
      .backgroundColor(Color.Brown)
  }
}

@Component
struct MyMain {
  build() {
    Column() {
      // 将相同的业务逻辑, 封装成一个通用的组件
      MyCom()
      MyCom()
      MyCom()
    }
    .layoutWeight(1)
    .width('100%')
    .backgroundColor(Color.Gray)
  }
}

@Component
struct MyFooter {
  build() {
    Row() {
      Text('我是底部')
    }
    .width('100%')
    .height(50)
    .backgroundColor(Color.Green)
  }
}

@Entry
@Component
struct Index {
  build() {
    Column() {
      MyHeader()
      MyMain()
      MyFooter()
    }
  }
}


---------------------------------------1.导出组件------------------
//加入这个@Preview可以预览页面

@Preview
@Component
export struct HelloCom {
  build() {
    Row() {
      Text('自定义组件')
      Button('按钮')
    }
    .width(200)
    .height(50)
    .backgroundColor(Color.Orange)
  }
}
-----------------------------------2.导入组件----------------------------
import { HelloCom } from '../components/HelloCom'

@Entry
@Component
struct Index {
  build() {
    Column() {
      HelloCom()
        .width(250)
        .height(60)
        .backgroundColor(Color.Gray)
        .onClick(() => {
          AlertDialog.show({
            message: '测试点击'
          })
        })
    }
  }
}

--------------------------成员变量函数重新赋值----------------------

通俗的讲就是带等号的重新赋值

@Component
struct MyPanel {
  // 成员变量 - 数据
  title: string = '默认的大标题'
  extra: string = '查看更多 >'
  // 成员变量 - 函数 - 可以外部传入覆盖的
  getMore = () => {
    AlertDialog.show({
      message: '查看更多'
    })
  }

  // 成员函数 - 不可以外部传入覆盖
  sayHi() {
    AlertDialog.show({
      message: '打招呼, 你好'
    })
  }

  build() {
    Column() {
      Row() {
        Text(this.title).fontSize(18)
        Text(this.extra).fontSize(18)
          .onClick(() => {
            this.getMore()
          })
      }
      .width('100%')
      .justifyContent(FlexAlign.SpaceBetween)
      Row() {
        Text('内容部分').fontSize(18)
        Button('按钮')
          .onClick(() => {
            this.sayHi()
          })
      }
      .padding(20)
    }
    .padding(10)
    .width('100%')
    .height(200)
    .margin({ bottom: 20 })
    .borderRadius(10)
    .backgroundColor(Color.White)
  }
}

@Entry
@Component
struct Index {
  build() {
    Column() {
      MyPanel({
        title: '我的订单',
        extra: '全部订单 > ',
        getMore() {
          AlertDialog.show({
            message: '点击了全部订单'
          })
        }
      })
      MyPanel({
        title: '小米有品重酬',
        extra: '7款重酬中 >',
        getMore() {
          AlertDialog.show({
            message: '查看7款重酬'
          })
        }
      })
    }
    .width('100%')
    .height('100%')
    .backgroundColor('#ccc')
    .padding(20)
  }
}
8.5 注解-@BuilderParam 可以让自定义组件外部传递UI,相当于vue的插槽
@Component
struct MyPanel {
  // 成员变量 - 数据
  title: string = '默认的大标题'
  extra: string = '查看更多 >'
  // 成员变量 - 函数 - 可以外部传入覆盖的
  getMore = () => {
    AlertDialog.show({
      message: '查看更多'
    })
  }

  // 成员函数 - 不可以外部传入覆盖
  sayHi() {
    AlertDialog.show({
      message: '打招呼, 你好'
    })
  }

  @BuilderParam ContentBuilder: () => void = this.defaultBuilder
  @Builder defaultBuilder () {
    Text('默认文本')
  }

  build() {
    Column() {
      Row() {
        Text(this.title).fontSize(18)
        Text(this.extra).fontSize(18)
          .onClick(() => {
            this.getMore()
          })
      }
      .width('100%')
      .justifyContent(FlexAlign.SpaceBetween)
      Row() {
        // 这里的结构不能写死, 需要通过 BuilderParam 来进行构建
        this.ContentBuilder()
      }
      .padding(20)
    }
    .padding(10)
    .width('100%')
    .height(200)
    .margin({ bottom: 20 })
    .borderRadius(10)
    .backgroundColor(Color.White)
  }
}

@Entry
@Component
struct Index {
  build() {
    Column() {
      MyPanel({
        title: '我的订单',
        extra: '全部订单 > ',
        getMore() {
          AlertDialog.show({
            message: '点击了全部订单'
          })
        }
      }) {
        Column() {
          Text('我是订单 - 相关的文本')
          Text('我是订单 - 相关的文本')
          Text('我是订单 - 相关的文本')
        }
      }
      MyPanel({
        title: '小米有品重酬',
        extra: '7款重酬中 >',
        getMore() {
          AlertDialog.show({
            message: '查看7款重酬'
          })
        }
      }) {
        Column() {
          Button('我是小米重酬的按钮')
          Button('我是小米重酬的按钮')
          Button('我是小米重酬的按钮')
        }
      }
    }
    .width('100%')
    .height('100%')
    .backgroundColor('#ccc')
    .padding(20)
  }
}

----------------------------多BuilderParam-----------------
@Component
struct MyCard {
  @BuilderParam tBuilder: () => void = this.tDefaultBuilder
  @BuilderParam cBuilder: () => void = this.cDefaultBuilder
  @Builder tDefaultBuilder () {
    Text('我是默认的大标题')
  }
  @Builder cDefaultBuilder () {
    Text('我是默认的内容')
  }

  build() {
    // 卡片组件
    Column() {
      // 标题部分
      Row() {
        this.tBuilder()
      }
      .height(30)
      .width('100%')
      .border({ color: '#ccc', width: { bottom: 1 }})
      .padding({ left: 10 })
      // 内容部分
      Row() {
        this.cBuilder()
      }
      .width('100%')
      .padding(10)
    }
    .width('100%')
    .height(100)
    .backgroundColor(Color.White)
    .borderRadius(10)
    .justifyContent(FlexAlign.Start)
  }
}


@Entry
@Component
struct Index {
  @Builder ftBuilder () {
    Text('我是传入的大标题结构')
  }
  @Builder fcBuilder () {
    Text('我是内容部分')
    Text('我是内容部分')
    Text('我是内容部分')
  }

  build() {
    Column({ space: 10 }) {
      MyCard()
      MyCard({
        tBuilder: this.ftBuilder,
        cBuilder: this.fcBuilder
      })
    }
    .width('100%')
    .height('100%')
    .padding(20)
    .backgroundColor('#ccc')
  }
}
8.6注解-@State 状态变量
// 注意点:
// 1. 普通变量, 只能在初始化时渲染, 后续变化了, 也不会引起更新
// 2. 状态变量, 被装饰器修饰, 值的改变, 会 [自动] 引起 界面的刷新

// 组件外的[普通变量] 不需要this即可访问
let myName: string = '吕布'

@Entry
@Component
struct Index {
  // 组件内的[普通变量] this.xxx
  myAge: number = 18

  // 组件内的[状态变量] this.xxx
  @State myMsg: string = 'hello 黑马'

  build() {
    Column() {
      Text(myName).onClick(() => {
        myName = '貂蝉'
        console.log('myName', myName)
      })
      Text(this.myAge.toString()).onClick(() => {
        this.myAge = 200
        console.log('myAge', this.myAge)
      })
      Text(this.myMsg).onClick(() => {
        this.myMsg = '你好 状态'
      })
    }
  }
}

-----------------------复杂类型更改方式-----------------------
//这么更改
//this.person.car = {
  //         name: '老爷车'
   //      }


interface Car {
  name: string
}
interface Person {
  name: string
  car: Car
}

const obj: Person = {
  name: 'zs',
  car: {
    name: '小黄车'
  }
}
console.log('查看第一层属性', Object.keys(obj))

@Entry
@Component
struct Index {
  // 状态变量
  // 1. string number boolean 可以直接监视到变化
  @State message: string = 'hello world'
  // 2. 复杂类型 object class, 第一层随便改, 嵌套需要进行整个嵌套对象的替换
  @State person: Person = {
    name: 'jack',
    car: {
      name: '宝马车'
    }
  }
  build() {
    Column() {
      Text(this.message).fontSize(20)
      Button('改message').onClick(() => {
        this.message = '你好'
      })
      Text(JSON.stringify(this.person))
      Button('改person').onClick(() => {
        // this.person = {
        //   name: 'amy',
        //   car: {
        //     name: '保时捷'
        //   }
        // }

         this.person.name = 'tony'

        // 如果不是对象的第一层属性, 修改时, 需要修改整个嵌套的对象
          this.person.car.name = '小火车'

        // console.log('car name', this.person.car.name)
        this.person.car = {
          name: '老爷车'
        }
      })
    }
  }
}
8.7 注解-@Prop父传子,让值变化
//@Prop加了这个后,父组件更改这个值,子组件也会跟着变化


@Component
struct SonCom {
  // 保证父组件的数据变化了, 能够往下响应式的更新
  @Prop sCar: string = ''
  changeCar = (newCar: string) => {}

  build() {
    Column() {
      Text(`子组件 ${this.sCar}`)
      Button('换车').onClick((event: ClickEvent) => {
        // 1. prop传值 → 单向传递
        // 子组件, 可以修改到 prop 传值, 但是修改的更新不会同步到父组件
        // 通常不太会直接修改 prop 传值, 父组件的状态一旦变化, 会自动向下同步
        // 修改就被覆盖了
        // this.sCar = '小黄车'

        // 2. 如果实在想更新, 希望保证父子同步 => 调用父组件传递过来的方法
        // 如果没有写箭头函数, 意味着, this 指向 调用者, 而此处执行环境 this → 子组件
        this.changeCar('蹦蹦车')
      })
    }
    .padding(20)
    .backgroundColor(Color.Orange)
  }
}

@Entry
@Component
struct FatherCom {
  @State fCar:string = '劳斯莱斯'
  build() {
    Column() {
      Text(`父组件 - ${this.fCar}`)
      Button('换车').onClick(() => {
        this.fCar = '三轮车'
      })

      SonCom({
        sCar: this.fCar,
        // 这里必须要用箭头函数, 否则会有 this 指向的问题
        // 使用箭头函数的好处, 可以使用外部环境的 this, 不受传递过去后的执行环境影响
        // 希望此处 this 指向 父组件
        changeCar: (newCar: string) => {
          this.fCar = newCar
        }
      })
    }
    .padding(50)
    .backgroundColor(Color.Pink)
  }
}
8.8注解-@Link 父传子 子传父,数据双向同步
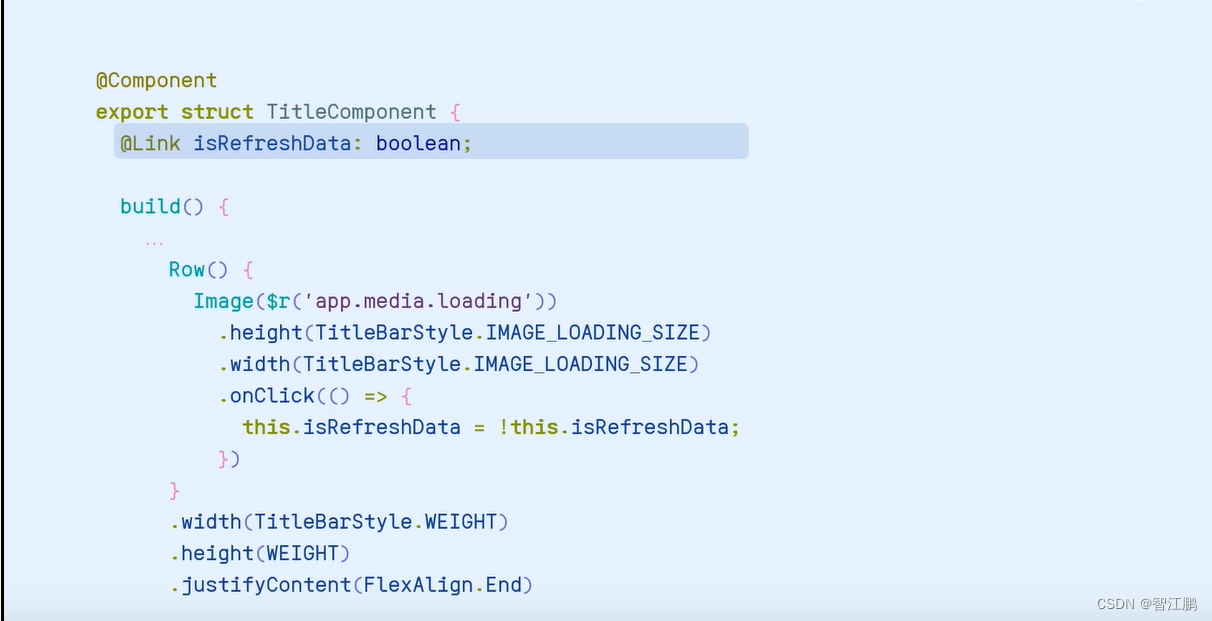
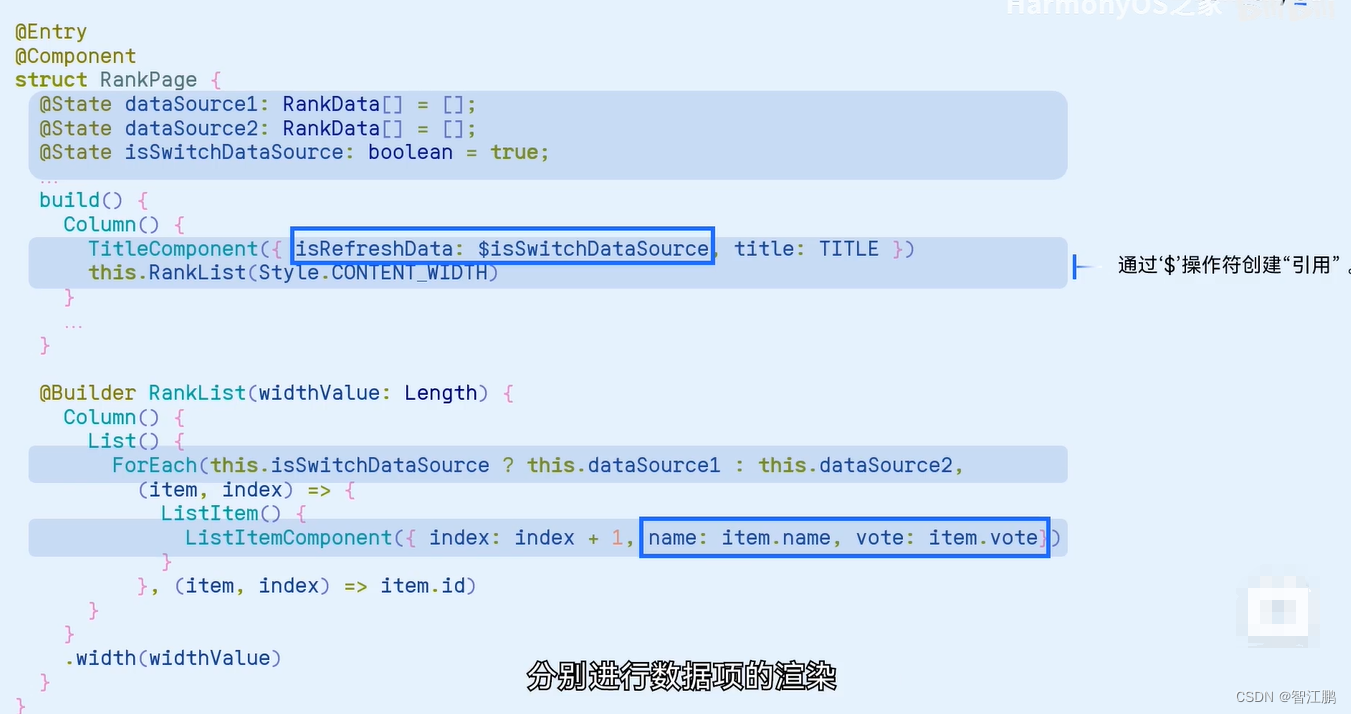
interface Person {
  name: string
  age: number
}

@Entry
@Component
  // 父组件
struct KnowledgePage {
  @State count: number = 0
  @State person: Person = {
    name: 'zs',
    age: 18
  }

  build() {
    Column() {
      Text('父组件')
        .fontSize(30)
      Text(this.count.toString())
      Text(JSON.stringify(this.person))
      Button('修改数据')
        .onClick(() => {
          this.count++
        })
      SonComponent({
        count: this.count,
        person: this.person
      })
    }
    .padding(10)
    .height('100%')
    .backgroundColor('#eee')
    .width('100%')
    .alignItems(HorizontalAlign.Center)
    .padding({ top: 100 })
  }
}


@Component
  // 子组件
struct SonComponent {
  @Link count: number
  @Link person: Person

  // 编写 UI
  build() {
    Column({ space: 20 }) {
      Text('我是子组件')
        .fontSize(20)
      Text(this.count.toString())
      Text(JSON.stringify(this.person))

      Column() {
        Button('修改数据')
          .onClick(() => {
            // this.count++
            this.person.age++
          })

      }

    }
    .backgroundColor('#a6c398')
    .alignItems(HorizontalAlign.Center)
    .width('80%')
    .margin({ top: 100 })
    .padding(10)
    .borderRadius(10)

  }
}
8.9注解- @Consume和@Provide父与子孙后代简单数据同步
interface Car {
  name: string
  brand: string
}

@Entry
@Component
  // 顶级组件
struct RootComponent {
  @Provide themeColor: string = 'yellow'
  @Provide car: Car = {
    name: '小黄',
    brand: '美团'
  }
  build() {
    Column() {
      Text('顶级组件')
        .fontSize(30)
        .fontWeight(900)
      Text(this.themeColor)
      Text(JSON.stringify(this.car))

      // 二级组件
      ParentComponent()
      ParentComponent()
    }
    .padding(10)
    .height('100%')
    .backgroundColor('#ccc')
    .width('100%')
    .alignItems(HorizontalAlign.Center)
    .padding({ top: 100 })
  }
}


@Component
  // 二级组件
struct ParentComponent {
  @Consume themeColor: string
  // 编写 UI
  build() {
    Column({ space: 20 }) {
      Text('我是二级组件')
        .fontSize(22)
        .fontWeight(900)
      Text(this.themeColor)

      // 内层子组件
      SonComponent()
    }
    .backgroundColor('#a6c398')
    .alignItems(HorizontalAlign.Center)
    .width('90%')
    .margin({ top: 50 })
    .padding(10)
    .borderRadius(10)

  }
}

@Component
  // 内层组件
struct SonComponent {
  @Consume themeColor: string
  @Consume car: Car
  // 编写 UI
  build() {
    Column({ space: 20 }) {
      Text('我是内层组件' + this.themeColor)
        .fontSize(20)
        .fontWeight(900)
        .onClick(() => {
          // this.themeColor = 'orange'
          this.car.name = '小绿'
        })
      Text(JSON.stringify(this.car))
    }
    .backgroundColor('#bf94e4')
    .alignItems(HorizontalAlign.Center)
    .width('90%')
    .margin({ top: 50 })
    .padding(10)
    .borderRadius(10)

  }
}
8.10注解- @Observed和@ObjectLink父与子孙后代复杂数据同步(多层数据)
interface IPerson {
  id: number
  name: string
  age: number
}

@Observed
class Person {
  id: number
  name: string
  age: number

  constructor(obj: IPerson) {
    this.id = obj.id
    this.name = obj.name
    this.age = obj.age
  }
}


@Entry
@Component
struct ObservedAndLink {
  @State personList: Person[] = [
    new Person({
      id: 1,
      name: '张三',
      age: 18
    }),
    new Person({
      id: 2,
      name: '李四',
      age: 19
    }),
    new Person({
      id: 3,
      name: '王五',
      age: 20
    })
  ]

  build() {
    Column({ space: 20 }) {
      Text('父组件')
        .fontSize(30)
      List({ space: 10 }) {
        ForEach(this.personList, (item: Person, index: number) => {
          ItemCom({
            info: item,
            addAge: () => {
              // 修改嵌套的数据 => 普通的情况, 监视不到更新
              item.age++ // 如果能监视到
              AlertDialog.show({
                message: JSON.stringify(this.personList)
              })
              // this.personList.splice(index, 1, item) // 无需手动替换更新
            }
          })
        })
      }

    }
    .backgroundColor('#cbe69b')
    .width('100%')
    .height('100%')
    .padding(20)
  }
}

@Component
struct ItemCom {
  @ObjectLink info: Person
  addAge = () => {

  }

  build() {
    ListItem() {
      Row({ space: 10 }) {
        Text('姓名:' + this.info.name)
        Text('年龄:' + this.info.age)
        Blank()
        Button('修改数据')
          .onClick(() => {
            // this.addAge()
            this.info.age++
          })
      }
      .backgroundColor(Color.Pink)
      .padding(10)
      .width('100%')
    }
  }
}
9.1 类
// 类
// class 类名 {
//   字段名:类型 = 初始值
//   字段名?:类型
// }

class Cat {
  name: string = 'Tom'
  foods?: string
}
// 基于类, 创建对象
let p: Cat = new Cat()
console.log('姓名:', p.name.length)

p.foods = '小黄鱼'
console.log('食物:', p.foods?.length)

@Entry
@Component
struct Index {
  build() {

  }
}
-----------------构造函数语法--------------------
// 构造函数语法
// class Food {
//   name: string
//   price: number
//   // 希望不同实例, 有不同的字段初始值 → 构造函数
//   constructor(name: string, price: number) {
//     this.name = name
//     this.price = price
//   }
// }
// let f1: Food = new Food('西兰花', 20)
// console.log('名称:', f1.name, '价格:', f1.price)
//
// let f2: Food = new Food('土豆炖鸡块', 28)
// console.log('名称:', f2.name, '价格:', f2.price)

interface IFood {
  name: string
  price: number
  desc: string
}

class Food {
  name: string
  price: number
  desc: string
  // 希望不同实例, 有不同的字段初始值 → 构造函数
  constructor(paramsObj: IFood) {
    this.name = paramsObj.name
    this.price = paramsObj.price
    this.desc = paramsObj.desc
  }
}
let p1: Food = new Food({
  name: '西兰花',
  desc: '好吃',
  price: 20
})
let p2: Food = new Food({
  name: '黄瓜炒鸡蛋',
  desc: '清爽',
  price: 12
})
console.log('名称', p1.name)
console.log('名称', p2.name)

@Entry
@Component
struct Index {
  build() {

  }
}

------------------------定义方法------------------------
// 类 → 定方法
class Person {
  name: string
  age: number

  constructor(name: string, age: number) {
    this.name = name
    this.age = age
  }
  // 跟xxx打招呼, 还要自我介绍
  sayHi(yourName: string) {
    // 通过this可以访问到创建出来的实例对象
    console.log(`hello, ${yourName}, 我是${this.name}`)
  }
  sing(): string {
    return '稻香'
  }
}
let p1:Person = new Person('凹凸曼', 18)
p1.sayHi('小怪兽')

let p2:Person = new Person('大灰狼', 5)
p2.sayHi('小绵羊')

@Entry
@Component
struct Index {
  build() {

  }
}
----------------------------静态属性和静态方法------------------------
// 静态属性 和 静态方法
class Robot {
  static version: string = 'v2.0'
  static getRandom(): number {
    return Math.random()
  }
}
console.log('Robot类的版本', Robot.version)
console.log('工具方法:', Robot.getRandom())
------------------------------类的继承-----------------------------------
// 父类   子类
// 人类   学生, 老师, 工人
class Person {
  name: string
  age: number

  constructor(name: string, age: number) {
    this.name = name
    this.age = age
  }

  sayHi() {
    console.log('大家好~', this.name, this.age)
  }
}

class Student extends Person {
  grade: string

  constructor(name: string, age: number, grade: string) {
    // 父类中的构造函数, 此时需要我们手动调用  super() 构造函数, super.方法名(), super.属性名
    super(name, age)
    // 完成自己属性的初始化
    this.grade = grade
  }

  study () {
    console.log('我是学生, 我爱学习~')
  }
  // 子类中想要重写父类中的方法, 只需提供同名的方法即可
  sayHi(): void {
    super.name // 获取父类的属性
    super.age // 获取父类的属性
    super.sayHi() // 调用了父类的方法
    console.log('hello, nice to meet you'); // 扩展了自己的特性
  }
}
let s1: Student = new Student('小明', 18, '五年级')
s1.sayHi() // 调用重写的sayHi方法

// s1.study() // 调用自己的study方法
// console.log(s1.grade) // 访问自己的grade属性

let s2: Student = new Student('小蓝', 18, '三年级')
// console.log(s2.grade)

// class Teacher extends Person {
// }
// let t1: Teacher = new Teacher('李老师', 35)
// t1.sayHi() // 调用父类的sayHi方法
//
//
// class Worker extends Person {
// }
-----------------判断是否是这个类-------------------------
class Person {}
class Student extends Person {}
class Worker extends Person {}

let s: Student = new Student()
console.log('判断结果:', s instanceof Student)
console.log('判断结果:', s instanceof Person)
console.log('判断结果:', s instanceof Worker)

interface IObj {}
// 判断一个变量是否存的是数组
let temp: IObj = {}
console.log('是否是数组', temp instanceof Array)

---------------------修饰符 readonly --------------------------------
// 修饰符 readonly
class Cat {
  name: string
  age: number
  readonly legs: number = 4
  constructor(name: string, age: number) {
    this.name = name
    this.age = age
  }
}
let c1 = new Cat('小花', 2)
c1.name = '小美'
// c1.legs = 6 // 不能修改
console.log('姓名:', c1.name)

------------------修饰符 private----------------
// class Person {
//   private name: string = ''
//   private age: number = 0
//   desc: string = '描述'
// }
// let p = new Person()
// console.log('实例访问:', p.name) // 无法再外部访问私有数据

// class Student extends Person {
//   sayHi () {
//     console.log('访问私有的数据:', super.name) // 私有数据无法再(子类)访问
//   }
// }

---------------------修饰符 protected和public--------------------------------
class Person {
  protected name: string
  protected age: number
  desc: string = '描述'
  // 类的内容, 无论是私有还是保护, 都是可以访问的
  constructor(name: string, age: number) {
    this.name = name
    this.age = age
  }
}
let p = new Person('小王', 18)
// console.log('实例访问:', p.name) // 无法在外部, 访问受保护的数据

class Student extends Person {
  sayHi () {
    console.log('访问私有的数据:', super.name) // 保护的数据可以在子类访问
  }
}
10.1 接口
------------------------------接口的继承---------------
interface IAnimal {
  name: string
  age: number
}
interface ICat extends IAnimal {
  hair: string
}
interface IDog extends IAnimal {
  color: string
}
let dog1: IDog = {
  name: '小泰迪',
  age: 2,
  color: '棕色'
}

---------------------------接口的实现-----------------------
// 接口实现: 定义一个接口, 约束类 => 类需要按照接口的要求, 实现类的主体
interface IDog {
  name: string
  age: number
  jump: () => void
}

// 基于接口, 实现类
class Dog implements IDog {
  name: string
  age: number
  desc: string

  constructor(name: string, age: number, desc: string) {
    this.name = name
    this.age = age
    this.desc = desc
  }

  jump() {

  }
}
let dog: Dog = new Dog('小飞', 2, '是一只非常帅气的二哈')
dog.jump()

function 函数名<Type>(temp:Type):Type{
  return temp
}
11.1泛型
// 泛型: 广泛的类型 => 类型可以作为参数传递过来, 类型是[可变]的
// function 函数名<Type> (形参: Type): Type {
//   return 形参
// }

// 封装了一个函数: 传入什么样的参数, 就立刻返回什么样的参数
function fn<T> (param: T) : T {
  return param
}
fn<string>('abc')
fn<number>(123)
fn<boolean>(true)
fn<number[]>([1, 2, 3, 4, 5])

// 会默认根据传参, 进行类型推断, 动态的配置 T 类型参数 的值
fn(true)
fn([1, 2, 3, 4, 5])

// 练习1: 定义函数, 参数是数组(存的类型不定), 返回数组的长度
function getLength<T> (arr: T[]) : number {
  return arr.length
}
console.log('', getLength<number>([1, 2, 3]))
console.log('', getLength<string>(['1', 'aa', 'bb', 'cc']))

// 练习2: 定义函数, 参数是数组(存的类型不定), 返回数组的最后一项
function getLast<T> (arr: T[]) : T {
  return arr[arr.length - 1]
}
console.log('', getLast<number>([1, 2, 3, 4, 99]))
console.log('', getLast<string>(['a', 'b', 'c']))

------------------------------------------泛型的约束----------------
// 泛型约束: 给传递的类型参数, 添加限制
interface ILength {
  length: number
}
function fn<T extends ILength>(param: T) {
  console.log('', param.length)
}

fn<string>('abc')
fn<number[]>([1, 2, 3])

class Desk {
  length = 2
}
let d = new Desk()

----------------------------多个泛型变量------------------------------
// 多个泛型变量 => 传递多个类型参数
function fn<T1, T2> (param1: T1, param2: T2) {
  console.log('参数1', param1)
  console.log('参数2', param2)
}
fn<string, boolean>('abc', true)
fn<number, string>(123, 'abc')
fn<string[], number[]>(['a', 'b'], [1, 2])

fn<Desk>(d)

--------------------------泛型接口------------------------------------
// 泛型接口
interface IdFunc<T> {
  // 约定有两个方法 (id类型不定, string number)
  // 1. 传入 id 值, 就返回 id 值
  // 2. 返回一个 ids 数组
  id: (value: T) => T
  ids: () => T[]
}

let obj: IdFunc<number> = {
  id(value: number) {
    return value
  },
  ids() {
    return [1, 2, 3]
  }
}

let obj2: IdFunc<string> = {
  id(value: string) {
    return value
  },
  ids() {
    return ['001', '002', '003']
  }
}
---------------------------泛型类--------------------------------------
// 泛型类: 定义类的时候, 配合泛型一起定义
class Person <T>{
  id: T
  constructor(id: T) {
    this.id = id
  }
  getId (): T {
    return this.id
  }
}
let p: Person<number> = new Person<number>(10)
let p2: Person<string> = new Person<string>('abc')
12.页面跳转
import { router } from '@kit.ArkUI';

@Entry
@Component
struct LoginPage {
  @State message: string = '登陆页';

  build() {
    Row() {
      Column() {
        Text(this.message)
          .fontSize(50)
          .fontWeight(FontWeight.Bold)
          .onClick(() => {
            router.pushUrl({
              url: 'pages/Index'
            })
          })
      }
      .width('100%')
    }
    .height('100%')
  }
}

----------------------------调用方法 - 替换跳转(无法返回)------------------
router.replaceUrl({
url:'页面地址'
})
----------------------------调用方法 - 返回()---------------------------
router.back()

-----------------------------获取页面栈长度------------------------------
router.getLength()
----------------------------清空页面栈-------------------------------------
router.clear()


-----------------------------路由模式------------------------------------
路由 -- 4. 路由模式
路由提供了两种不同的跳转模式
1. Standard:无论之前是否添加过,一直添加到页面栈【默认常用】
2. Single:如果目标页面已存在,会将已有的最近同url页面移到栈顶【看情况使用】

   router.pushUrl({
              url: 'pages/DetailPage'
            }, router.RouterMode.Single)

-----------------------------跳转携带参数----------------------
//发送参数
     router.pushUrl({
          url: 'pages/Index',
          params: {
            username: this.username,
            msg: '测试消息'
          }
        })
//接收参数
  // 一进入页面, 就会执行的函数 => 生命周期函数
  aboutToAppear(): void {
    console.log('传递过来的数据', JSON.stringify(router.getParams()))
    const params = router.getParams() as ParamsObj
    this.myName = params.username
  }
13.1 自定义组件-生命周期
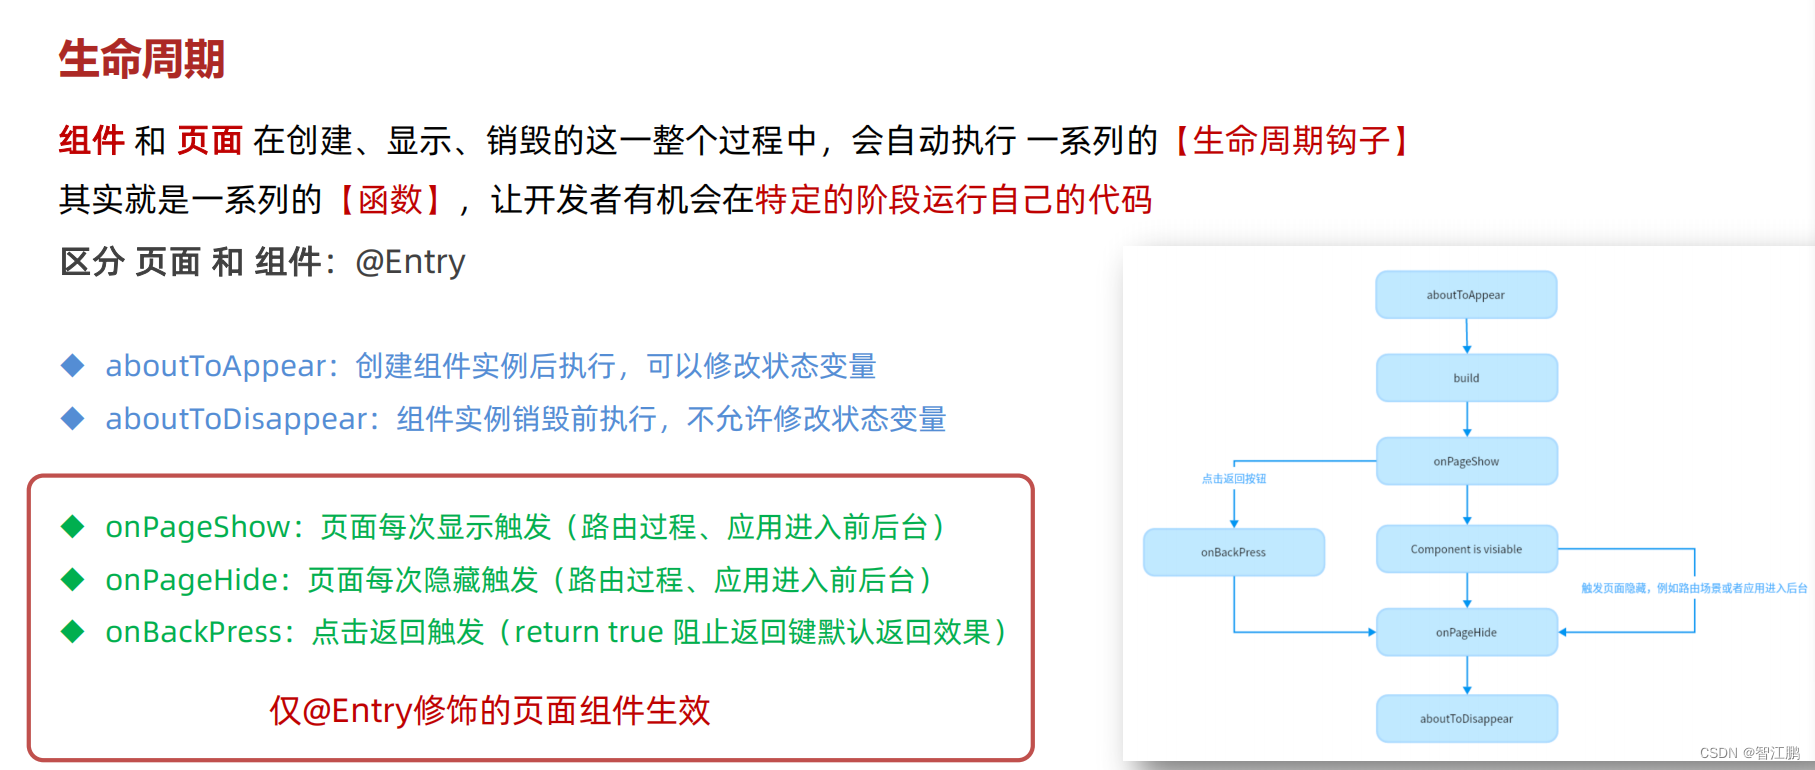
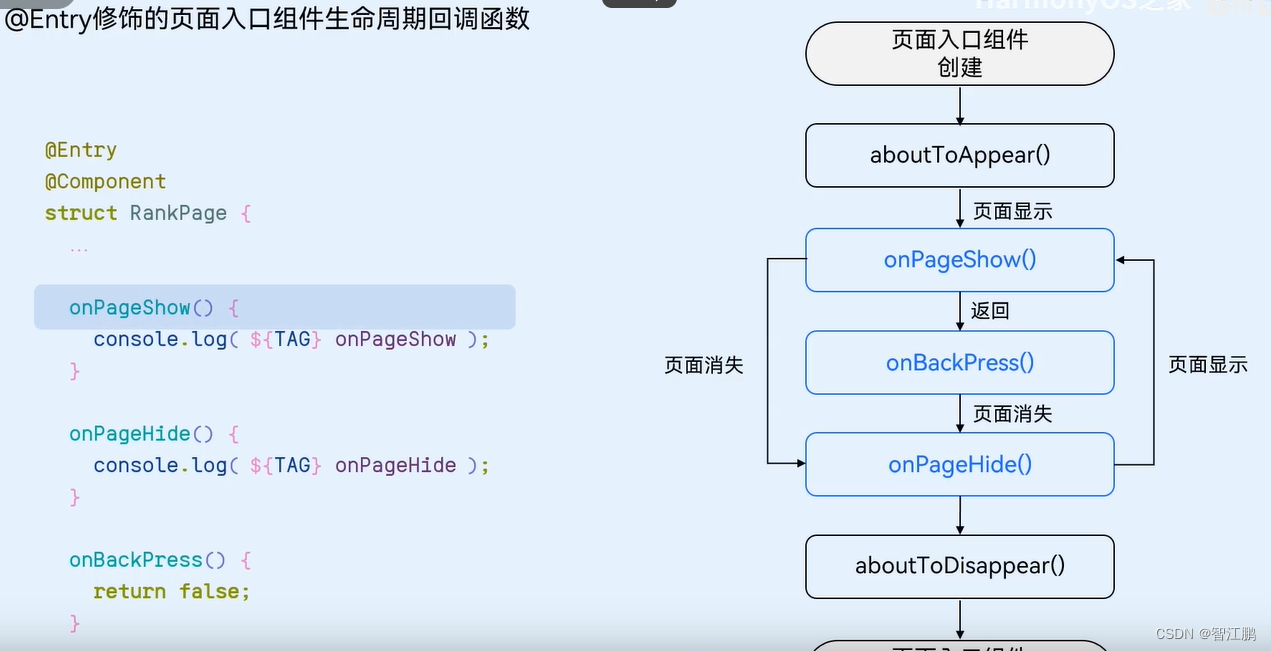
  aboutToAppear(): void {
  }
 aboutToDisappear(): void {
 }
 onPageShow(): void {
 }

 onPageHide(): void {
 }
 onBackPress(): boolean | void {
 }
  build() {

  }
13.2自定义组件-页面控制
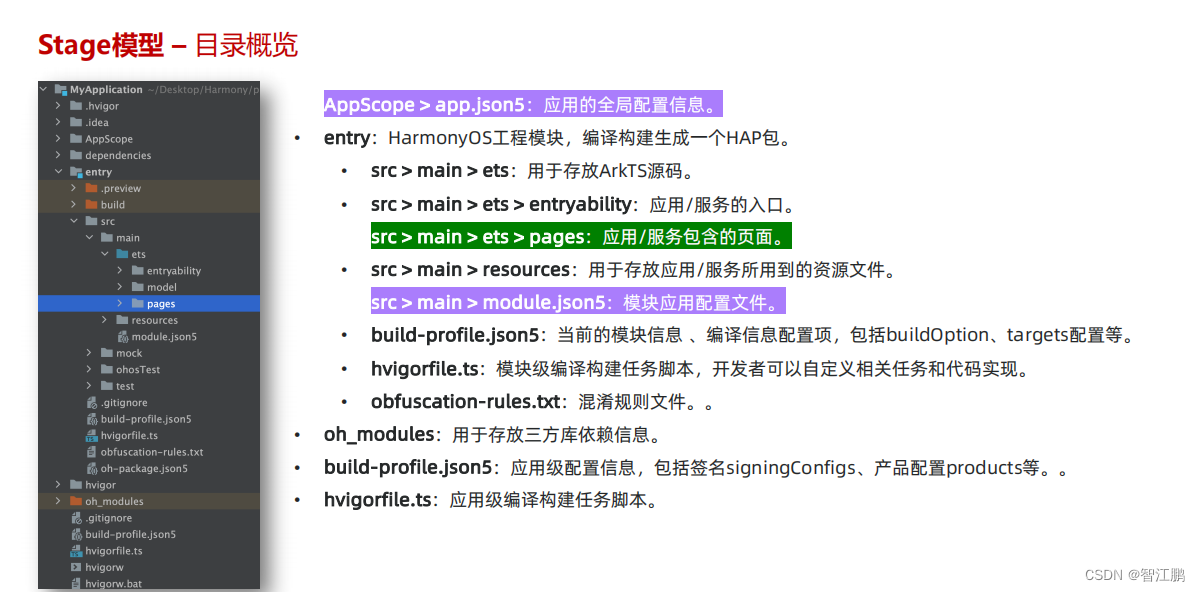
14.2 stage模型
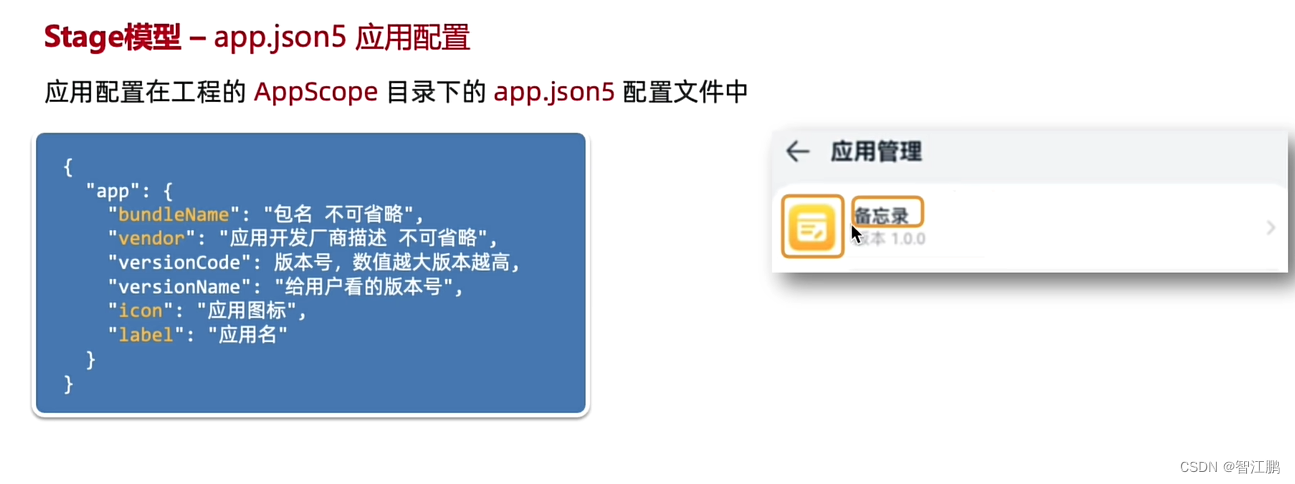
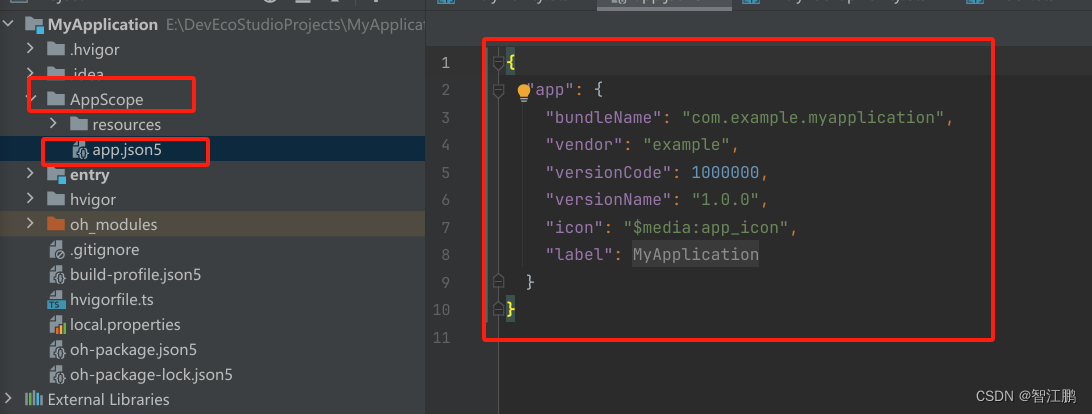
14.2 stage模型-全局配置信息
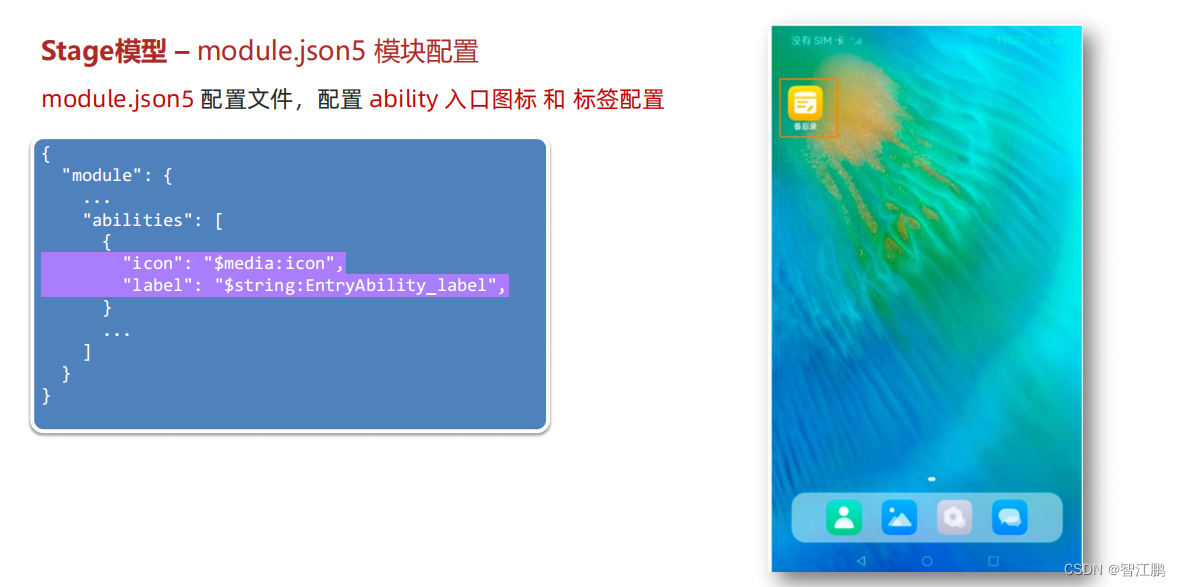
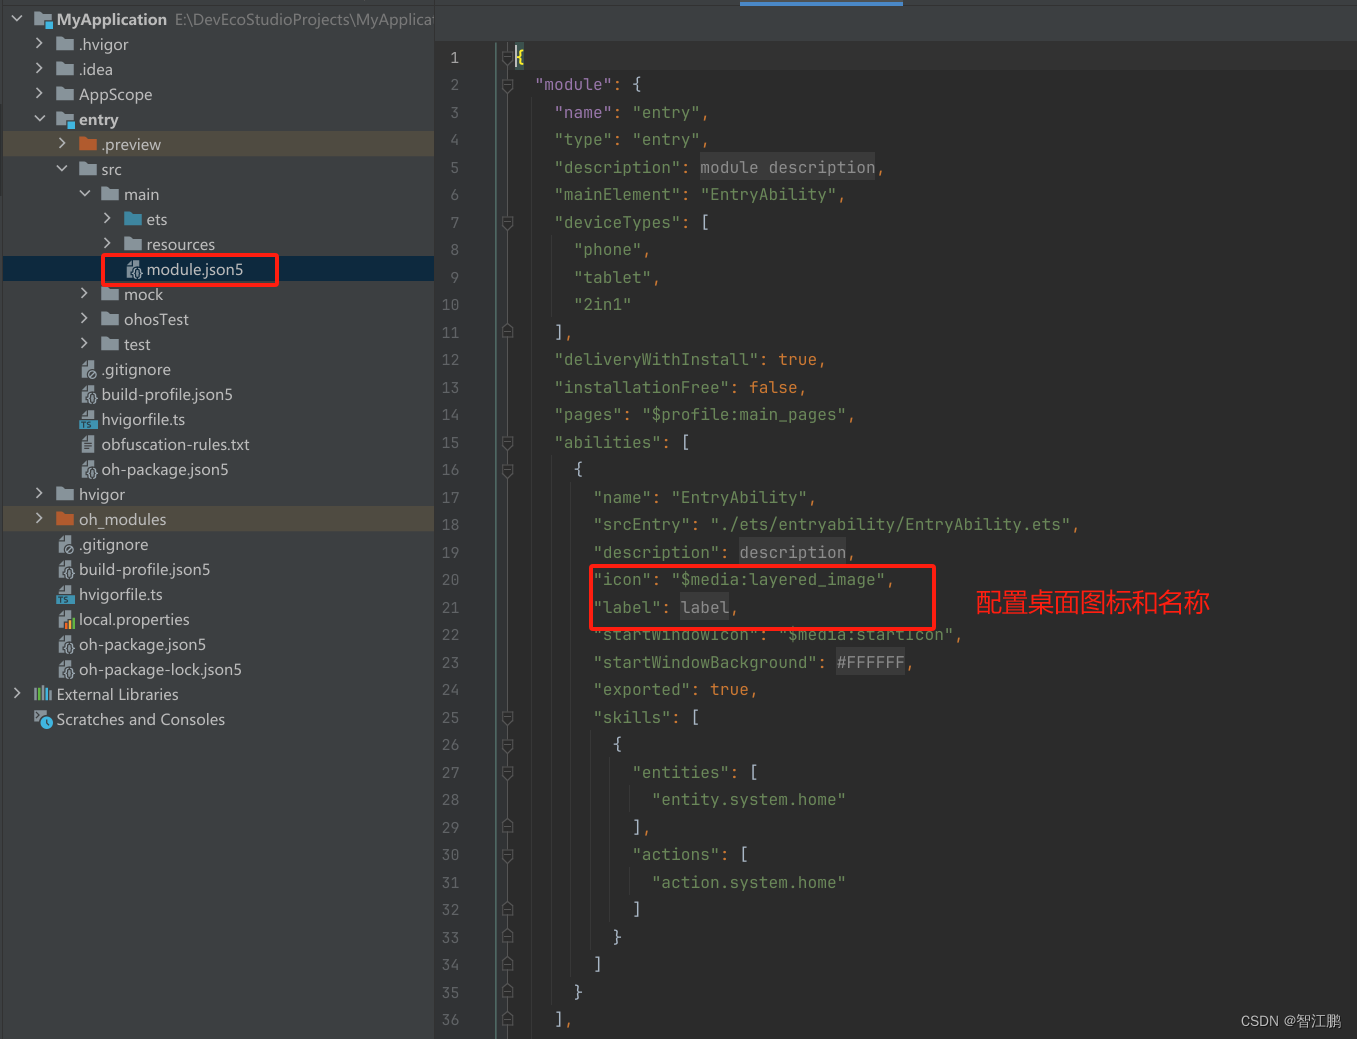
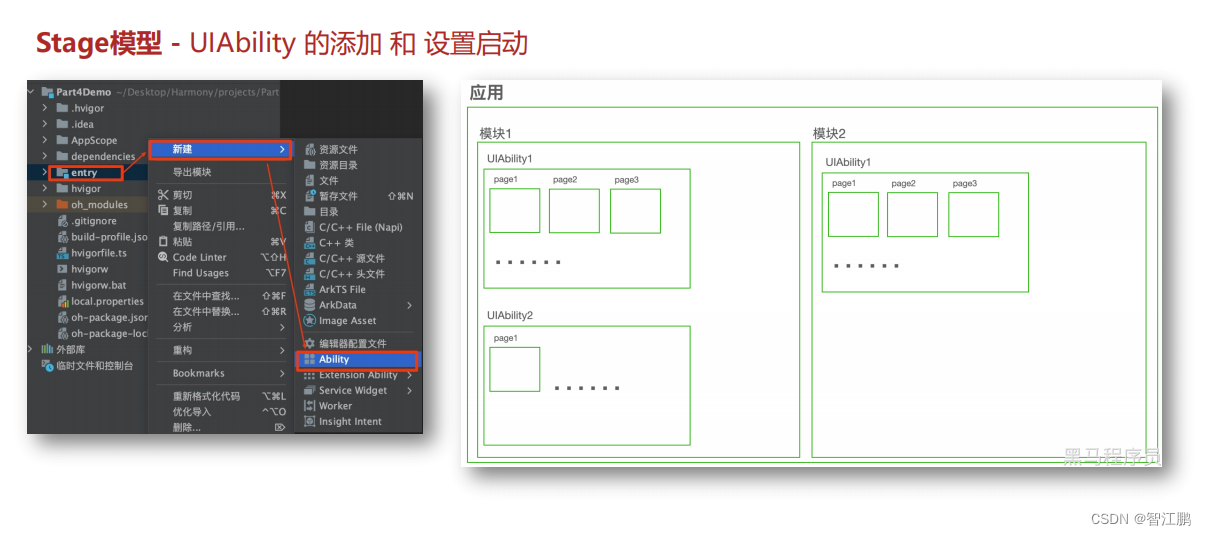
14.3 UIAbility 的添加 和 设置启动(相当于微信里的微信小程序,从最近任务打开,可以切换是聊天还是操作小程序)
14.4设置主启动Ability
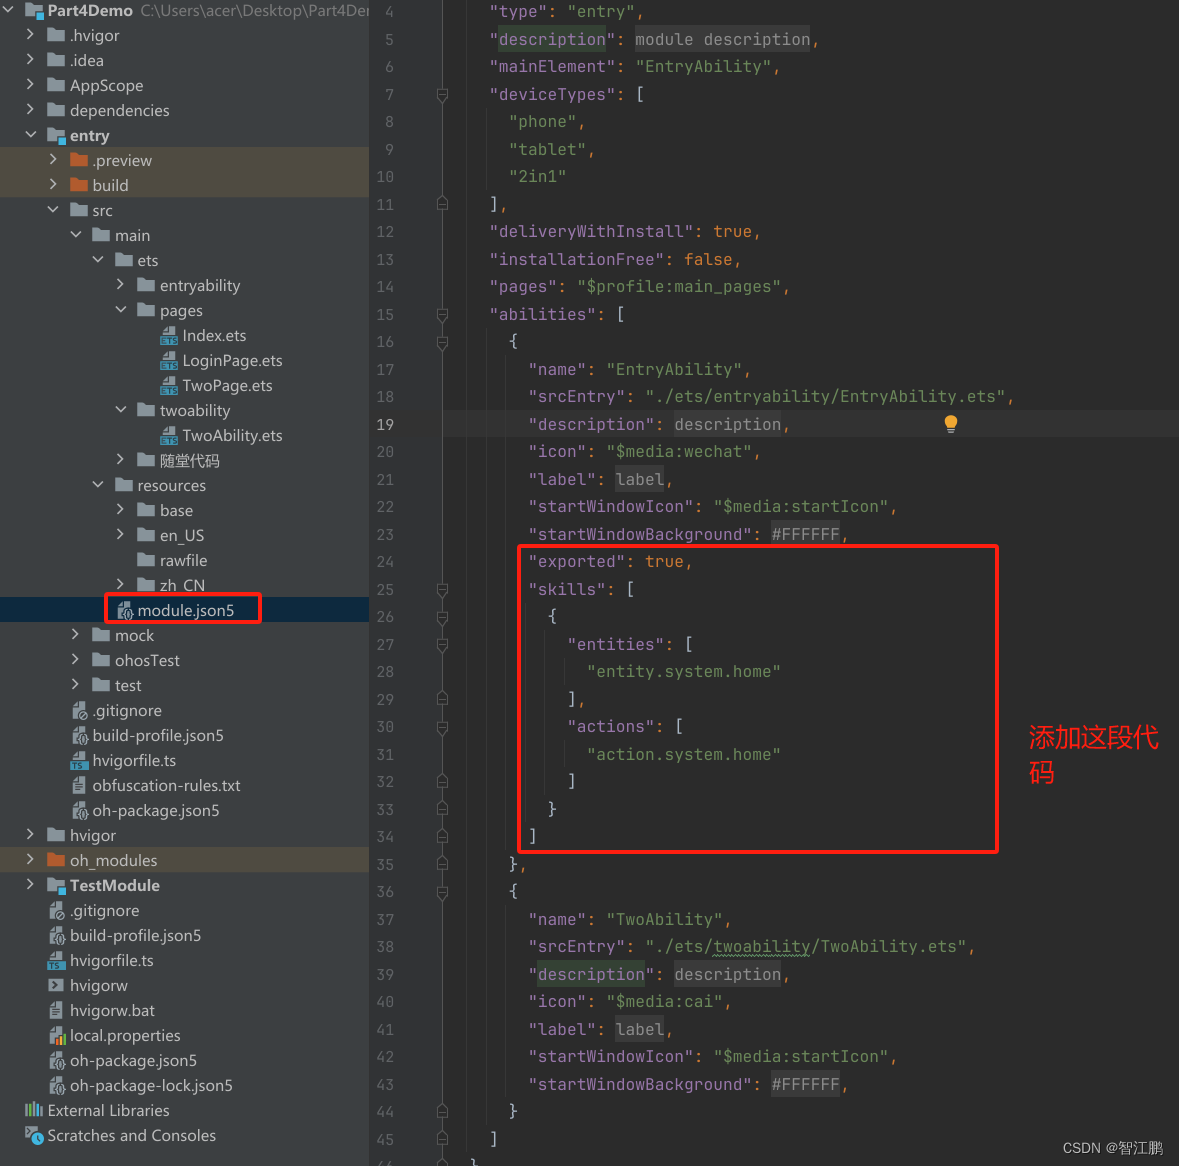
    "exported": true,
        "skills": [
          {
            "entities": [
              "entity.system.home"
            ],
            "actions": [
              "action.system.home"
            ]
          }
        ]
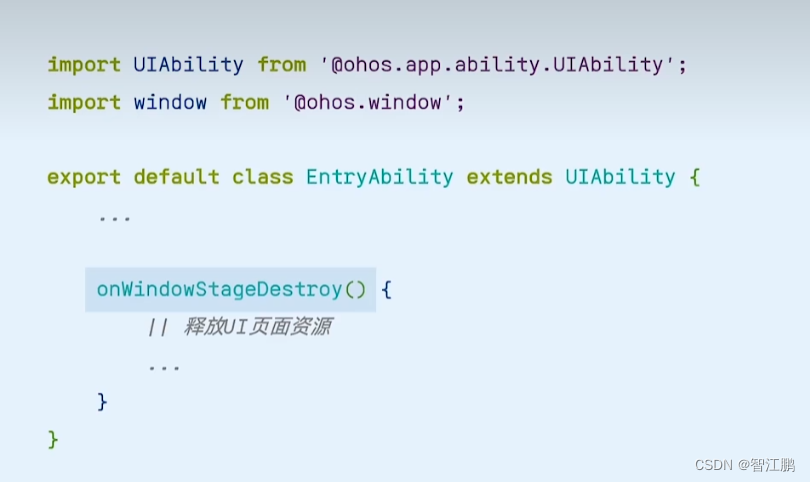
14.4 UIAbility 组件的生命周期
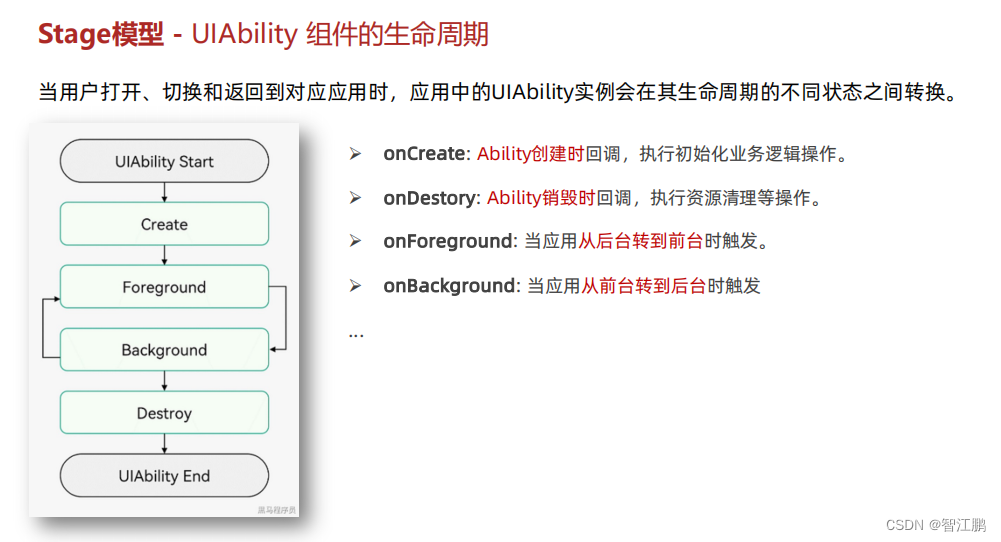
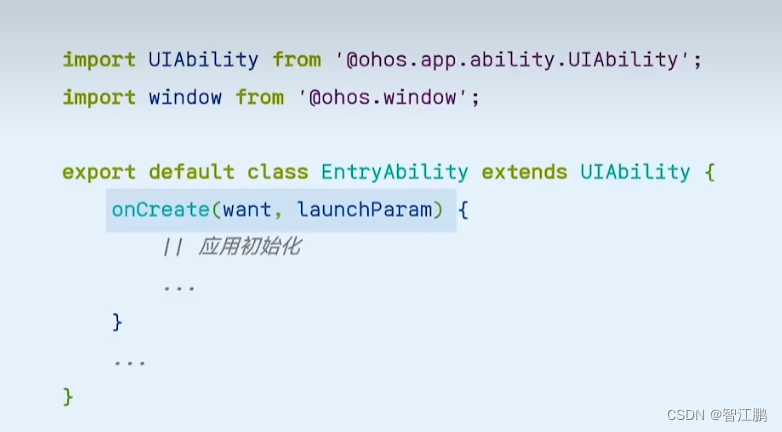
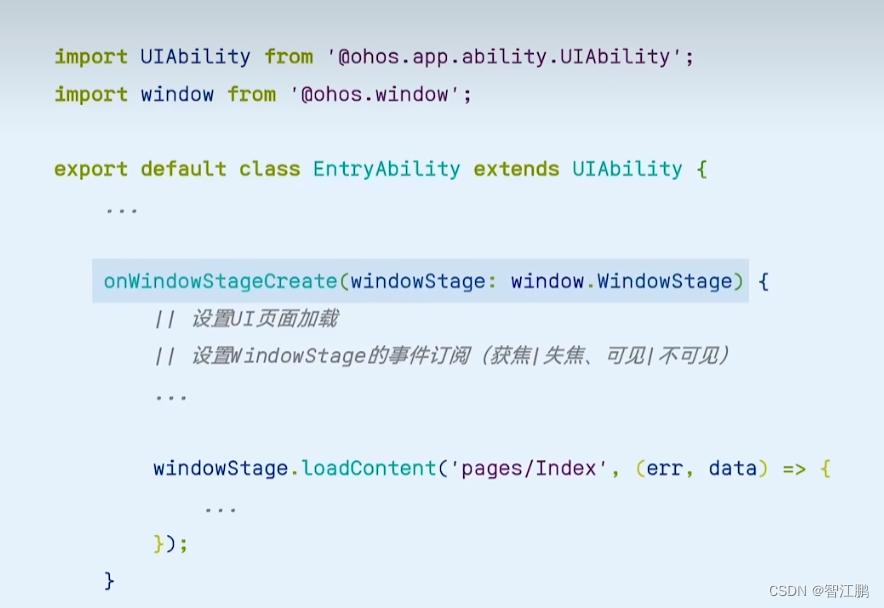
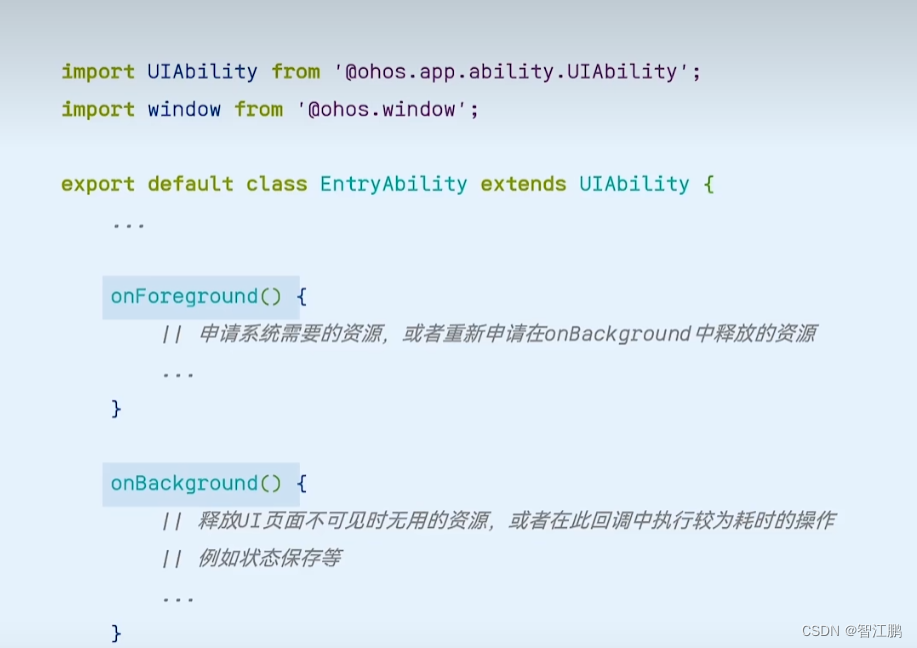
import { AbilityConstant, UIAbility, Want } from '@kit.AbilityKit';
import { hilog } from '@kit.PerformanceAnalysisKit';
import { window } from '@kit.ArkUI';

export default class ApplicationAbility extends UIAbility {
  onCreate(want: Want, launchParam: AbilityConstant.LaunchParam): void {
    hilog.info(0x0000, 'testTag', '%{public}s', 'Ability onCreate');
  }

  onDestroy(): void {
    hilog.info(0x0000, 'testTag', '%{public}s', 'Ability onDestroy');
  }

  onWindowStageCreate(windowStage: window.WindowStage): void {
    // Main window is created, set main page for this ability
    hilog.info(0x0000, 'testTag', '%{public}s', 'Ability onWindowStageCreate');

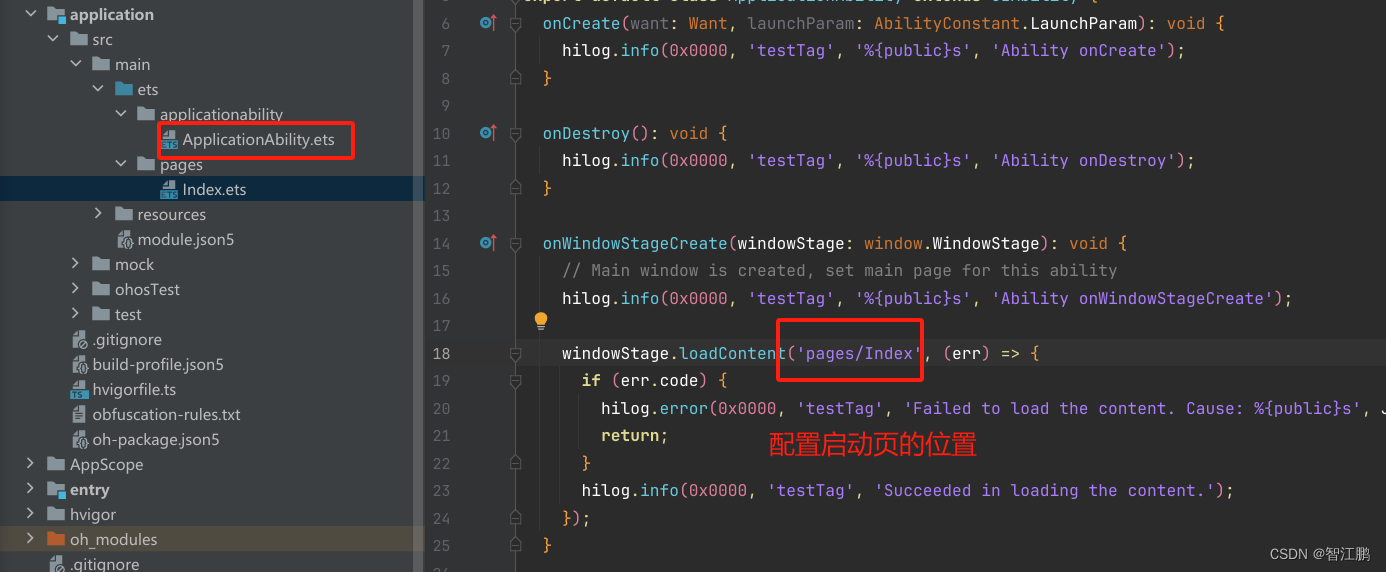
    windowStage.loadContent('pages/Index', (err) => {
      if (err.code) {
        hilog.error(0x0000, 'testTag', 'Failed to load the content. Cause: %{public}s', JSON.stringify(err) ?? '');
        return;
      }
      hilog.info(0x0000, 'testTag', 'Succeeded in loading the content.');
    });
  }

  onWindowStageDestroy(): void {
    // Main window is destroyed, release UI related resources
    hilog.info(0x0000, 'testTag', '%{public}s', 'Ability onWindowStageDestroy');
  }

  onForeground(): void {
    // Ability has brought to foreground
    hilog.info(0x0000, 'testTag', '%{public}s', 'Ability onForeground');
  }

  onBackground(): void {
    // Ability has back to background
    hilog.info(0x0000, 'testTag', '%{public}s', 'Ability onBackground');
  }
}
14.3配置-启动页配置
14.4 同模块唤醒Ability
 context = getContext(this) as common.UIAbilityContext

 // 1. 准备 want (参数信息)
            let wantInfo: Want = {
              deviceId: '', // 空表示本设备
              bundleName: 'com.example.part4demo', // AppScope/app.json 确认
              moduleName: 'entry', // 模块名
              abilityName: 'TwoAbility', // src/main/module.json5
              parameters: {
                info: '来自entryAbility'
              }
            }
            // 2. 利用context startAbility 调起 UIAbility
            //    返回一个promise对象
            this.context.startAbility(wantInfo)
              .then(() => {
                console.log('startAbility 成功')
              })
              .catch((error: BusinessError) => {
                console.log('启动Ability 失败', error)
              })
14.5 不同模块唤醒Ability
 context = getContext(this) as common.UIAbilityContext

    // 1. 准备 want (参数信息)
            let wantInfo: Want = {
              deviceId: '', // 空表示本设备
              bundleName: 'com.example.part4demo', // AppScope/app.json 确认
              moduleName: 'TestModule', // 模块名
              abilityName: 'TestModuleAbility', // src/main/module.json5
              parameters: {
                info: '来自entryAbility'
              }
            }
            // 2. 利用context startAbility 调起 UIAbility
            //    返回一个promise对象
            this.context.startAbility(wantInfo)
              .then(() => {
                console.log('startAbility 成功')
              })
              .catch((error: BusinessError) => {
                console.log('启动Ability 失败', error)
              })
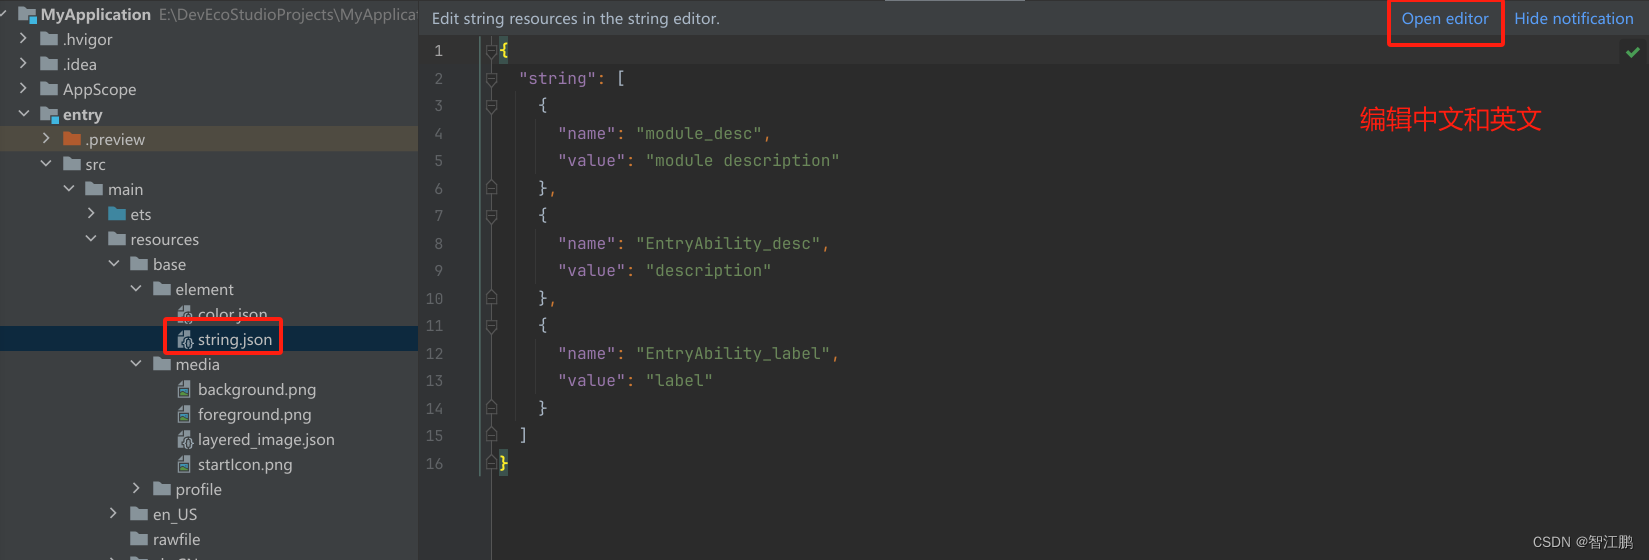
15.1 编辑器使用-编辑中英文
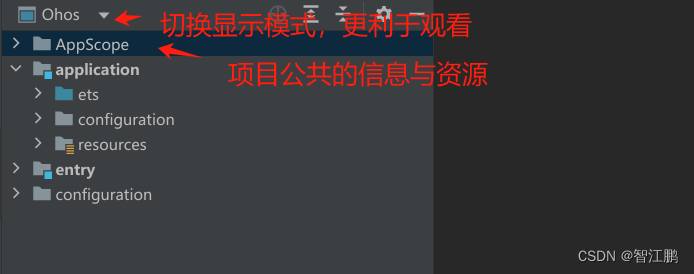
15.2 编辑器使用-切换工程模块
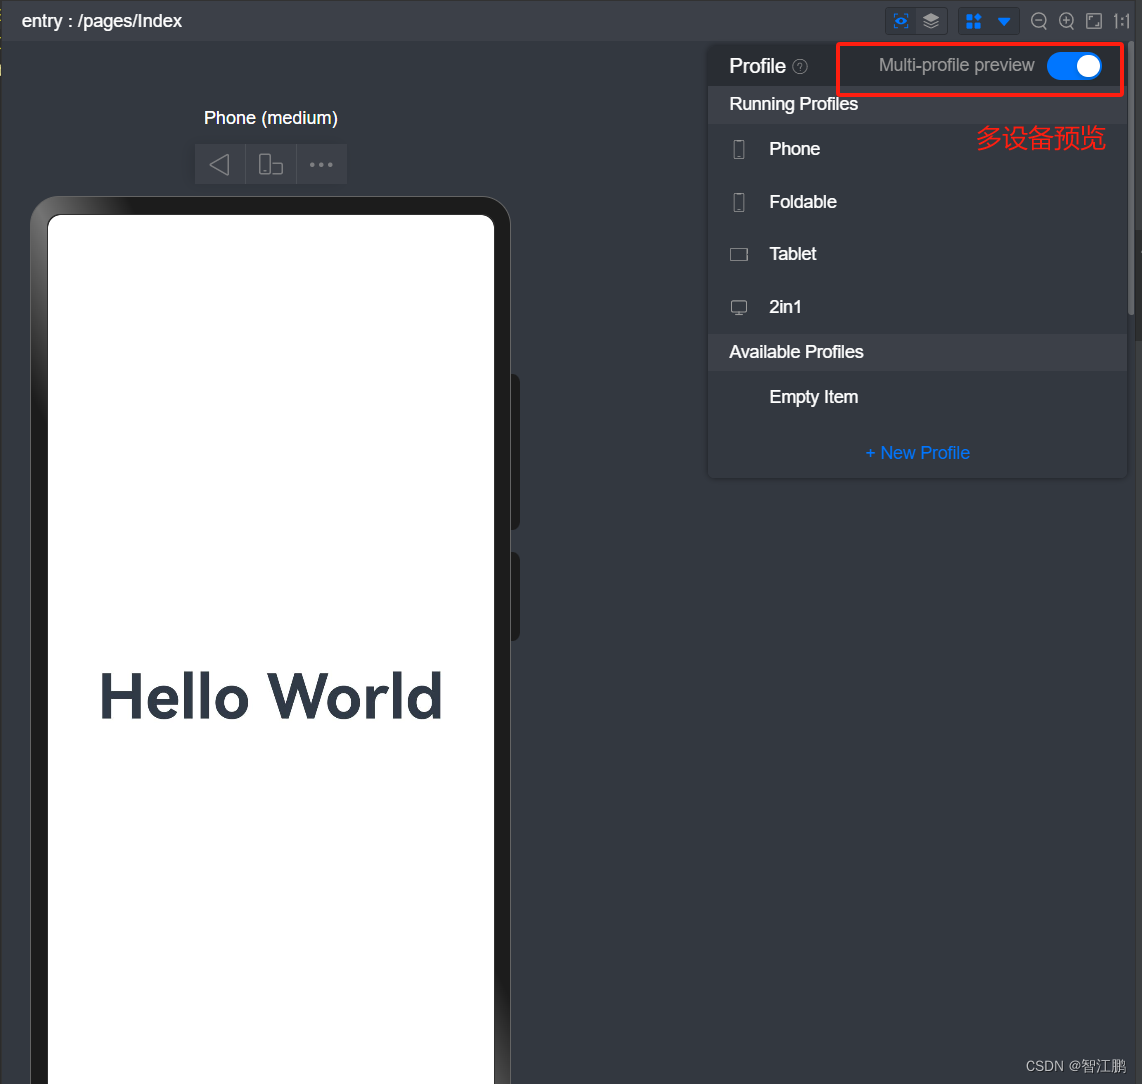
15.3 编辑器使用-多设备预览
