目录
[四、compiler 编译服务设计](#四、compiler 编译服务设计)
[1. http路由选择](#1. http路由选择)
[4.1 ctemplate安装](#4.1 ctemplate安装)
[4.2 ctemplate的使用](#4.2 ctemplate的使用)
[4.3 view 渲染与html](#4.3 view 渲染与html)
[5.control 控制](#5.control 控制)
5.1结合model模块与view模块进行获取html网页信息
[5.2 Machine 模块](#5.2 Machine 模块)
[5.3 LoadBlance负载均衡模块](#5.3 LoadBlance负载均衡模块)
[5.4 control 控制模块](#5.4 control 控制模块)
前言
学习了这么久的C/C++与Linux,终于到了做项目的时候,想想还是有点小激动,哈哈哈哈哈。我们的目标是做一个跟leetcode、牛客类似的在线OJ系统,功能阉割了一些,比如说登录、论坛、求职等等。主要实现了提交题目与判定对错的功能,其中,搭载了负载均衡模块,能让客户端提交的代码交给N台服务器(或者一台服务器的N个进程)去处理。
代码地址负载均衡在线oj系统 ,建议配合代码进行观看学习
一、所用技术与开发环境
所用技术:
- C++ STL 标准库
- Boost 准标准库(字符串切割)
- cpp-httplib 第三方开源网络库
- ctemplate 第三方开源前端网⻚渲染库
- jsoncpp 第三方开源序列化、反序列化库
- 负载均衡设计
- 多进程、多线程
- Ace前端在线编辑器(了解)
- html/css/js/jquery/ajax (了解)
开发环境:
- Centos 7 云服务器
- vscode
二、项目宏观结构
项目核心是三个模块
- comm: 公共模块
- compile_server: 编译与运行模块
- oj_server: 获取题目列表,查看题目与编写题目界面,负载均衡...
编写思路
- 先编写compile_server
- oj_server
- version 基于文件版的在线OJ
- 前端的⻚面设计(了解)
三、日志服务设计
日志的本质就是打印字符串,只是看是输入在文件中还是显示器中,我们默认选择输入在屏幕中,这里选择了可变参数包进行日志的打印。
cpp
#pragma once
#include <iostream>
#include <cstdarg>
#include <unistd.h>
#include <sys/stat.h>
#include <sys/types.h>
using namespace std;
namespace ns_log
{
enum
{
Debug = 0,
Info,
Warning,
Error,
Fatal
};
enum
{
Screen = 10,
OneFile,
ClassFile
};
string LevelToString(int level)
{
switch (level)
{
case Debug:
return "Debug";
case Info:
return "Info";
case Warning:
return "Warning";
case Error:
return "Error";
case Fatal:
return "Fatal";
default:
return "Unknown";
}
}
const int default_style = Screen;
const string default_filename = "Log.";
const string logdir = "log";
class Log
{
public:
Log(int style = default_style, string filename = default_filename)
: _style(style), _filename(filename)
{
if (_style != Screen)
mkdir(logdir.c_str(), 0775);
}
// 更改打印方式
void Enable(int style)
{
_style = style;
if (_style != Screen)
mkdir(logdir.c_str(), 0775);
}
// 时间戳转化为年月日时分秒
string GetTime()
{
time_t currtime = time(nullptr);
struct tm *curr = localtime(&currtime);
char time_buffer[128];
snprintf(time_buffer, sizeof(time_buffer), "%d-%d-%d %d:%d:%d",
curr->tm_year + 1900, curr->tm_mon + 1, curr->tm_mday, curr->tm_hour, curr->tm_min, curr->tm_sec);
return time_buffer;
}
// 写入到文件中
void WriteLogToOneFile(const string &logname, const string &message)
{
FILE *fp = fopen(logname.c_str(), "a");
if (fp == nullptr)
{
perror("fopen failed");
exit(-1);
}
fprintf(fp, "%s\n", message.c_str());
fclose(fp);
}
// 打印日志
void WriteLogToClassFile(const string &levelstr, const string &message)
{
string logname = logdir;
logname += "/";
logname += _filename;
logname += levelstr;
WriteLogToOneFile(logname, message);
}
void WriteLog(const string &levelstr, const string &message)
{
switch (_style)
{
case Screen:
cout << message << endl; // 打印到屏幕中
break;
case OneFile:
WriteLogToClassFile("all", message); // 给定all,直接写到all里
break;
case ClassFile:
WriteLogToClassFile(levelstr, message); // 写入levelstr里
break;
default:
break;
}
}
// 打印日志
void LogMessage(int level, const char *file, int line, const char *format, ...)
{
char rightbuffer[1024]; // 处理消息
va_list args; // va_list 是指针
va_start(args, format); // 初始化va_list对象,format是最后一个确定的参数
// 现在args指向了可变参数部分
vsnprintf(rightbuffer, sizeof(rightbuffer), format, args); // 写入到rightbuffer中
va_end(args);
char leftbuffer[1024]; // 处理日志等级、pid、时间、文件名和行号
string levelstr = LevelToString(level);
string currtime = GetTime();
string idstr = to_string(getpid());
snprintf(leftbuffer, sizeof(leftbuffer), "[%s][%s][%s][%s:%d]", levelstr.c_str(), currtime.c_str(), idstr.c_str(), file, line);
string loginfo = leftbuffer;
loginfo += rightbuffer;
WriteLog(levelstr, loginfo);
}
// 提供接口给运算符重载使用
void _LogMessage(int level, const char *file, int line, char *rightbuffer)
{
char leftbuffer[1024];
string levelstr = LevelToString(level);
string currtime = GetTime();
string idstr = to_string(getpid());
snprintf(leftbuffer, sizeof(leftbuffer), "[%s][%s][%s][%s:%d]", levelstr.c_str(), currtime.c_str(), idstr.c_str(), file, line);
string messages = leftbuffer;
messages += rightbuffer;
WriteLog(levelstr, messages);
}
// 运算符重载
void operator()(int level, const char *file, int line, const char *format, ...)
{
char rightbuffer[1024];
va_list args; // va_list 是指针
va_start(args, format); // 初始化va_list对象,format是最后一个确定的参数
vsnprintf(rightbuffer, sizeof(rightbuffer), format, args); // 写入到rightbuffer中
va_end(args);
_LogMessage(level, file, line, rightbuffer);
}
~Log()
{
}
private:
int _style;
string _filename;
};
Log lg;
class Conf
{
public:
Conf()
{
lg.Enable(Screen);
}
~Conf()
{
}
};
Conf conf;
}
// 辅助宏
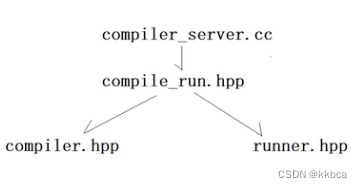
#define lg(level, format, ...) ns_log::lg(level, __FILE__, __LINE__, format, ##__VA_ARGS__)四、compiler 编译服务设计
对于在线OJ平台,我们先来处理编译服务。
1.编译服务
当远端提交代码的时候,我们就要对该代码提供编译服务,我们可以把提交的代码打包,使用程序替换(替换为g++)的方式进行编译,但是,如果远端代码是程序错误的代码或者恶意代码,我们贸然替换可能会导致服务程序崩溃,因此需要fork创建子进程,让子进程去进行程序替换执行代码。
如下是编译代码,首先编译的时候,我们传入的参数只有文件名,利用统一的PathUtil接口,将文件名转化为相对路径,同时给文件添加上后缀以方便将运行输出、编译错误内容、标准输入、标准输出、标准错误分类的写入文件中。
cpp
    //路径拼接功能

    const std::string tmp_path = "./temp/";
    class PathUtil
    {
    private:
        // 代码复用
        static std::string AddSuffix(const std::string &file_name, const std::string &suffix)
        {
            std::string path_name = tmp_path;
            path_name += file_name;
            path_name += suffix;
            return path_name;
        }

    public:
        // 如下三个编译时需要的临时文件
        // 构建源文件完整文件名 -> 路径+后缀
        static std::string Src(const std::string &file_name)
        {
            return AddSuffix(file_name, ".cpp");
        }

        // 构建可执行程序文件名 -> 路径+后缀
        static std::string Exe(const std::string &file_name)
        {
            return AddSuffix(file_name, ".exe");
        }

        static std::string CompilerError(const std::string &file_name)
        {
            return AddSuffix(file_name, ".compile_error");
        }

        // 如下三个运行时需要的临时文件

        static std::string Stdin(const std::string &file_name)
        {
            return AddSuffix(file_name, ".stdin");
        }

        static std::string Stdout(const std::string &file_name)
        {
            return AddSuffix(file_name, ".stdout");
        }

        // 构建标准错误文件名 -> 路径+后缀
        static std::string Stderr(const std::string &file_name)
        {
            return AddSuffix(file_name, ".stderr");
        }
    };
    class Compiler
    {
    public:
        Compiler()
        {
        }
        ~Compiler()
        {
        }

        // 是否编译成功
        // file_name只是文件名,没有后缀  我们需要自己拼接
        // test -> ./temp/test.cpp
        // test -> ./temp/test.exe
        // test -> ./temp/test.stderr
        static bool Compile(const std::string &file_name)
        {
            pid_t pid = fork();
            if (pid < 0)
            {
                lg(ns_log::Error,"编译错误,创建子进程失败");
                return false;
            }
            else if (pid == 0)
            {
                // 子进程
                umask(0);
                int _stderr = open(PathUtil::CompilerError(file_name).c_str(), O_CREAT | O_WRONLY, 0644);
                if (_stderr < 0)
                {
                    lg(Warning,"没有成功形成stderr文件");
                    exit(1);
                }

                // 重定向  编译出错重定向到file_name.stderr文件中
                dup2(_stderr, 2);

                // 子进程  调用编译器进行编译
                execlp("g++","g++", "-o", PathUtil::Exe(file_name).c_str(),
                       PathUtil::Src(file_name).c_str(), "-std=c++11",
                    "-D", "COMPILER_ONLINE", nullptr); // 最后传nullptr代表参数传递完毕

                //程序替换成功,后面的代码都不会执行了,会编程替换的代码
                lg(ns_log::Error,"启动编译器g++失败,可能是参数错误");
                exit(2);
            }
            else
            {
                // 父进程
                waitpid(pid, nullptr, 0);
                // 编译是否成功,看是否有exe文件
                if (FileUtil::IsFileExists(PathUtil::Exe(file_name)))
                {
                    lg(Info,"%s编译成功!!",PathUtil::Src(file_name).c_str());
                    return true;
                }
            }
            lg(ns_log::Error,"编译失败,没有形成可执行程序");
            return false;
        }
    };
测试结果如下,能够正常编译code程序,并且生成可执行与错误信息。
2.运行服务
我们想让编译模块提供编译服务,编译完成也要能自动运行,因此我们还需要运行服务,也是需要fork创建子进程去完成运行的(如果当前进程去运行发生错误会导致程序崩溃),其中运行我们并不关心程序运行的结果是否正确,因为这要配合测试用例,我们只关心程序运行是否正常运行完成,有没有收到信号(使用进程等待的方式查看)。同时将标准输入、标准输出、标准错误分门别类的写入到文件中,方便后续处理。
同时使用了setrlimit()函数去限制运行时间与内存占用空间。
cpp
#pragma once

#include <iostream>
#include <string>
#include <unistd.h>
#include <sys/types.h>
#include <sys/stat.h>
#include <fcntl.h>
#include <sys/wait.h>
#include <sys/time.h>
#include <sys/resource.h>

#include "../comm/log.hpp"
#include "../comm/util.hpp"

namespace ns_runner
{
    using namespace ns_log;
    using namespace ns_util;
    class Runner
    {
    public:
        Runner()
        {
        }
        ~Runner()
        {
        }

        // 设置进程资源占用大小
        static void SetProcLimit(int cpu_limit, int mem_limit)
        {
            // CPU时长
            struct rlimit _cpu_rlimit;
            _cpu_rlimit.rlim_cur = cpu_limit;
            _cpu_rlimit.rlim_max = RLIM_INFINITY; // 无穷大
            setrlimit(RLIMIT_CPU, &_cpu_rlimit);

            // 内存大小
            struct rlimit _mem_rlimit;
            _mem_rlimit.rlim_cur = mem_limit * 1024;
            _mem_rlimit.rlim_max = RLIM_INFINITY;
            setrlimit(RLIMIT_AS, &_mem_rlimit);
        }

        // 指明文件名即可,有comm/util.hpp里的PathUtil帮我们拼接
        // 返回值 > 0 : 程序异常了,返回值为退出收到了信号编号,
        // 返回值 == 0 : 正常运行完毕,结果保存到了临时文件中
        // 返回值 < 0 : 内部错误
        // cpu_limit:该程序运行时,可以使用的最大cpu资源上限
        // mem_limit:该程序运行时,可以使用的最大内存大小(KB)
        static int Run(const std::string &file_name, int cpu_limit, int mem_limit)
        {
            /**********************************************
             * 程序运行:
             * 1.代码跑完,结果正确
             * 2.代码跑完,结果不正确
             * 3.代码没跑完,结果异常
             * Run不用考虑结果是否正确,交给测试用例解决
             * 因此我们只考虑是否跑完
             * ********************************************/

            std::string _execute = PathUtil::Exe(file_name);
            std::string _stdin = PathUtil::Stdin(file_name);
            std::string _stdout = PathUtil::Stdout(file_name);
            std::string _stderr = PathUtil::Stderr(file_name);

            umask(0);
            int _in_fd = open(_stdin.c_str(), O_CREAT | O_RDONLY, 0664);
            int _out_fd = open(_stdout.c_str(), O_CREAT | O_WRONLY, 0664);
            int _err_fd = open(_stderr.c_str(), O_CREAT | O_WRONLY, 0664);
            if (_in_fd < 0 || _out_fd < 0 || _err_fd < 0)
            {
                lg(ns_log::Error, "运行时打开标准文件失败!!");
                return -1; // 文件打开失败
            }
            pid_t pid = fork();
            if (pid < 0)
            {
                lg(ns_log::Error, "运行时创建子进程失败!!");
                close(_in_fd);
                close(_out_fd);
                close(_err_fd);
                return -2; // 创建子进程失败
            }
            else if (pid == 0)
            {
                // 子进程
                dup2(_in_fd, 0);
                dup2(_out_fd, 1);
                dup2(_err_fd, 2);

                SetProcLimit(cpu_limit, mem_limit);
                //第一个参数为我要执行谁  第二个参数为如何执行
                execl(_execute.c_str(), _execute.c_str(), nullptr);
                perror("execl failed");
                exit(1);
            }
            else
            {
                // 父进程
                close(_in_fd);
                close(_out_fd);
                close(_err_fd);

                int status = 0;
                waitpid(pid, &status, 0);

                // 程序运行异常,一定是因为收到了信号!
                lg(Info, "This is a test log message with value:%d", (status & 0x7F));
                return status & 0x7F;
            }
        }
    };
}
测试结果
3.编译并运行服务
前面我们实现了编译与运行功能,但是远端传递过来的肯定不是直接的code,而是按照双方的通信协议进行传输数据,因此编译并运行(complie_and_run)他还得提供定制通信协议字段的功能,并正确调用编译服务和运行服务,同时文件id必须要有唯一性,不然多个用户之间会相互影响。
我们采用JSONcpp 库来帮助我们进行序列化与反序列化,如下命令安装jsoncpp
bash
sudo yum install jsoncpp-devel如下就是json的初步使用,需要注意编译时需要添加 -ljsoncpp 来链接jsoncpp库
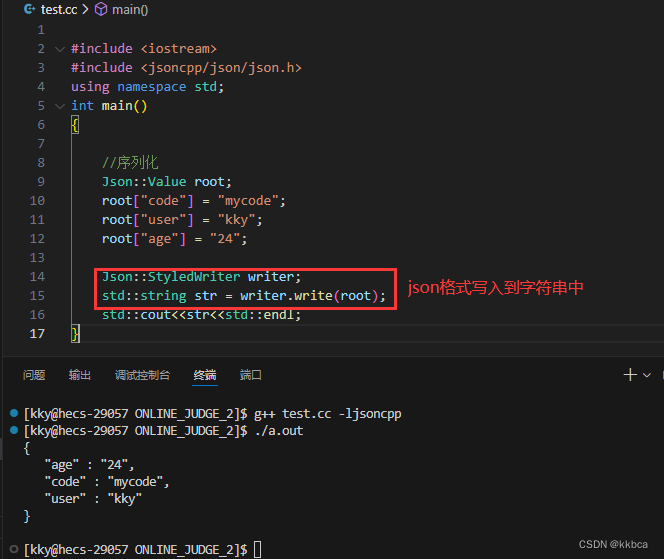
现在我们了解了json的使用,知道了json是按照 {key,value} 格式进行序列化,那么远端进行提交的代码我们就可以先利用json处理成相应的格式。如下,代码是一个key,输入是一个key,cpu限制与内存限制又是一个key
如下三个函数是PathUtil中compile_run需要用到的工具函数
- UniqFileName为唯一的文件名,使用了毫秒级时间错+atomic原子递增的唯一值
- WriteFile是往文件中写入函数,因为客户端传递的json里面的code需要写入到文件中,以便后续进行编译、运行。
- ReadFile为从文件中读取函数,因为编译运行是否发生错误、结果是什么都放在文件中,从文件中读取原因和结果赋值到json中再给客户端
cpp
        // 如下三个函数都是在PathUtil类中的
        //生成随机名
        static std::string UniqFileName()
        {
            // 毫秒级时间戳 + "_" + 原子性递增唯一值
            static std::atomic_uint id(0);
            id++;
            std::string ms = TimeUtil::GetTimeMs();
            std::string uniq_id = std::to_string(id);
            return ms + "_" + uniq_id;
        }
        //往文件中写入
        static bool WriteFile(const std::string &target, const std::string &content)
        {
            std::ofstream out(target);
            if (!out.is_open())
            {
                return false;
            }
            out.write(content.c_str(), content.size());
            out.close();
            return true;
        }
        //往文件中读取
        static bool ReadFile(const std::string &target, std::string *content, bool keep = false)
        {
            std::ifstream in(target);
            if (!in.is_open())
            {
                return false;
            }
            std::string line;

            // getline 按行读取,但不保存分隔符,有时候需要保留\n
            // getline 返回值ifstream会隐式类型转化为bool
            if (!keep)
                while (std::getline(in, line))
                    *content += line;
            else
                while (std::getline(in, line))
                    *content += line + '\n';

            in.close();
            return true;
        }
如下是compile_run的代码,主要函数为Start(const std::string &in_json, std::string *out_json),传入in_json格式字符串,进行处理,处理后将结果返回给到out_json。
cpp
#pragma once
#include "compiler.hpp"
#include "runner.hpp"
#include "../comm/log.hpp"
#include "../comm/util.hpp"
#include <signal.h>
#include <unistd.h>
#include <jsoncpp/json/json.h>
namespace ns_compile_and_run
{
using namespace ns_util;
using namespace ns_compiler;
using namespace ns_runner;
using namespace ns_log;
class CompileAndRun
{
public:
static void RemoveTempFile(const std::string &file_name)
{
// 清理文件的个数是不确定的,但有哪些我们知道
std::string _src = PathUtil::Src(file_name);
if (FileUtil::IsFileExists(_src))
unlink(_src.c_str());
std::string _compiler_error = PathUtil::CompilerError(file_name);
if (FileUtil::IsFileExists(_compiler_error))
unlink(_compiler_error.c_str());
std::string _execute = PathUtil::Exe(file_name);
if (FileUtil::IsFileExists(_execute))
unlink(_execute.c_str());
std::string _stdin = PathUtil::Stdin(file_name);
if (FileUtil::IsFileExists(_stdin))
unlink(_stdin.c_str());
std::string _stdout = PathUtil::Stdout(file_name);
if (FileUtil::IsFileExists(_stdout))
unlink(_stdout.c_str());
std::string _stderr = PathUtil::Stderr(file_name);
if (FileUtil::IsFileExists(_stderr))
unlink(_stderr.c_str());
}
// 状态码转化为状态描述 根据Start()函数对code的设置来定
/***************************
* code > 0 : 进程收到信号导致异常崩溃
* code < 0 : 整个过程非运行报错(代码为空,编译报错等)
* code = 0 :整个过程全部正常运行
* **************************/
static std::string CodeToDesc(int code, const std::string &file_name)
{
std::string desc;
switch (code)
{
case 0:
desc = "编译运行成功";
break;
case -1:
desc = "提交代码为空";
break;
case -2:
desc = "未知错误";
break;
case -3:
// desc = "编译时发生了错误";
// 编译时错误直接从错误哦文件中读取错误原因
FileUtil::ReadFile(PathUtil::CompilerError(file_name), &desc, true);
break;
case SIGABRT: // 6
desc = "内存超过范围";
break;
case SIGXCPU: // 24
desc = "运行超时";
break;
case SIGFPE: // 8
desc = "浮点数溢出";
break;
default:
desc = "未知:" + to_string(code);
break;
}
return desc;
}
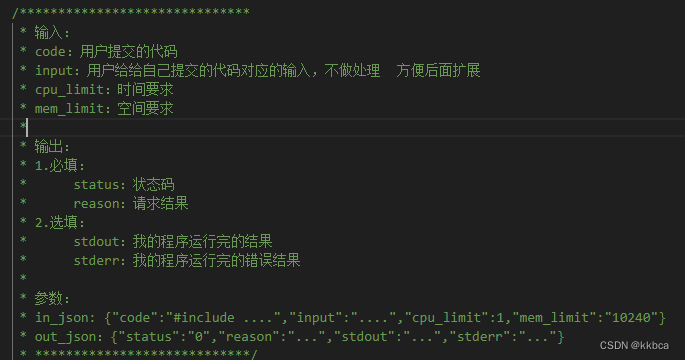
/******************************
* 输入:
* code:用户提交的代码
* input:用户给给自己提交的代码对应的输入,不做处理 方便后面扩展
* cpu_limit:时间要求
* mem_limit:空间要求
*
* 输出:
* 1.必填:
* status:状态码
* reason:请求结果
* 2.选填:
* stdout:我的程序运行完的结果
* stderr:我的程序运行完的错误结果
*
* 参数:
* in_json: {"code":"#include ....","input":"....","cpu_limit":1,"mem_limit":"10240"}
* out_json:{"status":"0","reason":"...","stdout":"...","stderr":"..."}
* ****************************/
static void Start(const std::string &in_json, std::string *out_json)
{
Json::Value in_value;
Json::Reader reader;
reader.parse(in_json, in_value);
std::string code = in_value["code"].asString();
std::string input = in_value["input"].asString();
int cpu_limit = in_value["cpu_limit"].asInt();
int mem_limit = in_value["mem_limit"].asInt();
Json::Value out_value;
int status_code = 0;
int run_result_code = 0;
std::string file_name; // 需要内部形成的唯一文件名
if (code.size() == 0)
{
status_code = -1;
// 差错处理
goto END;
}
// 获取具有唯一性的名字,防止编译冲突 不带后缀
file_name = FileUtil::UniqFileName();
// 形成临时src文件,并且写入用户传递的代码
if (!FileUtil::WriteFile(PathUtil::Src(file_name), code))
{
status_code = -2;
goto END;
}
if (!Compiler::Compile(file_name))
{
// 编译失败
status_code = -3;
goto END;
}
run_result_code = Runner::Run(file_name, cpu_limit, mem_limit);
if (run_result_code < 0)
{
// 打开文件描述符或fork失败
status_code = -2;
}
else if (run_result_code > 0)
{
// 程序运行崩溃
status_code = run_result_code;
}
else
{
// 运行成功
status_code = 0;
}
END:
out_value["status"] = status_code;
//状态码转描述
out_value["reason"] = CodeToDesc(status_code, file_name);
if (status_code == 0)
{
// 整个过程全部成功
std::string _stdout;
FileUtil::ReadFile(PathUtil::Stdout(file_name), &_stdout, true);
out_value["stdout"] = _stdout;
std::string _stderr;
FileUtil::ReadFile(PathUtil::Stderr(file_name), &_stderr, true);
out_value["stderr"] = _stderr;
}
Json::StyledWriter writer;
*out_json = writer.write(out_value);
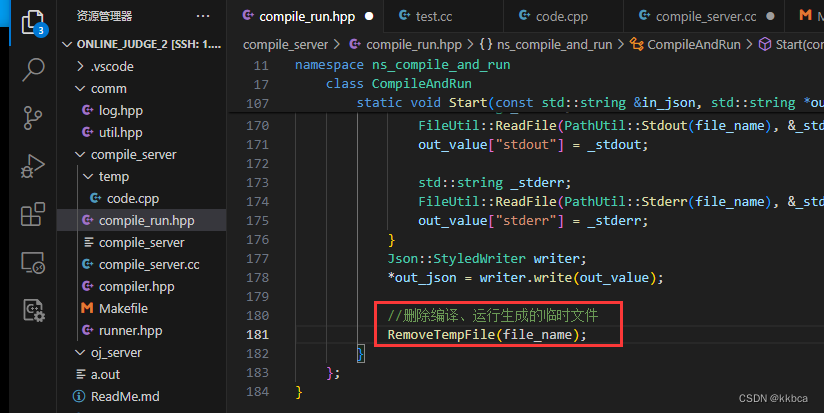
//删除编译、运行生成的临时文件
//RemoveTempFile(file_name);
}
};
}我们自定义一个json,然后代码提交看看效果
cpp
#include "compile_run.hpp"

using namespace ns_compile_and_run;

int main()
{
    // in_json : {"code" : "#include ....", "input" : "....", "cpu_limit" : 1, "mem_limit" : "10240"};
    // out_json:{"status" : "0", "reason" : "...", "stdout" : "...", "stderr" : "..."} ;

    // 测试-------------》》》》》》》》》》》充当客户端请求过来的json串
    std::string in_json;

    Json::Value in_value;
    in_value["code"] = R"(#include <iostream>
    int main()
    {
        std::cout<<"hello code"<<std::endl;
        return 0;
    })";
    in_value["input"] = "";
    in_value["cpu_limit"] = 1;
    in_value["mem_limit"] = 1024 * 30;

    Json::FastWriter write;
    in_json = write.write(in_value);
    std::cout<<in_json<<std::endl;

    string out_value;
    CompileAndRun::Start(in_json,&out_value);
    std::cout<<out_value<<std::endl;
    return 0;
}
运行结果如下,运行成功
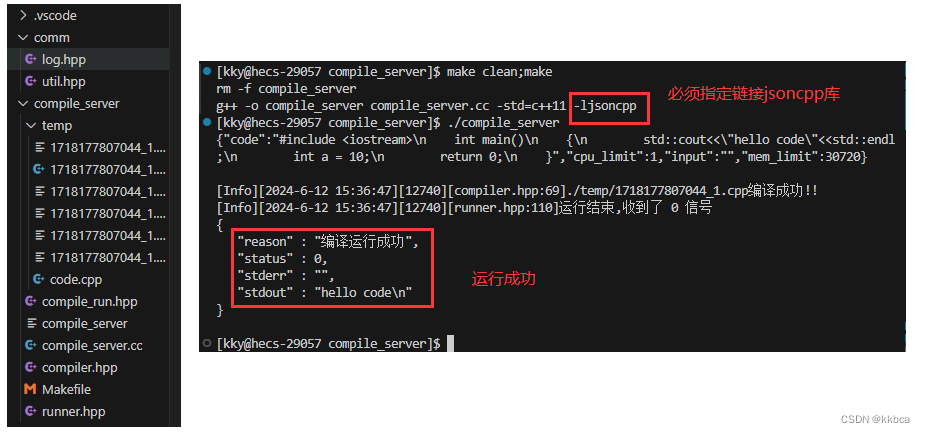
如果嫌每次都要生成这么多文件比较烦,可以打开compile_run.hpp下的这个接口,可以删除temp目录下生成的文件。因为我们的目的并不是获取这些文件,而是将这些文件的结果返回到json当中,读取完比这些文件就没有作用了。
4.引入cpp-httplib库
4.1升级gcc版本
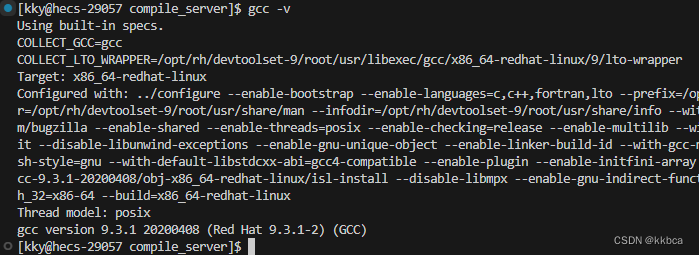
要使用cpp-httplib库,版本低的gcc运行会报错的,最好先将gcc升级成新版本,输入如下指令查看gcc版本
bash
gcc -v如果发现版本是9.几的就可以跳过该步骤,直接去4.2引入cpp-httplib
使用如下指令让scl gcc devsettool帮我们升级gcc
bash
sudo yum install centos-release-scl scl-utils-build
sudo yum install -y devtoolset-9-gcc devtoolset-9-gcc-c++
ls /opt/rh/
当看到devtoolset-9存在的时候,就证明我们安装好了

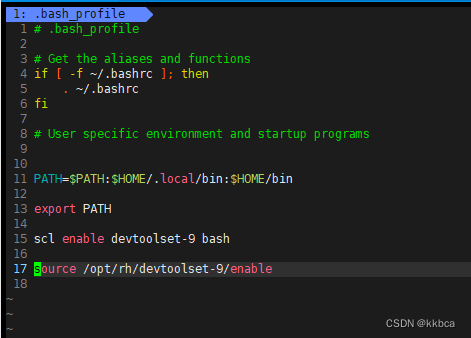
然后我们要进行配置,命令行输入如下指令打开bash_profile文件
bash
vim ~/.bash_profile把下面两行代码添加到 bash_profile文件中(输入 i 就可以插入,再esc退出插入模式,输入:wq保存)
bash
scl enable devtoolset-9 bash

source /opt/rh/devtoolset-9/enable
如下就是配置好了
再重** 启一下xshell输入gcc -v 就可以看到变为了新版本**。
4.2cpp-httplib
大家点击如下链接进行下载,git clone需要用户名和密码,用ZIP下载不需要
然后拖拽可以直接拷贝到Linux系统,或者输入指令rz 进行选择拷贝。随后输入如下指令进行解压
cpp
unzip cpp-httplib-v0.7.15.zip 解压之后我们需要将其中的httplib.h给拷贝到项目中
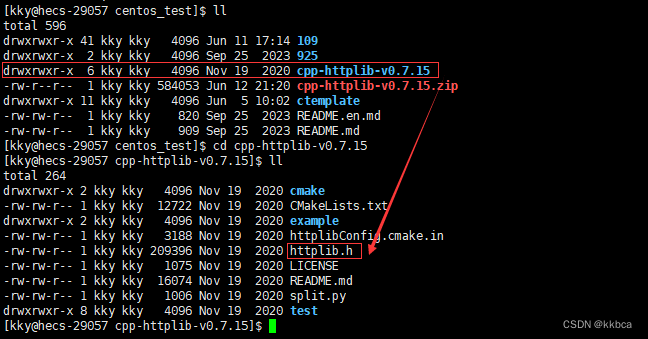
如下,拷贝到了我的项目中,这里右边的内容你需要换成自己的路径
cpp
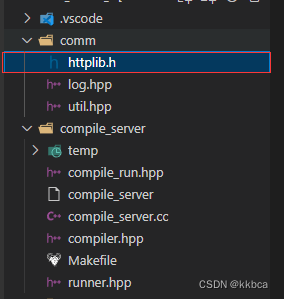
cp cpp-httplib-v0.7.15/httplib.h 109/ONLINE_JUDGE_2/comm/ 拷贝完成,comm下多了一个httplib
4.3httplib的使用
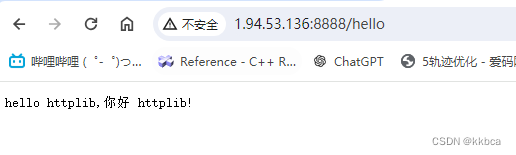
运用也十分简洁,调用Server对象的Get方法**,第一个参数为路径,第二个参数为回调函数**,函数参数类型第一个是Request请求、第二个是Response响应,我们给响应set_content添加正文内容,就可以在网页端看到效果了。这些是我们处理的回调对象,最后要记得进行listen监听,"0.0.0.0"代表可以接受来自所有网络接口的连接。
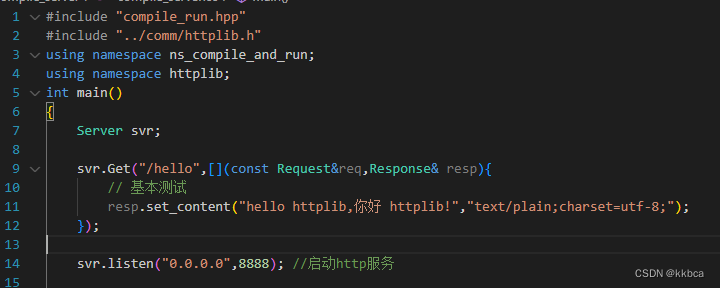
在编译时,我们一定要添加-lpthread,因为httplib使用的pthread库,需要指定链接

学会了httplib库的基本使用,我们得将http与编译运行模块链接起来。
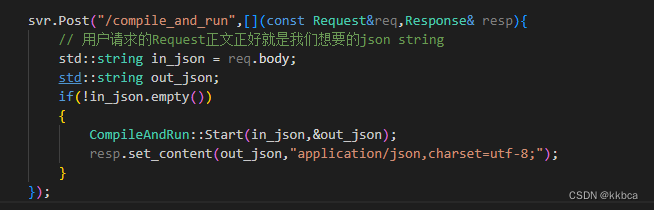
通过html前后端的交互,用户Post请求的Request正文正好就是我们想要的json string。于是就可以提取出req.body,然后就让这个body去进行编译并运行,最后返回给页面。
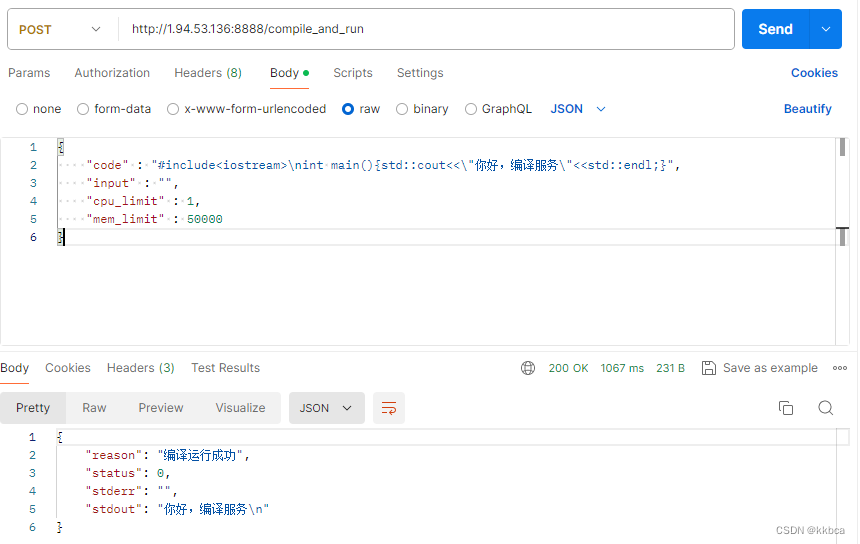
由于目前我们html网站还没写,因此使用Postman进行数据发送,如下,发送的原始Json,收到返回的是compile_run 模块返回的内容,成功完成http的编译与运行结果反馈。
日志也成功打印出来消息

文件也成功生成

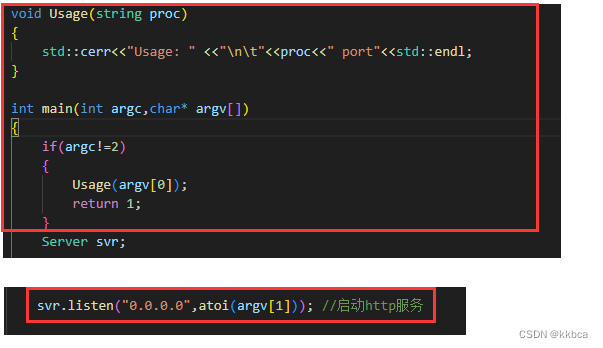
同时,我们想要负载均衡的在线OJ系统,那么compile_server服务就不能只支持一个,得支持多个,因此port端口不能固定的传入,可以通过命令行参数agrv运行时再传入端口,修改成如下即可。
五、oj_server服务设计
我们想做一个基于MVC结构的oj服务设计,他的本质就是建立一个小型网站,能从网站上进行代码提交并返回给编译服务进行编译,再将结构返回到前端网页。
MVC介绍
- M:Model,是和数据交互的模块,比如对题库的增删查改
- V :View,拿到数据后,要进行构建网页,渲染网页内容,展示给用户
- C:control,控制器,核心业务逻辑
oj_server的主要功能
- 获取首页,用题目列表充当
- 编辑区域页面
- 提交判题功能(编译并运行)
1. http路由选择
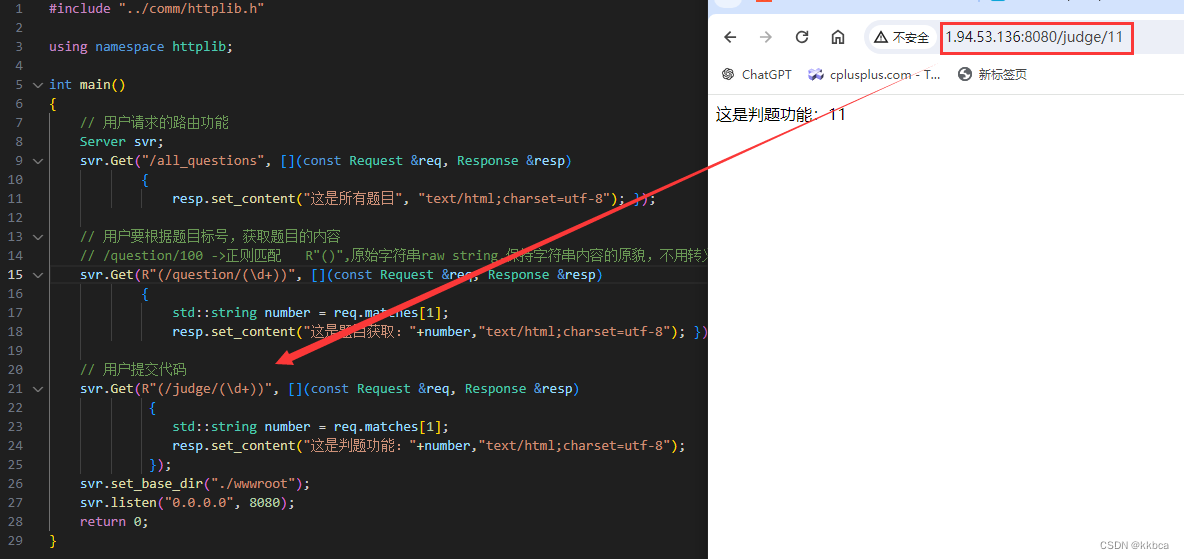
一样的,使用http进行路由选择,主要分为了三个路由,获取所有题目(从文件中读取所有题目并返回)、获取某一个具体题目内容、提交代码,目前网站随便放一点信息能体现路由成功就好,后面再添加功能
2.文件版题目设计
题目的主要内容
- 题目的编号
- 题目的标题
- 题目的难度
- 题目的描述
- 时间要求(内部处理)
- 空间要求(内部处理)
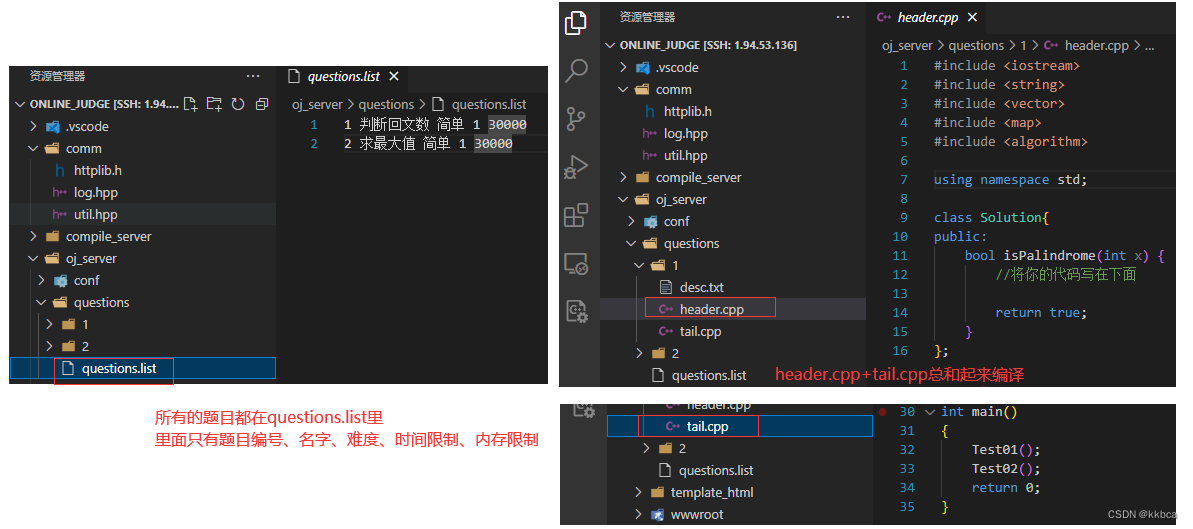
由两批文件构成
- questions.list:题目列表
- 题目描述,题目的预设值代码(header.cpp)、测试用例代码(tail.cpp)
- 先从questions.list题目描述中获取题目信息,根据题目编号去找到对应的文件夹
- 再找到文件夹下的desc.txt描述,将描述反馈到网站,在header编辑器中进行编译(html实现,先理解逻辑就好),提交时与tail.cpp(测试用例)进行拼接
- 再交给编译运行服务进行处理
- 最后将结果再返回到网站中。
3.model------数据交互模块
我们需要将文件中的数据读取出来,MVC模块中model就是用来干这个活的,我们可以定义一个Question类,里面有如下内容,可以完美的将题目的所有信息获取到,再创建一个vector<Question>容器,从文件中一行一行的将Question的信息读取出来
cpp
    struct Question
    {
        string number; // 题目唯一编号
        string title;  // 题目标题
        string star;   // 题目难度
        int cpu_limit; // 题目的时间要求(s)
        int mem_limit; // 题目的空间要求(KB)
        string desc;   // 题目的描述
        string header; // 题目预设给用户在线编译器的代码
        string tail;   // 题目的测试用例,与header拼接形成完整代码
    };
代码逻辑并不复杂,其中拆分逻辑用到了boost库
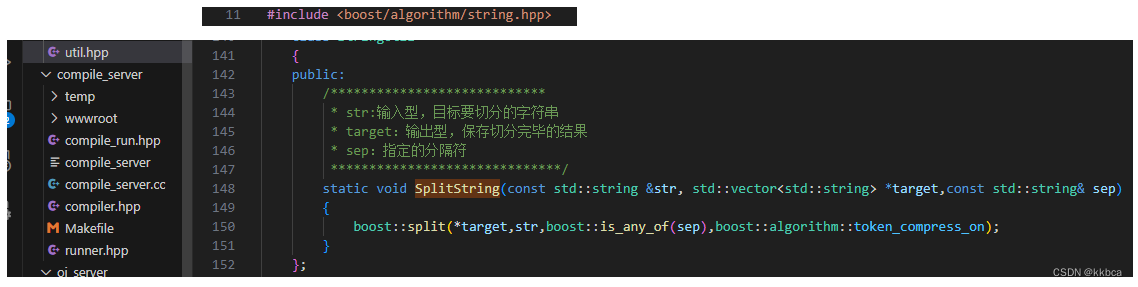
安装如下
cpp
sudo yum install -y boost-develoj_model.hpp代码如下
cpp
#pragma once

#include "../comm/log.hpp"
#include "../comm/util.hpp"
#include <cassert>
#include <vector>
#include <unordered_map>
// 根据题目list文件,加载所有的题目信息到内存中
// model:主要用来和数据进行交互,对外提供访问的接口

namespace ns_model
{
    using namespace std;
    using namespace ns_log;
    using namespace ns_util;

    struct Question
    {
        string number; // 题目唯一编号
        string title;  // 题目标题
        string star;   // 题目难度
        int cpu_limit; // 题目的时间要求(s)
        int mem_limit; // 题目的空间要求(KB)
        string desc;   // 题目的描述
        string header; // 题目预设给用户在线编译器的代码
        string tail;   // 题目的测试用例,与header拼接形成完整代码
    };

    const std::string question_list = "./questions/questions.list";
    const std::string question_path = "./questions/";

    class Model
    {
    public:
        Model()
        {
            assert(LoadQuestionList(question_list));
        }
        bool LoadQuestionList(const string &question_list)
        {
            ifstream in(question_list);
            if (!in.is_open())
            {
                lg(Fatal, "加载题库失败,请检查题库文件");
                return false;
            }
            std::string line;
            while (getline(in, line))
            {
                vector<string> tokens;
                StringUtil::SplitString(line, &tokens, " ");
                // 1 判断回文数 简单 1 30000
                if (tokens.size() != 5)
                {
                    lg(Warning,"加载部分题目失败,请检查文件格式");
                    continue;
                }
                Question q;
                q.number = tokens[0];
                q.title = tokens[1];
                q.star = tokens[2];
                q.cpu_limit = stoi(tokens[3]);
                q.mem_limit = stoi(tokens[4]);

                // 题目路径拼接
                string path = question_path;
                path += q.number;
                path += "/";

                FileUtil::ReadFile(path + "desc.txt", &q.desc, true);
                FileUtil::ReadFile(path + "header.cpp", &q.header, true);
                FileUtil::ReadFile(path + "tail.cpp", &q.tail, true);

                _questions.insert({q.number, q});
            }
            lg(Info,"加载题库成功!!!");
            in.close();
            return true;
        }
        bool GetAllQuestions(vector<Question> *out)
        {
            if (_questions.size() == 0)
            {
                lg(Error,"用户获取题库失败");
                return false;
            }

            for (auto &q : _questions)
            {
                // first:string, second:Question
                out->push_back(q.second);
            }
            return true;
        }

        bool GetOneQuestions(const string &number, Question *out)
        {
            const unordered_map<string, Question>::const_iterator &iter = _questions.find(number);
            if (iter == _questions.end())
            {
                lg(Error,"用户题目失败,题目编号:%s",number.c_str());
                return false;
            }
            *out = iter->second;
            return true;
        }

    private:
        // first为题目编号  second为题目结构体
        unordered_map<string, Question> _questions;
    };
}
4.view构建并渲染网页模块
前面的model模块让我们可以获取到构建网页所需要的数据了,现在view模块需要利用获取到的数据去构建网页。
4.1 ctemplate安装
这里会用到ctemplate库,我们先用如下指令clone一下
cpp
git clone https://github.com/OlafvdSpek/ctemplate.git再执行如下指令,就安装成功了
bash
cd ctemplate/
./autogen.sh
./configure
make
sudo make install
4.2 ctemplate的使用
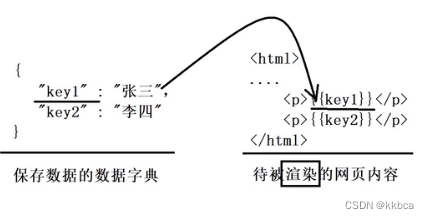
- ctemplate的主要作用是渲染html,本质上就是替换,将形成的数据字典添加上key:value的键值对,在html里将这些被双括号括起来的 {{键}} 都替换为值。
- 为什么要这么做呢?因为我们要将Question结构体的数据自动的填充到网页中,形成了数据字典,填充好字段,后续html也设置好key,后续ctemplate就可以自动的帮我们实现了。
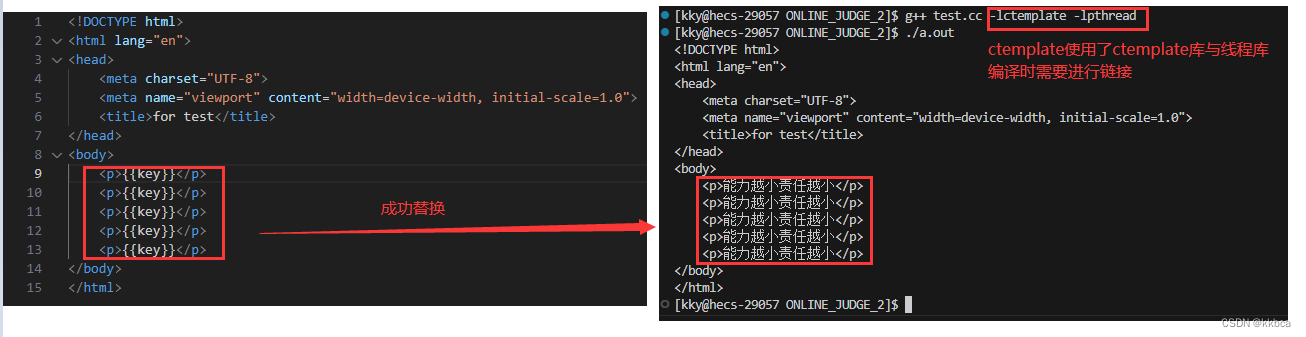
测试代码如下
cpp
#include <iostream>
#include <string>
#include <ctemplate/template.h>

using namespace std;
int main()
{
    string in_html = "./test.html";
    string value = "能力越小责任越小";

    //形成数据字典  类似于形成了一个unordered_map <key,value> test
    ctemplate::TemplateDictionary root("test");
    root.SetValue("key",value);

    //获取被渲染网页对象     DO_NOT_STRIP是不要剥离(保持字典原貌)
    ctemplate::Template *tpl = ctemplate::Template::GetTemplate(in_html,ctemplate::DO_NOT_STRIP);

    //添加字典数据到网页中
    string out_html;
    tpl->Expand(&out_html,&root);
    cout<<out_html<<endl;
}
4.3 view 渲染与html
学会了刚刚的用法,这里我们使用了循环渲染html,因为题目有很多,是放在vector<Question> questions里面的,因此html我们得让成功的输出每一行,而我们并不清楚具体有多少行,因为我们可能随时会添加题目,于是用循环渲染的方式,让代码更有健壮性。
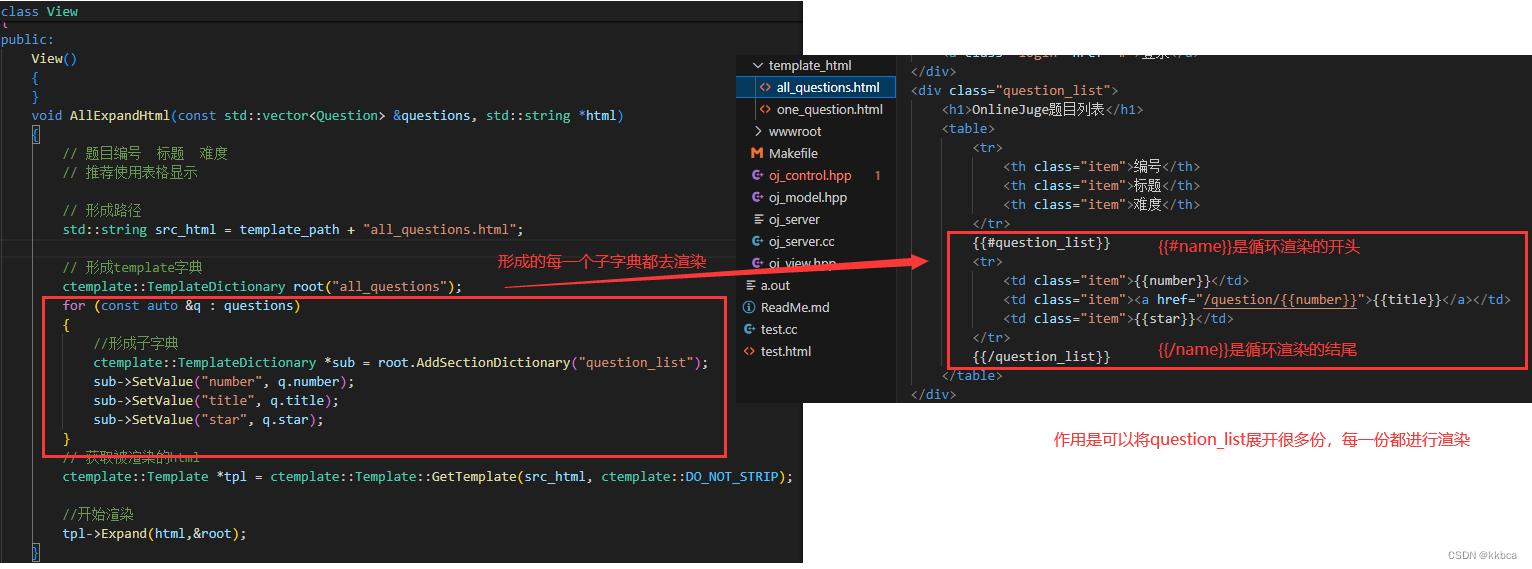
效果如下,这是all_questions网站(获取所有的题目大致信息),有questions里面有几道题就会循环渲染几次
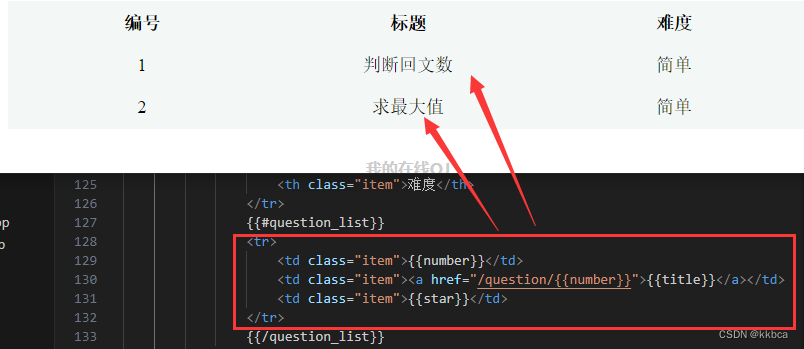
如下是one_question网站(获取某一个题目的具体信息),只需要一道题,因此不需要循环渲染
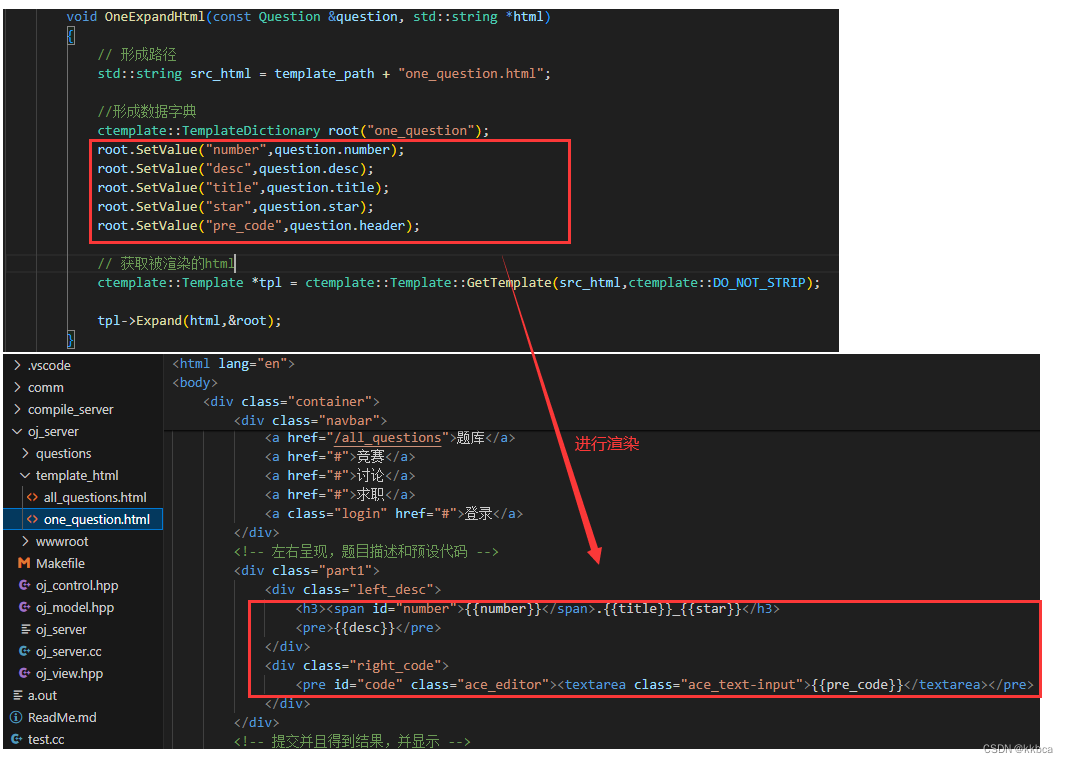
现在html就能成功获取后端数据了

具体代码如下
cpp
#pragma once

#include <ctemplate/template.h>

#include "oj_model.hpp"

namespace ns_view
{
    using namespace ns_model;

    const std::string template_path = "./template_html/";
    class View
    {
    public:
        View()
        {
        }
        void AllExpandHtml(const std::vector<Question> &questions, std::string *html)
        {
            // 题目编号  标题  难度
            // 推荐使用表格显示

            // 形成路径
            std::string src_html = template_path + "all_questions.html";

            // 形成template字典
            ctemplate::TemplateDictionary root("all_questions");
            for (const auto &q : questions)
            {
                // 形成子字典
                ctemplate::TemplateDictionary *sub = root.AddSectionDictionary("question_list");
                sub->SetValue("number", q.number);
                sub->SetValue("title", q.title);
                sub->SetValue("star", q.star);
            }
            // 获取被渲染的html
            ctemplate::Template *tpl = ctemplate::Template::GetTemplate(src_html, ctemplate::DO_NOT_STRIP);

            // 开始渲染
            tpl->Expand(html, &root);
        }
        void OneExpandHtml(const Question &question, std::string *html)
        {
            // 形成路径
            std::string src_html = template_path + "one_question.html";

            //形成数据字典
            ctemplate::TemplateDictionary root("one_question");
            root.SetValue("number",question.number);
            root.SetValue("desc",question.desc);
            root.SetValue("title",question.title);
            root.SetValue("star",question.star);
            root.SetValue("pre_code",question.header);

            // 获取被渲染的html
            ctemplate::Template *tpl = ctemplate::Template::GetTemplate(src_html,ctemplate::DO_NOT_STRIP);

            tpl->Expand(html,&root);
        }
        ~View()
        {
        }
    };
}
5.control 控制
5.1结合model模块与view模块进行获取html网页信息
这里是我们只是调用了之前写的model与view模块接口
cpp
#pragma once
#include "oj_model.hpp"
#include "oj_view.hpp"
namespace ns_contrl
{
    using namespace ns_model;
    using namespace ns_log;
    using namespace ns_util;
    using namespace ns_view;
    class Control
    {
    public:
        Control()
        {

        }
        //根据题目数据构建网页
        bool AllQuestions(string* html)
        {
            vector<Question> questions;
            if(_model.GetAllQuestions(&questions))
            {
                // 给题目编号进行排序
                sort(questions.begin(), questions.end(), [](const Question &q1, const Question q2)
                     { return stoi(q1.number) < stoi(q2.number); });
                // 获取题目信息成功,将所有的题目数据构建成网页
                _view.AllExpandHtml(questions, html);
            }
            else
            {
                *html = "获取题目失败, 形成题目列表失败";
                return false;
            }

            return true;
        }
        bool OneQuestion(const string& number,string *html)
        {
            Question q;
            if (_model.GetOneQuestion(number, &q))
            {
                // 获取指定题目信息成功,将题目数据构建成网页
                _view.OneExpandHtml(q, html);
            }
            else
            {
                *html = "获取指定题目: " + number + " 失败, 不存在!";
                return false;
            }
            return true;
        }
        ~Control()
        {

        }
    private:
        Model _model;
        View _view;
    };
}
5.2 Machine 模块
到这里,我们已经完成了从文件中获取数据,并将数据展示在html网页中,但是仅仅是展示还没够,我们还得将写好的数据能够提交到后端进行判题。
其中,我们是负载均衡的在线OJ系统,那我们应该要提交给哪一台机器呢?
因此我们得还有一个类来负责机器管理。此时我们得对负载因子进行加锁,因为同一时间可能有很多人进行提交代码到机器上进行编译处理,因此加锁可以预防多线程下变量的安全问题。
cpp
class Machine
    {
        friend class LoadBlance;
    public:
        Machine()
            : _ip(string()), _port(0), _load(0), _mtx(nullptr)
        {
        }
        Machine(string ip,uint16_t port)
            : _ip(ip), _port(port), _load(0), _mtx(new std::mutex())
        {
        }

        //提升主机负载
        void IncLoad()
        {
            if(_mtx)
                _mtx->lock();
            ++_load;
            if(_mtx)
                _mtx->unlock();
        }

        //直接使用参数_load也能获取,这样写是为了统一接口
        uint64_t Load()
        {
            uint64_t load = 0;
            if(_mtx)
                _mtx->lock();
            load = _load;
            if(_mtx)
                _mtx->unlock();
            return _load;
        }

        //减少主机负载
        void DecLoad()
        {
            if(_mtx)
                _mtx->lock();
            --_load;
            if(_mtx)
                _mtx->unlock();
        }

        //清零负载  主机离线后需要立刻将负载清零,防止下次主机上线时负载不为0
        void ResetLoad()
        {
            if (_mtx)
                _mtx->lock();
            _load = 0;
            if (_mtx)
                _mtx->unlock();
        }

        ~Machine()
        {
        }

    private:
        std::string _ip;  // ip
        uint16_t _port;        // port
        uint64_t _load;   // 负载
        std::mutex *_mtx; // 锁
    };
5.3 LoadBlance负载均衡模块
目前有了machine类,可以对机器进行管理,还需要负载均衡模块帮我们遍历查询哪一台主机负载少,就让哪个主机进行编译。
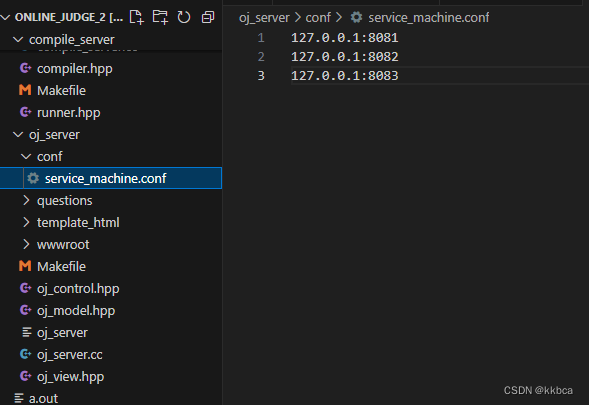
其中参数部分有 _online在线主机、_offline离线主机、_machines所有主机,首先从service_machine.conf进行主机的配置,按照ip+port进行配置,这里我们只有一台服务器,因此使用多进程进行模拟负载均衡。
机器的上线与离线通过_online 与 _offline的互相erase和insert实现。
cpp
const std::string service_machine = "./conf/service_machine.conf";
    class LoadBlance
    {
    public:
        LoadBlance()
        {
            assert(LoadConf(service_machine));
            lg(Info,"加载 %s 成果",service_machine.c_str());
        }
        bool LoadConf(const std::string &machine_conf)
        {
            std::ifstream in(machine_conf);
            if(!in.is_open())
            {
                lg(Fatal,"加载: %s 失败",machine_conf.c_str());
                return false;
            }

            std::string line;
            while(std::getline(in,line))
            {
                std::vector<std::string> tokens;
                StringUtil::SplitString(line,&tokens,":");
                if(tokens.size()!=2)
                {
                    lg(Warning,"切分: %s 失败",line.c_str());
                    continue;
                }
                Machine m(tokens[0],stoi(tokens[1]));
                _machines.push_back(m);
                _online.push_back(_machines.size());
            }

            in.close();
            return true;
        }

        bool SmartChoice(int *id,Machine** m)
        {
            // 1.选择好的主机(负载少的主机)并更新负载
            // 2.可能需要离线该主机
            lock_guard<mutex> lck(_mtx);
            // 负载均衡的算法 ------> 轮询 + hash
            int online_num = _online.size();
            if (online_num == 0)
            {
                lg(Fatal, "所有的编译主机全部离线,需要赶紧上线!!!");
                return false;
            }

            // 通过遍历的方式找到所有负载最小的机器
            *id = _online[0];
            *m = &_machines[_online[0]];
            uint64_t min_load = _machines[_online[0]].Load();
            for (int i = 1; i < online_num; i++)
            {
                uint64_t cur_load = _machines[_online[i]].Load();
                if (min_load > cur_load)
                {
                    min_load = cur_load;
                    *id = _online[i];
                    *m = &_machines[_online[i]];
                }
            }
            return true;
        }

        //选择进行下线 某个id 的主机
        void OfflineMachine(int which_id)
        {
            lock_guard<mutex> lock(_mtx);
            for (auto iter = _online.begin(); iter != _online.end(); iter++)
            {
                if (*iter == which_id)
                {
                    // 找到了要离线的主机  需要先给负载清0
                    _machines[which_id].ResetLoad();
                    _offline.push_back(*iter);
                    _online.erase(iter);
                    return;
                }
            }
        }

        // 统一上线主机
        void OnlineMachine()
        {
            lock_guard<mutex> lock(_mtx);
            {
                _online.insert(_online.end(), _offline.begin(), _offline.end());
                _offline.erase(_offline.begin(), _offline.end());
            }
            lg(Info, "所有的主机又上线啦!");
        }

        //仅供调试查看信息
        void showMachines()
        {
            lock_guard<mutex> lock(_mtx);
            std::cout << "当前在线主机列表:";
            for (auto &id : _online)
            {
                std::cout << id << " ";
            }
            std::cout << endl;
            std::cout << "当前离线主机列表:";
            for (auto &id : _offline)
            {
                std::cout << id << " ";
            }
            std::cout << endl;
        }

        ~LoadBlance()
        {
        }

    private:
        // 可以给我们提供编译服务所有的主机
        // 主机下标充当id
        std::vector<Machine> _machines;
        // 所有在线的主机id
        std::vector<int> _online;

        // 所有离线的主机id
        std::vector<int> _offline;

        // 保证loadBlance安全的锁
        std::mutex _mtx;
    };
5.4 control 控制模块
MVC模式中Model和View已经完成了,目前可以从文件中读取数据,View可以获取数据渲染的htm。现在我们要使用control模块对他们进行控制了。同时还提供了Judge功能,能够将用户提交的代码进行判题。
- 根据题目编号,拿到题目
- 对in_json进行反序列化,得到题目code、input
- 重新拼接用户代码+测试用例,得到新的代码
- 选择负载最低的主机
- 对负载最低的主机发起http请求得到结果
- 结果赋值给输出参数out_json
cpp
class Control
    {
    public:
        Control()
        {
        }
        // 根据题目数据构建网页
        bool AllQuestions(string *html)
        {
            vector<Question> questions;
            if (_model.GetAllQuestions(&questions))
            {
                // 给题目编号进行排序
                sort(questions.begin(), questions.end(), [](const Question &q1, const Question q2)
                     { return stoi(q1.number) < stoi(q2.number); });
                // 获取题目信息成功,将所有的题目数据构建成网页
                _view.AllExpandHtml(questions, html);
            }
            else
            {
                *html = "获取题目失败, 形成题目列表失败";
                return false;
            }

            return true;
        }
        bool OneQuestion(const string &number, string *html)
        {
            Question q;
            if (_model.GetOneQuestion(number, &q))
            {
                // 获取指定题目信息成功,将题目数据构建成网页
                _view.OneExpandHtml(q, html);
            }
            else
            {
                *html = "获取指定题目: " + number + " 失败, 不存在!";
                return false;
            }
            return true;
        }

        // 第一个参数in_json
        // {
        //      "code" : "#include ....",
        //      "input" : "...",
        // }
        void Judge(const std::string &number, const std::string in_json, std::string *out_json)
        {
            // 1. 根据题目编号,拿到题目
            struct Question q;
            _model.GetOneQuestion(number, &q);

            // 2. 对in_json进行反序列化,得到题目id、code、input
            Json::Reader reader;
            Json::Value in_value;
            reader.parse(in_json, in_value);
            std::string code = in_value["code"].asString();

            // 3. 重新拼接用户代码+测试用例,得到新的代码
            Json::Value compile_value;
            compile_value["input"] = in_value["input"].asString();
            compile_value["code"] = code + q.tail;
            // Json::Value既可以接受字符串又可以接受整数
            compile_value["cpu_limit"] = q.cpu_limit;
            compile_value["mem_limit"] = q.mem_limit;
            Json::StyledWriter writer;
            std::string compile_string = writer.write(compile_value);

            // 4. 选择负载最低的主机(做差错处理)
            // 选择规则: 一直选择,直到主机可用,否则就是全部挂掉
            while (true)
            {
                int id = 0;
                Machine *m = nullptr;
                if (!_load_blance.SmartChoice(&id, &m))
                {
                    break;
                }
                lg(Info, "选择主机成功,主机id: %d,详情: %s:%d,当前主机负载:%d", id, m->_ip.c_str(), m->_port,m->_load);
                // 5. 发起http请求得到结果
                Client cli(m->_ip, m->_port);
                m->IncLoad();
                if (auto res = cli.Post("/compile_and_run", compile_string, "application/json;charset=utf-8"))
                {
                    // 请求成功
                    // 6. 结果赋值给out_josn
                    if (res->status == 200)
                    {
                        *out_json = res->body;
                        m->DecLoad();
                        lg(Info,"请求编译和运行服务成果...");
                        break;
                    }
                    m->DecLoad();
                }
                else
                {
                    // 请求失败
                    lg(ns_log::Error, "当前请求的主机id: %d,详情: %s:%d 可能已经离线", id, m->_ip.c_str(), m->_port);

                    _load_blance.OfflineMachine(id);
                }
            }
        }

        ~Control()
        {
        }

    private:
        Model _model;            // 提供后台数据
        View _view;              // 提供网页渲染功能
        LoadBlance _load_blance; // 核心负载均衡器
    };
注意这里我们使用了之前导入的jsoncpp库,因此编译时需要添加 -ljsoncpp 指明动态库。
测试结果如下,成功进行编译服务。

六、html
html设计这里就不多展开了,大家看源码即可,但是前后端交互的页面我们还是得有所了解的。他主要在我们进行代码提交,后端服务给我们将编译结果返回的时候。
点击提交代码时,我们要获取题号与code,因为后端要得到json并做处理,由于使用的是ACE (Ajax.org Cloud9 Editor)编辑器。
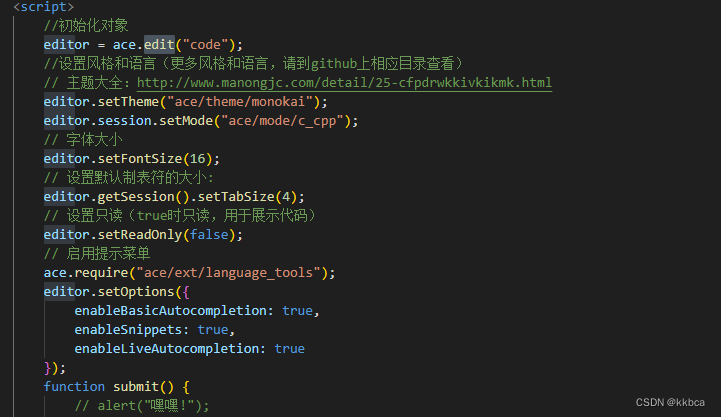
他有方法可以直接获取编辑框里的代码,因此直接定义code变量为获取的代码就可以。
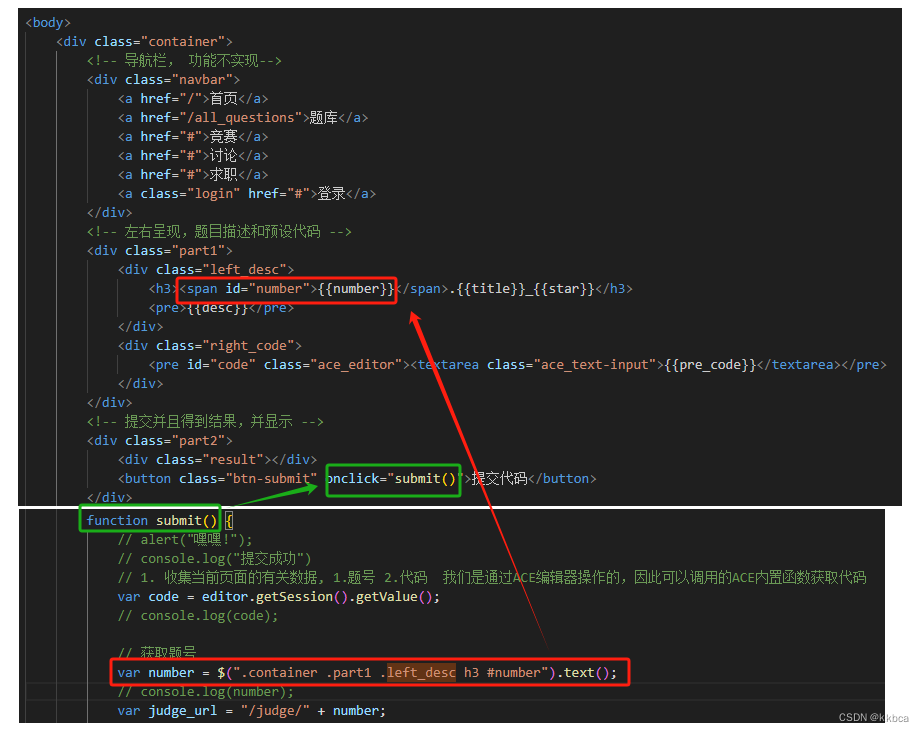
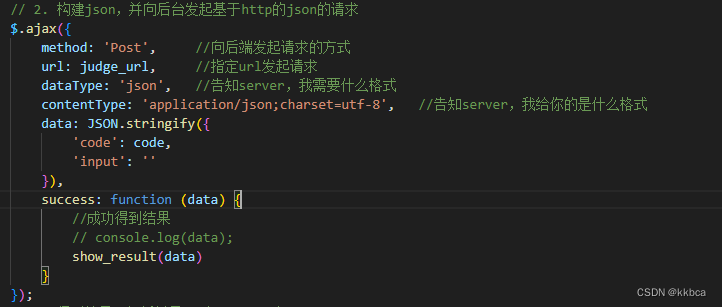
获取到了题号和代码,我们就要构建json向后端发起请求,这里使用了ajax发送json请求,当请求成功,就回去执行show_result函数
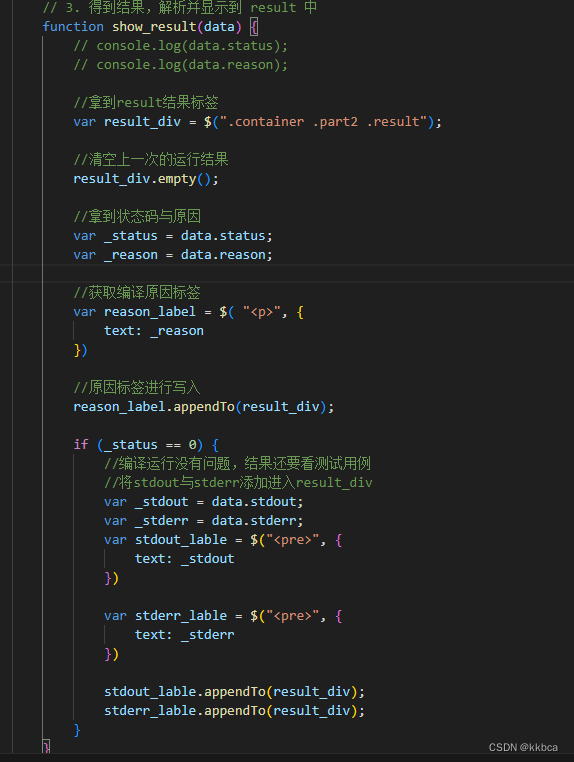
这个函数的目的就是将状态码和原因先显示到标签位置,如果状态码为0,证明至少编译时没问题的,结果对不对还得看测试用例,于是我们就可以将之前写入到stdout和stderr的运行结果再展示到标签位置。
七、总结
首先完成了编译运行模块,通过fork创建子进程,让子进程去调用程序替换,父进程等待子进程,同时获取到子进程的退出码。同时使用了httplib库来帮助我们进行Get、Post请求。
再完成了在线oj网站与服务器的搭建,从文件中读取机器的ip地址与端口,构建出负载均衡的所有机器。
然后智能选择负载较少的机器,给这个机器发送编译请求。
最后使用ajax进行前后端的交互,前端进行提交,将数据提交到后台,后台对数据做出响应,再将结果返回到前端上。
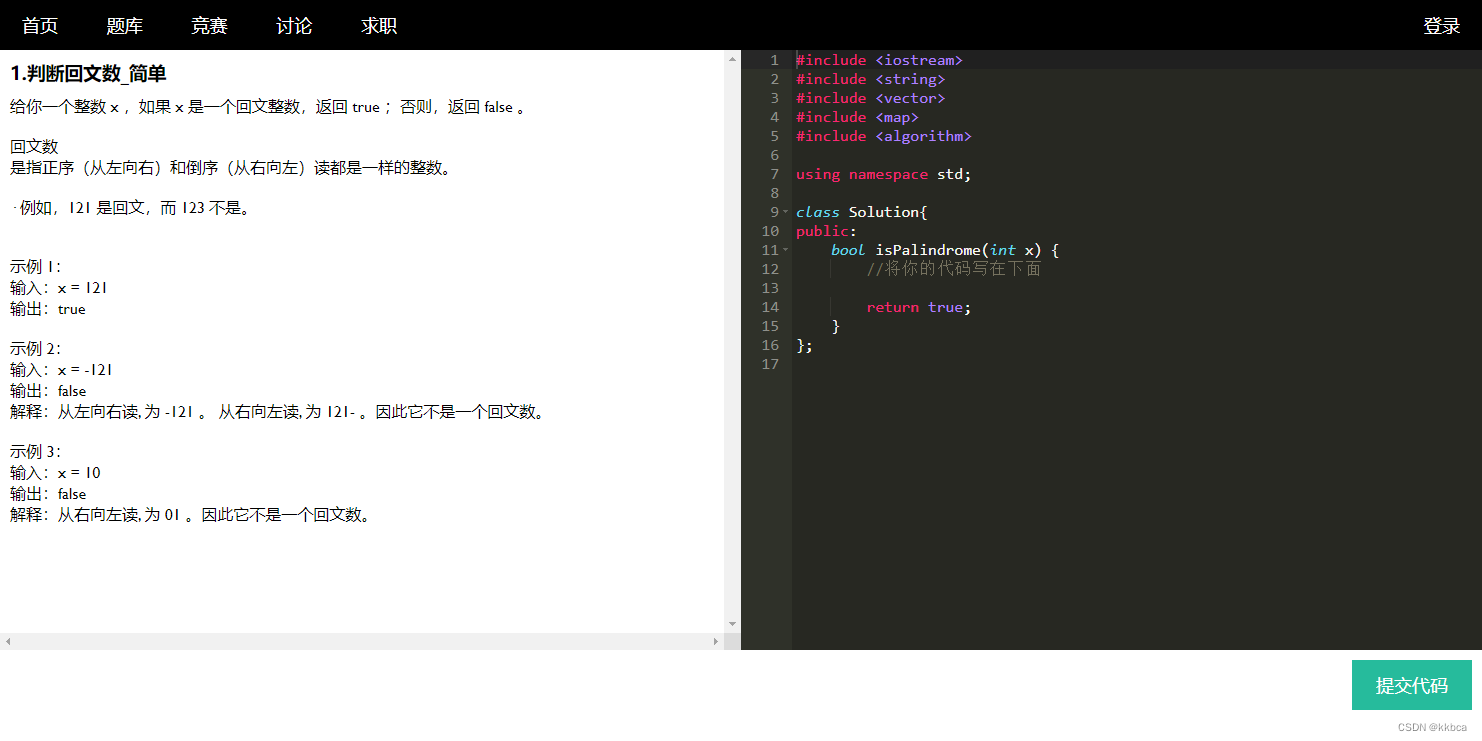
如下是某个题的答题界面
代码地址负载均衡在线oj系统
谢谢大家观看!