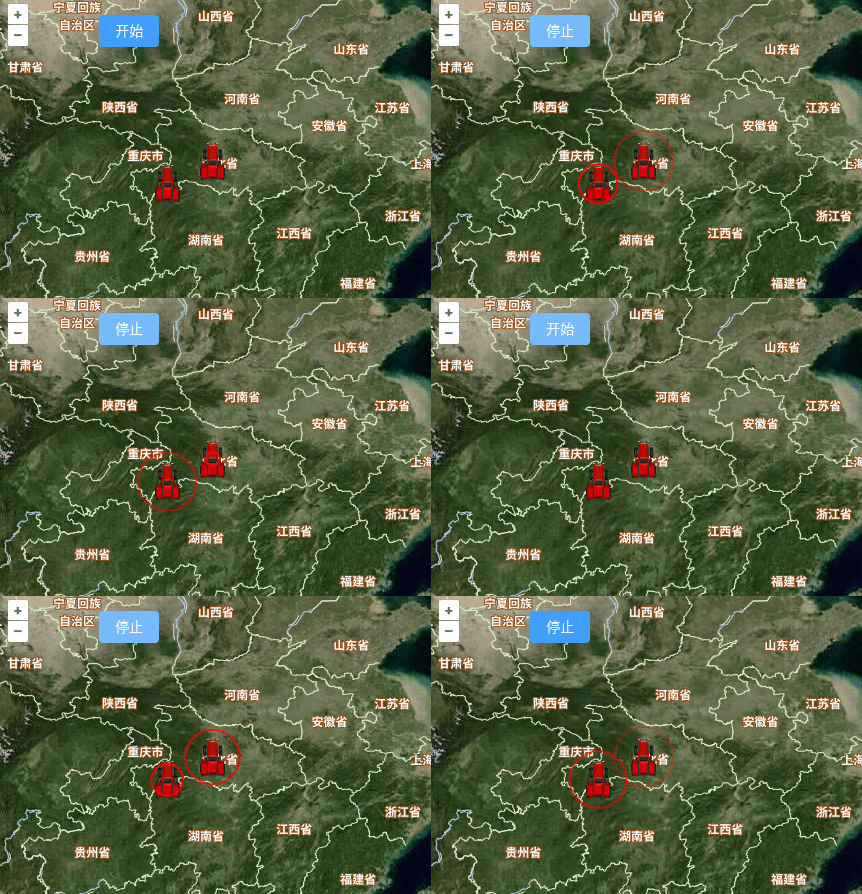
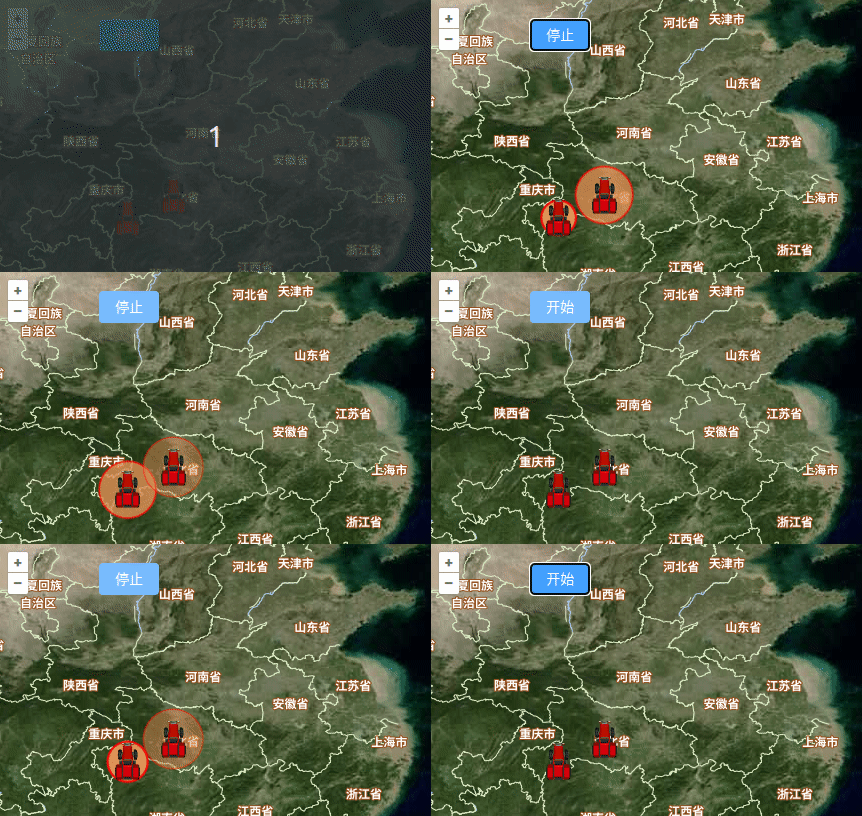
本篇介绍一下使用 vue3-openlayers marker 光晕扩散(光环扩散)(postrender 事件和 render 方法)
1 需求
- marker 光晕扩散(光环扩散)
2 分析
marker 光晕扩散(光环扩散)使用 postrender 事件和 render 方法
关于即时渲染的知识点请看上篇《openlayers marker 光晕扩散(光环扩散)(postrender 事件和 render 方法)》
3 实现
3.1 实现一(光环)

javascript
<template>
  <ol-map
    :loadTilesWhileAnimating="true"
    :loadTilesWhileInteracting="true"
    style="width: 100%; height: 100%"
    ref="mapRef"
  >
    <ol-view ref="view" :center="center" :zoom="zoom" :projection="projection" />

    <ol-tile-layer>
      <ol-source-tianditu
        layerType="img"
        :projection="projection"
        :tk="key"
        :hidpi="true"
        ref="sourceRef"
      ></ol-source-tianditu>
    </ol-tile-layer>
    <ol-tile-layer>
      <ol-source-tianditu
        :isLabel="true"
        layerType="img"
        :projection="projection"
        :tk="key"
        :hidpi="true"
      ></ol-source-tianditu>
    </ol-tile-layer>
    <ol-vector-layer ref="vectorLayerRef" @postrender="handlePostRender">
      <ol-source-vector>
        <ol-feature>
          <ol-geom-point :coordinates="[110, 30]"></ol-geom-point>
          <ol-style>
            <ol-style-icon :src="iconSrc" :scale="0.05"></ol-style-icon>
          </ol-style>
        </ol-feature>
        <ol-feature>
          <ol-geom-point :coordinates="[112, 31]"></ol-geom-point>
          <ol-style>
            <ol-style-icon :src="iconSrc" :scale="0.05"></ol-style-icon>
          </ol-style>
        </ol-feature>
      </ol-source-vector>
    </ol-vector-layer>
  </ol-map>
  <div class="toolbar">
    <el-button type="primary" @click="handleClick">{{ animationFlag ? '停止' : '开始' }}</el-button>
  </div>
</template>

<script setup lang="ts">
import iconSrc from '@/assets/image/truck.png';
import { getVectorContext } from 'ol/render.js';
import { easeOut } from 'ol/easing.js';
import { Circle, Stroke, Style } from 'ol/style';

const center = ref([121, 31]);
const projection = ref('EPSG:4326');
const zoom = ref(5);
const mapRef = ref();
const key = '替换为天地图key';
const sourceRef = ref(null);
const vectorLayerRef = ref(null);
const animationFlag = ref(false);
const duration = ref([3000, 1000]);
const start = ref([0, 0]);

const handleClick = () => {
  if (!animationFlag.value) {
    start.value = start.value.map(i => Date.now());
    vectorLayerRef.value.vectorLayer.changed();
  }
  animationFlag.value = !animationFlag.value;
};

const handlePostRender = e => {
  if (animationFlag.value) {
    const time = e.frameState.time;
    vectorLayerRef.value.vectorLayer
      .getSource()
      .getFeatures()
      .forEach((f, idx) => {
        // 时间戳差(毫秒)
        let elapsedTime = time - start.value[idx];
        if (elapsedTime >= duration.value[idx]) {
          start.value[idx] = Date.now();
          elapsedTime = duration.value[idx];
        }
        // 获取矢量上下文
        const vectorContext = getVectorContext(e);
        // elapsedRatio值0到1之间
        const elapsedRatio = elapsedTime / duration.value[idx];
        const radius = easeOut(elapsedRatio) * 25 + 5;
        const opacity = easeOut(1 - elapsedRatio);

        const style = new Style({
          image: new Circle({
            radius: radius,
            stroke: new Stroke({
              color: 'rgba(255, 0, 0, ' + opacity + ')',
              width: 1 + opacity
            })
          })
        });
        // 将feature渲染到画布中。
        vectorContext.drawFeature(f.clone(), style);
      });
    mapRef.value.map.render();
  }
};
</script>
<style scoped lang="scss">
.toolbar {
  position: absolute;
  top: 20px;
  left: 100px;
  display: flex;
  justify-content: center;
  align-items: center;
}
</style>
3.2 实现二(光晕)

javascript
<template>
  <ol-map
    :loadTilesWhileAnimating="true"
    :loadTilesWhileInteracting="true"
    style="width: 100%; height: 100%"
    ref="mapRef"
  >
    <ol-view ref="view" :center="center" :zoom="zoom" :projection="projection" />

    <ol-tile-layer>
      <ol-source-tianditu
        layerType="img"
        :projection="projection"
        :tk="key"
        :hidpi="true"
        ref="sourceRef"
      ></ol-source-tianditu>
    </ol-tile-layer>
    <ol-tile-layer>
      <ol-source-tianditu
        :isLabel="true"
        layerType="img"
        :projection="projection"
        :tk="key"
        :hidpi="true"
      ></ol-source-tianditu>
    </ol-tile-layer>
    <ol-vector-layer ref="vectorLayerRef" @postrender="handlePostRender">
      <ol-source-vector>
        <ol-feature>
          <ol-geom-point :coordinates="[110, 30]"></ol-geom-point>
        </ol-feature>
        <ol-feature>
          <ol-geom-point :coordinates="[112, 31]"></ol-geom-point>
        </ol-feature>
      </ol-source-vector>
    </ol-vector-layer>
    <ol-vector-layer >
      <ol-source-vector>
        <ol-feature>
          <ol-geom-point :coordinates="[110, 30]"></ol-geom-point>
          <ol-style>
            <ol-style-icon :src="iconSrc" :scale="0.05"></ol-style-icon>
          </ol-style>
        </ol-feature>
        <ol-feature>
          <ol-geom-point :coordinates="[112, 31]"></ol-geom-point>
          <ol-style>
            <ol-style-icon :src="iconSrc" :scale="0.05"></ol-style-icon>
          </ol-style>
        </ol-feature>
      </ol-source-vector>
    </ol-vector-layer>
  </ol-map>
  <div class="toolbar">
    <el-button type="primary" @click="handleClick">{{ animationFlag ? '停止' : '开始' }}</el-button>
  </div>
</template>

<script setup lang="ts">
import iconSrc from '@/assets/image/truck.png';
import { getVectorContext } from 'ol/render.js';
import { easeOut } from 'ol/easing.js';
import { Circle, Fill, Stroke, Style } from 'ol/style';

const center = ref([121, 31]);
const projection = ref('EPSG:4326');
const zoom = ref(5);
const mapRef = ref();
const key = '替换为天地图key';
const sourceRef = ref(null);
const vectorLayerRef = ref(null);
const animationFlag = ref(false);
const duration = ref([3000, 1000]);
const start = ref([0, 0]);

const handleClick = () => {
  if (!animationFlag.value) {
    start.value = start.value.map(i => Date.now());
    vectorLayerRef.value.vectorLayer.changed();
  }
  animationFlag.value = !animationFlag.value;
};

const handlePostRender = e => {
  if (animationFlag.value) {
    const time = e.frameState.time;
    vectorLayerRef.value.vectorLayer
      .getSource()
      .getFeatures()
      .forEach((f, idx) => {
        // 时间戳差(毫秒)
        let elapsedTime = time - start.value[idx];
        if (elapsedTime >= duration.value[idx]) {
          start.value[idx] = Date.now();
          elapsedTime = duration.value[idx];
        }
        // 获取矢量上下文
        const vectorContext = getVectorContext(e);
        // elapsedRatio值0到1之间
        const elapsedRatio = elapsedTime / duration.value[idx];
        const radius = easeOut(elapsedRatio) * 25 + 5;
        const opacity = easeOut(1 - elapsedRatio);

        const style = new Style({
          image: new Circle({
            radius: radius,
            fill: new Fill({
              color: 'rgba(228, 147, 87, ' + opacity + ')'
            }),
            stroke: new Stroke({
              color: 'rgba(255, 0, 0, ' + opacity + ')',
              width: 1 + opacity
            })
          })
        });
        // 将feature渲染到画布中。
        vectorContext.drawFeature(f.clone(), style);
      });
    mapRef.value.map.render();
  }
};
</script>
<style scoped lang="scss">
.toolbar {
  position: absolute;
  top: 20px;
  left: 100px;
  display: flex;
  justify-content: center;
  align-items: center;
}
</style>