Arduino - 74HC595 4 位 7 段显示器
Arduino - 74HC595 4-Digit 7-Segment Display)
A standard 4-digit 7-segment display is needed for clock, timer and counter projects, but it usually requires 12 connections. The 74HC595 module makes it easier by only requiring 5 connections: 2 for power and 3 for controlling the segments.
时钟、定时器和计数器项目需要标准的 4 位 7 段显示器,但通常需要 12 个连接。74HC595 模块只需 5 个连接即可实现更简单的操作:2 个用于电源,3 个用于控制段。
This tutorial will not overload you by deep driving into hardware. Instead, We will learn how to connect the 4-digit 7-segment display to Arduino, how to program it do display what we want.
本教程不会通过深入硬件来使您超载。相反,我们将学习如何将 4 位 7 段显示器连接到 Arduino,如何对其进行编程以显示我们想要的内容。
This tutorial are going to use the 4-dot 4-digit 7-segment display module that is able to displayed the float values. If you want to display a colon separator, please use the TM1637 4-digit 7-segment Display Module
本教程将使用 4 点 4 位 7 段显示模块,该模块能够显示浮点值。如果要显示冒号分隔符,请使用 TM1637 4 位 7 段显示模块
About 74HC595 4-digit 7-segment Display 关于74HC595 4位7段显示器
A 74HC595 4-digit 7-segment display module typically consists of 4 7-segment LEDs, 4 dot-shaped LEDs, and a 74HC595 driver for each digit: It is ideal for displaying the temperature or any decimal value.
74HC595 4 位 7 段显示模块通常由 4 个 7 段 LED、4 个点形 LED 和每个数字的 74HC595 驱动器组成:它非常适合显示温度或任何十进制值。
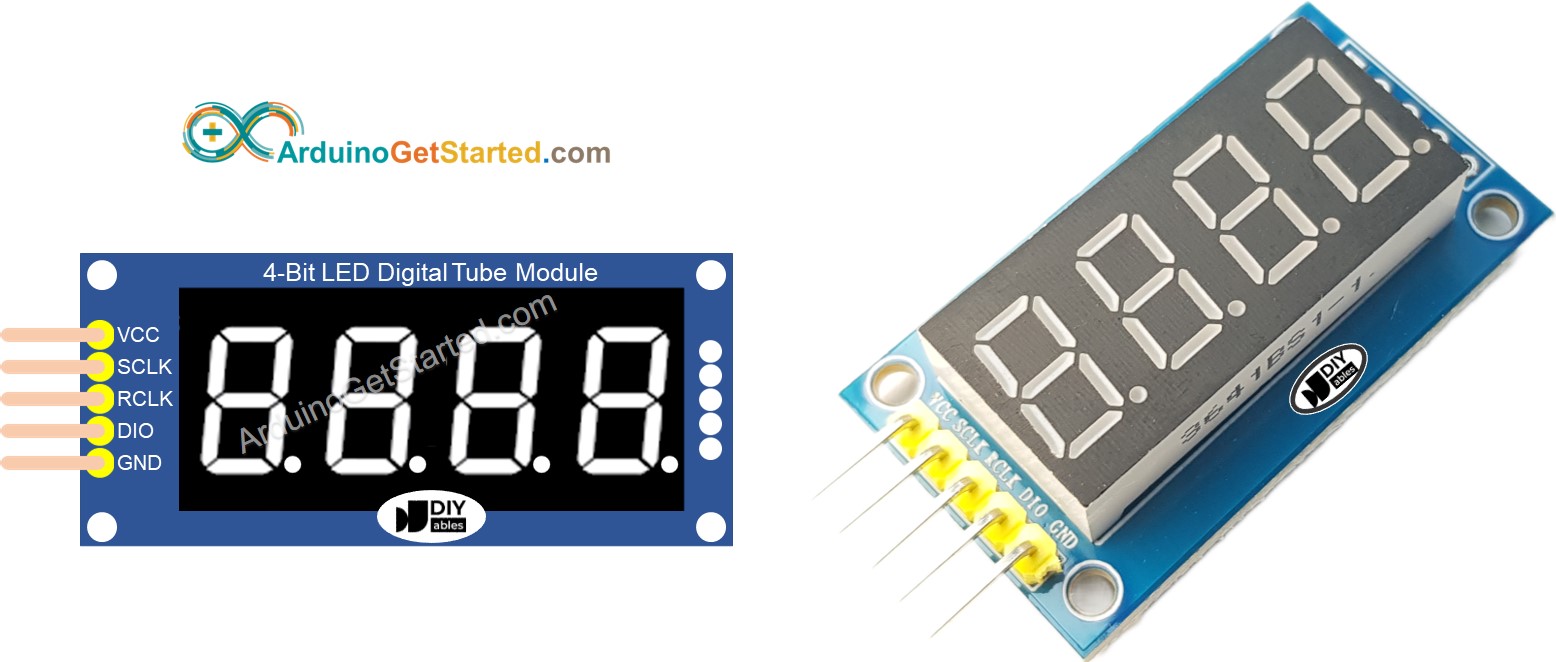
Pinout 引脚排列
The 74HC595 4-digit 7-segment display module includes 5 pins:
74HC595 4 位 7 段显示模块包括 5 个引脚:
- SCLK pin: is a clock input pin. Connect to any digital pin on Arduino.
SCLK引脚:是时钟输入引脚。连接到Arduino上的任何数字引脚。 - RCLK pin: is a clock input pin. Connect to any digital pin on Arduino.
RCLK引脚:是时钟输入引脚。连接到Arduino上的任何数字引脚。 - DIO pin: is a Data I/O pin. Connect to any digital pin on Arduino.
DIO 引脚:是数据 I/O 引脚。连接到Arduino上的任何数字引脚。 - VCC pin: supplies power to the module. Connect it to the 3.3V to 5V power supply.
VCC引脚:为模块供电。将其连接到 3.3V 至 5V 电源。 - GND pin: is a ground pin.
GND 引脚:是接地引脚。
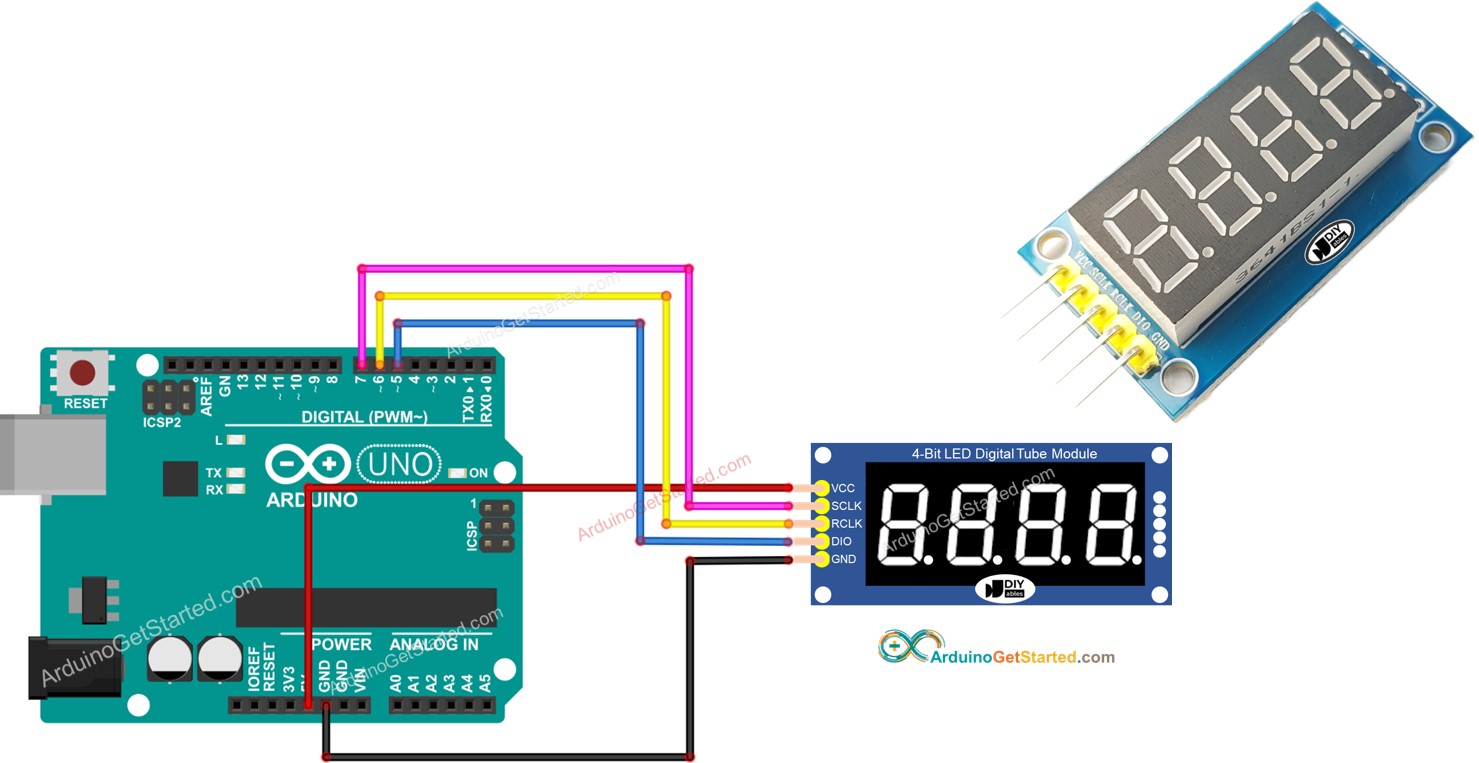
Wiring Diagram 接线图
The table below shown the wiring between Arduino pins and a 74HC595 4-digit 7-segment display pins:
下表显示了Arduino引脚和74HC595 4位7段显示引脚之间的接线:
| Arduino Arduino的 | 74HC595 7-segment display 74HC595 7段显示器 |
|---|---|
| 5V | 5V |
| 7 | SCLK |
| 6 | RCLK |
| 5 | DIO |
The pin numbers in the code should be changed if different pins are used.
如果使用不同的引脚,则应更改代码中的引脚编号。
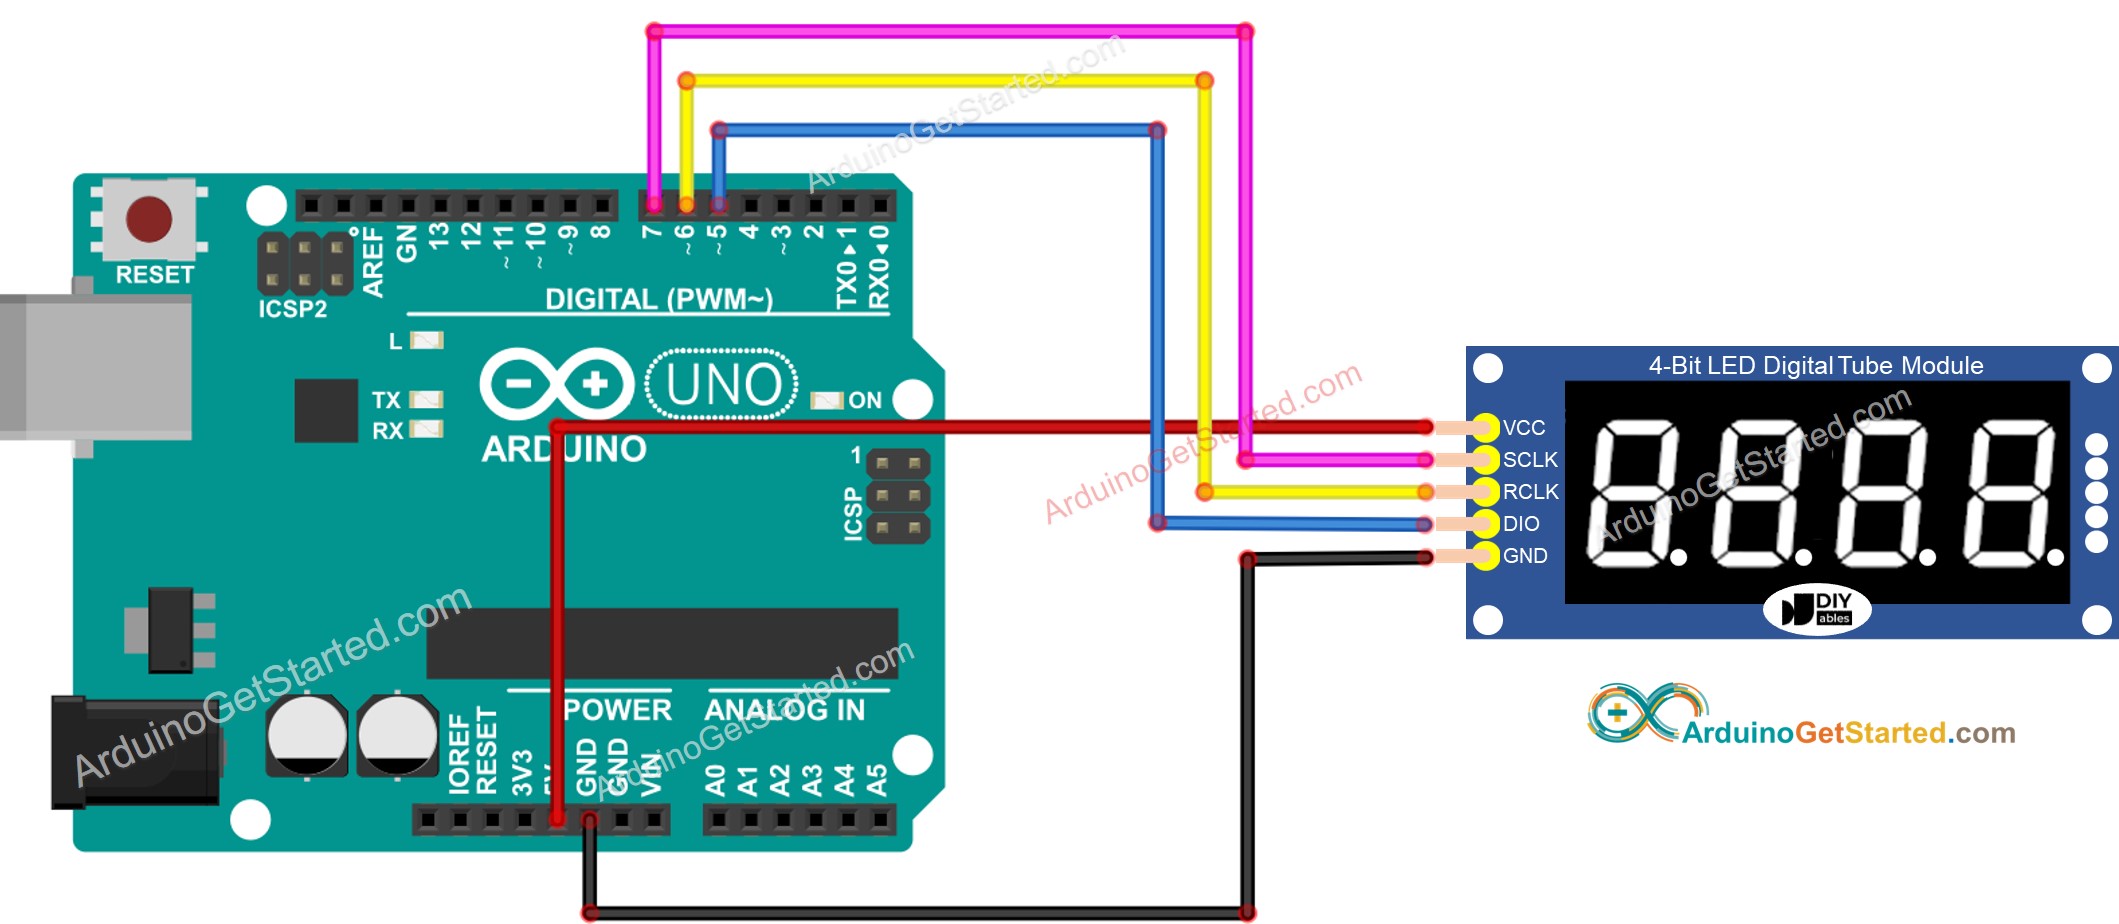
This image is created using Fritzing. Click to enlarge image
此图像是使用 Fritzing 创建的。点击放大图片
Library Installation 库安装
To program easily for 74HC595 4-digit 7-segment Display, we need to install DIYables_4Digit7Segment_74HC595 library by DIYables.io. Follow the below steps to install the library:
为了轻松编程 74HC595 4 位 7 段显示器,我们需要按 DIYables.io 安装DIYables_4Digit7Segment_74HC595库。按照以下步骤安装库:
- Navigate to the Libraries icon on the left bar of the Arduino IDE.
导航到 Arduino IDE 左侧栏上的 Libraries 图标。 - Search "DIYables_4Digit7Segment_74HC595" , then find the DIYables_4Digit7Segment_74HC595 library by DIYables.io
搜索"DIYables_4Digit7Segment_74HC595",然后按 DIYables.io 找到DIYables_4Digit7Segment_74HC595库 - Click Install button. 单击"安装"按钮。

How To Program For 74HC595 4-digit 7-segment using Arduino 如何使用Arduino对74HC595 4位7段进行编程
-
Include the library 包括库
#include <DIYables_4Digit7Segment_74HC595.h>
-
Define Arduino's pins that connects to SCLK, RCLK and DIO of the display module. For example, pin D7, D6 and D5
#define SCLK 7 // The Arduino pin connected to SCLK
#define RCLK 6 // The Arduino pin connected to RCLK
#define DIO 5 // The Arduino pin connected to DIO -
Create a display object of type DIYables_4Digit7Segment_74HC595
创建 DIYables_4Digit7Segment_74HC595 类型的显示对象
-
Then you can display the integer numbers with the zero-padding option, supporting the negative number:
然后,您可以使用零填充选项显示整数,支持负数:display.printInt(-13, false); // you can display a value from -999 to 9999
-
You can display the float numbers with the decimal place, zero-padding options, supporting the negative number:
您可以使用小数位、零填充选项显示浮点数,支持负数:display.printFloat(-9.2, 1, false);
-
You can also display number, decimal point, character digit-by-digit by using lower-level functions:
您还可以使用较低级别的函数逐位显示数字、小数点、字符:// display 9.3°C
display.clear();
display.setNumber(1, 9); // set 9 at the 1st digit
display.setDot(1); // set . at the 1st digit
display.setNumber(2, 3); // set 3 at the 2nd digit
display.setChar(3, SegChars::DEGREE); // set ° at the 3rd digit
display.setChar(4, SegChars::C); // set C at the 3rd digit
display.show(); // show on the display -
Because the 74HC595 4-digit 7-segment module uses the multiplexing technique to control individual segments and LEDs, Arduino code MUST:
由于 74HC595 4 位 7 段模块使用多路复用技术来控制各个段和 LED,因此 Arduino 代码必须:- Call display.show() function in the main loop
在主循环中调用 display.show() 函数 - Not use delay() function in the main loop
在主循环中不使用 delay() 函数
- Call display.show() function in the main loop
-
You can see more detail in the the library reference
您可以在库参考中查看更多详细信息
Arduino Code - Display Integer Arduino 代码 - 显示整数
/*
   Created by DIYables

   This example code is in the public domain

   Product page: https://diyables.io/products/4-digit-7-segment-display-led-74hc595-driver-with-4-dots
*/

#include <DIYables_4Digit7Segment_74HC595.h> // DIYables_4Digit7Segment_74HC595 library

#define SCLK  7  // The Arduino pin connected to SCLK
#define RCLK  6  // The Arduino pin connected to RCLK
#define DIO   5  // The Arduino pin connected to DIO

DIYables_4Digit7Segment_74HC595 display(SCLK, RCLK, DIO);

void setup() {
  Serial.begin(9600);

  display.printInt(-13, false); // you can display a value from -999 to 9999
  //display.printInt(-132, false);
  //display.printInt(9132, false);
  //display.printInt(132, false);
  //display.printInt(32, false);
  //display.printInt(2, false);
  //display.printInt(2, true);
}

void loop() {
  display.loop(); // MUST call the display.loop() function in loop()

  // DO SOMETHING HERE
  // NOTE: do NOT use the delay() function in loop because it affects to the multiplexing
}
Quick Steps 快速步骤
- Copy the above code and open with Arduino IDE
复制上面的代码并使用Arduino IDE打开 - Click Upload button on Arduino IDE to upload code to Arduino
单击Arduino IDE上的"上传"按钮,将代码上传到Arduino - See the states of the 7-segment display
查看 7 段显示器的状态
Arduino 代码 - 显示浮点数
/*
   Created by DIYables

   This example code is in the public domain

   Product page: https://diyables.io/products/4-digit-7-segment-display-led-74hc595-driver-with-4-dots
*/

#include <DIYables_4Digit7Segment_74HC595.h> // DIYables_4Digit7Segment_74HC595 library

#define SCLK  7  // The Arduino pin connected to SCLK
#define RCLK  6  // The Arduino pin connected to RCLK
#define DIO   5  // The Arduino pin connected to DIO

DIYables_4Digit7Segment_74HC595 display(SCLK, RCLK, DIO);

void setup() {
  Serial.begin(9600);
  display.printFloat(-9.2,  1, false);
  //display.printFloat(-92.4, 1, false);
  //display.printFloat(-9.24, 2, false);
  //display.printFloat(192.4, 1, false);
  //display.printFloat(19.24, 2, false);
  //display.printFloat(1.924, 3, false);
}

void loop() {
  display.loop(); // MUST call the display.loop() function in loop()

  // DO SOMETHING HERE
  // NOTE: do NOT use the delay() function in loop because it affects to the multiplexing
}
Arduino Code - Display Temperature Arduino代码 - 显示温度
/*
Created by DIYables
This example code is in the public domain
Product page: https://diyables.io/products/4-digit-7-segment-display-led-74hc595-driver-with-4-dots
*/
#include <DIYables_4Digit7Segment_74HC595.h> // DIYables_4Digit7Segment_74HC595 library
#define SCLK 7 // The Arduino pin connected to SCLK
#define RCLK 6 // The Arduino pin connected to RCLK
#define DIO 5 // The Arduino pin connected to DIO
DIYables_4Digit7Segment_74HC595 display(SCLK, RCLK, DIO);
void setup() {
Serial.begin(9600);
// display 9.3°C by controlling digit by digit
display.clear();
display.setNumber(1, 9); // set 9 at the 1st digit
display.setDot(1); // set . at the 1st digit
display.setNumber(2, 3); // set 3 at the 2nd digit
display.setChar(3, SegChars::DEGREE); // set ° at the 3rd digit
display.setChar(4, SegChars::C); // set C at the 3rd digit
display.show(); // show on the display
}
void loop() {
display.loop(); // MUST call the display.loop() function in loop()
// DO SOMETHING HERE
// NOTE: do NOT use the delay() function in loop because it affects to the multiplexing
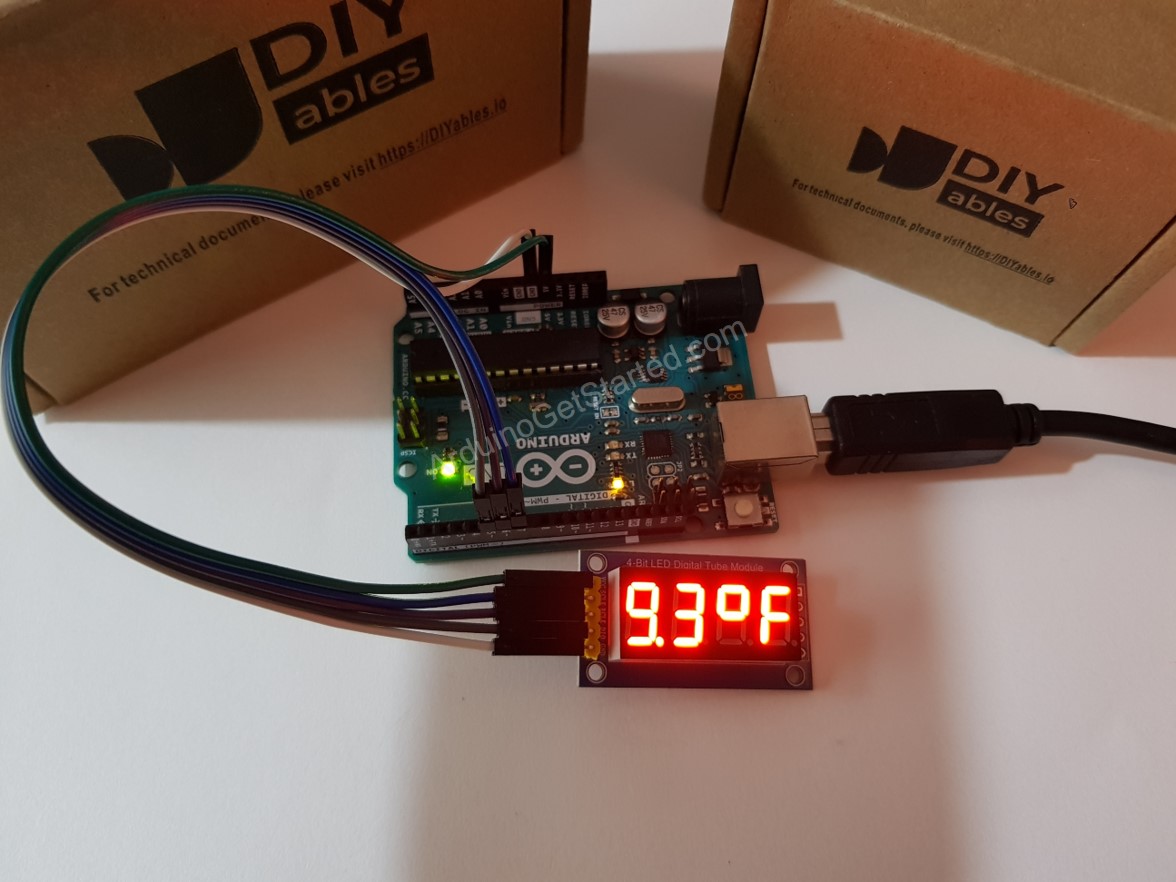
}The result is as the below image:
结果如下图所示: