Pytest总结第一弹基础
- 入门知识点
- 如何编写测试Case
- pytest的Fixture使用
-
- Fixture入门案例
- 使用fixture的Setup、Teardown
- [-- setup-show 开启追踪](#-- setup-show 开启追踪)
- [fixture 的范围和conftest](#fixture 的范围和conftest)
- 多个fixture使用
- 动态的scope
- autouse
- pytest的内置fixture
-
- [tmp_path && tmp_path_factory](#tmp_path && tmp_path_factory)
- capsys
- 如何做数据驱动
- 常用的Markers
入门知识点
安装pytest
pytest可以使用pip(python包管理工具进行安装)
安装pytest命令
markup
pip install pytest运行pytest
测试用例发现规则
在默认情况下 一下规则命名的file、class、method、function
才能被pytest发现并运行,当然我们也可以设置自定义的规则,下面先介绍默认的规则模式 : 假设我们有这样一份测试文件:
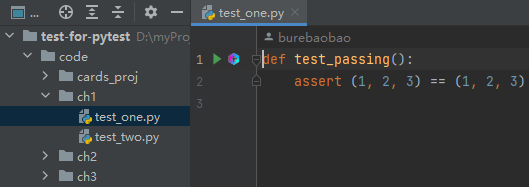
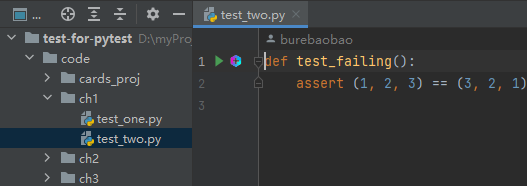
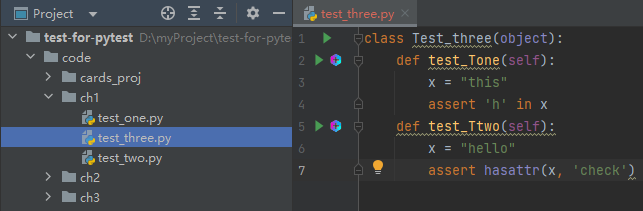
- 测试文件 命名规则 :test_.py 或者 _test.py
- 测试类 命名规则:Test
- 测试方法 or 测试 函数 命名规则:test_
当我们运行 pytest 进行测试是 如上文件都会自动被发现并执行 执行结果如下 2 成功 2失败 另外一个tttt_one
方法并没有被发现

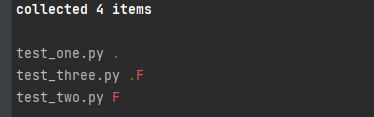
执行结果会有的状态 以下为6种状态及其运行时显示的简显模式
PASSED (.), FAILED (F), SKIPPED (s), XFAIL (x), XPASS (X), and ERROR (E)
- PASSED 成功
- FAILED 失败
- SKIPPED 跳过
- XFAIL 预期失败,被@pytest.mark.xfail 注解的case 预期失败实际也失败
- XPASS 预期失败但成功,被@pytest.mark.xfail 注解的case 预期失败但是成功
- ERROR 侵入性错误
执行方式
安装pytest后可以通过pytest命令来运行已有的测试案例
- 无案例选择参数
直接运行当前路径及子路径下的所有测试案例
python
pytest #运行所有案例- pytest
指定文件名参数 仅运行当前文件下的所有case
python
pytest test_one.py #仅运行 test_one.py 下的测试案例- pytest
指定运行多个文件的测试用例
python
pytest .\test_one.py .\test_three.py- pytest 指定路径执行
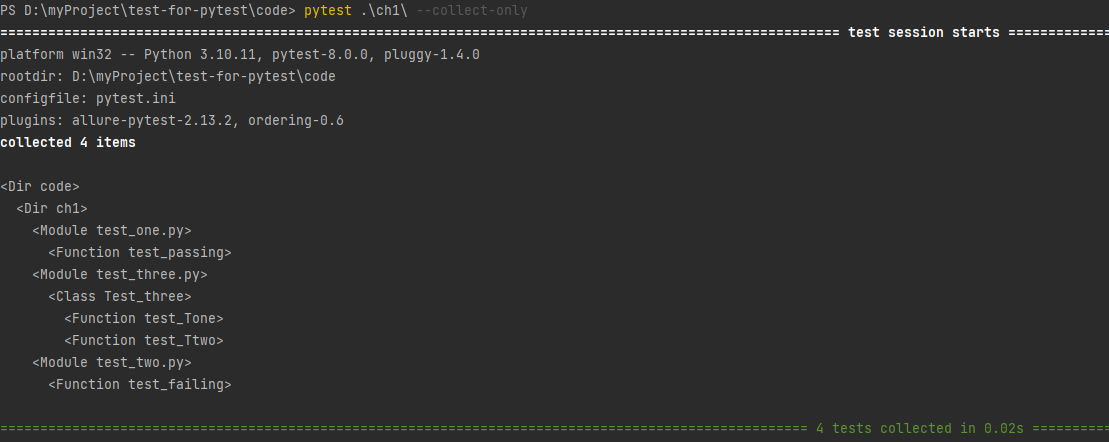
python
pytest .\ch1\- 运行某一个案例
通常以两个冒号分割不同层级 下面示例为 文件::类::方法 指定了 某个文件的某个类的 某个方法执行
python
pytest .\ch1\test_three.py::Test_three::test_Ttwo命令行执行参数
-
-s 运行向终端输入,比如案例里写了print,如果终端运行的话加-s就可以捕获显示print的东西。
-
-v展示详细信息
-
pytest --help 帮助文件
-
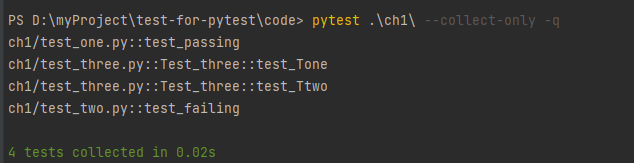
--collect-only 仅仅展示哪些测试用例会被执行但是不执行测试,可以很方便的在测试运行前知道有哪些测试案例。
-
-k 指定运行的测试用例 pytest -k 'asdict or default' asdict或者default名字的测试用例会被运行。
pythonpytest -k Tone -
-m 指定测试分组 使用@pytest.mark.xxx 标记
例如:
python使用 @pyest.mar.run_these_place 标记测试方法 运行时 :pyest -m run_these_place -m选项可以使用多个条件或者且的条件: pytest -m "mark1 and mark2" pytest -m "mark1 or mark2" -
-x 选项 遇到失败就停止不允许后续的测试案例。多用于debug时节省时间,否则全部用例都运行完毕才停止。
-
--maxfail=num 运行失败多少个再停止,比-x区别就是指定了失败次数停止。
-
-q 展示简要信息 我喜欢 用 -q和--tb=no一起使用。非常简介加上--tb=no
-
--showlocals 字面意思显示局部变量,有时候报错了想查询变量都赋了何值,这个方式非常好。
-
--tb=style 这个style有以下几个类型:
- short 只显示assert基本上
- line 用一行显示
- no 不显示只显示简单信息 上面说了和 -q合起来用非常好用。
-
--duaration=N 这个命令可以加快测试节奏,他不关心如何测试,只统计测试哪个阶段最慢。
-
--version 最没啥用就是看pytest版本号的
配置发现规则
在pytest.ini文件下配置发现规则,注意文件开头的第一行 pytest
python
[pytest]
python_files =tc_*.py test_*.py
python_functions = test_case* test_*


# 测试文件的目录
testpaths = ./tests

# 测试文件名的模式
python_files = test_*.py

# 测试函数名的模式
python_classes = Test
python_functions = test

# 在控制台中以不同的颜色显示输出
color = yes

# 在控制台中显示进度条
console_output_style = progress

# 在执行测试时,忽略指定的文件或目录
norecursedirs = .* build temp dist CVS .git __pycache__ *.egg

# 在执行测试时,忽略指定的文件或目录
norecursematch = my_module.py

# 在执行测试时,如果指定了 --maxfail 选项,则在出现指定数量的失败后停止测试
maxfail = 3

# 在执行测试时,如果指定了 --lf 或 --last-failed 选项,则只运行上次失败的测试
usefixtures = last_failed

# 在执行测试时,如果指定了 --ff 或 --failed-first 选项,则在所有其他测试成功执行后,
# 重新执行上次失败的测试
fail_fast = true
如何编写测试Case
此处我有一个微型项目 需要将其显安装
感兴趣想自己安装尝试下可以到我的gitee下载 安装
项目地址 项目gitee地址
python
pip install .\cards_proj\项目基础功能了解:
项目分为三个层次,CLI API DB, CLI与用户做交互,CLI调用API 负责应用的大部分逻辑 ,API调用DB,DB负责数据持久化。Card结构有三个str属性 summary, owner, state 和一个id属性。state 属性默认为todo。
基于此微型项目的业务处理做操作演示如下:
python
cards add do something --owner liwei  # 运行增加数据
cards # 查看数据

#  ID   state   owner   summary
# ───────────────────────────────────
#  1    todo    liwei   do something

  cards add do something else # 增加一条数据 不添加作者
  cards # 查看数据

    ID   state   owner   summary
# ────────────────────────────────────────
#  1    todo    liwei   do something
#  2    todo            do something else

cards update 2 --owner liwei # 修改数据id2 的数据作者
cards # 查看

#  ID   state   owner   summary
# ────────────────────────────────────────
#  1    todo    liwei   do something
#  2    todo    liwei   do something else

cards start 1     #开始执行任务1
cards finish 1    #结束任务1
cards start 2     #开始执行任务2
cards

#  ID   state     owner   summary
# ──────────────────────────────────────────
#  1    done      liwei   do something
#  2    in prog   liwei   do something else

cards delete 1  #删除记录1
cards

#  ID   state     owner   summary
# ──────────────────────────────────────────
#  2    in prog   liwei   do something else
基础案例
本案例旨在简单了解pytest案例的书写,以单测形式,后续会专门针对接口自动化测试的pytest集成做总结所以不涉及接口自动化封装部分内容。
- 1.书写规范 如上所述 file名以test开头,函数名test_开头
- 2.以assert 方式断言 验证案例的正确性,assert 断言失败会抛出 AssertionError异常,AssertionError 断定当前案例失败(fail),若为其他异常 pytest会认为该案例为 error状态。
python
# test_card.py
from cards import Card


def test_field_access():
    c = Card("something", "brian", "todo", 123)
    assert c.summary == "something"
    assert c.owner == "brian"
    assert c.state == "todo"
    assert c.id == 123


def test_defaults():
    c = Card()
    assert c.summary is None
    assert c.owner is None
    assert c.state == "todo"
    assert c.id is None


def test_equality():
    c1 = Card("something", "brian", "todo", 123)
    c2 = Card("something", "brian", "todo", 123)
    assert c1 == c2


def test_equality_with_diff_ids():
    c1 = Card("something", "brian", "todo", 123)
    c2 = Card("something", "brian", "todo", 4567)
    assert c1 == c2
def test_inequality():
    c1 = Card("something", "brian", "todo", 123)
    c2 = Card("completely different", "okken", "done", 123)
    assert c1 != c2


def test_from_dict():
    c1 = Card("something", "brian", "todo", 123)
    c2_dict = {
        "summary": "something",
        "owner": "brian",
        "state": "todo",
        "id": 123,
    }
    c2 = Card.from_dict(c2_dict)
    assert c1 == c2


def test_to_dict():
    c1 = Card("something", "brian", "todo", 123)
    c2 = c1.to_dict()
    c2_expected = {
        "summary": "something",
        "owner": "brian",
        "state": "todo",
        "id": 123,
    }
    assert c2 == c2_expected
断言语句的使用
通过断言语句我们可以明确案例是否成功,assert的方式较多 语法为 assert + 条件测试验证语句
python
assert something
assert not something
assert a == b
assert a != b
assert a <= b
我们故意写一个会失败的案例如下:
python
# test_card_fail.py
from cards import Card

def test_equality_fail():
    c1 = Card("sit there", "brian")
    c2 = Card("do something", "okken")
    assert c1 == c2
执行该案例
pytest -k test_equality_fail
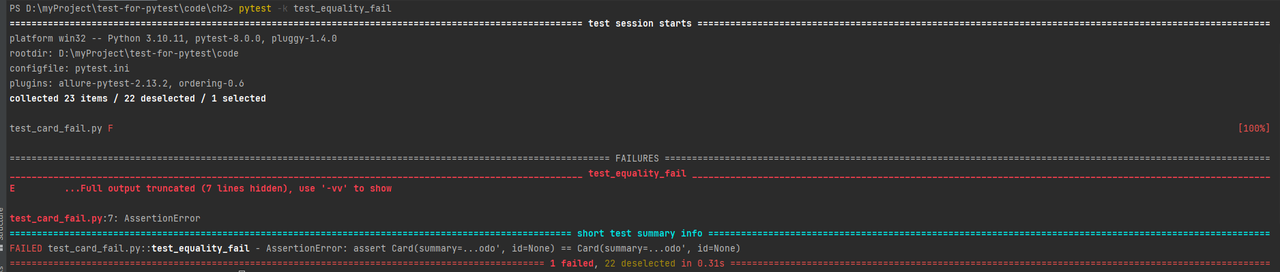
可以使用-s -vv参数来查看详细信息
pytest -s -vv -k test_equality_fail
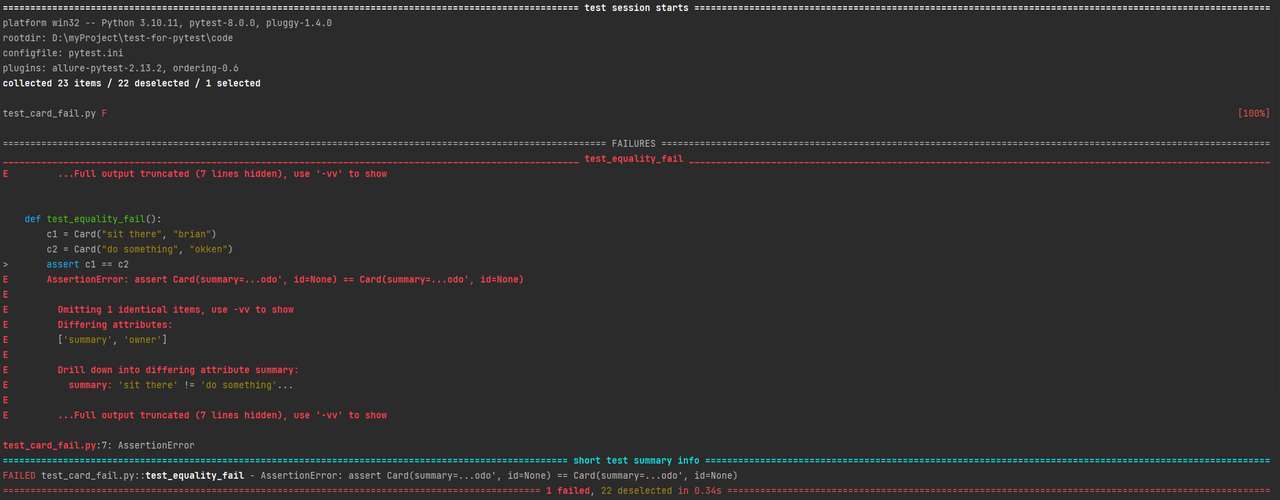
在断言 assert c1 == c2 时明显两个对象的值不相同 抛出AssertionError异常
值得注意的是 == 断言的是对象的数下是否全部相同,要断言 对象是否是相同 要用 is。
pytest.fail() 和 Exceptions
引发未捕获的异常或者调用pytest.fail()会导致pytest认定案例失败,所以可以导致原因大概三种:
- assert语句失败引发 AssertionError exception
- 其他未捕获的异常
- pytest.fail()方法的被调用
上面断言已经有assert引发案例失败的示例这条不在举例说明。
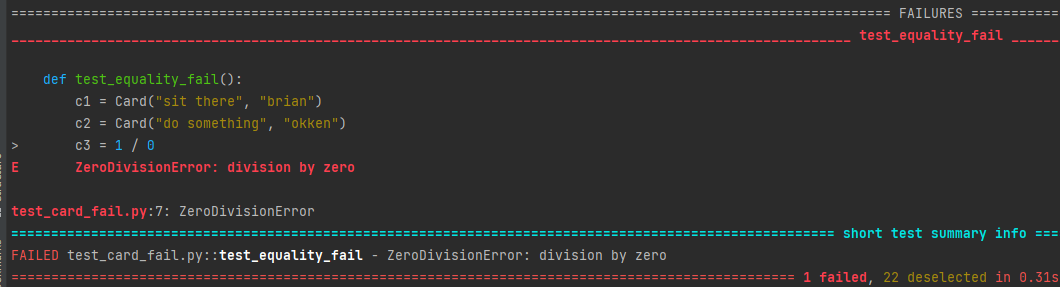
ZeroDivisionError异常导致的失败
python
def test_equality_fail():
    c1 = Card("sit there", "brian")
    c2 = Card("do something", "okken")
    c3 = 1 / 0
调用pytest.fail() 引起案例失败
python
def test_equality_fail():
    c1 = Card("sit there", "brian")
    c2 = Card("do something", "okken")
    if c1 != c2:
        pytest.fail("they don't match")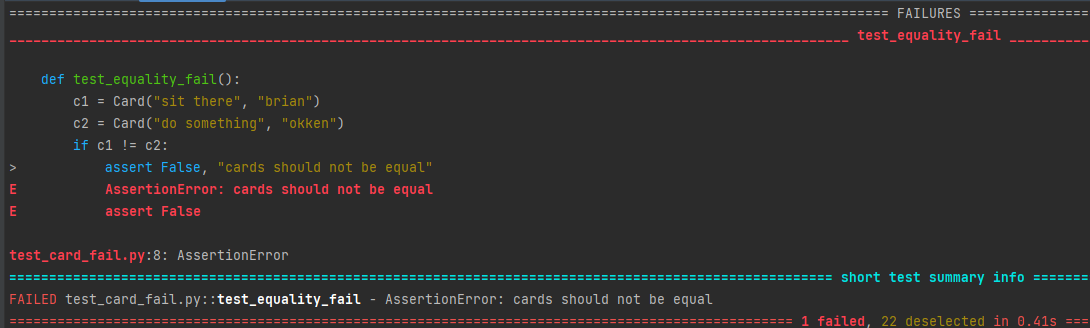
自定义断言函数
在当前基础断言方式不能满足断言时我们可以增加断言方法,
例如: 在项目测试类 Card中 属性id 被指定为不参与比较 id: int =
field(default=None, compare=False) 所以在id不同时其他属性相同也会被断言为
相等,那此时我们如果需要另外对id进行比较
python
from cards import Card
import pytest


def assert_identical(c1: Card, c2: Card):
    # hide the traceback for this function
    __tracebackhide__ = True
    assert c1 == c2
    if c1.id != c2.id:
        pytest.fail(f"id's don't match. {c1.id} != {c2.id}")


def test_identical():
    c1 = Card("foo", id=123)
    c2 = Card("foo", id=123)
    assert_identical(c1, c2)


def test_identical_fail():
    c1 = Card("foo", id=123)
    c2 = Card("foo", id=456)
    assert_identical(c1, c2)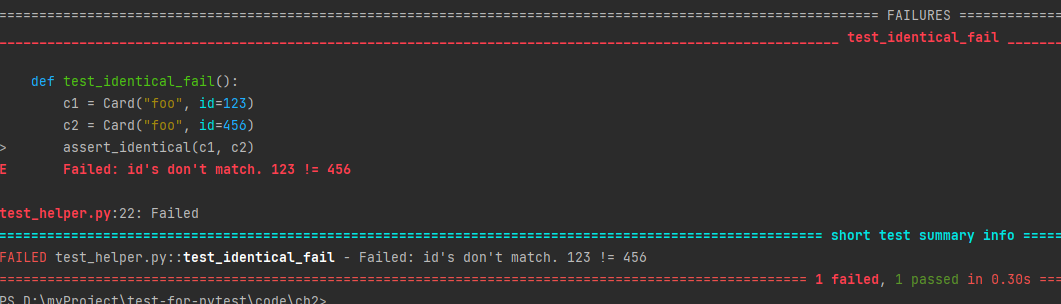
异常测试
很多时候异常信息正是我们的测试验证点,可以使用with pytest.raises() 来进行异常测试
以下示例 CardsDB 默认构造器需要参数,通过空参调用时会抛出 TypeError异常:
TypeError: CardsDB.init() missing 1 required positional argument: 'db_path'
通常可以断言 异常类型、异常描述、异常类型+描述
python
import pytest
import cards
# 断言异常类型
def test_no_path_raises():
with pytest.raises(TypeError):
cards.CardsDB()
# 断言异常类型 和 异常描述正则
def test_raises_with_info():
match_regex = "missing 1 .* positional argument"
with pytest.raises(TypeError, match=match_regex):
cards.CardsDB()
# 断言 异常描述信息 包含xxx
def test_raises_with_info_alt():
with pytest.raises(TypeError) as exc_info:
cards.CardsDB()
expected = "missing 1 required positional argument"
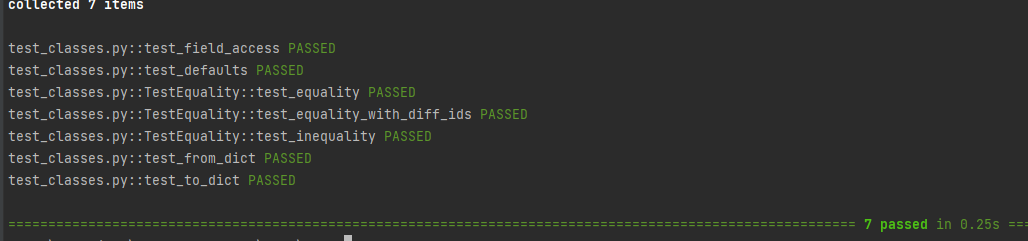
assert expected in str(exc_info.value)测试类形式
以上示例大多以函数形式,pytest还是支持以测试类的面向对象的形式来写测试case。当然在一个测试文件中 以规范规定的形式 类 +
函数混合的测试用例集合也是可以支持的 下面是一个测试混合书写模式下的示例。
python
from cards import Card


def test_field_access():
    c = Card("something", "brian", "todo", 123)
    assert c.summary == "something"
    assert c.owner == "brian"
    assert c.state == "todo"
    assert c.id == 123


def test_defaults():
    c = Card()
    assert c.summary is None
    assert c.owner is None
    assert c.state == "todo"
    assert c.id is None


class TestEquality:
    def test_equality(self):
        c1 = Card("something", "brian", "todo", 123)
        c2 = Card("something", "brian", "todo", 123)
        assert c1 == c2
    def test_equality_with_diff_ids(self):
        c1 = Card("something", "brian", "todo", 123)
        c2 = Card("something", "brian", "todo", 4567)
        assert c1 == c2

    def test_inequality(self):
        c1 = Card("something", "brian", "todo", 123)
        c2 = Card("completely different", "okken", "done", 123)
        assert c1 != c2


def test_from_dict():
    c1 = Card("something", "brian", "todo", 123)
    c2_dict = {
        "summary": "something",
        "owner": "brian",
        "state": "todo",
        "id": 123,
    }
    c2 = Card.from_dict(c2_dict)
    assert c1 == c2


def test_to_dict():
    c1 = Card("something", "brian", "todo", 123)
    c2 = c1.to_dict()
    c2_expected = {
        "summary": "something",
        "owner": "brian",
        "state": "todo",
        "id": 123,
    }
    assert c2 == c2_expected
执行结果:
pytest的Fixture使用
pytest框架的fixture测试夹具就相当于unittest框架的setup、teardown,但相对之下它的功能更加强大和灵活。 另外
pytest提供了众多的内建 Fixture可供使用的同时还提供给用户自定义fixture函数的方式。
fixture实际就是个装饰器,原理是应用python的闭包 此处不做引申。
Fixture入门案例
1、首先 通过@pytest.fixture() 注解来 自定义一个 fixture函数 2、通过在测试函数中传入 fixture函数的名称
来使用 fixture,fixture函数会在测试函数执行前执行
python
"""Demonstrate simple fixtures."""

import pytest


@pytest.fixture()
def some_data():
    """Return answer to ultimate question."""
    return 42
def test_some_data(some_data):
    """Use fixture return value in a test."""
    assert some_data == 42

"""
some_data 是一个fixture函数,它返回42。 test_some_data 函数使用 some_data fixture 的返回值,
assert 语句确保返回值是42 == 42 案例通过 pass状态。
"""


@pytest.fixture()
def some_other_data():
    """Raise an exception from fixture."""
    x = 43
    assert x == 42
    return x


def test_other_data(some_other_data):
    """Try to use failing fixture."""
    assert some_other_data == 42
"""
some_other_data 是一个fixture函数,在返回之前引发异常。 test_other_data 函数尝试使用 some_other_data fixture,
由于前置条件异常 所以此条案例 error状态。
"""


@pytest.fixture()
def a_tuple():
    """Return something more interesting."""
    return (1, "foo", None, {"bar": 23})


def test_a_tuple(a_tuple):
    """Demo the a_tuple fixture."""
    assert a_tuple[3]["bar"] == 32
"""
a_tuple 是一个fixture函数,返回一个元组。 test_a_tuple 函数使用 a_tuple fixture 的返回值,
assert 语句确保返回值是 a_tuple[3]["bar"] = 23 == 32 案例失败 fail状态。
"""
执行测试用例
pytest -s -vv .\ch3\test_fixtures.py
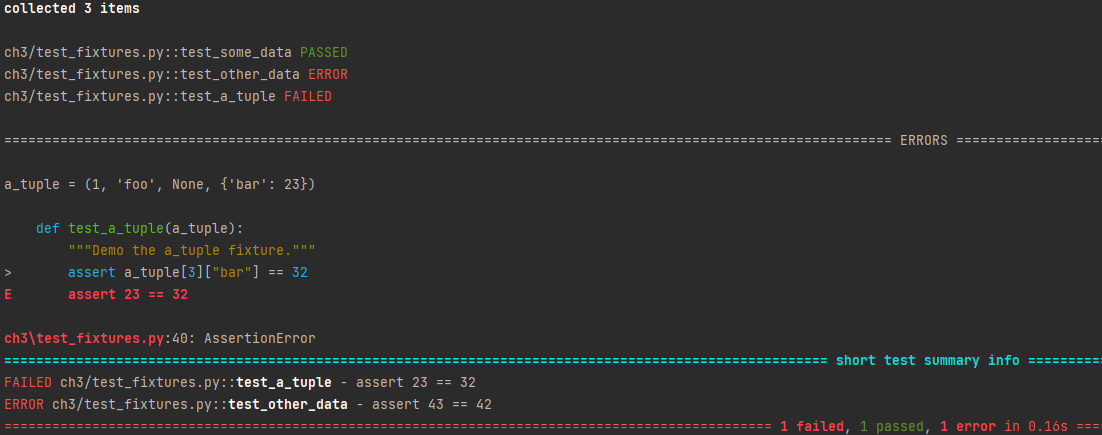
以上三个用例1失败 1 error 1 fail,具体解析已卸载注释中,值得注意的是 当前置的fixture异常时 该条案例会是error状态 而非 fail。
使用fixture的Setup、Teardown
现在我们需要对 cards_db的count函数 进行测试,cards_db是测试项目 API层中复杂调用DB部分的代码模块,
count是对数据库中 cards_db 的记录数量进行统计, 测试是我们可以增加几条记录后调用count来查看记录数,这样我们就需要
一个案例的前置条件 即Setup ,测试完成后我们需要针对此次测试数据进行销毁 即Teardown中close文件 销毁临时文件。
先演示下card_db在实际业务中的逻辑:
python
Cards add  first   # 增加一条记录
Cards list         # 查看所有记录
cards count        # 查看记录数
cards add second   # 增加第二条记录
cards list
cards count        # 此时查看数量 数量增加到2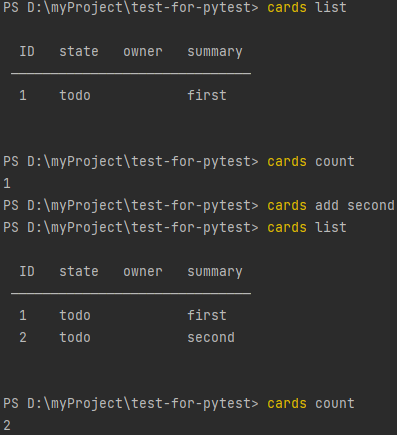
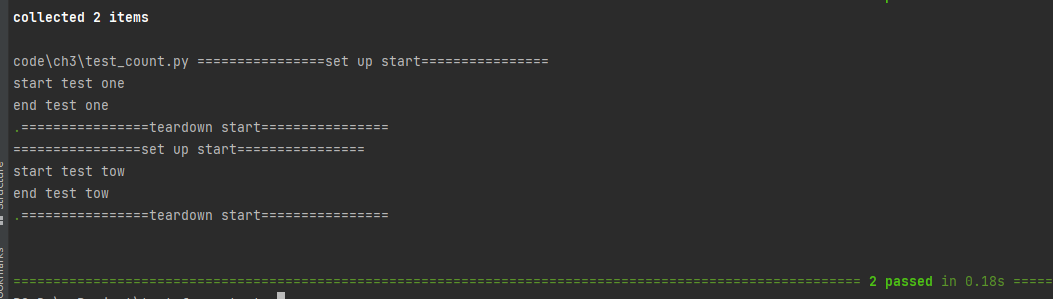
现在我们实现这个测试case:
- 如下代码所示 定义一个 fixture来初始化db,在此方法中生成一个临时路径方式db信息 并通过 yield 返回,
测试完成后通过db.close 关闭数据库文件,注意此处的 yeld是返回一个生成器 将db信息返回给调用它的模块,模块执行完成后
会继续回到yeild执行后边部分操作 ,详细 yeild语法不做过多说明; - 测试函数 test_empty() 断言初始化后的记录数 应该为 0;
- 测试函数 test_two() 增加两条记录后 断言count 此时数量应该为2。
python
# test_count.py
from pathlib import Path
from tempfile import TemporaryDirectory
import cards

import pytest


@pytest.fixture()
def cards_db():
    with TemporaryDirectory() as db_dir:
        db_path = Path(db_dir)
        db = cards.CardsDB(db_path)
        print("================set up start================")
        yield db
        print("================teardown start================")
        db.close()


def test_empty(cards_db):
    print("start test one")
    assert cards_db.count() == 0
    print("end test one")


def test_two(cards_db):
    print("start test tow")
    cards_db.add_card(cards.Card("first"))
    cards_db.add_card(cards.Card("second"))
    assert cards_db.count() == 2
    print("end test tow")
执行结果:
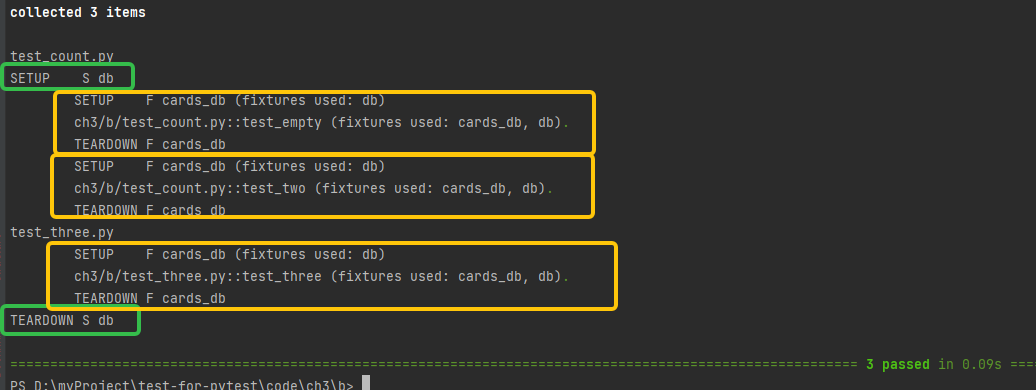
pytest .\code\ch3\test_count.py
通过测试结果执行打印的信息
- 1、2条案例通过,被fixture标记的 装饰器 充当 setup、teardown 不会记录到案例数量。
- 2、fixture被执行了两次,分别在每个案例执行开始前 之前yeild 语句前逻辑,案例结束后执行 yeild 语句后逻辑。
其实两个案例顺序执行我们初始化一次数据库就可以,后边fixture 的适用范围再介绍控制方式。
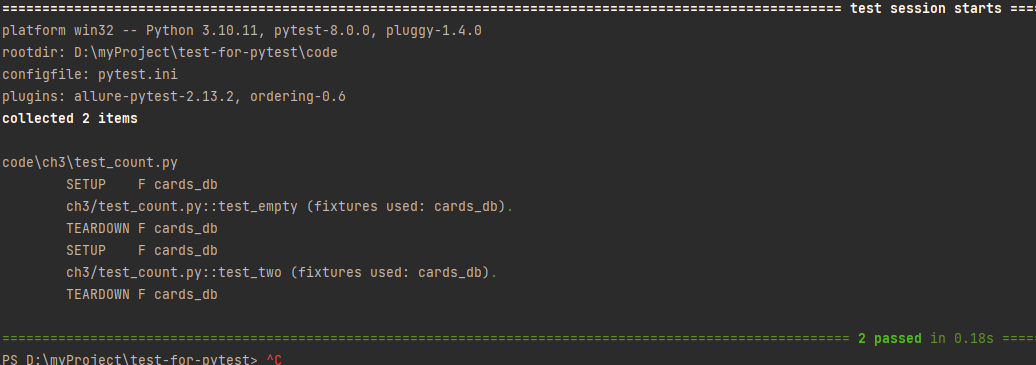
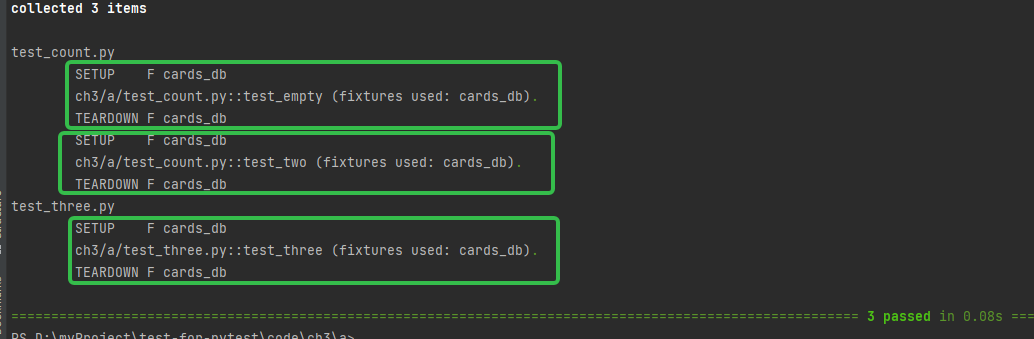
-- setup-show 开启追踪
使用--setup-show 可以开启fixture的执行追踪
pytest --setup-show ./code/ch3/test_count.py
fixture 的范围和conftest
通过scope参数来控制 fixture的适用范围
- scope='function' 方法级,每个方法执行一次
- scope='class' 类级,每个类执行一次
- scope='module' 模块级,每个模块执行一次
- scope='package' 包级,每个包执行一次
- scope='session' 会话级,每此会话执行一次
- 不写默认 'function'
可以将 fixture放置到一个文件中,通常我们放到 conftest.py
,conftest.py会被pytest认定为一个本地插件的形式,案例执行前会先扫描 conftest.py。
scope='session'
下面我们建立一个文件夹 放置 conftest.py,在conftest.py 中定义测试fixture,并设置 scope='session'
python
# conftest.py
from pathlib import Path
from tempfile import TemporaryDirectory
import cards
import pytest


@pytest.fixture(scope="session")
def cards_db():
    """CardsDB object connected to a temporary database"""
    with TemporaryDirectory() as db_dir:
        db_path = Path(db_dir)
        db = cards.CardsDB(db_path)
        yield db
        db.close()
python
import cards


def test_empty(cards_db):
    assert cards_db.count() == 0


def test_two(cards_db):
    cards_db.add_card(cards.Card("first"))
    cards_db.add_card(cards.Card("second"))
    assert cards_db.count() == 2
python
import cards
def test_three(cards_db):
cards_db.add_card(cards.Card("first"))
cards_db.add_card(cards.Card("second"))
cards_db.add_card(cards.Card("third"))
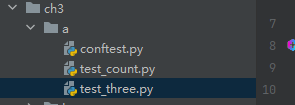
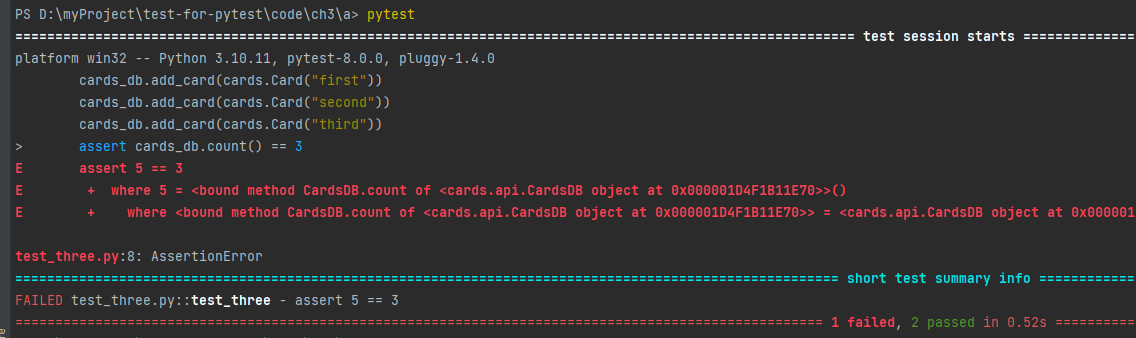
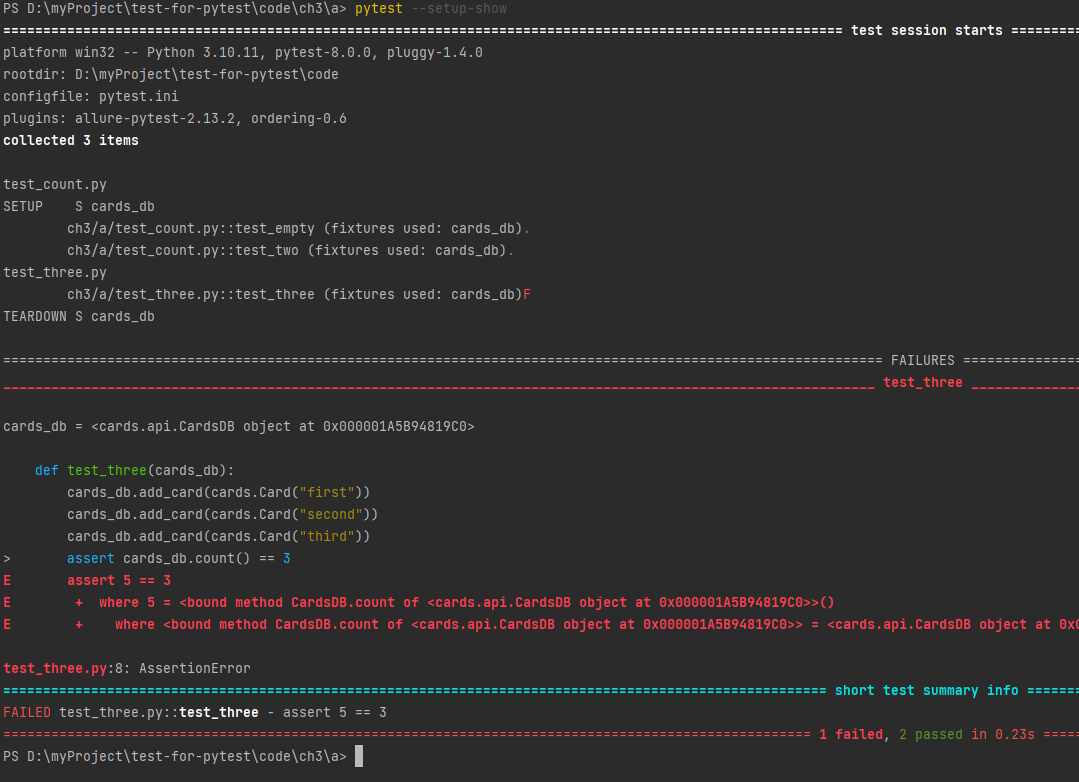
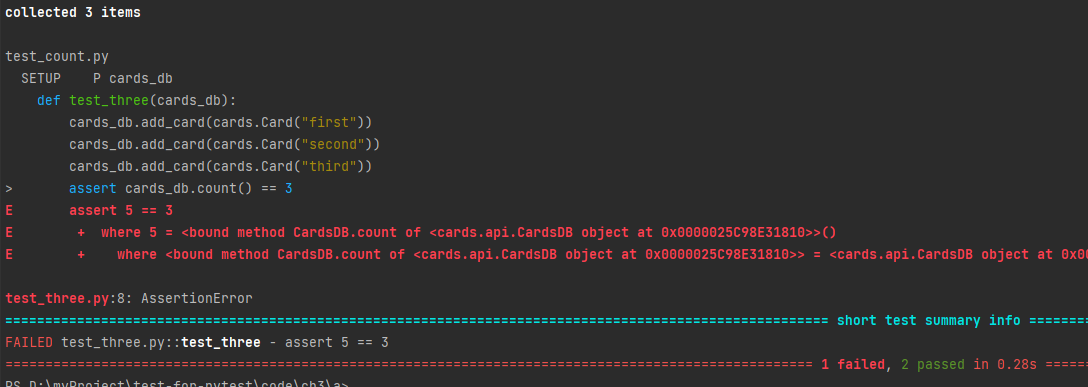
assert cards_db.count() == 3在 a路径下执行pytest命令运行三条案例,得到结果 2 pass 1 fail,test_three 失败原因为
fixture在整个测试会话中执行且执行一次,所以案例三又增加了3条记录的情况下 总记录数应该为5
追踪一下fixture执行轨迹 pytst --setup-show 可以明显看出fixture 执行且只执行了一次
scope='function'
还是上面的案例 将 fixture scope 改为 function 则 每个方法运行前都会运行一次 则 三个案例都会通过。
python
# conftest.py
from pathlib import Path
from tempfile import TemporaryDirectory
import cards
import pytest


@pytest.fixture(scope="function")
def cards_db():
    """CardsDB object connected to a temporary database"""
    with TemporaryDirectory() as db_dir:
        db_path = Path(db_dir)
        db = cards.CardsDB(db_path)
        yield db
        db.close()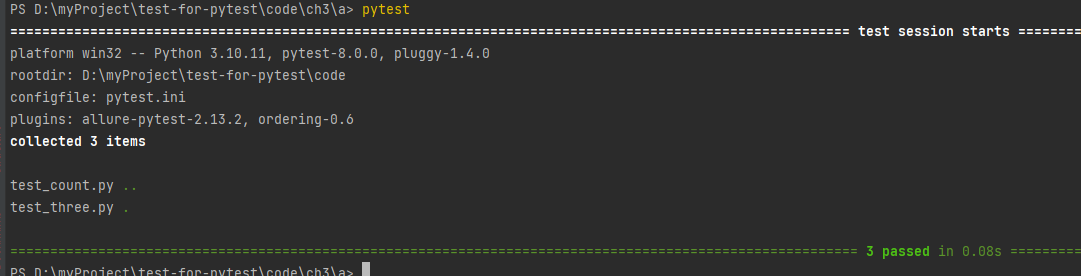
追踪一下fixture执行轨迹 pytst --setup-show 可以明显看出fixture 每个方法都执行了一次
scope='module'
同样加 scope改为 module,每个文件会执行一次
python
from pathlib import Path
from tempfile import TemporaryDirectory
import cards
import pytest


@pytest.fixture(scope="module")
def cards_db():
    """CardsDB object connected to a temporary database"""
    with TemporaryDirectory() as db_dir:
        db_path = Path(db_dir)
        db = cards.CardsDB(db_path)
        yield db
        db.close()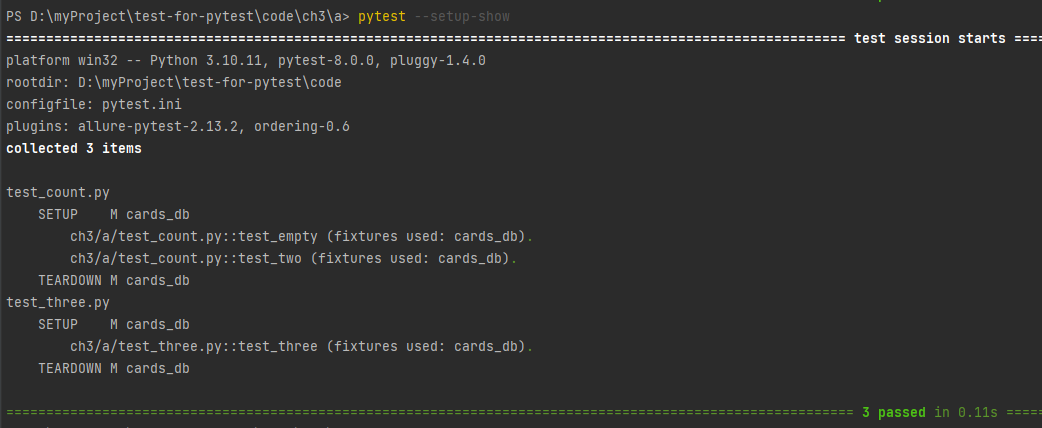
scope='package'
当scope改为包级别时
python
from pathlib import Path
from tempfile import TemporaryDirectory
import cards
import pytest


@pytest.fixture(scope="package")
def cards_db():
    """CardsDB object connected to a temporary database"""
    with TemporaryDirectory() as db_dir:
        db_path = Path(db_dir)
        db = cards.CardsDB(db_path)
        yield db
        db.close()
执行结果 仅执行了一次 因为两个测试文件都在同一个包内,并且 案例3 数量会因为只初始化一次数据库而失败
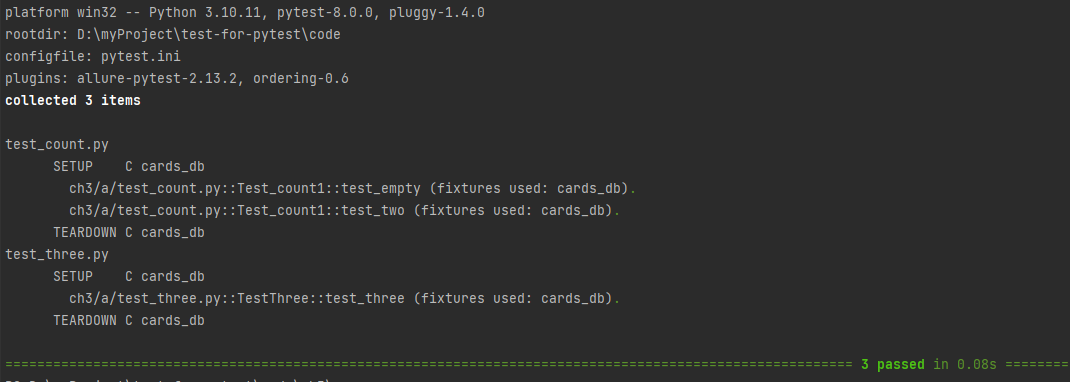
scope='class'
将上述案例做些变动,放到两个类中,scope 改为class
python
from pathlib import Path
from tempfile import TemporaryDirectory
import cards
import pytest


@pytest.fixture(scope="class")
def cards_db():
    """CardsDB object connected to a temporary database"""
    with TemporaryDirectory() as db_dir:
        db_path = Path(db_dir)
        db = cards.CardsDB(db_path)
        yield db
        db.close()
python
import cards

class Test_count1:


    def test_empty(self,cards_db):
        self.cards_db = cards_db
        assert self.cards_db.count() == 0


    def test_two(self,cards_db):
        self.cards_db = cards_db
        self.cards_db.add_card(cards.Card("first"))
        self.cards_db.add_card(cards.Card("second"))
        assert self.cards_db.count() == 2
python
import cards

class TestThree:

    def test_three(self,cards_db):
        self.cards_db = cards_db
        self.cards_db.add_card(cards.Card("first"))
        self.cards_db.add_card(cards.Card("second"))
        self.cards_db.add_card(cards.Card("third"))
        assert self.cards_db.count() == 3
运行结果每个类都会执行一次fixture,所以三个案例全部成功
多个fixture使用
fixture的灵活应用有助于测试的灵活性,fixture不仅可以多个scope级别混用,也可以在一个测试方法中应用多个fixture,更可以在fxture引用fixture。
多scope级别的fixture混合例1
在之前的案例中,最初 test_count 会增加两个记录,test_three 会增加三条记录,而我们的数据库会初始化一次仅仅在最开始当
scope = 'session'时, 上面我们控制tree成功的方式是 增加 db_fixture
的执行次数,但是实际场景不可能每个案例都去初始化数据库,而应该在每个session开始前初始化一次,后面采取操作数据的方式来恢复环境 例如
删除所有数据。
所以基于这种模式 我们需要一个 fixture 在最开始初始化数据库 db 它的scope设置为'session',另外我们需要一个fixture card_db在每个测试方法执行前 做删除数据,并在 card_db中调用db。
python
from pathlib import Path
from tempfile import TemporaryDirectory
import cards
import pytest


@pytest.fixture(scope="session")
def db():
    """CardsDB object connected to a temporary database"""
    with TemporaryDirectory() as db_dir:
        db_path = Path(db_dir)
        db_ = cards.CardsDB(db_path)
        yield db_
        db_.close()


@pytest.fixture(scope="function")
def cards_db(db):
    """CardsDB object that's empty"""
    db.delete_all()
    return db
python
import cards


def test_empty(cards_db):
    assert cards_db.count() == 0


def test_two(cards_db):
    cards_db.add_card(cards.Card("first"))
    cards_db.add_card(cards.Card("second"))
    assert cards_db.count() == 2
python
import cards


def test_three(cards_db):
    cards_db.add_card(cards.Card("first"))
    cards_db.add_card(cards.Card("second"))
    cards_db.add_card(cards.Card("third"))
    assert cards_db.count() == 3
执行结果:3个案例全部成功,db fixture在整个会话前后执行,cards_db在每个 function执行前执行。
多scope级别的fixture混合例2
在例1基础上再增加混合使用程度, 增加一个session级的fixture some_cards 来做数据的存储; 增加一个
function级的 fixture non_empty_db 来引入 cards_db 和 some_cards 在清除 素有数据后 将
some_cards 中储存的数据结构 添加到数据库,这样每次测试开始前 使用some_cards 的 数据库中都已经存在了
4条数据。代码如下;这几个混合使用比较复杂 下面逐条分析下案例执行过程。
python
# conftest.py
from pathlib import Path
from tempfile import TemporaryDirectory
import cards
import pytest
@pytest.fixture(scope="session")
def db():
"""CardsDB object connected to a temporary database"""
with TemporaryDirectory() as db_dir:
db_path = Path(db_dir)
db_ = cards.CardsDB(db_path)
yield db_
db_.close()
@pytest.fixture(scope="function")
def cards_db(db):
"""CardsDB object that's empty"""
db.delete_all()
return db
@pytest.fixture(scope="session")
def some_cards():
"""List of different Card objects"""
return [
cards.Card("write book", "Brian", "done"),
cards.Card("edit book", "Katie", "done"),
cards.Card("write 2nd edition", "Brian", "todo"),
cards.Card("edit 2nd edition", "Katie", "todo"),
]
@pytest.fixture(scope="function")
def non_empty_db(cards_db, some_cards):
"""CardsDB object that's been populated with 'some_cards'"""
for c in some_cards:
cards_db.add_card(c)
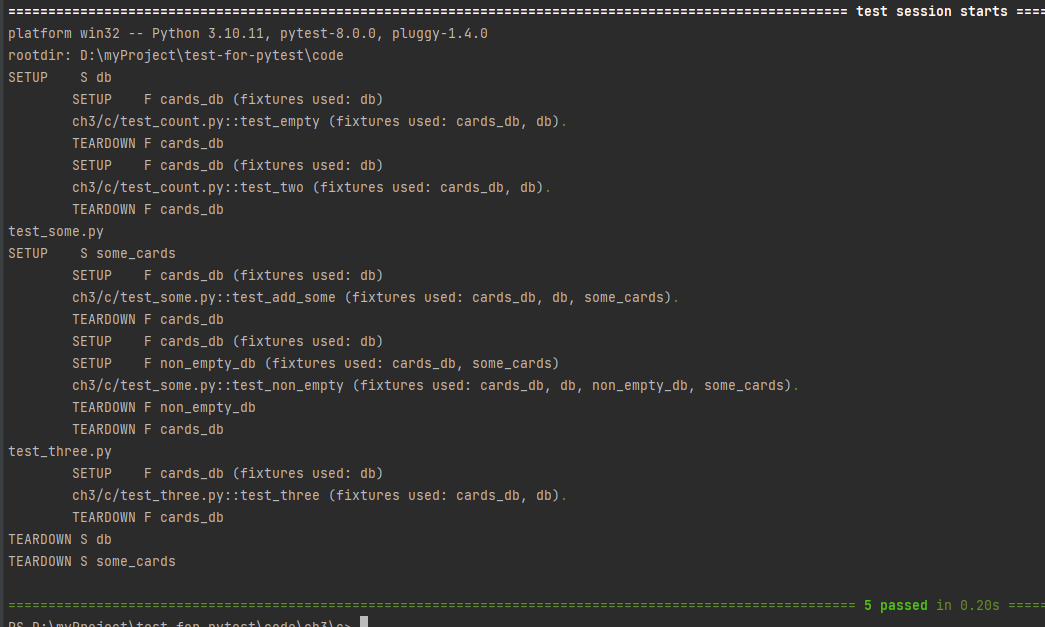
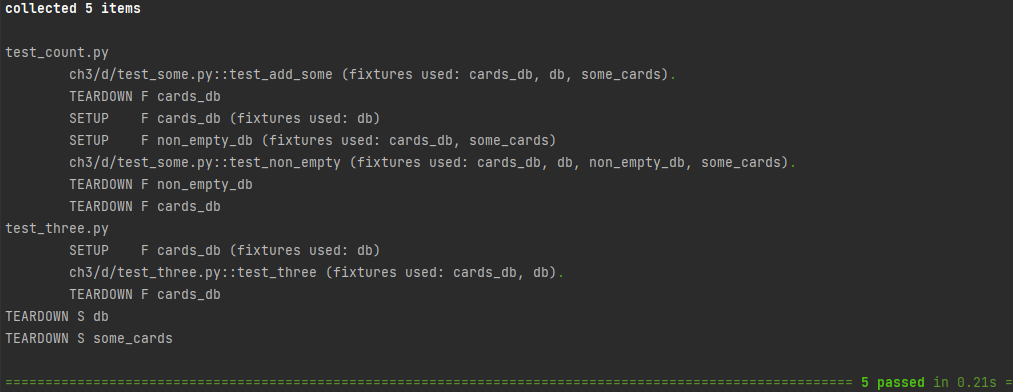
return cards_db首先是 test_count.py 中的两个案例 ,如前一样 在运行强会调用 cards_db,cards_db
的级别是function,所以这个模块下的两个 测试案例 每个案例执行前 cards_db都会执行一此 共执行两次,cards_db
会调用一次 db 因为db的级别是session的,
执行顺序应该是 db执行初始化数据库->cards_db 执行删除所有数据-> test_empty执行 案例pass -> cards_db 执行删除所有数据 -> test_two 执行 案例pass
python
# test_count.py
import cards


def test_empty(cards_db):
    assert cards_db.count() == 0


def test_two(cards_db):
    cards_db.add_card(cards.Card("first"))
    cards_db.add_card(cards.Card("second"))
    assert cards_db.count() == 2
接着是 test_some.py 文件中的两个案例,先调用some_cards 获取数据结构, 然后test_some.py 调用了cards_db 删除数据,案例将数据结构中数据加入到db,test_non_empty 调用 non_empty_db,non_empty_db 会掉 card_db先删除所有数据,随后调 some_cards 获取数据结构 随后案例增加了所有数据结构中的数据到db中。执行顺序来捋一下 紧接上面 先 some_cards ->cards_db -> test_add_some 测试通过-> cards_db -> non_empty_db 测试pass;
看到这有人可能有疑问test_add_some 中传参数 some_cards 在 cards_bd之后为啥先执行而且还只执行了一次?non_empty_db中不也用到了么? 因为some_cards的scope是session。
python
# test_some.py
def test_add_some(cards_db, some_cards):
    expected_count = len(some_cards)
    for c in some_cards:
        cards_db.add_card(c)
    assert cards_db.count() == expected_count


def test_non_empty(non_empty_db):
    assert non_empty_db.count() > 0
接下来最后一个案例,简单 先cards_db 删除所有数据 案例加了三条数据 最后 会掉 db 做teardown 关闭数据库
python
# test_three.py
import cards


def test_three(cards_db):
    cards_db.add_card(cards.Card("first"))
    cards_db.add_card(cards.Card("second"))
    cards_db.add_card(cards.Card("third"))
    assert cards_db.count() == 3
执行结果:
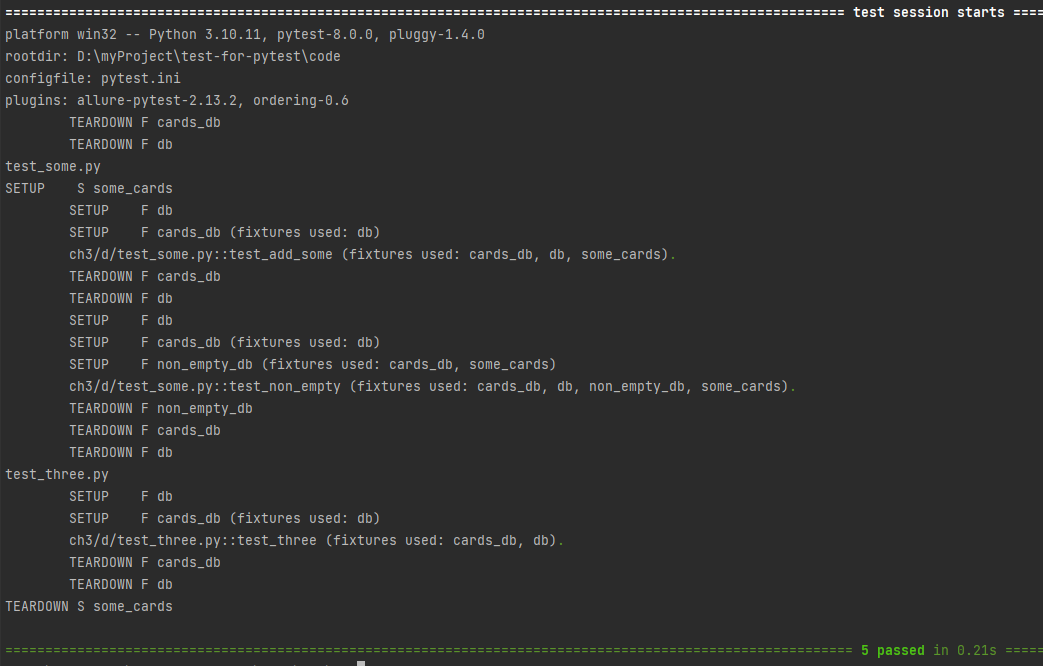
动态的scope
通过pytest_addoption建立沟子将 scope参数进行参数化 当传入 --fun-db参数时 scope 未
function,未传入则为 session的实现
python
# conftest.py
from pathlib import Path
from tempfile import TemporaryDirectory
import cards
import pytest


def pytest_addoption(parser):
    parser.addoption(
        "--func-db",
        action="store_true",
        default=False,
        help="new db for each test",
    )


def db_scope(fixture_name, config):
    if config.getoption("--func-db", None):
        return "function"
    return "session"


@pytest.fixture(scope=db_scope)
def db():
    """CardsDB object connected to a temporary database"""
    with TemporaryDirectory() as db_dir:
        db_path = Path(db_dir)
        db_ = cards.CardsDB(db_path)
        yield db_
        db_.close()


@pytest.fixture(scope="function")
def cards_db(db):
    """CardsDB object that's empty"""
    db.delete_all()
    return db


@pytest.fixture(scope="session")
def some_cards():
    """List of different Card objects"""
    return [
        cards.Card("write book", "Brian", "done"),
        cards.Card("edit book", "Katie", "done"),
        cards.Card("write 2nd edition", "Brian", "todo"),
        cards.Card("edit 2nd edition", "Katie", "todo"),
    ]


@pytest.fixture(scope="function")
def non_empty_db(cards_db, some_cards):
    """CardsDB object that's been populated with 'some_cards'"""
    for c in some_cards:
        cards_db.add_card(c)
    return cards_db
python
# test_count.py
import cards


def test_empty(cards_db):
    assert cards_db.count() == 0


def test_two(cards_db):
    cards_db.add_card(cards.Card("first"))
    cards_db.add_card(cards.Card("second"))
    assert cards_db.count() == 2
python
# test_some.py
def test_add_some(cards_db, some_cards):
    expected_count = len(some_cards)
    for c in some_cards:
        cards_db.add_card(c)
    assert cards_db.count() == expected_count


def test_non_empty(non_empty_db):
    assert non_empty_db.count() > 0
python
# test_three.py
import cards


def test_three(cards_db):
    cards_db.add_card(cards.Card("first"))
    cards_db.add_card(cards.Card("second"))
    cards_db.add_card(cards.Card("third"))
    assert cards_db.count() == 3
执行结果:
不传入参数 pytest --setup-show 默认环境
传入参数 pytest --setup-show --func-db
autouse
Fixture 可以以非指定的方式自动在不同级别执行,指定autouse=True参数 footer_session_scope 和 footer_function_scope 都传入autouse参数 ,footer_function_scope 未指定scope默认为function在每个案例执行前都会执行,footer_session_scope 仅执行一次。
python
import pytest
import time


@pytest.fixture(autouse=True, scope="session")
def footer_session_scope():
    """Report the time at the end of a session."""
    yield
    now = time.time()
    print("--")
    print(
        "finished : {}".format(
            time.strftime("%d %b %X", time.localtime(now))
        )
    )
    print("-----------------")


@pytest.fixture(autouse=True)
def footer_function_scope():
    """Report test durations after each function."""
    start = time.time()
    yield
    stop = time.time()
    delta = stop - start
    print("\ntest duration : {:0.3} seconds".format(delta))


def test_1():
    """Simulate long-ish running test."""
    time.sleep(1)


def test_2():
    """Simulate slightly longer test."""
    time.sleep(1.23)
pytest的内置fixture
tmp_path && tmp_path_factory
临时文件的生成,有时自动化测试可能需要需临时变量存储到文件或 临时创建临时文件副本,此时可以应用这两个内置fixture。
python
def test_tmp_path(tmp_path):
    file = tmp_path / "file.txt"
    file.write_text("Hello")
    assert file.read_text() == "Hello"

def test_tmp_path_factory(tmp_path_factory):
    path = tmp_path_factory.mktemp("sub")
    file = path / "file.txt"
    file.write_text("Hello")
assert file.read_text() == "Hello"- 临时文件夹生成后会最多积累三个 多余时会删除最旧的。
- test_tmp_path的scope 是 function
- test_tmp_path_factory 的scope 是session
- 使用test_tmp_path_factory 必须使用 mktemp()方法来创建 路径


上面的示例中一直在使用 TemporaryDirectory()的方式来建立临时文件初始化 db
下面可以通过tmp_path_factory 或者 tmp_path方式来更改之前的fixture实现, 由于之db 的scope是 session所以可以直接使用 tmp_path_factory,改造代码如下:
python
@pytest.fixture(scope="session")
def db(tmp_path_factory):
    """CardsDB object connected to a temporary database"""
    db_path = tmp_path_factory.mktemp("cards_db")
    db_ = cards.CardsDB(db_path)
    yield db_
    db_.close()
capsys
capsys是针对控制台输出的测试方式,可以通过capsys 获取到输出到控制台的内容。
python
def test_cas(capsys):
    print("hello")
    out, err = capsys.readouterr()
    assert out == "hello\n"
如何做数据驱动
通常当存在大量的相同操作案例是我们考虑使用数据驱动的方式,避免冗余的案例代码。
未使用 数据驱动前的做法:
python
from cards import Card


def test_finish_from_in_prog(cards_db):
    index = cards_db.add_card(Card("second edition", state="in prog"))
    cards_db.finish(index)
    card = cards_db.get_card(index)
    assert card.state == "done"


def test_finish_from_done(cards_db):
    index = cards_db.add_card(Card("write a book", state="done"))
    cards_db.finish(index)
    card = cards_db.get_card(index)
    assert card.state == "done"


def test_finish_from_todo(cards_db):
    index = cards_db.add_card(Card("create a course", state="todo"))
    cards_db.finish(index)
    card = cards_db.get_card(index)
    assert card.state == "done"
两种方式实现数据驱动
parametrize
使用@pytest.mark.parametrize 做数据驱动,入参未 测试用例的参数名,加要进行测试的参数集合
python
import pytest
from cards import Card


@pytest.mark.parametrize(
    "start_summary, start_state",
    [
        ("write a book", "done"),
        ("second edition", "in prog"),
        ("create a course", "todo"),
    ],
)
def test_finish(cards_db, start_summary, start_state):
    initial_card = Card(summary=start_summary, state=start_state)
    index = cards_db.add_card(initial_card)

    cards_db.finish(index)

    card = cards_db.get_card(index)
    assert card.state == "done"


@pytest.mark.parametrize("start_state", ["done", "in prog", "todo"])
def test_finish_simple(cards_db, start_state):
    c = Card("write a book", state=start_state)
    index = cards_db.add_card(c)
    cards_db.finish(index)
    card = cards_db.get_card(index)
    assert card.state == "done"
fixture方式
使用fixture 做数据驱动,将案例集合给 fixture注解的 params参数
python
import pytest
from cards import Card


@pytest.fixture(params=["done", "in prog", "todo"])
def start_state(request):
    return request.param


def test_finish(cards_db, start_state):
    c = Card("write a book", state=start_state)
    index = cards_db.add_card(c)
    cards_db.finish(index)
    card = cards_db.get_card(index)
    assert card.state == "done"
案例选择
数据驱动的多个案例也可以选择其中某个案例执行。
python
import pytest
from cards import Card


@pytest.fixture(params=["done", "in prog", "todo"])
def start_state(request):
    return request.param


def test_finish(cards_db, start_state):
    c = Card("write a book", state=start_state)
    index = cards_db.add_card(c)
    cards_db.finish(index)
    card = cards_db.get_card(index)
    assert card.state == "done"
如上数据驱动的案例 可以通过 -k 参数方式进行选择
pytest .\test_fix_param.py 一共三条案例

使用 -k 筛选只执行 参数未 done状态的 cards
pytest .\test_fix_param.py -k "done"

常用的Markers
Mark 是一种注解形式,也是pytest内置的装饰器,通过mark可以实现多种案例操作,
例如:@pytest.mark.skip 标记的案例会跳过执行 上面的数据驱动 也是一种mark。
@pytest.mark.skip
被该注解标记的 测试case会被跳过,可以通过reason参数来传入跳过原因。
python
from cards import Card

import pytest


@pytest.mark.skip(reason="Card doesn't support < comparison yet")
def test_less_than():
    c1 = Card("a task")
    c2 = Card("b task")
    assert c1 < c2


def test_equality():
    c1 = Card("a task")
    c2 = Card("a task")
    assert c1 == c2
@pytest.mark.skipif
有条件的跳过 ,当条件满足时跳过该条案例
python
import pytest
from cards import Card


import cards
from packaging.version import parse


@pytest.mark.skipif(
    parse(cards.__version__).major < 2,
    reason="Card < comparison not supported in 1.x",
)
def test_less_than():
    c1 = Card("a task")
    c2 = Card("b task")
    assert c1 < c2
@pytest.mark.xfail
被该注解标记的case 为预期失败的案例,如果该案例失败了 则状态为 XFAIL状态,如果该案例成功了 即预期失败但成功了 则状态为
XPASS ;例外 当 strict=True 时 如果被xfail标记的案例成功了则直接为 FAIL状态
python
import pytest
import cards
from cards import Card
from packaging.version import parse


@pytest.mark.xfail(
    parse(cards.__version__).major < 2,
    reason="Card < comparison not supported in 1.x",
)
def test_less_than():
    c1 = Card("a task")
    c2 = Card("b task")
    assert c1 < c2


@pytest.mark.xfail(reason="XPASS demo")
def test_xpass():
    c1 = Card("a task")
    c2 = Card("a task")
    assert c1 == c2


@pytest.mark.xfail(reason="strict demo", strict=True)
def test_xfail_strict():
    c1 = Card("a task")
    c2 = Card("a task")
    assert c1 == c2
选择案例的自定义mark
可以通过自定义的mark在运行案例时 选择指定案例执行
1.首先在pytest.init文件 通过markers 配置 自定义的标签,格式为 标签名 :描述
如下为名为pytest.init的文件
python
[pytest]
markers =
    Tag_Smoking: This label indicates the case can be used in smoking test
    Tan_Factory: This label indicates the case runs stably and can be used for auto-factory inneritance test
    Tag_bigrule: bigrule项目
    Tag_repos: Tag_repos
    Tag_nable: This label indicates the test cases that can be enabled
    Tag_nable1: test
    run : test
    Tag_putong : test
    Tag_aps: APS TEST
通过在案例里使用 标签的注解 在执行测试案例时 使用 -m 指定标签
python
import pytest


@pytest.mark.Tag_aps
def test_onet():
    assert 1 == 1
def test_two():
    assert 2 == 2
def test_three():
    assert 3 == 3
执行案例 pytest .\test_mark_run.py -m "Tag_aps"
