1. 概述
1.1 Nginx 简介
Nginx 是一个高性能的 HTTP 和反向代理服务器,也是一个 IMAP/POP3/SMTP 代理服务器。Nginx 以其高性能、稳定性、丰富的功能集、简单的配置文件以及低系统资源消耗而闻名。
1.2 负载均衡概述
负载均衡是一种将工作负载分摊到多个服务器上的技术,以提高网站、应用或数据库的性能和可靠性。负载均衡器可以在不同的网络层级实现,最常见的是第 4 层(传输层)和第 7 层(应用层)负载均衡。
2. 四层负载均衡(传输层)
2.1 工作原理
第 4 层负载均衡基于传输层协议(如 TCP 和 UDP)进行负载均衡。Nginx 作为第 4 层负载均衡器时,会基于 IP 地址和端口将请求分发到后端服务器。
2.2 特点
-
透明性: 第 4 层负载均衡器只处理网络层和传输层的数据包,不关心应用层的数据内容。
-
高效性: 因为不需要解析应用层数据包,处理速度快,性能高。
-
简单性: 配置较为简单,适用于不需要复杂应用层处理的场景。
2.3 优缺点
优点
-
高性能: 因为只处理传输层的数据包,Nginx 可以高效地转发请求。
-
广泛适用: 可以处理任何基于 TCP 或 UDP 的应用。
缺点
-
功能有限: 无法基于应用层内容(如 URL、头信息)进行负载均衡。
-
调试复杂: 因为透明性,难以对应用层问题进行调试。
2.4 示例场景
-
TCP 负载均衡: 适用于需要将 TCP 流量分发到多个后端服务器的场景,如数据库连接池。
-
UDP 负载均衡: 适用于需要将 UDP 流量分发到多个后端服务器的场景,如 DNS 请求。
3. 七层负载均衡(应用层)
3.1 工作原理
第 7 层负载均衡基于应用层协议(如 HTTP 和 HTTPS)进行负载均衡。Nginx 作为第 7 层负载均衡器时,会解析 HTTP 请求,并基于请求的内容(如 URL、头信息、Cookies)将请求分发到后端服务器。
3.2 特点
-
灵活性: 第 7 层负载均衡器可以基于应用层的任何信息进行复杂的负载均衡决策。
-
可见性: 可以解析并记录详细的请求信息,便于监控和调试。
-
安全性: 可以基于请求内容进行安全过滤和权限控制。
3.3 优缺点
优点
-
灵活性高: 可以基于 URL、头信息、Cookies 等进行复杂的负载均衡。
-
强大的功能: 支持 SSL 终结、缓存、压缩、请求重写等高级功能。
-
可扩展性: 易于扩展和集成其他应用层服务,如 WAF、认证等。
缺点
-
性能开销: 因为需要解析和处理应用层数据包,性能开销较大。
-
配置复杂: 需要更多的配置和管理工作,特别是在复杂的应用场景中。
3.4 示例场景
-
HTTP 负载均衡: 适用于需要将 HTTP 请求分发到多个后端 Web 服务器的场景。
-
HTTPS 负载均衡: 适用于需要处理 HTTPS 请求,并将其分发到多个后端服务器的场景。
-
基于 URL 的负载均衡: 适用于需要将不同路径的请求分发到不同服务器的场景。
-
基于 Cookies 的会话保持: 适用于需要基于用户会话将请求分发到同一服务器的场景。
4. Nginx 调度算法
4.1 轮询(Round Robin)
-
简介: 将请求依次分发给每个后端服务器,循环进行。
-
特点: 简单易用,适用于负载均衡较为均匀的场景。
4.2 最小连接数(Least Connections)
-
简介: 将请求分发给当前活动连接数最少的后端服务器。
-
特点: 适用于请求处理时间差异较大的场景。
4.3 IP 哈希(IP Hash)
-
简介: 基于客户端 IP 地址计算哈希值,将请求分发给对应的后端服务器。
-
特点: 适用于需要会话保持的场景,确保同一客户端的请求始终分发到同一服务器。
4.4 加权轮询(Weighted Round Robin)
-
简介: 根据服务器的权重进行轮询,权重高的服务器分配更多的请求。
-
特点: 适用于后端服务器性能不一致的场景。
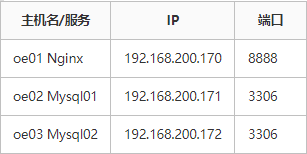
5. 四层负载配置示例
需求:使用nginx监听8888端口,后端服务器均为MySQL,并且MySQL为主从模式,客户端将访问nginx提供的8888端口来连接MySQL
我这里只是模拟,所以数据库里面是空的,没有任何库,表
5.1 安装并启动数据库
[root@oe02~]# yum install mariadb-server -y
[root@oe03 ~]# yum install mariadb-server -y
[root@oe02 ~]# systemctl enable --now mariadb
Created symlink /etc/systemd/system/mysql.service → /usr/lib/systemd/system/mariadb.service.
Created symlink /etc/systemd/system/mysqld.service → /usr/lib/systemd/system/mariadb.service.
Created symlink /etc/systemd/system/multi-user.target.wants/mariadb.service → /usr/lib/systemd/system/mariadb.service.
[root@oe03 ~]# systemctl enable --now mariadb
Created symlink /etc/systemd/system/mysql.service → /usr/lib/systemd/system/mariadb.service.
Created symlink /etc/systemd/system/mysqld.service → /usr/lib/systemd/system/mariadb.service.
Created symlink /etc/systemd/system/multi-user.target.wants/mariadb.service → /usr/lib/systemd/system/mariadb.service.

# 初始化数据库
[root@oe02 ~]# mysql_secure_installation
[root@oe03 ~]# mysql_secure_installation
5.2 开启root远程连接权限
如果不开启远程连接权限的话,是不能够连接上数据库的,此时的数据库只能够本地进行使用,所以我们需要开启远程权限
[root@oe02 ~]# mysql -uroot -p123
MariaDB [(none)]> grant all privileges on *.* to 'root'@'123' identified by '123';
Query OK, 0 rows affected (0.001 sec)
MariaDB [(none)]> flush privileges;
Query OK, 0 rows affected (0.001 sec)

[root@oe03 ~]# mysql -uroot -p123
MariaDB [(none)]> grant all privileges on *.* to 'root'@'123' identified by '123';
Query OK, 0 rows affected (0.001 sec)
MariaDB [(none)]> flush privileges;
Query OK, 0 rows affected (0.001 sec)
5.3 配置Nginx
[root@oe01 ~]# vim /etc/nginx/nginx.conf

# 在末尾加上这一段配置
stream {
        upstream db {
                server 192.168.200.171:3306;
                server 192.168.200.172:3306;
                }
        server {
                listen 8888;
                proxy_pass db;
        }
}
配置解释:
-
一定要在**/etc/nginx/nginx.conf** 里面加入这一段配置,如果在
conf.d目录下写的话会报错的,因为这个是四层负载,而你将配置写在conf.d下的话他是会被加载到http段落里面去的,http属于7层,所以他会报错 -
upstream db :表示定义一个后端服务器组,这个组的名字叫做db,在这个段落里面使用server来指定主机和端口
-
server段落:这里就是配置虚拟主机,监听8888端口
5.4 重启nginx并测试
[root@oe01 ~]# systemctl restart nginx现在我们使用客户端来连接mysql
[root@oe01 ~]# mysql -uroot -p123 -h 192.168.200.170 -P 8888
mysql: [Warning] Using a password on the command line interface can be insecure.
Welcome to the MySQL monitor.  Commands end with ; or \g.
Your MySQL connection id is 15
Server version: 5.5.5-10.5.25-MariaDB MariaDB Server

Copyright (c) 2000, 2024, Oracle and/or its affiliates.

Oracle is a registered trademark of Oracle Corporation and/or its
affiliates. Other names may be trademarks of their respective
owners.

Type 'help;' or '\h' for help. Type '\c' to clear the current input statement.

mysql>
客户端成功的连接上了数据库,并且使用的地址是Nginx的地址,端口也是Nginx监听的端口
6. 七层负载配置示例
四层的负载是需要定义在http段落以外的,而七层的负载就可以定义在http段落内了,也就是说我们可以将负载的配置文件单独写一个并放在/etc/nginx/conf.d/下
需求:使用nginx轮询的策略负载后端的web服务
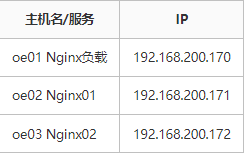
从这个规划来,第一个nginx不提供web服务,只提供对后端的负载
6.1 配置web服务器
# 安装nginx
[root@oe02 ~]# yum install nginx -y
[root@oe03 ~]# yum install nginx -y

# 启动nginx
[root@oe02 ~]# systemctl start nginx
[root@oe03 ~]# systemctl start nginx

# 编写index.html
[root@oe02 ~]# echo "hello nginx01" >/usr/share/nginx/html/index.html
[root@oe02 ~]# echo "hello nginx02" >/usr/share/nginx/html/index.html
我们的web服务器就配置好了,接下来配置Nginx的负载均衡
6.2 配置负载均衡
[root@oe01 ~]# cd /etc/nginx/conf.d/
[root@oe01 conf.d]# vim load.conf

upstream webserver {
     server 192.168.200.171:80;
     server 192.168.200.172:80;
}
server {
    listen 80;
    location / {
        proxy_pass http://webserver;
    }
}
6.3 重启nginx并测试
[root@oe01 conf.d]# systemctl restart nginx客户端测试
C:\Users\86156>curl 192.168.200.170
hello nginx01

C:\Users\86156>curl 192.168.200.170
hello nginx02

C:\Users\86156>curl 192.168.200.170
hello nginx01

C:\Users\86156>curl 192.168.200.170
hello nginx02
文章转载自: FuShudi