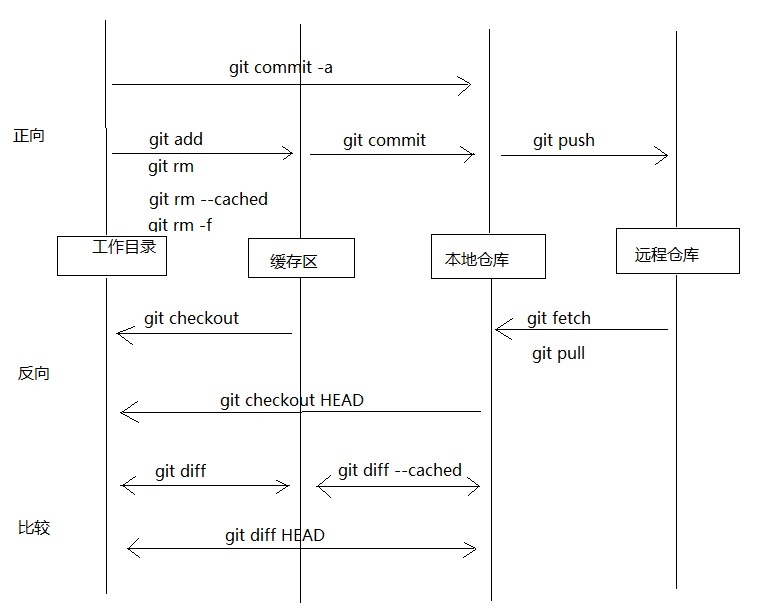
1. 下载git
yum -y install git
2. 配置用户,邮箱
git config --global user.name 'tom'
git config --global user.email '328294199@qq.com'
git config --global color.ui true
git config --global --list
3. 初始化代码目录
mkdir -p /app/src/tom-app
cd /app/src/tom-app
git init
ll .git/
4. git工作空间

工作区:工作目录就是我们执行命令git init时所在的地方
暂存区:暂存区和本地仓库都是在.git目录,因为它们只是用来存数据的
本地仓库:暂存区和本地仓库都是在.git目录,因为它们只是用来存数据的
远程仓库:远程仓库在中心服务器,也就是我们做好工作之后推送到远程仓库
5. git常用命令
|-------------------------------|-----------------------------------------------------------------|
| 命令 | 含义 |
| git init | 初始化本地仓库目录 |
| git config --global | 邮箱,用户名,颜色 |
| git add | 提交数据到缓冲区(暂存区) git add . (所有文件) 或 git add 文件 |
| git commit | 把暂存区的数据提交到本地仓库 git commit -m "标记/说明" |
| git status | 显示工作空间的状态 |
| git reset | 回滚 |
| git reset --soft cid(版本号) | 把指定的版本数据内容下载到暂存区 |
| git reset HEAD | 暂存区 -->工作空间(被修改的状态) |
| git checkout | 文件下载到工作空间并可以使用 git checkout . 或 git checkout 文件 |
| git reset --mix 版本号 | |
| git reset --hard 版本号 | 把本地仓库指定版本信息数据下载到工作目录中 |
| git branch | 查看分支 |
| git branch name | 创建分支 |
| git branch -d name | 删除分支 |
| git checkout 分支名字 | 切换分支 |
| git merge 分支名字 | 合并(吸收)分支(把指定的分支合并到当前分支中) |
| git checkout -b name | 创建分支并切换到这个分支 |
| git pull origin 分支名字 | 用于从远程仓库获取最新的提交,并将其合并到当前分支中, 它相当于执行了 git fetch 后紧接着执行了 git merge |
| git fetch origin 分支名字 | 用于从远程仓库获取最新的提交,但不会自动合并或更新本地分支 |
| git push -u origin 分支名字 | 将本地仓库代码推送至远程分支 |
| git clone [https://|git] | 用于初始化本地仓库,只需要执行一次。它会在本地创建一个新的目录,并将远程仓库的整个代码库复制到该目录中 |
| git tag -a v1.0 -m "new v1.0" | 给当前版本打个标签,用于发版本 |
| git push -u origin --tags | 将标签推送至远程仓库 |
| | |
#书写代码
]# echo 进度1% > index.html

#查看状态
]# git status
# On branch master
# Initial commit
# Untracked files:
#   (use "git add <file>..." to include in what will be committed)
#	index.html
nothing added to commit but untracked files present (use "git add" to track)

#把工作区中未被跟踪的文件加到暂存区进行跟踪
git add .

#再次查看状态,文件已加入到暂存区
[root@gitlab tom-app]# git status
# On branch master
# Initial commit
# Changes to be committed:
#   (use "git rm --cached <file>..." to unstage)
#	new file:   index.html

#把暂存区的文件提交到本地仓库
[root@gitlab tom-app]# git commit -m "项目v1"
[master (root-commit) 92bbd3f] 项目v1
 1 file changed, 1 insertion(+)
 create mode 100644 index.html

#再次查看状态,工作区和暂存区都没有文件要提交了
[root@gitlab tom-app]# git status
# On branch master
nothing to commit, working directory clean

#不小心把代码删除了,可以通过git checkout .把最新代码从本地仓库拉取下来
[root@gitlab tom-app]# rm -rf index.html
[root@gitlab tom-app]# ll
total 0
[root@gitlab tom-app]# git status
# On branch master
# Changes not staged for commit:
#   (use "git add/rm <file>..." to update what will be committed)
#   (use "git checkout -- <file>..." to discard changes in working directory)
#
#	deleted:    index.html
#
no changes added to commit (use "git add" and/or "git commit -a")
[root@gitlab tom-app]# git checkout .
[root@gitlab tom-app]# ll
total 4
-rw-r--r-- 1 root root 9 Jul 10 11:38 index.html
[root@gitlab tom-app]# git status
# On branch master
nothing to commit, working directory clean
6. 分支
#当前共一个分支,目前位于master分支
[root@gitlab tom-app]# git branch
* master

#从当前分支位置,创建要给新分支shopping
[root@gitlab tom-app]# git branch shopping

#当前仓库共2个分支,代码目前位于master分支
[root@gitlab tom-app]# git branch
* master
  shopping

#切换代码到shopping分支
[root@gitlab tom-app]# git checkout shopping
Switched to branch 'shopping'

#当前仓库共2个分支,代码目前位于shopping分支
[root@gitlab tom-app]# git branch
  master
* shopping

#shopping分支新增代码并提交---------------------------------------------------
[root@gitlab tom-app]# vim shopping.html
[root@gitlab tom-app]# git status
# On branch shopping
# Untracked files:
#   (use "git add <file>..." to include in what will be committed)
#
#	shopping.html
nothing added to commit but untracked files present (use "git add" to track)
[root@gitlab tom-app]# git add .
[root@gitlab tom-app]# git commit -m "shopping v1"
[shopping 94cead0] shopping v1
 1 file changed, 1 insertion(+)
 create mode 100644 shopping.html
#----------------------------------------------------------------------

#把shoping分支的代码合并到master分支--------------------------------------
#先确保当前分支在master分支
[root@gitlab tom-app]# git checkout master
Switched to branch 'master'
[root@gitlab tom-app]# ll
-rw-r--r-- 1 root root 9 Jul 10 12:08 index.html
[root@gitlab tom-app]# git merge shopping
Updating 65d8fab..94cead0
Fast-forward
 shopping.html | 1 +
 1 file changed, 1 insertion(+)
 create mode 100644 shopping.html
[root@gitlab tom-app]# ll
-rw-r--r-- 1 root root 9 Jul 10 12:08 index.html
-rw-r--r-- 1 root root 9 Jul 10 12:26 shopping.html
#----------------------------------------------------------------------
7. 远程仓库(gitee)
7.1. 方式一:https方式(密码认证方式)
#仓库为https(密码认证方式),每次push的时候,都要输入用户名密码
]
]# git push -u origin "master"
Username for 'https://gitee.com': 13202283227
Password for 'https://13202283227@gitee.com':
Counting objects: 12, done.
Compressing objects: 100% (7/7), done.
Writing objects: 100% (12/12), 1.04 KiB | 0 bytes/s, done.
Total 12 (delta 1), reused 0 (delta 0)
remote: Powered by GITEE.COM [GNK-6.4]
To https://gitee.com/a-little-phoenix/tomapp.git
 * [new branch]      master -> master
Branch master set up to track remote branch master from origin.
7.2. 方式二:为了提交代码方便,重新设置远程仓库地址为ssh的方式(密钥认证方式)
git remote set-url origin git@gitee.com:a-little-phoenix/tomapp.git

#本地生成密钥对
[root@gitlab tom-app]# ssh-keygen
Generating public/private rsa key pair.
Enter file in which to save the key (/root/.ssh/id_rsa):
Enter passphrase (empty for no passphrase):
Enter same passphrase again:
Your identification has been saved in /root/.ssh/id_rsa.
Your public key has been saved in /root/.ssh/id_rsa.pub.
The key fingerprint is:
SHA256:9iVmjImoq30tv/FAixhelh9mBp/zAVWM8KvW4UF8Cy0 root@gitlab
The key's randomart image is:
+---[RSA 2048]----+
|      ...+.      |
|       +...      |
|    . . E o      |
|     = = O .     |
|  . = @ S * .    |
| . * B X B o     |
|  + ..B + .      |
| . .o..+         |
|..o. oo..        |
+----[SHA256]-----+
[root@gitlab tom-app]# ll /root/.ssh/
total 12
-rw------- 1 root root 1679 Jul 10 13:45 id_rsa
-rw-r--r-- 1 root root  393 Jul 10 13:45 id_rsa.pub
gitee上面添加刚刚生成的公钥
