1--完整代码
2--简单代码
python
import PIL
import torch
import numpy as np
from PIL import Image
from tqdm import tqdm
import torchvision
from diffusers import AutoencoderKL, UNet2DConditionModel, DDIMScheduler
from transformers import CLIPTextModel, CLIPTokenizer
# 预处理mask
def preprocess_mask(mask):
mask = mask.convert("L") # 转换为灰度图: L = R * 299/1000 + G * 587/1000+ B * 114/1000。
w, h = mask.size # 512, 512
w, h = map(lambda x: x - x % 32, (w, h)) # resize to integer multiple of 32
mask = mask.resize((w // 8, h // 8), resample = PIL.Image.NEAREST) # 64, 64
mask = np.array(mask).astype(np.float32) / 255.0 # 归一化 64, 64
mask = np.tile(mask, (4, 1, 1)) # 4, 64, 64
mask = mask[None].transpose(0, 1, 2, 3)
mask = 1 - mask # repaint white, keep black # mask图中,mask的部分变为0
mask = torch.from_numpy(mask)
return mask
# 预处理image
def preprocess(image):
w, h = image.size
w, h = map(lambda x: x - x % 32, (w, h)) # resize to integer multiple of 32
image = image.resize((w, h), resample=PIL.Image.LANCZOS)
image = np.array(image).astype(np.float32) / 255.0
image = image[None].transpose(0, 3, 1, 2)
image = torch.from_numpy(image)
return 2.0 * image - 1.0
if __name__ == "__main__":
model_id = "runwayml/stable-diffusion-v1-5" # online download
# model_id = "/mnt/dolphinfs/hdd_pool/docker/user/hadoop-waimai-aigc/liujinfu/All_test/test0714/huggingface.co/runwayml/stable-diffusion-v1-5" # local path
# 读取输入图像和输入mask
input_image = Image.open("./images/overture-creations-5sI6fQgYIuo.png").resize((512, 512))
input_mask = Image.open("./images/overture-creations-5sI6fQgYIuo_mask.png").resize((512, 512))
# 1. 加载autoencoder
vae = AutoencoderKL.from_pretrained(model_id, subfolder = "vae")
# 2. 加载tokenizer和text encoder
tokenizer = CLIPTokenizer.from_pretrained(model_id, subfolder = "tokenizer")
text_encoder = CLIPTextModel.from_pretrained(model_id, subfolder = "text_encoder")
# 3. 加载扩散模型UNet
unet = UNet2DConditionModel.from_pretrained(model_id, subfolder = "unet")
# 4. 定义noise scheduler
noise_scheduler = DDIMScheduler(
num_train_timesteps = 1000,
beta_start = 0.00085,
beta_end = 0.012,
beta_schedule = "scaled_linear",
clip_sample = False, # don't clip sample, the x0 in stable diffusion not in range [-1, 1]
set_alpha_to_one = False,
)
# 将模型复制到GPU上
device = "cuda"
vae.to(device, dtype = torch.float16)
text_encoder.to(device, dtype = torch.float16)
unet = unet.to(device, dtype = torch.float16)
# 设置prompt和超参数
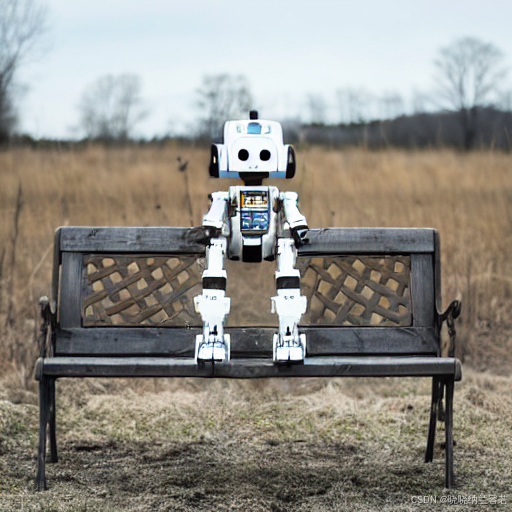
prompt = "a mecha robot sitting on a bench"
negative_prompt = ""
strength = 0.75
guidance_scale = 7.5
batch_size = 1
num_inference_steps = 50
generator = torch.Generator(device).manual_seed(0)
with torch.no_grad():
# get prompt text_embeddings
text_input = tokenizer(prompt, padding = "max_length",
max_length = tokenizer.model_max_length,
truncation = True,
return_tensors = "pt")
text_embeddings = text_encoder(text_input.input_ids.to(device))[0]
# get unconditional text embeddings
max_length = text_input.input_ids.shape[-1]
uncond_input = tokenizer(
[negative_prompt] * batch_size, padding = "max_length", max_length = max_length, return_tensors = "pt"
)
uncond_embeddings = text_encoder(uncond_input.input_ids.to(device))[0]
# concat batch
text_embeddings = torch.cat([uncond_embeddings, text_embeddings])
# 设置采样步数
noise_scheduler.set_timesteps(num_inference_steps, device = device)
# 根据strength计算timesteps
init_timestep = min(int(num_inference_steps * strength), num_inference_steps)
t_start = max(num_inference_steps - init_timestep, 0)
timesteps = noise_scheduler.timesteps[t_start:]
# 预处理init_image
init_input = preprocess(input_image)
init_latents = vae.encode(init_input.to(device, dtype=torch.float16)).latent_dist.sample(generator)
init_latents = 0.18215 * init_latents
init_latents = torch.cat([init_latents] * batch_size, dim=0)
init_latents_orig = init_latents
# 处理mask
mask_image = preprocess_mask(input_mask)
mask_image = mask_image.to(device=device, dtype=init_latents.dtype)
mask = torch.cat([mask_image] * batch_size)
# 给init_latents加噪音
noise = torch.randn(init_latents.shape, generator = generator, device = device, dtype = init_latents.dtype)
init_latents = noise_scheduler.add_noise(init_latents, noise, timesteps[:1])
latents = init_latents # 作为初始latents
# Do denoise steps
for t in tqdm(timesteps):
# 这里latens扩展2份,是为了同时计算unconditional prediction
latent_model_input = torch.cat([latents] * 2)
latent_model_input = noise_scheduler.scale_model_input(latent_model_input, t) # for DDIM, do nothing
# 预测噪音
noise_pred = unet(latent_model_input, t, encoder_hidden_states=text_embeddings).sample
# Classifier Free Guidance
noise_pred_uncond, noise_pred_text = noise_pred.chunk(2)
noise_pred = noise_pred_uncond + guidance_scale * (noise_pred_text - noise_pred_uncond)
# x_t -> x_t-1
latents = noise_scheduler.step(noise_pred, t, latents).prev_sample
# 将unmask区域替换原始图像的nosiy latents
init_latents_proper = noise_scheduler.add_noise(init_latents_orig, noise, torch.tensor([t]))
# mask的部分数值为0
# 因此init_latents_proper * mask为保留原始latents(不mask)
# 而latents * (1 - mask)为用生成的latents替换mask的部分
latents = (init_latents_proper * mask) + (latents * (1 - mask))
# 注意要对latents进行scale
latents = 1 / 0.18215 * latents
image = vae.decode(latents).sample
# 转成pillow
img = (image / 2 + 0.5).clamp(0, 1).detach().cpu()
img = torchvision.transforms.ToPILImage()(img.squeeze())
img.save("./outputs/output.png")
print("All Done!")运行结果:
3--基于Diffuser进行调用
python
import torch
import torchvision
from PIL import Image
from diffusers import StableDiffusionInpaintPipelineLegacy
if __name__ == "__main__":
# load inpainting pipeline
model_id = "runwayml/stable-diffusion-v1-5"
# model_id = "/mnt/dolphinfs/hdd_pool/docker/user/hadoop-waimai-aigc/liujinfu/All_test/test0714/huggingface.co/runwayml/stable-diffusion-v1-5" # local path
pipe = StableDiffusionInpaintPipelineLegacy.from_pretrained(model_id, torch_dtype = torch.float16).to("cuda")
# load input image and input mask
input_image = Image.open("./images/overture-creations-5sI6fQgYIuo.png").resize((512, 512))
input_mask = Image.open("./images/overture-creations-5sI6fQgYIuo_mask.png").resize((512, 512))
# run inference
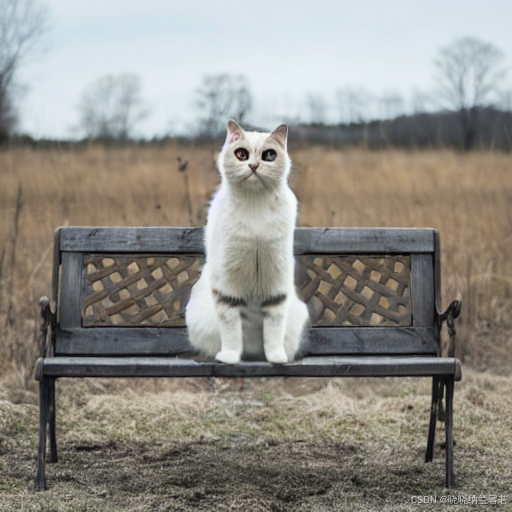
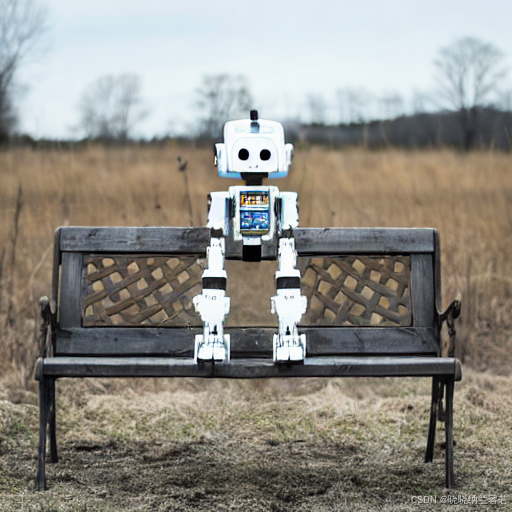
prompt = ["a mecha robot sitting on a bench", "a cat sitting on a bench"]
generator = torch.Generator("cuda").manual_seed(0)
with torch.autocast("cuda"):
images = pipe(
prompt = prompt,
image = input_image,
mask_image = input_mask,
num_inference_steps = 50,
strength = 0.75,
guidance_scale = 7.5,
num_images_per_prompt = 1,
generator = generator
).images
# 转成pillow
for idx, image in enumerate(images):
image.save("./outputs/output_{:d}.png".format(idx))
print("All Done!")运行结果: