目录
-
- 前言
- alloc方法源码探索
-
- [1. `alloc`方法:](#1.
alloc方法:) - [2. `_objc_rootAlloc()`方法:](#2.
_objc_rootAlloc()方法:) - [3. `callAlloc()`方法:](#3.
callAlloc()方法:) - [4. 里面有个`_objc_rootAllocWithZone()`方法:](#4. 里面有个
_objc_rootAllocWithZone()方法:) - [5. `_class_createInstance()`方法:](#5.
_class_createInstance()方法:) - alloc流程总结
- [1. `alloc`方法:](#1.
- init方法
- new方法
前言
先来看看下面这段代码:
objectivec
Person* person = [Person alloc];
Person* person1 = [person init];
Person* person2 = [person init];
NSLog(@"person = %@ ** %p ** %p", person, person, &person);
NSLog(@"person1 = %@ ** %p ** %p", person1, person1, &person1);
NSLog(@"person2 = %@ ** %p ** %p", person2, person2, &person2);
运行结果:

可以看出person、person1以及person2的指针变量是不同的 ,但却指向了同一个内存地址 ,所以内存的申请开辟是在alloc方法里实现的,init方法只是生成对象指针并初始化一些信息,并没有对内存空间做任何处理
alloc方法源码探索
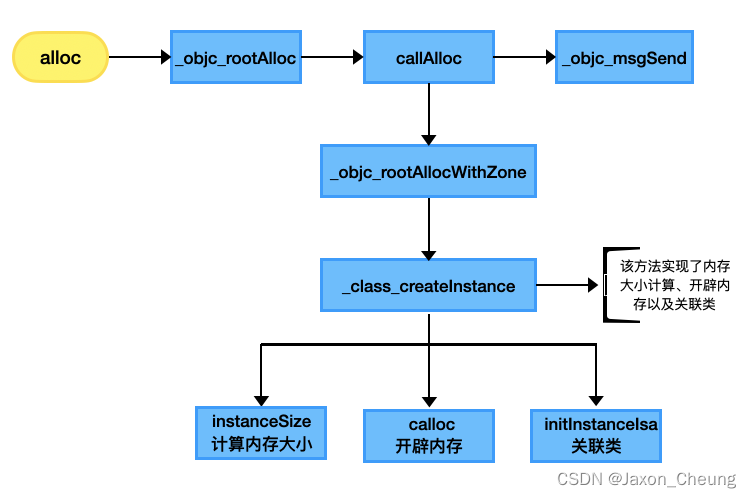
1. alloc方法:
objectivec
+ (id)alloc {
    return _objc_rootAlloc(self);
}
2. _objc_rootAlloc()方法:
objectivec
// Base class implementation of +alloc. cls is not nil.
// Calls [cls allocWithZone:nil]. 从OC视角来看,alloc 实际会调用 allocWithZone:
id
_objc_rootAlloc(Class cls)
{
    return callAlloc(cls, false/*checkNil*/, true/*allocWithZone*/);
}
3. callAlloc()方法:
objectivec
// Call [cls alloc] or [cls allocWithZone:nil], with appropriate
// shortcutting optimizations.
static ALWAYS_INLINE id
callAlloc(Class cls, bool checkNil, bool allocWithZone=false)
{
    if (slowpath(checkNil && !cls)) return nil;

    //  判断该类是否实现了自定义的 +allocWithZone:,没有则进入 if 条件语句
    if (fastpath(!cls->ISA()->hasCustomAWZ())) {
        return _objc_rootAllocWithZone(cls, nil);
    }

    // No shortcuts available.
    if (allocWithZone) {
        return ((id(*)(id, SEL, struct _NSZone *))objc_msgSend)(cls, @selector(allocWithZone:), nil);
    }
    return ((id(*)(id, SEL))objc_msgSend)(cls, @selector(alloc));
}
4. 里面有个_objc_rootAllocWithZone()方法:
objectivec
id
_objc_rootAllocWithZone(Class cls, objc_zone_t)
{
    // allocWithZone under __OBJC2__ ignores the zone parameter
    return _class_createInstance(cls, 0, OBJECT_CONSTRUCT_CALL_BADALLOC);
}
5. _class_createInstance()方法:
objectivec
static ALWAYS_INLINE id
_class_createInstance(Class cls, size_t extraBytes,
                      int construct_flags = OBJECT_CONSTRUCT_NONE,
                      bool cxxConstruct = true,
                      size_t *outAllocatedSize = nil)
{
    ASSERT(cls->isRealized());

    // Read class's info bits all at once for performance
    bool hasCxxCtor = cxxConstruct && cls->hasCxxCtor();
    bool hasCxxDtor = cls->hasCxxDtor();
    bool fast = cls->canAllocNonpointer();
    size_t size;

    size = cls->instanceSize(extraBytes);  //计算开辟内存大小
    if (outAllocatedSize) *outAllocatedSize = size;

    id obj = objc::malloc_instance(size, cls);  //申请内存
    if (slowpath(!obj)) {
        if (construct_flags & OBJECT_CONSTRUCT_CALL_BADALLOC) {
            return _objc_callBadAllocHandler(cls);
        }
        return nil;
    }

    if (fast) {
        obj->initInstanceIsa(cls, hasCxxDtor);  //关联当前类的 isa
    } else {
        // Use raw pointer isa on the assumption that they might be
        // doing something weird with the zone or RR.
        // 使用原始指针 isa,假设它们可能在处理区域(zone)或资源记录(RR)时做了一些特殊操作。
        obj->initIsa(cls);
    }

    if (fastpath(!hasCxxCtor)) {
        return obj;
    }

    construct_flags |= OBJECT_CONSTRUCT_FREE_ONFAILURE;
    return object_cxxConstructFromClass(obj, cls, construct_flags);
}这个方法真正开辟了内存,3个关键步骤:instanceSize()计算开辟内存大小、objc::malloc_instance()开辟内存、initInstanceIsa()关联当前类的 isa
上面第 1 个方法提到alloc实际上调用的是allocWithZone:(struct _NSZone *)zone方法,查allocWithZone:的源码同样的能寻到上述后续步骤的方法
instanceSize()方法
objectivec
inline size_t instanceSize(size_t extraBytes) const {
	// 快速计算内存大小
    if (fastpath(cache.hasFastInstanceSize(extraBytes))) {
        return cache.fastInstanceSize(extraBytes);
    }
    //计算类中所有变量需要的内存大小 extraBytes额外字节数一般是0
    size_t size = alignedInstanceSize() + extraBytes;
    // CF requires all objects be at least 16 bytes.
    if (size < 16) size = 16;
    return size;
}fastInstanceSize()方法
objectivec
size_t fastInstanceSize(size_t extra) const
{
    ASSERT(hasFastInstanceSize(extra));
    if (__builtin_constant_p(extra) && extra == 0) {
        return _flags & FAST_CACHE_ALLOC_MASK16;
    } else {
        size_t size = _flags & FAST_CACHE_ALLOC_MASK;
        // remove the FAST_CACHE_ALLOC_DELTA16 that was added
        // by setFastInstanceSize
        return align16(size + extra - FAST_CACHE_ALLOC_DELTA16);
    }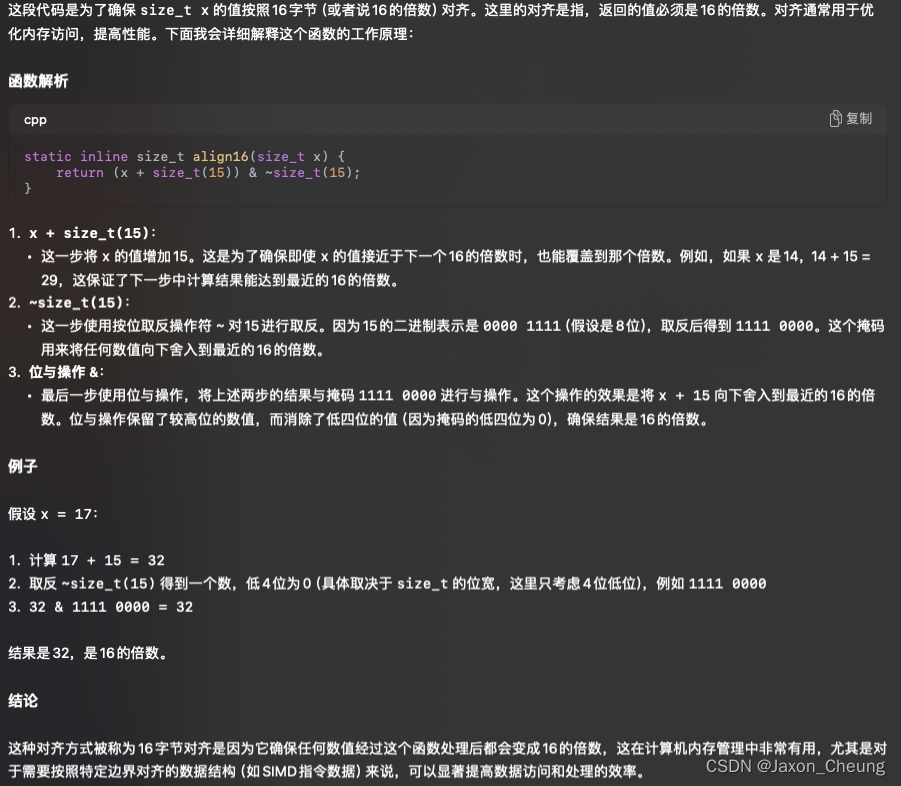
}align16()方法(16 字节对齐)
objectivec
static inline size_t align16(size_t x) {
    return (x + size_t(15)) & ~size_t(15);
}
这个函数是为了确保,传进去的
x值按照 16 字节对齐,也就是返回值必须是 16 的倍数。因为掩码的最低4位为0,对 x + 15 的结果进行 & 操作后,会把结果中的最低4位清零,这意味着结果必定是16的倍数。原因是二进制中的数如果最后四位是0,则该数可以被16整除。
malloc_instance方法
objectivec
static inline id
malloc_instance(size_t size, Class cls __unused)
{
#if _MALLOC_TYPE_ENABLED
    malloc_type_descriptor_t desc = {};
    desc.summary.type_kind = MALLOC_TYPE_KIND_OBJC;
    return (id)malloc_type_calloc(1, size, desc.type_id);
#else
    return (id)calloc(1, size);
#endif
}实际是调用calloc函数开辟内存
initInstanceIsa方法
objectivec
inline void
objc_object::initInstanceIsa(Class cls, bool hasCxxDtor)
{
    ASSERT(!cls->instancesRequireRawIsa());
    ASSERT(hasCxxDtor == cls->hasCxxDtor());

    initIsa(cls, true, hasCxxDtor);
}
初始化 isa 指针,和类关联起来
alloc流程总结
init方法
objectivec
- (id)init {
    return _objc_rootInit(self);
}

id
_objc_rootInit(id obj)
{
    // In practice, it will be hard to rely on this function.
    // Many classes do not properly chain -init calls.
    return obj;
}init方法返回的是对象本身,类似工厂模式,init方法的意义除了初始化内存,还可以扩展更多的初始化方法
new方法
objectivec
+ (id)new {
    return [callAlloc(self, false/*checkNil*/) init];
}new方法的底层实现就是调用alloc流程 + init方法