布局是一种可用于放置很多控件的容器,它可以按照一定的规律调整内部控件的位置,从而编写出精美的界面,布局内不单单可以放控件,也可以嵌套布局,这样可以完成一些复杂的界面,下面就来认识一些常用的布局吧。
线性布局
-
名称:LinearLayout,这个布局会将它所包含的控件在线性方向上依次排列
-
属性:
android:orientation这个属性就规定了是在竖直方向上还是水平方向上,当为vertical 时,规定的排列方向就为竖直方向;当为horizontal时,控件就会在水平方向上排列 -
设置一个主活动,并修改其xml中的代码,在这个活动里面加入三个按钮控件,此时设置为竖直方向:
xml
<LinearLayout xmlns:android="http://schemas.android.com/apk/res/android"
    xmlns:app="http://schemas.android.com/apk/res-auto"
    xmlns:tools="http://schemas.android.com/tools"
    android:id="@+id/main"
    android:layout_width="match_parent"
    android:layout_height="match_parent"
    android:orientation="vertical"
    tools:context=".MainActivity">

    <Button
        android:layout_width="wrap_content"
        android:layout_height="wrap_content"
        android:id="@+id/Button_1"
        android:text="Button1"/>

    <Button
        android:layout_width="wrap_content"
        android:layout_height="wrap_content"
        android:id="@+id/Button_2"
        android:text="Button2"/>

    <Button
        android:layout_width="wrap_content"
        android:layout_height="wrap_content"
        android:id="@+id/Button_3"
        android:text="Button3"/>

</LinearLayout>
此时使用的是android:orientation="vertical"即竖直方向,因此运行结果为:

但如果改为android:orientation="horizontal"即为水平方向,即三个按钮水平排列在第一行
注意:如果排列方式为horizontal,内部控件绝不能将宽度设置为match_parent,同样的道理,如果排列方式为vertical,内部控件绝不能将高度设置为match_parent,当不指定orietation属性时,则默认为水平方向排列
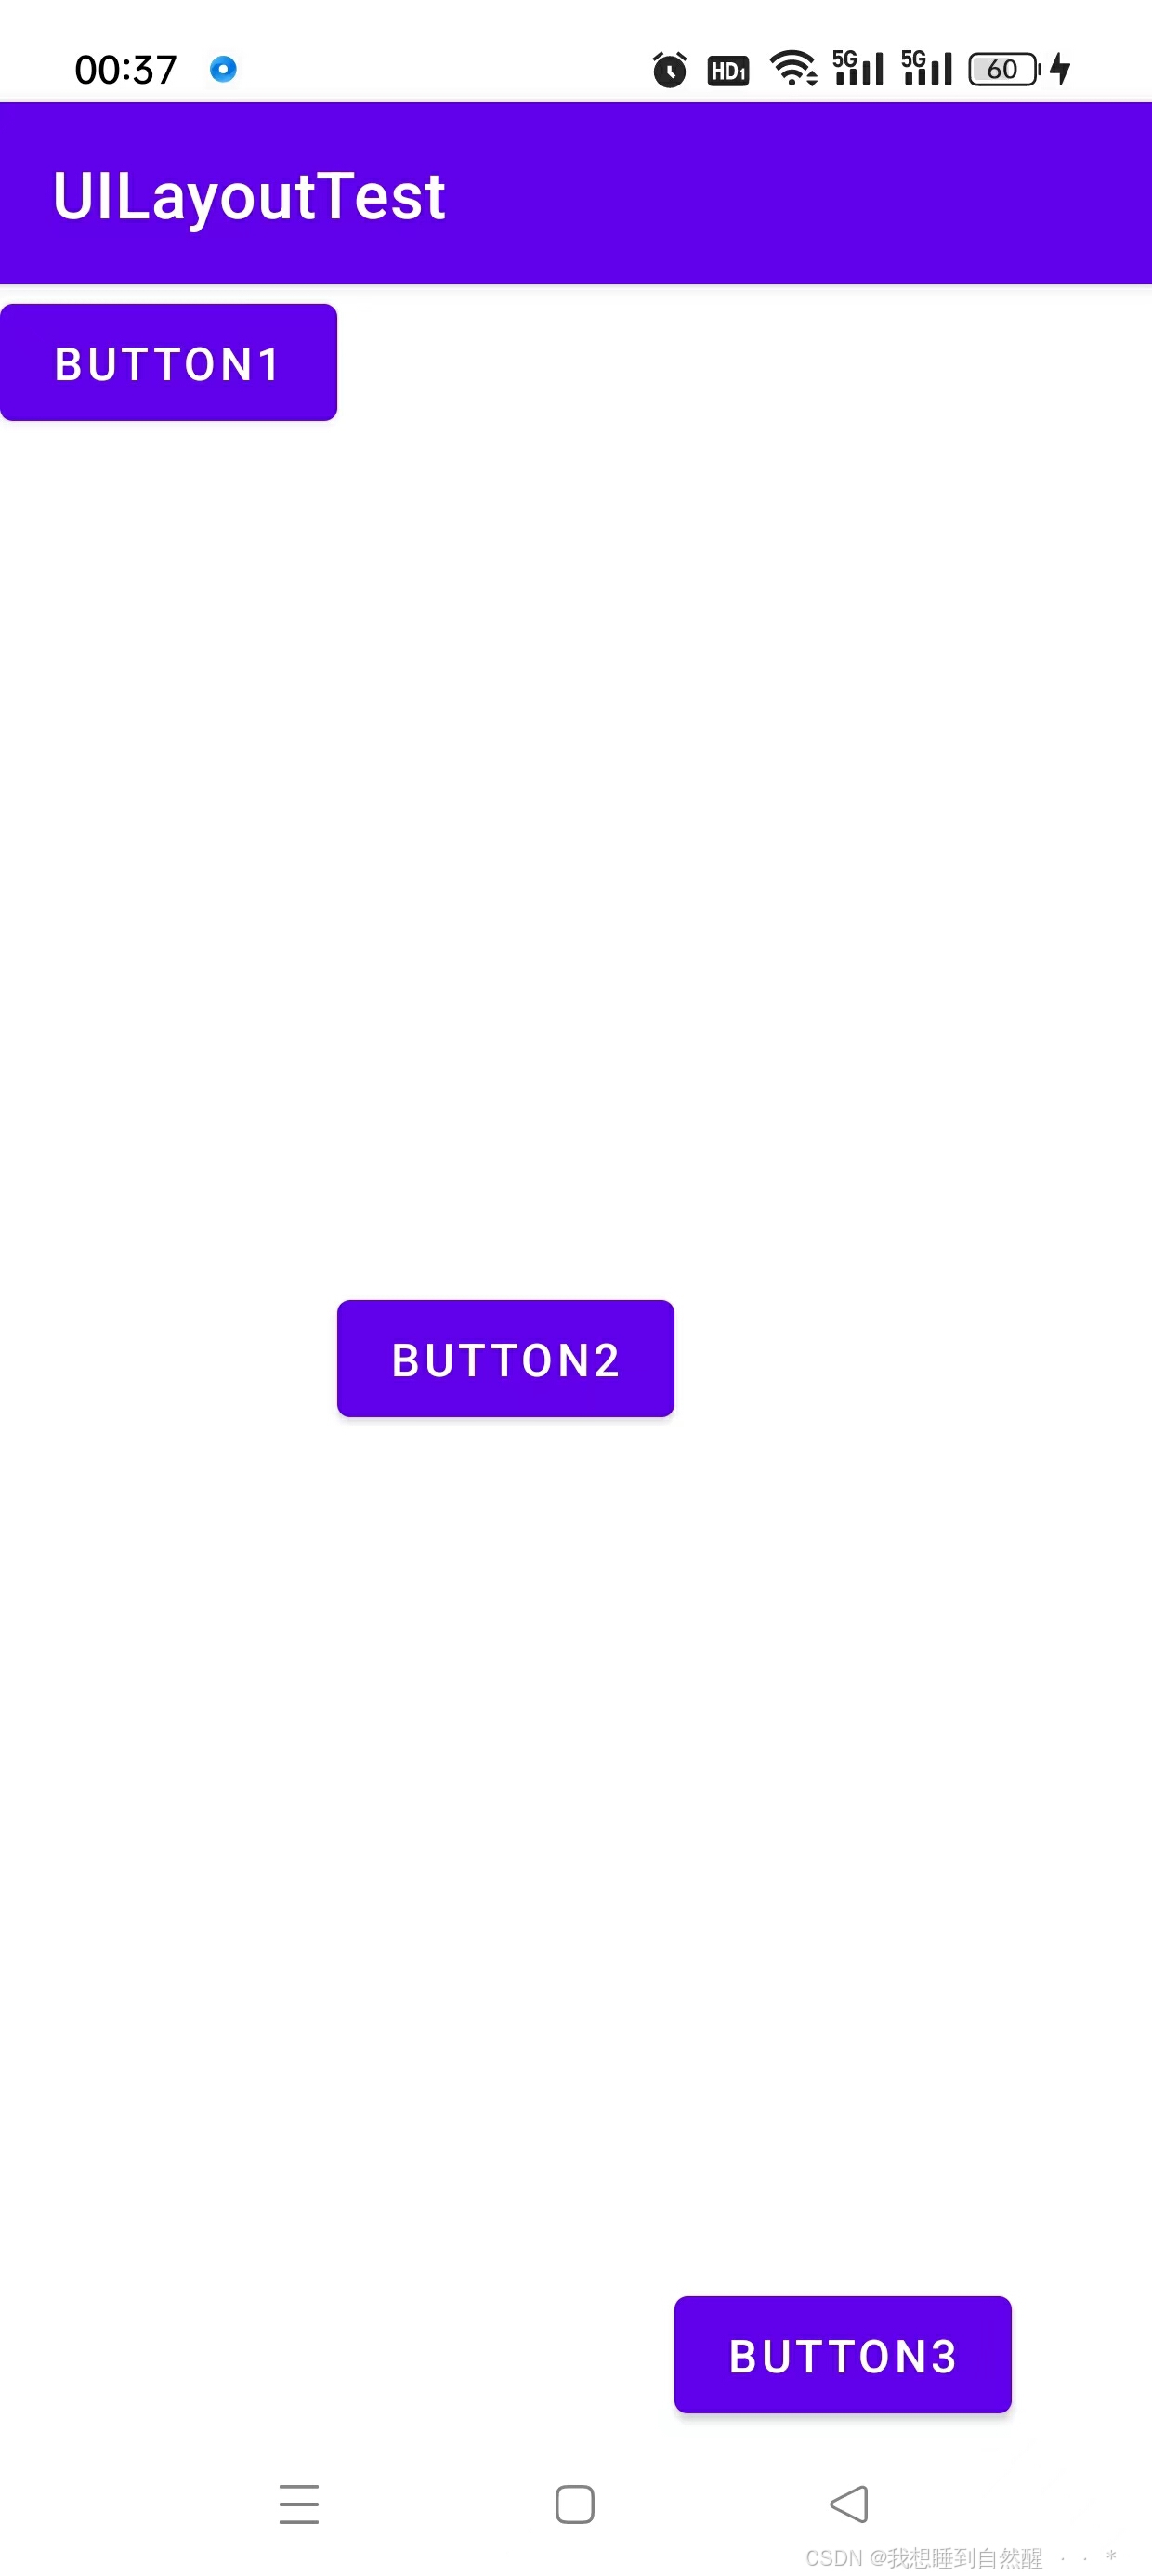
重要属性 :通过android:layout_gravity来设置控件与上级视图(即布局)的对齐方式,当这三个控件仍然会坚持以布局所规定的方向排列
xml
<LinearLayout xmlns:android="http://schemas.android.com/apk/res/android"
    xmlns:app="http://schemas.android.com/apk/res-auto"
    xmlns:tools="http://schemas.android.com/tools"
    android:id="@+id/main"
    android:layout_width="match_parent"
    android:layout_height="match_parent"
    android:orientation="horizontal"
    tools:context=".MainActivity">

    <Button
        android:layout_width="wrap_content"
        android:layout_height="wrap_content"
        android:id="@+id/Button_1"
        android:layout_gravity="top"
        android:text="Button1"/>

    <Button
        android:layout_width="wrap_content"
        android:layout_height="wrap_content"
        android:id="@+id/Button_2"
        android:layout_gravity="center_vertical"
        android:text="Button2"/>

    <Button
        android:layout_width="wrap_content"
        android:layout_height="wrap_content"
        android:layout_gravity="bottom"
        android:id="@+id/Button_3"
        android:text="Button3"/>

</LinearLayout>
因此运行结果为:
重要属性 :android:layout_weight:允许我们使用比例的方式指定控件的大小,即将控件的宽或者高其中一个设置为0dp,则会根据你所设置的数值计算所占的权重,从而规划大小:
xml
<LinearLayout xmlns:android="http://schemas.android.com/apk/res/android"
    xmlns:app="http://schemas.android.com/apk/res-auto"
    xmlns:tools="http://schemas.android.com/tools"
    android:id="@+id/main"
    android:layout_width="match_parent"
    android:layout_height="match_parent"
    android:orientation="horizontal"
    tools:context=".MainActivity">

    <EditText
        android:layout_width="0dp"
        android:layout_height="wrap_content"
        android:layout_weight="1"
        android:id="@+id/editText"
        android:hint="Type Something"/>

    <Button
        android:layout_width="0dp"
        android:layout_height="wrap_content"
        android:id="@+id/Button_1"
        android:layout_gravity="top"
        android:layout_weight="1"
        android:text="Button1"/>

</LinearLayout>
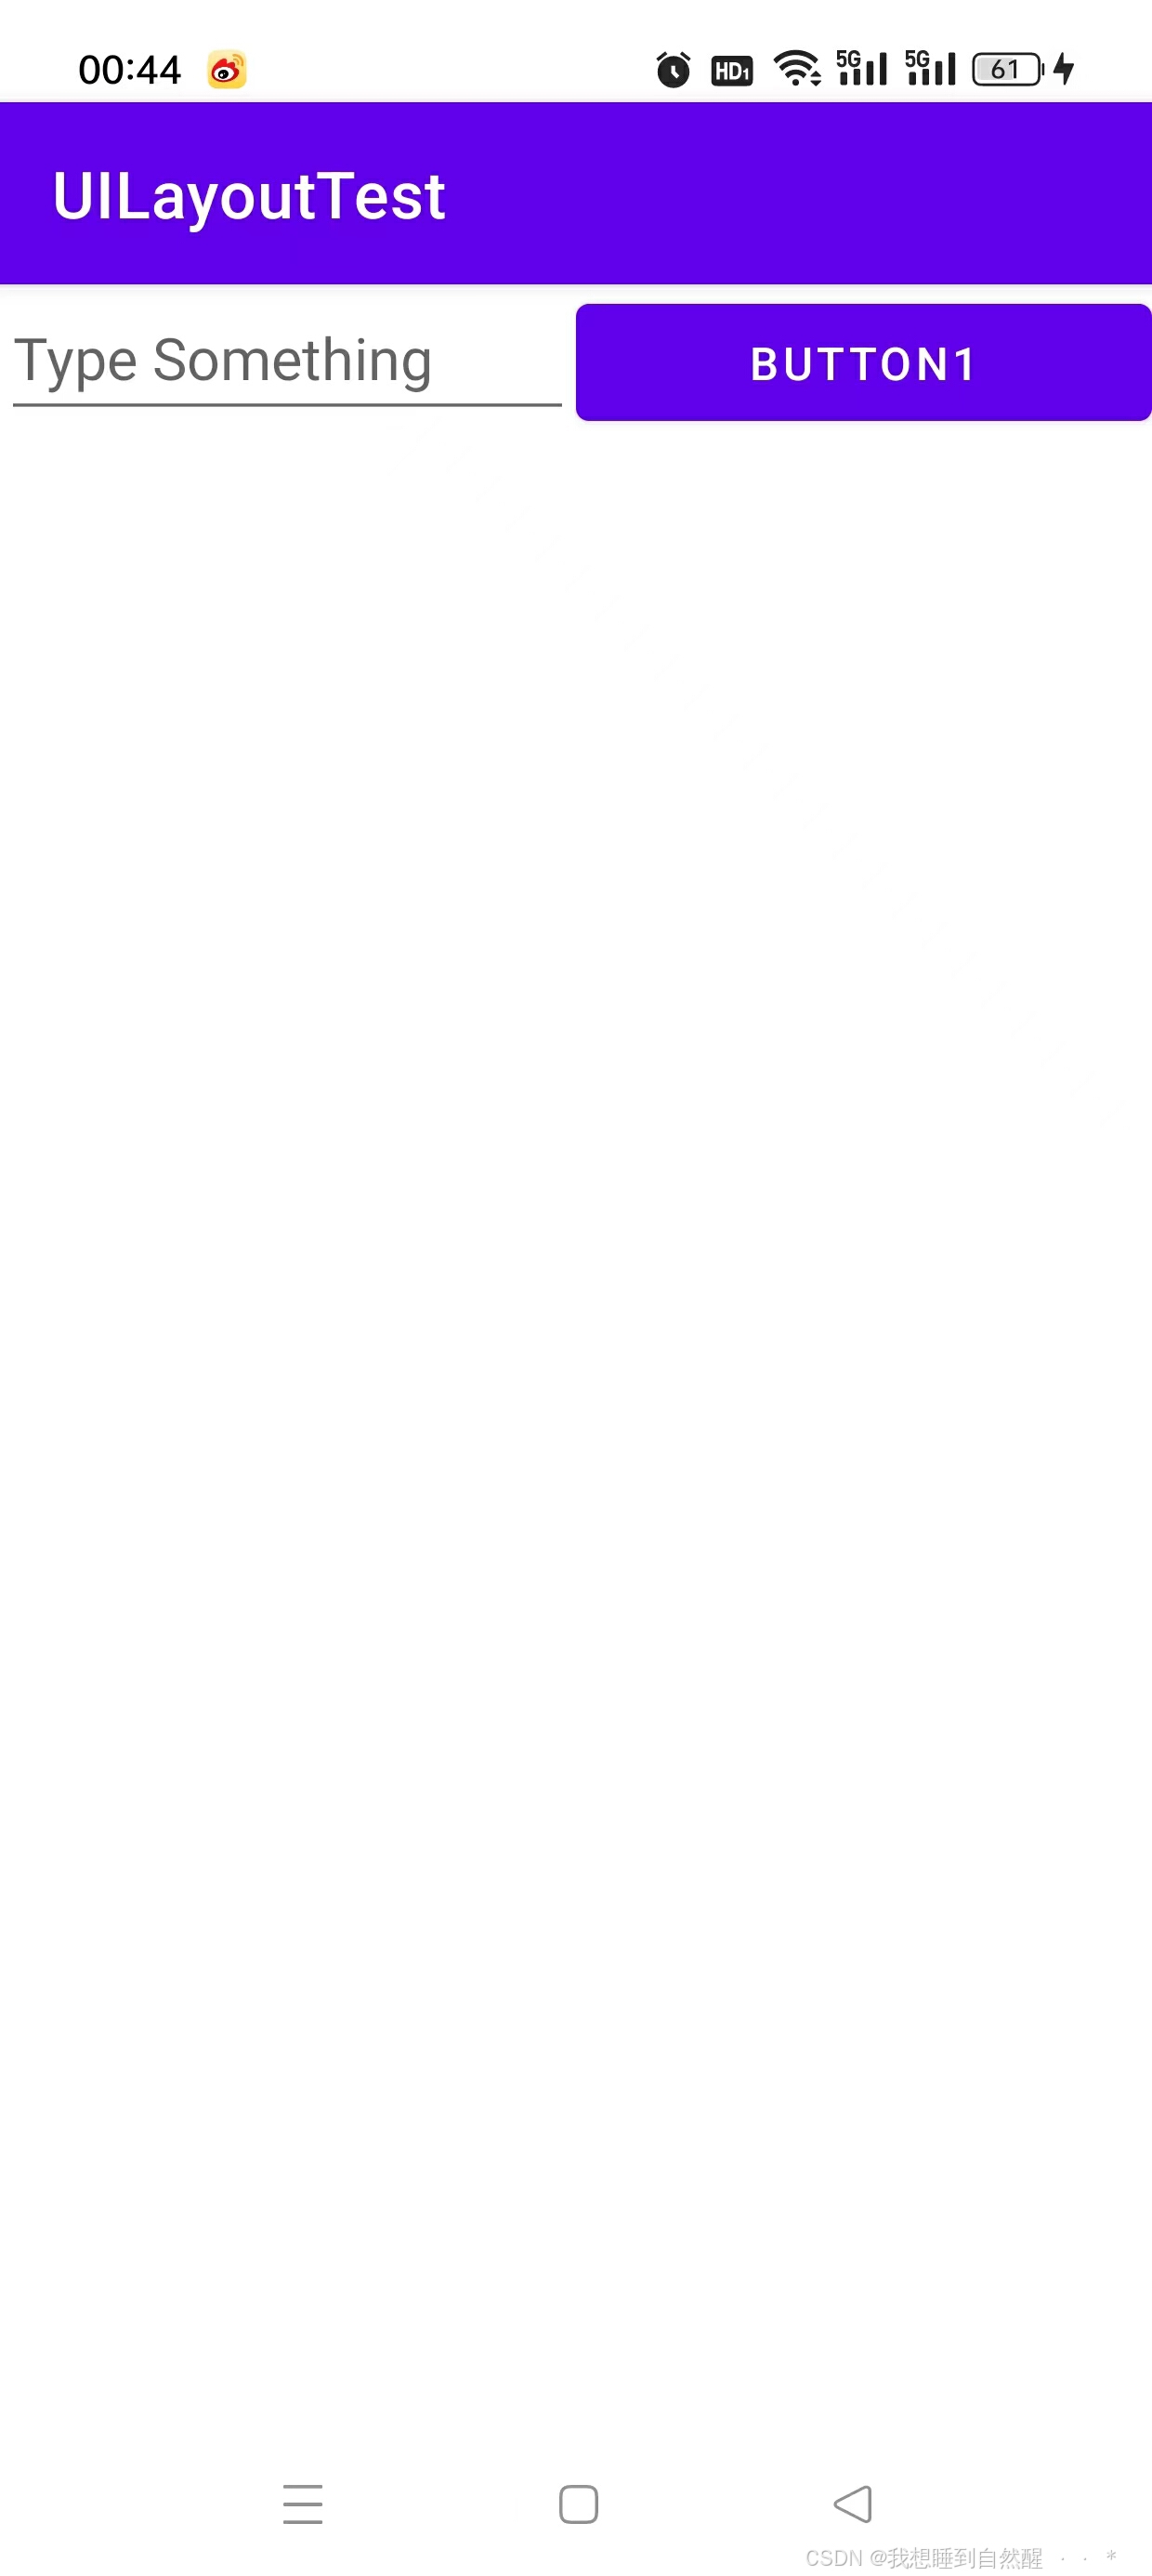
此时,我们将一个两个控件的宽度都设置为0dp,权重设置为1,此时权重就管的是宽度,它们两个来分配,都占二分之一,运行程序:
相对布局
- 名称:RelativeLayout
- 作用:可以通过相对定位的方式让控件出现在布局的任何位置
- 对于父布局的定位示例:
xml
<RelativeLayout xmlns:android="http://schemas.android.com/apk/res/android"
    xmlns:app="http://schemas.android.com/apk/res-auto"
    xmlns:tools="http://schemas.android.com/tools"
    android:id="@+id/main"
    android:layout_width="match_parent"
    android:layout_height="match_parent"
    tools:context=".MainActivity">

    <Button
        android:layout_width="wrap_content"
        android:layout_height="wrap_content"
        android:id="@+id/Button_1"
        android:layout_alignParentTop="true"
        android:layout_alignParentStart="true"
        android:text="Button1"/>

    <Button
        android:layout_width="wrap_content"
        android:layout_height="wrap_content"
        android:id="@+id/Button_2"
        android:layout_alignParentTop="true"
        android:layout_alignParentEnd="true"
        android:text="Button2"/>

    <Button
        android:layout_width="wrap_content"
        android:layout_height="wrap_content"
        android:id="@+id/Button_3"
        android:layout_centerInParent="true"
        android:text="Button3"/>

    <Button
        android:layout_width="wrap_content"
        android:layout_height="wrap_content"
        android:id="@+id/Button_4"
        android:layout_alignParentBottom="true"
        android:layout_alignParentStart="true"
        android:text="Button4"/>

    <Button
        android:layout_width="wrap_content"
        android:layout_height="wrap_content"
        android:id="@+id/Button_5"
        android:layout_alignParentBottom="true"
        android:layout_alignParentEnd="true"
        android:text="Button5"/>


</RelativeLayout>
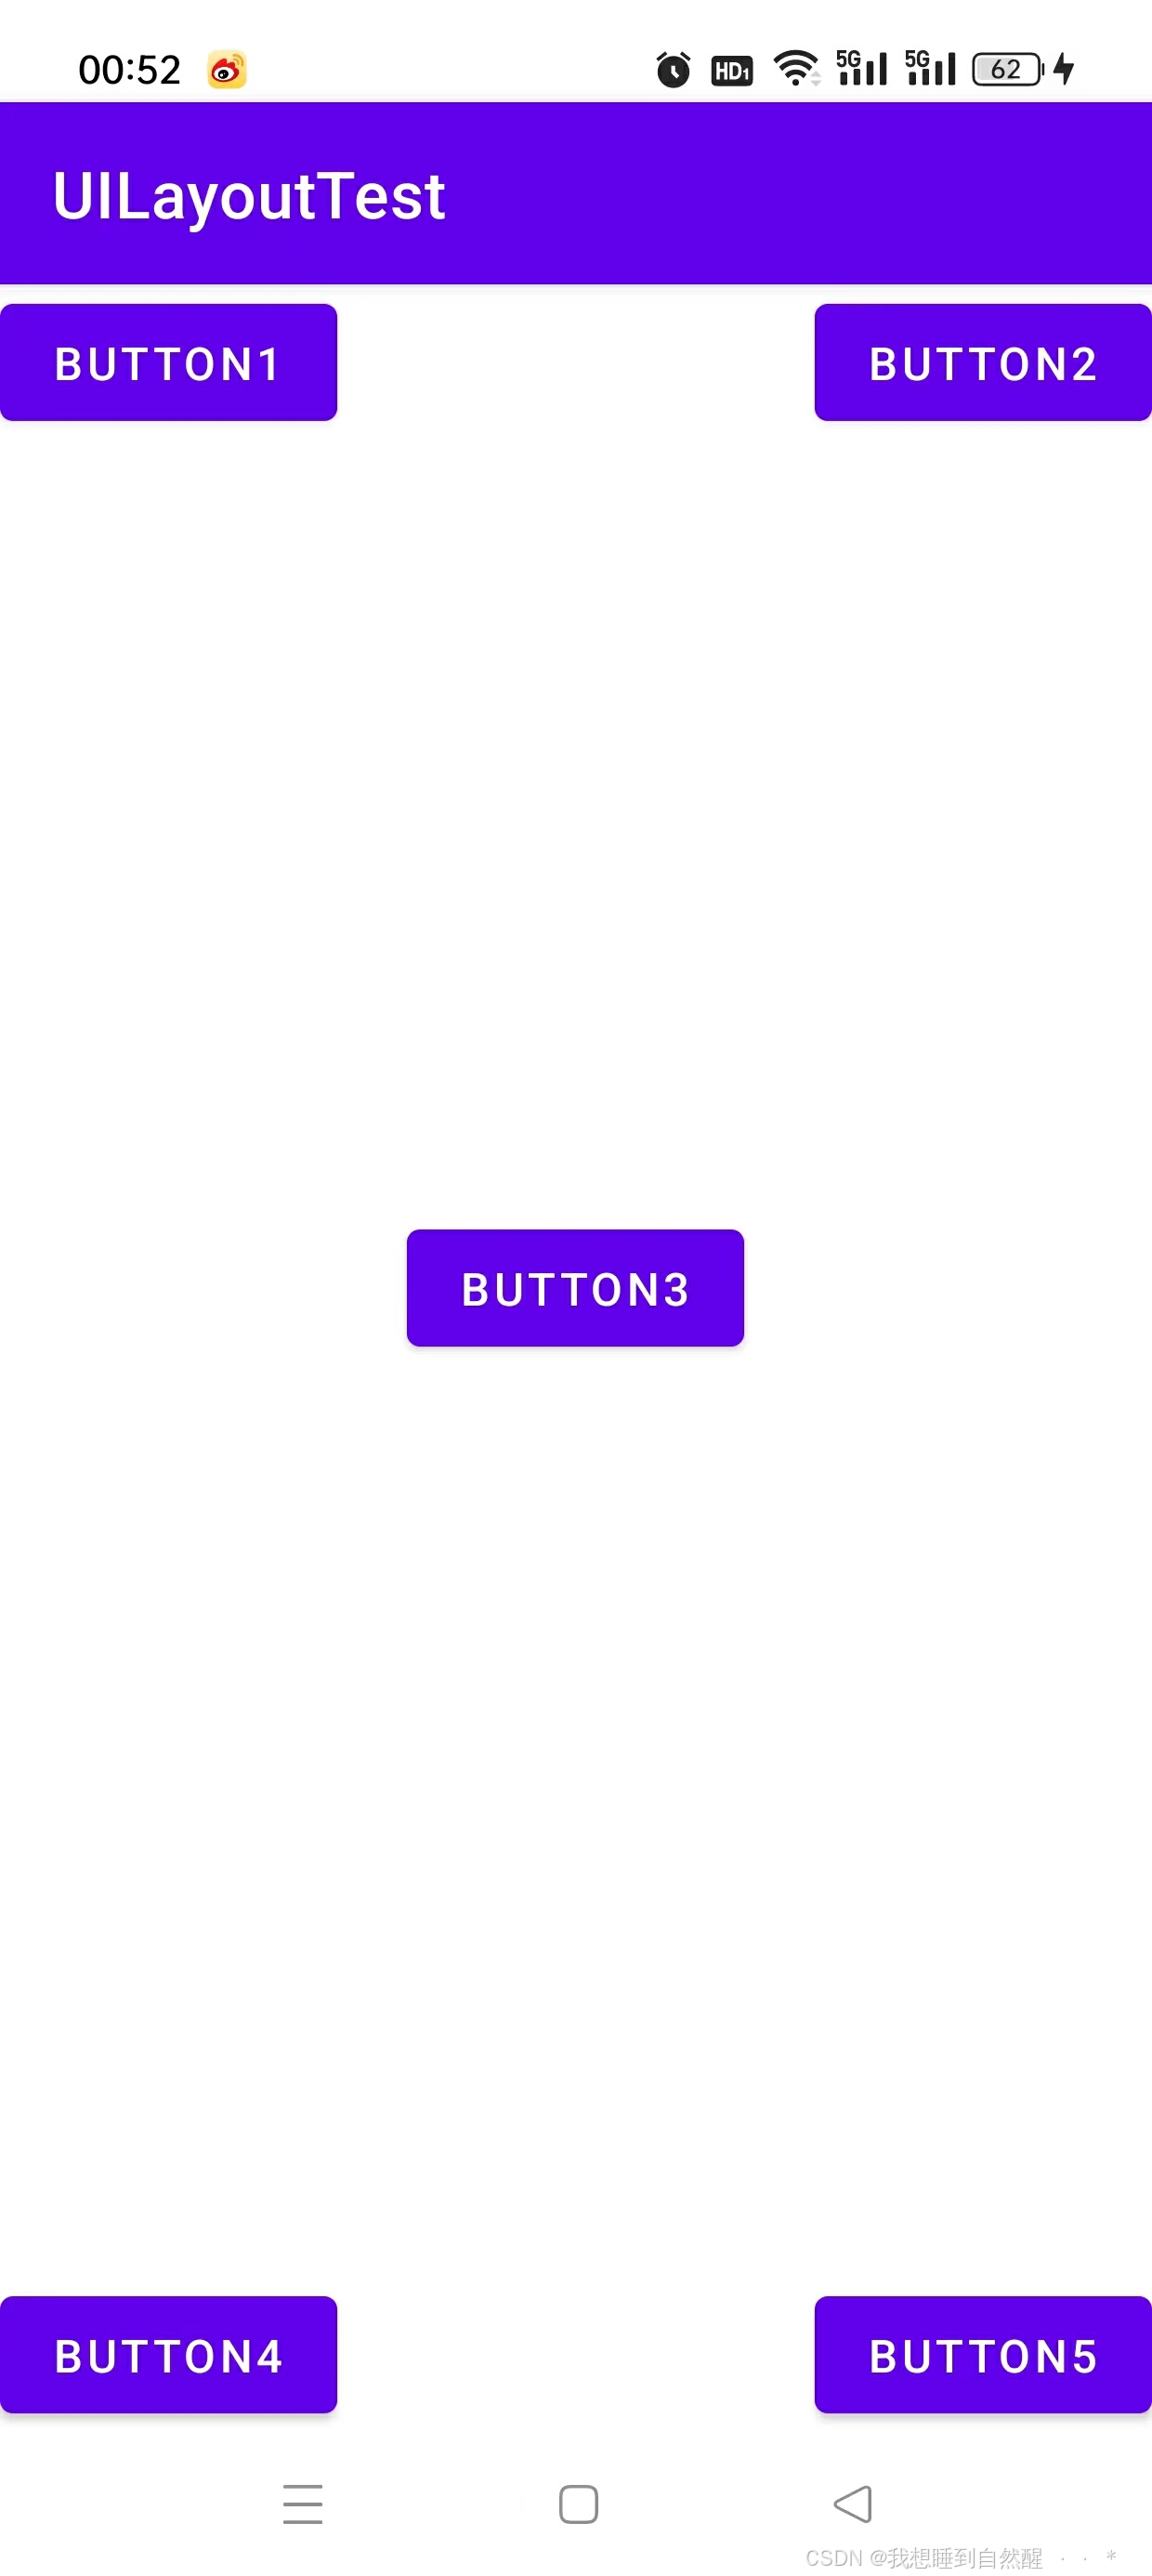
运行结果:
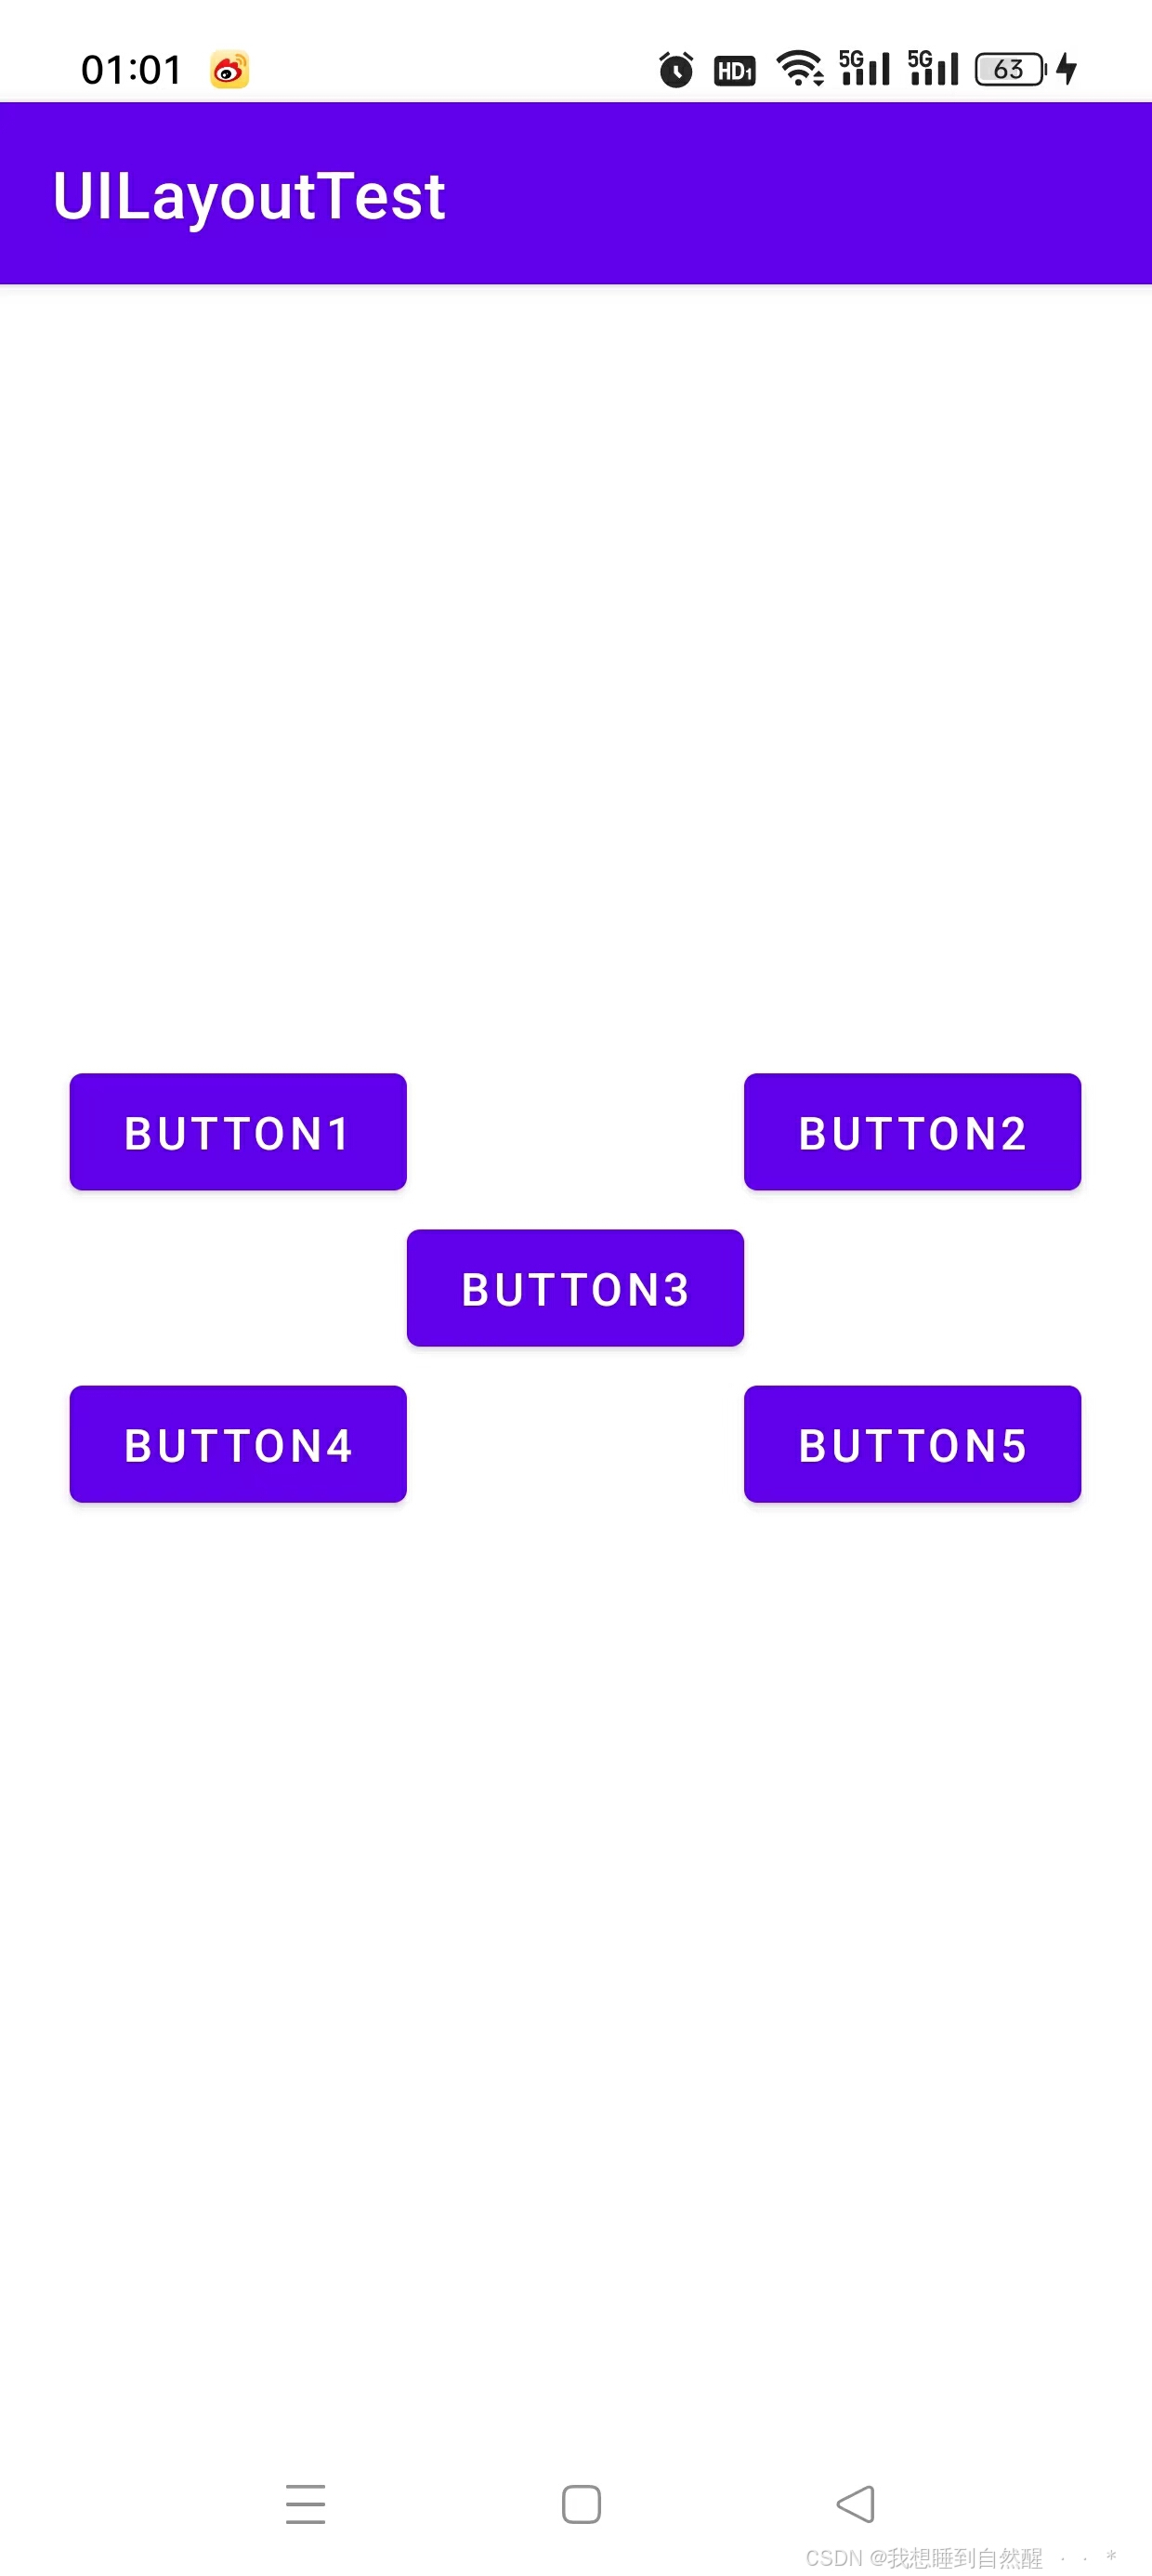
以上是对于父布局进行定位,控件还可以以控件进行定位:
xml
<RelativeLayout xmlns:android="http://schemas.android.com/apk/res/android"
    xmlns:app="http://schemas.android.com/apk/res-auto"
    xmlns:tools="http://schemas.android.com/tools"
    android:id="@+id/main"
    android:layout_width="match_parent"
    android:layout_height="match_parent"
    tools:context=".MainActivity">

    <Button
        android:layout_width="wrap_content"
        android:layout_height="wrap_content"
        android:id="@+id/Button_1"
        android:layout_above="@id/Button_3"
        android:layout_toStartOf="@id/Button_3"
        android:text="Button1"/>

    <Button
        android:layout_width="wrap_content"
        android:layout_height="wrap_content"
        android:id="@+id/Button_2"
        android:layout_above="@id/Button_3"
        android:layout_toEndOf="@id/Button_3"
        android:text="Button2"/>

    <Button
        android:layout_width="wrap_content"
        android:layout_height="wrap_content"
        android:id="@+id/Button_3"
        android:layout_centerInParent="true"
        android:text="Button3"/>

    <Button
        android:layout_width="wrap_content"
        android:layout_height="wrap_content"
        android:id="@+id/Button_4"
        android:layout_below="@id/Button_3"
        android:layout_toStartOf="@id/Button_3"
        android:text="Button4"/>

    <Button
        android:layout_width="wrap_content"
        android:layout_height="wrap_content"
        android:id="@+id/Button_5"
        android:layout_below="@id/Button_3"
        android:layout_toEndOf="@id/Button_3"
        android:text="Button5"/>
android:layout_above:可以让一个控件位于另一个控件的上方
android:layout_below:可以让一个控件位于另一个控件的下方
android:layout_toStartOf:可以让一个控件位于另一个控件的左侧
android:layout_toEndOf:可以让一个控件位于另一个控件的右侧
android:layout_alignBottom:一个控件和另一个控件的下边缘对齐
android:layout_alignTop:一个控件和另一个控件的上边缘对齐
android:layout_alignEnd:一个控件和另一个控件的右边缘对齐
android:layout_alignStart:一个控件和另一个控件的左边缘对齐
上面代码运行结果:
帧布局
-
名称:FrameLayout
-
作用:没有方便的定位方式,所有的控件都会默认放在布局的左上角,控件堆叠在一起,通常用于覆盖或弹出窗口。
-
示例:
xml
<FrameLayout xmlns:android="http://schemas.android.com/apk/res/android"
    xmlns:app="http://schemas.android.com/apk/res-auto"
    xmlns:tools="http://schemas.android.com/tools"
    android:id="@+id/main"
    android:layout_width="match_parent"
    android:layout_height="match_parent"
    tools:context=".MainActivity">

    <TextView
        android:layout_width="wrap_content"
        android:layout_height="wrap_content"
        android:text="This is TextView"/>

    <ImageView
        android:layout_width="wrap_content"
        android:layout_height="wrap_content"
        android:src="@mipmap/ic_launcher"/>

</FrameLayout>
由于都位于左上角,因此文本会被图片遮盖一部分,因此运行结果为:
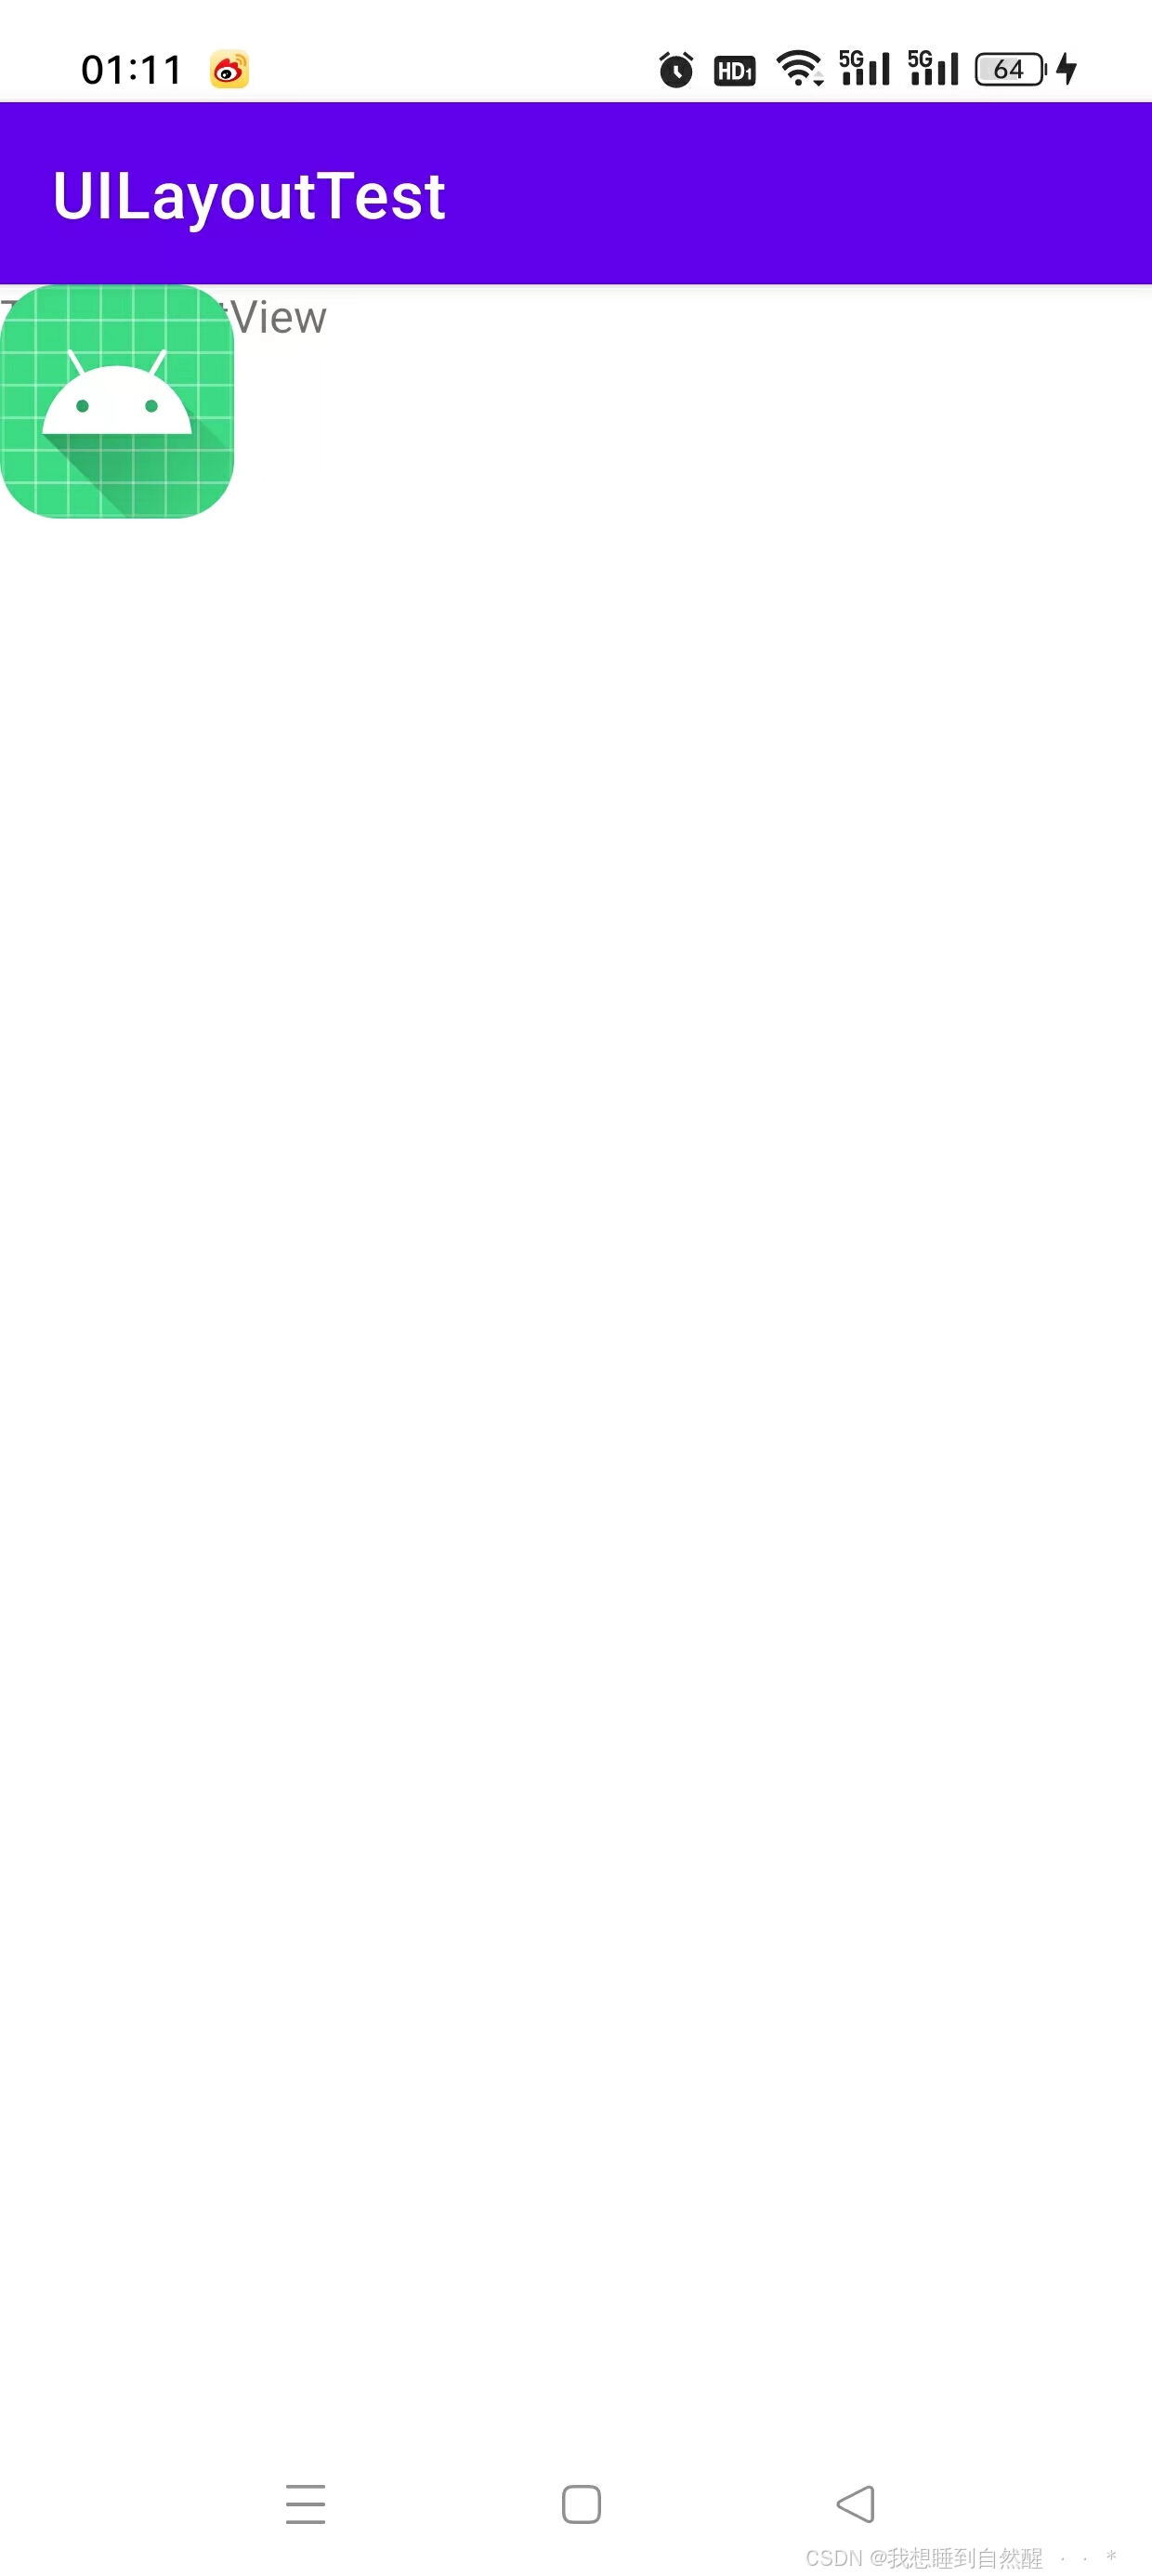
除了默认的效果还可以通过android:layout_gravity来指定控件在布局里的对齐方式
网格布局
-
名称:GridLayout
-
支持多行多列的表格排列
-
网格布局默认从左向右、从上到下排列,它新增了两个属性:
- columnCount属性,它指定了网格的列数,即每行能放多少个视图
- rowCount属性:它指定了网格的行数,即每列能放多少个视图
-
示例:
xml
<GridLayout xmlns:android="http://schemas.android.com/apk/res/android"
    xmlns:app="http://schemas.android.com/apk/res-auto"
    xmlns:tools="http://schemas.android.com/tools"
    android:id="@+id/main"
    android:layout_width="match_parent"
    android:layout_height="match_parent"
    android:columnCount="2"
    android:rowCount="2"
    tools:context=".MainActivity">

    <TextView
        android:layout_width="0dp"
        android:layout_height="60dp"
        android:background="#ffcccc"
        android:gravity="center"
        android:layout_columnWeight="1"
        android:text="aa"/>

    <TextView
        android:layout_width="0dp"
        android:layout_height="60dp"
        android:background="#00ffff"
        android:gravity="center"
        android:layout_columnWeight="1"
        android:text="aa"/>

    <TextView
        android:layout_width="0dp"
        android:layout_height="60dp"
        android:background="#ff00cc"
        android:gravity="center"
        android:layout_columnWeight="1"
        android:text="aa"/>

    <TextView
        android:layout_width="0dp"
        android:layout_height="60dp"
        android:background="#ffcc00"
        android:gravity="center"
        android:layout_columnWeight="1"
        android:text="aa"/>


</GridLayout>
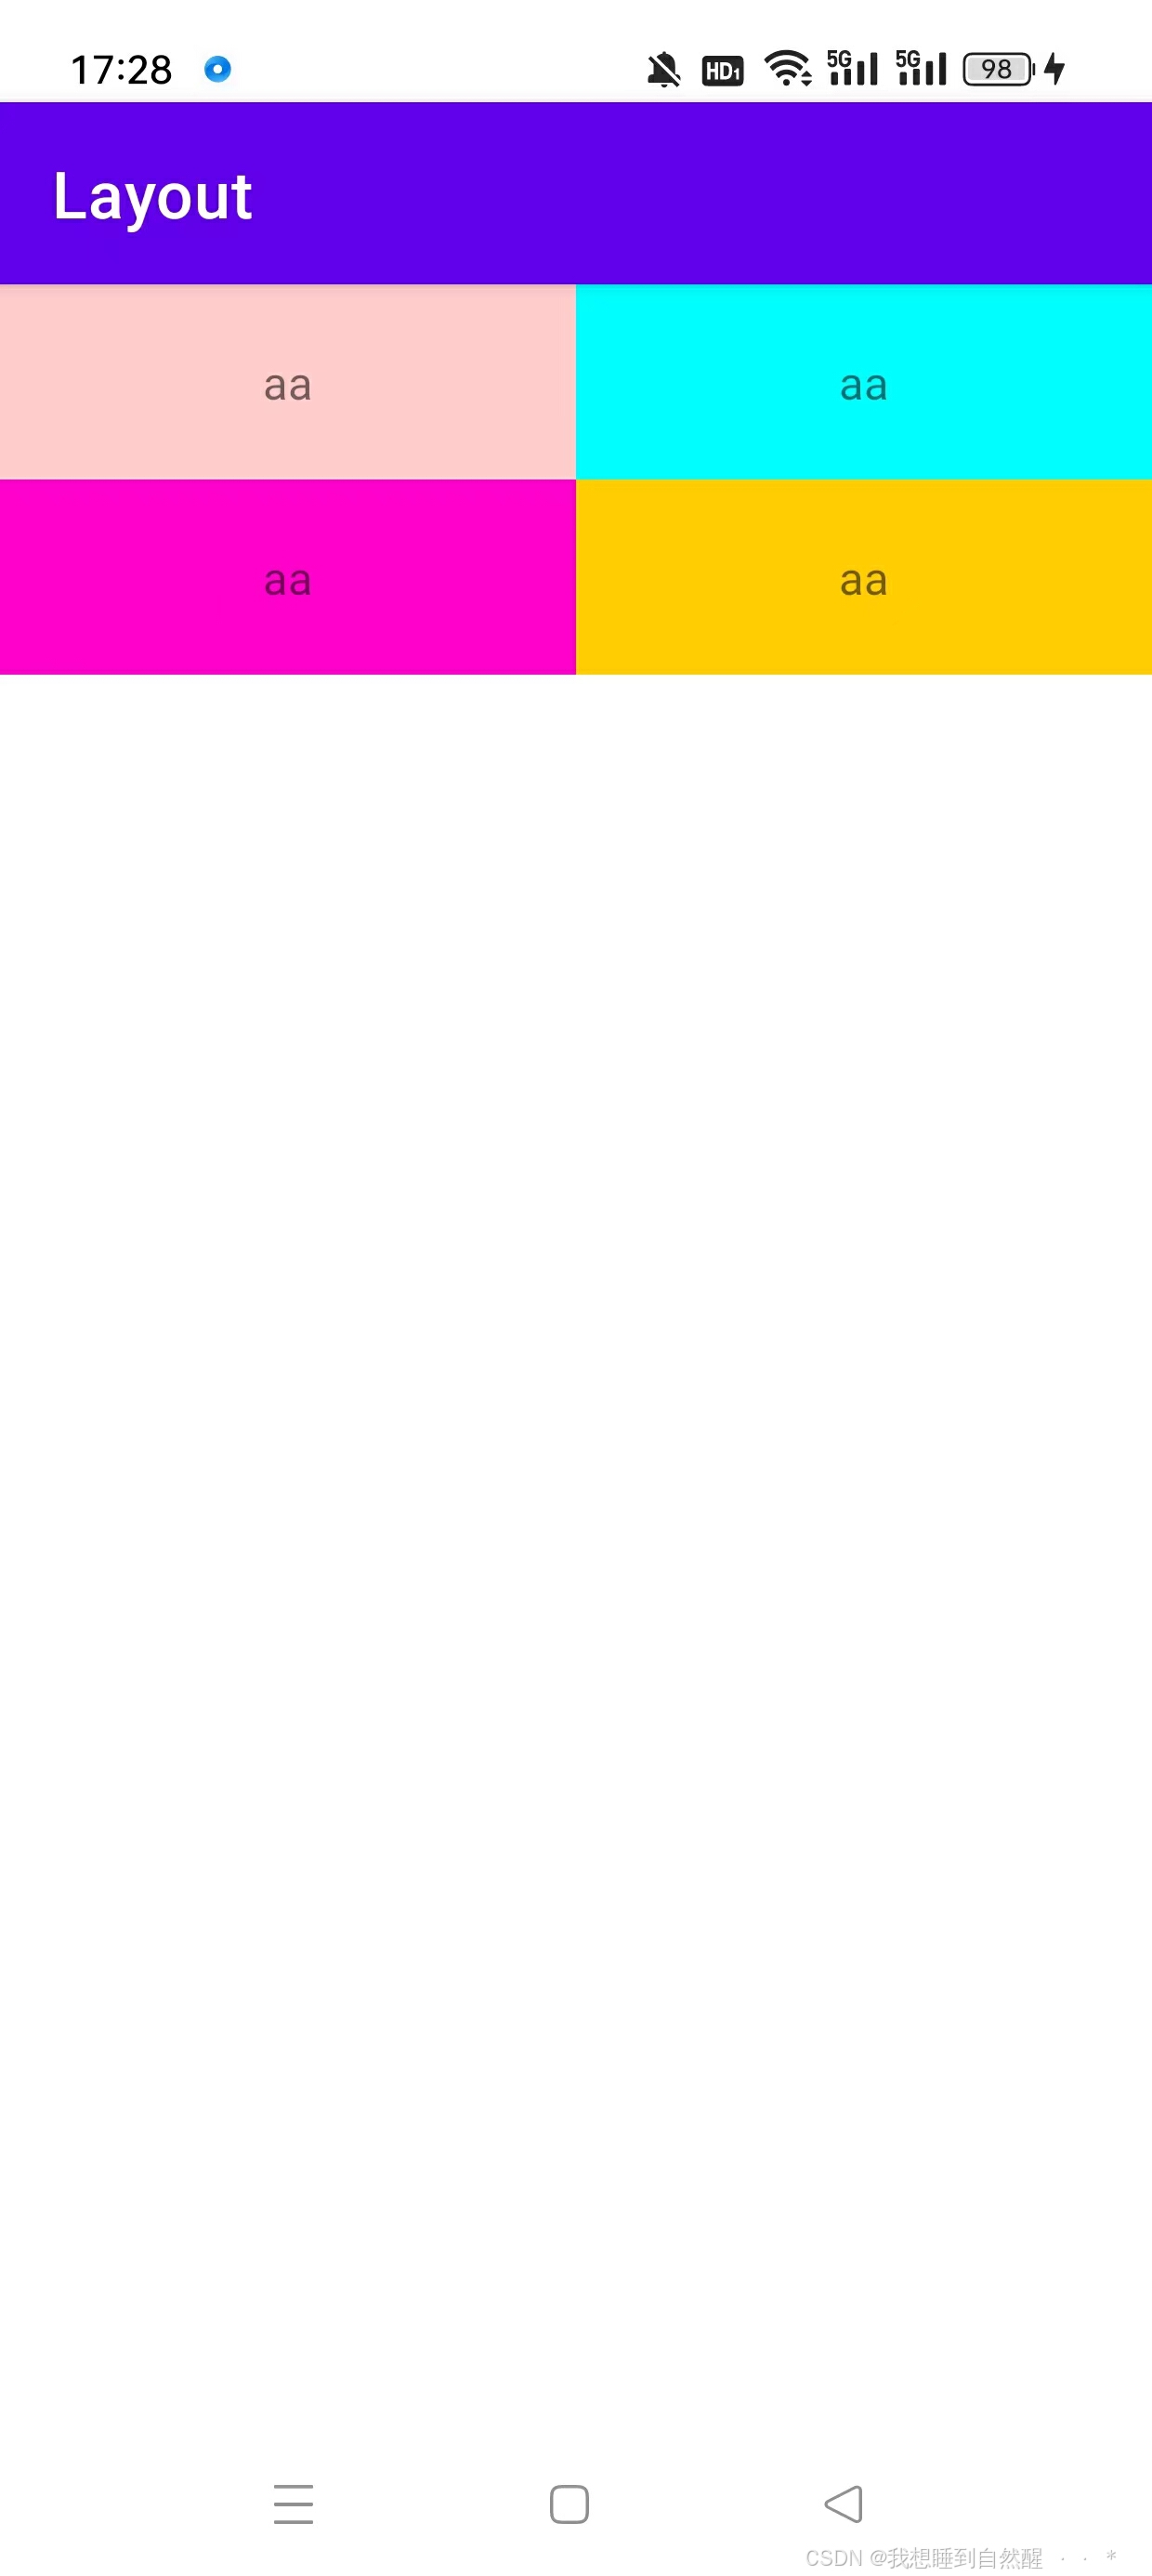
定义了一个2行2列的网格布局,并注意其中对于宽度进行了权重的赋值,有代码在网格布局当中权重的设置方式是与前面不一样的,运行界面:
约束布局
ConstraintLayout:是一种灵活的布局管理器,它允许开发者在Android应用中创建复杂的布局,同时保持性能和灵活性。
相对定位
| 属性 | 作用 |
|---|---|
| layout_constraintTop_toTopOf | 将控件的顶部与另一个控件的顶部对齐。 |
| layout_constraintTop_toBottomOf | 将控件的顶部与另一个控件的底部对齐。 |
| layout_constraintBottom_toBottomOf | 将控件的底部与另一个控件的底部对齐。 |
| layout_constraintBottom_toTopOf | 将控件的底部与另一个控件的顶部对齐。 |
| layout_constraintLeft_toLeftOf | 将控件的左边与另一个控件的左边对齐。 |
| layout_constraintLeft_toRightOf | 将控件的左边与另一个控件的右边对齐。 |
| layout_constraintRight_toRightOf | 将控件的右边与另一个控件的右边对齐。 |
| layout_constraintRight_toLeftOf | 将控件的右边与另一个控件的左边对齐。 |
| layout_constraintStart_toStartOf | 将控件的开始边与另一个控件的开始边对齐。 |
| layout_constraintStart_toEndOf | 将控件的开始边与另一个控件的结束边对齐。 |
| layout_constraintEnd_toEndOf: | 将控件的结束边与另一个控件的结束边对齐。 |
| layout_constraintEnd_toStartOf | 将控件的结束边与另一个控件的开始边对齐。 |
| layout_constraintBaseline_toBaselineOf | 将一个控件的基线(baseline)与另一个控件的基线对齐 |
注意:当出现顶部与底部之间的对齐时这意味着当你将这个属性应用到一个视图上时,它会将视图的顶部放置在另一个所要对其的底部,从而在垂直方向上将它们连接起来。
示例:
xml
<androidx.constraintlayout.widget.ConstraintLayout xmlns:android="http://schemas.android.com/apk/res/android"
    xmlns:app="http://schemas.android.com/apk/res-auto"
    xmlns:tools="http://schemas.android.com/tools"
    android:id="@+id/main"
    android:layout_width="match_parent"
    android:layout_height="match_parent"
    tools:context=".MainActivity">

    <Button
        android:id="@+id/button1"
        android:layout_width="100dp"
        android:layout_height="100dp"
        android:background="#ff2200"
        android:text="button1"
        app:layout_constraintLeft_toLeftOf="parent"
        app:layout_constraintTop_toTopOf="@+id/button2" />

    <Button
        android:id="@+id/buttoncenter"
        android:layout_width="100dp"
        android:layout_height="100dp"
        android:background="@color/teal_200"
        android:text="button center"
        app:layout_constraintBottom_toBottomOf="parent"
        app:layout_constraintLeft_toLeftOf="parent"
        app:layout_constraintRight_toRightOf="parent"
        app:layout_constraintTop_toTopOf="parent" />

    <Button
        android:id="@+id/button2"
        android:layout_width="100dp"
        android:layout_height="100dp"
        android:layout_marginRight="4dp"
        android:background="#ff4400"
        android:text="button2"
        app:layout_constraintRight_toRightOf="parent"
        app:layout_constraintTop_toBottomOf="@+id/button1" />

    <Button
        android:id="@+id/button3"
        android:layout_width="100dp"
        android:layout_height="100dp"
        android:background="#ff8825"
        android:text="button3"
        app:layout_constraintBottom_toBottomOf="parent"
        app:layout_constraintLeft_toRightOf="@+id/button1" />

    <Button
        android:id="@+id/button4"
        android:layout_width="100dp"
        android:layout_height="100dp"
        android:background="#ff6677"
        android:text="button4"
        app:layout_constraintBottom_toBottomOf="parent"
        app:layout_constraintRight_toLeftOf="@id/button2" />

</androidx.constraintlayout.widget.ConstraintLayout>
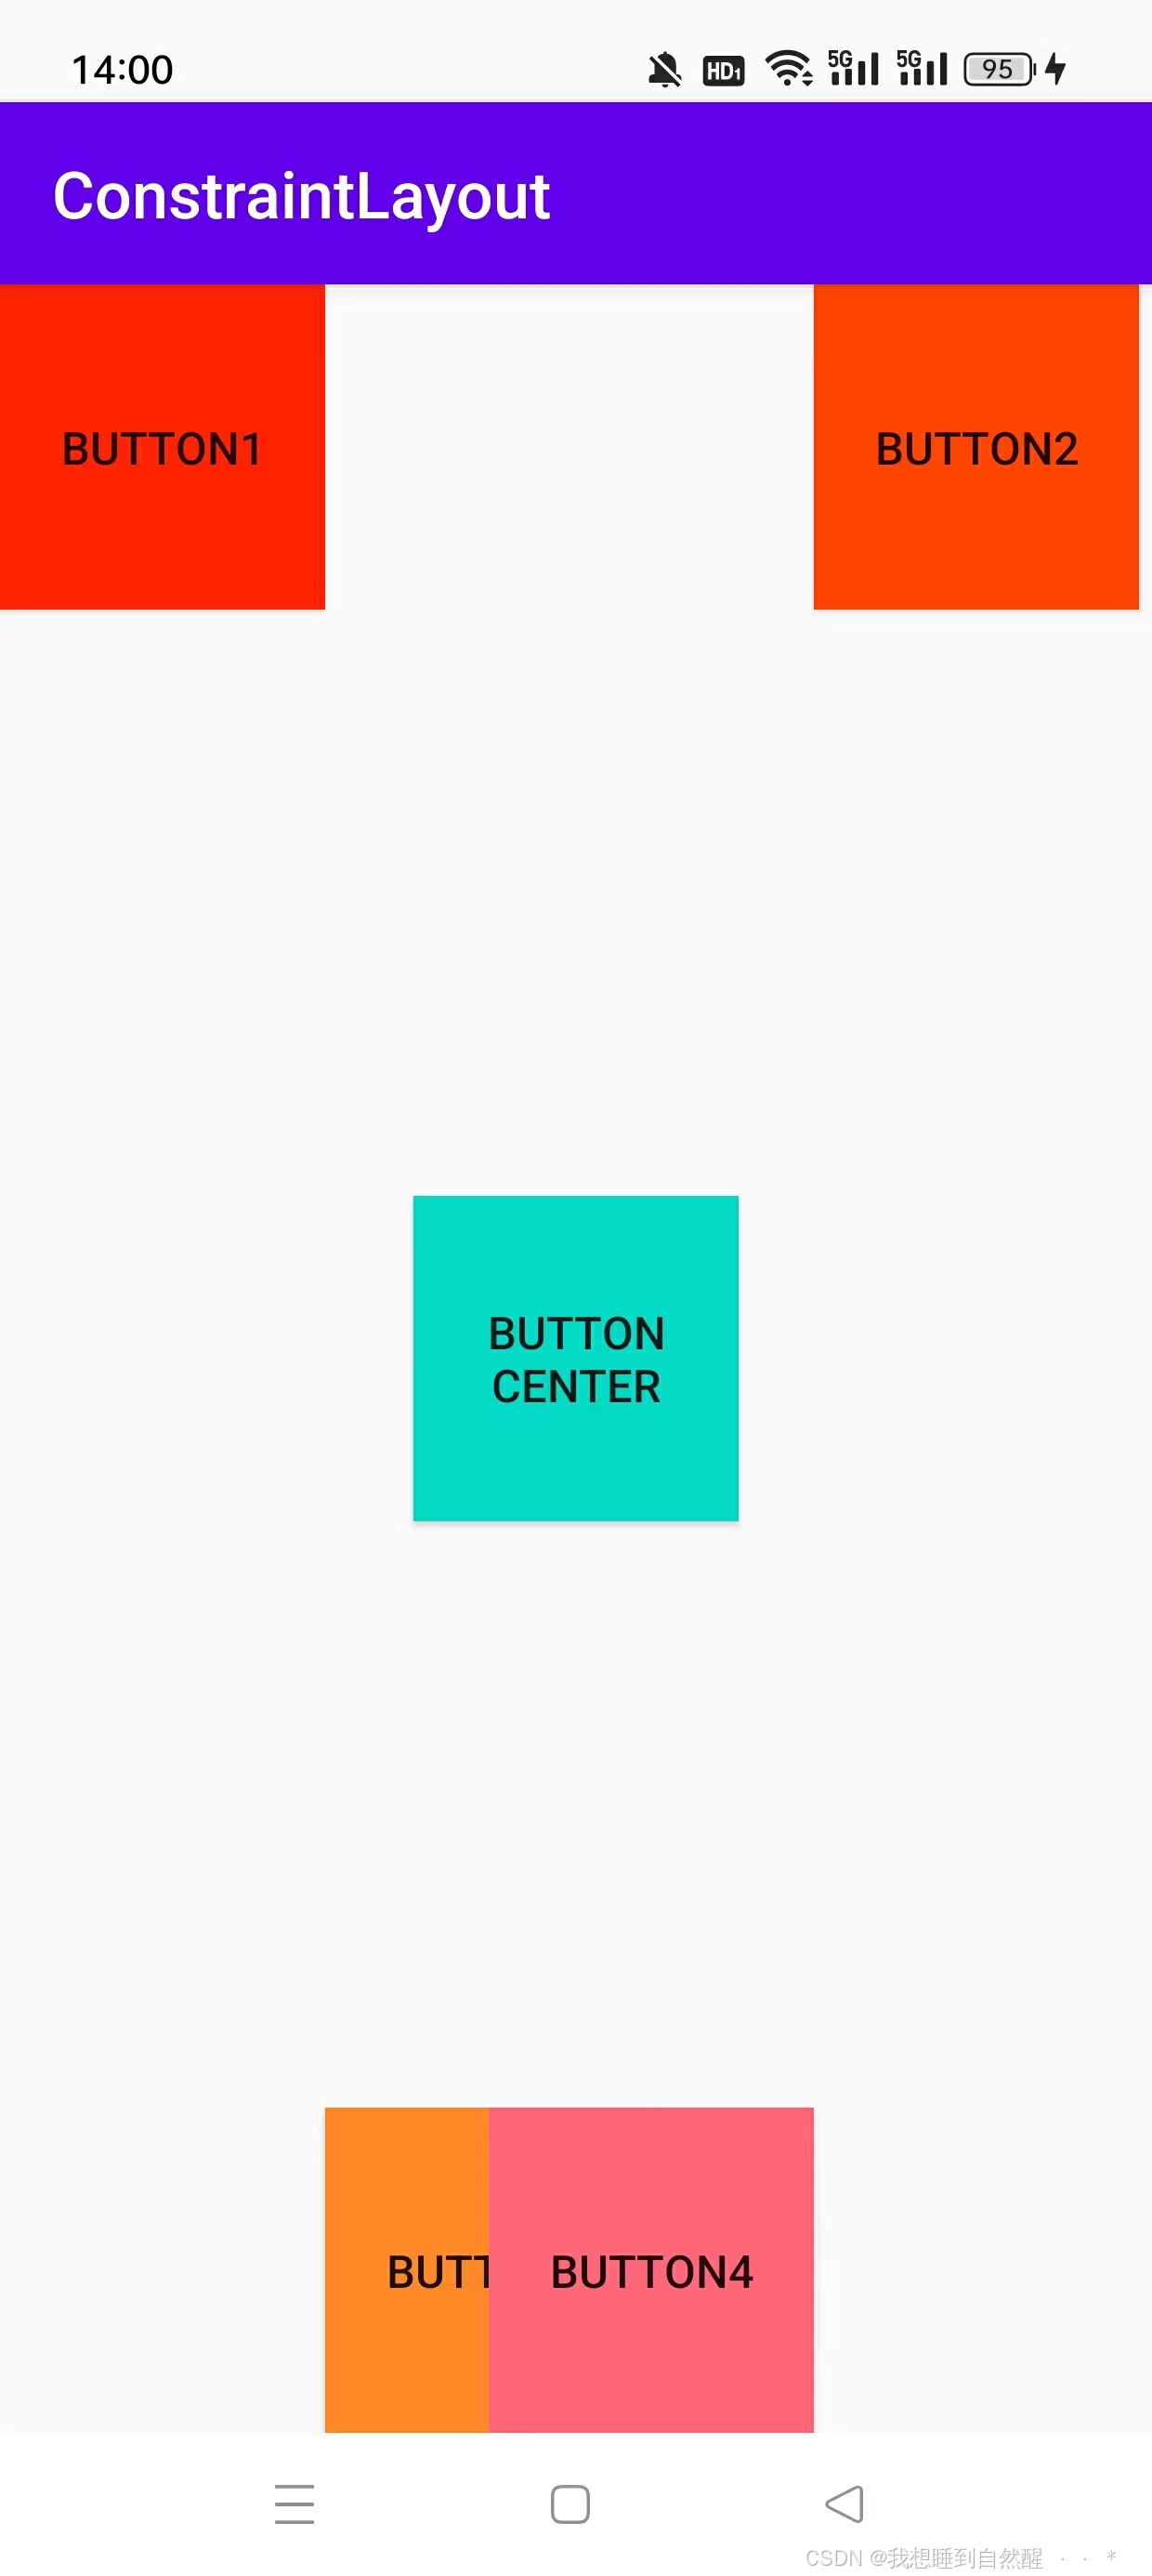
运行结果:
角度定位
| 属性 | 作用 |
|---|---|
| layout_constraintCircle | 指定控件相对于另一个控件的圆形路径进行定位。 |
| layout_constraintCircleAngle | 指定控件在圆形路径上的角度位置。 |
| layout_constraintCircleRadius | 指定控件相对于圆形路径的半径。 |
示例:
xml
<androidx.constraintlayout.widget.ConstraintLayout xmlns:android="http://schemas.android.com/apk/res/android"
    xmlns:app="http://schemas.android.com/apk/res-auto"
    xmlns:tools="http://schemas.android.com/tools"
    android:id="@+id/main"
    android:layout_width="match_parent"
    android:layout_height="match_parent"
    tools:context=".MainActivity">

    <TextView
        android:layout_width="100dp"
        android:layout_height="100dp"
        android:id="@+id/TextView1"
        android:background="#00ff00"
        android:text="TextView1"
        android:visibility="visible"
        app:layout_constraintLeft_toLeftOf="parent"
        app:layout_constraintTop_toTopOf="parent"/>

    <TextView
        android:layout_width="100dp"
        android:layout_height="100dp"
        android:id="@+id/TextView2"
        android:background="#ff0033"
        android:text="TextView2"
        android:visibility="visible"
        app:layout_constraintCircle="@id/TextView1"
        app:layout_constraintCircleAngle="120"
        app:layout_constraintCircleRadius="150dp"
        app:layout_constraintRight_toRightOf="parent"
        app:layout_goneMarginLeft="50dp"
        app:layout_constraintTop_toTopOf="parent"/>

</androidx.constraintlayout.widget.ConstraintLayout>
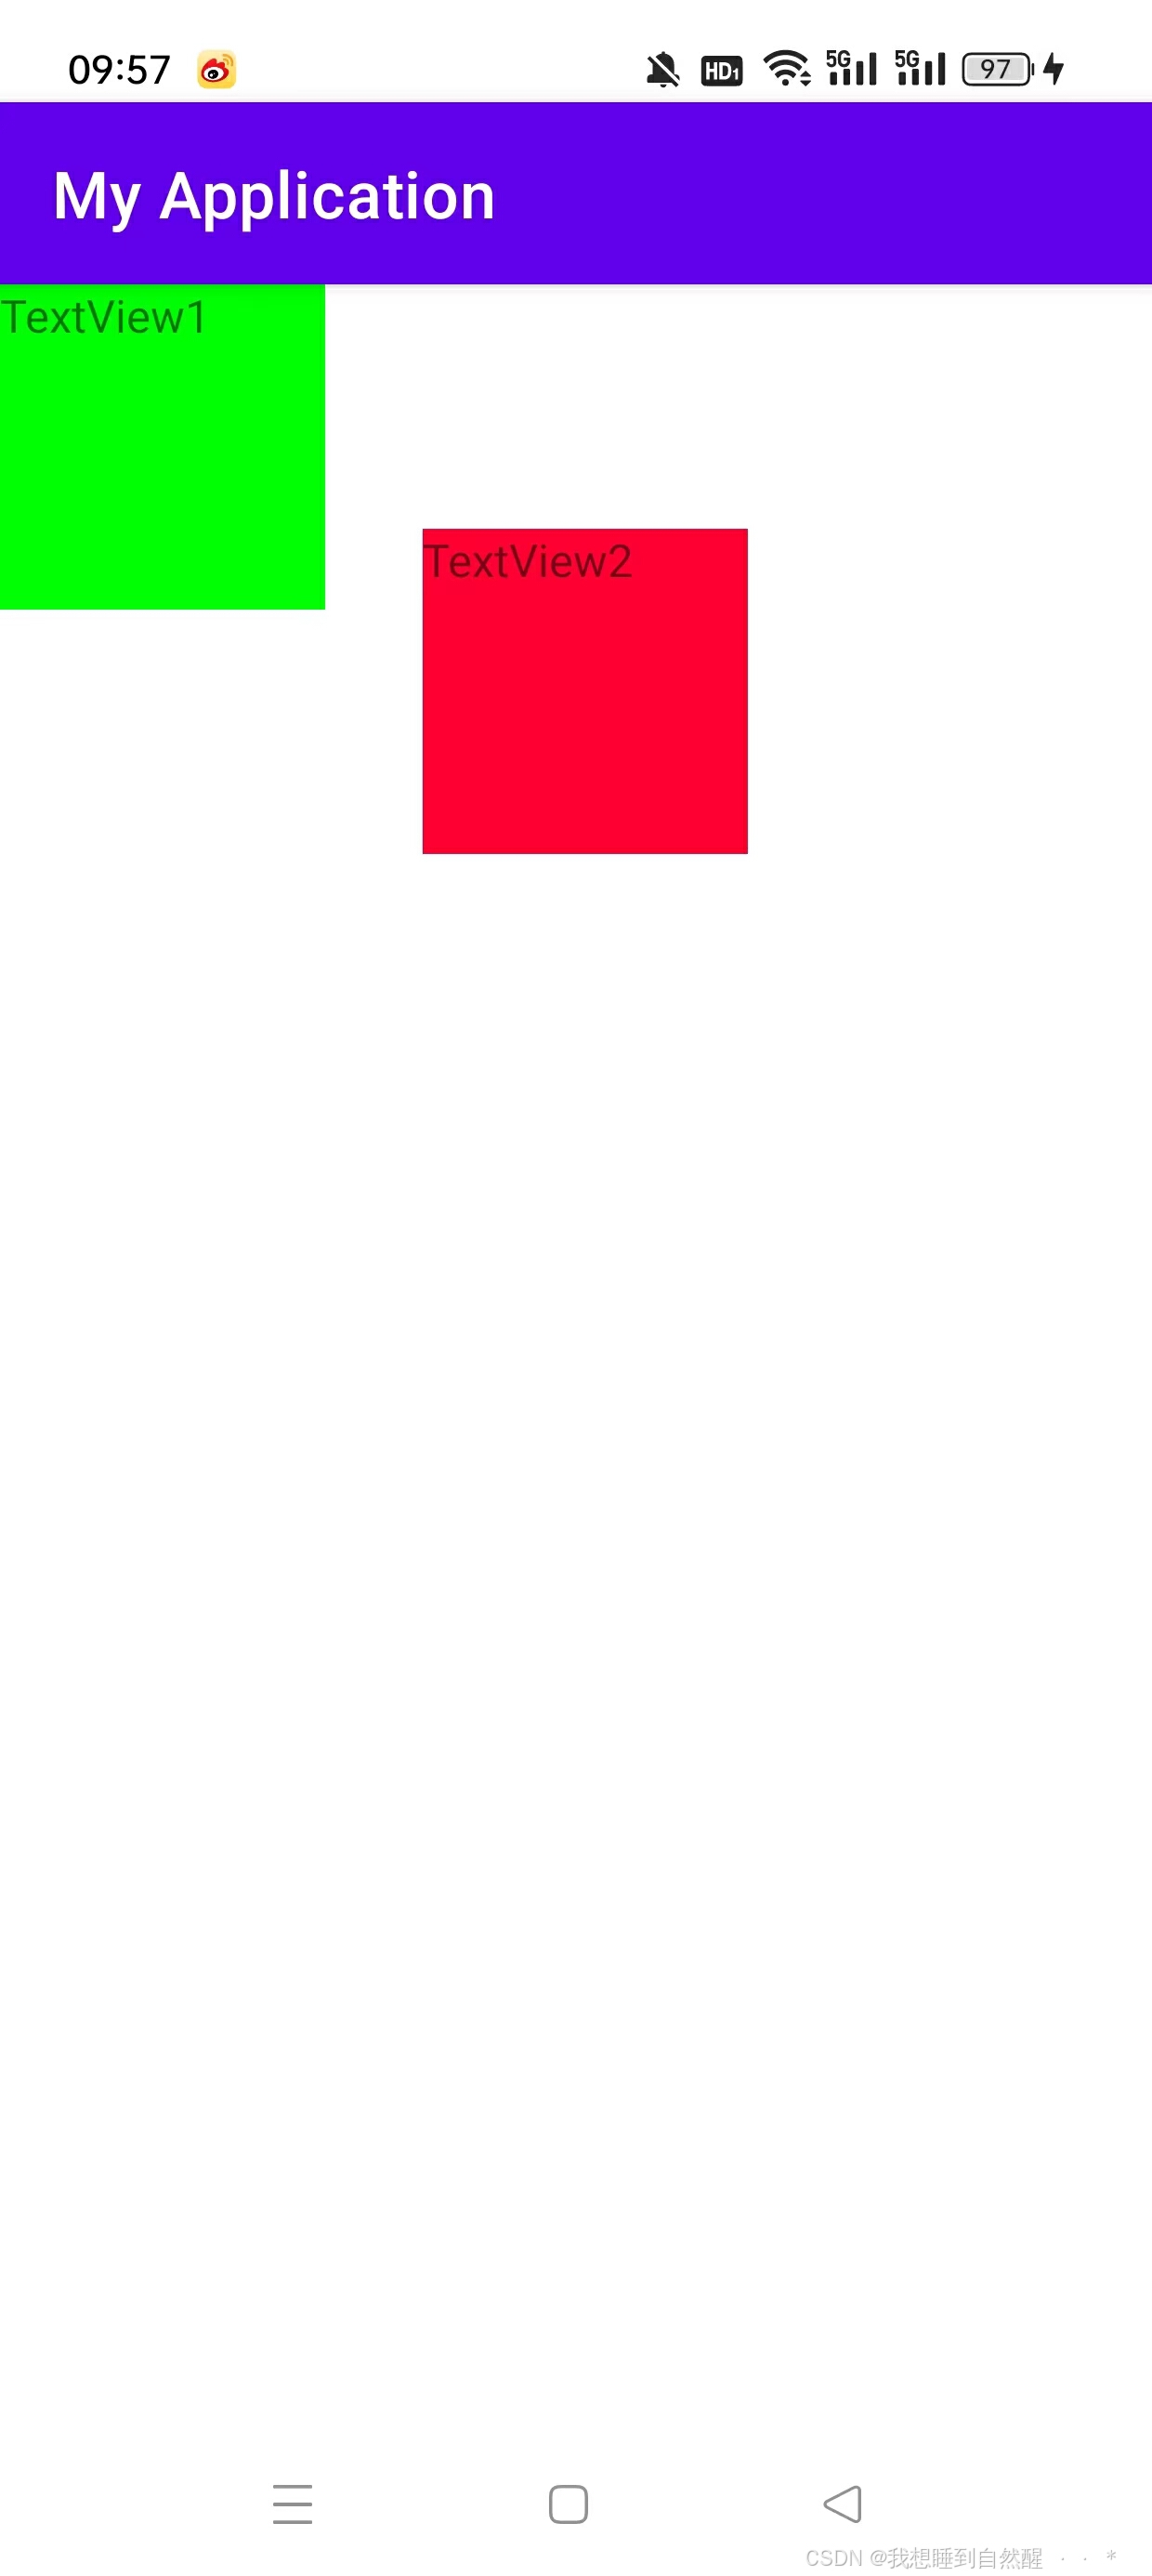
运行结果:
边距示例:
| 属性 | 作用 |
|---|---|
| android:layout_marginStart | 设置控件在其起始边(左边或右边,取决于布局方向)的外边距。 |
| android:layout_marginEnd | 设置控件在其结束边(右边或左边,取决于布局方向)的外边距。 |
| android:layout_marginLeft | 设置控件在其左边的外边距。 |
| android:layout_marginTop | 设置控件在其顶部的外边距。 |
| android:layout_marginRight | 设置控件在其右边的外边距。 |
| android:layout_marginBottom | 设置控件在其底部的外边距。 |
当给marginBottom前面加上gone时就代表控件在不可用时相对应位置的外边距
示例:
xml
<androidx.constraintlayout.widget.ConstraintLayout xmlns:android="http://schemas.android.com/apk/res/android"
    xmlns:app="http://schemas.android.com/apk/res-auto"
    xmlns:tools="http://schemas.android.com/tools"
    android:id="@+id/main"
    android:layout_width="match_parent"
    android:layout_height="match_parent"
    tools:context=".MainActivity">

    <TextView
        android:layout_width="100dp"
        android:layout_height="100dp"
        android:id="@+id/TextView1"
        android:background="#00ff00"
        android:text="TextView1"
        android:visibility="visible"
        app:layout_constraintLeft_toLeftOf="parent"
        app:layout_constraintTop_toTopOf="parent"/>

    <TextView
        android:layout_width="100dp"
        android:layout_height="100dp"
        android:id="@+id/TextView2"
        android:background="#ff0033"
        android:text="TextView2"
        android:visibility="visible"
        app:layout_constraintLeft_toRightOf="@id/TextView1"
        app:layout_goneMarginLeft="50dp"
        app:layout_constraintTop_toTopOf="parent"/>

</androidx.constraintlayout.widget.ConstraintLayout>
运行结果:
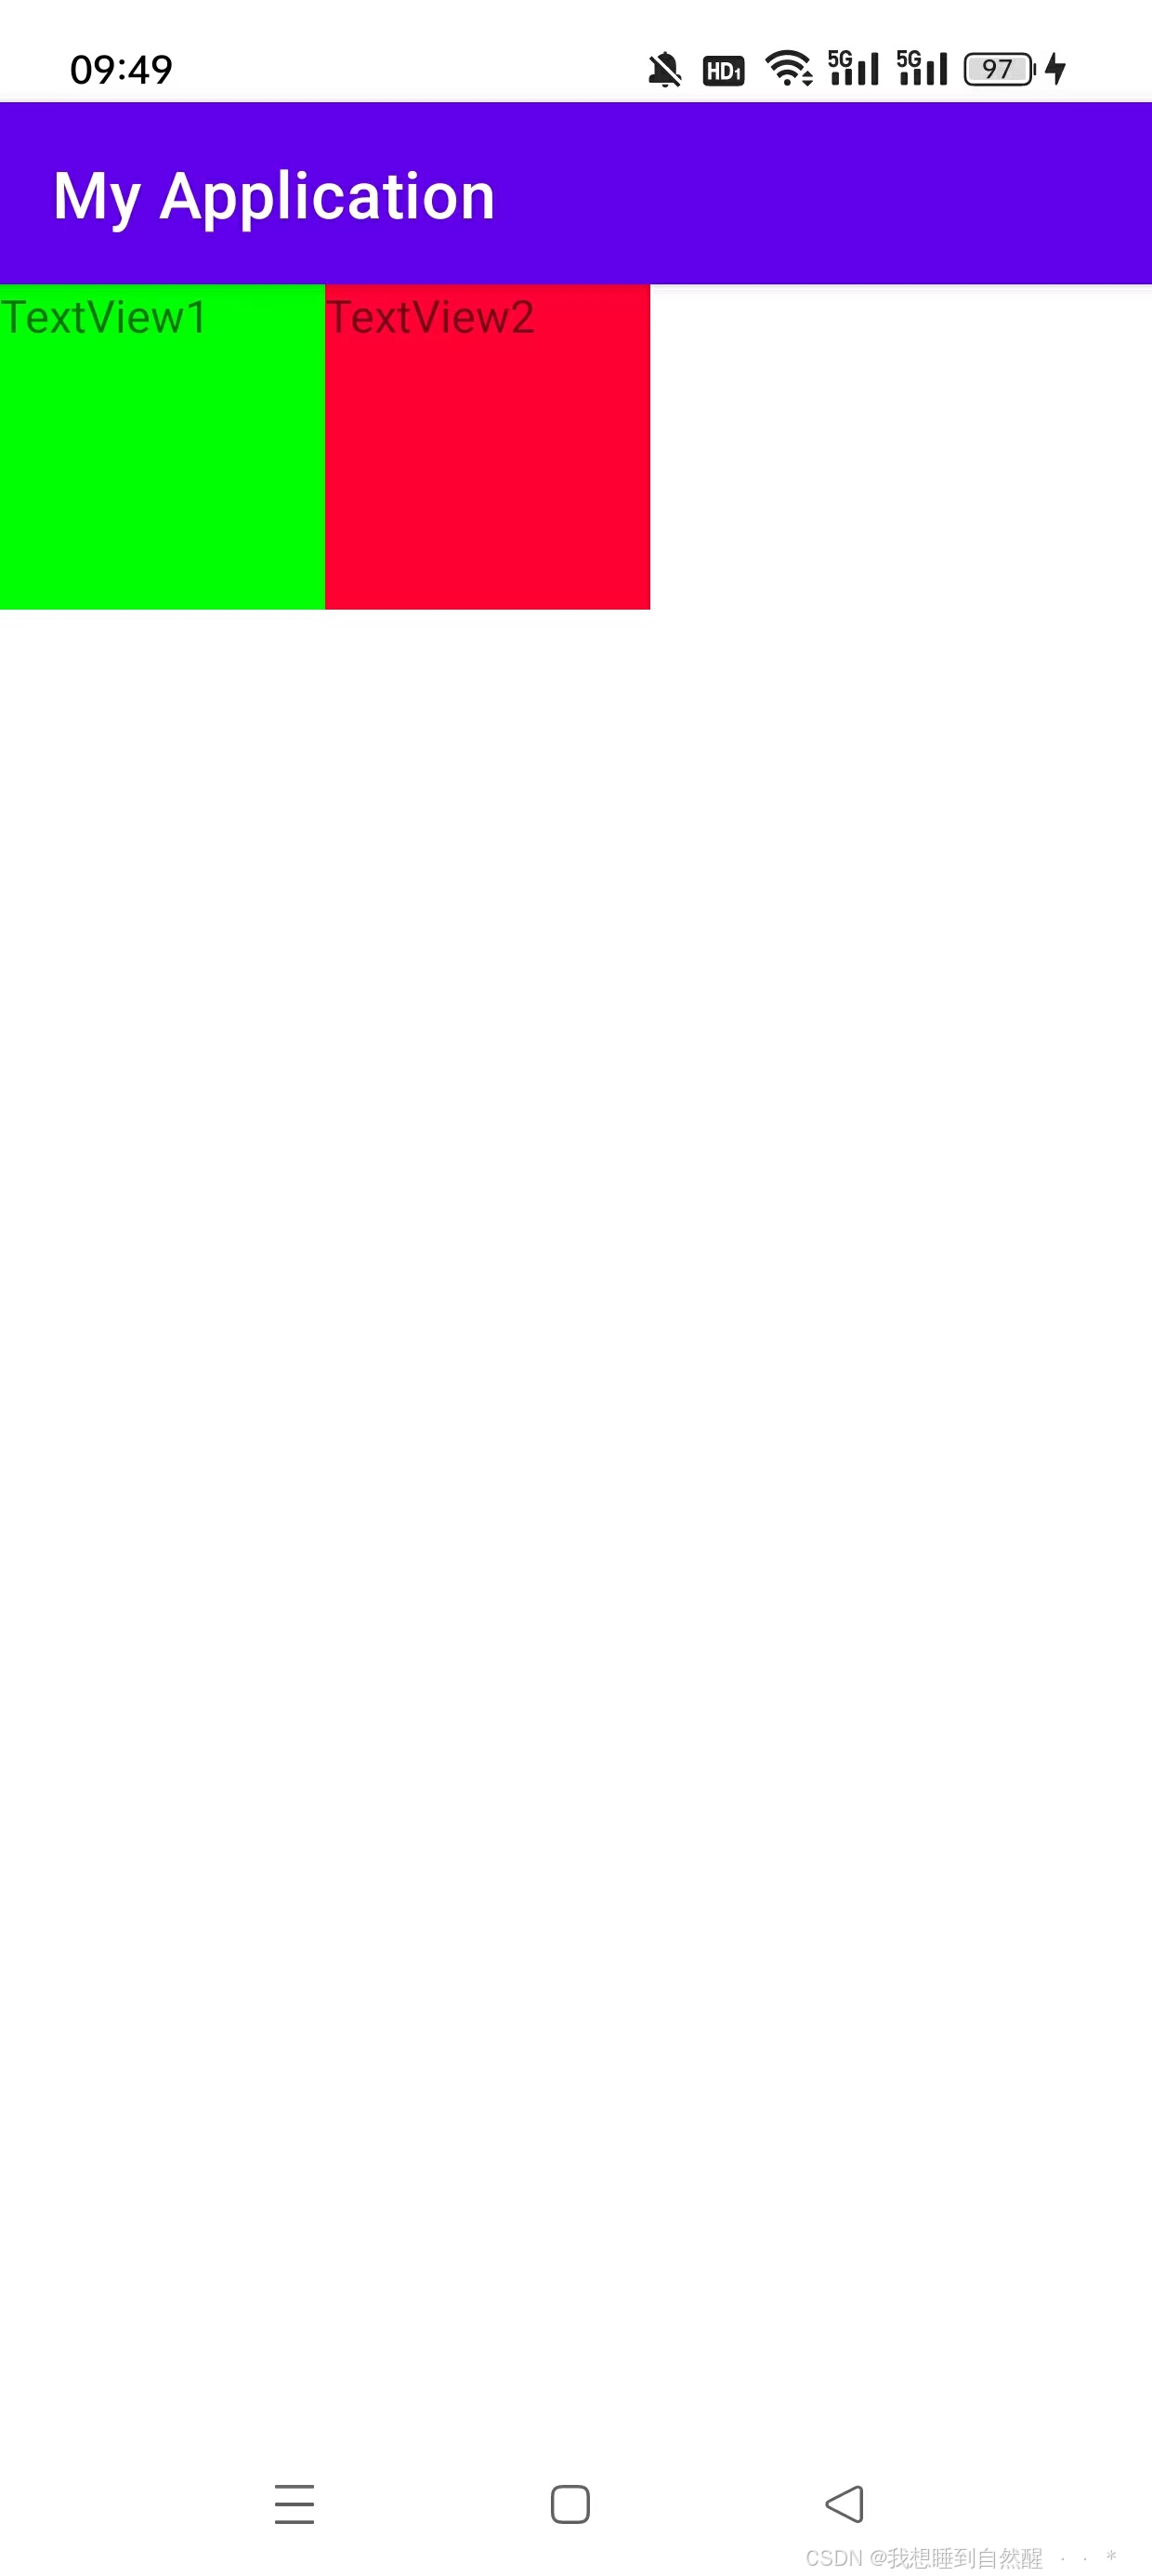
当我们将第一个控件的可见性属性进行改变:android:visibility="gone",由于设置,此时运行结果为:
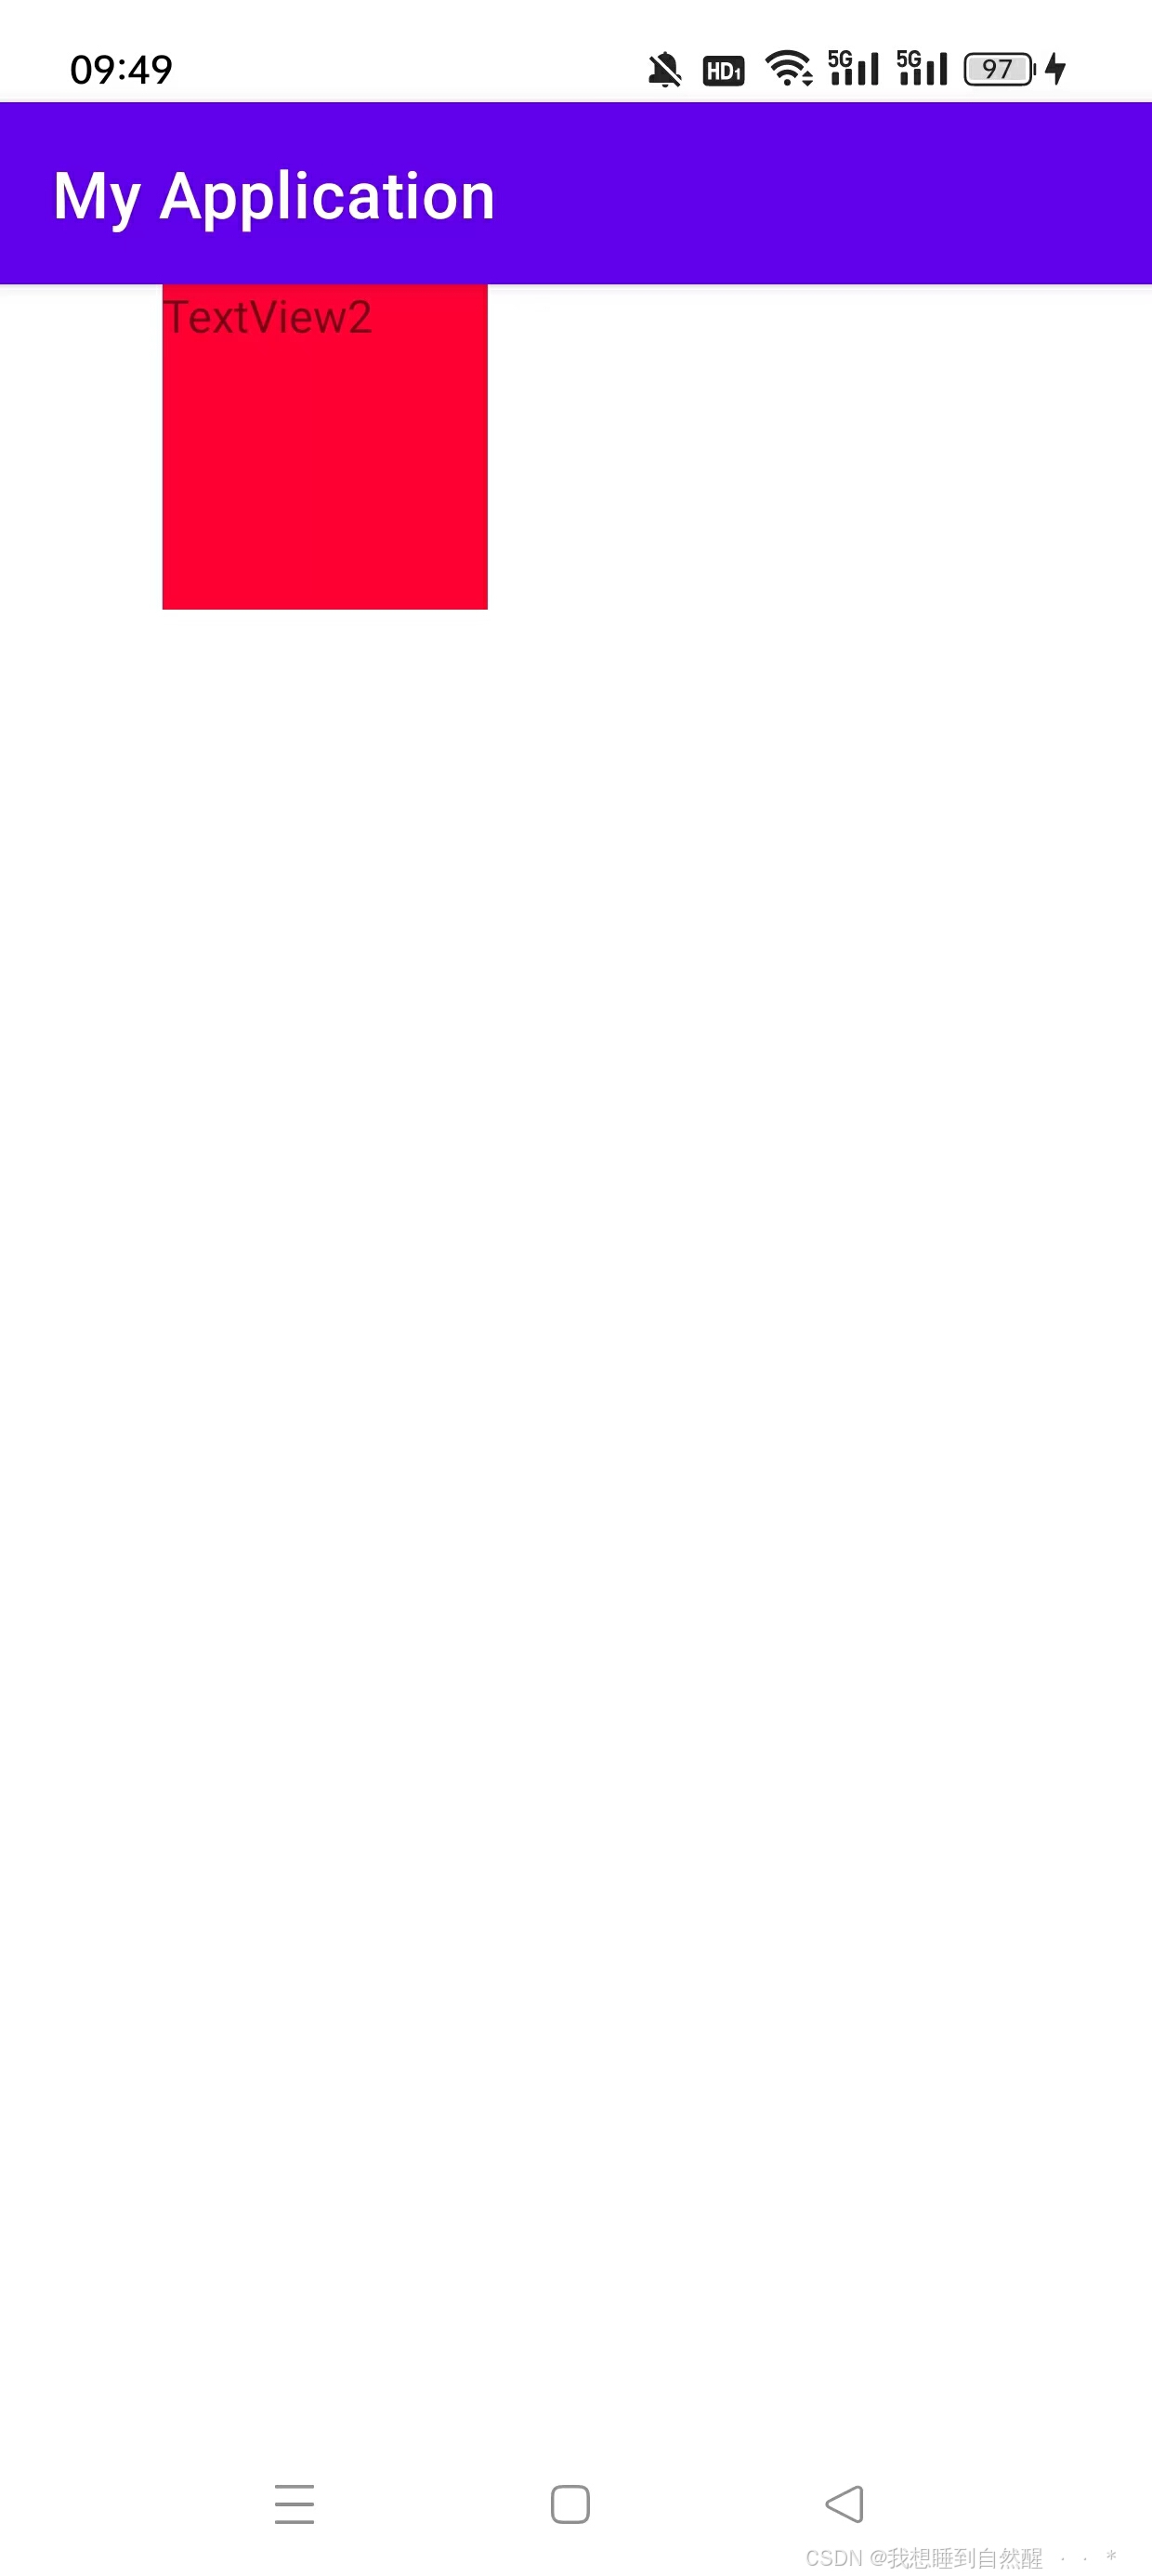
居中和偏移:
居中:
xml
<androidx.constraintlayout.widget.ConstraintLayout xmlns:android="http://schemas.android.com/apk/res/android"
    xmlns:app="http://schemas.android.com/apk/res-auto"
    xmlns:tools="http://schemas.android.com/tools"
    android:id="@+id/main"
    android:layout_width="match_parent"
    android:layout_height="match_parent"
    tools:context=".MainActivity">

    <TextView
        android:layout_width="100dp"
        android:layout_height="100dp"
        android:id="@+id/TextView1"
        android:background="#00ff00"
        android:text="TextView1"
        android:visibility="visible"
        app:layout_constraintTop_toTopOf="parent"
        app:layout_constraintLeft_toLeftOf="parent"
        app:layout_constraintBottom_toBottomOf="parent"
        app:layout_constraintRight_toRightOf="parent"/>

</androidx.constraintlayout.widget.ConstraintLayout>
运行之后,此时就会有一个TextView位于屏幕的中间:

偏移:
| 属性 | 作用 |
|---|---|
| layout_constraintHorizontal_bias | 水平偏移 |
| layout_constraintVertical_bias | 垂直偏移 |
偏移量的设置范围为0~1,当设置偏移量为1时,当为水平偏移时就会位于最右端,当为垂直偏移时,就会位于最下端。当为0.5就会位于中间,以此类推。
尺寸约束
-
当我们使用wrap_content,即让控件自己确定大小,此时我们可以设立属性来规定它的最大最小宽度与高度:
xmlandroid:minWidth 最小的宽度 android:minHeight 最小的高度 android:maxWidth 最大的宽度 android:maxHeight 最大的高度 -
使用0dp:
match_parent是一个布局参数,它可以使视图的尺寸与父容器的尺寸相匹配。然而,ConstraintLayout推荐使用MATCH_CONSTRAINT(在XML中表示为0dp)来代替match_parent,因为它提供了更多的灵活性和控制。使用
MATCH_CONSTRAINT时,可以通过设置视图的约束来控制其尺寸。例如,你可以让视图的宽度或高度匹配父容器,或者根据其他视图的尺寸来调整自己的尺寸。这样做的好处是,它允许视图在不同屏幕尺寸和方向下保持更好的适应性。
示例:
xml
 <TextView
        android:layout_width="0dp"
        android:layout_height="wrap_content"
        android:id="@+id/TextView1"
        android:background="#00ff00"
        android:text="TextView1"
        android:visibility="visible"
        app:layout_constraintTop_toTopOf="parent"
        app:layout_constraintLeft_toLeftOf="parent"
app:layout_constraintRight_toRightOf="parent" />在一般情况下,当我们设置了android:layout_width="0dp"时,这个视图就看不到了,但在约束布局当中由于我们设立了左右要与父视图对齐,因此运行结果如下:
- 宽高比:当宽或高至少有一个尺寸被设置为0dp时,可以通过属性layout_constraintDimensionRatio设置宽高比
示例:
xml
<androidx.constraintlayout.widget.ConstraintLayout xmlns:android="http://schemas.android.com/apk/res/android"
    xmlns:app="http://schemas.android.com/apk/res-auto"
    xmlns:tools="http://schemas.android.com/tools"
    android:id="@+id/main"
    android:layout_width="match_parent"
    android:layout_height="match_parent"
    tools:context=".MainActivity">

    <TextView
        android:layout_width="0dp"
        android:layout_height="100dp"
        android:id="@+id/TextView1"
        android:background="#00ff00"
        android:text="TextView2"
        android:visibility="visible"
        app:layout_constraintDimensionRatio="1:1"
        app:layout_constraintTop_toTopOf="parent"
        app:layout_constraintLeft_toLeftOf="parent" />

    <TextView
        android:layout_width="0dp"
        android:layout_height="100dp"
        android:id="@+id/TextView2"
        android:background="#00ff00"
        android:text="TextView2"
        android:visibility="visible"
        app:layout_constraintDimensionRatio="H,2:3"
        app:layout_constraintTop_toTopOf="parent"
        app:layout_constraintRight_toRightOf="parent" />

    <TextView
        android:layout_width="0dp"
        android:layout_height="100dp"
        android:id="@+id/TextView3"
        android:background="#00ff00"
        android:text="TextView1"
        android:visibility="visible"
        app:layout_constraintDimensionRatio="W,2:3"
        app:layout_constraintBottom_toBottomOf="parent"
        app:layout_constraintLeft_toLeftOf="parent" />

</androidx.constraintlayout.widget.ConstraintLayout>
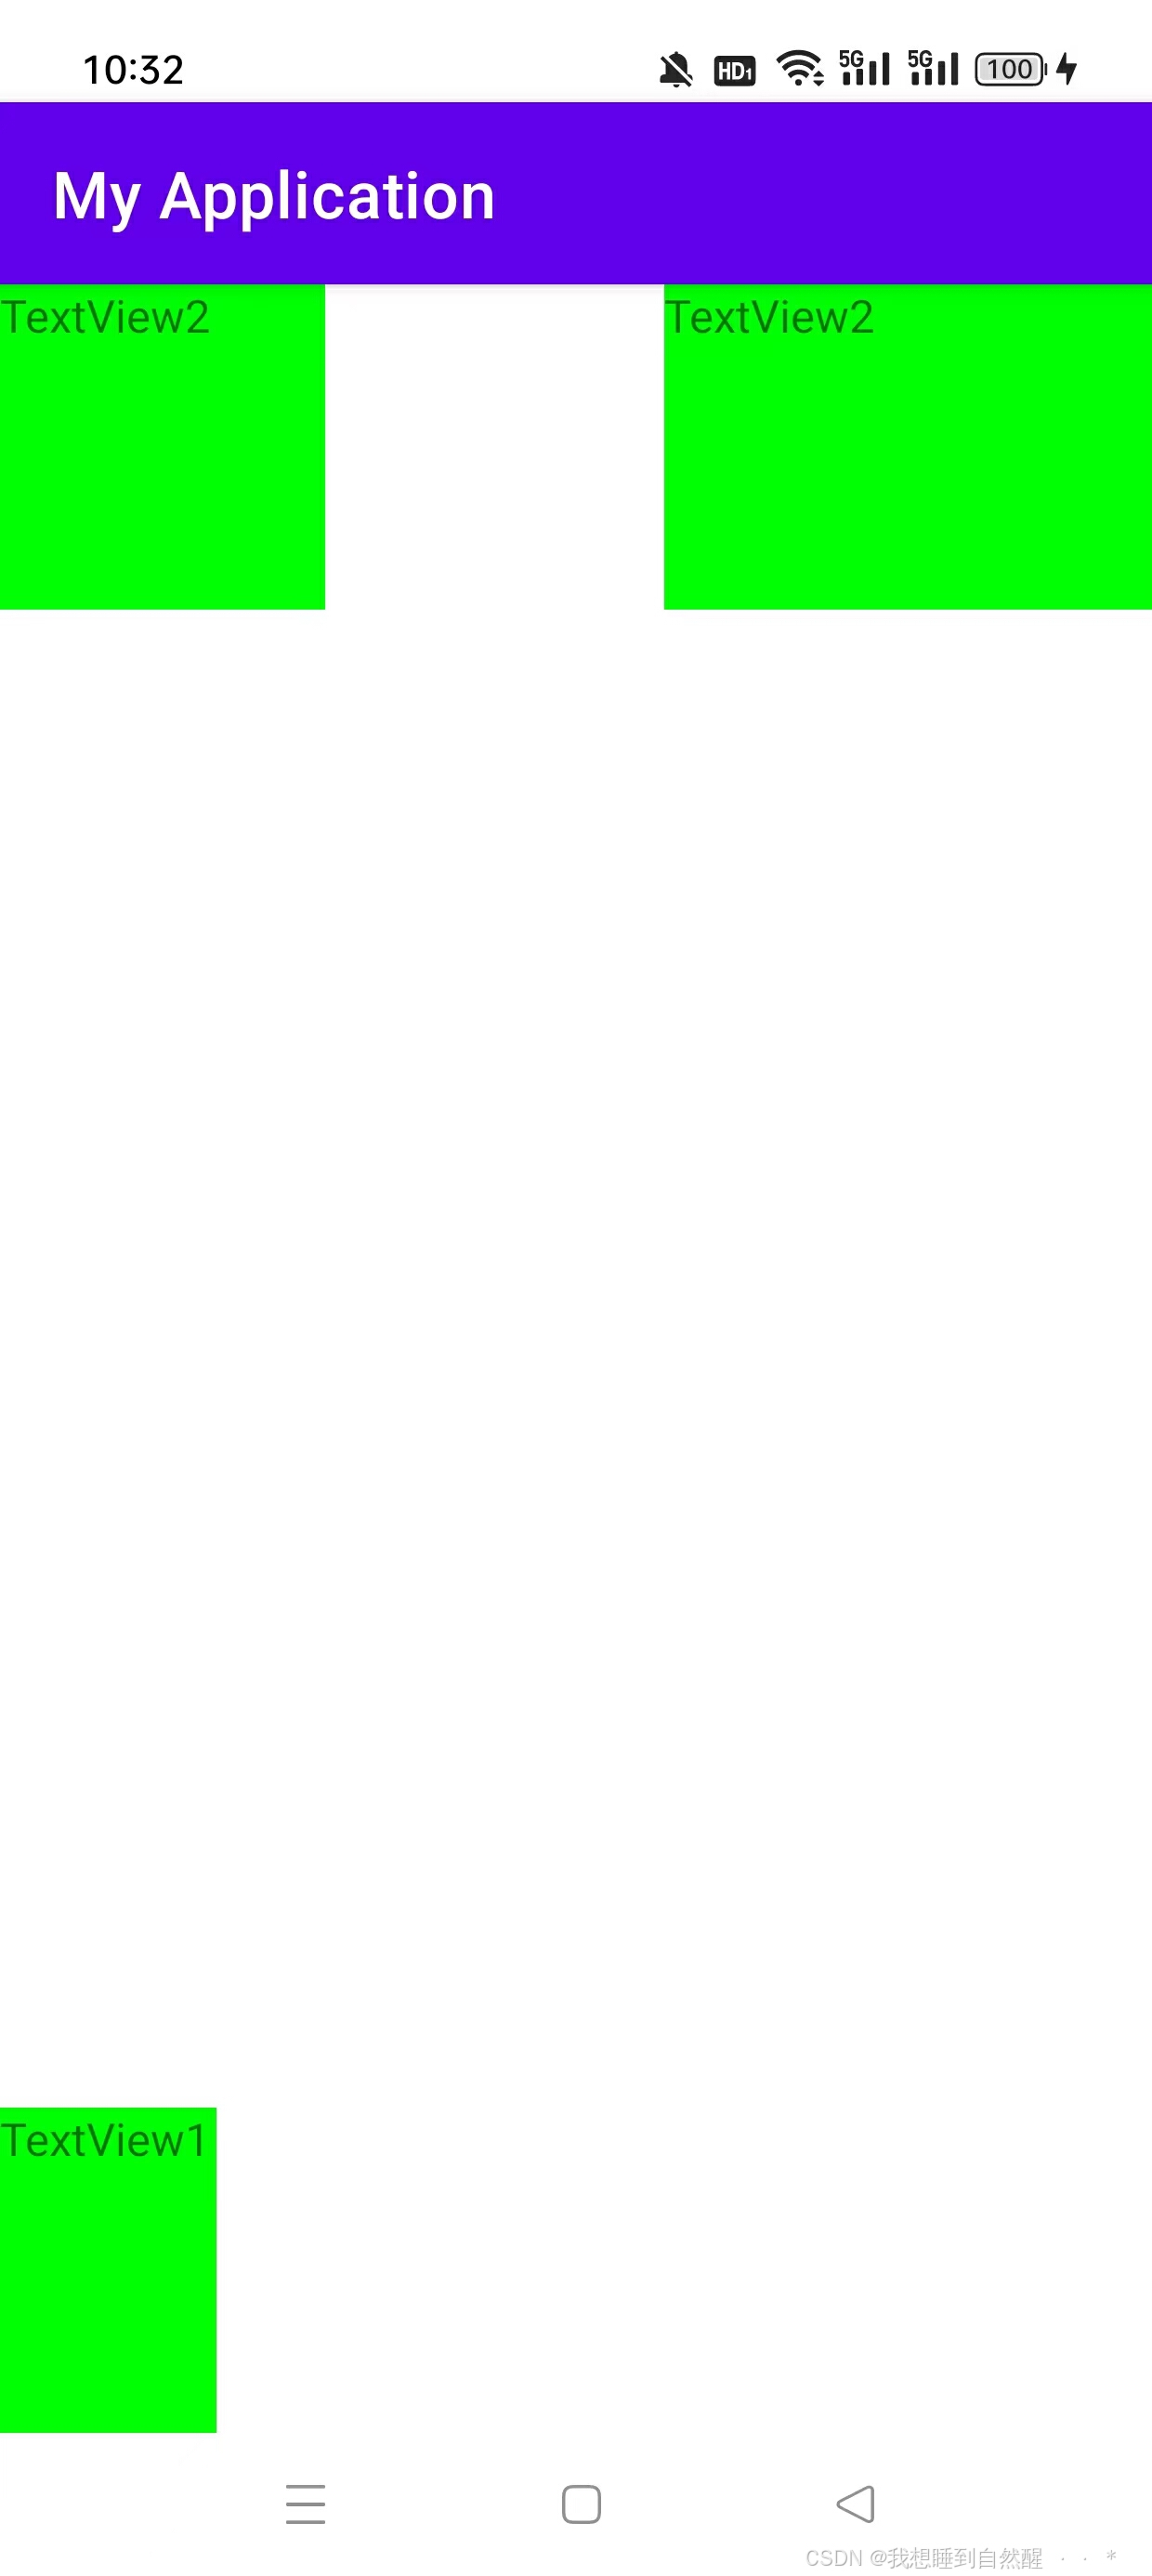
运行结果:

一般没有特殊声明时,指的为高比宽,也可在前面加上比例的限制,例如上面的示例文本控件2与文本控件3就加了限制,当前面为H时代表的是高比宽,当前面为W时,代表的是宽比高。
链
在约束布局中,链(Chains)是一种用于定义一组相关控件之间关系的方法,可以控制它们的排列方式和行为。
| 属性 | 作用 |
|---|---|
| app:layout_constraintHorizontal_chainStyle | 定义水平链的样式,可以设置为 spread(均匀分布)、spread_inside(均匀分布,但不包括边缘控件)或 packed(靠拢排列)。 |
| app:layout_constraintVertical_chainStyle | 定义垂直链的样式,可以设置为 spread、spread_inside或 packed。 |
| app:layout_constraintHorizontal_bias | 设置水平链中每个控件的偏移量,取值范围为 0.0(左边)到 1.0(右边)。 |
| app:layout_constraintVertical_bias | 设置垂直链中每个控件的偏移量 |
| app:layout_constraintHorizontal_weight | 定义水平链中每个控件的权重,用于均匀分配额外空间。 |
| app:layout_constraintVertical_weight | 定义垂直链中每个控件的权重。 |
示例:
xml
<androidx.constraintlayout.widget.ConstraintLayout xmlns:android="http://schemas.android.com/apk/res/android"
    xmlns:app="http://schemas.android.com/apk/res-auto"
    xmlns:tools="http://schemas.android.com/tools"
    android:id="@+id/main"
    android:layout_width="match_parent"
    android:layout_height="match_parent"
    tools:context=".MainActivity">

    <TextView
        android:layout_width="50dp"
        android:layout_height="wrap_content"
        android:id="@+id/TextView1"
        android:background="#00ff00"
        android:text="TextView2"
        android:visibility="visible"
        app:layout_constraintHorizontal_chainStyle="spread_inside"
        app:layout_constraintTop_toTopOf="parent"
        app:layout_constraintLeft_toLeftOf="parent"
        app:layout_constraintRight_toLeftOf="@id/TextView2" />

    <TextView
        android:layout_width="50dp"
        android:layout_height="wrap_content"
        android:id="@+id/TextView2"
        android:background="#ff0011"
        android:text="TextView2"
        android:visibility="visible"
        app:layout_constraintTop_toTopOf="parent"
        app:layout_constraintLeft_toRightOf="@id/TextView1"
        app:layout_constraintRight_toRightOf="parent"
        app:layout_constraintRight_toLeftOf="@id/TextView3" />

    <TextView
        android:layout_width="50dp"
        android:layout_height="wrap_content"
        android:id="@+id/TextView3"
        android:background="#1100ff"
        android:text="TextView1"
        android:visibility="visible"
        app:layout_constraintTop_toTopOf="parent"
        app:layout_constraintRight_toRightOf="parent"
        app:layout_constraintLeft_toRightOf="@id/TextView2" />

</androidx.constraintlayout.widget.ConstraintLayout>
运行程序,此时结果为:
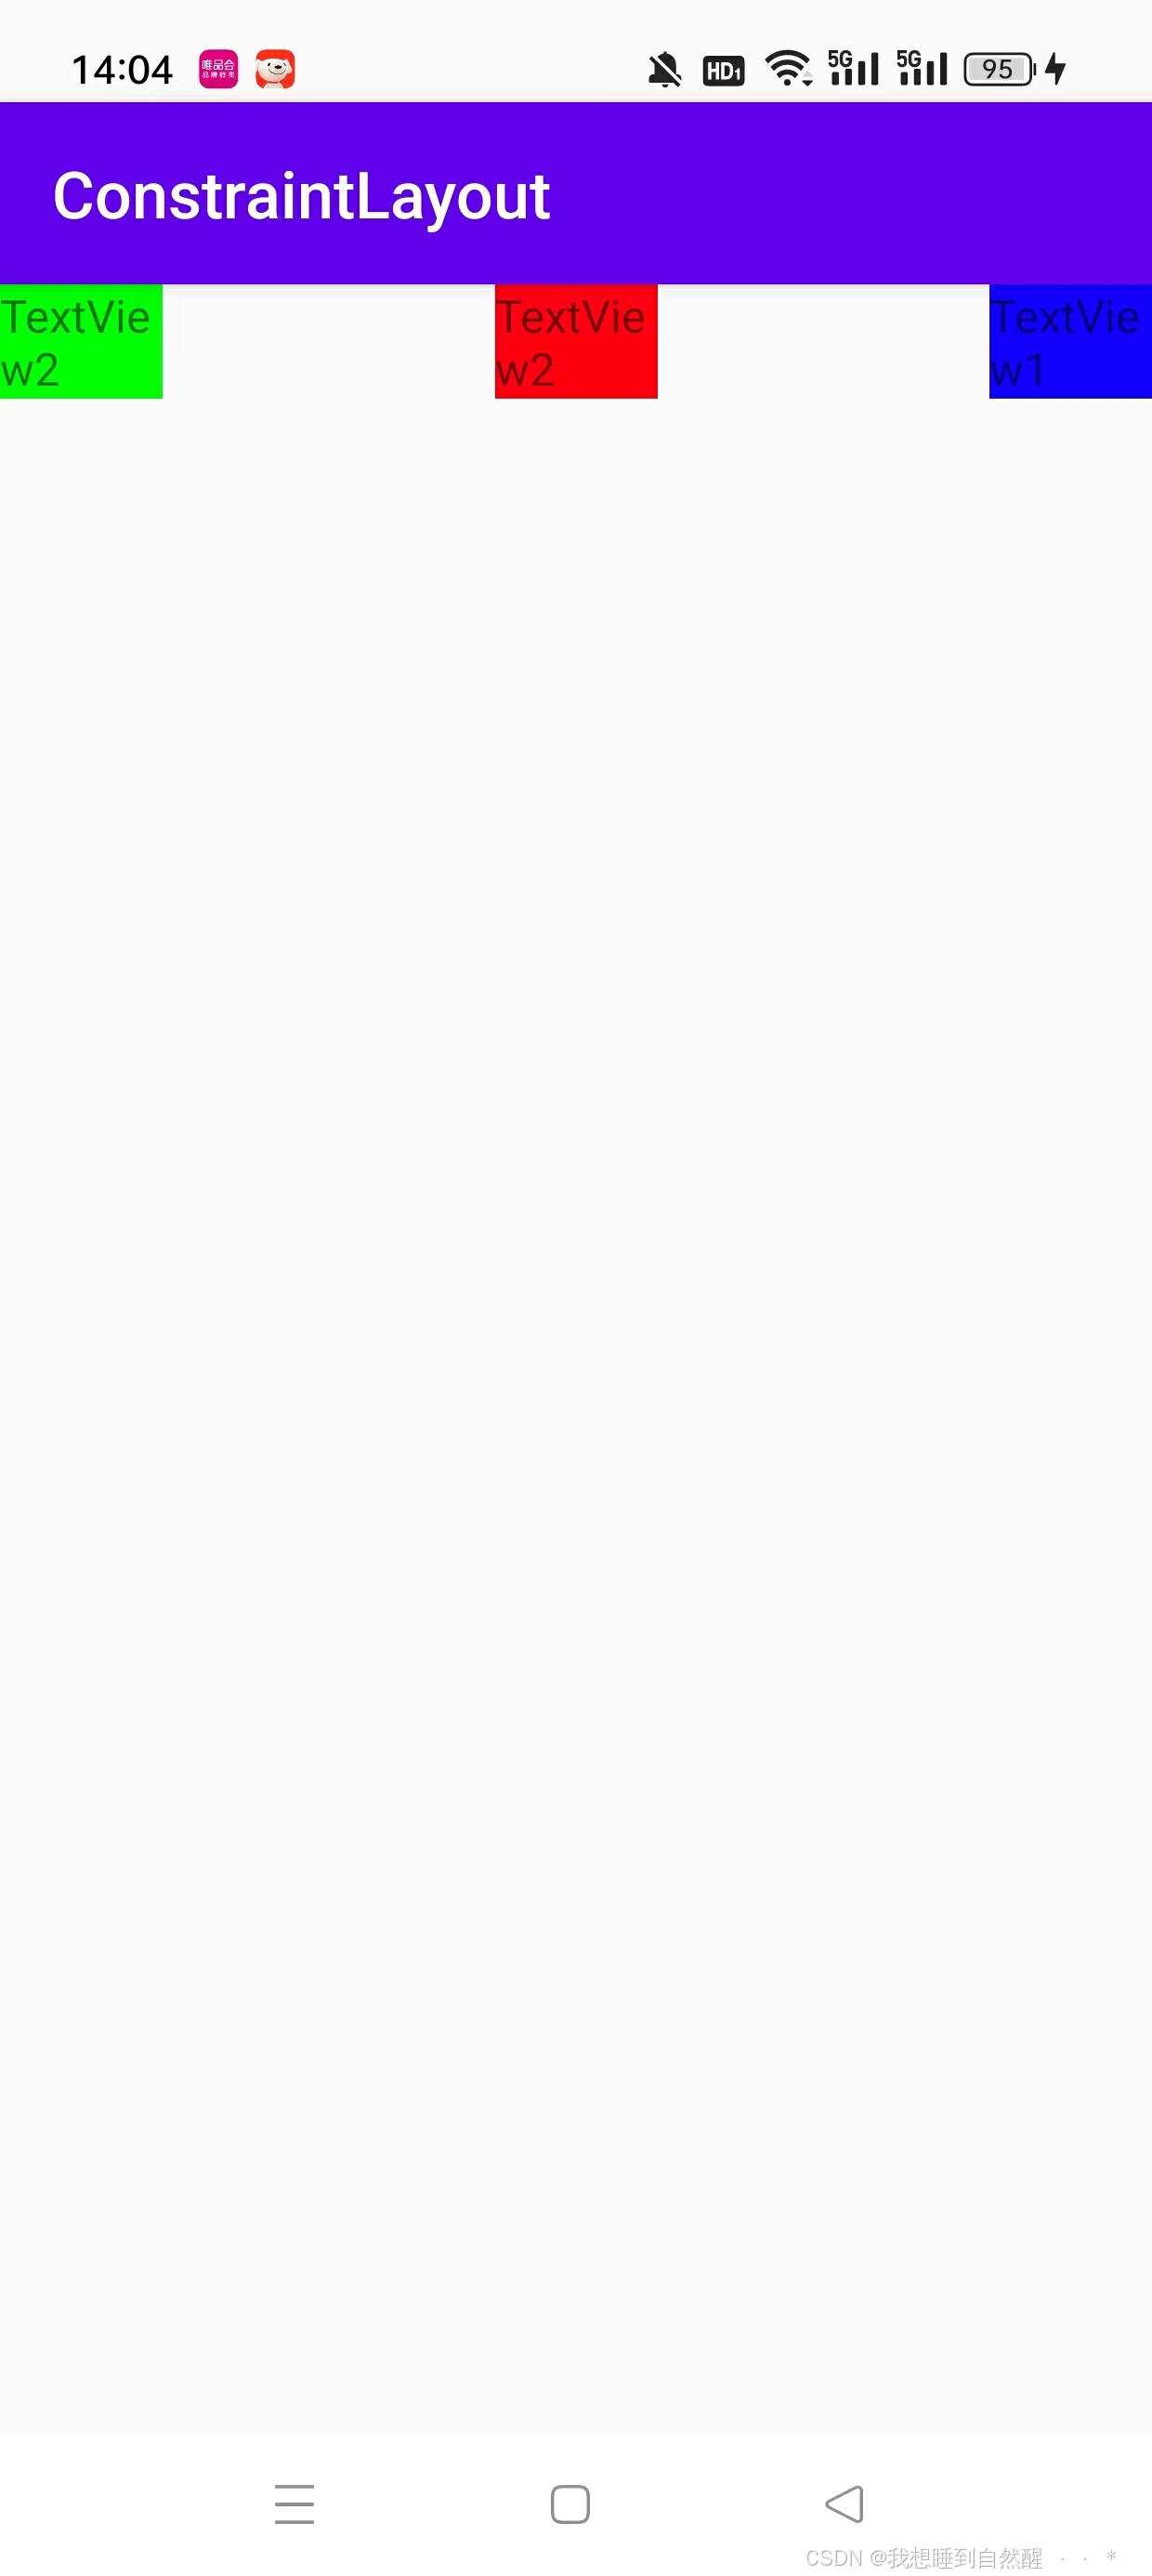
当我们将第一个的属性改变:app:layout_constraintHorizontal_chainStyle="spread"

app:layout_constraintHorizontal_chainStyle="packed",此时三个TextView为挨在一起的
到这里就结束了!