文章目录
- [0. 前言](#0. 前言)
- [1. 裁剪效果(可实时预览)](#1. 裁剪效果(可实时预览))
- [2. 安装 cropper](#2. 安装 cropper)
- [3. 引入 Vue Cropper](#3. 引入 Vue Cropper)
-
- [3.1 局部引入(推荐使用)](#3.1 局部引入(推荐使用))
- [3.2 全局引入](#3.2 全局引入)
- [4. 在代码中使用](#4. 在代码中使用)
-
- [4.1 template部分](#4.1 template部分)
- [4.2 script部分](#4.2 script部分)
- [5. 注意事项](#5. 注意事项)
- [6. SpringBoot 后端接收图片](#6. SpringBoot 后端接收图片)
-
- [6.1 UserController.java](#6.1 UserController.java)
- [6.2 Result.java](#6.2 Result.java)
- [7. 完整的示例代码](#7. 完整的示例代码)
-
- [7.1 Homeview.vue](#7.1 Homeview.vue)
- [7.2 request.js](#7.2 request.js)
- [7.3 main.js](#7.3 main.js)
- [7.4 vite.config.js](#7.4 vite.config.js)
- [8. 完整的源代码](#8. 完整的源代码)
0. 前言
裁剪头像的需求十分常见,主要目的是为了统一用户头像的尺寸,避免因为用户上传的图片尺寸大小不一致导致页面布局出现问题
高效实现需求的方法,就是避免重复造轮子,在这里推荐使用 cropper 实现头像裁剪功能 (原因是 cropper 功能强大、上手简单、文档详细)
cropper 的Gitee地址:vue-cropper
cropper Vue3在线示例:cropper Vue3在线示例
1. 裁剪效果(可实时预览)
2. 安装 cropper
# npm 安装
npm install vue-cropper@next

# yarn 安装
yarn add vue-cropper@next
3. 引入 Vue Cropper
3.1 局部引入(推荐使用)
哪个组件需要使用 Vue Cropper,就在哪个组件导入
javascript
import 'vue-cropper/dist/index.css'
import { VueCropper }  from 'vue-cropper'
3.2 全局引入
main.js 文件
javascript
import VueCropper from 'vue-cropper'
import 'vue-cropper/dist/index.css'

const app = createApp(App)
app.use(VueCropper)
app.mount('#app')
4. 在代码中使用
注意事项:
要为
<vue-cropper></vue-cropper>组件设置宽和高,并用一个外层容器包裹<vue-cropper></vue-cropper>组件
4.1 template部分
html
<vue-cropper
    class="crop"
    ref="cropper"
    :autoCrop="option.autoCrop"
    :autoCropHeight="option.autoCropHeight"
    :autoCropWidth="option.autoCropWidth"
    :canMove="option.canMove"
    :canScale="option.canScale"
    :centerBox="option.centerBox"
    :fixed="option.fixed"
    :fixedBox="option.fixedBox"
    :fixedNumber="option.fixedNumber"
    :img="option.img"
    :info-true="option.infoTrue"
    :mode="option.mode"
    :origin="option.origin"
    :outputSize="option.outputSize"
    :outputType="option.outputType"
    @realTime="realTime"
></vue-cropper>
4.2 script部分
javascript
const option = ref({
  autoCrop: true, // 是否默认生成截图框
  autoCropHeight: '240px', // 默认生成截图框宽度(默认值:容器的 80%, 可选值:0 ~ max), 真正裁剪出来的图片的宽度为 autoCropHeight * 1.25
  autoCropWidth: '240px', // 默认生成截图框宽度(默认值:容器的 80%, 可选值:0 ~ max), 真正裁剪出来的图片的宽度为 autoWidth * 1.25
  canMove: true, // 上传图片是否可以移动
  canScale: true, // 图片是否允许滚轮缩放
  centerBox: true, // 截图框是否被限制在图片里面
  fixed: true, // 是否固定截图框的宽高比例
  fixedBox: true, // 是否固定截图框大小
  fixedNumber: [1, 1], // 截图框的宽高比例([ 宽度 , 高度 ])
  img: 'https://img2.baidu.com/it/u=2339635883,2403687892&fm=253&fmt=auto&app=138&f=JPEG', // 裁剪图片的地址(可选值:url 地址, base64, blob)
  infoTrue: true, // infoTrue为 true 时显示预览图片的宽高信息,infoTrue为 false 时表示显示裁剪框的宽高信息
  mode: 'contain', // 截图框可拖动时的方向(可选值:contain , cover, 100px, 100% auto)
  origin: false, // 上传的图片是否按照原始比例渲染
  outputSize: 1, // 裁剪生成图片的质量(可选值:0.1 ~ 1)
  outputType: 'png', // 裁剪生成图片的格式(可选值:png, jpeg, webp)
})

// 实时预览
const realTime = (data) => {
  // console.log('realTime data =', data)
  previews.value = data
}
5. 注意事项
- cropper 对象的 getCropBlob 方法和 getCropData 方法都是异步方法
- 虽然 getCropBlob 获取的的 Blob 对象在控制台打印时只有 size 和 type 属性,但是仍然可以使用
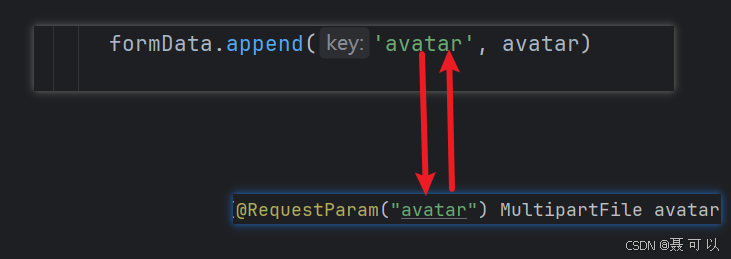
window.URL.createObjectURL(blob)来生成 url ,从 Java 的角度来说,相当于重写了 Blob 类的 toString 方法 - 前端用 formData 上传文件时, key 要与后端接口中 @RequestParam("avatar") 指定的参数名一致
6. SpringBoot 后端接收图片
后端环境:
- JDK:17.0.7
- SpringBoot:3.0.2
6.1 UserController.java
java
import cn.edu.scau.controller.vo.Result;
import org.springframework.web.bind.annotation.PostMapping;
import org.springframework.web.bind.annotation.RequestMapping;
import org.springframework.web.bind.annotation.RequestParam;
import org.springframework.web.bind.annotation.RestController;
import org.springframework.web.multipart.MultipartFile;

import java.io.File;
import java.io.IOException;
import java.util.Objects;
import java.util.UUID;

@RestController
@RequestMapping("/user")
public class UserController {

    @PostMapping("/updateAvatar")
    public Result<Object> updateAvatar(@RequestParam("avatar") MultipartFile avatar) {
        System.err.println("文件名:" + avatar.getOriginalFilename());
        System.err.println("文件大小(KB):" + avatar.getSize() / 1024);

        try {
            // 拿到图片文件后,可以将图片上传到阿里云、腾讯云、minio等第三方存储服务,然后返回图片的访问地址
            // 这里直接保存到本地

            String fileName = UUID.randomUUID().toString();
            String suffix = Objects.requireNonNull(avatar.getOriginalFilename()).substring(avatar.getOriginalFilename().lastIndexOf("."));
            avatar.transferTo(new File("F:\\Blog\\crop-avatar\\" + fileName + suffix));
        } catch (IOException ioException) {
            throw new RuntimeException(ioException);
        }

        return Result.success();
    }

}
6.2 Result.java
java
import java.io.Serializable;

/**
 * 后端统一返回结果
 *
 * @param <T>
 */
public class Result<T> implements Serializable {

    private Integer code;
    private String message;
    private T data;

    public static <T> Result<T> success() {
        Result<T> result = new Result<>();
        result.code = 200;
        result.message = "success";
        return result;
    }

    public static <T> Result<T> success(T object) {
        Result<T> result = new Result<>();
        result.data = object;
        result.code = 200;
        result.message = "success";
        return result;
    }

    public static <T> Result<T> fail(String message) {
        Result<T> result = new Result<>();
        result.message = message;
        result.code = 500;
        return result;
    }

    public Integer getCode() {
        return code;
    }

    public void setCode(Integer code) {
        this.code = code;
    }

    public String getMessage() {
        return message;
    }

    public void setMessage(String message) {
        this.message = message;
    }

    public T getData() {
        return data;
    }

    public void setData(T data) {
        this.data = data;
    }

    @Override
    public String toString() {
        return "Result{" +
                "code=" + code +
                ", message='" + message + '\'' +
                ", data=" + data +
                '}';
    }

}
7. 完整的示例代码
7.1 Homeview.vue
html
<template>
  <div class="wrapper">
    <div class="blank-line"></div>
    <div class="top">
      <p class="title">裁剪头像</p>
    </div>
    <div class="blank-line"></div>
    <div class="main">
      <div class="crop-container">
        <vue-cropper
            class="crop"
            ref="cropper"
            :autoCrop="option.autoCrop"
            :autoCropHeight="option.autoCropHeight"
            :autoCropWidth="option.autoCropWidth"
            :canMove="option.canMove"
            :canScale="option.canScale"
            :centerBox="option.centerBox"
            :fixed="option.fixed"
            :fixedBox="option.fixedBox"
            :fixedNumber="option.fixedNumber"
            :img="option.img"
            :info="option.info"
            :info-true="option.infoTrue"
            :mode="option.mode"
            :origin="option.origin"
            :outputSize="option.outputSize"
            :outputType="option.outputType"
            :rounded="true"
            @realTime="realTime"
        ></vue-cropper>

        <input
            id="input"
            ref="input"
            type="file"
            accept="image/png, image/jpeg, image/gif, image/jpg"
            @change="uploadAvatar($event)"
            v-show="false">

        <div class="action-buttons">
          <el-button :size="'default'" type="primary" @click="handleUploadAvatar">上传图片</el-button>
          <el-button :size="'default'" type="danger" plain :icon="ZoomIn" @click="changeScale(1)">
            放大(向上滚动鼠标滑轮)
          </el-button>
          <el-button :size="'default'" type="danger" plain :icon="ZoomOut" @click="changeScale(-1)">
            缩小(向下滚动鼠标滑轮)
          </el-button>
          <el-button :size="'default'" type="primary" @click="rotateLeft">向左旋转</el-button>
          <el-button :size="'default'" type="primary" @click="rotateRight">向右旋转</el-button>
          <el-button :size="'default'" type="primary" @click="downloadPreView">下载预览图</el-button>
          <el-button :size="'default'" type="primary" @click="updateAvatar">确定修改</el-button>
        </div>
      </div>

      <div class="preview-container">
        <div>
          <p class="preview-title">实时预览</p>
        </div>
        <div :style="getPreviewStyle">
          <div :style="previews.div">
            <img :src="previews.url" :style="previews.img" alt="" class="preview-img">
          </div>
        </div>
      </div>
    </div>
  </div>
</template>

<script setup>
import 'vue-cropper/dist/index.css'
import {VueCropper} from 'vue-cropper'
import {computed, ref} from 'vue'
import {ElMessage} from 'element-plus'
import {ZoomIn, ZoomOut} from '@element-plus/icons-vue'
import request from '@/util/request.js'

const previews = ref({})
const previewBlob = ref()
const previewBase64 = ref()

const cropper = ref()
const input = ref()
const option = ref({
  autoCrop: true, // 是否默认生成截图框
  autoCropHeight: '240px', // 默认生成截图框宽度(默认值:容器的 80%, 可选值:0 ~ max), 真正裁剪出来的图片的宽度为 autoCropHeight * 1.25
  autoCropWidth: '240px', // 默认生成截图框宽度(默认值:容器的 80%, 可选值:0 ~ max), 真正裁剪出来的图片的宽度为 autoWidth * 1.25
  canMove: true, // 上传图片是否可以移动
  canScale: true, // 图片是否允许滚轮缩放
  centerBox: true, // 截图框是否被限制在图片里面
  fixed: true, // 是否固定截图框的宽高比例
  fixedBox: true, // 是否固定截图框大小
  fixedNumber: [1, 1], // 截图框的宽高比例([ 宽度 , 高度 ])
  img: 'https://img1.baidu.com/it/u=3450282427,2041051230&fm=253', // 裁剪图片的地址(可选值:url 地址, base64, blob)
  info: false, // 是否显示裁剪框的宽高信息
  infoTrue: true, // infoTrue为 true 时裁剪框显示的是预览图片的宽高信息,infoTrue为 false 时裁剪框显示的是裁剪框的宽高信息
  mode: 'contain', // 截图框可拖动时的方向(可选值:contain , cover, 100px, 100% auto)
  origin: false, // 上传的图片是否按照原始比例渲染
  outputSize: 1, // 裁剪生成图片的质量(可选值:0.1 ~ 1)
  outputType: 'png', // 裁剪生成图片的格式(可选值:png, jpeg, webp)
})

// 实时预览
const realTime = (data) => {
  // console.log('realTime data =', data)
  previews.value = data
}

const downloadPreView = () => {
  let aLink = document.createElement('a')
  aLink.download = '预览图.png'

  cropper.value.getCropBlob((blob) => {
    aLink.href = window.URL.createObjectURL(blob)
    aLink.click()
  })
}

const uploadAvatar = (event) => {
  let file = event.target.files[0]
  // console.log('uploadAvatar file=', file)

  if (!/\.(gif|jpg|jpeg|png|bmp)$/i.test(event.target.value)) {
    ElMessage.error('图片类型必须是.gif、jpeg、jpg、png、bmp中的一种')
    return false
  }

  let fileReader = new FileReader()
  fileReader.onload = (event) => {
    let data
    if (typeof event.target.result === 'object') {
      // 把 Array Buffer 转化为 blob
      data = window.URL.createObjectURL(new Blob([event.target.result]))
    } else {
      // 如果是 base64 ,不需要转换
      data = event.target.result
    }
    option.value.img = data
  }

  // 转化为base64
  // fileReader.readAsDataURL(file)

  // 转化为blob
  fileReader.readAsArrayBuffer(file)
}

const handleUploadAvatar = () => {
  input.value.click()
}

const getPreviewStyle = computed(() => {
  return {
    'width': previews.value.w + 'px',
    'height': previews.value.h + 'px',
    'overflow': 'hidden',
    // 'border-radius': '50%'
  }
})

const rotateLeft = () => {
  cropper.value.rotateLeft()
}

const rotateRight = () => {
  cropper.value.rotateRight()
}

const changeScale = (scaleSize) => {
  cropper.value.changeScale(scaleSize)
}

// 注意:getCropData是一个异步方法
const getBase64 = () => {
  cropper.value.getCropData((base64) => {
    previewBase64.value = base64
    console.log('previewBase64 =', previewBase64.value)
  })
}

// 注意:getCropBlob是一个异步方法
const getBlob = () => {
  cropper.value.getCropBlob((blob) => {
    previewBlob.value = blob
    // 虽然 getCropBlob 方法获取的的 Blob 对象在控制台打印时只有 size 和 type 属性,但是仍然可以使用 window.URL.createObjectURL(blob) 生成 url
    // 从 Java 的角度来说,相当于重写了 Blob 类的 toString 方法
    console.log('previewBlob =', previewBlob.value)
  })
}

const updateAvatar = async () => {
  cropper.value.getCropBlob((blob) => {
    let avatar = new File([blob], 'avatar.png')
    let formData = new FormData()
    formData.append('avatar', avatar)

    request
        .post('/user/updateAvatar', formData, {
          headers: {
            'Content-Type': 'multipart/form-data'
          }
        })
        .then((response) => {
          if (response.code === 200) {
            ElMessage.success('修改头像成功')
          } else {
            ElMessage.error('修改头像失败')
          }
        })
        .catch((error) => {
          console.log('error =', error)
          ElMessage.error('修改头像失败')
        })
  })
}
</script>

<style scoped>
.title {
  font-size: 40px;
  text-align: center;
}

.main {
  display: flex;
  justify-content: space-around;
}

.crop {
  width: 925px;
  height: 500px;
}

.action-buttons {
  display: flex;
  justify-content: space-between;
  margin-top: 10px;
}

.blank-line {
  height: 20px;
  width: 100%;
}

.preview-img {
  border: 5px solid black;
}

.preview-title {
  font-size: 20px;
  margin-bottom: 10px;
  text-align: center;
}
</style>
7.2 request.js
javascript
import axios from 'axios'

const request = axios.create({
  baseURL: '/api',
  timeout: 60000,
  headers: {
    'Content-Type': 'application/json;charset=UTF-8'
  }
})

request.interceptors.request.use(

)

request.interceptors.response.use(response => {
  if (response.data) {
    return response.data
  }
  return response
}, (error) => {
  return Promise.reject(error)
})

export default request
7.3 main.js
java
import '@/assets/main.css'

import {createApp} from 'vue'
import {createPinia} from 'pinia'
import ElementPlus from 'element-plus'
import 'element-plus/dist/index.css'
import zhCn from 'element-plus/es/locale/lang/zh-cn'
import * as ElementPlusIconsVue from '@element-plus/icons-vue'

import App from './App.vue'
import router from './router'
import 'default-passive-events'

const app = createApp(App)

app.use(createPinia())
app.use(ElementPlus, {locale: zhCn})
for (const [key, component] of Object.entries(ElementPlusIconsVue)) {
  app.component(key, component)
}
app.use(router)

app.mount('#app')
7.4 vite.config.js
javascript
import {fileURLToPath, URL} from 'node:url'

import {defineConfig} from 'vite'
import vue from '@vitejs/plugin-vue'

// https://vitejs.dev/config/
export default defineConfig({
  plugins: [
    vue()
  ],
  resolve: {
    alias: {
      '@': fileURLToPath(new URL('./src', import.meta.url))
    }
  },
  server: {
    proxy: {
      '/api': {
        target: 'http://localhost:8001',
        changeOrigin: true,
        rewrite: (path) => {
          return path.replace('/api', '')
        }
      }
    }
  }
})