一、环境准备
1.准备三台rhel9服务器
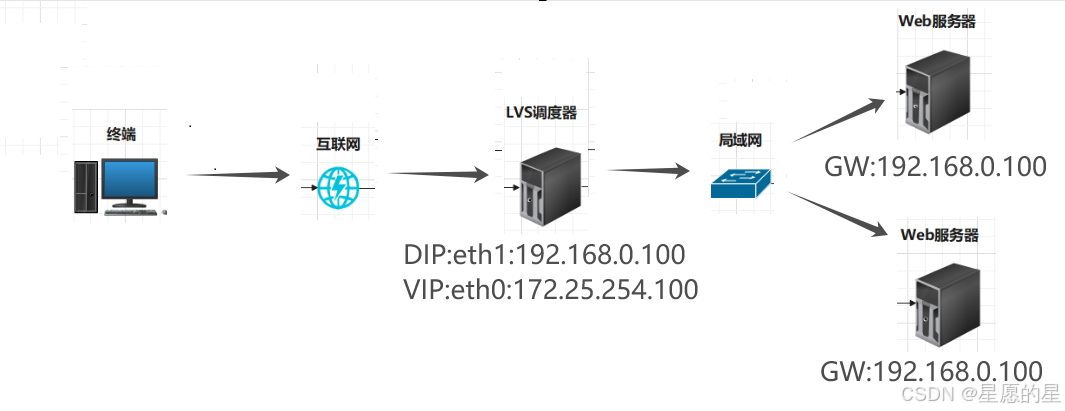
|-----------------|--------------------------|------------------------------------------------|---------------|
| 服务器名称 | 主机名 | ip地址 | 备注 |
| LVS调度服务器 | lvs.timinglee.org | eth0:172.25.254.100(外网) eth1:192.168.0.100(内网) | 关闭selinux和防火墙 |
| webserver2网站服务器 | webserver1.timinglee.org | eth0:192.168.0.10(内网) | 关闭selinux和防火墙 |
| webserver2网站服务器 | webserver2.timinglee.org | eth0:192.168.0.20(内网) | 关闭selinux和防火墙 |
2.实验拓扑
二、LVS-NAT模式部署
bash
# 版本
[root@lvs ~]# hostnamectl
 Static hostname: lvs.timinglee.org
       Icon name: computer-vm
         Chassis: vm ??
      Machine ID: 4748448370474b72a05bc780ede57860
         Boot ID: de3da80744f044728475c9c7388a2f1c
  Virtualization: vmware
Operating System: Red Hat Enterprise Linux 9.1 (Plow)
     CPE OS Name: cpe:/o:redhat:enterprise_linux:9::baseos
          Kernel: Linux 5.14.0-162.6.1.el9_1.x86_64
    Architecture: x86-64
 Hardware Vendor: VMware, Inc.
  Hardware Model: VMware Virtual Platform
bash
# lvs主机网卡配置
[root@lvs ~]# cat /etc/NetworkManager/system-connections/eth0.nmconnection
[connection]
id=eth0
type=ethernet
interface-name=eth0

[ipv4]
address1=172.25.254.100/24,172.25.254.2
method=manual
dns=114.114.114.114;
[root@lvs ~]# cat /etc/NetworkManager/system-connections/eth1.nmconnection
[connection]
id=eth1
type=ethernet
interface-name=eth1

[ipv4]
address1=192.168.0.100/24
method=manual


webserver1网卡配置,配置网关
[root@webserver1 ~]# cat /etc/NetworkManager/system-connections/eth0.nmconnection
[connection]
id=eth0
type=ethernet
interface-name=eth0

[ipv4]
address1=192.168.0.10/24,192.168.0.100
method=manual
dns=114.114.114.114;

webserver2网卡配置,配置网关
[root@webserver2 ~]# cat /etc/NetworkManager/system-connections/eth0.nmconnection
[connection]
id=eth0
type=ethernet
interface-name=eth0

[ipv4]
address1=192.168.0.20/24,192.168.0.100
method=manual
dns=114.114.114.114;
1.给webserver1,webserver2服务器安装httpd
bash
[root@webserver1 ~]# yum install httpd -y
[root@webserver1 ~]# echo webserver1 - 192.168.0.10 > /var/www/html/index.html
[root@webserver1 ~]# systemctl enable --now httpd
Created symlink /etc/systemd/system/multi-user.target.wants/httpd.service → /usr/lib/systemd/system/httpd.service.

[root@webserver2 ~]# yum install httpd -y
[root@webserver2 ~]# echo webserver1 - 192.168.0.20 > /var/www/html/index.html
[root@webserver2 ~]# systemctl enable --now httpd
Created symlink /etc/systemd/system/multi-user.target.wants/httpd.service → /usr/lib/systemd/system/httpd.service.
2.在LVS服务器中检测
bash
[root@lvs ~]# ipvsadm -A -t ^C
[root@lvs ~]# curl 192.168.0.10
webserver1 - 192.168.0.10
[root@lvs ~]# curl 192.168.0.20
webserver2 - 192.168.0.20
3.在LVS服务器中安装LVS
bash
[root@lvs ~]# yum install ipvsadm.x86_64 -y4.新建LVS集群
bash
[root@lvs ~]# ipvsadm -A -t 172.25.254.100:80 -s rr
[root@lvs ~]# ipvsadm -Ln
IP Virtual Server version 1.2.1 (size=4096)
Prot LocalAddress:Port Scheduler Flags
  -> RemoteAddress:Port           Forward Weight ActiveConn InActConn
TCP  172.25.254.100:80 rr
5.添加Real Server服务器节点
bash
-a     添加真实服务器
-d     删除真实服务器
-r     指定真实服务器(Real Server)的地址
-m     使用NAT模式;另外 -g 对应DR模式、-i 对应TUN模式
-w     为节点服务器设置权重,默认为1,只有设置加权轮询或者加权最小连接才生效


#将两个web服务器加入LVS集群,-m表示为NAT模式

[root@lvs ~]# ipvsadm -a -t 172.25.254.100:80 -r 192.168.0.10:80 -m
[root@lvs ~]# ipvsadm -a -t 172.25.254.100:80 -r 192.168.0.20:80 -m
[root@lvs ~]# ipvsadm -Ln
IP Virtual Server version 1.2.1 (size=4096)
Prot LocalAddress:Port Scheduler Flags
  -> RemoteAddress:Port           Forward Weight ActiveConn InActConn
TCP  172.25.254.100:80 rr
  -> 192.168.0.10:80              Masq    1      0          0
  -> 192.168.0.20:80              Masq    1      0          0
[root@lvs ~]#


#补充:如果想删除节点,将-a换成-d即可
6.开启路由转发模式
bash
因为LVS的工作原理是路由转发,所以LVS调度服务器需要开启路由转发

[root@lvs ~]# sysctl -a | grep ip_forward
net.ipv4.ip_forward = 0
net.ipv4.ip_forward_update_priority = 1
net.ipv4.ip_forward_use_pmtu = 0


[root@lvs ~]# cat /etc/sysctl.conf
# 定位最后一行添加
net.ipv4.ip_forward = 1


# 生效
[root@lvs ~]# sysctl -p
net.ipv4.ip_forward = 1
7.效果测试
bash
[root@lvs ~]# curl 172.25.254.100
web2 - 192.168.0.20
[root@lvs ~]# curl 172.25.254.100
web1 - 192.168.0.10
[root@lvs ~]#
[root@lvs ~]# for i in {1..10}
> do
> curl 172.25.254.100
> done
web2 - 192.168.0.20
web1 - 192.168.0.10
web2 - 192.168.0.20
web1 - 192.168.0.10
web2 - 192.168.0.20
web1 - 192.168.0.10
web2 - 192.168.0.20
web1 - 192.168.0.10
web2 - 192.168.0.20
web1 - 192.168.0.10
如上可以看到轮询负载均衡效果!!!