1.Linux系统搭建ES环境:
1.1.单机版:
a.安装ES-7.8版本
-
1.下载ES:
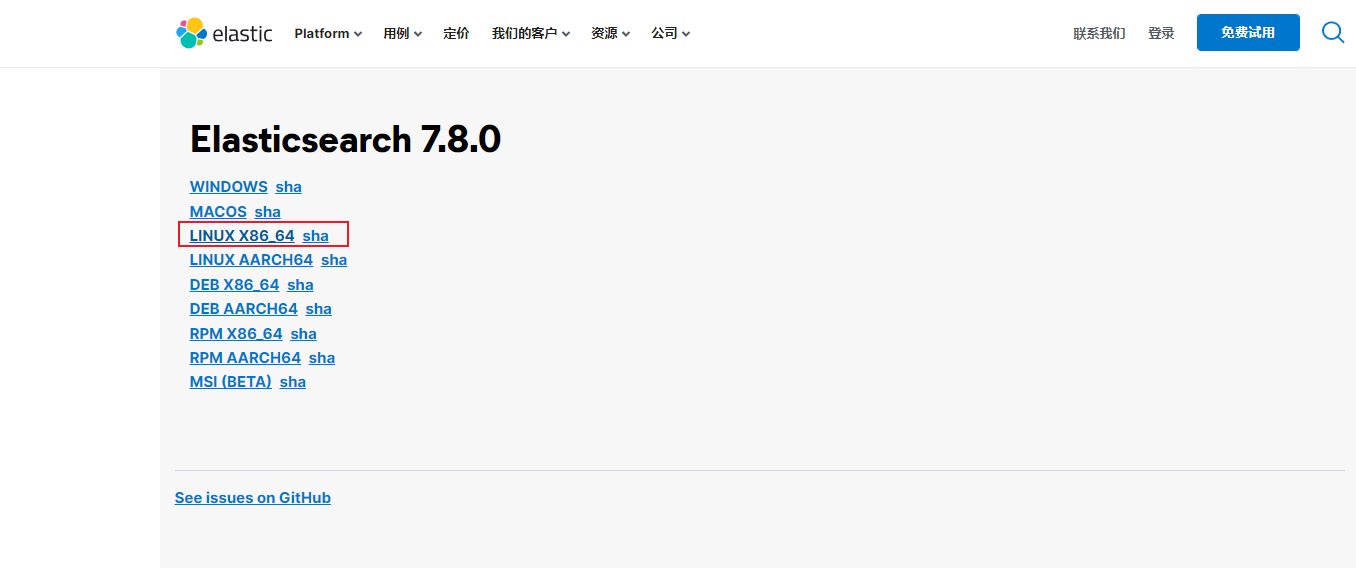
-
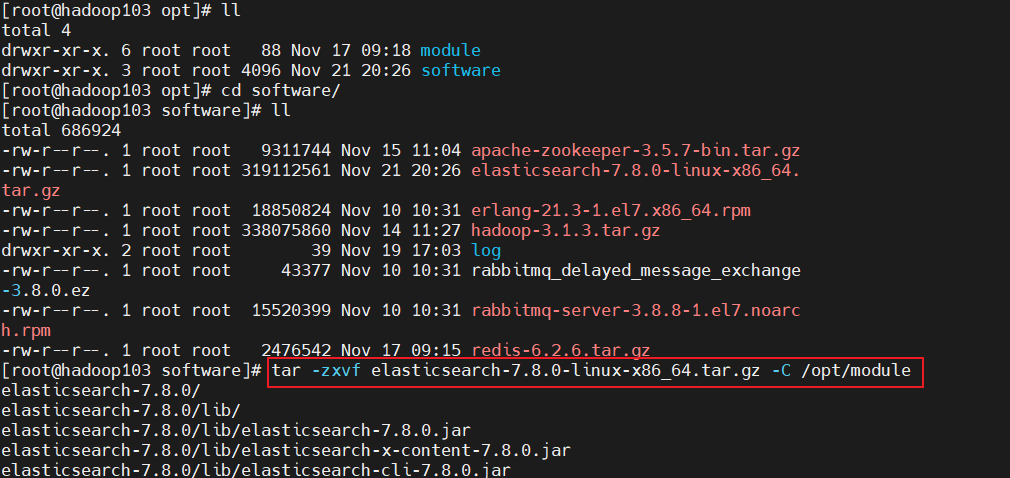
2.上传与解压:将下载的tar包上传到服务器software目录下,然后解压缩:
tar -zxvf elasticsearch-7.8.0-linux-x86_64.tar.gz -C /opt/module
-
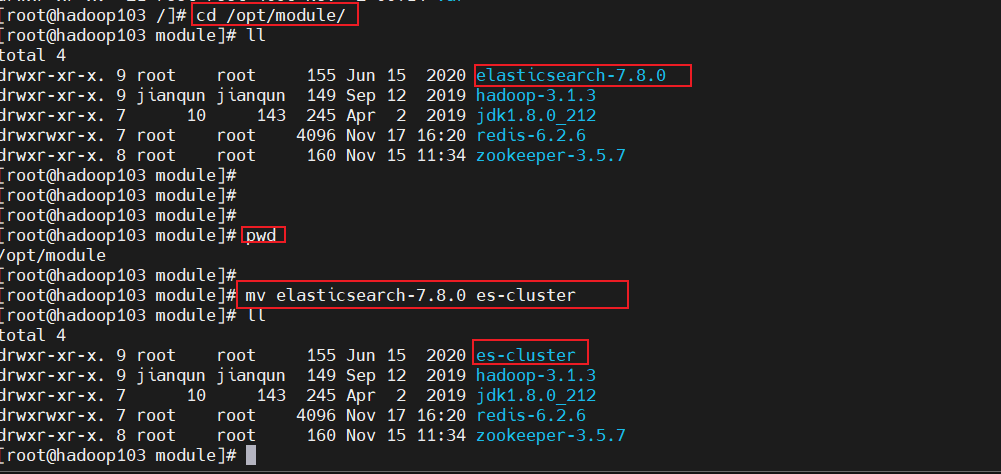
3.将文件名更改成es-cluster:
mv elasticsearch-7.8.0 es-cluster:
-
4.将软件分发到另外两台服务器上:

-
5.创建用户: 因为安全问题,
Elasticsearch 不允许 root 用户直接运行,所以要在每个节点中创建新用户,在 root 用户中创建新用户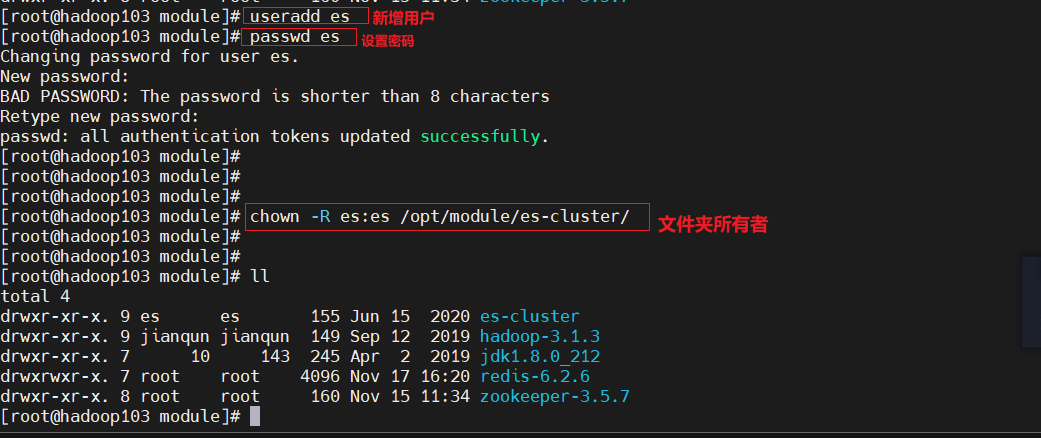
-
6.修改配置文件:修改
/opt/module/es/config/elasticsearch.yml文件,分发文件:yml# 加入如下配置 cluster.name: elasticsearch node.name: node-1 network.host: 0.0.0.0 http.port: 9200 cluster.initial_master_nodes: ["node-1"] -
7.修改
/etc/security/limits.confyml# 在文件末尾中增加下面内容 # 每个进程可以打开的文件数的限制 es soft nofile 65536 es hard nofile 65536 -
8.修改
/etc/security/limits.d/20-nproc.confyml# 在文件末尾中增加下面内容 # 每个进程可以打开的文件数的限制 es soft nofile 65536 es hard nofile 65536 # 操作系统级别对每个用户创建的进程数的限制 * hard nproc 4096 # 注:* 带表 Linux 所有用户名称 -
9.修改
/etc/sysctl.confyml# 在文件中增加下面内容 # 一个进程可以拥有的 VMA(虚拟内存区域)的数量,默认值为 65536 vm.max_map_count=655360 -
10.重新加载:
sysctl -p -
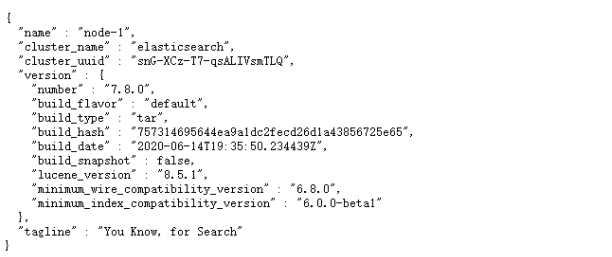
11.启动软件:
shellcd /opt/module/es/ #前台启动 bin/elasticsearch #后台启动 bin/elasticsearch -d -
12.测试软件:浏览器中输入地址:
http://192.168.148.3:9200/
b.安装ES6.8.0版本安装
- 1.下载ES6.8.0版本安装并上传到服务器上jdk
- 2.JDK安装:
shell
# 1.在官方网站下载ES
- wget http://artifacts.elastic.co/downloads/elasticsearch/elasticsearch-6.8.0.tar.gz

# 2.安装JDK(必须JDK1.8+)
- rpm -ivh jdk-8u181-linux-x64.rpm
/*注意:默认安装位置 /usr/java/jdk1.8.0_171-amd64*/

# 3.配置环境变量
- vim /etc/profile
	在文件末尾加入:
	export JAVA_HOME=/usr/java/jdk1.8.0_171-amd64
	export PATH=$PATH:$JAVA_HOME/bin

# 4.重载系统配置
- source /etc/profile- 3.安装ES服务:
shell
# 1. ES不能以root用户身份启动必须创建普通用户
- a.在linux系统中创建新的组
		groupadd es
- b.创建新的用户es并将es用户放入es组中
		useradd es -g es
- c.修改es用户密码
		passwd es
# 2.使用普通用户登录并上传安装包

 3.解压缩elasticsearch
- tar -zxvf elasticsearch-6.4.1.tar.gz
# 4.进入ES安装目录查看目录结构
- bin                         可执行的二进制文件的目录
- config                    	配置文件的目录
- lib                         运行时依赖的库
- logs         								运行时日志文件
- modules											运行时依赖的模块
- plugins                   	可以安装官方以及第三方插件
# 5.进入bin目录中启动ES服务
- ./elasticsearch
- 出现下图红色日志说明启动成功:

# 6.执行如下命令测试客户端操作
- curl http://localhost:9200- 3.开启远程连接权限
- 注意:ES服务默认启动是受保护的,只允许本地客户端连接,如果想要通过远程客户端访问,必须开启远程连接
shell
# 1.开启ES远程访问
- vim elasticsearch.yml 将原来network修改为以下配置:
	network.host: 0.0.0.0
c.Dcoke安装ES
- 1.我们以安装Elasticsearch-7.4.2版本为例,下载镜像文件:注意版本要对应
shell
docker pull elasticsearch:7.4.2  存储和检索数据
docker pull kibana:7.4.2 可视化检索数据- 2.创建elasticsearch实例:
shell
mkdir -p /mydata/elasticsearch/config
mkdir -p /mydata/elasticsearch/data
echo "http.host: 0.0.0.0" >> /mydata/elasticsearch/config/elasticsearch.yml

chmod -R 777 /mydata/elasticsearch/ 保证权限

docker run --name elasticsearch -p 9200:9200 -p 9300:9300 \
-e "discovery.type=single-node" \
-e ES_JAVA_OPTS="-Xms64m -Xmx512m" \
-v /mydata/elasticsearch/config/elasticsearch.yml:/usr/share/elasticsearch/config/elasticsearch.yml \
-v /mydata/elasticsearch/data:/usr/share/elasticsearch/data \
-v /mydata/elasticsearch/plugins:/usr/share/elasticsearch/plugins \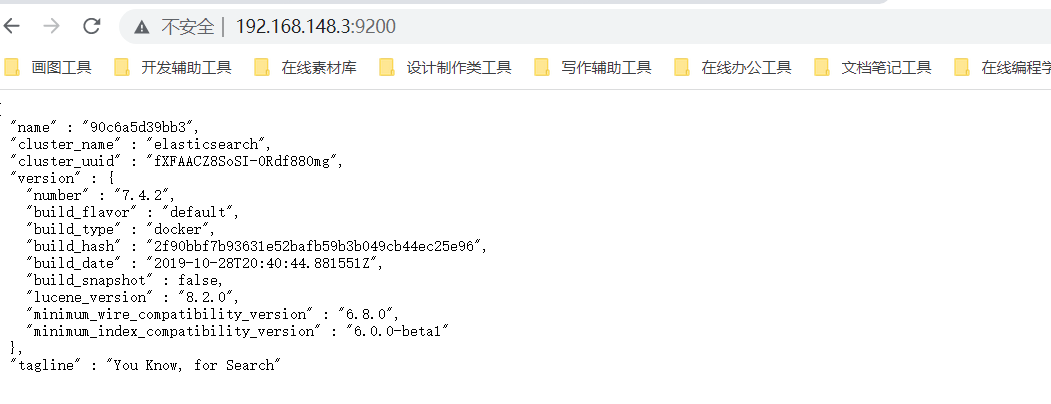
-d elasticsearch:7.4.2- 4.测试:
1.2.集群版:
- 1.Elasticsearch集群规划:
| 关系型数据库(比如Mysql) | 非关系型数据库(Elasticsearch) | 非关系型数据库(Elasticsearch) |
|---|---|---|
| centos7 | hadoop103 | 192.168.148.3 |
| centos7 | hadoop104 | 192.168.148.4 |
| centos7 | hadoop105 | 192.168.148.5 |
a.版本ES-6.8.0集群:
b.版本ES-7.8.0集群:
- 1.解压压缩包:
tar -zxvf elasticsearch-7.8.0-linux-x86_64.tar.gz -C /opt/module
- 2.将文件名更改成es-cluster:
mv elasticsearch-7.8.0 es-cluster:
- 3.创建用户:Elasticsearch 因为安全问题,不允许 root 用户直接运行,所以要在每个节点中创建新用户,在 root 用户中创建新用户
shell
useradd es #新增 es 用户
passwd es #为 es 用户设置密码
userdel -r es #如果错了,可以删除再加
chown -R es:es /opt/module/es-cluster #文件夹所有者- 4.将软件分发到另外两台服务器上:
- 5.配置目录:安装完毕后会生成很多文件,包括配置文件日志文件等等,下面几个是
最主要的配置文件路径/opt/module/es-cluster/# elasticsearch 安装目录/opt/module/es-cluster/config/elasticsearch.yml#elasticsearch的配置文件/opt/module/es-cluster/config/jvm.options#JVM相关的配置,内存大小等等/data/elk1/data# 数据存放路径/data/elk1/logs# 日志存放路径
- 6.创建用于存放数据与日志的目录:数据文件会随着系统的运行飞速增长,所以默认的日志文件与数据文件的路径不能满足我们的需求,需要手动创建日志与数据文件路径
shell
mkdir -p /data/elk1/data
mkdir -p /data/elk1/logs- 7.集群配置:
vim /opt/module/es-cluster/config/elasticsearch.yml(yml文件有严格的语法要求,在配置的时候,一定要注意语法,这里容易出现错误)
yml
# 加入如下配置
# #集群名称
 cluster.name: cluster-es
# 节点名称,每个节点的名称不能重复
 node.name: node-1
#ip 地址,每个节点的地址不能重复
 network.host: hadoop103
#是不是有资格主节点
 node.master: true
 node.data: true
 http.port: 9200
## head 插件需要这打开这两个配置
 http.cors.allow-origin: "*"
 http.cors.enabled: true
 http.max_content_length: 200mb
##es7.x 之后新增的配置,初始化一个新的集群时需要此配置来选举 master
 cluster.initial_master_nodes: ["node-1"]
##es7.x 之后新增的配置,节点发现
 discovery.seed_hosts: ["192.168.148.3:9300","192.168.148.4:9300","192.168.148.5:9300"]
 gateway.recover_after_nodes: 2
 network.tcp.keep_alive: true
 network.tcp.no_delay: true
 transport.tcp.compress: true
##集群内同时启动的数据任务个数,默认是 2 个
 cluster.routing.allocation.cluster_concurrent_rebalance: 16
##添加或删除节点及负载均衡时并发恢复的线程个数,默认 4 个
 cluster.routing.allocation.node_concurrent_recoveries: 16
##初始化数据恢复时,并发恢复线程的个数,默认 4 个
 cluster.routing.allocation.node_initial_primaries_recoveries: 16
yml
# 加入如下配置
# #集群名称
 cluster.name: cluster-es
# 节点名称,每个节点的名称不能重复
 node.name: node-2
#ip 地址,每个节点的地址不能重复
 network.host: hadoop104
#是不是有资格主节点
 node.master: true
 node.data: true
 http.port: 9200
## head 插件需要这打开这两个配置
 http.cors.allow-origin: "*"
 http.cors.enabled: true
 http.max_content_length: 200mb
##es7.x 之后新增的配置,初始化一个新的集群时需要此配置来选举 master
 cluster.initial_master_nodes: ["node-1"]
##es7.x 之后新增的配置,节点发现
 discovery.seed_hosts: ["192.168.148.3:9300","192.168.148.4:9300","192.168.148.5:9300"]
 gateway.recover_after_nodes: 2
 network.tcp.keep_alive: true
 network.tcp.no_delay: true
 transport.tcp.compress: true
##集群内同时启动的数据任务个数,默认是 2 个
 cluster.routing.allocation.cluster_concurrent_rebalance: 16
##添加或删除节点及负载均衡时并发恢复的线程个数,默认 4 个
 cluster.routing.allocation.node_concurrent_recoveries: 16
##初始化数据恢复时,并发恢复线程的个数,默认 4 个
 cluster.routing.allocation.node_initial_primaries_recoveries: 16
yml
# 加入如下配置
# #集群名称
 cluster.name: cluster-es
# 节点名称,每个节点的名称不能重复
 node.name: node-3
#ip 地址,每个节点的地址不能重复
 network.host: hadoop105
#是不是有资格主节点
 node.master: true
 node.data: true
 http.port: 9200
## head 插件需要这打开这两个配置
 http.cors.allow-origin: "*"
 http.cors.enabled: true
 http.max_content_length: 200mb
##es7.x 之后新增的配置,初始化一个新的集群时需要此配置来选举 master
 cluster.initial_master_nodes: ["node-1"]
##es7.x 之后新增的配置,节点发现
 discovery.seed_hosts: ["192.168.148.3:9300","192.168.148.4:9300","192.168.148.5:9300"]
 gateway.recover_after_nodes: 2
 network.tcp.keep_alive: true
 network.tcp.no_delay: true
 transport.tcp.compress: true
##集群内同时启动的数据任务个数,默认是 2 个
 cluster.routing.allocation.cluster_concurrent_rebalance: 16
##添加或删除节点及负载均衡时并发恢复的线程个数,默认 4 个
 cluster.routing.allocation.node_concurrent_recoveries: 16
##初始化数据恢复时,并发恢复线程的个数,默认 4 个
cluster.routing.allocation.node_initial_primaries_recoveries: 16- 三台机器不一样的
elasticsearch.yml配置点如下
shell
node.name: node-1      #192.168.148.3
node.name: node-2      #192.168.148.4
node.name: node-3      #192.168.148.5
network.host: 192.168.148.3	#192.168.148.3
network.host: 192.168.148.4	#192.168.148.4
network.host: 192.168.148.5 #192.168.148.5- 8.JVM配置:
- 由于Elasticsearch是Java开发的,所以可以通过
/etc/elasticsearch/jvm.options配置文件来设定JVM的相关设定。如果没有特殊需求按默认即可。 - 但是其中还是有两项最重要的-Xmx1g与-Xms1gJVM的最大最小内存。如果太小会导致Elasticsearch刚刚启动就立刻停止。太大会拖慢系统本身。
- 由于Elasticsearch是Java开发的,所以可以通过
shell
 vim /opt/module/es-cluster/config/jvm.options
-Xms1g   修改为 ===>  -Xms2g
-Xmx1g 修改为 ===> -Xmx2g- 9.修改
/etc/sysctl.conf:添加如下配置后并重新加载:sysctl -p:
shell
vm.max_map_count=655360- 10.切换用户es后,切到es的安装目录后,启动服务:
./bin/elasticsearch
c.使用Docker部署ES集群版:
3.Kinbana环境搭建
- 1.创建Kinbana实例:
shell
docker run --name kibana -e ELASTICSEARCH_HOSTS=http://192.168.148.3:9200 -p 5601:5601 \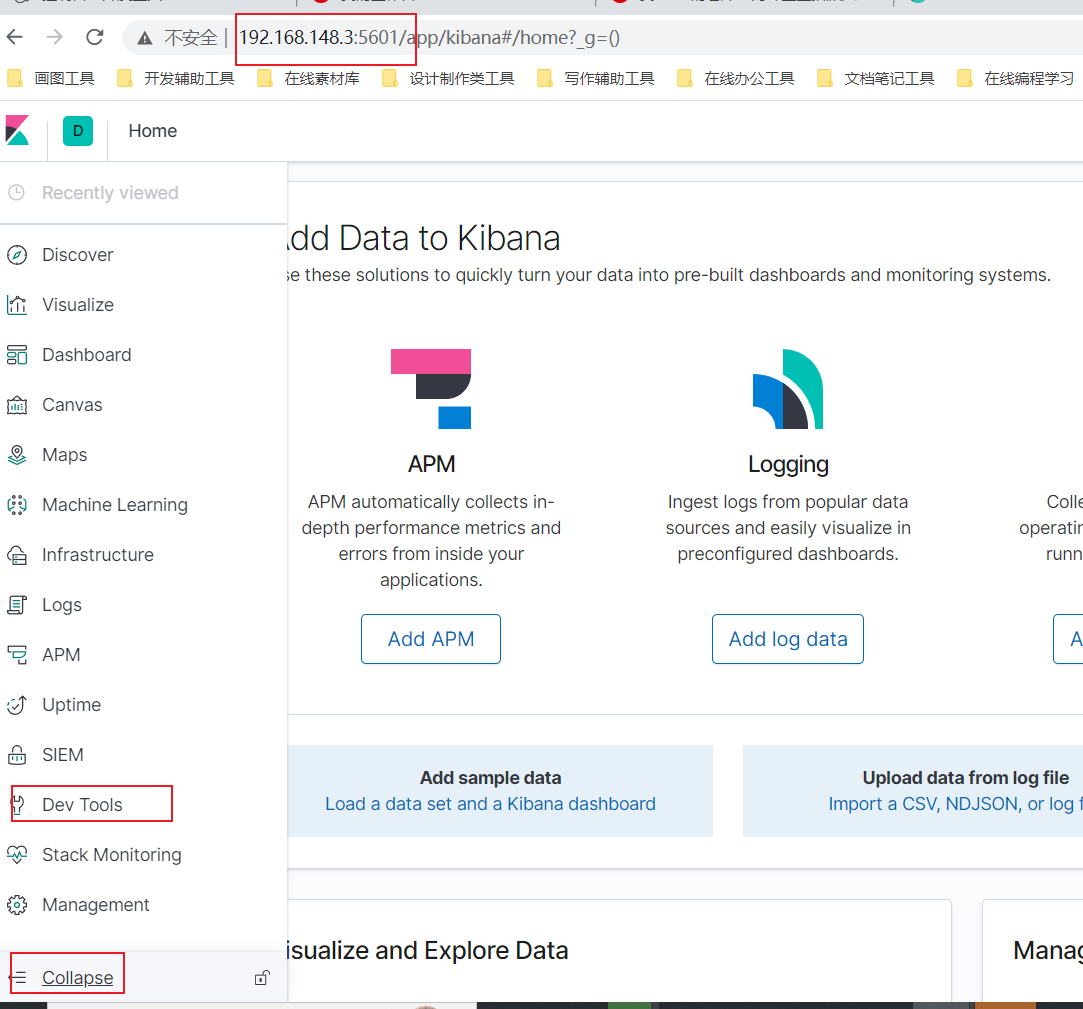
-d kibana:6.8.1- 5.访问测试:192.168.148.3:5601