HCIA云计算-02-网络基础实验
实验内容:
- 交换机视图介绍
- 交换机基础配置
- VLAN原理实验
- 路由原理实验
vlan 介绍
VLAN(Virtual Local Area Network)即虚拟局域网,是将一个物理的 LAN 在逻辑上划分成多个广播域的通信技术。每个 VLAN 是一个广播域,VLAN 内的主机间通信就和在一个 LAN 内一样,而 VLAN 间则不能直接互通,这样,广播报文就被限制在一个 VLAN 内。
vlan 作用
交换机的作用是隔离冲突域,但不能隔离广播域。VLAN 将一个广播域划分成多个,减少了数据帧泛洪,减少了网络资源的浪费,提高了通信效率。
vlan 术语
-
VID(VLAN ID):以太网数据帧中添加了 VLAN 标签(VLAN Tag or 802.1Q Tag),VID 是 VLAN 标签中的一个字段,该字段标识了该数据帧所属的VLAN,数据帧只能在其所属的 VLAN 内进行传输。有效范围:1-4094。
-
Untagged Frame(无标记帧):原始的、未加入4字节VLAN标签的帧。
-
Tagged Frame(有标记帧):加入了4字节的VLAN标签的数据帧;
-
PVID(port default vlan id, 缺省VLAN)表示接口所属的 vlan;每个接口都有一个 pivd
- Access接口只属于1个VLAN,它的缺省VLAN就是它所在的VLAN。
- Hybrid接口和Trunk接口属于多个VLAN,但是缺省VLAN只有1个,所以需要设置缺省VLAN。
- 默认情况下,缺省VLAN :1
-
VLANIF 用于跨 VLAN 通信。
vlan 链路类型
- 接入链路(Access Link):连接不能或不需要识别VLAN Tag的终端设备。用户主机和设备之间的链路都是接入链路,接入链路上通过的帧为Untagged帧。
- 干道链路(Trunk Link):连接设备和设备的链路。干道链路上通过的帧为Tagged帧,所有数据帧必须都打上VLAN Tag。
vlan 三种接口类型
Access 接口
工作场景:Access 接口一般用于和不能识别 Tag 的用户终端(如用户主机、服务器等)相连,或者不需要区分不同 VLAN 成员时使用。
特点:
- 仅允许 VLAN ID 与接口 PVID 相同的数据帧通过。
- 接收:
- Untagged 帧:接收该帧,并打上该接口 PVID 的 Tag。
- Tagged 帧:如果该帧 VID 与该接口 PVID 相同,则接收该帧;如果不同,则丢弃。
- 发送:比较该帧 VID 与该接口 PVID 是否相同
- 相同则将这个 Tagged 帧的 Tag 进行剥离再发送。
- 不同则丢弃。
Trunk 接口
工作场景:Trunk 接口一般用于连接交换机、路由器、AP 以及可同时收发 Tagged 帧和 Untagged 帧的语音终端。
特点:
- 仅允许 VLAN ID 在允许通过列表的数据帧通过。
- 可以允许多个 VLAN 的帧带 Tag 通过,但只允许一个 VLAN 的帧从该类接口上发出时不带Tag。
- 接收:
- Untagged 帧:打上 PVID,如果 PVID 在该接口允许通过的 VLAN 列表,则转发,否则丢弃。
- Tagged 帧:判断 VID 是否在允许的 VLAN 列表,是则转发,否则丢弃。
- 发送:
- 帧的 VID 不在该接口允许通过的 VLAN 列表,直接丢弃。
- 帧的 在该接口允许通过的 VLAN 列表,则比较 VID 与 PVID,相同则对该 Tagged 帧的 Tag 剥离后发送;不同则直接发送。
Hybrid 接口
工作场景:Hybrid 接口姐可以用于连接不能识别 Tag 的用户终端(如用户主机、服务器等),也可用于连接交换机、路由器以及可同时收发 Tagged 帧和 Untagged 帧的语音终端、AP。
特点:
- 仅允许 VLAN ID 在允许通过列表的数据帧通过。
- 可以允许多个 VLAN 的帧带 Tag 通过,且允许该类接口发出的帧根据需要配置某些 VLAN 的帧是否带Tag。
- 接收:
- Untagged 帧:打上 PVID,然后查看 PVID 是否在 Untagged 或 Tagged VLAN ID 列表中,在则转发,不在则丢弃。
- Tagged 帧:VID 是否在 Untagged 或 Tagged VLAN ID 列表中,在则转发,不在则丢弃。
- 发送:
- 不在 Untagged 或 Tagged VLAN ID 列表中,丢弃。
- 在 Untagged VLAN ID 列表中,剥离 Tag 转发。
- 在 Tagged VLAN ID 列表中, 直接转发。
交换机视图介绍
实验介绍
-
学习 ensp 的使用
-
介绍交换机的基本操作试图
实验步骤
1. ensp 使用
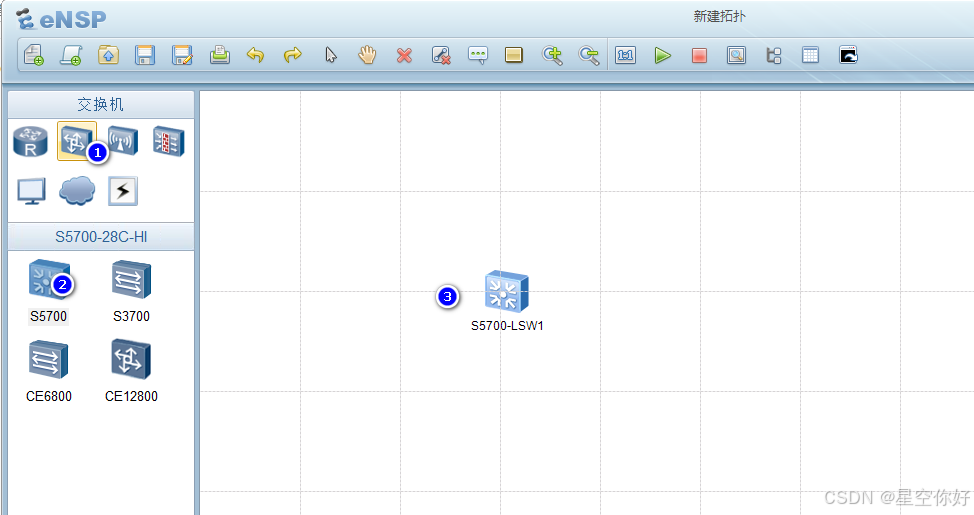
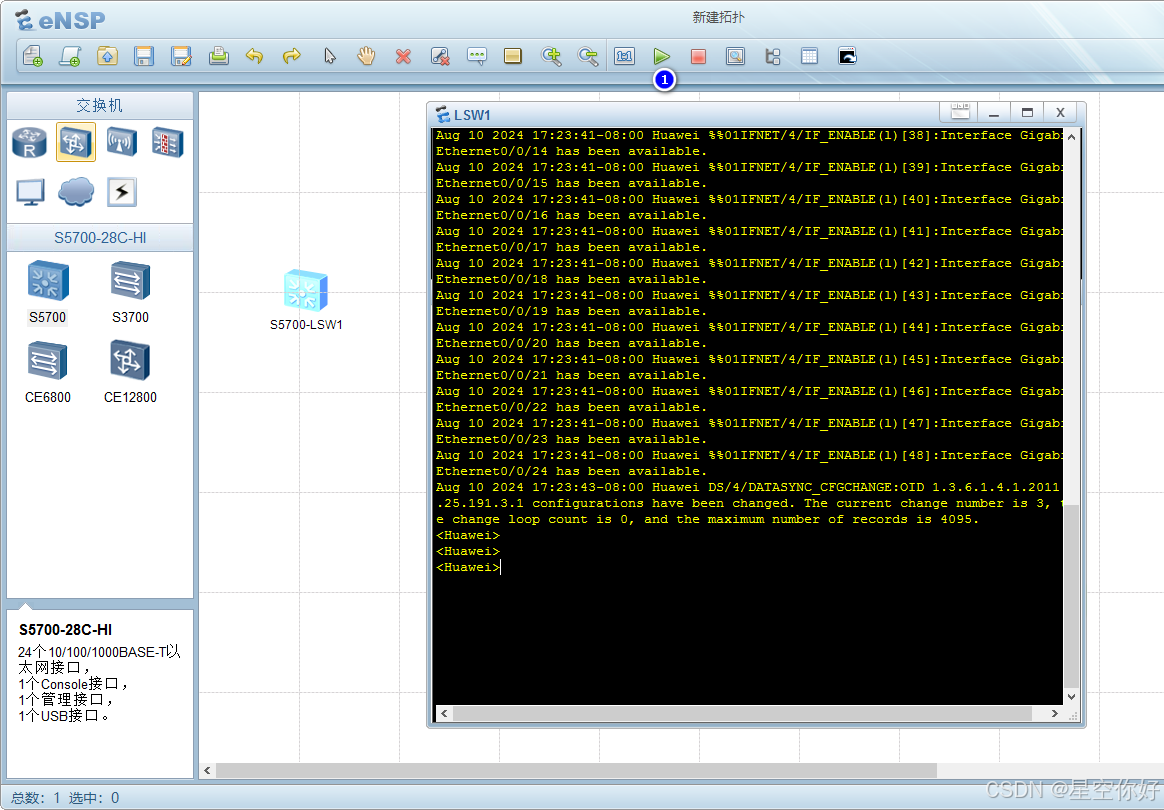
打开 ensp 软件,选择交换机,然后鼠标拖入画布,选中交换机图标,点击工具栏中的绿色启动图标按钮,启动交换机(是虚拟机);双击画布中的交换机,打开命令行,等待启动成功。
启动完成画面:
2. 用户视图
打开命令行,自动进入用户视图:"<>"表示用户视图。
用户视图下,基本命令:
bash
# 查看设备版本信息
<Huawei>display version
Huawei Versatile Routing Platform Software
VRP (R) software, Version 5.110 (S5700 V200R001C00)
Copyright (c) 2000-2011 HUAWEI TECH CO., LTD

Quidway S5700-28C-HI Routing Switch uptime is 0 week, 0 day, 0 hour, 4 minutes

# 查看设备的部件类型及状态信息
<Huawei>display device
S5700-28C-HI's Device status:
Slot  Sub Type         Online    Power      Register       Status     Role
- - - - - - - - - - - - - - - - - - - - - - - - - - - - - - - - - - - - - - -
0     -   5728C        Present   PowerOn    Registered     Normal     Master
<Huawei>

# 查看接口信息
<Huawei>display interface brief
PHY: Physical
*down: administratively down
(l): loopback
(s): spoofing
(b): BFD down
(e): ETHOAM down
(dl): DLDP down
(d): Dampening Suppressed
InUti/OutUti: input utility/output utility
Interface                   PHY   Protocol InUti OutUti   inErrors  outErrors
GigabitEthernet0/0/1        down  down        0%     0%          0          0
GigabitEthernet0/0/2        down  down        0%     0%          0          0
GigabitEthernet0/0/3        down  down        0%     0%          0          0
...
3. 进入系统视图
bash
# 进入交换机的系统视图
<Huawei>system-view
Enter system view, return user view with Ctrl+Z.
[Huawei]
系统视图下修改系统名称:
bash
<Huawei>system-view
Enter system view, return user view with Ctrl+Z.
[Huawei]
关闭命令提示信息:
bash
[SW1]und
[SW1]undo inf
[SW1]undo info-center en
[SW1]undo info-center enable
Info: Information center is disabled.
[SW1]
上面展示的命令自动补全功能,输入前面字母,按tab会自动补全信息。
4. 进入接口视图
bash
[SW1]int g0/0/1
[SW1-GigabitEthernet0/0/1]
5. 退出接口视图、系统视图
两种方式:
quit 会从接口视图退到系统视图
bash
[SW1-GigabitEthernet0/0/1]quit
[SW1]
return 会从接口视图或系统视图直接退到用户视图
bash
[SW1]int g0/0/1
[SW1-GigabitEthernet0/0/1]return
<SW1>
交换机基础配置
帮助使用
"?"用于查看当前可以命令:
查看 interface 命令后的可用参数:
bash
[SW1]interface ?
  Eth-Trunk        Ethernet-Trunk interface
  GigabitEthernet  GigabitEthernet interface
  LoopBack         LoopBack interface
  MEth             MEth interface
  NULL             NULL interface
  Tunnel           Tunnel interface
  Vlanif           Vlan interface

[SW1]interface
display 命令
在用户视图或系统视图下,可以查看接口信息:
bash
[SW1]display interface brief
PHY: Physical
*down: administratively down
(l): loopback
(s): spoofing
(b): BFD down
(e): ETHOAM down
(dl): DLDP down
(d): Dampening Suppressed
InUti/OutUti: input utility/output utility
Interface                   PHY   Protocol InUti OutUti   inErrors  outErrors
GigabitEthernet0/0/1        down  down        0%     0%          0          0
...
在用户视图或系统视图下,路由表信息:
bash
[SW1]display ip routing-table 在用户视图或系统视图下,查看当前设备配置:
bash
<SW1>display current-configuration 在接口视图下查看当前视图配置:
bash
[SW1]int g0/0/1
[SW1-GigabitEthernet0/0/1]dis this
#
interface GigabitEthernet0/0/1
#
return
[SW1-GigabitEthernet0/0/1]
undo 命令的使用
以配置接口vlan类型为例,先设置为access 配置,然后使用 undo 撤销配置:

VLAN 原理实验
实验介绍
通过 VLAN 配置,实现相同 VLAN 的用户通信及不同 VLAN 的用户隔离
实验目的
- 理解 VLAN 的基本原理
- 理解 VLAN 的链路类型
- 掌握 VLAN 不同端口类型的配置
- 理解不同端口类型的作用
实验规划
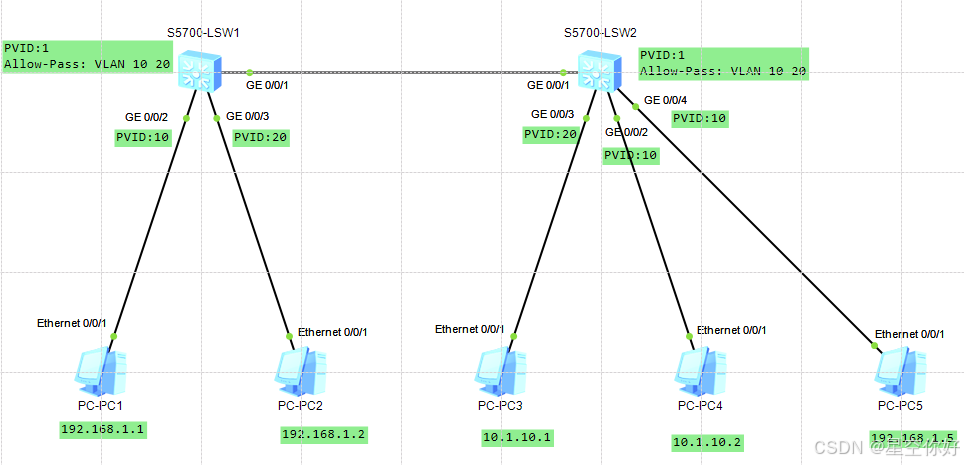
- SW1 和 SW2 是接入交换机,PC1-PC5分别作为用户接入。在交换机中创建 VLAN 10、VLAN 20 分别PC。
- 接入交换机之间端口采用 Trunk 类型,并允许对应的 VLAN 通过。交换机与PC采用 Access 类型的端口。
- 配置完成后,实现相同 VLAN 用户互访以及不同 VLAN 用户的二层隔离。
实验步骤
1. 拓扑准备
在 ensp 中按照上图布置设备和拓扑。
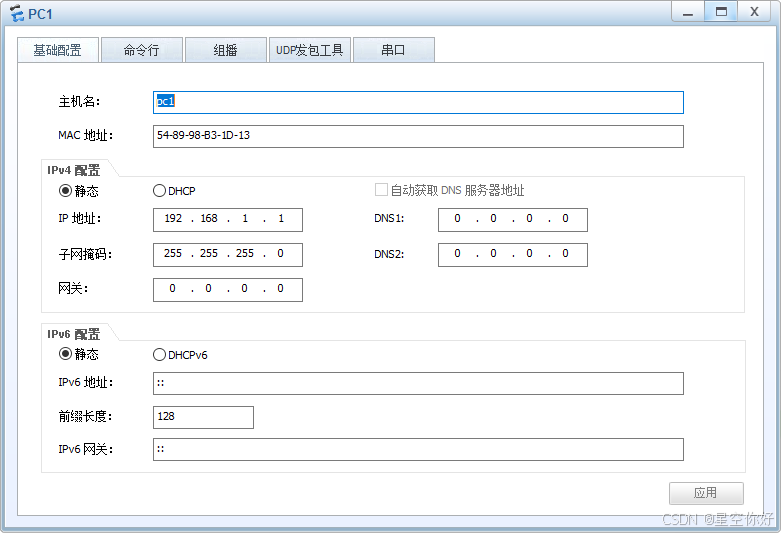
2. 配置 PC ip 地址
IP地址在上面拓扑图上已经标记。配置完成后,开启所有设备。
3. 配置交换机
交换机SW1配置:
- 进入系统视图,修改系统名称
bash
<Huawei>system-view
Enter system view, return user view with Ctrl+Z.
[Huawei]undo info-center enable
Info: Information center is disabled.
[Huawei]sysname SW1- 创建 VLAN
bash
[SW1]vlan batch 10 20- 按照拓扑设计,配置 g0/0/2 和 g0/0/3 接口为 Access 类型,并配置 pvid
bash
[SW1]int g0/0/2
[SW1-GigabitEthernet0/0/2]port link-type access
[SW1-GigabitEthernet0/0/2]port default vlan 10
[SW1-GigabitEthernet0/0/2]quit
[SW1]int g0/0/3
[SW1-GigabitEthernet0/0/3]port link-type access
[SW1-GigabitEthernet0/0/3]port default vlan 20
[SW1-GigabitEthernet0/0/3]quit- 配置 g/0/0/1 接口为 trunk 类型,放行 VLAN 10 和 VLAN 20
bash
[SW1]int g0/0/1
[SW1-GigabitEthernet0/0/1]port link-type trunk
[SW1-GigabitEthernet0/0/1]port trunk allow-pass vlan 10 20- 保存配置
bash
[SW1-GigabitEthernet0/0/1]return
<SW1> save
交换机SW2配置:
-
参照上面设置,修改系统名称,创建vlan
-
配置 access 接口
-
配置 trunk 接口
配置完成后,查看配置结果:
bash
<SW2>display current-configuration interface
#
interface Vlanif1
#
interface MEth0/0/1
#
interface GigabitEthernet0/0/1
 port link-type trunk
 port trunk allow-pass vlan 10 20
#
interface GigabitEthernet0/0/2
 port link-type access
 port default vlan 10
#
interface GigabitEthernet0/0/3
 port link-type access
 port default vlan 20
#
interface GigabitEthernet0/0/4
 port link-type access
 port default vlan 10
#
interface GigabitEthernet0/0/5
#
测试
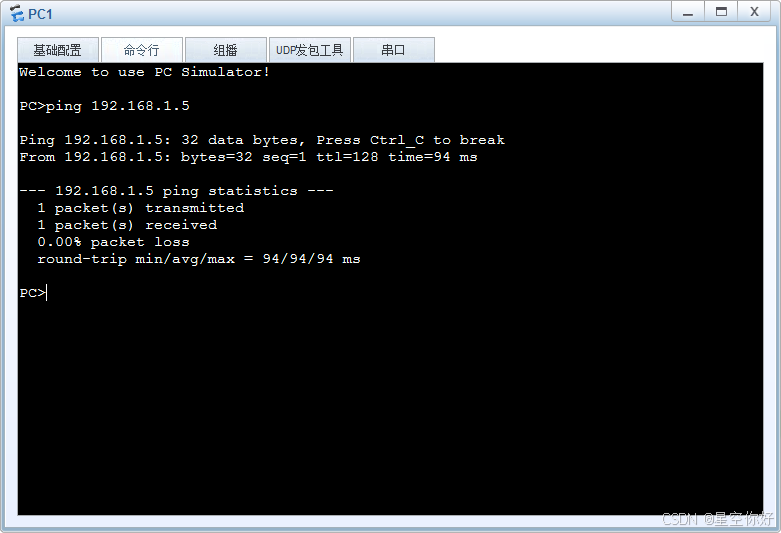
测试 VLAN 10 连通性:PC1 和 PC5 在同一网段,且属于相同 VLAN,可以相互通信
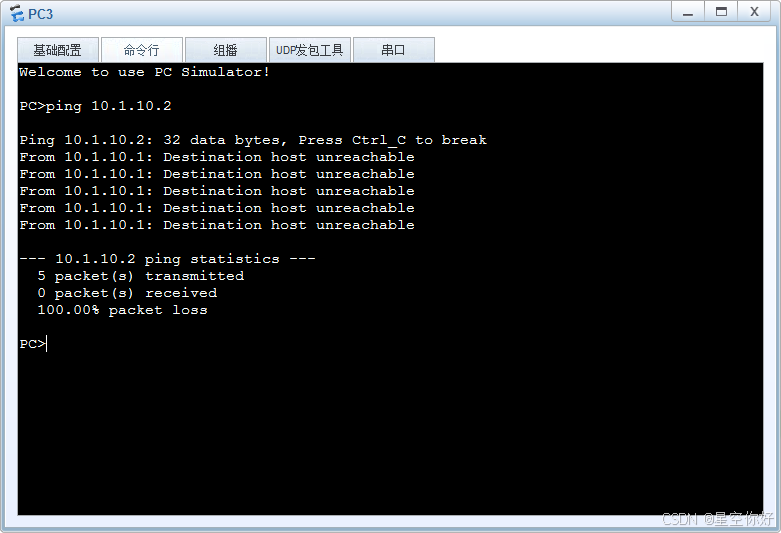
PC3 和 PC4 属于相同网段,但不属于相同 VLAN ,无法相互通信:
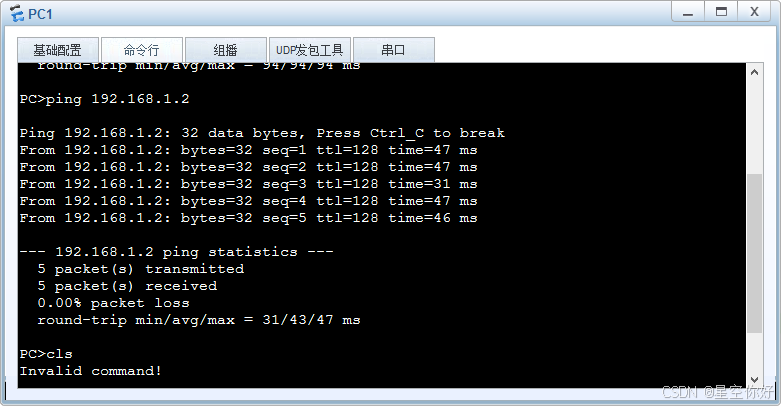
如果进入 SW1,把 g/0/3 的 pvid 改为 10,则可以实现 PC1 与 PC2 相互通信
路由原理实验
实验介绍
通过配置静态路由特性,实现不同网段跨用户通信。
实验目的
- 掌握华为三层交换机的基本使用方法
- 掌握华为交换机 VLANIF 接口配置方式
- 掌握华为交换机静态路由特性及配置方式
实验规划
-
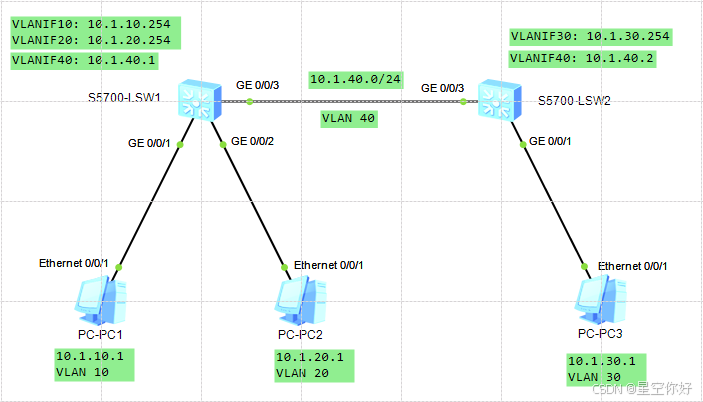
SW1 和 SW2 分别为部门接入交换机。PC1、PC2、PC3 模拟不同部门接入园区网的用户。
-
SW1 和 SW2 间互联网段为 10.1.40.0/24,PC1 所在部门网段为 10.1.10.0/24,PC2 所在部门网段为 10.1.20.0/24,PC3 所在部门网段为 10.1.30.0/24。
-
通过在 SW1 和 SW2 上分别部署静态路由的方式,实现处于不同部门的用户互相通信。
| 设备 | 接口 | 接口类型 | VLAN配置 | VLANIF接口 |
|---|---|---|---|---|
| S5700-SW1 | g0/0/1 | Access | Default VLAN: 10 | VLANIF10: 10.1.10.254/24 |
| g0/0/2 | Access | Default VLAN: 20 | VLANIF20: 10.1.20.254/24 | |
| g0/0/3 | Access | Default VLAN: 40 | VLANIF40: 10.1.40.1/24 | |
| S5700-SW1 | g0/0/1 | Access | Default VLAN: 30 | VLANIF30: 10.1.30.254/24 |
| g0/0/3 | Access | Default VLAN: 40 | VLANIF40: 10.1.40.2/24 |
静态路由规划:
-
S5700-SW1:ip route-static 10.1.30.0 24 10.1.40.2
-
S5700-SW2:ip route-static 10.1.10.0 24 10.1.40.1 、ip route-static 10.1.20.0 24 10.1.40.1
实验步骤
1. 拓扑准备
打开 ensp 软件,拖入两个 SW5700 交换机、4个PC。按照上面图片联线。
2. 配置PC IP 地址
在 PC 图标上,右键选择"设置",分别配置 IP、子网掩码、网关:

- PC1: 10.1.10.1,255.255.255.0,10.1.10.254
- PC2: 10.1.20.1,255.255.255.0,10.1.20.254
- PC3: 10.1.30.1,255.255.255.0,10.1.30.254
3. 配置交换机
配置步骤:
- 进入系统视图
- 修改交换机名称
- 批量创建 vlan
- 分别设置 #1,#2,#3 接口 vlan 为 access,并设置 pvid
- 配置 vlanif 接口
- 配置静态路由
- 查看路由表
- 保存配置
sw1交换机:
bash
# 进入系统视图
<Huawei>system-view
Enter system view, return user view with Ctrl+Z.
[Huawei]undo info-center enable
Info: Information center is disabled.
[Huawei]sysname SW1

# 批量创建 VLAN
[SW1]vlan batch 10 20 40
Info: This operation may take a few seconds. Please wait for a moment...done.

# 设置 #1 接口 access,pvid 10
[SW1]int g0/0/1
[SW1-GigabitEthernet0/0/1]port link-type access
[SW1-GigabitEthernet0/0/1]port default vlan 10

# 设置 #2 接口 access,pvid 20
[SW1-GigabitEthernet0/0/1]int g0/0/2
[SW1-GigabitEthernet0/0/2]port link-type access
[SW1-GigabitEthernet0/0/2]port default vlan 20

# 设置 #3 接口 access,pvid 40
[SW1-GigabitEthernet0/0/2]int g0/0/3
[SW1-GigabitEthernet0/0/3]port link-type access
[SW1-GigabitEthernet0/0/3]port default vlan 40
[SW1-GigabitEthernet0/0/3]quit

# 配置 Vlanif 接口
[SW1]int Vlanif 10
[SW1-Vlanif10]ip address 10.1.10.254 24
[SW1-Vlanif10]quit
[SW1]int Vlanif 20
[SW1-Vlanif20]ip address 10.1.20.254 24
[SW1-Vlanif20]quit
[SW1]int Vlanif 40
[SW1-Vlanif40]ip address 10.1.40.1 24
[SW1-Vlanif40]quit

# 查看接口当前配置信息
[SW1]display current-configuration interface
#
interface Vlanif1
#
interface Vlanif10
 ip address 10.1.10.254 255.255.255.0
#
interface Vlanif20
 ip address 10.1.20.254 255.255.255.0
#
interface Vlanif40
 ip address 10.1.40.1 255.255.255.0
#
interface MEth0/0/1
#
interface GigabitEthernet0/0/1
 port link-type access
 port default vlan 10
#
interface GigabitEthernet0/0/2
 port link-type access
 port default vlan 20
#
interface GigabitEthernet0/0/3
 port link-type access
 port default vlan 40
#
interface GigabitEthernet0/0/4
#
interface GigabitEthernet0/0/5

# 配置静态路由
[SW1]ip route-static 10.1.30.0 24 10.1.40.2

[SW1]display ip routing-table
Route Flags: R - relay, D - download to fib
------------------------------------------------------------------------------
Routing Tables: Public
         Destinations : 9        Routes : 9

Destination/Mask    Proto   Pre  Cost      Flags NextHop         Interface

      10.1.10.0/24  Direct  0    0           D   10.1.10.254     Vlanif10
    10.1.10.254/32  Direct  0    0           D   127.0.0.1       Vlanif10
      10.1.20.0/24  Direct  0    0           D   10.1.20.254     Vlanif20
    10.1.20.254/32  Direct  0    0           D   127.0.0.1       Vlanif20
      10.1.30.0/24  Static  60   0          RD   10.1.40.2       Vlanif40
      10.1.40.0/24  Direct  0    0           D   10.1.40.1       Vlanif40
      10.1.40.1/32  Direct  0    0           D   127.0.0.1       Vlanif40
      127.0.0.0/8   Direct  0    0           D   127.0.0.1       InLoopBack0
      127.0.0.1/32  Direct  0    0           D   127.0.0.1       InLoopBack0

# 保存配置
[SW1]return
<SW1>save
The current configuration will be written to the device.
Are you sure to continue?[Y/N]
Error: Please choose 'YES' or 'NO' first before pressing 'Enter'. [Y/N]:Y
Info: Please input the file name ( *.cfg, *.zip ) [vrpcfg.zip]:
Now saving the current configuration to the slot 0.
Save the configuration successfully.
sw2交换机:
bash
# 进入系统视图
<Huawei>system-view
Enter system view, return user view with Ctrl+Z.
[Huawei]undo info-center enable
Info: Information center is disabled.
[Huawei]sysname SW2

# 批量创建 VLAN
[SW2]vlan batch 30 40
Info: This operation may take a few seconds. Please wait for a moment...done.

# 设置 #1 接口 access,pvid 30
[SW2]int g0/0/1
[SW2-GigabitEthernet0/0/1]port link-type access
[SW2-GigabitEthernet0/0/1]port default vlan 30

# 设置 #3 接口 access,pvid 40
[SW2-GigabitEthernet0/0/1]int g0/0/3
[SW2-GigabitEthernet0/0/3]port link-type access
[SW2-GigabitEthernet0/0/3]port default vlan 40
[SW2-GigabitEthernet0/0/3]quit

# 配置 Vlanif 接口
[SW2]interface Vlanif 30
[SW2-Vlanif30]ip address 10.1.30.254 24
[SW2-Vlanif30]quit

[SW2]interface Vlanif 40
[SW2-Vlanif40]ip address 10.1.40.2 24
[SW2-Vlanif40]quit

# 配置静态路由
[SW2]ip route-static 10.1.10.0 24 10.1.40.1
[SW2]ip route-static 10.1.20.0 24 10.1.40.1

# 查看路由表
[SW2]display ip routing-table
Route Flags: R - relay, D - download to fib
------------------------------------------------------------------------------
Routing Tables: Public
         Destinations : 8        Routes : 8

Destination/Mask    Proto   Pre  Cost      Flags NextHop         Interface

      10.1.10.0/24  Static  60   0          RD   10.1.40.1       Vlanif40
      10.1.20.0/24  Static  60   0          RD   10.1.40.1       Vlanif40
      10.1.30.0/24  Direct  0    0           D   10.1.30.254     Vlanif30
    10.1.30.254/32  Direct  0    0           D   127.0.0.1       Vlanif30
      10.1.40.0/24  Direct  0    0           D   10.1.40.2       Vlanif40
      10.1.40.2/32  Direct  0    0           D   127.0.0.1       Vlanif40
      127.0.0.0/8   Direct  0    0           D   127.0.0.1       InLoopBack0
      127.0.0.1/32  Direct  0    0           D   127.0.0.1       InLoopBack0

[SW2]return
<SW2>save
The current configuration will be written to the device.
Are you sure to continue?[Y/N]Y
Info: Please input the file name ( *.cfg, *.zip ) [vrpcfg.zip]:
Now saving the current configuration to the slot 0.
Save the configuration successfully.
测试
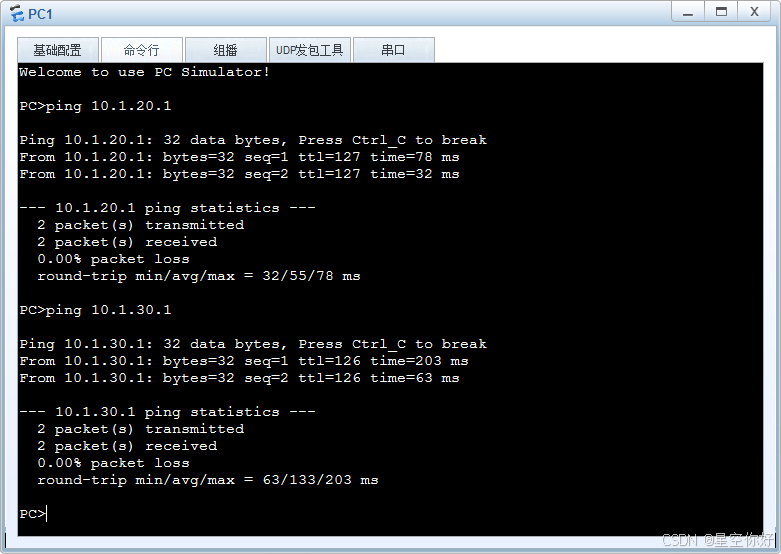
在PC1测试与PC2、PC3的连通性:
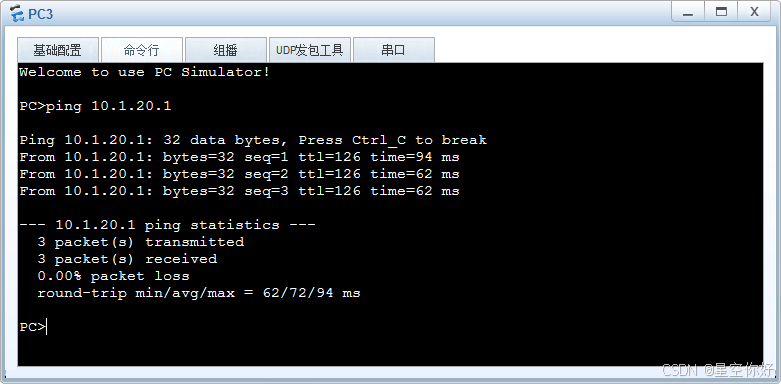
在PC3测试与PC2的连通性:
参考: