文章目录
- [1.安装RealSense Viewer](#1.安装RealSense Viewer)
- 2.录制数据集
- 3.格式转换
-
- [3.1 解析.bag文件](#3.1 解析.bag文件)
- [3.2 提取rgb和depth图片和信息](#3.2 提取rgb和depth图片和信息)
- [3.3 对齐时间戳](#3.3 对齐时间戳)
- 4.用我们做的这个数据集跑跑SLAM算法
提示:该篇文章在Ubuntu22.04系统上进行
1.安装RealSense Viewer
1.下载realsense
cpp
git clone https://github.com/IntelRealSense/librealsense 如果clone不下来,可以试试用手机流量。
如果流量也不行可以科学上网至今进入github网址下载下来,然后利用WinSCP或者X-Ftps等软件传输即可。
2.安装依赖项
cpp
cd librealsense
sudo apt-get install libudev-dev pkg-config libgtk-3-dev
sudo apt-get install libusb-1.0-0-dev pkg-config
sudo apt-get install libglfw3-dev
sudo apt-get install libssl-dev
3.编译与安装
c
sudo cp config/99-realsense-libusb.rules /etc/udev/rules.d/
sudo udevadm control --reload-rules && udevadm trigger
mkdir build
cd build
cpp
//从这里开始用手机流量,否则你会遇到网络问题无法继续下去!!!!
cmake ../ -DBUILD_EXAMPLES=true
make
sudo make install
4.测试
c
realsense-viewer 
2.录制数据集
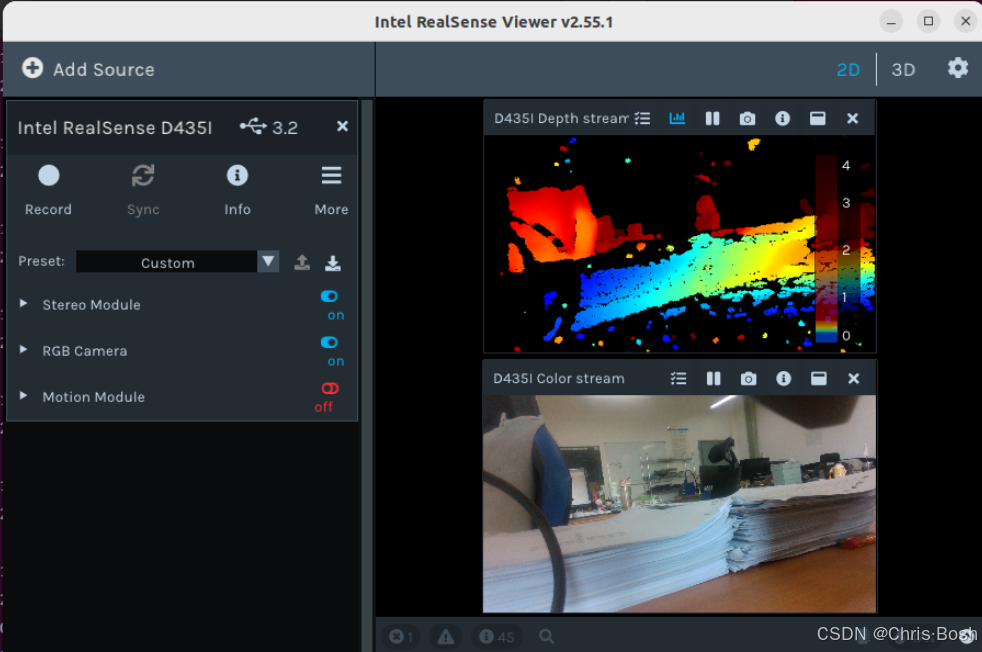
使用 USB 线连接好深度相机和电脑,打开 Intel RealSense Viewer 。设置 Depth Stream 以及 Color Stream 的图像分辨率为 640 × 480 ,设置采集帧率为 30 fps 。点击左上角的 Record 按钮即可进行录制,开始录制后,点击左上角的 Stop 按钮即可结束录制并保存录制结果,如下图所示:
提示:开始录制时如果报错,在setting里修改一下保存位置即可!


结束录制后,在相应存储路径下即生成 .bag 文件,按需重命名该文件。至此,完成离线数据集的录制过程。
3.格式转换
此步骤的目的在于将录制好的数据集转换为 BundleFusion 所要求的离线输入格式,即 .sens 格式。BundleFusion 提供了将源格式封装成 .sens 格式的实现,因此只需将录制好的数据集存储为源格式即可。
3.1 解析.bag文件
.bag 是 ROS 常用的数据存储格式。我们需要对.bag 文件的解析,并从中提取出深度图和彩色图。首先,进入 bag 文件的存储路径并打开终端,通过 rosbag info ***.bag 查看待提取的深度图及彩色图所对应的 topic,如下图所示:
cpp
rosbag info myslam.bag 提示:这里一定要用ROS1,ROS2不能识别.bag的文件,我之前安装ROS看别人说ROS1已经不再维护更新了,所以我装的ROS2,这可把我恶心坏了,搞了半天才知道ROS2不能识别.bag文件,浪费好多时间!


3.2 提取rgb和depth图片和信息
新建文件夹SLAM_Picture(此名称随意),在此文件夹下新建文件夹rgb和depth保存提取出来的深度图和彩色图,同时新建文件rgb.txt和depth.txt为对齐时间戳做准备。

Python脚本(ass.py)如下:
如果你保存的路径出现了中文,要在第一行加入
coding: utf-8
否则会报错SyntaxError: Non-ASCII character '\xe8' in file
cpp
#coding=utf-8
import pyrealsense2 as rs
import numpy as np
import cv2
import time
import os
#像素对齐了
pipeline = rs.pipeline()
#Create a config并配置要流式传输的管道
config = rs.config()
config.enable_device_from_file("/home/lvslam/myslam.bag")#这是打开相机API录制的视频
# config.enable_stream(rs.stream.depth, 640, 480, rs.format.z16, 30)
# config.enable_stream(rs.stream.color, 640, 480, rs.format.bgr8, 30)
profile = pipeline.start(config)
depth_sensor = profile.get_device().first_depth_sensor()
depth_scale = depth_sensor.get_depth_scale()
print("Depth Scale is: " , depth_scale)
align_to = rs.stream.color
align = rs.align(align_to)
# 保存路径
save_path = '/home/lvslam/SLAM_Picture/'
# 保存的图片和实时的图片界面
# cv2.namedWindow("live", cv2.WINDOW_AUTOSIZE)
# cv2.namedWindow("save", cv2.WINDOW_AUTOSIZE)
number = 0
file_handle1 = open('/home/lvslam/SLAM_Picture/rgb.txt', 'w')
file_handle2 = open('/home/lvslam/SLAM_Picture/depth.txt', 'w')
# 主循环
try:
while True:
#获得深度图的时间戳
frames = pipeline.wait_for_frames()
number = number + 1
depth_timestamp = "%.6f" % (frames.timestamp / 1000)
rgb_timestamp = "%.6f" % (frames.timestamp / 1000 + 0.000017)#对比了 提取图片.py 的时间戳,发现rgb比depth多0.000017
aligned_frames = align.process(frames)
#获取对齐后的深度图与彩色图
aligned_depth_frame = aligned_frames.get_depth_frame()
color_frame = aligned_frames.get_color_frame()
if not aligned_depth_frame or not color_frame:
continue
depth_data = np.asanyarray(aligned_depth_frame.get_data(), dtype="float16")
depth_image = np.asanyarray(aligned_depth_frame.get_data())
color_image = np.asanyarray(color_frame.get_data())
color_image = cv2.cvtColor(color_image,cv2.COLOR_BGR2RGB)
depth_mapped_image = cv2.applyColorMap(cv2.convertScaleAbs(depth_image, alpha=0.05), cv2.COLORMAP_JET)
#下面两行是opencv显示部分
# cv2.imshow("live", np.hstack((color_image, depth_mapped_image)))
# key = cv2.waitKey(30)
rgb_image_name = rgb_timestamp+ ".png"
depth_image_name = depth_timestamp+ ".png"
rgb_path = "rgb/" + rgb_image_name
depth_path = "depth/" + depth_image_name
# rgb图片路径及图片保存为png格式
file_handle1.write(rgb_timestamp + " " + rgb_path + '\n')
cv2.imwrite(save_path + rgb_path, color_image)
# depth图片路径及图片保存为png格式
file_handle2.write(depth_timestamp + " " + depth_path + '\n')
cv2.imwrite(save_path + depth_path, depth_image)
print(number, rgb_timestamp, depth_timestamp)
#cv2.imshow("save", np.hstack((saved_color_image, saved_depth_mapped_image)))
#查看话题包有多少帧图片,下面就改成多少
if number == 2890:
cv2.destroyAllWindows()
break
finally:
pipeline.stop()
file_handle1.close()
file_handle2.close()需要将以下几行路径改成自己对应的路径
cpp
config.enable_device_from_file("/home/lvslam/myslam.bag")#这是打开相机API录制的视频
save_path = '/home/lvslam/SLAM_Picture/'
file_handle1 = open('/home/lvslam/SLAM_Picture/rgb.txt', 'w')
file_handle2 = open('/home/lvslam/SLAM_Picture/depth.txt', 'w')
还有判断停止的条件
cpp
#查看话题包有多少帧图片,下面就改成多少
if number == 2890:
改好了之后打开终端输入以下指令执行python脚本
cpp
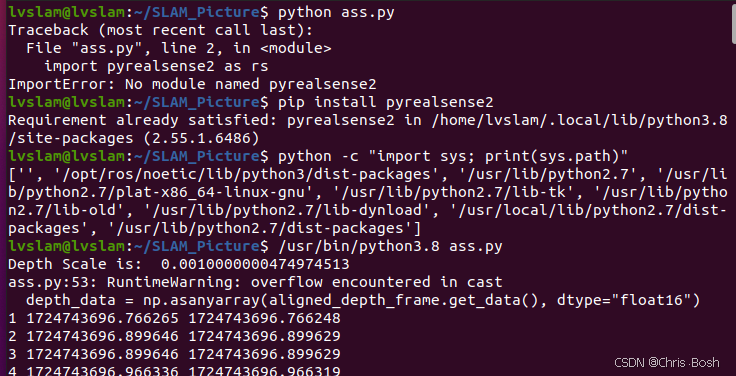
python ass.py
//由于我之前跑别的版本的SLAM电脑上装了几个不同版本的python,所以我要制定目录的python来跑!
/usr/bin/python3.8 ass.py
此时我们的rgb文件夹,depth文件夹,rgb.txt,depth.txt里面都写入了东西
3.3 对齐时间戳
由于深度图及彩色图的时间戳并非严格一一对齐,存在一定的时间差,因此需将深度图及彩色图按照时间戳最接近原则进行两两配对。将associate.py脚本文件存储至SLAM_Picture文件夹下,如图所示:

cpp
import argparse
import sys
import os
import numpy


def read_file_list(filename, remove_bounds):
    """
    Reads a trajectory from a text file.

    File format:
    The file format is "stamp d1 d2 d3 ...", where stamp denotes the time stamp (to be matched)
    and "d1 d2 d3.." is arbitary data (e.g., a 3D position and 3D orientation) associated to this timestamp.

    Input:
    filename -- File name

    Output:
    dict -- dictionary of (stamp,data) tuples

    """
    file = open(filename)
    data = file.read()
    lines = data.replace(",", " ").replace("\t", " ").split("\n")
    if remove_bounds:
        lines = lines[100:-100]
    list = [[v.strip() for v in line.split(" ") if v.strip() != ""] for line in lines if len(line) > 0 and line[0] != "#"]
    list = [(float(l[0]), l[1:]) for l in list if len(l) > 1]
    return dict(list)


def associate(first_list, second_list, offset, max_difference):
    """
    Associate two dictionaries of (stamp,data). As the time stamps never match exactly, we aim
    to find the closest match for every input tuple.

    Input:
    first_list -- first dictionary of (stamp,data) tuples
    second_list -- second dictionary of (stamp,data) tuples
    offset -- time offset between both dictionaries (e.g., to model the delay between the sensors)
    max_difference -- search radius for candidate generation

    Output:
    matches -- list of matched tuples ((stamp1,data1),(stamp2,data2))

    """
    first_keys = list(first_list.keys())
    second_keys = list(second_list.keys())
    potential_matches = [(abs(a - (b + offset)), a, b)
                         for a in first_keys
                         for b in second_keys
                         if abs(a - (b + offset)) < max_difference]
    potential_matches.sort()
    matches = []
    for diff, a, b in potential_matches:
        if a in first_keys and b in second_keys:
            first_keys.remove(a)
            second_keys.remove(b)
            matches.append((a, b))

    matches.sort()
    return matches


if __name__ == '__main__':
    # parse command line
    parser = argparse.ArgumentParser(description='''
    This script takes two data files with timestamps and associates them
    ''')
    parser.add_argument('first_file', help='first text file (format: timestamp data)')
    parser.add_argument('second_file', help='second text file (format: timestamp data)')
    parser.add_argument('--first_only', help='only output associated lines from first file', action='store_true')
    parser.add_argument('--offset', help='time offset added to the timestamps of the second file (default: 0.0)', default=0.0)
    parser.add_argument('--max_difference', help='maximally allowed time difference for matching entries (default: 0.02)', default=0.02)
    parser.add_argument('--remove_bounds', help='remove first and last 100 entries', action='store_true')
    args = parser.parse_args()

    first_list = read_file_list(args.first_file, args.remove_bounds)
    second_list = read_file_list(args.second_file, args.remove_bounds)

    matches = associate(first_list, second_list, float(args.offset), float(args.max_difference))

    if args.first_only:
        for a, b in matches:
            print("%f %s" % (a, " ".join(first_list[a])))
    else:
        for a, b in matches:
            print("%f %s %f %s" % (a, " ".join(first_list[a]), b - float(args.offset), " ".join(second_list[b])))
在该路径下打开终端并通过执行如下命令生成配对结果associate.txt
cpp
python associate.py rgb.txt depth.txt > associate.txt至此,数据集制作完成。

4.用我们做的这个数据集跑跑SLAM算法
我还是以之前跑过的YOLO_ORB_SLAM3_with_pointcloud_map算法来做实验,这个算法的复现之前也写过博客。

运行成功!!
自制数据集完美运行!