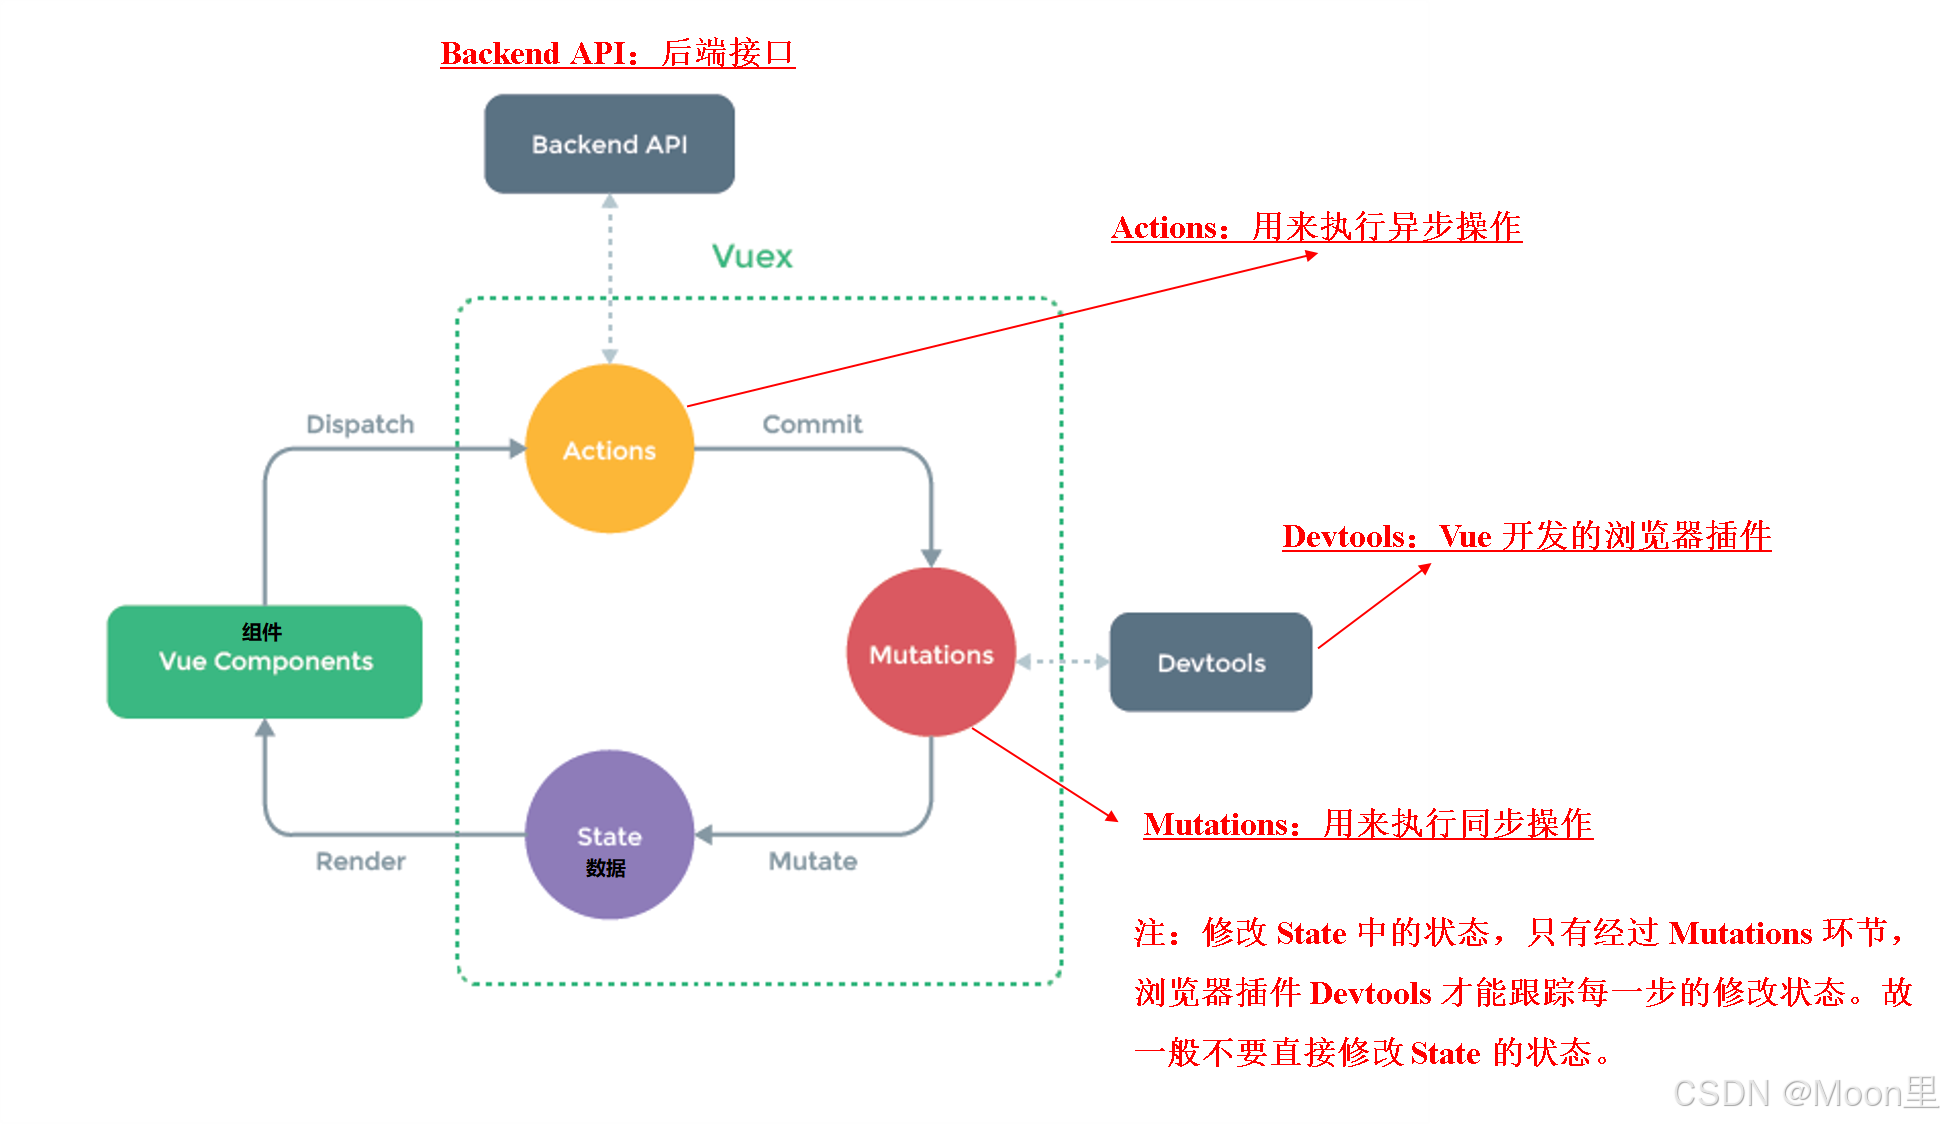
数据共享
流程
Vuex是一个Vue的状态管理工具,状态就是数据(某个状态在很多个组件来使用 ,多个组件共同维护一份数据)

搭建
1)Vuex我们在脚手架搭建项目的时候直接搭建好了,所有可以直接用(如果搭建的时候没有选择Vuex,则需要以下步骤)
javascript
1.安装:npm install vuex --save

2.在src下创建store文件夹创建index.js文件,内容如下:
	<script>
		import Vue from 'vue'
		import Vuex from 'vuex' // vuex也是vue的插件, 需要use一下, 进行插件的安装初始化

		Vue.use(Vuex)

		export default new Vuex.Store({
			state: {
				//存储数据
			},
			getters: {
				//获取state中的数据时进行一些计算或过滤处理
			},
			mutations: {
				//同步更改状态
			},
			actions: {
				//处理异步逻辑
			},
			modules: {
				//模块化状态管理
			}
		})
	</script>

3.在main.js中配置:
	 引入:import store from './store'

	 挂载:
			<script>
				new Vue({
					router,
					store,  //创建的共享数据挂载到vue实例,所有组件能够直接从store中获取到全局的数据
					render: h => h(App)
				}).$mount('#app')
			</script>
2)在store/index.js中写入需要共享的数据
javascript
state: {
	//数据
	count:9,
}
3)在组件中使用数据
html
<h2>{{$store.state.count}}</h2>变更状态
通过页面上的事件触发(1. @click 触发组件中的事件,2. 组件中的事件触发actions,3. actions发起axios请求获取数据,4. 触发mutations中的函数存储state数据,5. 页面上绑定state中的数据)。当组件created页面初始数据的时候,则获取服务器的数据保存到Vuex中,再获取出来到页面中使用
MyVuex.vue
html
<h2>计数:{{$store.state.count}}</h2>
<button @click="increment"> + </button>
<button @click="incrementAsync(10)"> 异步+ </button>

<h2>处理后的计数:{{myCount}}</h2>

<ul v-for="item in $store.state.productData">
	<li>{{item.name}}</li>
</ul>
<button @click="getData">在本组件向服务器发起请求获取数据</button>
<button @click="getData2">在actions中向服务器发起请求获取数据</button>

<script>
	// import {mapActions} from 'vuex'
	export default {
		name: "MyVuex",
		computed:{
			myCount: function(){
				return this.$store.getters.getCount;
			}
		},
		methods:{
			increment(){
				this.$store.dispatch("increment",3); //在组件中使用 this.$store.dispatch('方法名',可带参) 来分发到 action
			},
			incrementAsync(n){
				this.$store.dispatch("incrementAsync",n)
			},
			getData2(){
				this.$store.dispatch("getData2")
			}
			//等同于:引入mapActions之后的新写法,它自动就去找了,参数都省的接了,自动映射为 this.$store.dispatch('xxx')
			//...mapActions([
			//	'increment',
			//	'incrementAsync'
			//	'getData2'
			//]),

			getData() {
				//在这里发起axios请求获取数据(该怎么发怎么发)
				this.$axios({
					method:"get",
					url:"/api/product.do"
				}).then(resp=>{
					//可以拿到服务器返回的数据,并将数据存储到state中
					this.$store.dispatch("saveData",resp.data)
				})
			}
		}
	}
</script>
store/index.js
javascript
import Vue from 'vue'
import Vuex from 'vuex'
import axios from "axios" //因为拿不到所有引进来
Vue.use(Vuex)

export default new Vuex.Store({
    state: { //数据
        count:9,
        productData:[]
    },

    getters: { //getter用于对store中的数据进行加工处理,不会修改store中的数据,只是包装
    	getCount(state){
			return state.count + '月亮'
		}
    },

    mutations: {
        increment(state,n){ //依赖注入state
            state.count+=n; //更改state中的数据
        },
        saveData(state,data){
            console.log(data)
            state.productData=data
        }
    },

    actions: {
        increment(context,n){ //依赖注入context(一个与store实例具有相同方法和属性的context对象)
            context.commit("increment",n); //使用context.commit("方法名",可带参) 来提交到 mutation
        },
        incrementAsync(ctx,n){ //实现异步调用
            setTimeout(()=>{
                ctx.commit("increment",n)
            },1000)
        },
        saveData(ctx,data){
            ctx.commit("saveData",data)
        },
        async getData2(ctx){
            await axios({ // this.$axios 这里的this指向Vuex对象,而axios绑在全局Vue对象上,这里拿不到所有在这里引入axios
                method:"get",
                url:"/api/product.do"
            }).then(resp=>{
                console.log(resp.data)
                ctx.commit("saveData",resp.data)
            })
        }
    },

    modules: { //模块

    }
})
辅助函数
mapActions 、mapMutations(将它们全局的函数映射到本组件中),mapState(将全局数据映射为当前组件的计算属性),mapGetters(仅仅是将store中的getter映射到局部计算属性)
javascript
import { mapActions,mapMutations,mapState,mapGetters } from 'vuex'

export default {
	methods: {
		...mapActions([
			'increment', //将 this.方法名() 映射为 this.$store.dispatch('方法名')
      		'incrementB' //将 this.incrementBy(参数) 映射为 this.$store.dispatch('incrementBy',参数)
			// ...
    	]),
    	...mapActions({
			add: 'increment' //将 this.add() 映射为 this.$store.dispatch('increment')
			// ...
    	}),
    	...mapMutations([ //写法与mapActions同理,将dispatch方法换成commit方法
    		// ...
    	]),
    	...mapMutations({
    		// ...
    	}),
    	// ...
	},

	computed: {
		...mapState([
  			'count' //当映射的计算属性的名称与state的子节点名称相同时,映射 this.count为 this.$store.state.count
			// ...
		]),
		...mapState({
			done:'doneCount' //将 this.done 映射为 this.$store.state.doneCount
			// ...
		}),
		...mapGetters([ //写法与mapState同理,映射为 this.$store.getters.方法名(store中的数据发生变化,getter中的数据也发生变化,存在一个响应关系)
			// ...
		]),
		...mapGetters({
			// ...
		}),
		// ...
	}
}
分割模块
由于使用单一状态树,应用的所有状态会集中到一个比较大的对象中。当应用变得非常复杂时,store对象就有可能变得相当臃肿难以维护,由此有了Vuex的模块化
目录结构:
html
src/
│
├── store/
│   ├── index.js          # 主Store入口文件,引入并组合所有模块
│   ├── modules/
│   │   ├── xxxxx.js      # xxxxx模块
│   │   ├── xxxxx.js      # xxxxx模块
│   │   └── ...           # 其它模块
│
└── main.js               # 应用主入口,引入并使用Vuex Store
模块化: 使用模块化可以将Store分割为更小、更易管理的部分,每个模块对应应用的一个功能域
命名空间: 在模块化时,启用命名空间可以避免不同模块之间Getters、Actions、Mutations的命名冲突
定义两个模块:modules/carte.js 和 modules/product.js
javascript
const state={
};
const getters={
};
const mutations={
};
const actions= {
}
export default {  //模块 carte
	namespaced: true, // 启用命名空间(默认挂载到全局,开启后挂载到子模块,若不开启相当于没做模块化)
	state,
	getters,
	mutations,
	actions
}
javascript
const state={
};
const getters={
};
const mutations={
};
const actions= {
}
export default {  //模块 product
	namespaced: true, // 启用命名空间(默认挂载到全局,开启后挂载到子模块,若不开启相当于没做模块化)
	state,
	getters,
	mutations,
	actions
}
引入store的子状态模块,并注册到:store/index.js
javascript
import Vue from 'vue'
import Vuex from 'vuex'

//引入store的子状态模块
import carte from "@/store/modules/carte";
import myVuex from "@/store/modules/product";

Vue.use(Vuex)

export default new Vuex.Store({
  modules: { //在modules中配置注册子状态文件
    carte,
    product
  }
})
获取模块中的方法和数据
1) 直接访问
store.state.模块名.需要使用的状态名
store.getters['模块名/方法名'] (额外参数)
store.commit('模块名/方法名', 额外参数)
store.dispatch('模块名/方法名', 额外参数)
注意:默认模块中的内容会被挂载到全局,需要开启命名空间,才会挂载到子模块。
html
<template>
	<div>
		<!-- $store.state.模块名.需要使用的状态名 -->
		<h2>{{$store.state.carte.userInfo.username }}</h2>

		<!-- $store.getters['模块名/方法名'] -->
		<h2>{{$store.getters['carte/filterList']}}</h2>
		<h2>{{filterList2}}</h2>

		<button @click="changeAge"> 修改年龄 </button>
		<button @click="changeAge2"> 修改年龄2 </button>
	</div>
</template>

<script>
	export default {
		name: "Carte",
		computed:{
			filterList2: function () {
				return this.$store.getters['carte/filterList2'];
			}
		},

		methods:{
			changeAge() {
				// $store.commit('模块名/方法名',额外参数)
				this.$store.commit('carte/updateAge',20)
			},
			changeAge2() {
				// $store.dispatch('模块名/方法名',额外参数)
				this.$store.dispatch('carte/updateAge2',25)
			},
		}
	}
</script>
2) 通过 mapXxxx 映射
默认根级别的映射:mapXxxx(['xxx'])
子模块的映射:mapXxxx('模块名', ['xxx']) , 需要开启命名空间 namespaced:true
html
<template>
	<div>
		<h2>{{ userInfo.username }}</h2>
		<h2>{{ filterList }}</h2>
		<button @click="updateAge(20)"> 修改年龄 </button>
		<button @click="updateAge2(25)"> 修改年龄2 </button>
	</div>
</template>

<script>
	import { mapState , mapGetters , mapActions , mapMutations } from 'vuex'

	export default {
		name: "Carte",
		computed:{
			...mapState('carte', ['xxx','userInfo'])

			...mapGetters('carte', ['xxxxxx','filterList ','xxx'])
		}

		methods:{
			...mapMutations('carte', ['updateAge']),
			...mapMutations('product', ['xxxx','xxx'])

			...mapActions('carte', ['xxx','updateAge2','xxxxxx'])
		}
	}
</script>

// 若需要映射不同模块中的state、getters、actions、mutations内容,就分模块映射