书接上回:
1. 打开文件
(1 )创建新文件
from openpyxl import Workbook
wb = Workbook()
(2 )打开已有文件
from openpyxl import load_workbook
wb = load_workbook('excel.xlsx')
注:打开文件时可根据需要选择只读或者只写
只读:wb = load_workbook('excel.xlsx',read_only=True)
只写:wb = load_workbook('excel.xlsx',write_only=True)
2. 获取 sheet
(1 )创建sheet
ws = wb.create_sheet('sheet_name') #放在最后
ws = wb.create_sheet('sheet_name',0) #放在最前
ws = wb.create_sheet('sheet_name',-1) #放在倒数第二
(2 )获取已有sheet
ws = wb['sheet_name']
(3 )获取当前活动工作表
ws = wb.active
(4 )获取excel 的所有表名
sn = wb.sheetnames
(5 )工作表重命名
ws.title="new_name"
(6 )遍历所有工作表
for sheet in wb:
print(sheet.title)
3. 写数据
(1 )根据行/ 列num 写入内容
ws.cell(row_num,col_num,context)
ws.cell(row_num,col_num).value = context
注意:openpyxl的行列num>=1
(2 )根据cell 名称写入内容
ws['A1'] = context
4. 读数据
(1 )根据行/ 列num 读数据
data = ws.cell(row_num,col_num).value
(2 )根据cell 名称读数据
data = ws['A1']
data = ws['A1: C2']
data = ws['A:C']
data = ws[10:15]
5. 保存数据
wb.save(excel.xlsx)
6. 获取最大行数,最大列数
max_row = ws.max_row
max_col = ws.max_column
7. 删除数据
(1 )删除sheet
ws = workbook[sheet_name]
wb.remove(ws)
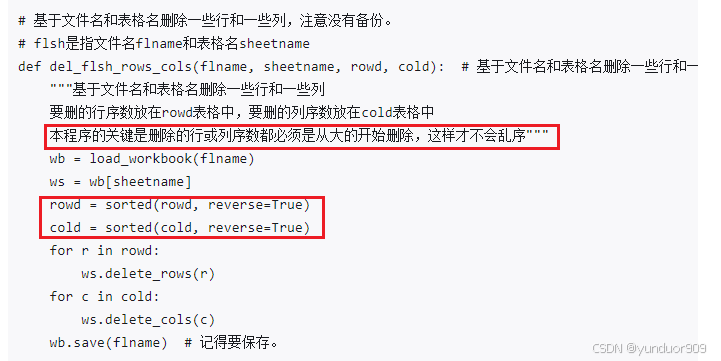
(2 )删除行
ws.delete_rows(3)
注意:删除时要从行数最大的开始删,不然会混乱
(3 )删除列
ws.delete_cols(3)
注意:删除时要从列数最大的开始删,不然会混乱

8. 设置单元格风格
from openpyxl.styles import Front,colors,Alignment,Color
(1)设置字体
font_style = Font(name='Times New Roman', size=24, color=colors.RED, bold=True, italic=True)
ws.cell(row_num,col_num).font = font_style
注:颜色的设置有多种方式,如下:
- color=colors.RED
- color=Color(index=0) #根据index选择
- color=Color(rgb='00000000')#根据rgb值选择
index和rgb值的对应关系如下:
|----------------|----------|-------|-----|-------|-----|
| index | rgb | index | rgb | index | rgb |
| 0(BLACK) | 00000000 | | | | |
| 1(WRITE) | 00FFFFFF | | | | |
| 2(RED) | 00FF0000 | | | | |
| 3(GREEN) | 0000FF00 | | | | |
| 4(BLUE) | 000000FF | | | | |
| 5(YELLOW) | 00FFFF00 | | | | |
| 6 | 00FF00FF | | | | |
| 7 | 0000FFFF | | | | |
| 8 (DARKRED) | 00000000 | | | | |
| 9(DARKGREEN) | 00FFFFFF | | | | |
| 10 | 00FF0000 | | | | |
| 11 | 0000FF00 | | | | |
| 12(DARKBLUE) | | | | | |
| 13 | | | | | |
| 14 | | | | | |
| 15 | | | | | |
| 16 | | | | | |
| 17 | | | | | |
| 18 | | | | | |
| 19(DARKYELLOW) | | | | | |
| 20 | | | | | |
| 21 | | | | | |
| 22 | | | | | |
(2)设置单元格填充格式
color_style = PatternFill(patternType='solid', fgColor='FFD700')
ws.cell(row_num,col_num).fill = color_style
|-----------------|-------------|----------------|-----------|---------------|
| patternType(底纹纹路) |||||
| darkDown | darkUp | lightDown | darkGrid | lightVertical |
| solid(纯色) | gray0625 | darkHorizontal | lightGrid | lightTrellis |
| mediumGray | gray125 | darkGray | lightGray | lightUp |
| lightHorizontal | darkTrellis | darkVertical | | |
| fgColor:前景色,即花纹纹路色 |||||
| bgColor:背景色,默认为黑色 |||||
(3 )设置对齐方式
align_style = Alignment(horizontal='center', vertical='center',wrap_text=True)
ws.cell(row_num,col_num).alignment = align_style
|--------|-------------|------------------|--------|-------------|
| horizontal |||||
| right | justify | fill | center | general |
| left | distributed | centerContinuous | | |
| vertical |||||
| bottom | justify | center | top | distributed |
| wrap_text:自动换行(True/False) |||||
(4 )设置边框格式
border_style = Border(left=Side(style='thin',color=colors.BLACK),
right=Side(style='thin',color=colors.BLACK),
top=Side(style='thin',color=colors.BLACK),
bottom=Side(style='thin',color=colors.BLACK))
ws.cell(row_num,col_num).border = border_style
|------------|------------|----------|---------|---------------|
| style |||||
| thin(细) | medium(中粗) | thick(粗) | dashDot | dashDotDot |
| dashed(虚线) | dotted(点线) | double | hair | mediumDashDot |
|------------------|--------------|--------------|---|---|
| mediumDashDotDot | mediumDashed | slantDashDot | | |
(5 )多个样式整合
excel_style = NamedStyle(name='excel_style',
font= Font(name='Times New Roman', size=24),
fill= PatternFill(patternType='solid', fgColor='FFD700'),
alignment= Alignment(horizontal='center', vertical='center'))
wb.add_named_style(excel_style)
ws['A5'].style=excel_style
9. 合并 / 拆分单元格
(1 )合并单元格
方式一:以单元格名称合并
ws.merge_cells('A2:D3')
方式二:以行列num合并
ws.merge_cells(start_row=5,start_column=3,end_row=7,end_column=5)
(2 )拆分单元格
方式一:以单元格名称拆分
ws.unmerge_cells('A2:D3')
方式二:以行列num拆分
ws.unmerge_cells(start_row=5,start_column=3,end_row=7,end_column=5)
注意:拆分后的内容在左上角cell里
(3)查找当前sheet里已存在的所有合并单元格
ws.merged_cells
(4)查找当前sheet已存在的所有合并单元格列表
ws.merged_cell_ranges(不推荐)
ws.merged_cells.ranges
10. 列号数字和字母之间的转换
from openpyxl.utils import get_column_letter, column_index_from_string
(1 )数字转化为字母
get_column_letter(2)
(2 )字母转化为数字
column_index_from_string('D')
11. 单元格属性
(1 )获取单元格列索引
cell.col_idx或者cell.column
(2 )获取单元格行索引
cell.row
(3 )获取单元格列名
cell.column_letter
(4 )获取单元格坐标
cell.coordinate
(5 )获取单元格数值类型
cell.data_type
n:数值类型(默认)
s:字符串类型
d:日期时间
(6 )获取单元格编码格式
cell.encoding
utf-8(默认)
(7 )获取单元格样式
cell.style
Normal:(默认)
(8 )查看单元格是否有样式
cell.has_style
默认样式是normal,返回false
12. openpyxl 转 pandas
import pandas as pd
df = pd.DataFrame(ws.values)
13. pandas 转 openpyxl
for i in df.values:
ws.append(i.tolist())
14. 设置行高和列宽
row = ws.row_dimensions[3]
row.height = 15 #设置第3行的行高为15
col = ws.column_dimensions['E']
col.width = 10 #设置E列的列宽为10