copy和strong的区别
有如下代码:
objectivec
#import "Person.h"

@interface Person ()

@property (nonatomic, strong) NSString *strStrong;
@property (nonatomic, copy) NSString *strCopy;

@end

@implementation Person

- (void) go {
    NSMutableString *newStr = [NSMutableString stringWithString:@"newString"];
    self.strStrong = newStr;
    self.strCopy = newStr;
    [newStr setString:@"changString"];

    NSLog(@"newStr:%p %@", newStr, newStr);
    NSLog(@"strStrong:%p %@", self.strStrong, self.strStrong);
    NSLog(@"strCopy:%p %@", self.strCopy, self.strCopy);

}

@end
打印出的结果是:


可以看出来使用copy修饰的strCopy的值没有改变。
根据前面的学习我们知道:copy修饰的变量,对象地址不一致了,指针指向了一个新的内存区域(相当于深拷贝),导致新值(newString)修改时不会影响。
那么copy和strong这种区别的实现究竟是在哪里,下面我们一步一步解析:
属性使用点语法和_属性名的区别的原理
我们根据之前学的知识可知:一个属性使用self.的赋值是调用它的setter方法,而使用_属性名是直接赋值。下面我们使用clang分析两个语法的cpp:
cpp
//self.strStrong = newStr;
((void (*)(id, SEL, NSString *))(void *)objc_msgSend)((id)self, sel_registerName("setStrStrong:"), (NSString *)newStr);
//_strStrong = newStr;
(*(NSString **)((char *)self + OBJC_IVAR_$_Person$_strStrong)) = newStr;
第一段代码是使用这个函数指针向对象 self 发送消息 setStrStrong:,并传递 newStr 作为参数。
而第二段是self + OBJC_IVAR_...(属性偏移值) = strongStr的内存地址,然后在内存中进行替换。
属性的setter方法的底层
实际上strong和copy的区别在于它们setter方法的底层逻辑不同,我们先来看strStrong的setter方法:
cpp
static void _I_Person_setStrStrong_(Person * self, SEL _cmd, NSString *strStrong) { (*(NSString **)((char *)self + OBJC_IVAR_$_Person$_strStrong)) = strStrong; }这里是通过指针偏移后,将变量指针指向新的地址。
而strCopy的setter方法:
cpp
static void _I_Person_setStrCopy_(Person * self, SEL _cmd, NSString *strCopy) { objc_setProperty (self, _cmd, __OFFSETOFIVAR__(struct Person, _strCopy), (id)strCopy, 0, 1); }这里的(id)strCopy就是我们要给strCopy赋的新值newStr。因为_I_Person_setStrCopy_(Person * self, SEL _cmd, NSString *strCopy)函数传入的参数中的NSString *strCopy就是newStr。
与strStrong不同的是,strCopy的setter方法中多了一个objc_setProperty,它们出现这样的区别的代码就在这里。
objc_setProperty
objc_setProperty 函数是在 Objective-C 中用于实现属性设置操作的一个函数。它负责处理属性的内存管理策略,如 copy、retain(对应于 strong)、nonatomic、atomic 等。
objectivec
/*self: 调用该方法的对象。
_cmd: 方法的选择子(selector),即当前方法的名字。
offset: 属性在对象中的偏移量。
newValue: 要设置的新值。
atomic: 是否为原子操作。
shouldCopy: 是否需要复制新值。*/
void objc_setProperty(id self, SEL _cmd, ptrdiff_t offset, id newValue, BOOL atomic, signed char shouldCopy)
{
    //#define MUTABLE_COPY 2
    bool copy = (shouldCopy && shouldCopy != MUTABLE_COPY);
    bool mutableCopy = (shouldCopy == MUTABLE_COPY);
    reallySetProperty(self, _cmd, newValue, offset, atomic, copy, mutableCopy);
}
为什么copy修饰的变量set方法是调用objc_setProperty函数,而strong修饰却没有呢?因为:
cpp
void objc_setProperty_atomic(id self, SEL _cmd, id newValue, ptrdiff_t offset)
{
    reallySetProperty(self, _cmd, newValue, offset, true, false, false);
}

void objc_setProperty_nonatomic(id self, SEL _cmd, id newValue, ptrdiff_t offset)
{
    reallySetProperty(self, _cmd, newValue, offset, false, false, false);
}
strong 修饰符要求在设置属性时,对传入的对象增加一个引用计数,以确保对象在属性持有期间不会被释放。这个操作比较简单,可以直接通过 objc_storeStrong 函数来实现,因此不需要调用 objc_setProperty。编译器生成的 set 方法会直接使用 objc_storeStrong 来处理 strong 修饰的属性。
objc_setProperty_nonatomic_copy
接下来在objc4中搜索objc_setProperty_nonatomic_copy可以看到它的源码:
cpp
void objc_setProperty_atomic_copy(id self, SEL _cmd, id newValue, ptrdiff_t offset)
{
    reallySetProperty(self, _cmd, newValue, offset, true, true, false);
}

void objc_setProperty_nonatomic_copy(id self, SEL _cmd, id newValue, ptrdiff_t offset)
{
    reallySetProperty(self, _cmd, newValue, offset, false, true, false);
}
可以看到实际上它里面调用了一个reallySetProperty方法:
reallySetProperty
cpp
static inline void reallySetProperty(id self, SEL _cmd, id newValue, ptrdiff_t offset, bool atomic, bool copy, bool mutableCopy)
{
    //如果offset为0,说明这是在设置对象的类(如isa指针),直接调用object_setClass来设置类,并返回。
    if (offset == 0) {
        object_setClass(self, newValue);
        return;
    }

    id oldValue;
    //slot指向属性在对象中的存储位置。
    id *slot = (id*) ((char*)self + offset);

    if (copy) {
        newValue = [newValue copyWithZone:nil];
    } else if (mutableCopy) {
        newValue = [newValue mutableCopyWithZone:nil];
    } else {
      //检查 newValue 是否与当前值相同,如果相同则返回;如果不同,调用 objc_retain 来保留新值。
        if (*slot == newValue) return;
        newValue = objc_retain(newValue);
    }

    if (!atomic) {
        oldValue = *slot;
        *slot = newValue;
    } else {
        spinlock_t& slotlock = PropertyLocks.get()[slot];
        slotlock.lock();
        oldValue = *slot;
        *slot = newValue;
        slotlock.unlock();
    }

    objc_release(oldValue);
}
根据这段代码可知,使用copy时,底层会调用copyWithZone;而使用mutableCopy时,底层会调用mutableCopyWithZone;两个都不是时,会增加引用计数,确保对象被正确持有。
这里根据我们上面的例子可知,我们的newStr是NSMutableString类型的。而且根据上面的各个方法的结果可知,copy为1,mutableCopy为0。因此会进入newValue = [newValue copyWithZone:nil]; 这一行,在这一行中,调用了newValue(NSMutableString)的copyWithZone,但是在NSMutableString中并没有找到copyWithZone的方法,向上找到了父类中的copyWithZone方法。
我们通过GUNstep找到copyWithZone和mutableCopyWithZone的具体实现:
objectivec
- (id) copyWithZone: (NSZone*)zone
{
  /*
 * 默认实现不应简单地保留(retain)...字符串可能已经在初始化时设置了 freeWhenDone==NO 并且不拥有其字符数据...
 * 因此创建它的代码在处理完原始字符串后可能会销毁该内存...
 * 这样会导致副本指向无效的数据指针。 所以我们总是完全复制。
 */
  return [[NSStringClass allocWithZone: zone] initWithString: self];
}

- (id) mutableCopyWithZone: (NSZone*)zone
{
  return [[GSMutableStringClass allocWithZone: zone] initWithString: self];
}
我们再查看allocWithZone 的内部:

NSAllocateObject方法
我们发现在allocWithZone中调用了NSAllocateObject方法
objectivec
inline id
NSAllocateObject(Class aClass, NSUInteger extraBytes, NSZone *zone)
{
id new;
#ifdef OBJC_CAP_ARC
if ((new = class_createInstance(aClass, extraBytes)) != nil)
{
AADD(aClass, new);
}
#else
int size;
NSCAssert((!class_isMetaClass(aClass)), @"Bad class for new object");
size = class_getInstanceSize(aClass) + extraBytes + sizeof(struct obj_layout);
//如果 zone 为 0,则使用默认的内存分配区域。
if (zone == 0)
{
zone = NSDefaultMallocZone();
}
//计算分配对象所需的大小。
new = NSZoneMalloc(zone, size);
//分配内存。
if (new != nil)
{
memset (new, 0, size);
new = (id)&((obj)new)[1];
// 将新的内存空间设置为aClass的类型
object_setClass(new, aClass);
AADD(aClass, new);
}
/* Don't bother doing this in a thread-safe way, because the cost of locking
* will be a lot more than the cost of doing the same call in two threads.
* The returned selector will persist and the runtime will ensure that both
* calls return the same selector, so we don't need to bother doing it
* ourselves.
*/
//初始化内存,设置类,并进行附加操作。
if (0 == cxx_construct)
{
cxx_construct = sel_registerName(".cxx_construct");
cxx_destruct = sel_registerName(".cxx_destruct");
}
callCXXConstructors(aClass, new);
#endif
return new;
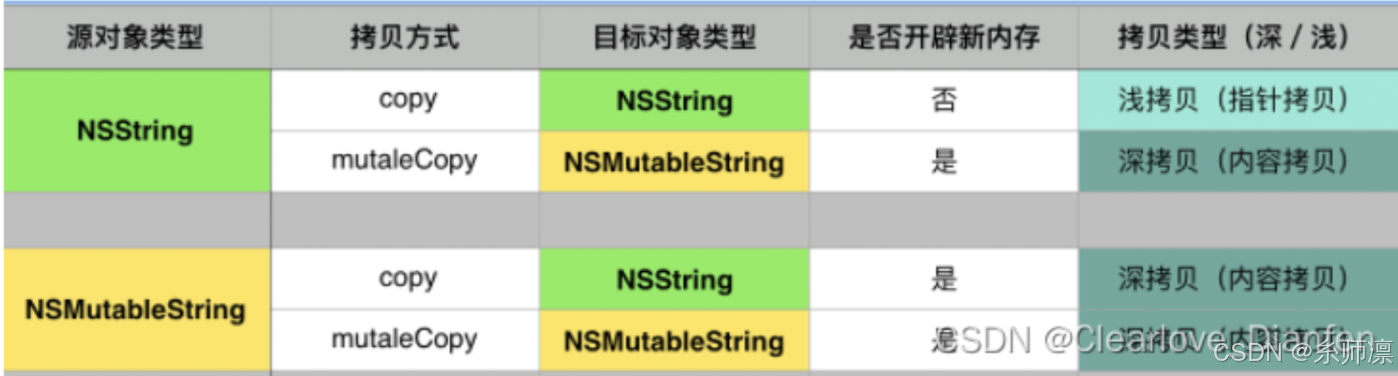
}到这就可以得出结论了,NSMutablString的Copy协议是创建了新的内存空间,进行了内容拷贝,通俗可以理解为进行了深拷贝。
依次再使用别的拷贝模式的深浅拷贝关系: