iOS学习
前言
经过暑期培训,完成了五个项目的仿写,在项目中将零散的内容经过实践学习,有了不少收获,因此来总结一下比较重要的内容。
无限轮播图
这是写项目的第一个难点,在很多项目中都有使用,越写越熟练。
原理为制造两个假页,在首和尾分别制作最后一页和第一页的假页,当移动到假页时,使用取消动画的方式跳到真正的页数,即可实现无限轮播图
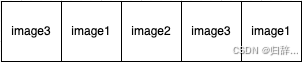
大概的代码实现相同,都是创建两个假页,然后在协议方法中,跳转到假页时移动到真正的图片上
objectivec
_scrollView = [[UIScrollView alloc] init];

    _scrollView.contentSize =  CGSizeMake(screenWidth*7, 200);

    _scrollView.pagingEnabled = YES;
    _scrollView.scrollEnabled = YES;
    _scrollView.delegate = self;


    for (int i = 0; i < 7; i++) {
        NSString *strName;
        if (i == 0) {
            strName = @"5.jpg";
        } else if (i == 6) {
            strName = @"1.jpg";
        } else {
            strName = [NSString stringWithFormat:@"%d.jpg",i];
        }

        UIImage *image = [UIImage imageNamed:strName];
        UIImageView *imageView = [[UIImageView alloc] init];
        imageView.image = image;
        imageView.frame = CGRectMake(screenWidth * i, 0, screenWidth, 200);
        [_scrollView addSubview:imageView];
    }
    [self.scrollView setContentOffset:CGPointMake(screenWidth , 0) animated:NO];
    [self.contentView addSubview:_scrollView];

//该方法的if语句实现假页的跳转。
- (void) scrollViewDidEndDecelerating:(UIScrollView *)scrollView
{
    [self startTimerForCell1_1];

    NSInteger currentIndex = scrollView.contentOffset.x / scrollView.frame.size.width;
    if (currentIndex == 0) {
        scrollView.contentOffset = CGPointMake(scrollView.frame.size.width * 5, 0);

    } else if (currentIndex == 6) {
        scrollView.contentOffset = CGPointMake(scrollView.frame.size.width * 1, 0);
    }

}
无限轮播图还有很多细节,比如加入UIPageControl方便观看,加入定时器定时移动。这些代码与无限轮播图和假页跳转都相似,只需要修改判断函数或者修改一些判断逻辑即可。
需要设计移动屏幕时停止计时器,结束移动时开始定时器,则需要如下的代码
objectivec
[[NSRunLoop mainRunLoop] addTimer:self.timer forMode:NSRunLoopCommonModes];具体原理还没有学会。
换头像
第二个重难点功能就是换头像了,主要设计的是传值和现实的问题,以及判错的逻辑。
该处主要使用了协议传值
objectivec
-(void) press{
    if (self.selectPhotoCount == 1) {
        for (UIView *subview in self.sv.subviews) {
            if ([subview isKindOfClass:[UIButton class]]) {
                UIButton *button = (UIButton *) subview;
                if (button.selected) {
                    _strImageSend = [NSString stringWithFormat:@"头像%ld.jpg",(long)(button.tag - 100)];
                    if ([self.delegate respondsToSelector:@selector(didSelectImageWithNameAgain:)]) {
                    //协议传头像名字
                           [self.delegate didSelectImageWithNameAgain:_strImageSend];
                       }
                    button.selected = NO;
                    [self.navigationController popToRootViewControllerAnimated:YES];

                    break;
                }
            }
        }
    } else {
        _alertVier = [UIAlertController alertControllerWithTitle:@"警告" message:@"只能选择一张图片" preferredStyle:UIAlertControllerStyleAlert];
        UIAlertAction* action01 = [UIAlertAction actionWithTitle:@"确定" style:UIAlertActionStyleDefault handler:^(UIAlertAction *action){/* 在这里编写执行该选项的代码*/}];
        [_alertVier addAction:action01];
        [self presentViewController:_alertVier animated:YES completion:nil];
    }
}

//在相应的视图控制器中,响应该协议。
- (void)didSelectImageWithNameAgain:(NSString *)imageName1
{
    self.selectedImageName = imageName1;
    NSIndexPath *indexPath = [NSIndexPath indexPathForRow:0 inSection:0];
    myCell2_1 *cell = [self.tableView0 cellForRowAtIndexPath:indexPath];
    cell.strReturn = _selectedImageName;
    cell.imageView1.image = [UIImage imageNamed:_selectedImageName];
    [self.tableView0 reloadData];
}
此外,还可以通过两次属性传值,实现点击图片放大后,再确认传入显示的页面。效果如图所示,此处不展示详细的细节了,有空将这两种结合,写成比较好的demo。

网络请求
网络申请分成五步
- 创建请求地址
- 创建请求类
- 创建会话
- 根据会话创建任务
- 启动任务
具体到介绍在另一篇博客中有写,此处不赘述了。
需要注意的是数据的使用以及一开始请求的网址,不然需要更换的话,所有设置好的单元格内容都需要一起进行更换。
按钮的configuration属性
一开始设置按钮的时候,同时设置图像和文字有不显示的问题,后面解决好了,但是学习了一些config属性。
objectivec
UIButtonConfiguration *config = [UIButtonConfiguration plainButtonConfiguration];
        NSString *str = array[i];
        NSString *strImage = [NSString stringWithFormat:@"%@.png",str];
        config.attributedTitle = [[NSAttributedString alloc] initWithString:str];
        config.image = [UIImage imageNamed:strImage];
        config.imagePlacement = NSDirectionalRectEdgeTop;
        config.buttonSize = UIButtonConfigurationSizeMini;
        config.imagePadding = 8;
        config.baseForegroundColor = [UIColor blackColor];

        config.imageColorTransformer = ^UIColor * _Nonnull(UIColor * _Nonnull color) {
            return [UIColor systemRedColor];};

        _btn = [UIButton buttonWithType:UIButtonTypeCustom];

_btn.configuration = config;以此为例,可以设置按钮图像与文字的间距,位置,和颜色等。主要为imagePlacement属性
- leading:图左字右
- top:图上字下
- trailing:图右字左
- bottom:图下字上
除此之外,在设置导航栏的文字颜色和背景颜色时,需要调整文字大小也犯了难
,学习到使用titleTextAttributes来修改
objectivec
 UINavigationBarAppearance *appearance = [[UINavigationBarAppearance alloc] init];
        appearance.backgroundColor = [UIColor colorWithRed:79/225.0f green:141/225.0f blue:198/225.0f alpha:1];
    //设置标题文字的颜色和大小
    appearance.titleTextAttributes = @{
            NSForegroundColorAttributeName: [UIColor whiteColor],
            NSFontAttributeName: [UIFont systemFontOfSize:30]
        };

        self.navigationController.navigationBar.scrollEdgeAppearance = appearance;
        self.navigationController.navigationBar.standardAppearance = appearance;
    self.navigationItem.title = @"SHARE";
    self.tabBarController.tabBar.backgroundColor = [UIColor blackColor];
总结
在暑期的学习中,每次解决一个问题后都对原本学的内容有了更深刻的理解,掌握后都会收获很多。关关难过关关过。