文章目录
-
- [1 系统烧写](#1 系统烧写)
-
- [1.1 烧写镜像](#1.1 烧写镜像)
- [1.2 更新文件系统](#1.2 更新文件系统)
- [1.3 关闭 LED](#1.3 关闭 LED)
- [1.4 扩展 SDCard 剩余空间](#1.4 扩展 SDCard 剩余空间)
- [2 配置网络](#2 配置网络)
- [3 更新系统](#3 更新系统)
-
- [3.1 debian](#3.1 debian)
- [4 其它配置](#4 其它配置)
-
- [4.1 ssh 配置](#4.1 ssh 配置)
- [4.2 时间设置](#4.2 时间设置)
- [4.3 中文乱码](#4.3 中文乱码)
- [5 低配版局域网 NAS](#5 低配版局域网 NAS)
-
- [5.1 挂载 SSD 硬盘](#5.1 挂载 SSD 硬盘)
- [5.2 安装 Samba](#5.2 安装 Samba)
- [5.3 登录](#5.3 登录)
-
- [5.3.1 Windows 下登录](#5.3.1 Windows 下登录)
- [5.3.2 Android 手机登录](#5.3.2 Android 手机登录)
- [附录1:nginx 安装](#附录1:nginx 安装)
1 系统烧写
1.1 烧写镜像
-
1)Cubieboard 官方提供的 3 个系统镜像如下:
-

-
可以看到,有 Server 版和桌面版,为了节省资源我选择 Server 版中的 datacard 版(即第 2 个镜像)。
-
-
2)使用树莓派官方提供的系统烧写工具,将系统镜像烧写到 SDCard 中:
-
3)正常这个时候把 SDCard 插入 Cubieboard,就可以正常使用了。

1.2 更新文件系统
-
1)由于 Cubieboard2 发布于 2012 年左右,官方提供的镜像是基于 debian 7(wheezy),所以这里将 debian 的版本升级到较新稳定版 debian 11(bullseye)。
- 最新稳定版为 debian 12,但是我使用 ssh 无法登录,搞了一晚上还是失败。
- debian 版本:https://www.debian.org/releases/
-
2)编译 Debian 11:
bash# (1)环境准备 mkdir -p ~/cubieboard2/chroot-armhf # 创建目录 WORK_DIR=~/cubieboard2 # 工作目录 ROOTFS_DIR=${WORK_DIR}/chroot-armhf # 目标系统 rootfs 目录 # (2)下载 Debian 11(bullseye)基础系统 cd $ROOTFS_DIR ##/ man debootstrap : # --no-check-gpg :Disables checking gpg signatures of retrieved Release files. # 从 man 的示例 "debootstrap stretch ./stretch-chroot http://deb.debian.org/debian" 可知: # 这里允许自定义下载源,官方的地址已经不支持 wheezy 版本,这里通过指定阿里源来指定 debian 版本为最新的 bullseye #/ debootstrap --foreign --no-check-gpg --arch armhf bullseye . http://mirrors.aliyun.com/debian/ # 备份配置前文件系统 cd $ROOTFS_DIR && sudo cp /usr/bin/qemu-arm-static usr/bin/ LC_ALL=C LANGUAGE=C LANG=C chroot . /debootstrap/debootstrap --second-stage # 到此为止,Debian 基础系统已经配置好了;现在可以把 $ROOTFS_DIR 保存为一个压缩包,以备日后之用。 cd ../ && sudo tar -czvf chroot-armhf_cb2_`date +%Y%m%d_%H%M%S`.tar.gz chroot-armhf/ # (3)配置 ROOTFS cd $WORK_DIR/chroot-armhf chroot . passwd # 修改密码 echo "Cubieboard" > etc/hostname echo "127.0.0.1 Cubieboard" >> etc/hosts echo T0:2345:respawn:/sbin/getty -L ttyS0 115200 vt100 >> etc/inittab vi etc/apt/sources.list # 替换清华源,见下方。 chroot . apt-get update # 更新。这里可能会提示证书验证失败,可以临时将 https 替换成 http chroot . apt-get upgrade # 升级 chroot . apt-get install -y openssh-server chroot . apt-get install -y locales echo "en_US.UTF-8 UTF-8" > etc/locale.gen echo "zh_CN.UTF-8 UTF-8" >> etc/locale.gen chroot . locale-gen chroot . apt-get install -y wireless-tools wpasupplicant firmware-ralink vim lrzsz net-tools chroot . apt-get install -y ssh # 允许 root 账户登录。修改 etc/ssh/sshd_config 文件的 PermitRootLogin yes # (4)备件 cd ../ && sudo tar -czvf chroot-armhf_cb2_`date +%Y%m%d_%H%M%S`.tar.gz chroot-armhf/- (1)清华源:https://mirror.tuna.tsinghua.edu.cn/help/debian/
- (2)update 或 upgrade 时出现证书验证的问题时:
*- 首先临时将 sources.list 文件中 https 替换为 http,等待更新完成
-
- 然后通过 chroot . apt-get install --reinstall ca-certificates 命令来更新证书
-
- 最后再将 sources.list 文件中的 http 替换为 https。
- 参考:https://www.yii666.com/blog/662479.html
-
3)替换镜像的文件系统:
bash# (1)首先通过 rufus 将 debian-server-cb2-datacard-v1.2.img 烧录到 SDCard 中 # (2)将 SDCard 通过读卡器连接到 Linux 上 ll /dev/sd* # 一般 sda 为 Linux 系统盘,剩下的 sdb、sdc 即为 sd 卡 # (3)烧写 mount /dev/sdc2 /mnt # 将文件系统挂载到 Linux 上 rm -rf /mnt/* # 删除原来的文件系统 cp $WORK_DIR/chroot-armhf.tar.gz /mnt/ tar -zxvf chroot-armhf.tar.gz sync && umount /mnt # 注意:卸载时当前目录不能为 /mnt,否则无法卸载
1.3 关闭 LED
-
1)由于我想把 Cubieboard 当作服务器,两个 LED(绿、蓝)在夜里长亮影响睡眠,需要关闭。
-
2)在 sunxi-tools 目录下有两个工具:
- bin2fex:将 bin 文件转换成 fex 文件
- fex2bin:将 fex 文件转换成 bin 文件
-
3)获取脚本文件:
bash# 将 SDCard 的分区 sdc1 挂载到 /mnt 目录 mount /dev/sdc1 /mnt # 将 script.bin 复制到 ~ 目录下 cp /mnt/script.bin ~ # 将 bin 文件转换成可编辑的 fex 文件 bin2fex script.bin script.fex -
4)控制 LED 的参数:
conf[leds_para] leds_used = 1 leds_num = 2 leds_pin_1 = port:PH20<1><default><default><0> leds_name_1 = "green:ph20:led1" leds_default_1 = 1 leds_pin_2 = port:PH21<1><default><default><0> leds_name_2 = "blue:ph21:led2" leds_default_2 = 0 leds_trigger_2 = "heartbeat"- leds_default_1 的值为 1 则长亮,为 0 则熄灭。
-
参考:
1.4 扩展 SDCard 剩余空间
- 1)查看已经使用空间
sh
df -h

Filesystem      Size  Used Avail Use% Mounted on
/dev/root       990M  559M  381M  60% /
devtmpfs        398M     0  398M   0% /dev
tmpfs           494M     0  494M   0% /dev/shm
tmpfs           198M  504K  197M   1% /run
tmpfs           5.0M     0  5.0M   0% /run/lock
tmpfs           4.0M     0  4.0M   0% /sys/fs/cgroup
可以看到,16G 仅使用了不到 3G 空间
- 2)获取第二分区的起始地址:
sh
cat /sys/block/mmcblk0/mmcblk0p2/start

26624- 3)空间扩容
bash
fdisk /dev/mmcblk0                          # 使用 fdisk 操作磁盘

Welcome to fdisk (util-linux 2.36.1).
Changes will remain in memory only, until you decide to write them.
Be careful before using the write command.


Command (m for help): d                     # 删除分区
Partition number (1,2, default 2): 2        # 删除第 2 分区

Partition 2 has been deleted.

Command (m for help): n                     # 新建分区
Partition type
   p   primary (1 primary, 0 extended, 3 free)
   e   extended (container for logical partitions)
Select (default p): p                       # 选择主分区
Partition number (2-4, default 2): 2
First sector (26624-31116287, default 26624): 26624     # 输入分区的起始地址
Last sector, +/-sectors or +/-size{K,M,G,T,P} (26624-31116287, default 31116287):

Created a new partition 2 of type 'Linux' and of size 14.8 GiB.
Partition #2 contains a ext4 signature.

Do you want to remove the signature? [Y]es/[N]o: Y      # 删除签名

The signature will be removed by a write command.

Command (m for help): w                     # 保存
The partition table has been altered.
Failed to update system information about partition 2: Invalid argument

The kernel still uses the old partitions. The new table will be used at the next reboot.
Syncing disks.- 4)使用 reboot 命令重启。重启后空间没有变化,还需要如下命令:
sh
resize2fs /dev/mmcblk0p2

df -h   # 再次 df -h 查看空间
Filesystem      Size  Used Avail Use% Mounted on
/dev/root        15G  561M   14G   4% /
devtmpfs        398M     0  398M   0% /dev
tmpfs           494M     0  494M   0% /dev/shm
tmpfs           198M  504K  197M   1% /run
tmpfs           5.0M     0  5.0M   0% /run/lock
tmpfs 4.0M 0 4.0M 0% /sys/fs/cgroup2 配置网络
- 1)配置静态网络。编辑 /etc/network/interfaces(记得备份)
sh
auto eth0
iface eth0 inet static
address 192.168.1.10
netmask 255.255.255.0
gateway 192.168.1.1
如果是要自动获取 IP,则将第二行的 static 修改为 dhcp
- 2)配置 DNS。编辑 /etc/resolv.conf 文件
sh
nameserver 8.8.8.8
nameserver 114.114.114.1143 更新系统
3.1 debian
- 1)编辑 /etc/apt/sources.list 文件(记得备份)
sh
deb https://mirrors.tuna.tsinghua.edu.cn/debian/ bullseye main contrib non-free
deb-src https://mirrors.tuna.tsinghua.edu.cn/debian/ bullseye main contrib non-free
deb https://mirrors.tuna.tsinghua.edu.cn/debian/ bullseye-updates main contrib non-free
deb-src https://mirrors.tuna.tsinghua.edu.cn/debian/ bullseye-updates main contrib non-free
deb https://mirrors.tuna.tsinghua.edu.cn/debian/ bullseye-backports main contrib non-free
deb-src https://mirrors.tuna.tsinghua.edu.cn/debian/ bullseye-backports main contrib non-free
deb https://mirrors.tuna.tsinghua.edu.cn/debian-security bullseye-security main contrib non-free
deb-src https://mirrors.tuna.tsinghua.edu.cn/debian-security bullseye-security main contrib non-free
如果提示证书的问题,则将 https 替换成 http。
- 2)更新与升级
sh
apt-get update
apt-get upgrade4 其它配置
4.1 ssh 配置
-
1)安装 ssh:sudo apt-get install -y ssh
-
2)登录时提示:Permission Denied
bash
# 备份
sudo cp /etc/ssh/sshd_config /etc/ssh/sshd_config.`date +%Y%m%d_%H%M%S`

# 修改 /etc/ssh/sshd_config 文件中 PermitRootLogin 为 yes
PermitRootLogin yes
4.2 时间设置
-
1)执行 tzselect 命令,按照提示选择 Asia、China
-
2)执行 TZ='Asia/Shanghai'; export TZ,并添加到 ~/.profile 中。
-
3)更新时间:
- 从 ntp 服务器同步时间:ntpdate ntp.aliyun.com
- 系统时间更新到硬件时间:hwclock --systohc
4.3 中文乱码
sh
# (1)安装 locales
apt-get install locales

# (2)打开 /etc/default/locale 文件,添加如下内容:
#  File generated by update-locale
LANG="zh_CN.UTF-8"
LANGUAGE="zh_CN:en_US:en"
LC_NUMERIC="zh_CN.UTF-8"
LC_TIME="zh_CN.UTF-8"
LC_MONETARY="zh_CN.UTF-8"
LC_PAPER="zh_CN.UTF-8"
LC_IDENTIFICATION="zh_CN.UTF-8"
LC_NAME="zh_CN.UTF-8"
LC_ADDRESS="zh_CN.UTF-8"
LC_TELEPHONE="zh_CN.UTF-8"
LC_MEASUREMENT="zh_CN.UTF-8"

# (3)打开 ~/.bashrc 文件,添加:
export LC_ALL="zh_CN.UTF-8"

# (4)添加如下内容:
echo "en_US.UTF-8 UTF-8" >> /etc/locale.gen
echo "zh_CN.UTF-8 UTF-8" >> /etc/locale.gen
# (5)运行如下命令
locale-gen
5 低配版局域网 NAS
- 1)Cubieboard2 预留有一个 SATA 接口及 5V 电源接口。正好手头有几个闲置的小容量 SSD 硬盘,组成一个低配版 NAS。
5.1 挂载 SSD 硬盘
- 1)查看硬盘信息
bash
# (1)查看硬盘信息
fdisk -l

Disk /dev/mmcblk0: 14.84 GiB, 15931539456 bytes, 31116288 sectors
Units: sectors of 1 * 512 = 512 bytes
Sector size (logical/physical): 512 bytes / 512 bytes
I/O size (minimum/optimal): 512 bytes / 512 bytes
Disklabel type: dos
Disk identifier: 0xed71a818

Device         Boot Start      End  Sectors  Size Id Type
/dev/mmcblk0p1       2048    26623    24576   12M 83 Linux
/dev/mmcblk0p2      26624 31116287 31089664 14.8G 83 Linux


Disk /dev/sda: 238.47 GiB, 256060514304 bytes, 500118192 sectors
Disk model: INTEL SSDSC2KW25
Units: sectors of 1 * 512 = 512 bytes
Sector size (logical/physical): 512 bytes / 512 bytes
I/O size (minimum/optimal): 512 bytes / 512 bytes
Disklabel type: gpt
Disk identifier: 1964757C-3B45-224B-AC5A-75842C918543

Device     Start       End   Sectors   Size Type
/dev/sda1   2048 500117503 500115456 238.5G Linux filesystem
这一步中如果没有出现待的挂载的硬盘,需要检查电源线及 SATA 线,以及硬盘状态。
- 2)本来使用 fdisk 进行 exFAT、ext4 格式的分区,折腾了一晚上没有成功。然后尝试使用 parted 工具来进行分区:
bash
# (1)查看硬盘信息
parted -l

Model: ATA INTEL SSDSC2KW25 (scsi)
Disk /dev/sda: 256GB
Sector size (logical/physical): 512B/512B
Partition Table: gpt
Disk Flags:

Number  Start   End    Size   File system  Name     Flags
 1      1049kB  256GB  256GB  ext2         primary


Model: SD SL16G (sd/mmc)
Disk /dev/mmcblk0: 15.9GB
Sector size (logical/physical): 512B/512B
Partition Table: loop
Disk Flags:

Number  Start  End     Size    File system  Flags
 1      0.00B  15.9GB  15.9GB  fat32


# (2)进入 parted 交互式命令行来操作
parted /dev/sda
h                               # 查看帮助
p                               # 打印出硬盘的分区信息
rm 分区号                       # 删除已经存在的分区
mkpart primary ext2 0.0GB 100% # ext2 格式的分区,空间占据所有剩余空间- 3)格式化与挂载:
bash
# (1)格式化 sda1 分区为 ext2 格式的文件系统
mkfs.ext2 /dev/sda1
# (2)创建新目录(挂载硬盘用)
mkdir /data
# (3)挂载 sda1 分区到 /data 目录(这里可以创建多个分区,分别挂载到不同目录)
mount /dev/sda1 /data
# (4)设置开机自动挂载
echo /dev/sda1 /data ext2 defaults 0 0 >> /etc/fstab
# (5)查看挂载信息
df -h /data

Filesystem      Size  Used Avail Use% Mounted on
/dev/sda1 235G 7.2G 216G 4% /data5.2 安装 Samba
- 1)安装步骤:
bash
# (1)惯例更新系统
apt update && apt upgrade && apt autoremove

# (2)安装 samba
apt install samba       # Samba 在 Debian 11 上的默认服务名为 nmbd
                        # 默认配置文件:/etc/samba/smb.conf
                        # 重启命令:systemctl restart nmbd

# (3)添加用户
useradd -s /bin/bash -m samba   # 创建一个 Linux 用户(Samba 使用 Linux 用户体系,但有自已独立认证机制)
                                # -s 指定用户登入后使用的 shell
                                # -m/-M  是否在 /home 目录下创建用户目录
smbpasswd -a samba # 创建 samba 用户,并设置 samba 用户密码- 2)配置 /etc/samba/smb.conf 文件
ini
[shared]
# 共享文件目录描述
comment = Shared Dirs
# 共享文件目录(这里设置为 SSD 挂载的目录,如 /data)
path = /mnt/sdb1
# 设置共享是否允许guest账户访问
public = no
# 设置共享的管理员,如果 security =share 时,引项无效,多用户中间使用逗号隔开,例如admin users = samba,user1,user2
admin users = samba
# 设置共享是否可浏览,如果no就表示隐藏,需要通过IP+共享名称进行访问
browseable = yes
# 设置共享是否具有可写权限
writeable = yes
# 创建的文件权限为666
create mask = 0666
# 创建的目录权限为666
directory mask = 0666
# 设置共享是否具有只读权限
# read only  =  yes/no
# 设置允许访问共享的用户,例如valid users = user1,user2,@group1,@group2(多用户或组使用逗号隔开,@group表示group用户组)
# valid users  =  username
# 设置不允许访问共享的用户
# invalid users  =  username
# 设置在共享具有写入权限的用户,例如例如write list  = user1,user2,@group1,@group2(多用户或组使用逗号隔开,@group表示group用户组)
# write list = username- 3)重启 samba 服务:
sh
systemctl restart nmbd5.3 登录
5.3.1 Windows 下登录
-
1)Win + R 打开后输入:\\:ip
-
2)如果出现 "你不能访问此共享文件夹,因为你组织的安全策略..." 的提示,则通过以下方法:
- (1)Win + R 打开后输入:gpedit.msc
- (2)找到 "计算机配置" -> "管理模板" -> "网络" -> "Lanman 工作站"
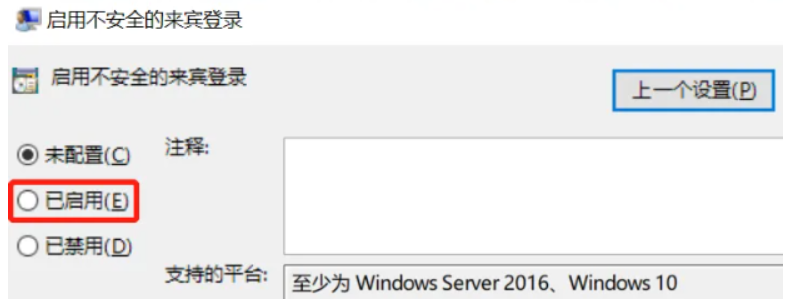
- (3)双击 "启用不安全的来宾登录",选择 "已启用":
-
3)Windows 下,在 PowerShell 中打开 samba 共享的目录:
bat
New-SmbMapping -RemotePath "\\192.168.1.50\share" -LocalPath Z:

cd z:

Get-SmbMapping      # 获取 samba 的映射
Remove-SmbMapping   # 删除 smaba 的映射
5.3.2 Android 手机登录
- Android(华为手机):文件管理 -> 网络邻居 -> 添加设备:
- 主机名或 IP 地址:192.168.0.x
- 用户名:samba
- 密码:密码
附录1:nginx 安装
-
1)下载:https://nginx.org/en/download.html
-
2)安装
bash# 前置软件 sudo apt-get install openssl libssl-dev libpcre3 libpcre3-dev zlib1g-dev make # CentOS7.x 下: yum install -y openssl-devel pcre pcre-devel zlib make # check ./configure --with-http_gzip_static_module --http-client-body-temp-path=/usr/local/nginx/temp/client --http-proxy-temp-path=/usr/local/nginx/temp/proxy --http-fastcgi-temp-path=/usr/local/nginx/temp/fastcgi --http-uwsgi-temp-path=/usr/local/nginx/temp/uwsgi --http-scgi-temp-path=/usr/local/nginx/temp/scgi --with-http_stub_status_module --with-http_ssl_module --with-file-aio --with-http_realip_module --with-stream # 安装 sudo make && sudo make install
