一、安装环境
准备三台主机:
192.168.1.66 k8s-master
192.168.1.77 k8s-node01
192.168.1.88 k8s-node02
网段:
Pod ⽹段 172.16.0.0/16
Service ⽹段 10.96.0.0/16
注:宿主机⽹段、Pod ⽹段、Service ⽹段不能重复,服务器 IP 地址不能设置为 DHCP,需配置为静态 IP。
二、 前期准备
1、用master主机对另外两台node机进行免密登录
root@k8s-master \~# ssh-keygen
root@k8s-master \~# ssh-copy-id root@192.168.1.77
root@k8s-master \~# ssh-copy-id root@192.168.1.88
2、配置主机映射
root@k8s-master \~# vim /etc/hosts
192.168.1.66 k8s-master
192.168.1.77 k8s-node01
192.168.1.88 k8s-node02
root@k8s-master \~# scp /etc/hosts root@192.168.1.77:/etc/hosts
root@k8s-master \~# scp /etc/hosts root@192.168.1.88:/etc/hosts
3、上传repo源
kubernetes.repo
docker-ce.repo
还需要阿里云源以及epel.repo源
如果没有的话也可以在官网下载或是把我之前的文章中把对应的内容写入docker-ce.repo和kubernetes.repo 里。
root@k8s-master \~# yun clean all && yum makecache
三、前期环境配置
(对master以及两台node机子进行以下操作)
1、安装必备工具
root@k8s-master \~# yum install wget jq psmisc vim net-tools telnet yum-utils device-mapper-persistent-data lvm2 git tree -y
2、关闭安全及swap分区
root@k8s-master \~# swapoff -a && sysctl -w vm.swappiness=0
root@k8s-master \~# sed -ri '/^\^#*swap/s@^@#@' /etc/fstab
3、设置时间同步
root@k8s-master \~# yum -y install ntpdate
root@k8s-master \~# ntpdate time2.aliyun.com
root@k8s-master \~# crontab -e
* 5 * * * /usr/sbin/ntpdate time2.aliyun.com
4、设置限制条件
root@k8s-master \~# ulimit -SHn 65535 #单个进程可以打开的⽂件数量将被限制为 65535
root@k8s-master \~# vim /etc/security/limits.conf
* soft nofile 65536
* hard nofile 131072
* soft nproc 65535
* hard nproc 655350
* soft memlock unlimited
* hard memlock unlimited
5、安装k8s高可用性Git仓库
root@k8s-master \~# cd /root/ ; git clone https://gitee.com/dukuan/k8s-ha-install.git # 在 /root/ ⽬录下克隆⼀个名为 k8s-ha-install.git 的 Git 仓库
6、更新系统
root@k8s-master \~# yum update -y --exclude=kernel* --nobest && reboot
四、内核模块配置
root@k8s-master \~# yum install ipvsadm ipset sysstat conntrack libseccomp -y
root@k8s-master \~# modprobe -- ip_vs # 使用 modprobe 命令加载内核模块,核心 IPVS 模块。
root@k8s-master \~# modprobe -- ip_vs_rr # IPVS 负载均衡算法 rr
root@k8s-master \~# modprobe -- ip_vs_wrr # IPVS 负载均衡算法 wrr
root@k8s-master \~# modprobe -- ip_vs_sh # 用于源端负载均衡的模块
root@k8s-master \~# modprobe -- nf_conntrack # 用于网络流量过滤和跟踪的模块
root@k8s-master \~# vim /etc/modules-load.d/ipvs.conf
在系统启动时加载下列 IPVS 和相关功能所需的模块
ip_vs # 负载均衡模块
ip_vs_lc # 用于实现基于连接数量的负载均衡算法
ip_vs_wlc # 用于实现带权重的最少连接算法的模块
ip_vs_rr # 负载均衡rr算法模块
ip_vs_wrr # 负载均衡wrr算法模块
ip_vs_lblc # 负载均衡算法,它结合了最少连接(LC)算法和基于偏置的轮询(Round Robin with Bias)算法
ip_vs_lblcr # 用于实现基于链路层拥塞状况的最少连接负载调度算法的模块
ip_vs_dh # 用于实现基于散列(Hashing)的负载均衡算法的模块
ip_vs_sh # 用于源端负载均衡的模块
ip_vs_fo # 用于实现基于本地服务的负载均衡算法的模块
ip_vs_nq # 用于实现NQ算法的模块
ip_vs_sed # 用于实现随机早期检测(Random Early Detection)算法的模块
ip_vs_ftp # 用于实现FTP服务的负载均衡模块
ip_vs_sh
nf_conntrack # 用于跟踪网络连接的状态的模块
ip_tables # 用于管理防护墙的机制
ip_set # 用于创建和管理IP集合的模块
xt_set # 用于处理IP数据包集合的模块,提供了与iptables等网络工具的接口
ipt_set # 用于处理iptables规则集合的模块
ipt_rpfilter # 用于实现路由反向路径过滤的模块
ipt_REJECT # iptables模块之一,用于将不符合规则的数据包拒绝,并返回特定的错误码
ipip # 用于实现IP隧道功能的模块,使得数据可以在两个网络之间进行传输
root@k8s-master \~# lsmod | grep -e ip_vs -e nf_conntrack # 查看已写入加载的模块
ip_vs_sh 16384 0
ip_vs_wrr 16384 0
ip_vs_rr 16384 0
ip_vs 172032 6 ip_vs_rr,ip_vs_sh,ip_vs_wrr
nf_conntrack 172032 4 xt_conntrack,nf_nat,ipt_MASQUERADE,ip_vs
nf_defrag_ipv6 20480 2 nf_conntrack,ip_vs
nf_defrag_ipv4 16384 1 nf_conntrack
libcrc32c 16384 5 nf_conntrack,nf_nat,nf_tables,xfs,ip_vs
root@k8s-master \~# vim /etc/sysctl.d/k8s.conf
写入k8s所需内核模块
net.bridge.bridge-nf-call-iptables = 1 # 控制网络桥接与iptables之间的网络转发行为
net.bridge.bridge-nf-call-ip6tables = 1 # 用于控制网络桥接(bridge)的IP6tables过滤规则。当该参数设置为1时,表示启用对网络桥接的IP6tables过滤规则
fs.may_detach_mounts = 1 # 用于控制文件系统是否允许分离挂载,1表示允许
net.ipv4.conf.all.route_localnet = 1 # 允许本地网络上的路由。设置为1表示允许,设置为0表示禁止。
vm.overcommit_memory=1 # 控制内存分配策略。设置为1表示允许内存过量分配,设置为0表示不允许。
vm.panic_on_oom=0 # 决定当系统遇到内存不足(OOM)时是否产生panic。设置为0表示不产生panic,设置为1表示产生panic。
fs.inotify.max_user_watches=89100 # inotify可以监视的文件和目录的最大数量。
fs.file-max=52706963 # 系统级别的文件描述符的最大数量。
fs.nr_open=52706963 # 单个进程可以打开的文件描述符的最大数量。
net.netfilter.nf_conntrack_max=2310720 # 网络连接跟踪表的最大大小。
net.ipv4.tcp_keepalive_time = 600 # TCP保活机制发送探测包的间隔时间(秒)。
net.ipv4.tcp_keepalive_probes = 3 # TCP保活机制发送探测包的最大次数。
net.ipv4.tcp_keepalive_intvl =15 # TCP保活机制在发送下一个探测包之前等待响应的时间(秒)。
net.ipv4.tcp_max_tw_buckets = 36000 # TCP TIME_WAIT状态的bucket数量。
net.ipv4.tcp_tw_reuse = 1 # 允许重用TIME_WAIT套接字。设置为1表示允许,设置为0表示不允许。
net.ipv4.tcp_max_orphans = 327680 # 系统中最大的孤套接字数量。
net.ipv4.tcp_orphan_retries = 3 # 系统尝试重新分配孤套接字的次数。
net.ipv4.tcp_syncookies = 1 # 用于防止SYN洪水攻击。设置为1表示启用SYN cookies,设置为0表示禁用。
net.ipv4.tcp_max_syn_backlog = 16384 # SYN连接请求队列的最大长度。
net.ipv4.ip_conntrack_max = 65536 # IP连接跟踪表的最大大小。
net.ipv4.tcp_max_syn_backlog = 16384 # 系统中最大的监听队列的长度。
net.ipv4.tcp_timestamps = 0 # 用于关闭TCP时间戳选项。
net.core.somaxconn = 16384 # 用于设置系统中最大的监听队列的长度
root@k8s-master \~# reboot
保存后,所有节点重启,保证重启后内核依然加载
五、基本组件安装
1、安装Containerd
5.1.1安装Docker
root@k8s-master \~# yum remove -y podman runc containerd # 卸载之前的containerd
root@k8s-master \~# yum install docker-ce docker-ce-cli containerd.io -y # 安装Docker和containerd
5.1.2配置Containerd所需模块
root@k8s-master \~# cat <<EOF | sudo tee /etc/modules-load.d/containerd.conf
>overlay # 用于支持Overlay网络文件系统的模块,它可以在现有的文件系统之上创建叠加层,以实现虚拟化、隔离和管理等功能。
> br_netfilter # 用于containerd的网络过滤模块,它可以对进出容器的网络流量进行过滤和管理。
root@k8s-master \~# modprobe -- overlay
root@k8s-master \~# modprobe -- br_netfilter
5.1.3配置 Containerd 所需内核
root@k8s-master \~# cat <<EOF | sudo tee /etc/sysctl.d/99-kubernetes-cri.conf # tee:读取的数据写入到一个或多个文件中,同时还将其复制到标准输出
> net.bridge.bridge-nf-call-iptables = 1 # 用于控制网络桥接是否调用iptables进行包过滤和转发。
> net.ipv4.ip_forward = 1 # 路由转发,1为开启
> net.bridge.bridge-nf-call-ip6tables = 1 # 控制是否在桥接接口上调用IPv6的iptables进行数据包过滤和转发。
> EOF
net.bridge.bridge-nf-call-iptables = 1
net.ipv4.ip_forward = 1
net.bridge.bridge-nf-call-ip6tables = 1
root@k8s-master \~# sysctl --system
1.4 Containerd 配置⽂件
root@k8s-master \~# mkdir -p /etc/containerd
root@k8s-master \~# containerd config default | tee /etc/containerd/config.toml
root@k8s-master \~# vim /etc/containerd/config.toml
63 sandbox_image = "registry.cn-hangzhou.aliyuncs.com/google_containers/pause:3.9"
127 SystemdCgroup = true
root@k8s-master \~# systemctl daemon-reload # 加载systemctl控制脚本
root@k8s-master \~# systemctl enable --now containerd # 启动containerd并设置开机启动
1.5 配置 crictl 客户端连接的运⾏位置
root@k8s-master \~# cat > /etc/crictl.yaml <<EOF
>runtime-endpoint: unix:///run/containerd/containerd.sock
>image-endpoint: unix:///run/containerd/containerd.sock
>timeout: 10
>debug:false
>EOF
2、安装 Kubernetes 组件
root@k8s-master \~#yum -y install kubelet-1.28*
root@k8s-master \~#yum -y install kubeadm-1.28*
root@k8s-master \~#yum -y install kubectl-1.28*
root@k8s-master \~#systemctl deamon-reload
root@k8s-master \~#ls /var/lib
root@k8s-master \~#systemctl enable --now kubelet
root@k8s-master \~#netstat -lnput | grep kube
3、Kubernetes 集群初始化
(接下来的的操作单独在master上进行)
5.3.1 Kubeadm 配置⽂件
root@k8s-master \~#vim kubeadm-config.yaml #将里面排除最后两个地址后所有的地址改为本机地址
root@k8s-master \~# kubeadm config migrate --old-config kubeadm-config.yaml --new-config new.yaml # 将旧的kubeadm配置⽂件转换为新的格式
5.3.2 下载组件镜像
root@k8s-master \~#kubeadm config images pull --config new.yaml # 通过新的配置⽂件new.yaml从指定的阿⾥云仓库拉取kubernetes组件镜像
5.3.3 集群初始化
root@k8s-master \~# kubeadm init --config /root/new.yaml --upload-certs #生成节点链接
kubeadm join 192.168.1.66:6443 --token 7t2weq.bjbawausm0jaxury --discovery-token-ca-cert-hash sha256:304a92f45959230f54663367ae9a01715f35c9958c7280497b3337b3a
root@k8s-master \~#vim token
kubeadm join 192.168.1.66:6443 --token 7t2weq.bjbawausm0jaxury --discovery-token-ca-cert-hash sha256:304a92f45959230f54663367ae9a01715f35c9958c7280497b3337b3a
5.3.4 前往node节点加入集群
node01
root@k8s-node01 \~# systemctl stop kubelet
root@k8s-node01 \~# kubeadm join 192.168.1.66:6443 --token 7t2weq.bjbawausm0jaxury --discovery-token-ca-cert-hash sha256:304a92f45959230f54663367ae9a01715f35c9958c7280497b3337b3a
node02
root@k8s-node01 \~# systemctl stop kubelet
root@k8s-node01 \~# kubeadm join 192.168.1.66:6443 --token 7t2weq.bjbawausm0jaxury --discovery-token-ca-cert-hash sha256:304a92f45959230f54663367ae9a01715f35c9958c7280497b3337b3a
回到master主机:
5.3.5 加载环境变量
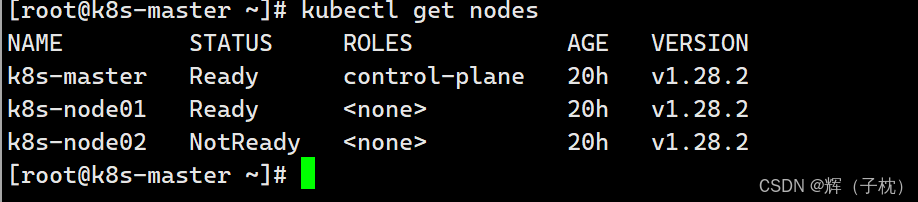
root@k8s-master \~# kubectl get nodes #查看集群
root@k8s-master \~# vim .bashrc #在最后一行加入(开机自启)
export KUBECONFIG=/etc/kubernetes/admin.conf
5.3.6查看组件容器状态
root@k8s-master \~# kubectl get po -n kube-system
5.3.7Calico 组件安装
root@k8s-master \~# cd k8s-ha-install/
root@k8s-master \~# git checkout manual-installation-v1.28.x && cd calico/
root@k8s-master \~# kubectl apply -f calico.yaml # 创建calico的pod
root@k8s-master \~# kubectl get po -A 如果到了这里前面还有机子没有跑起来则输入下面6行代码,反之则跳过 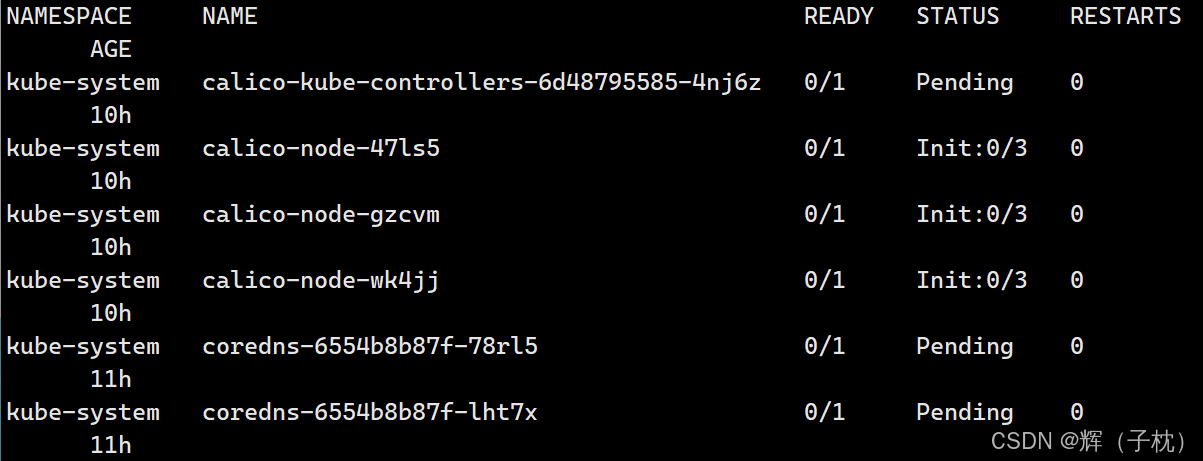
root@k8s-master \~# yum list kernel #这6行是三台机子都要使用的命令
root@k8s-master \~# yum update kernel
root@k8s-master \~# cd /etc/cni/net.d/
root@k8s-master net.d# ls
10-calico.conflist calico-kubeconfig # 这两个文件是自己放的,原来没有
root@k8s-master \~# reboot
root@k8s-master \~# kubectl get po -A # 这个时候等一会儿前面的服务就开始创建并运行了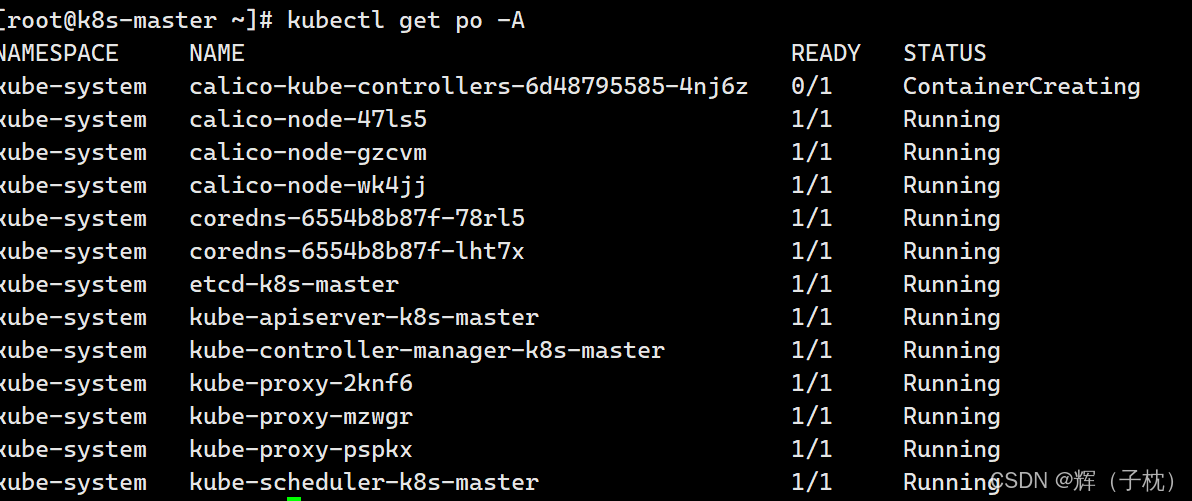
如果这个时候还有问题的话可以去/var/log/messages 查看最后一行就可以找到出错的地方
root@k8s-master \~# kubectl run nginx --image=nginx:latest
root@k8s-master \~# kubectl get po -Aowide | grep nginx
root@k8s-master \~# kubectl logs nginx
root@k8s-master \~# kubectl delete pod nginx
root@k8s-master \~# curl 172.16.85.194
5.3.8Metrics 部署
5.3.8.1 复制证书到所有 node 节点
root@k8s-master \~# scp /etc/kubernetes/pki/front-proxy-ca.crt k8s-node01:/etc/kubernetes/pki-proxy-ca.crt
root@k8s-master \~# scp /etc/kubernetes/pki/front-proxy-ca.crt k8s-node02:/etc/kubernetes/pki-proxy-ca.crt
#向node01、node02节点发送代理证书
5.3.8.2 布置metrics(监控)
root@k8s-master \~# mkdir pods #上传components.yaml
root@k8s-master \~# cd pods
root@k8s-master pods#ls
components.yaml 这里的的这个文件也是我们传上去的
root@k8s-master pods# kubectl create -f components.yaml # 添加metric server的pod资源
root@k8s-master pods# kubectl get po -A |grep metric
root@k8s-master pods# kubectl top nodes # 查看node节点的系统资源使⽤情况
root@k8s-master pods# kubectl top pods -A # 查看pod容器的系统资源使⽤情况
5.3.9 Dashboard部署
5.3.9.1安装组件
root@k8s-master pods# cd k8s-ha-install/dashboard/
root@k8s-master dashboard# vim dashboard.yaml # 啥也不用改,可以进去看看脚本
root@k8s-master dashboard# vim dashboard-user.yaml # 啥也不用改,可以进去看看脚本
root@k8s-master dashboard# kubectl create -f . # 建⽴dashboard的pod资源
root@k8s-master dashboard# kubectl get po -A
root@k8s-master dashboard# kubectl get po -A|grep dashboard
5.3.9.2 更改 svc 模式
root@k8s-master dashboard# kubectl edit svc kubernetes-dashboard -n kubernetes-dashboard
type: NodePort
5.3.9.3 查看访问端口号
root@k8s-master dashboard# kubectl get svc kubernetes-dashboard -n kubernetes-dashboard # 获取kubernetes-dashboard状态信息,包含端⼝,服务IP等
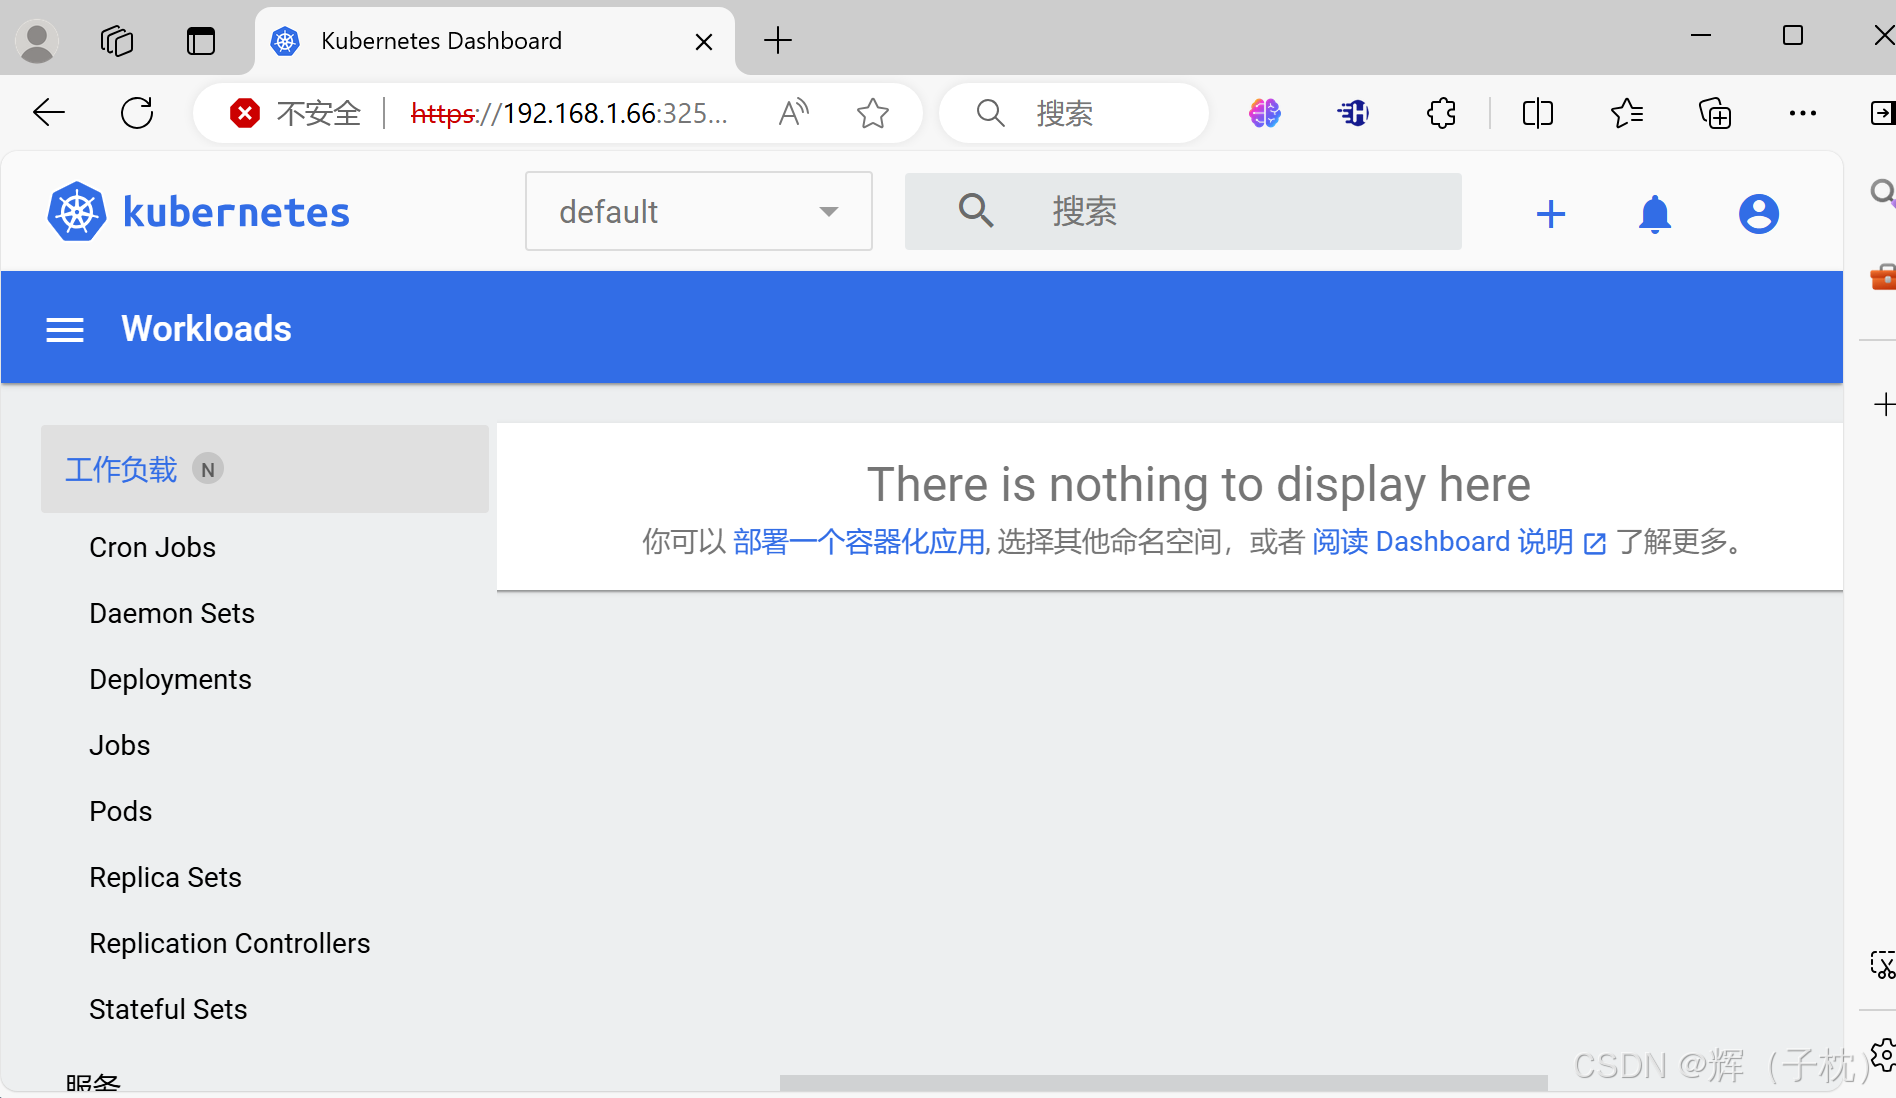
通过浏览器访问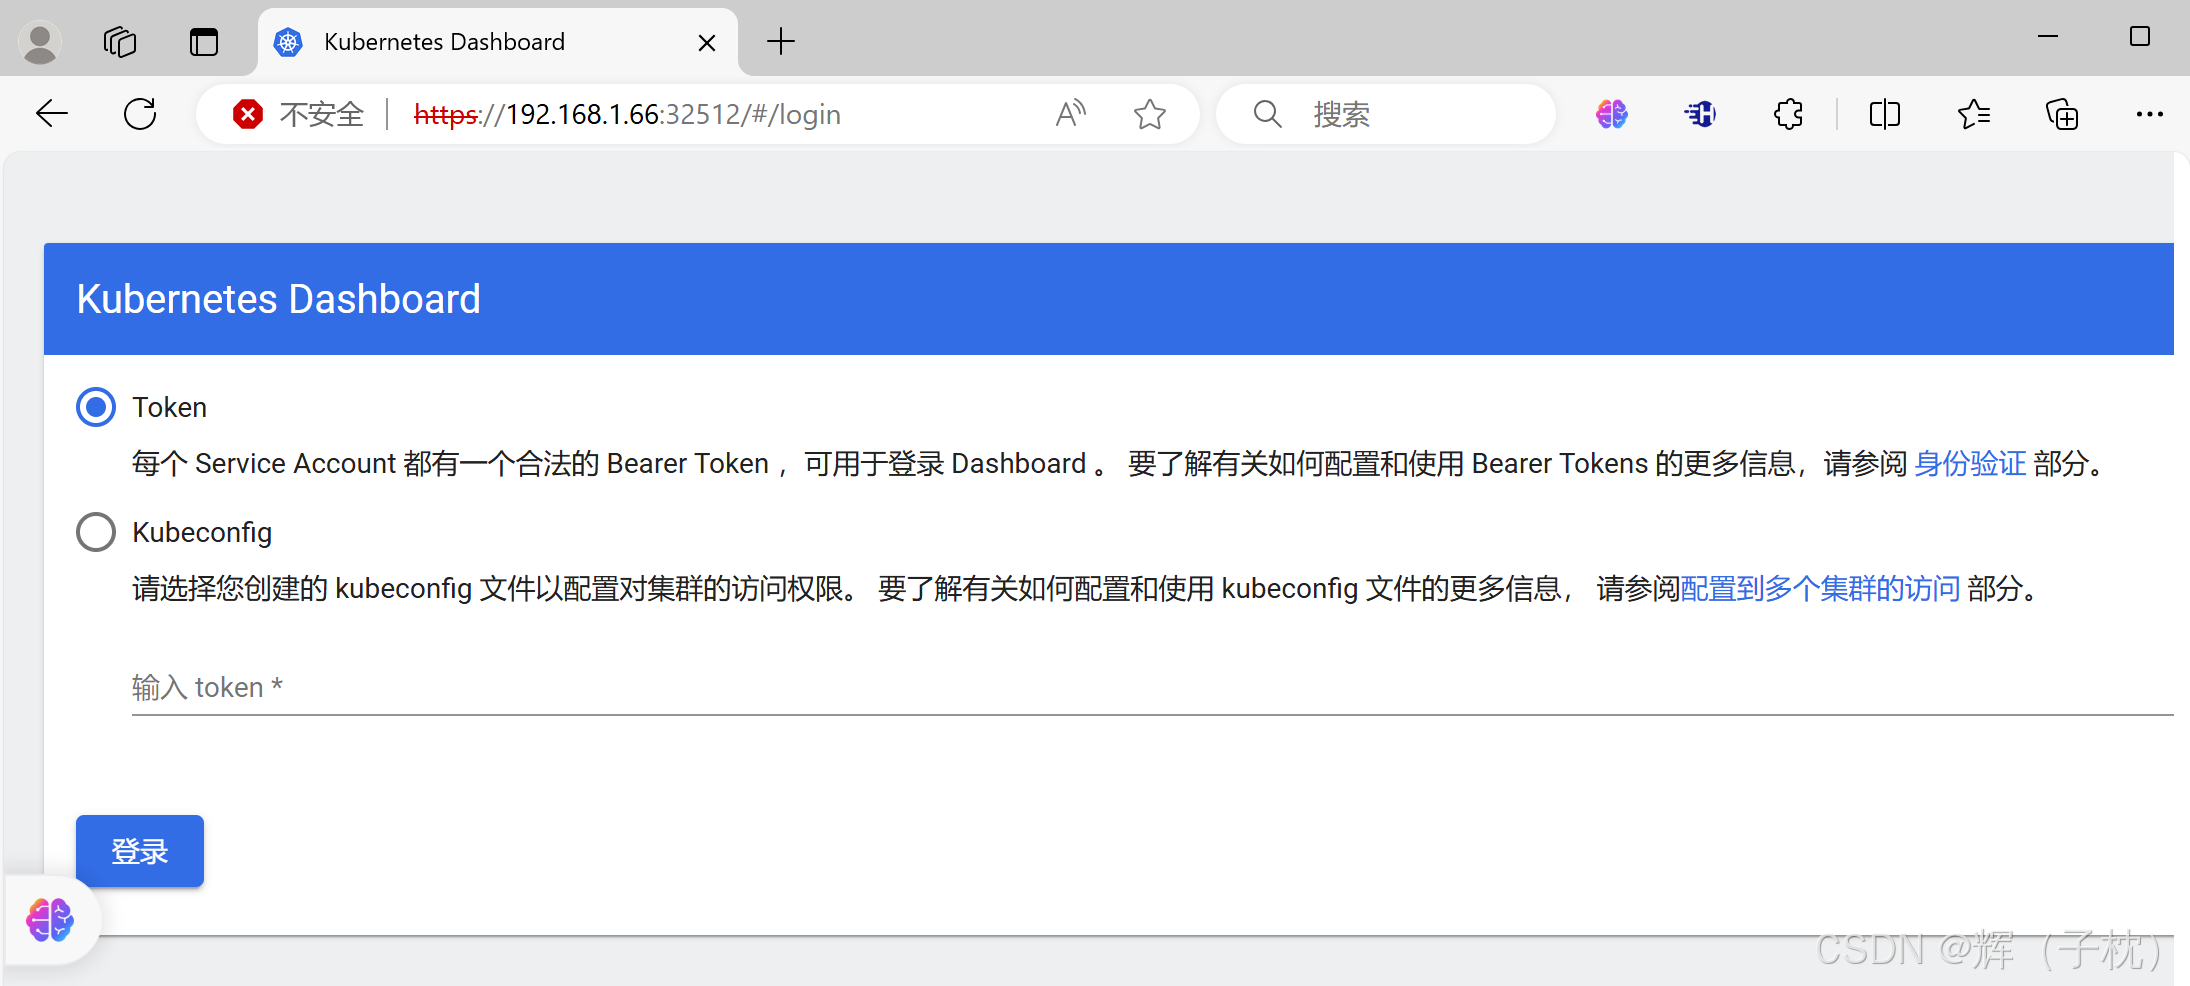
5.3.9.4创建登录token
root@k8s-master dashboard# kubectl create token admin-user -n kube-system
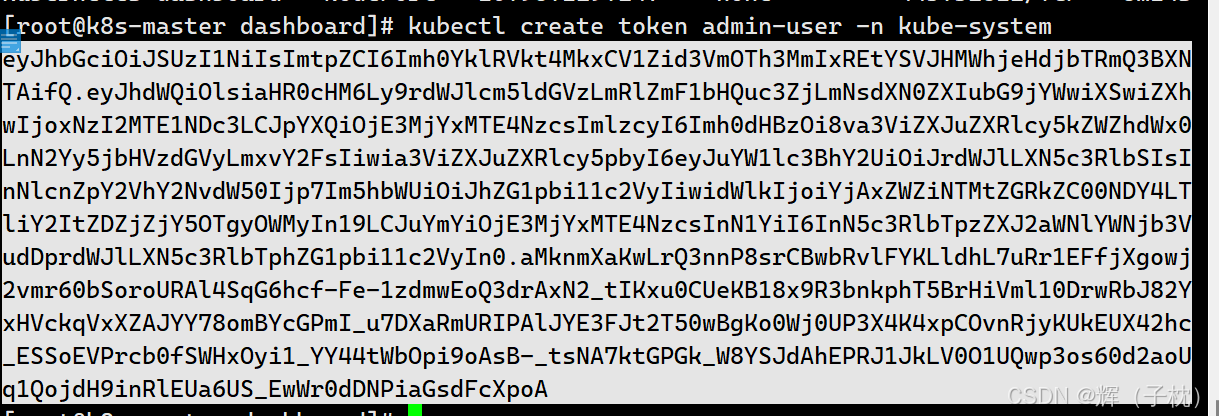
回到浏览器输入token密码登录
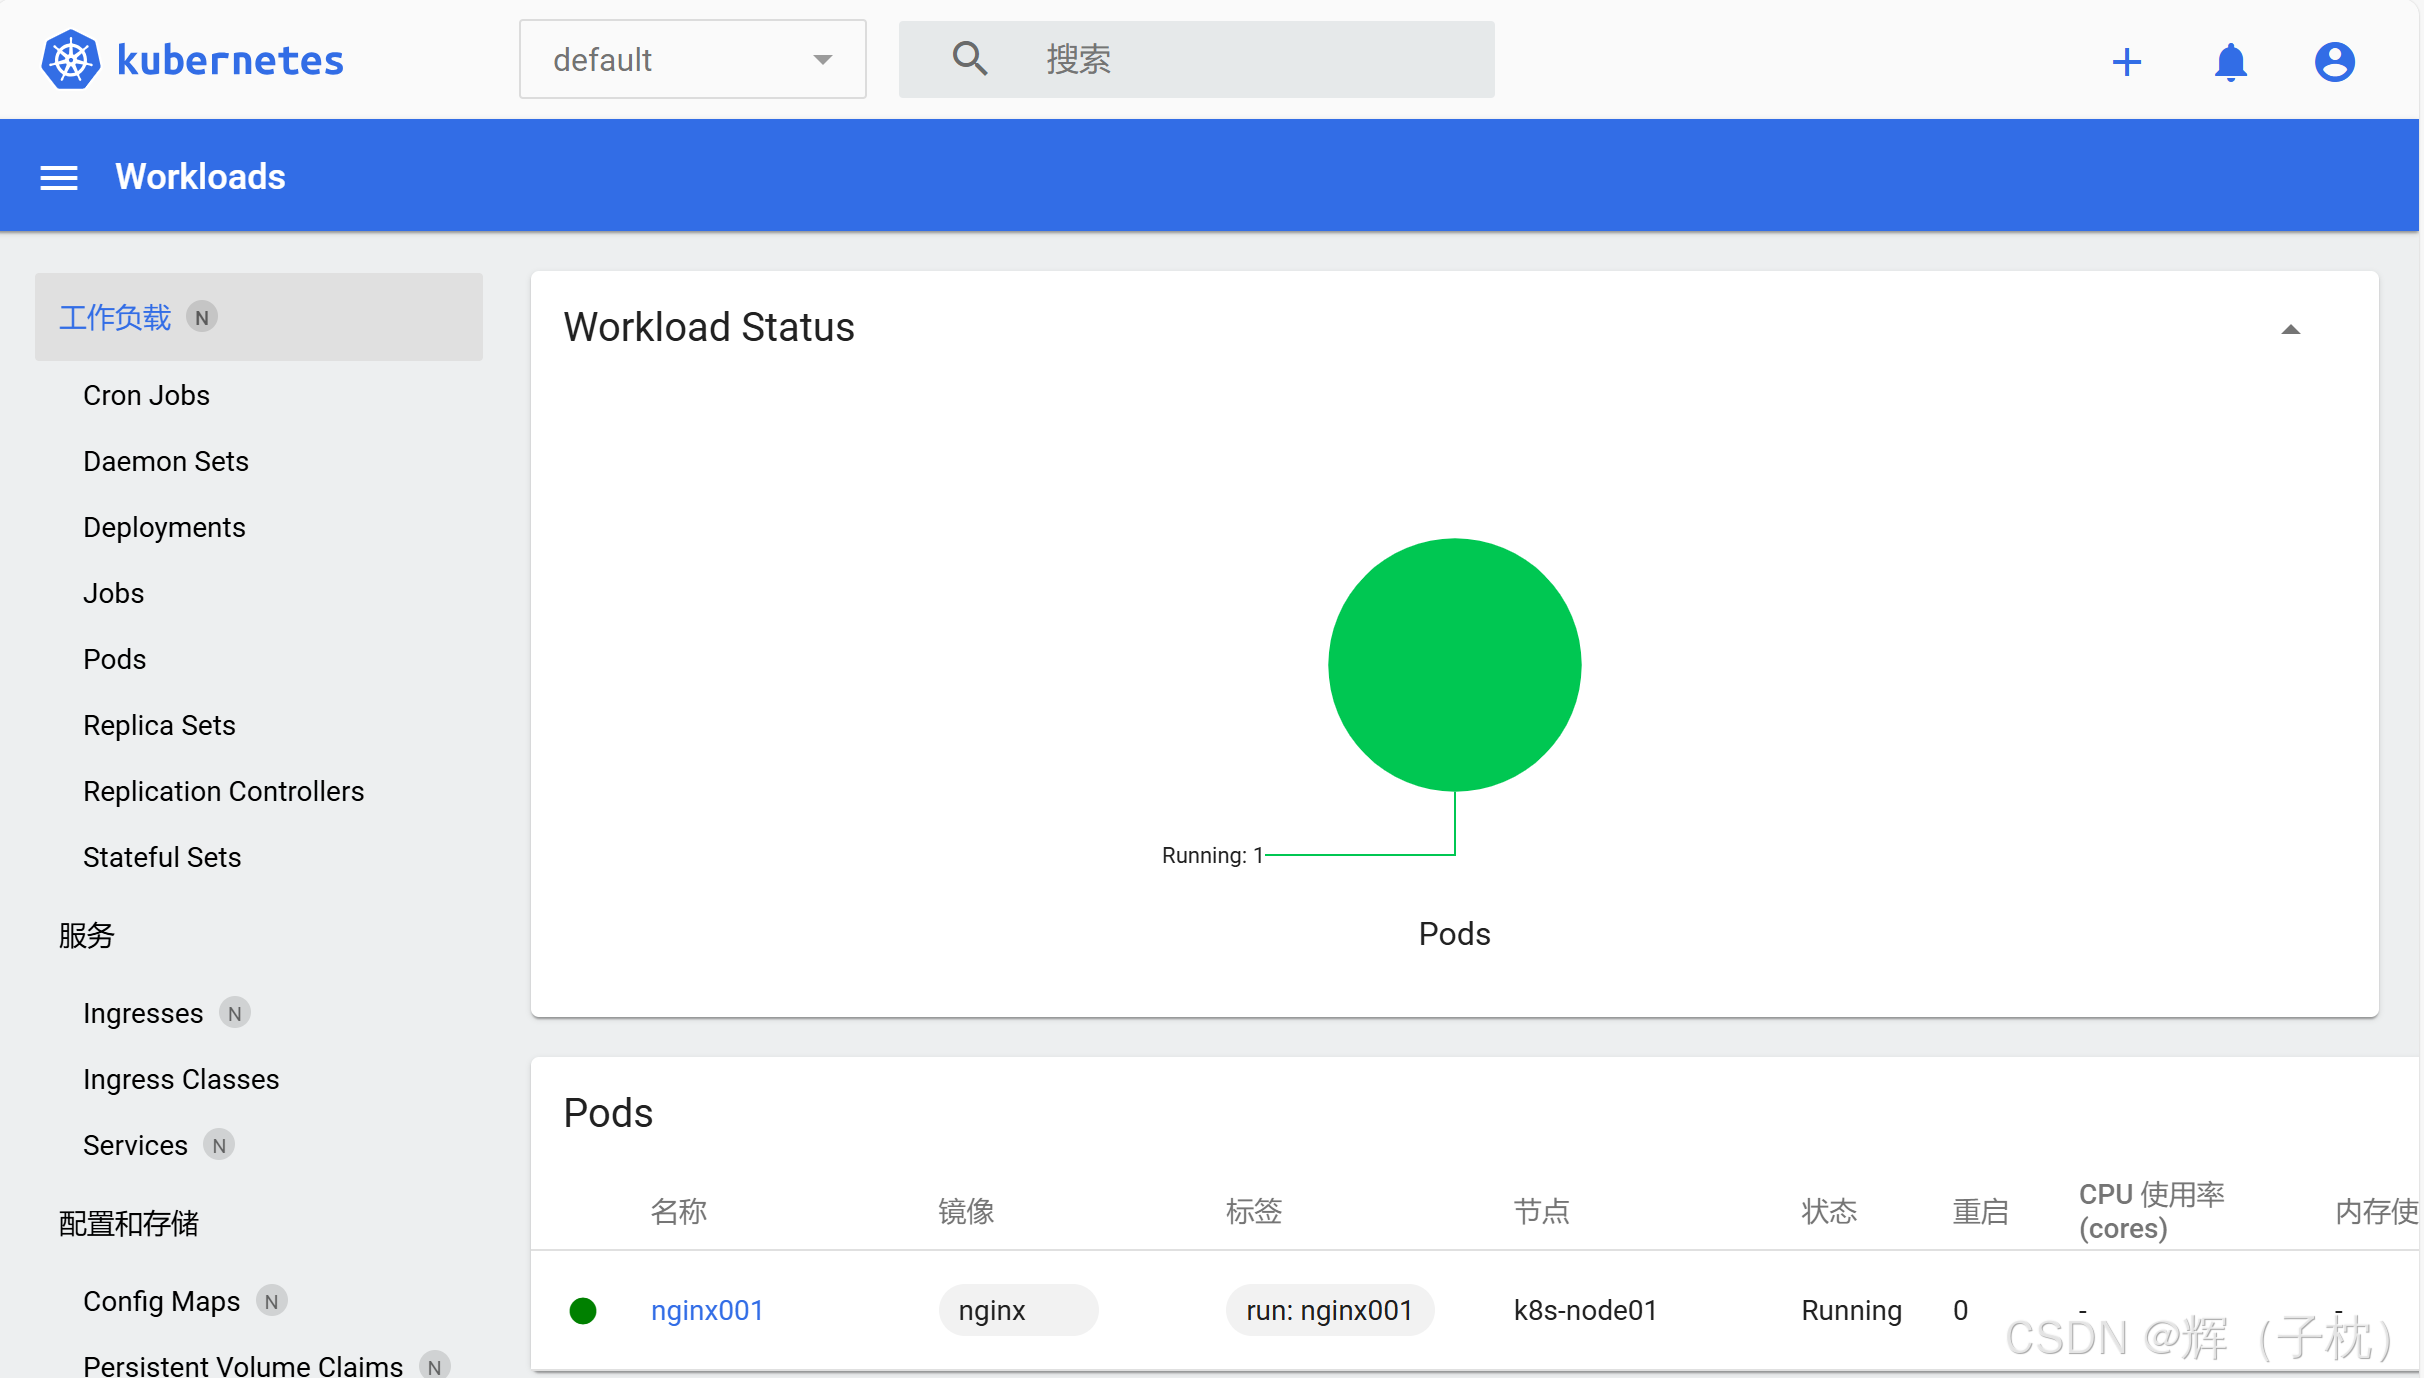
root@k8s-master dashboard# kubectl run nginx001 --image=nginx
root@k8s-master dashboard# cd
root@k8s-master \~# kubectl get pods -A |grep Proxy
5.4 Kube-Proxy
5.4.1 改为ipvs模式
root@k8s-master \~# kubectl edit cm kube-proxy -n kube-system
mode: ipvs
5.4.2 更新 Kube-Proxy 的 Pod
root@k8s-master \~# kubectl patch daemonset kube-proxy -p "{\"spec\":{\"template\":{\"metada{\"annotations\":{\"date\":\"`date +'%s'`\"}}}}}" -n kube-system
root@k8s-master \~# curl 127.0.0.1:10249/proxyMode
ipvs
root@k8s-master \~#tail -f /var/log/messages
root@k8s-master \~# kubectl get svc
root@k8s-master \~# kubectl get po -Aowide #查看pod容器详细信息
root@k8s-master \~# kubectl get po -A|wc -l #查看pod有几行
5.4.3 验证是否可正常创建参数
root@k8s-master \~# kubectl create deploy cluster-test --image=registry.cn-beijing.aliyuncs.cbalo/debug-tools -- sleep 3600
deployment.apps/cluster-test created # 已创建,表示正常
root@k8s-master \~# kubectl get po -A|wc -l
root@k8s-master \~# kubectl get po -A|grep clu
root@k8s-master \~# kubectl exec -it cluster-test-66bb44bd88-x9sv5 -- bash ## 进⼊pod下的某个容器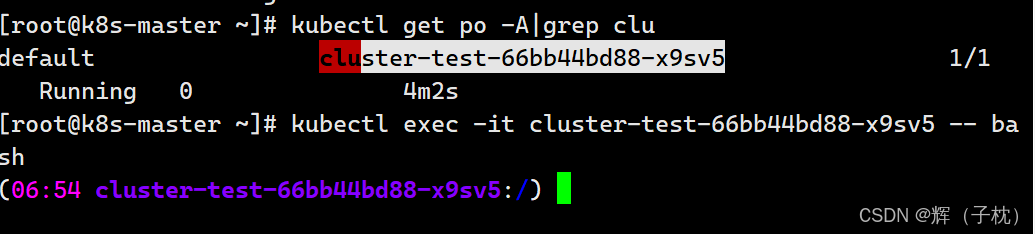
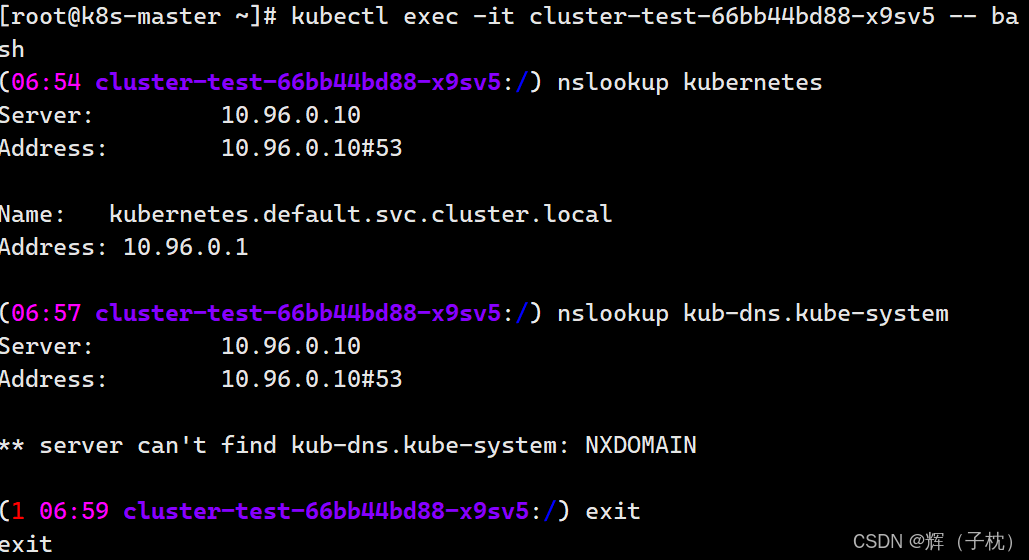
root@k8s-master \~# curl -k https://10.96.0.1:443
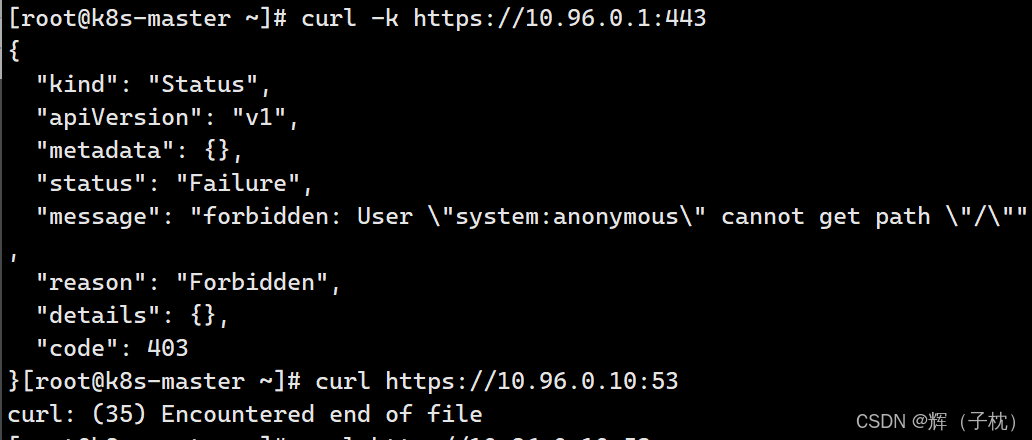
root@k8s-master \~# curl http://10.96.0.10:53 #这里这个是由于不安全所以访问不到
root@k8s-master \~# ping 172.16.58.195
五、Kubernetes 自动补齐
root@k8s-master \~# source <(kubectl completion bash) # 临时开启自动补齐功能
root@k8s-master \~# kubectl echo "source <(kubectl completion bash)" >> ~/.bashrc # 永久开启自动补齐功能