目录
[4.1 camera.py](#4.1 camera.py)
[4.2 interaction.py](#4.2 interaction.py)
[4.3 object_detection.py](#4.3 object_detection.py)
[4.5 运行结果](#4.5 运行结果)
1.物品识别
该项目使用Python,OpenCV进行图像捕捉,进行物品识别。我们将使用YOLO(You Only Look Once)模型进行物品识别,YOLO是一个高效的实时物体检测系统。
2.模型介绍
YOLO(You Only Look Once)是一种目标检测算法,它在实时性和精确度上取得了很好的平衡。它的核心思想是在一张图片上同时预测出所有物体的位置和类别,而无需像传统的区域提议网络(R-CNN)那样分步骤进行。
3.文件框架

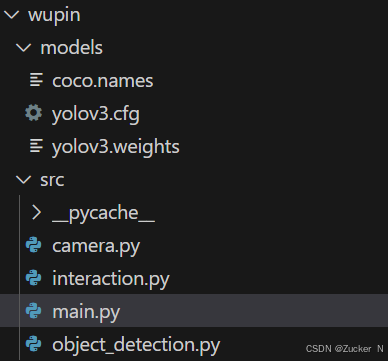
models中的定义标签文件可以搜索yolo模型来找,下面的四个代码文件是主文件,camera是调用电脑摄像头,interaction是调用opencv绘制图像框,object_detection是定义物品检测函数,main是主函数。
运行main函数即可实现物品检测。
4.代码示例
4.1 camera.py
import cv2  # 导入OpenCV库

def get_camera_frame():
    cap = cv2.VideoCapture(0)  # 打开摄像头
    if not cap.isOpened():
        raise Exception("无法打开摄像头。")  # 如果无法打开摄像头,抛出异常

    ret, frame = cap.read()  # 读取帧
    cap.release()  # 释放摄像头

    if not ret:
        raise Exception("读取照片信息失败。")  # 如果读取失败,抛出异常

    return frame  # 返回捕捉到的帧
4.2 interaction.py
import cv2  # 导入OpenCV库

def draw_boxes(frame, detections):
    for (class_name, confidence, box) in detections:
        x, y, w, h = box
        label = f"{class_name} {confidence:.2f}"  # 创建标签
        cv2.rectangle(frame, (x, y), (x + w, y + h), (0, 255, 0), 2)  # 绘制矩形框
        cv2.putText(frame, label, (x, y - 10), cv2.FONT_HERSHEY_SIMPLEX, 0.5, (0, 255, 0), 2)  # 绘制标签
    return frame  # 返回绘制后的帧
4.3 object_detection.py
import cv2  # 导入OpenCV库,用于计算机视觉任务
import numpy as np  # 导入NumPy库,用于处理数组

class ObjectDetector:
    def __init__(self, config_path, weights_path, names_path):
        # 初始化YOLO模型
        self.net = cv2.dnn.readNetFromDarknet(config_path, weights_path)
        self.layer_names = self.net.getLayerNames()
        # 获取YOLO模型的输出层
        self.output_layers = [self.layer_names[i - 1] for i in self.net.getUnconnectedOutLayers()]
        # 读入类别名称
        with open(names_path, 'r') as f:
            self.classes = [line.strip() for line in f.readlines()]

    def detect_objects(self, frame):
        height, width = frame.shape[:2]  # 获取图像的高度和宽度
        # 将图像转换为YOLO模型输入所需的blob格式
        blob = cv2.dnn.blobFromImage(frame, 0.00392, (416, 416), (0, 0, 0), True, crop=False)
        self.net.setInput(blob)  # 设置YOLO模型的输入
        outs = self.net.forward(self.output_layers)  # 前向传播,获取检测结果

        class_ids = []  # 存储检测到的类别ID
        confidences = []  # 存储检测到的置信度
        boxes = []  # 存储检测到的边框

        # 处理每个输出层的检测结果
        for out in outs:
            for detection in out:
                scores = detection[5:]  # 获取每个类别的置信度分数
                class_id = np.argmax(scores)  # 获取置信度最高的类别ID
                confidence = scores[class_id]  # 获取最高置信度
                if confidence > 0.5:  # 过滤低置信度的检测结果
                    center_x = int(detection[0] * width)
                    center_y = int(detection[1] * height)
                    w = int(detection[2] * width)
                    h = int(detection[3] * height)
                    x = int(center_x - w / 2)
                    y = int(center_y - h / 2)
                    boxes.append([x, y, w, h])
                    confidences.append(float(confidence))
                    class_ids.append(class_id)

        # 非极大值抑制,去除冗余的边框
        indices = cv2.dnn.NMSBoxes(boxes, confidences, 0.5, 0.4)
        result = []
        if len(indices) > 0:
            for i in indices.flatten():  # 确保indices是一个可迭代的列表
                box = boxes[i]
                result.append((self.classes[class_ids[i]], confidences[i], box))
        return result
4.4 main.py
import sys
import os
import cv2  # 导入OpenCV库
from camera import get_camera_frame  # 导入相机捕捉函数
from object_detection import ObjectDetector  # 导入物体检测类
from interaction import draw_boxes  # 导入绘制边框函数

def main():
    # 配置文件路径
    config_path = "./pythonProject/ai_modle_win/wupin/models/yolov3.cfg"
    weights_path = "./pythonProject/ai_modle_win/wupin/models/yolov3.weights"
    names_path = "./pythonProject/ai_modle_win/wupin/models/coco.names"

    # 初始化物体检测器
    detector = ObjectDetector(config_path, weights_path, names_path)

    while True:
        frame = get_camera_frame()  # 获取摄像头帧
        detections = detector.detect_objects(frame)  # 检测物体
        frame = draw_boxes(frame, detections)  # 绘制检测结果

        cv2.imshow("Object Detection", frame)  # 显示结果
        if cv2.waitKey(1) & 0xFF == ord('q'):  # 按下 'q' 键退出
            break

    cv2.destroyAllWindows()  # 关闭所有窗口

if __name__ == "__main__":
    main()
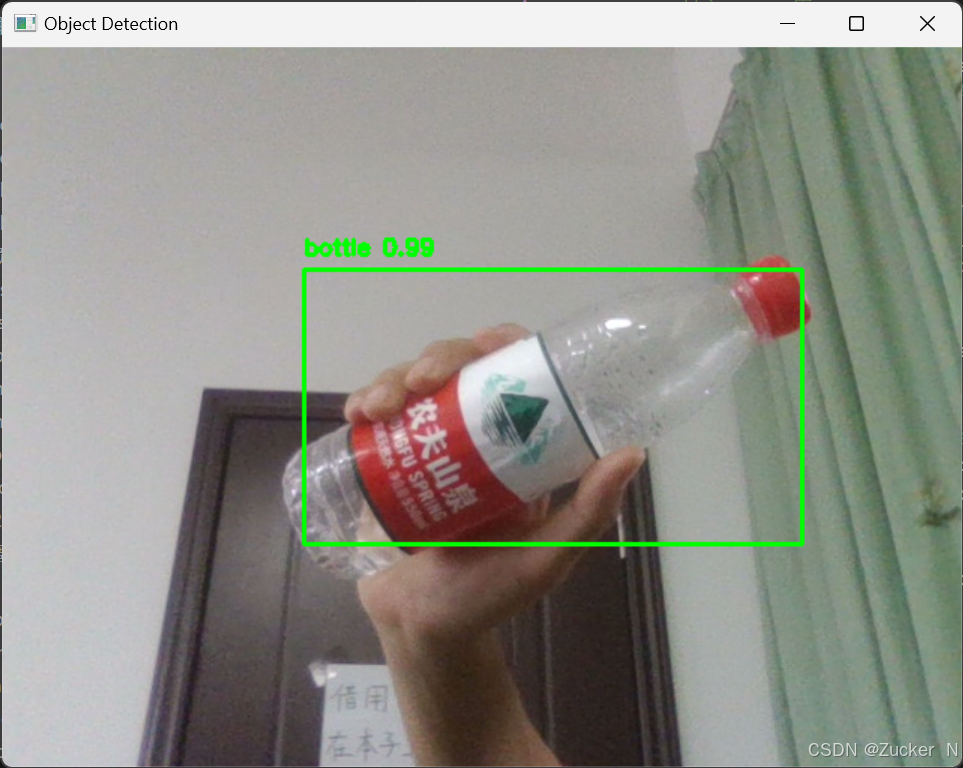
4.5 运行结果

5.总结
YOLO的主要用途是计算机视觉中的目标检测任务,例如自动驾驶中的行人和车辆识别、安防监控、无人机拍摄分析等场景,它能够实现实时检测,并且对于小目标和大目标都具备较好的性能。你也快来试一试吧!