一、首先搭建直播服务器
环境widows,并且已经集成了 :nginx-http-flv-module模块
nginx.conf配置如下:
worker_processes  1;

#error_log  logs/error.log;
#error_log  logs/error.log  notice;
#error_log  logs/error.log  info;
#error_log  logs/error.log  debug;

#pid        logs/nginx.pid;

events {
    worker_connections  1024;
}

# 添加RTMP服务
rtmp {
    server {
        listen 1935; # 监听端口

        chunk_size 4000;
        application live {
            live on;
	    gop_cache on;
	    hls on;
	    hls_path html/hls
        }
    }
}

# HTTP服务
http {
    include       mime.types;
    default_type  application/octet-stream;

    #access_log  logs/access.log  main;

    server {
        listen       8080; # 监听端口

	location /flv {
	    flv_live on;
	    chunked_transfer_encoding on;
	    add_header 'Access-Control-Allow-Origin' '*';
	    add_header 'Access-Control-Allow-Credentials' 'true';
	    add_header 'Access-Control-Allow-Methods' '*';
	    add_header "Access-Control-Allow-Headers" "Content-Type,Access-Token";
	    add_header 'Access-Control-Expose-Headers' '*';

	}

	location /stat.xsl {
            root html;
        }
		location /stat {
            rtmp_stat all;
            rtmp_stat_stylesheet stat.xsl;
        }
		location / {
            root html;
        }
    }
}
application live {
}
是指推流的目录在live,hls on是指开启切片,hls_path: html/hls是指切片直播的目录,手动创建,hls_fragment:3,每3秒创建一个切片
注意loaction /flv配置的是跨域
二、推流:
ffmpeg -re -i tuiliuceshi.mp4 -vcodec libx264 -acodec aac -f flv -y rtmp://127.0.0.1:1935/live/test1三、播放
1、vlc播放:(有以下三种播放方式:)
**http-flv方式:**http://localhost:8080/flv?port=1935\&app=live\&stream=test1
Rtmp方式:rtmp://127.0.0.1:1935/live/test1
**Hls方式:**http://localhost:8080/hls/test1.m3u8
2、网页播放:
网页需要解决跨域问题,需要在nginx中配置:
location /flv {
	    flv_live on;
	    chunked_transfer_encoding on;
	    add_header 'Access-Control-Allow-Origin' '*';
	    add_header 'Access-Control-Allow-Credentials' 'true';
	    add_header 'Access-Control-Allow-Methods' '*';
	    add_header "Access-Control-Allow-Headers" "Content-Type,Access-Token";
	    add_header 'Access-Control-Expose-Headers' '*';

}我们这个nginx推流服务器的http地址是:http://localhost:8080
我们再开一个nginx服务器,
我们再开一个nginx,端口为:80,http://localhost/可直接访问:
在网页 flv.html中,引用到flv.js
https://cdn.bootcss.com/flv.js/1.3.3/flv.min.js
html
<html>
	<head>
		<script src="https://cdn.bootcss.com/flv.js/1.3.3/flv.min.js">
		</script>
	</head>
	<body>
	  <video id = "videoElement" controls></video>
	  <script>
		if(flvjs.isSupported()){
			var videoElement = document.getElementById('videoElement')
			var flvPlayer = flvjs.createPlayer({
				type:'flv',
				url:'http//localhost:8080/flv?port=1935&app=live&stream=test1'
			})
			flvPlayer.attachMediaElement(videoElement)//将flv视频装载进来
			flvPlayer.load()//载入视频
			flvPlayer.play()//播放视频,如果不想自动播放,可以不要本行
		}

	  </script>
	</body>
</html>
这样就播放出来了视频
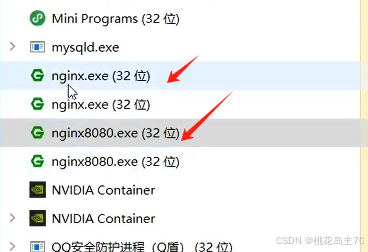
注意是两个nginx,一个是8080,负责直播推流,80的负责播放
ffmpeg检查摄像头、麦克风设备的命令:
ffmpeg -list_devices true -f dshow -i dummy播放摄像头命令:
ffplay -f dshow -i video="Integrated Camera"用ffmpeg推流的命令:
ffmpeg -f -dshow -i video="useb2.0 PC Camera" -vcodec libx264 -f flv -y rtmp://127.0.0.1:1935/live/test001