🌟个人主页:时间会证明一切.
目录
- [Spring 中的 Bean 是线程安全的吗?](#Spring 中的 Bean 是线程安全的吗?)
- SpringBoot和Spring的区别是什么?
- SpringBoot的启动流程是怎么样的?
-
- [new SpringApplication()](#new SpringApplication())
- SpringApplication.run
Spring 中的 Bean 是线程安全的吗?
Spring的Bean是否线程安全,这个要取决于他的作用域。Spring的Bean有多种作用域,其中用的比较多的就是Singleton和Prototype。
默认情况下,Spring Bean 是单例的(Singleton)。这意味着在整个 Spring 容器中只存在一个 Bean 实例。如果将 Bean 的作用域设置为原型的(Prototype) ,那么每次从容器中获取 Bean 时都会创建一个新的实例。
对于Prototype这种作用域的Bean,他的Bean 实例不会被多个线程共享,所以不存在线程安全的问题。
但是对于Singleton的Bean,就可能存在线程安全问题了,但是也不绝对,要看这个Bean中是否有共享变量。
如以下Bean:
java
@Service
public class CounterService {
    private int count = 0;

    public int increment() {
        return ++count;
    }
}
默认情况下,Spring Bean 是单例的,count字段是一个共享变量,那么如果多个线程同时调用 increment 方法,可能导致计数器的值不正确。那么这段代码就不是线程安全的。
我们通常把上面这种Bean叫做有状态的Bean,有状态的Bean就是非线程安全的,我们需要自己来考虑他的线程安全性问题。
那如果一个Singleton的Bean中是无状态的,即没有成员变量,或者成员变量只读不写,那么他就是个线程安全的。
java
@Service
public class CounterService {

    public int increment(int a) {
        return ++a;
    }
}
所以,总结一下就是:
Prototype的Bean是线程安全的,无状态的Singleton的Bean是线程安全的。有状态的Singleton的Bean是非线程安全的。
有状态的Bean如何解决线程安全问题
想要让一个有状态的Bean变得线程安全,有以下几个做法:
1、修改作用域为Prototype,这样的Bean就可以避免线程安全问题。
java
@Scope("prototype")
@Service
public class CounterService {

  	private int count = 0;
    // ...
}
但是需要注意,Prototype的bean,每次从容器中请求一个 Prototype Bean 时,都会创建一个新的实例。这可能导致性能开销,特别是在需要频繁创建对象的情况下。 而且,每个 Prototype Bean 的实例都需要占用一定的内存,可能会导致内存资源的消耗较大。
2、加锁
想要实现线程安全,有一个有效的办法就是加锁,在并发修改共享变量的地方加锁:
java
@Service
public class CounterService {
    private int count = 0;

    public synchronized int increment() {
        return ++count;
    }
}
但是加锁的话会影响并发,降低系统的吞吐量,所以使用的时候需要谨慎,不建议用这个方案。
3、使用并发工具类
可以使用并发包中提供的工具类,如原子类,线程安全的集合等。
java
import java.util.concurrent.atomic.AtomicInteger;

public class CounterService {
    private AtomicInteger count = new AtomicInteger(0);

    public int increment() {
        return count.incrementAndGet();
    }
}
建议使用这种,既能保证线程安全,又有比较好的性能。
SpringBoot和Spring的区别是什么?
Spring是一个非常强大的企业级Java开发框架(Java的腾飞他居功至伟),提供了一系列模块来支持不同的应用需求,如依赖注入、面向切面编程、事务管理、Web应用程序开发等。而SpringBoot的出现,主要是起到了简化Spring应用程序的开发和部署,特别是用于构建微服务和快速开发的应用程序。
相比于Spring,SpringBoot主要在这几个方面来提升了我们使用Spring的效率,降低开发成本:
1、自动配置:Spring Boot通过Auto-Configuration来减少开发人员的配置工作。我们可以通过依赖一个starter就把一坨东西全部都依赖进来,使开发人员可以更专注于业务逻辑而不是配置。
2、内嵌Web服务器:Spring Boot内置了常见的Web服务器(如Tomcat、Jetty),这意味着您可以轻松创建可运行的独立应用程序,而无需外部Web服务器。
3、约定大于配置:SpringBoot中有很多约定大于配置的思想的体现,通过一种约定的方式,来降低开发人员的配置工作。如他默认读取spring.factories来加载Starter、读取application.properties或application.yml文件来进行属性配置等。
SpringBoot的启动流程是怎么样的?
以下就是一个SpringBoot启动的入口,想要了解SpringBoot的启动过程,就从这里开始。
java
@SpringBootApplication
public class Application {
    public static void main(String[] args) {
    	SpringApplication.run(Application.class, args);  也可简化调用静态方法
    }
}这里我们直接看重重点的SpringApplication.run(Application.class, args);方法。他的实现细节如下:
java
public static ConfigurableApplicationContext run(Object source, String... args) {
    return run(new Object[] { source }, args);
}

public static ConfigurableApplicationContext run(Object[] sources, String[] args) {
    return new SpringApplication(sources).run(args);
}最终就是new SpringApplication(sources).run(args)这部分代码了。那么接下来就需要分两方面介绍SpringBoot的启动过程。一个是new SpringApplication的初始化过程,一个是SpringApplication.run的启动过程。
new SpringApplication()
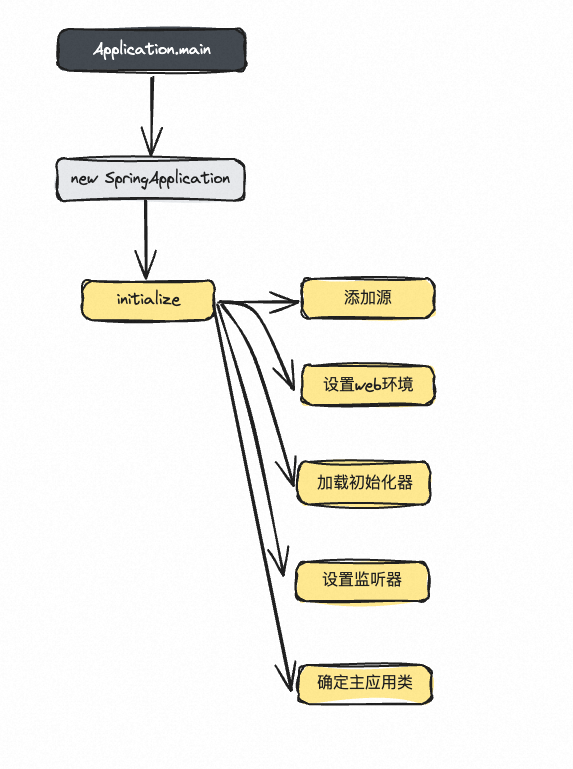
在SpringApplication的构造函数中,调用了一个initialize方法,所以他的初始化逻辑直接看这个initialize方法就行了。流程图及代码如下:

java
public SpringApplication(Object... sources) {
    initialize(sources);
}

private void initialize(Object[] sources) {
    // 添加源:如果 sources 不为空且长度大于 0,则将它们添加到应用的源列表中
    if (sources != null && sources.length > 0) {
        this.sources.addAll(Arrays.asList(sources));
    }

    // 设置web环境:推断并设置 Web 环境(例如,检查应用是否应该运行在 Web 环境中)
    this.webEnvironment = deduceWebEnvironment();

    // 加载初始化器:设置 ApplicationContext 的初始化器,从 'spring.factories' 文件中加载 ApplicationContextInitializer 实现
    setInitializers((Collection) getSpringFactoriesInstances(ApplicationContextInitializer.class));

    // 设置监听器:从 'spring.factories' 文件中加载 ApplicationListener 实现
    setListeners((Collection) getSpringFactoriesInstances(ApplicationListener.class));

    // 确定主应用类:通常是包含 main 方法的类
    this.mainApplicationClass = deduceMainApplicationClass();
}- 添加源:将提供的源(通常是配置类)添加到应用的源列表中。
- 设置 Web 环境:判断应用是否应该运行在 Web 环境中,这会影响后续的 Web 相关配置。
- 加载初始化器 :从
spring.factories文件中加载所有列出的ApplicationContextInitializer实现,并将它们设置到SpringApplication实例中,以便在应用上下文的初始化阶段执行它们。 - 设置监听器 :加载和设置
ApplicationListener实例,以便应用能够响应不同的事件。 - 确定主应用类 :确定主应用类,这个主应用程序类通常是包含
public static void main(String[] args)方法的类,是启动整个Spring Boot应用的入口点。
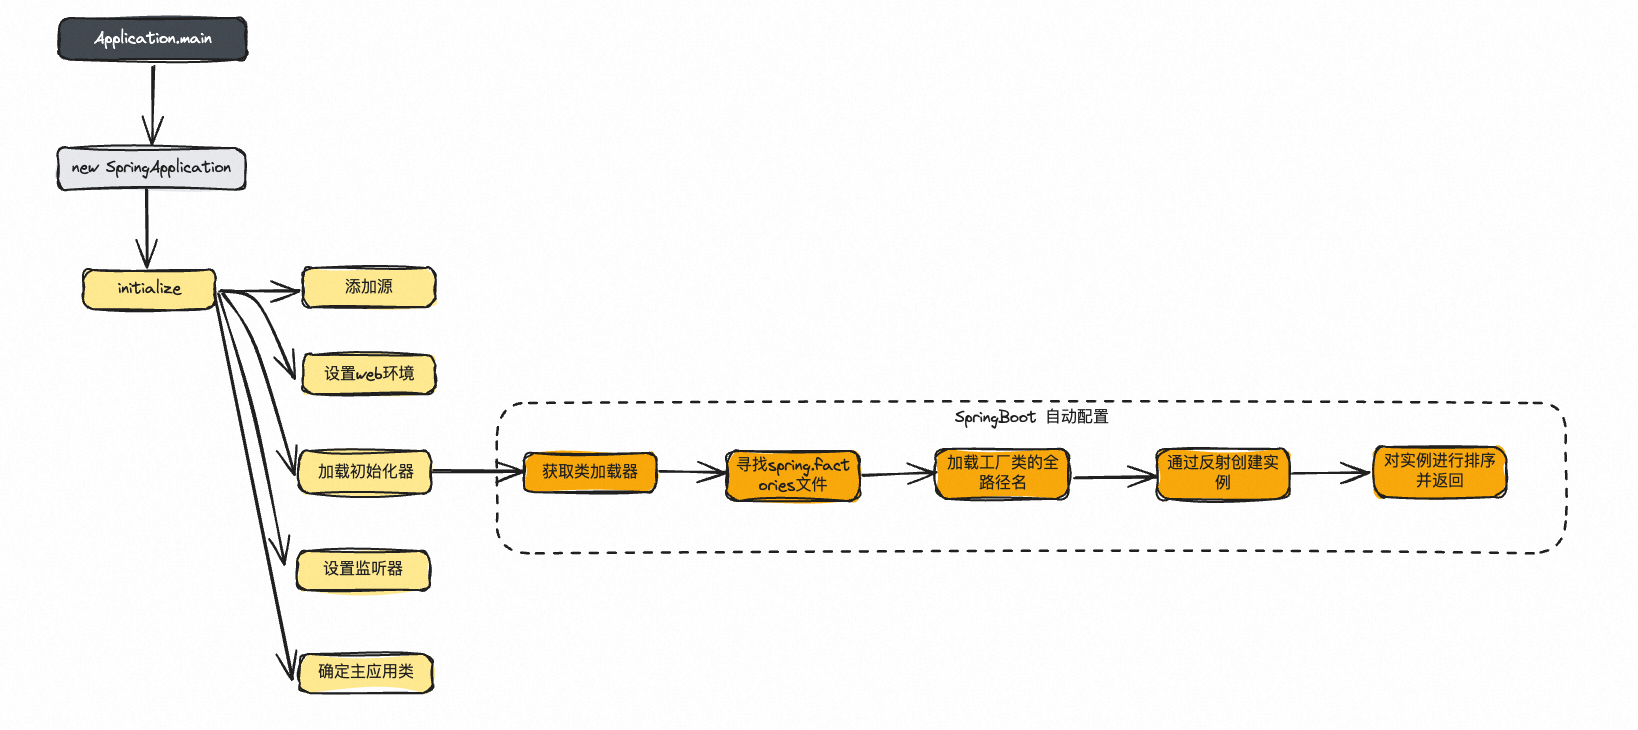
这里面第三步,加载初始化器这一步是Spring Boot的自动配置的核心,因为在这一步会从 spring.factories 文件中加载并实例化指定类型的类。
具体实现的代码和流程如下:

java
private <T> Collection<? extends T> getSpringFactoriesInstances(Class<T> type, Class<?>[] parameterTypes, Object... args) {
    // 获取当前线程的上下文类加载器
    ClassLoader classLoader = Thread.currentThread().getContextClassLoader();

    // 从spring.factories加载指定类型的工厂名称,并使用LinkedHashSet确保名称的唯一性,以防重复
    Set<String> names = new LinkedHashSet<String>(SpringFactoriesLoader.loadFactoryNames(type, classLoader));

    // 创建指定类型的实例。这里使用反射来实例化类,并传入任何必要的参数
    List<T> instances = createSpringFactoriesInstances(type, parameterTypes, classLoader, args, names);

    // 对实例进行排序,这里使用的是Spring的注解感知比较器,可以处理@Order注解和Ordered接口
    AnnotationAwareOrderComparator.sort(instances);

    // 返回实例集合
    return instances;
}
以下就是new SpringApplication的主要流程,主要依赖initialize 方法初始化 Spring Boot 应用的关键组件和配置。

这个过程确保了在应用上下文被创建和启动之前,所有关键的设置都已就绪,包括环境设置、初始化器和监听器的配置,以及主应用类的识别。
SpringApplication.run
看完了new SpringApplication接下来就在看看run方法做了哪些事情。这个方法是 SpringApplication 类的核心,用于启动 Spring Boot 应用。

java
public ConfigurableApplicationContext run(String... args) {
    // 创建并启动一个计时器,用于记录应用启动耗时
    StopWatch stopWatch = new StopWatch();
    stopWatch.start();

    ConfigurableApplicationContext context = null;
    FailureAnalyzers analyzers = null;

    // 配置无头(headless)属性,影响图形环境的处理
    configureHeadlessProperty();

    // 获取应用运行监听器,并触发开始事件
    SpringApplicationRunListeners listeners = getRunListeners(args);
    listeners.starting();

    try {
        // 创建应用参数对象
        ApplicationArguments applicationArguments = new DefaultApplicationArguments(args);
        // 准备环境,包括配置文件和属性源
        ConfigurableEnvironment environment = prepareEnvironment(listeners, applicationArguments);
        // 打印应用的 Banner
        Banner printedBanner = printBanner(environment);
        // 创建应用上下文
        context = createApplicationContext();
        // 创建失败分析器
        analyzers = new FailureAnalyzers(context);
        // 准备上下文,包括加载 bean 定义
        prepareContext(context, environment, listeners, applicationArguments, printedBanner);
        // 刷新上下文,完成 bean 的创建和初始化
        refreshContext(context);
        // 刷新后的后置处理
        afterRefresh(context, applicationArguments);
        // 通知监听器,应用运行完成
        listeners.finished(context, null);
        // 停止计时器
        stopWatch.stop();
        // 如果启用了启动信息日志,记录应用的启动信息
        if (this.logStartupInfo) {
            new StartupInfoLogger(this.mainApplicationClass).logStarted(getApplicationLog(), stopWatch);
        }
        //触发ApplicationStartedEvent 事件
        listeners.started(context);
        //调用实现了 CommandLineRunner 和 ApplicationRunner 接口的 bean 中的 run 方法
		callRunners(context, applicationArguments);
        // 触发 ApplicationReadyEvent 事件
        listeners.running(context);
        // 返回配置好的应用上下文
        return context;
    }
    catch (Throwable ex) {
        // 处理运行失败的情况
        handleRunFailure(context, listeners, analyzers, ex);
        throw new IllegalStateException(ex);
    }
}
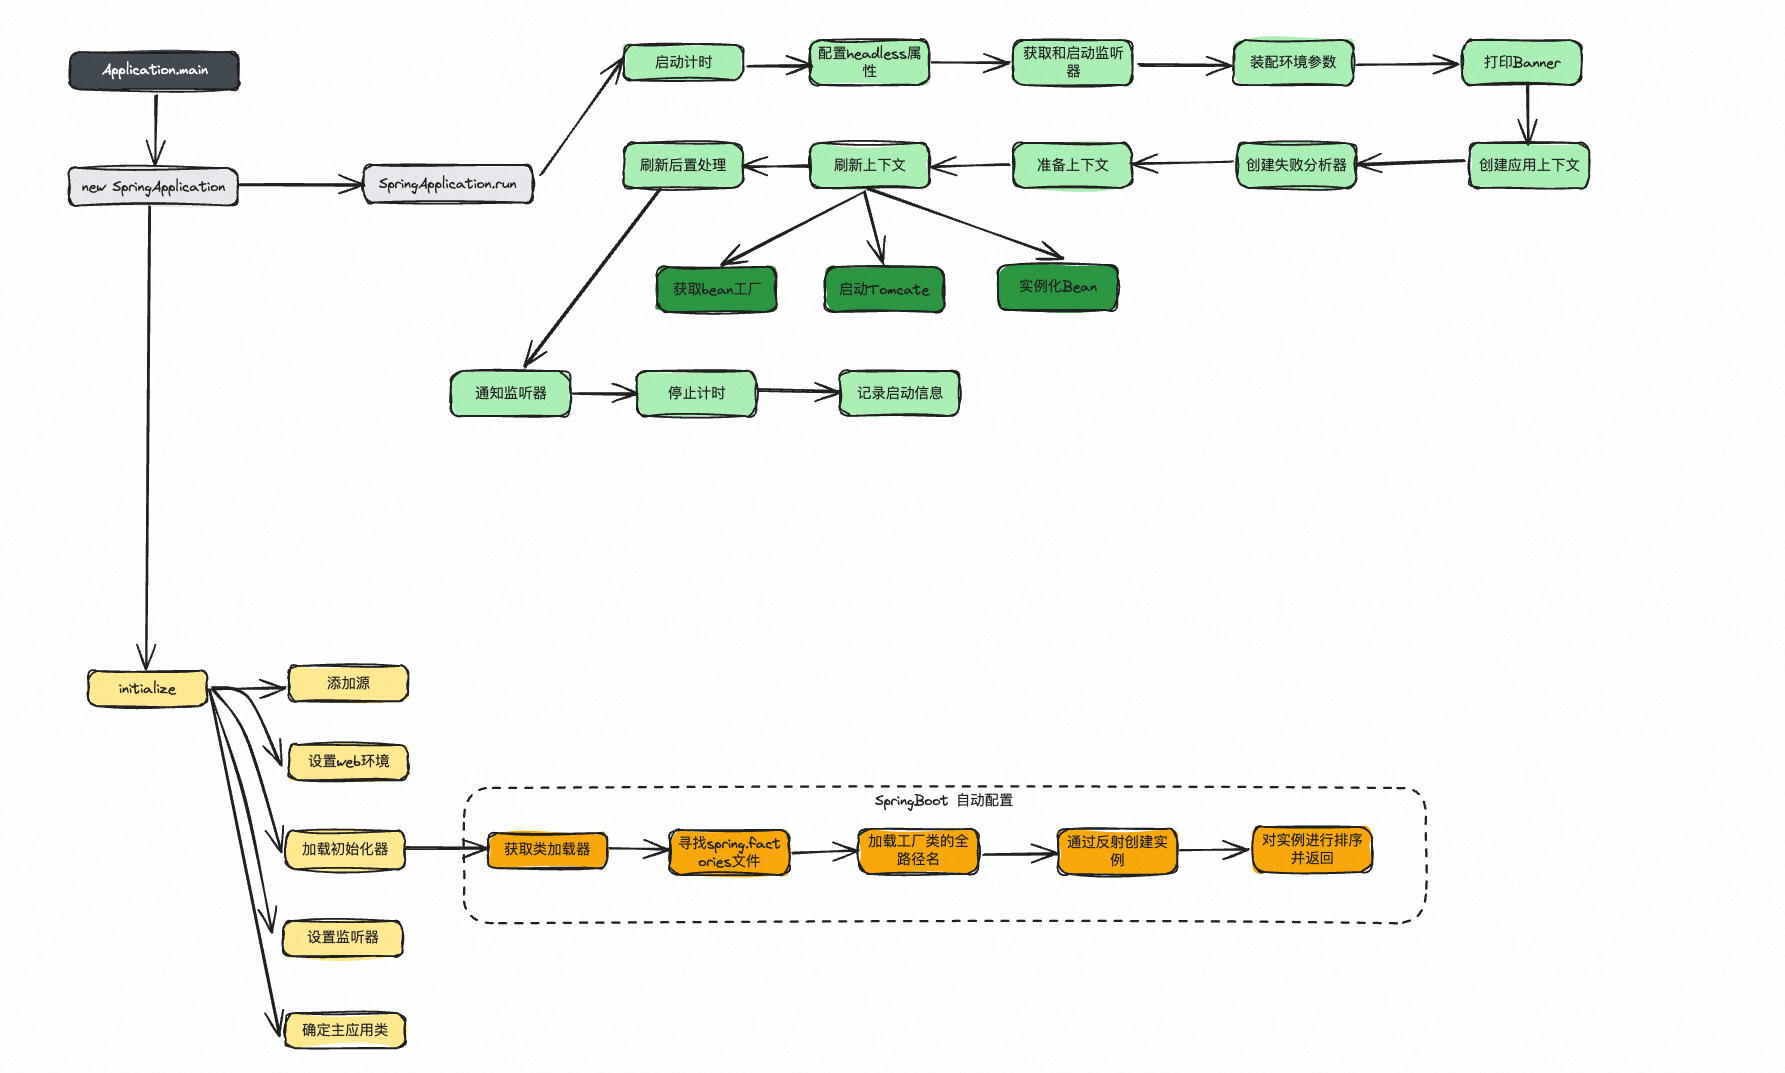
以上的过程太复杂了,我们挑几个关键的介绍一下他们的主要作用。
启动&停止计时器:在代码中,用到stopWatch来进行计时。所以在最开始先要启动计时,在最后要停止计时。这个计时就是最终用来统计启动过程的时长的。最终在应用启动信息输出的实时打印出来,如以下内容:
java
2023-11-18 09:00:05.789 INFO 12345 --- [ main] com.hollis.myapp.Application : Started Application in 6.666 seconds (JVM running for 7.789)**获取和启动监听器:**这一步从spring.factories中解析初始所有的SpringApplicationRunListener 实例,并通知他们应用的启动过程已经开始。
SpringApplicationRunListener 是 Spring Boot 中的一个接口,用于在应用的启动过程中的不同阶段提供回调。实现这个接口允许监听并响应应用启动周期中的关键事件。SpringApplicationRunListener 接口定义了多个方法,每个方法对应于启动过程中的一个特定阶段。这些方法包括:
- starting():在运行开始时调用,此时任何处理都未开始,可以用于初始化在启动过程中需要的资源。
- environmentPrepared():当 SpringApplication 准备好 Environment(但在创建 ApplicationContext 之前)时调用,这是修改应用环境属性的好时机。
- contextPrepared():当 ApplicationContext 准备好但在它加载之前调用,可以用于对上下文进行一些预处理。
- contextLoaded():当 ApplicationContext 被加载(但在它被刷新之前)时调用,这个阶段所有的 bean 定义都已经加载但还未实例化。
- started():在 ApplicationContext 刷新之后、任何应用和命令行运行器被调用之前调用,此时应用已经准备好接收请求。
- running():在运行器被调用之后、应用启动完成之前调用,这是在应用启动并准备好服务请求时执行某些动作的好时机。
- failed():如果启动过程中出现异常,则调用此方法。
**装配环境参数:**这一步主要是用来做参数绑定的,prepareEnvironment 方法会加载应用的外部配置。这包括 application.properties 或 application.yml 文件中的属性,环境变量,系统属性等。所以,我们自定义的那些参数就是在这一步被绑定的。
**打印Banner:**这一步的作用很简单,就是在控制台打印应用的启动横幅Banner。如以下内容:
java
  .   ____          _            __ _ _
 /\\ / ___'_ __ _ _(_)_ __  __ _ \ \ \ \
( ( )\___ | '_ | '_| | '_ \/ _` | \ \ \ \
 \\/  ___)| |_)| | | | | || (_| |  ) ) ) )
  '  |____| .__|_| |_|_| |_\__, | / / / /
 =========|_|==============|___/=/_/_/_/
 :: Spring Boot ::                (v3.1.5)
**创建应用上下文:**到这一步就真的开始启动了,第一步就是先要创建一个Spring的上下文出来,只有有了这个上下文才能进行Bean的加载、配置等工作。
准备上下文:这一步非常关键,很多核心操作都是在这一步完成的:
java
private void prepareContext(ConfigurableApplicationContext context, ConfigurableEnvironment environment,
        SpringApplicationRunListeners listeners, ApplicationArguments applicationArguments, Banner printedBanner) {

    // 将environment设置到应用上下文中
    context.setEnvironment(environment);

    // 对应用上下文进行后处理(可能涉及一些自定义逻辑)
    postProcessApplicationContext(context);

    // 应用所有的ApplicationContextInitializer
    applyInitializers(context);

    // 通知监听器上下文准备工作已完成
    listeners.contextPrepared(context);

    // 如果启用了启动信息日志,则记录启动信息和配置文件信息
    if (this.logStartupInfo) {
        logStartupInfo(context.getParent() == null);
        logStartupProfileInfo(context);
    }

    // 向上下文中添加特定于 Spring Boot 的单例 Bean
    context.getBeanFactory().registerSingleton("springApplicationArguments", applicationArguments);
    if (printedBanner != null) {
        context.getBeanFactory().registerSingleton("springBootBanner", printedBanner);
    }

    // 加载应用的源(如配置类)
    Set<Object> sources = getSources();
    Assert.notEmpty(sources, "Sources must not be empty");
    load(context, sources.toArray(new Object[sources.size()]));

    // 通知监听器上下文加载已完成
    listeners.contextLoaded(context);
}
在这一步,会打印启动的信息日志,主要内容如下:
java
2023-11-18 09:00:00.123 INFO 12345 --- [ main] com.example.myapp.Application : Starting Application v0.1.0 on MyComputer with PID 12345 (started by user in /path/to/app)刷新上下文:这一步,是Spring启动的核心步骤了,这一步骤包括了实例化所有的 Bean、设置它们之间的依赖关系以及执行其他的初始化任务。
java
@Override
public void refresh() throws BeansException, IllegalStateException {
	synchronized (this.startupShutdownMonitor) {
		// 为刷新操作准备此上下文
		prepareRefresh();

		// 告诉子类刷新内部 bean 工厂
		ConfigurableListableBeanFactory beanFactory = obtainFreshBeanFactory();

		// 为在此上下文中使用做好 bean 工厂的准备工作
		prepareBeanFactory(beanFactory);

		try {
			// 允许在上下文子类中对 bean 工厂进行后处理
			postProcessBeanFactory(beanFactory);

			// 调用在上下文中注册为 bean 的工厂处理器
			invokeBeanFactoryPostProcessors(beanFactory);

			// 注册拦截 bean 创建的 bean 处理器
			registerBeanPostProcessors(beanFactory);

			// 初始化此上下文的消息源
			initMessageSource();

			// 初始化此上下文的事件多播器
			initApplicationEventMulticaster();

			// 在特定上下文子类中初始化其他特殊 bean
			onRefresh();

			// 检查监听器 bean 并注册它们
			registerListeners();

			// 实例化所有剩余的(非懒加载)单例
			finishBeanFactoryInitialization(beanFactory);

			// 最后一步:发布相应的事件
			finishRefresh();
		}

		catch (BeansException ex) {
			if (logger.isWarnEnabled()) {
				logger.warn("Exception encountered during context initialization - " +
						"cancelling refresh attempt: " + ex);
			}

			// 销毁已经创建的单例以避免悬挂资源
			destroyBeans();

			// 重置"激活"标志
			cancelRefresh(ex);

			// 将异常传播给调用者
			throw ex;
		}

		finally {
			// 在 Spring 的核心中重置常见的内省缓存,因为我们可能不再需要单例 bean 的元数据...
			resetCommonCaches();
		}
	}
}
所以,这一步中,主要就是创建BeanFactory,然后再通过BeanFactory来实例化Bean。
但是,很多人都会忽略一个关键的步骤(网上很多介绍SpringBoot启动流程的都没提到),那就是Web容器的启动,及Tomcat的启动其实也是在这个步骤。
在refresh-> onRefresh中,这里会调用到ServletWebServerApplicationContext的onRefresh中:
java
@Override
protected void onRefresh() {
    super.onRefresh();
    try {
        createWebServer();
    }
    catch (Throwable ex) {
        throw new ApplicationContextException("Unable to start web server", ex);
    }
}


private void createWebServer() {
    WebServer webServer = this.webServer;
    ServletContext servletContext = getServletContext();
    if (webServer == null && servletContext == null) {
        StartupStep createWebServer = getApplicationStartup().start("spring.boot.webserver.create");
        ServletWebServerFactory factory = getWebServerFactory();
        createWebServer.tag("factory", factory.getClass().toString());
        this.webServer = factory.getWebServer(getSelfInitializer());
        createWebServer.end();
        getBeanFactory().registerSingleton("webServerGracefulShutdown",
                new WebServerGracefulShutdownLifecycle(this.webServer));
        getBeanFactory().registerSingleton("webServerStartStop",
                new WebServerStartStopLifecycle(this, this.webServer));
    }
    else if (servletContext != null) {
        try {
            getSelfInitializer().onStartup(servletContext);
        }
        catch (ServletException ex) {
            throw new ApplicationContextException("Cannot initialize servlet context", ex);
        }
    }
    initPropertySources();
}
这里面的createWebServer方法中,调用到factory.getWebServer(getSelfInitializer());的时候,factory有三种实现,分别是JettyServletWebServerFactory、TomcatServletWebServerFactory、UndertowServletWebServerFactory这三个,默认使用TomcatServletWebServerFactory。
TomcatServletWebServerFactory的getWebServer方法如下,这里会创建一个Tomcat
java
@Override
public WebServer getWebServer(ServletContextInitializer... initializers) {
    if (this.disableMBeanRegistry) {
        Registry.disableRegistry();
    }
    Tomcat tomcat = new Tomcat();
    File baseDir = (this.baseDirectory != null) ? this.baseDirectory : createTempDir("tomcat");
    tomcat.setBaseDir(baseDir.getAbsolutePath());
    for (LifecycleListener listener : this.serverLifecycleListeners) {
        tomcat.getServer().addLifecycleListener(listener);
    }
    Connector connector = new Connector(this.protocol);
    connector.setThrowOnFailure(true);
    tomcat.getService().addConnector(connector);
    customizeConnector(connector);
    tomcat.setConnector(connector);
    tomcat.getHost().setAutoDeploy(false);
    configureEngine(tomcat.getEngine());
    for (Connector additionalConnector : this.additionalTomcatConnectors) {
        tomcat.getService().addConnector(additionalConnector);
    }
    prepareContext(tomcat.getHost(), initializers);
    return getTomcatWebServer(tomcat);
}
在最后一步getTomcatWebServer(tomcat);的代码中,会创建一个TomcatServer,并且把他启动:
java
protected TomcatWebServer getTomcatWebServer(Tomcat tomcat) {
    return new TomcatWebServer(tomcat, getPort() >= 0, getShutdown());
}


public TomcatWebServer(Tomcat tomcat, boolean autoStart, Shutdown shutdown) {
    Assert.notNull(tomcat, "Tomcat Server must not be null");
    this.tomcat = tomcat;
    this.autoStart = autoStart;
    this.gracefulShutdown = (shutdown == Shutdown.GRACEFUL) ? new GracefulShutdown(tomcat) : null;
    initialize();
}
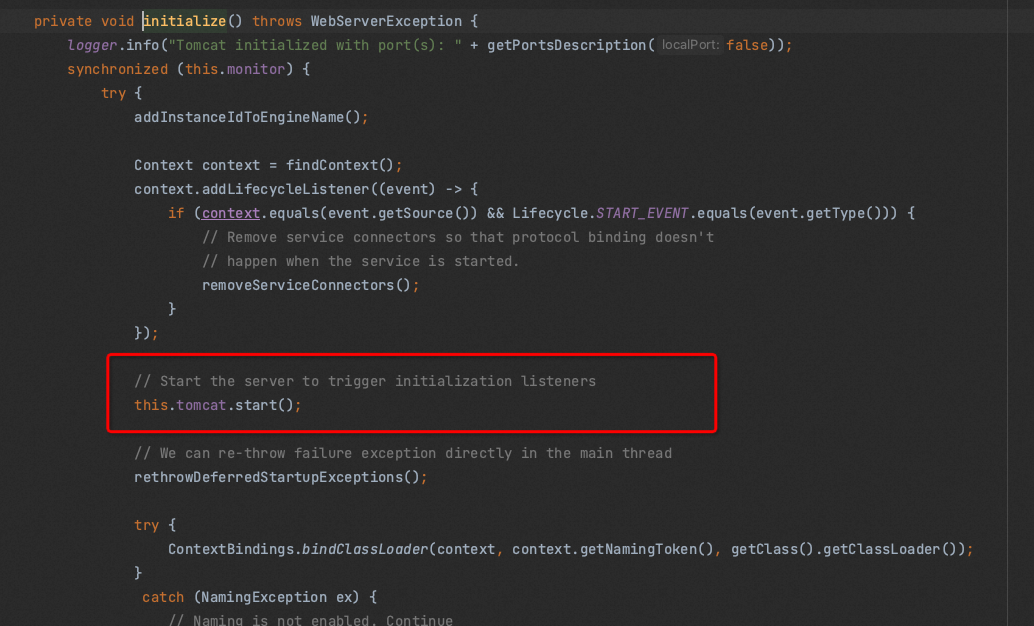
接下来在initialize中完成了tomcat的启动。

最后,SpringBoot的启动过程主要流程如下:
