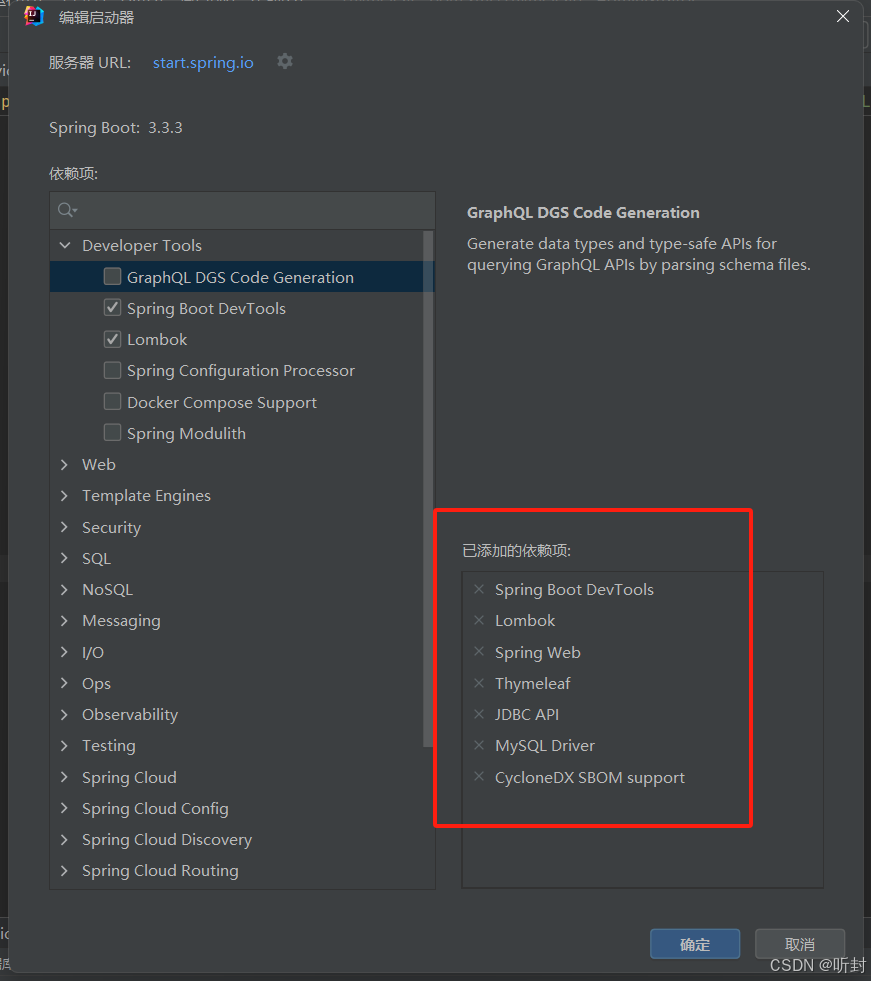
pox.xml 文件
XML
<?xml version="1.0" encoding="UTF-8"?>
<project xmlns="http://maven.apache.org/POM/4.0.0" xmlns:xsi="http://www.w3.org/2001/XMLSchema-instance"
         xsi:schemaLocation="http://maven.apache.org/POM/4.0.0 https://maven.apache.org/xsd/maven-4.0.0.xsd">
    <modelVersion>4.0.0</modelVersion>
    <parent>
        <groupId>org.springframework.boot</groupId>
        <artifactId>spring-boot-starter-parent</artifactId>
        <version>3.3.3</version>
        <relativePath/> <!-- lookup parent from repository -->
    </parent>
    <groupId>com.ty</groupId>
    <artifactId>Thymeleaf</artifactId>
    <version>0.0.1-SNAPSHOT</version>
    <packaging>war</packaging>
    <name>Thymeleaf</name>
    <description>Thymeleaf</description>
    <url/>
    <licenses>
        <license/>
    </licenses>
    <developers>
        <developer/>
    </developers>
    <scm>
        <connection/>
        <developerConnection/>
        <tag/>
        <url/>
    </scm>
    <properties>
        <java.version>21</java.version>
    </properties>
    <dependencies>

        <!--  导入thymeleaf 布局包  -->
        <dependency>
            <groupId>nz.net.ultraq.web.thymeleaf</groupId>
            <artifactId>thymeleaf-layout-dialect</artifactId>
            <version>1.0.6</version>
        </dependency>
        <!-- 导入 mybatis-plus 包 -->
        <dependency>
            <groupId>com.baomidou</groupId>
            <artifactId>mybatis-plus-spring-boot3-starter</artifactId>
            <version>3.5.7</version>
        </dependency>
        <!--    导入 MySQL 驱动    -->
        <dependency>
            <groupId>mysql</groupId>
            <artifactId>mysql-connector-java</artifactId>
            <version>8.0.30</version>
        </dependency>
        <!--   引入阿里巴巴数据源     -->
        <dependency>
            <groupId>com.alibaba</groupId>
            <artifactId>druid-spring-boot-3-starter</artifactId>
            <version>1.2.20</version>
        </dependency>
        <!--    开启热部署    -->
        <dependency>
            <groupId>org.springframework.boot</groupId>
            <artifactId>spring-boot-devtools</artifactId>
            <scope>runtime</scope>
            <optional>true</optional>
        </dependency>

        <!--    导入jquery包    -->
        <dependency>
            <groupId>org.webjars</groupId>
            <artifactId>jquery</artifactId>
            <version>3.7.1</version>
        </dependency>

        <!--    thymeleaf 模版引擎 启动器    -->
        <dependency>
            <groupId>org.springframework.boot</groupId>
            <artifactId>spring-boot-starter-thymeleaf</artifactId>
        </dependency>
        <!--    SpringBoot web 启动器    -->
        <dependency>
            <groupId>org.springframework.boot</groupId>
            <artifactId>spring-boot-starter-web</artifactId>
        </dependency>
        <!--    导入mysql包    -->
        <dependency>
            <groupId>com.mysql</groupId>
            <artifactId>mysql-connector-j</artifactId>
            <scope>runtime</scope>
        </dependency>
        <!--    导入 lombok    -->
        <dependency>
            <groupId>org.projectlombok</groupId>
            <artifactId>lombok</artifactId>
            <optional>true</optional>
        </dependency>
        <!--    tomcat    -->
        <dependency>
            <groupId>org.springframework.boot</groupId>
            <artifactId>spring-boot-starter-tomcat</artifactId>
            <scope>provided</scope>
        </dependency>
        <!--    SpringBoot test 启动器    -->
        <dependency>
            <groupId>org.springframework.boot</groupId>
            <artifactId>spring-boot-starter-test</artifactId>
            <scope>test</scope>
        </dependency>
        <dependency>
            <groupId>org.springframework.boot</groupId>
            <artifactId>spring-boot-starter</artifactId>
        </dependency>
        <dependency>
            <groupId>org.springframework.boot</groupId>
            <artifactId>spring-boot-starter-web</artifactId>
        </dependency>
        <!-- 引入MyBatis-Plus支持(不需要再引入MyBatis包) -->
        <dependency>
            <groupId>com.baomidou</groupId>
            <artifactId>mybatis-plus-spring-boot3-starter</artifactId>
            <version>3.5.7</version>
        </dependency>
        <!-- 引入MyBatis-Plus动态数据源支持 -->
        <dependency>
            <groupId>com.baomidou</groupId>
            <artifactId>dynamic-datasource-spring-boot3-starter</artifactId>
            <version>4.1.2</version>
        </dependency>
        <!-- 引入 slf4j 包  -->
        <dependency>
            <groupId>org.slf4j</groupId>
            <artifactId>slf4j-api</artifactId>
        </dependency>
    </dependencies>

    <build>
        <plugins>
            <plugin>
                <groupId>org.springframework.boot</groupId>
                <artifactId>spring-boot-maven-plugin</artifactId>
            </plugin>
        </plugins>
    </build>

</project>
application.yml
XML
spring:
  # 配置数据源
    datasource:
      driver-class-name: com.mysql.cj.jdbc.Driver
      url: jdbc:mysql://localhost:3306/crm?serverTimezone=GMT-8
      username: root
      password: whs
      type: com.alibaba.druid.pool.DruidDataSource # 使用阿里巴巴 Druid 数据源
      dynamic:
        primary: master # 指定主数据库
        datasource:
          # 主数据库
          master:
            driver-class-name: com.mysql.cj.jdbc.Driver
            url: jdbc:mysql://192.168.2.128:3306/crm?serverTimezone=GMT-8
            username: root
            password: whs
          # 次数据库 01
          slave_1:
            driver-class-name: com.mysql.cj.jdbc.Driver
            url: jdbc:mysql://192.168.2.129:3306/crm?serverTimezone=GMT-8
            username: root
            password: whs
需要的依赖:

model :

控制器:
java
package com.ty.thymeleaf.controller;

import com.ty.thymeleaf.entity.User;
import com.ty.thymeleaf.service.UserService;
import jakarta.annotation.Resource;
import org.springframework.web.bind.annotation.*;

import java.util.List;

/**
 * UserController
 *
 * @aurhor Administrator  whs
 * @since 2024/9/4
 */
@RestController
public class UserController {

    @Resource
    private UserService userService;  // 根据id 查询数据
    @RequestMapping(value = "/getUser",method = RequestMethod.GET)
    public User getUser(Long usrId){
        User user = userService.getUser(usrId);
        return user;
    }


    @GetMapping(value = "/users")  // 查询所有数据
    public List<User> findAllUsers(){
        return userService.findAllUsers();
    }

    @GetMapping(value = "/user/{id}") // 根据 @PathVariable 注入id 查询数据
    public User getUsers(@PathVariable("id") Long usrId){
        return userService.getUser(usrId);
    }

    @PostMapping(value = "/userAdd")  // 添加
    public void addUser(User user){


        user.setUsrId(null);
        user.setUsrName("帅帅");
        user.setUsrPassword("1234321");
        user.setUsrRoleId(2L);
        user.setUsrFlag(1L);
        System.out.println(userService.addUser(user)==1?"\n\n\n添加成功!":"\n\n\n添加失败!");
    }

    @PostMapping(value = "/user/update") // 修改
    public void updateUser(User user){
        System.out.println(userService.updateUser(user)==1?"添加成功!":"添加失败!");
    }

//    @DeleteMapping(value = "/user/del/{id}") // 删除
//    public void deleteUser(@PathVariable("id") Long usrId){
//        userService.deleteUser(usrId);
//    }

    @PostMapping(value = "/user/del/{id}")  // 添加
    public void delUser(@PathVariable("id") Long usrId){
        userService.deleteUser(usrId);
    }


}
总结:
Thymeleaf 的特点
Thymeleaf 模板是自然的 ,因为它们可以直接作为 HTML 文件编写 ,不需要额外的标签库或特定的语法。开发人员可以使用熟悉的 HTML 标签和属性,同时在需要动态内容的地方插入 Thymeleaf 表达式。
例如,在 HTML 中可以使用th:text属性来设置元素的文本内容 :**<span th:text="{message}"\>默认文本\。** 这里,{message}是 Thymeleaf 表达式,它将在运行时被动态的值替换。
强大的表达式语言
Thymeleaf 提供了强大的表达式语言,可以访问对象属性、集合、方法调用等。表达式可以用于设置文本内容、属性值、条件判断、循环遍历等。
例如,可以使用th:if和th:unless属性进行条件判断:<div th:if="${user.isAdmin}">管理员内容</div>。这里,如果user对象的isAdmin属性为true,则显示该<div>元素。
易于集成
Thymeleaf 可以轻松集成到各种 Java Web 框架中,如 Spring MVC、Spring Boot 等。它也可以与其他技术栈一起使用,如 JavaScript 框架和前端构建工具。
在 Spring Boot 项目中,只需添加 Thymeleaf 的依赖,配置好模板路径,就可以开始使用 Thymeleaf 模板进行页面渲染。
支持国际化
Thymeleaf 支持国际化,可以根据用户的语言偏好显示不同的文本内容。开发人员可以使用国际化资源文件来定义不同语言的文本,然后在模板中使用 Thymeleaf 的国际化表达式来引用这些文本。
例如,使用th:text="#{message.key}"来引用国际化资源文件中的文本。
Thymeleaf 的用法
配置 Thymeleaf
在 Maven 或 Gradle 项目中,添加 Thymeleaf 的依赖。
在 Spring Boot 项目中,可以通过在application.properties或application.yml文件中配置 Thymeleaf 的相关属性,如模板路径、缓存设置等。
例如,可以使用th:each属性来循环遍历集合:<ul><li th:each="item : {items}" th:text="{item}"></li></ul>。
<!--      th:insert 只是加载  其中demo/layout 是文件夹地址 , footer是文件名 , copyright 是指定义的代码片段    -->
<div th:insert="demo/layout/footer :: copyright"></div>
if:
XML
  <!--  th:if 条件成立才显示其内容 -->
        <a th:if="${flag == 'yes' }" th:href="@{http://www.ktjiaoyu.com/}">ktjiaoyu</a><br>

   <!--  th:unless 条件不成立才显示其内容 -->
   <a th:unless="${flag == '11'}" th:href="@{http://www.czkt.com/}">czkt</a><br>
switch:
XML
<div th:switch="${sex}">
            <p th:case="'woman'">她是一个花姑娘···</p>
            <p th:case="'man'">他是一个爷们!!!</p>
            <p th:case="'*'">未知的···</p>
        </div>
for 循环:
html
<!DOCTYPE html>
<html lang="en" xmlns:th="http://www.thymeleaf.org">
<head>
    <meta charset="UTF-8">
    <title>for循环</title>
</head>
<body>
            <table border="1">
                <tr>
                    <th>usrId</th>
                    <th>usrName</th>
                    <th>usrRoleId</th>
                    <th>usrFlag</th>
                    <th>当前对象迭代的index(从0开始计算)</th>
                    <th>当前对象迭代的index(从1开始计算)</th>
                    <th>被迭代对象的大小</th>
                    <th>当前迭代变量</th>
                    <th>布尔值,当前循环是否第一个</th>
                    <th>布尔值,当前循环是否最后一个</th>
                    <th>布尔值,是否偶数</th>
                    <th>布尔值,是否奇数</th>

                </tr>
                <!--     list 表示获取数据的集合 ,user表示循环变量 , status 表示循环状态变量           -->
                <tr th:each="user, status : ${list}">
                     <td th:text="${user.usrId}"></td>
                     <td th:text="${user.usrName}"></td>
                     <td th:text="${user.usrRoleId}"></td>
                     <!--  <td th:text="${user.role.roleName}"></td>-->
                     <td th:text="${user.usrFlag}"></td>

                     <td th:text="${status.index}"></td>
                     <td th:text="${status.count}"></td>
                     <td th:text="${status.size}"></td>
                     <td th:text="${status.current}"></td>
                     <td th:text="${status.first}"></td>
                     <td th:text="${status.last}"></td>
                     <!--  even 是否偶数  -->
                     <td th:text="${status.even}"></td>
                     <!--  odd  是否奇数  -->-
                     <td th:text="${status.odd}"></td>
                </tr>
            </table>

</body>
</html>
Thymeleaf 赋值、字符串拼接
html
<!DOCTYPE html>
<html lang="en" xmlns:th="http://www.thymeleaf.org">
<head>
    <meta charset="UTF-8">
    <title>演示赋值、字符串拼接</title>
</head>
<body>
    赋值,<span th:text="${userName}">userName</span>!<br>
    拼接:<span th:text="'Hello '+ ${userName} + ' ! '">11111111</span><br>
    拼接:<span th:text="|Hello ${userName}! |">Hello userName  !</span><br>
    <!--  th:text="" 等于空会报错  -->
    <!--    测试:<span th:text="">111</span><br> -->
    测试 null:<span th:text="null">22</span><br>
    测试 33:<span th:text="33">33</span><br>


    <h1>基本对象</h1>
    <!--  操作 request 对象   -->
<!--    <p th:text="${#requestdatavalue.getAttbute('test')}"></p>-->

    <!-- 操作 request 对象 -->
    <p th:text="${#request.getAttribute('test')}"></p>

<!--    <p th:text="${#httpServletRequest.getAttribute('test')}"></p>-->


    <!--     操作 request 作用域 , 不能使用 request.test 操作  -->
    <p th:text="${test}"></p>
    <!--  操作 session 作用域  -->
    <p th:text="${session.test}"></p>

    <h1>Utility对象</h1>
    <!--  格式化时间  -->
    <p th:text="${#dates.format(date,'yyyy-MM-dd HH:mm:ss')}"></p>
    <!--  创建当前时间 精确到明天 -->
    <p th:text="${#dates.createToday()}"></p>


    <!--  选择表达式 方式1  -->

    <h3>选择表达式1 使用 *{ } :</h3>
    <div th:object="${user}">
        <span th:text="*{usrId}"></span>
        <span th:text="*{usrName}"></span>
    </div>

    <!--  选择表达式 方式2 -->
    <h3>选择表达式1 使用 ${ } :</h3>
    <div>
        <span th:text="${user.usrId}"></span>
        <span th:text="${user.usrName}"></span>
    </div>

</body>
</html>
引入其他资源:
html
<!DOCTYPE html>
<html lang="en" xmlns:th="http://www.thymeleaf.org">
<head th:fragment="head(title,links)">
    <meta charset="UTF-8">
    <!--  用来设置不同的title  -->
    <title th:replace="${title}">title</title>
    <!--  添加公共的css和js  -->
    <link rel="stylesheet" type="text/css" media="all" th:href="@{/css/comm.css}">
    <script type="text/javascript" th:src="@{/js/comm.js}"></script>
    <!--  添加私有的css  -->
<!--    <th:block th:replace="${links}" />-->
</head>
<body>
            <header th:fragment="header">
                <h2>我是 头部 🦖</h2>
            </header>


</body>
</html>
最后在控制器中返回模板,可以在 Java 控制器类中,使用Model对象添加数据,并返回模板名称,以便 Thymeleaf 进行渲染。