CV之OCR:GOT-OCR2.0的简介、安装和使用方法、案例应用之详细攻略
目录
[1、使用 NVIDIA GPU 上的 Huggingface transformers 进行推理](#1、使用 NVIDIA GPU 上的 Huggingface transformers 进行推理)
GOT-OCR2.0的简介
GOT-OCR2.0 是一款通用光学字符识别(OCR)理论的官方代码实现,旨在通过一个统一的端到端模型推进 OCR-2.0 的发展。
GOT-OCR2.0 提供了一种新的 OCR 解决方案,整合了最新的技术和理论,以提升文本识别的准确性和效率。该项目是基于 Huggingface 平台的 GPU 资源支持,并已在多个平台上开源。特点如下:
>> 统一端到端模型:整合多个模块于一体,提高整体识别精度。
>> 多种 OCR 类型支持:支持普通文本、格式化文本、细粒度 OCR、多裁剪和多页面 OCR 等。
>> 高效推理与训练:提供了高效的训练和推理代码,能够在有限的硬件资源上运行。
>> 开源与社区支持:代码、权重和基准测试已开源,鼓励社区进行进一步开发和应用。
该项目旨在通过创新的架构和方法,提升 OCR 技术的性能和应用范围。
1、更新
2024/9/14 我们发布了官方演示。非常感谢Huggingface提供的GPU资源。
2024/9/13 我们发布了Huggingface部署。
2024/9/03 我们开源了代码、权重和基准测试。论文可以在该仓库中找到。我们也已将其提交至Arxiv。
2024/9/03 我们发布了OCR-2.0模型GOT!
使用与许可声明:数据、代码及检查点仅供研究用途,并且仅限于遵循Vary许可协议的使用。
GOT-OCR2.0的安装和使用方法
1、 安装
安装 环境cuda11.8+torch2.0.1
克隆此仓库并导航到GOT文件夹
git clone https://github.com/Ucas-HaoranWei/GOT-OCR2.0.git
cd 'the GOT folder'
安装包
conda create -n got python=3.10 -y
conda activate got
pip install -e .
安装Flash-Attention
pip install ninja
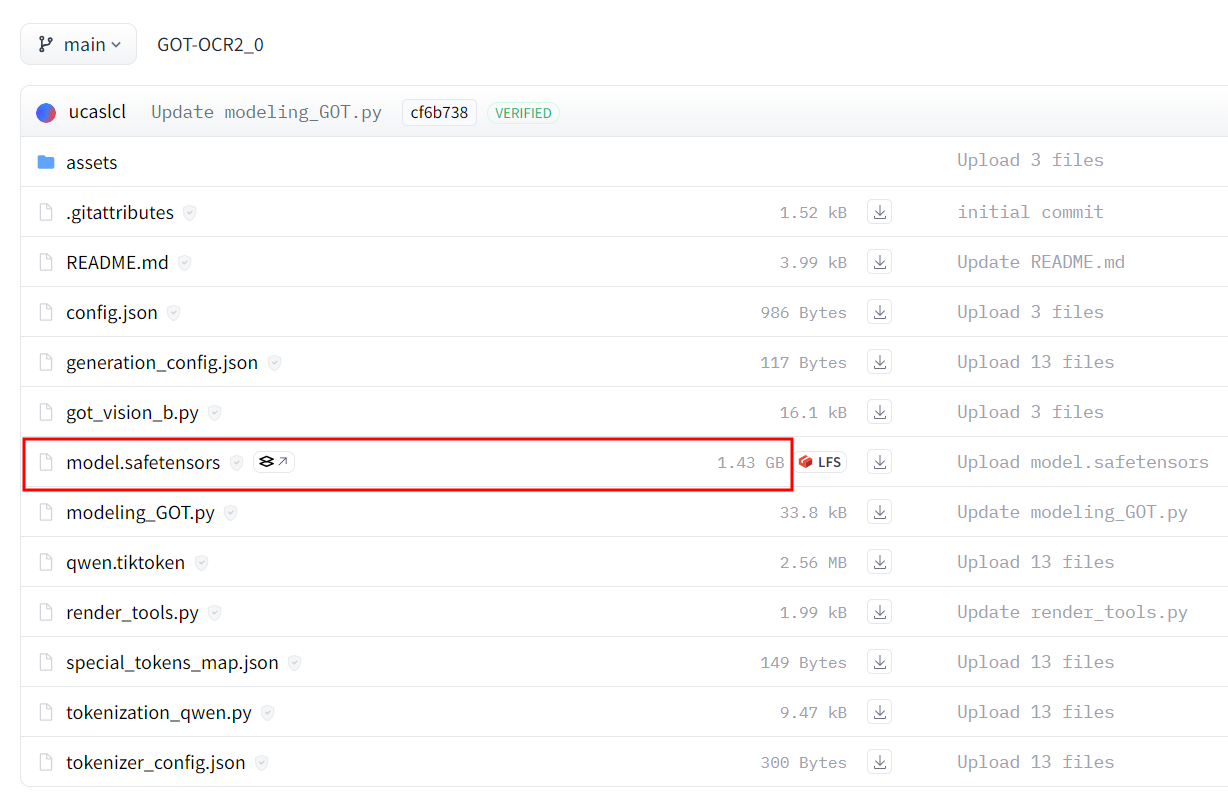
pip install flash-attn --no-build-isolationGOT权重:1.43G
- Huggingface
- Google Drive
- BaiduYun code: OCR2
2、 演示
纯文本OCR:
python3 GOT/demo/run_ocr_2.0.py --model-name /GOT_weights/ --image-file /an/image/file.png --type ocr格式化文本OCR:
python3 GOT/demo/run_ocr_2.0.py --model-name /GOT_weights/ --image-file /an/image/file.png --type format细粒度OCR:
python3 GOT/demo/run_ocr_2.0.py  --model-name  /GOT_weights/  --image-file  /an/image/file.png  --type format/ocr --box [x1,y1,x2,y2]

python3 GOT/demo/run_ocr_2.0.py  --model-name  /GOT_weights/  --image-file  /an/image/file.png  --type format/ocr --color red/green/blue
多裁剪OCR:
python3 GOT/demo/run_ocr_2.0_crop.py --model-name /GOT_weights/ --image-file /an/image/file.png 多页OCR(图片路径包含多个.png文件):
python3 GOT/demo/run_ocr_2.0_crop.py --model-name /GOT_weights/ --image-file /images/path/ --multi-page渲染格式化的OCR结果:
python3 GOT/demo/run_ocr_2.0.py --model-name /GOT_weights/ --image-file /an/image/file.png --type format --render注意:渲染结果可以在/results/demo.html中找到。
请打开demo.html查看结果。
3、 训练
示例训练可以在这里找到。请注意,'conversations'-'human'-'value'中的'<image>'是必需的!
本代码库只支持基于我们的GOT权重进行后期训练(阶段2/阶段3)。
如果你想按照论文中描述的从阶段1开始训练,你需要这个仓库。
deepspeed   /GOT-OCR-2.0-master/GOT/train/train_GOT.py \
 --deepspeed /GOT-OCR-2.0-master/zero_config/zero2.json    --model_name_or_path /GOT_weights/ \
 --use_im_start_end True   \
 --bf16 True   \
 --gradient_accumulation_steps 2    \
 --evaluation_strategy "no"   \
 --save_strategy "steps"  \
 --save_steps 200   \
 --save_total_limit 1   \
 --weight_decay 0.    \
 --warmup_ratio 0.001     \
 --lr_scheduler_type "cosine"    \
 --logging_steps 1    \
 --tf32 True     \
 --model_max_length 8192    \
 --gradient_checkpointing True   \
 --dataloader_num_workers 8    \
 --report_to none  \
 --per_device_train_batch_size 2    \
 --num_train_epochs 1  \
 --learning_rate 2e-5   \
 --datasets pdf-ocr+scence \
 --output_dir /your/output/path
注意:
更改constant.py中的相应数据信息。
将conversation_dataset_qwen.py第37行更改为你的data_name。
4、 评估
我们使用Fox和OneChart基准测试,其他基准测试可以在权重下载链接中找到。
评估代码可以在GOT/eval中找到。
你可以使用evaluate_GOT.py来运行评估。如果你有8个GPU,--num-chunks可以设置为8。
python3 GOT/eval/evaluate_GOT.py --model-name /GOT_weights/ --gtfile_path xxxx.json --image_path /image/path/ --out_path /data/eval_results/GOT_mathpix_test/ --num-chunks 8 --datatype OCRGOT-OCR2.0的案例应用
持续更新中......
1、使用 NVIDIA GPU 上的 Huggingface transformers 进行推理
要求在 Python 3.10 上进行测试
torch==2.0.1
torchvision==0.15.2
transformers==4.37.2
tiktoken==0.6.0
verovio==4.3.1
accelerate==0.28.0
python
from transformers import AutoModel, AutoTokenizer

tokenizer = AutoTokenizer.from_pretrained('ucaslcl/GOT-OCR2_0', trust_remote_code=True)
model = AutoModel.from_pretrained('ucaslcl/GOT-OCR2_0', trust_remote_code=True, low_cpu_mem_usage=True, device_map='cuda', use_safetensors=True, pad_token_id=tokenizer.eos_token_id)
model = model.eval().cuda()


# input your test image
image_file = 'xxx.jpg'

# plain texts OCR
res = model.chat(tokenizer, image_file, ocr_type='ocr')

# format texts OCR:
# res = model.chat(tokenizer, image_file, ocr_type='format')

# fine-grained OCR:
# res = model.chat(tokenizer, image_file, ocr_type='ocr', ocr_box='')
# res = model.chat(tokenizer, image_file, ocr_type='format', ocr_box='')
# res = model.chat(tokenizer, image_file, ocr_type='ocr', ocr_color='')
# res = model.chat(tokenizer, image_file, ocr_type='format', ocr_color='')

# multi-crop OCR:
# res = model.chat_crop(tokenizer, image_file, ocr_type='ocr')
# res = model.chat_crop(tokenizer, image_file, ocr_type='format')

# render the formatted OCR results:
# res = model.chat(tokenizer, image_file, ocr_type='format', render=True, save_render_file = './demo.html')

print(res)
T2、在线测试
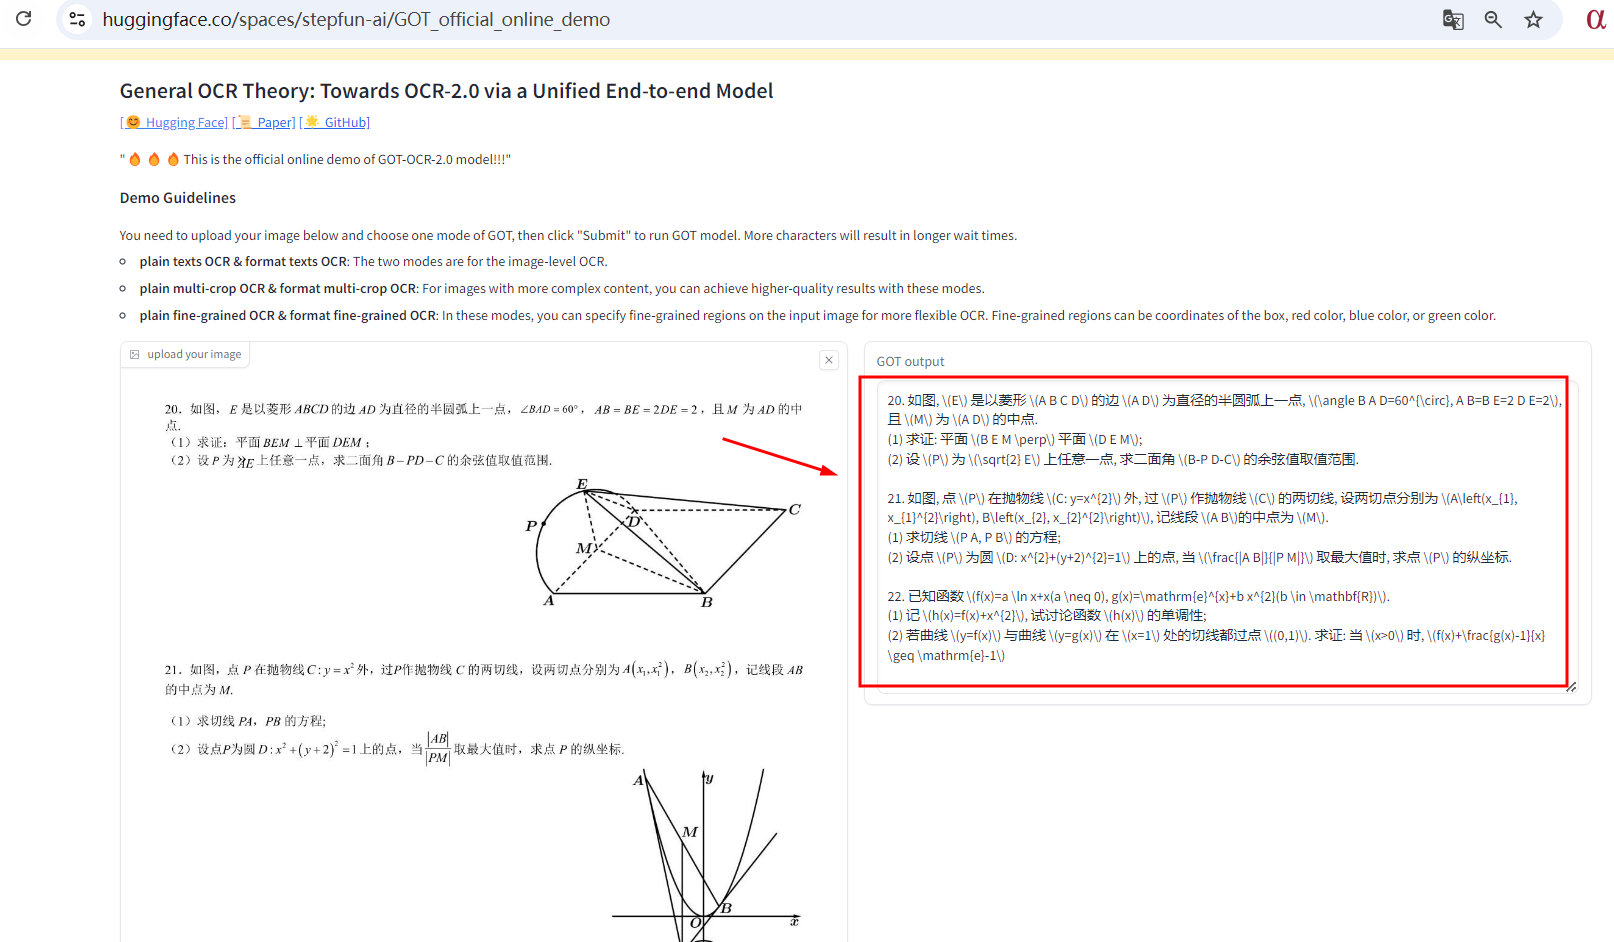
地址 :https://huggingface.co/spaces/stepfun-ai/GOT_official_online_demo