我们在许多其他平台看到过OCR功能的应用,那么HarmonyOS在这方面的支持如何呢?我们如何能快速使用这一能力呢?使用这一能力需要注意的点有哪些呢?就让我们一起来探究吧~
【开发环境】
- 版本规则号:HarmonyOS NEXT
- 版本类型:Developer Preview2
- OpenHarmony API Version:11 Release
- compileSdkVersion:4.1.0(11)
- IDE:DevEco Studio 4.1.3.700(Mac)
实现目标
通过对Core Vision Kit的基础功能的实现,完成相册图片获取、OCR、相机预览,图片格式转换等功能,熟悉ArkTS的开发流程和细节,加深对HarmonyOS中各类基础库的理解。
名词解释
- Core Vision Kit:基础视觉服务
- Camera Kit:相机服务
- Core File Kit:文件基础服务
- OCR:Optical Character Recognition,通用文字识别或光学字符识别
- URI: Uniform Resource Identifier,资源标识符,本文中URI指图片资源的访问路径
核心功能
本篇所涉及的核心功能就是通用文字识别(OCR)。
OCR是通过拍照、扫描等光学输入方式,把各种票据、卡证、表格、报刊、书籍等印刷品文字转化为图像信息,再利用文字识别技术将图像信息转化为计算机等设备可以使用的字符信息的技术。
首先,我们实现从相册选取一张图片,并识别图片上的文字的功能。这一功能的实现基于系统提供的Core Vision Kit中的OCR能力。
- 创建一个
ImageOCRUtil类,用于封装OCR相关功能。
从CoreVisionKit中导入textRecognition模块,声明一个名为ImageOCRUtil的类,并创建其new()方法。
ts
import { textRecognition } from '@kit.CoreVisionKit';

export class ImageOCRUtil {}

export default new ImageOCRUtil();- 在
ImageOCRUtil中实现图片中文字识别功能。
构建一个异步方法:async recognizeText(image: PixelMap | undefined, resultCallback: Function),其中PixelMap为图像像素类,用于读取或写入图像数据以及获取图像信息。目前pixelmap序列化大小最大128MB,超过会送显失败。大小计算方式为:宽 x 高 x 每像素占用字节数。
ts
export class ImageOCRUtil {

  /**
   * 文字识别
   *
   * @param image 图片源数据
   * @param resultCallback 结果返回
   * @returns
   */
  static async recognizeText(image:  PixelMap | undefined, resultCallback: Function) {
    // 非空判断
    if (!image || image === undefined) {
      hilog.error(0x0000, 'OCR', 'the image is not existed');
      return;
    }

    let visionInfo: textRecognition.VisionInfo = {
      pixelMap: image
    };

    let textConfiguration: textRecognition.TextRecognitionConfiguration = {
      isDirectionDetectionSupported: false
    };

    textRecognition.recognizeText(visionInfo, textConfiguration, (error: BusinessError, data: textRecognition.TextRecognitionResult) => {
      // 识别成功,获取结果
      if (error.code == 0) {
        let recognitionRes = data.value.toString();
        // 将识别结果返回
        resultCallback(recognitionRes);
      }
    });
  }
}- 在
ImageOCRUtil中实现从相册获取图片URI功能。
这里需用到Core File Kit,可借助图片选择器获取图片的存储路径。
ts
import { picker } from '@kit.CoreFileKit';

/**
  * 打开相册选择图片
  * @returns 异步返回图片URI
  */
static openAlbum(): Promise<string> {
    return new Promise<string>((resolve, reject) => {
      let photoPicker = new picker.PhotoViewPicker;
      photoPicker.select({
        MIMEType: picker.PhotoViewMIMETypes.IMAGE_TYPE,
        maxSelectNumber: 1
      }).then((res: picker.PhotoSelectResult) => {
        resolve(res.photoUris[0]);
      }).catch((err: BusinessError) => {
        hilog.error(0x0000, "OCR", `Failed to get photo uri, code: ${err.code}, message: ${err.message}`)
        resolve('')
      })
    })
}
UI与调用
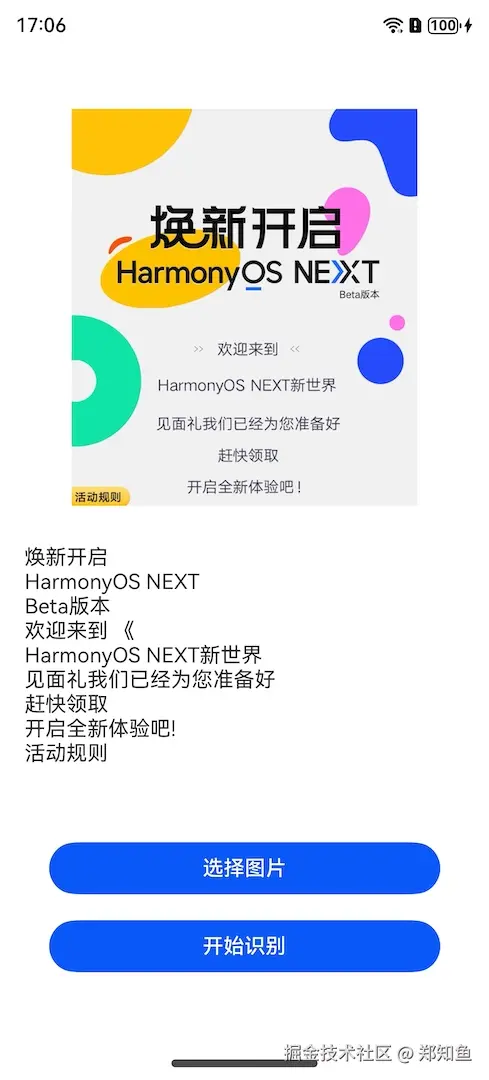
为了验证图片识别的效果,我们可以搭建简单的UI,提供从相册获取图片 -> 文字识别 -> 显示识别结果这一流程的UI与交互。
在Index页面中,UI相关的代码如下:
ts
import { image } from '@kit.ImageKit'
import { hilog } from '@kit.PerformanceAnalysisKit';
import { ImageOCRUtil } from '../common/utils/ImageOCRUtil';
import { CommonUtils } from '../common/utils/CommonUtils';
import { fileIo } from '@kit.CoreFileKit';

@Entry
@Component
struct Index {
  private imageSource: image.ImageSource | undefined = undefined;
  @State selectedImage: PixelMap | undefined = undefined;
  @State dataValues: string = '';

  build() {
    Column() {
      // 选中的图片
      Image(this.selectedImage)
        .objectFit(ImageFit.Fill)
        .height('60%')

      // 识别的内容
      Text(this.dataValues)
        .copyOption(CopyOptions.LocalDevice)
        .height('15%')
        .width('60%')
        .margin(10)

      // 选择图片按钮
      Button('选择图片')
        .type(ButtonType.Capsule)
        .fontColor(Color.White)
        .width('80%')
        .margin(10)
        .onClick(() => {
          this.selectImage();
        })

      Button('开始识别')
        .type(ButtonType.Capsule)
        .fontColor(Color.White)
        .alignSelf(ItemAlign.Center)
        .width('80%')
        .margin(10)
        .onClick(() => {
            // 点击"开始识别"
          });
        })
    }
    .width('100%')
    .height('100%')
    .justifyContent(FlexAlign.Center)
  }

  private async selectImage() {
    let uri = await ImageOCRUtil.openAlbum();
    if (uri === undefined) {
      hilog.error(0x0000, 'OCR', 'Failed to get the uri of photo.')
      return;
    }

    this.loadImage(uri);
  }

  loadImage(path: string) {
    setTimeout(async () => {
      let fileSource = await fileIo.open(path, fileIo.OpenMode.READ_ONLY);
      this.imageSource = image.createImageSource(fileSource.fd);
      this.selectedImage = await this.imageSource.createPixelMap();
    })
  }
}在"开始识别"的按钮的点击事件中,我们调用ImageOCRUtil的recognizeText,并在其回调中显示识别结果。
并对imageSource和selectedImage进行release()释放内存空间。
ts
ImageOCRUtil.recognizeText(this.selectedImage, (content: string) => {
  if (!CommonUtils.isEmpty(content)) {
    this.dataValues = content;
  }

  // 释放内存空间
  this.imageSource?.release();
  this.selectedImage?.release();
});
其实现效果如下所示:
双路预览
为了对文字识别这一功能进行扩展,我们可以结合相机的双路预览功能实时获取图片帧,并对图片帧进行文字识别。
我们创建一个XComponentPage的页面,添加一个相机预览视图。
- 获取ImageReceiver组件的SurfaceId。
ts
async getImageReceiverSurfaceId(receiver: image.ImageReceiver): Promise<string | undefined> {
    let ImageReceiverSurfaceId: string | undefined = undefined;
    if (receiver !== undefined) {
      console.info('receiver is not undefined');
      let ImageReceiverSurfaceId: string = await receiver.getReceivingSurfaceId();
      console.info(`ImageReceived id: ${ImageReceiverSurfaceId}`);
    } else {
      console.error('createImageReceiver failed');
    }
    return ImageReceiverSurfaceId;
}- 创建XComponent组件Surface。
ts
XComponent({
        // 组件的唯一标识
        id: 'LOXComponent',
        // surface:EGL/OpenGLES和媒体数据写入  component:开发者定制绘制内容
        type: XComponentType.SURFACE,
        // 应用Native层编译输出动态库名称,仅XComponent类型为"surface"时有效
        libraryname: 'SingleXComponent',
        // 给组件绑定一个控制器,通过控制器调用组件方法,仅XComponent类型为"surface"时有效
        controller: this.mXComponentController
      })// 插件加载完成时回调事件
        .onLoad(() => {
          // 设置Surface宽高(1920*1080),预览尺寸设置参考前面 previewProfilesArray 获取的当前设备所支持的预览分辨率大小去设置
          // 预览流与录像输出流的分辨率的宽高比要保持一致
          this.mXComponentController.setXComponentSurfaceSize({ surfaceWidth: 1920, surfaceHeight: 1080 });
          // 获取Surface ID
          this.xComponentSurfaceId = this.mXComponentController.getXComponentSurfaceId();
        })// 插件卸载完成时回调事件
        .onDestroy(() => {

        })
        .width("100%")
.height(display.getDefaultDisplaySync().width * 9 / 16)- 实现双路预览。
ts
import camera from '@ohos.multimedia.camera';


async createDualChannelPreview(cameraManager: camera.CameraManager, XComponentSurfaceId: string, receiver: image.ImageReceiver): Promise<void> {
    // 获取支持的相机设备对象
    let camerasDevices: Array<camera.CameraDevice> = cameraManager.getSupportedCameras();

    // 获取支持的模式类型
    let sceneModes: Array<camera.SceneMode> = cameraManager.getSupportedSceneModes(camerasDevices[0]);
    let isSupportPhotoMode: boolean = sceneModes.indexOf(camera.SceneMode.NORMAL_PHOTO) >= 0;
    if (!isSupportPhotoMode) {
      console.error('photo mode not support');
      return;
    }

    // 获取profile对象
    let profiles: camera.CameraOutputCapability = cameraManager.getSupportedOutputCapability(camerasDevices[0], camera.SceneMode.NORMAL_PHOTO); // 获取对应相机设备profiles
    let previewProfiles: Array<camera.Profile> = profiles.previewProfiles;

    // 预览流1
    let previewProfilesObj: camera.Profile = previewProfiles[0];

    // 预览流2
    let previewProfilesObj2: camera.Profile = previewProfiles[0];

    // 创建 预览流1 输出对象
    let previewOutput: camera.PreviewOutput = cameraManager.createPreviewOutput(previewProfilesObj, XComponentSurfaceId);

    // 创建 预览流2 输出对象
    let imageReceiverSurfaceId: string = await receiver.getReceivingSurfaceId();
    let previewOutput2: camera.PreviewOutput = cameraManager.createPreviewOutput(previewProfilesObj2, imageReceiverSurfaceId);

    // 创建cameraInput对象
    let cameraInput: camera.CameraInput = cameraManager.createCameraInput(camerasDevices[0]);

    // 打开相机
    await cameraInput.open();

    // 会话流程
    let photoSession: camera.PhotoSession = cameraManager.createSession(camera.SceneMode.NORMAL_PHOTO) as camera.PhotoSession;

    // 开始配置会话
    photoSession.beginConfig();

    // 把CameraInput加入到会话
    photoSession.addInput(cameraInput);

    // 把 预览流1 加入到会话
    photoSession.addOutput(previewOutput);

    // 把 预览流2 加入到会话
    photoSession.addOutput(previewOutput2);

    // 提交配置信息
    await photoSession.commitConfig();

    // 会话开始
    await photoSession.start();
}- 通过ImageReceiver实时获取预览图像。
ts
onImageArrival(receiver: image.ImageReceiver): void {
  receiver.on('imageArrival', () => {
    receiver.readNextImage((err: BusinessError, nextImage: image.Image) => {
      if (err || nextImage === undefined) {
        console.error('readNextImage failed');
        return;
      }
      nextImage.getComponent(image.ComponentType.JPEG, async (err: BusinessError, imgComponent: image.Component) => {
        if (err || imgComponent === undefined) {
          console.error('getComponent failed');
        }
        if (imgComponent && imgComponent.byteBuffer as ArrayBuffer) {
          let imageArrayBuffer = imgComponent.byteBuffer as ArrayBuffer;
          console.log("得到图片数据:" + JSON.stringify(imageArrayBuffer))
          console.log("图片数据长度:" + imageArrayBuffer.byteLength)

          //TODO:OCR识别

        } else {
          console.error('byteBuffer is null');
        }
        nextImage.release();
      })
    })
  })
}最后,我们对预览返回进行文字识别。预览返回的结果imageArrayBuffer的类型为ArrayBuffer,我们需要将其转换为PixelMap类,然后再调用recognizeText()识别。
ts
// 转换图片格式为PixelMap,并识别其中的文字
let opts: image.InitializationOptions = {
  editable: true,
  pixelFormat: 3,
  size: { height: 320, width: 320 }
}
image.createPixelMap(imageArrayBuffer, opts).then((pixelMap: image.PixelMap) => {
  console.info('Succeeded in creating pixelmap.');

  ImageOCRUtil.recognizeText(pixelMap, (res: string) => {
    console.info("识别结果:" + res);
  });
  }).catch((error: BusinessError) => {
    console.error('Failed to create pixelmap.');
})这样,运行XComponentPage时,打开预览对准包含文字的物体,就可从Log中看到识别的文字信息。
完整代码见 -> hosgo-vision
拥抱鸿蒙,拥抱未来,选择远方,风雨兼程。
参考