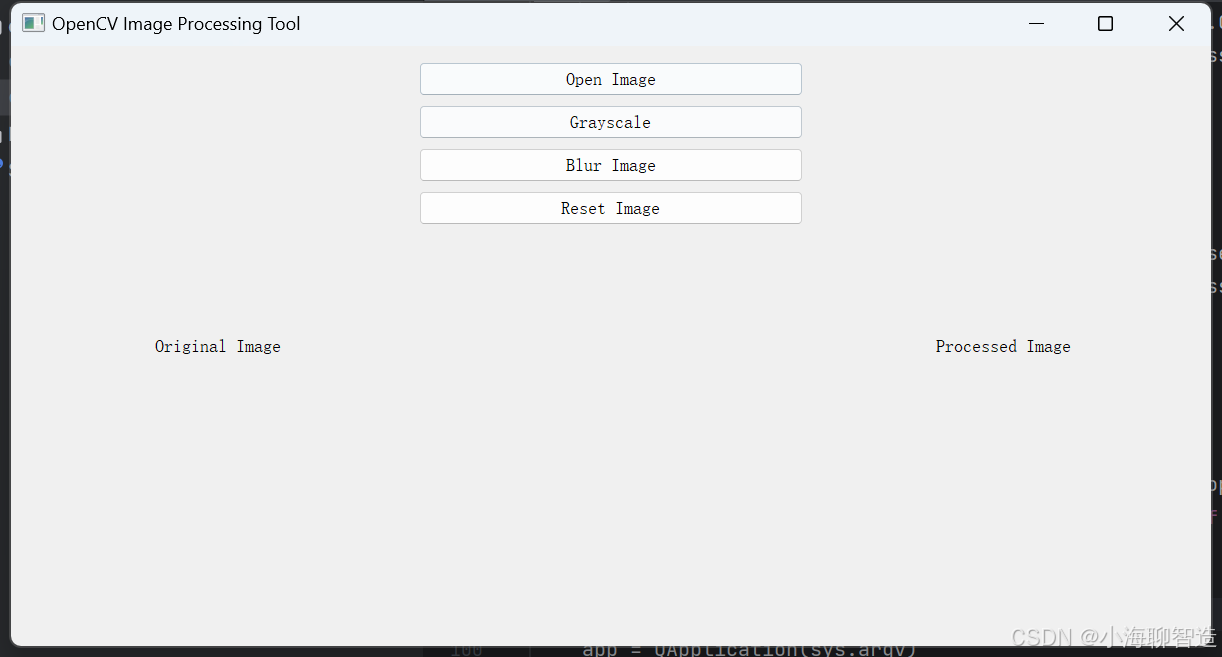
为了实现一个基于 PyQt5 和 OpenCV 的图形用户界面(GUI),要求如下:
左边显示加载的图片。
中间提供各种对图片进行处理的操作方法(如灰度化、模糊处理等)。
右边显示处理后的效果图。
接下来我将详细讲解如何实现这个界面。
1. 环境配置
确保你已经安装了 PyQt5 和 OpenCV:
pip install PyQt5
pip install opencv-python
2. 实现代码
以下是完整的代码实现,基于 PyQt5 创建 GUI,使用 OpenCV 进行图像处理操作:
import sys
import cv2
from PyQt5.QtWidgets import QApplication, QLabel, QPushButton, QVBoxLayout, QHBoxLayout, QWidget, QFileDialog
from PyQt5.QtGui import QImage, QPixmap
from PyQt5.QtCore import Qt


class ImageProcessorApp(QWidget):
    def __init__(self):
        super().__init__()

        # 初始化UI
        self.setWindowTitle("OpenCV Image Processing Tool")
        self.setGeometry(100, 100, 1200, 600)

        # 布局
        self.layout = QHBoxLayout()

        # 左侧:原始图片显示
        self.original_label = QLabel("Original Image")
        self.original_label.setAlignment(Qt.AlignCenter)
        self.layout.addWidget(self.original_label)

        # 中间:按钮操作
        self.button_layout = QVBoxLayout()
        self.open_button = QPushButton("Open Image")
        self.open_button.clicked.connect(self.open_image)
        self.button_layout.addWidget(self.open_button)

        self.gray_button = QPushButton("Grayscale")
        self.gray_button.clicked.connect(self.apply_grayscale)
        self.button_layout.addWidget(self.gray_button)

        self.blur_button = QPushButton("Blur Image")
        self.blur_button.clicked.connect(self.apply_blur)
        self.button_layout.addWidget(self.blur_button)

        self.reset_button = QPushButton("Reset Image")
        self.reset_button.clicked.connect(self.reset_image)
        self.button_layout.addWidget(self.reset_button)

        self.button_layout.addStretch()  # 中间空白拉伸
        self.layout.addLayout(self.button_layout)

        # 右侧:处理后的图像显示
        self.processed_label = QLabel("Processed Image")
        self.processed_label.setAlignment(Qt.AlignCenter)
        self.layout.addWidget(self.processed_label)

        # 设置主窗口布局
        self.setLayout(self.layout)

        # 变量用于存储加载和处理的图像
        self.original_image = None
        self.processed_image = None

    def open_image(self):
        # 打开文件对话框选择图片
        image_path = QFileDialog.getOpenFileName(self, "Open Image", "", "Image Files (*.png *.jpg *.jpeg *.bmp)")[0]
        if image_path:
            self.original_image = cv2.imread(image_path)
            self.processed_image = self.original_image.copy()
            self.display_image(self.original_image, self.original_label)

    def display_image(self, img, label):
        # 将 OpenCV BGR 图像转换为 RGB 图像
        rgb_image = cv2.cvtColor(img, cv2.COLOR_BGR2RGB)
        # 获取图像的尺寸
        h, w, ch = rgb_image.shape
        bytes_per_line = ch * w
        # 将 OpenCV 图像转换为 QImage
        qimg = QImage(rgb_image.data, w, h, bytes_per_line, QImage.Format_RGB888)
        # 将 QImage 转换为 QPixmap
        pixmap = QPixmap.fromImage(qimg)
        # 将图像设置为 QLabel
        label.setPixmap(pixmap.scaled(label.size(), Qt.KeepAspectRatio))

    def apply_grayscale(self):
        # 对图像应用灰度化处理
        if self.processed_image is not None:
            gray_image = cv2.cvtColor(self.processed_image, cv2.COLOR_BGR2GRAY)
            # 将单通道图像转回三通道以显示
            gray_3channel = cv2.cvtColor(gray_image, cv2.COLOR_GRAY2BGR)
            self.display_image(gray_3channel, self.processed_label)

    def apply_blur(self):
        # 对图像应用模糊处理
        if self.processed_image is not None:
            blurred_image = cv2.GaussianBlur(self.processed_image, (15, 15), 0)
            self.display_image(blurred_image, self.processed_label)

    def reset_image(self):
        # 恢复原始图像
        if self.original_image is not None:
            self.processed_image = self.original_image.copy()
            self.display_image(self.processed_image, self.processed_label)


if __name__ == '__main__':
    app = QApplication(sys.argv)
    window = ImageProcessorApp()
    window.show()
    sys.exit(app.exec_())
3. 代码详解
主窗口布局
QHBoxLayout 被用作主布局,分为三部分:
左侧:显示加载的原始图片。
中间:包含各类图像处理的按钮,比如打开图片、应用灰度化、模糊处理、重置图像。
右侧:显示处理后的效果图。
打开图片功能
点击 "Open Image" 按钮,打开文件对话框,用户选择一张图片后,将其加载并在左侧显示。
通过 OpenCV 读取图像后,使用 cv2.cvtColor 将 BGR 格式转换为 RGB 格式,并使用 QImage 和 QPixmap 将图像显示在 QLabel 上。
图像处理功能
Grayscale 按钮:应用灰度化处理,将图像从彩色转换为灰度图,并在右侧显示。
Blur Image 按钮:应用高斯模糊处理(cv2.GaussianBlur),并在右侧显示模糊后的图像。
Reset Image 按钮:恢复原始图像,重置所有处理效果。
图像显示
通过 display_image 函数,将 OpenCV 处理后的图像转换为 QImage,再通过 QLabel 显示在界面上。图像在 QLabel 中保持适当的缩放比例,保证图片内容不会失真。
4. 界面示例
左侧:加载的原始图像。
中间:有四个按钮,分别用于打开图片、灰度处理、模糊处理、重置。
右侧:显示经过处理的效果图。
5. 功能扩展
可以进一步扩展此应用,增加更多图像处理方法,例如:
边缘检测(Canny 算法)。
图像旋转、缩放。
图像滤镜(锐化、浮雕等效果)。
保存处理后的图像功能。
运行效果

灰度示例
可以在这个基础上继续添加更多的opencv 的方法