从 8.3 开始的 WooCommerce版本中,您可能会注意到您的自定义付款方式在结账区块中不可用。
例如,如果您尝试停用商店中除自定义付款方式之外的所有付款方式,您可能会收到如下错误消息:

这里我使用 Storefront 主题作为示例,但任何 WordPress 主题都会出现相同的错误消息。
但可以肯定的是,当您使用旧的[woocommerce_checkout]简码时,一切都运行良好。
是的,之前发布的支付网关教程似乎不再完整,但我们今天将通过这个额外的教程来更改它,我将逐步指导您应该做什么,以添加自定义的兼容性WooCommerce 购物车和结帐块的 WooCommerce 付款方式。
这就是我们在本教程结束时要实现的目标:

当然,我还会向您展示一些巧妙的额外内容,例如为您的付款方式添加自定义图标。
文章目录
服务器端集成
首先,让我们从服务器端集成开始,我很确定你们中的许多人都觉得使用 PHP 开发比 JavaScript + React 更舒服,所以让我们从简单的事情开始。
注册一个块支持 PHP 类
"区块支持PHP类"是除主要支付网关类之外的PHP类。我们将使用下面的简单代码片段来注册它,这与我们在 woocommerce_payment_gateways hook 中注册主网关类时所做的类似。
add_action( 'woocommerce_blocks_loaded', 'rudr_gateway_block_support' );function rudr_gateway_block_support() {// if( ! class_exists( 'Automattic\WooCommerce\Blocks\Payments\Integrations\AbstractPaymentMethodType' ) ) {// return;// }// 在这里引入 "gateway block support class" 文件require_once __DIR__ . '/includes/class-wc-misha-gateway-blocks-support.php';// 注册我们刚才引入的 PHP 类add_action('woocommerce_blocks_payment_method_type_registration',function( Automattic\WooCommerce\Blocks\Payments\PaymentMethodRegistry $payment_method_registry ) {$payment_method_registry->register( new WC_Misha_Gateway_Blocks_Support );});}
请记住以下几点:
- 我注销了
class_exists()条件,因为我们不再需要它,因为结账块现在是 WooCommerce 的一部分,而不是独立的插件。 - 我们的块支持 PHP 类本身将位于一个单独的文件中,我们将在下一步中
class-wc-misha-gateway-blocks-support.php查看它。
块支持 PHP 类
在这一部分中,我将创建一个WC_Misha_Gateway_Blocks_Support PHP 类来扩展 WooCommerce 的 AbstractPaymentMethodType 类。同时不要忘记我们已经有了扩展 WC_Payment_Gateway 的WC_Misha_Gateway 类。
就我而言,我将其放入includes/class-wc-misha-gateway-blocks-support.php.
<?phpuse Automattic\WooCommerce\Blocks\Payments\Integrations\AbstractPaymentMethodType;final class WC_Misha_Gateway_Blocks_Support extends AbstractPaymentMethodType {private $gateway;protected $name = 'misha'; // payment gateway idpublic function initialize() {// get payment gateway settings$this->settings = get_option( "woocommerce_{$this->name}_settings", array() );// you can also initialize your payment gateway here// $gateways = WC()->payment_gateways->payment_gateways();// $this->gateway = $gateways[ $this->name ];}public function is_active() {return ! empty( $this->settings[ 'enabled' ] ) && 'yes' === $this->settings[ 'enabled' ];}public function get_payment_method_script_handles() {wp_register_script('wc-misha-blocks-integration',plugin_dir_url( __DIR__ ) . 'build/index.js',array('wc-blocks-registry','wc-settings','wp-element','wp-html-entities',),null, // or time() or filemtime( ... ) to skip cachingtrue);return array( 'wc-misha-blocks-integration' );}public function get_payment_method_data() {return array('title' => $this->get_setting( 'title' ),// almost the same way:// 'title' => isset( $this->settings[ 'title' ] ) ? $this->settings[ 'title' ] : 'Default value';'description' => $this->get_setting( 'description' ),// if $this->gateway was initialized on line 15// 'supports' => array_filter( $this->gateway->supports, [ $this->gateway, 'supports' ] ),// example of getting a public key// 'publicKey' => $this->get_publishable_key(),);}//private function get_publishable_key() {// $test_mode = ( ! empty( $this->settings[ 'testmode' ] ) && 'yes' === $this->settings[ 'testmode' ] );// $setting_key = $test_mode ? 'test_publishable_key' : 'publishable_key';// return ! empty( $this->settings[ $setting_key ] ) ? $this->settings[ $setting_key ] : '';//}}
首先让我们看一下类的属性和方法。
属性:
方法:
is_active(),get_payment_method_script_handles()-- 这是我们包含 JavaScript 文件的地方,其中包含集成的客户端部分。get_payment_method_data()-- 提供您将在前端作为关联数组使用的所有必要数据。
您还可以使用index.asset.php来获取脚本版本和依赖项。
public function get_payment_method_script_handles() {$asset_path = plugin_dir_path( __DIR__ ) . 'build/index.asset.php';$version = null;$dependencies = array();if( file_exists( $asset_path ) ) {$asset = require $asset_path;$version = isset( $asset[ 'version' ] ) ? $asset[ 'version' ] : $version;$dependencies = isset( $asset[ 'dependencies' ] ) ? $asset[ 'dependencies' ] : $dependencies;}wp_register_script('wc-misha-blocks-integration',plugin_dir_url( __DIR__ ) . 'build/index.js',$dependencies,$version,true);return array( 'wc-misha-blocks-integration' );}
声明兼容性
当您想让用户知道您的付款方式与 WooCommerce Checkout 块不兼容时,此部分通常很有用。
当用户尝试编辑古腾堡中的结账页面时,他们将收到通知:
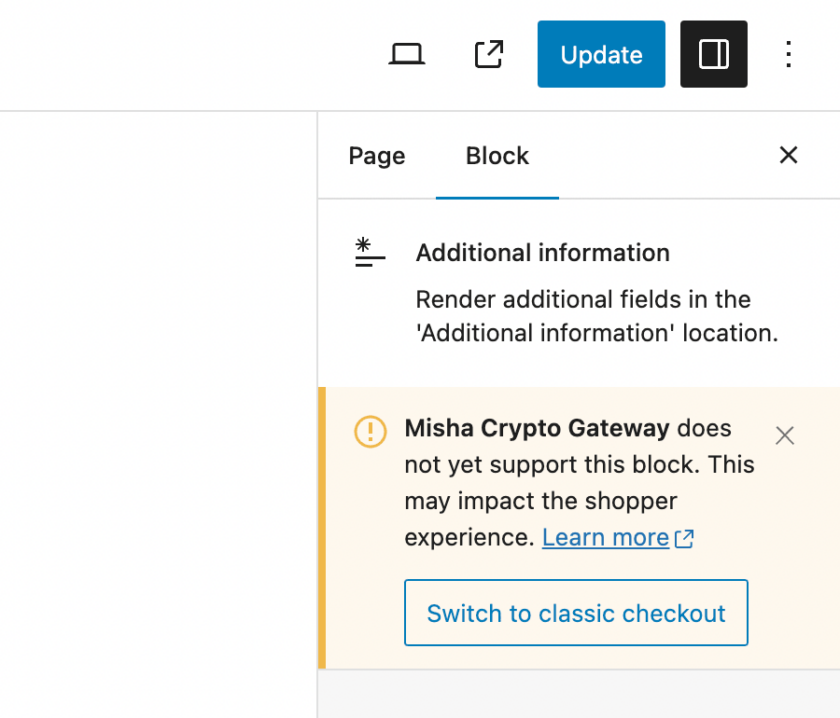
方法如下:
add_action( 'before_woocommerce_init', 'rudr_cart_checkout_blocks_compatibility' );function rudr_cart_checkout_blocks_compatibility() {if( class_exists( '\Automattic\WooCommerce\Utilities\FeaturesUtil' ) ) {\Automattic\WooCommerce\Utilities\FeaturesUtil::declare_compatibility('cart_checkout_blocks',__FILE__,false // true (compatible, default) or false (not compatible));}}
客户端集成
设置项目
再次强调,我希望本教程中的内容保持超级简单,因此我将使用@wordpress/scripts即可。
在我们的构建中,您肯定可以进一步配置 WooCommerce 混合构建,这样您就可以使用import { registerPaymentMethod } from ....
这就是我的文件夹结构的样子:

为 WooCommerce Checkout 区块注册自定义付款方式
以下是/src/index.js文件,以防您有疑问。
import { decodeEntities } from '@wordpress/html-entities';const { registerPaymentMethod } = window.wc.wcBlocksRegistryconst { getSetting } = window.wc.wcSettingsconst settings = getSetting( 'misha_data', {} )const label = decodeEntities( settings.title )const Content = () => {return decodeEntities( settings.description || '' )}const Label = ( props ) => {const { PaymentMethodLabel } = props.componentsreturn <PaymentMethodLabel text={ label } />}registerPaymentMethod( {name: "misha",label: <Label />,content: <Content />,edit: <Content />,canMakePayment: () => true,ariaLabel: label,supports: {features: settings.supports,}})
也许详细讨论 registerPaymentMethod() 以及讨论 registerExpressPaymentMethod()是一个好主意,但我认为我们将在我的博客上的下一个教程中更深入地研究特定示例。
最后!恭喜你!
如果您想知道付款方式标题和说明的来源:

添加付款方式图标
由于我向您承诺了更多示例,并且您可能不想等到下一个教程,所以让我们从这个开始。
我现在的目标是在 WooCommerce Checkout 块中的自定义支付网关标题附近显示一个图标:

首先,让我们修改我们的块支持 PHP 类,特别是它的get_payment_method_data(),我们将在那里提供另一个参数:
public function get_payment_method_data() {return array('title' => $this->get_setting( 'title' ),'description' => $this->get_setting( 'description' ),'icon' => plugin_dir_url( __DIR__ ) . 'assets/icon.png',...
然后我建议为其创建另一个 React 组件:
const Icon = () => {return settings.icon? <img src={settings.icon} style={``{ float: 'right', marginRight: '20px' }} />: ''}const Label = () => {return (<span style={``{ width: '100%' }}>{label}<Icon /></span>);};
如果未提供图标图像 URL,则不会显示<img>标签,太棒了!