一、概念
简介
keepalived是集群管理中保证集群高可用的一个服务软件,用来防止单点故障。
工作原理
keepalived是以VRRP协议为实现基础的,N台路由器组成一个路由器组。master上有一个对外提供服务的vip,master会向backup进行发送组播,如果backup未收到vrrp包,就认为master宕掉了,VRRP会根据优先级选取一个backup作为master与之同时会将原master上的vip漂移到新master上
扩展:
脑裂:
如果master和backup之间因为原因无法接收到组播的通知,但是实际两个节点都在正常工作,这两个节点均为master,并且会强行绑定VIP。
解决方式:
1.添加检测手段,给两个主机的网卡做健康检查,ping对方减少脑裂的发生机会
2.设置仲裁机制,依赖第三番检测,启用共享磁盘锁,ping网关等等。
3.将master停掉,检查防火墙等机制,网络之间的通信等等
配置文件
! Configuration File for keepalived

global_defs {
   notification_email {
     acassen@firewall.loc
     failover@firewall.loc
     sysadmin@firewall.loc
   }
   notification_email_from Alexandre.Cassen@firewall.loc
   smtp_server 192.168.200.1
   smtp_connect_timeout 30
   router_id LVS_DEVEL
   vrrp_skip_check_adv_addr
   vrrp_strict
   vrrp_garp_interval 0
   vrrp_gna_interval 0
}

vrrp_instance VI_1 {
    state MASTER
    interface eth0
    virtual_router_id 51
    priority 100
    advert_int 1
    authentication {
        auth_type PASS
        auth_pass 1111
    }
    virtual_ipaddress {
        192.168.200.16
        192.168.200.17
        192.168.200.18
    }
}

virtual_server 192.168.200.100 443 {
    delay_loop 6
    lb_algo rr
    lb_kind NAT
    persistence_timeout 50
    protocol TCP

    real_server 192.168.201.100 443 {
        weight 1
        SSL_GET {
            url {
              path /
              digest ff20ad2481f97b1754ef3e12ecd3a9cc
            }
            url {
              path /mrtg/
              digest 9b3a0c85a887a256d6939da88aabd8cd
            }
            connect_timeout 3
            nb_get_retry 3
            delay_before_retry 3
        }
    }
}

virtual_server 10.10.10.2 1358 {
    delay_loop 6
    lb_algo rr
    lb_kind NAT
    persistence_timeout 50
    protocol TCP

    sorry_server 192.168.200.200 1358

    real_server 192.168.200.2 1358 {
        weight 1
        HTTP_GET {
            url {
              path /testurl/test.jsp
              digest 640205b7b0fc66c1ea91c463fac6334d
            }
            url {
              path /testurl2/test.jsp
              digest 640205b7b0fc66c1ea91c463fac6334d
            }
            url {
              path /testurl3/test.jsp
              digest 640205b7b0fc66c1ea91c463fac6334d
            }
            connect_timeout 3
            nb_get_retry 3
            delay_before_retry 3
      }
    }

    real_server 192.168.200.3 1358 {
        weight 1
        HTTP_GET {
            url {
              path /testurl/test.jsp
              digest 640205b7b0fc66c1ea91c463fac6334c
            }
            url {
              path /testurl2/test.jsp
              digest 640205b7b0fc66c1ea91c463fac6334c
            }
            connect_timeout 3
            nb_get_retry 3
            delay_before_retry 3
        }
    }
}

virtual_server 10.10.10.3 1358 {
    delay_loop 3
    lb_algo rr
    lb_kind NAT
    persistence_timeout 50
    protocol TCP

    real_server 192.168.200.4 1358 {
        weight 1
        HTTP_GET {
            url {
              path /testurl/test.jsp
              digest 640205b7b0fc66c1ea91c463fac6334d
            }
            url {
              path /testurl2/test.jsp
              digest 640205b7b0fc66c1ea91c463fac6334d
            }
            url {
              path /testurl3/test.jsp
              digest 640205b7b0fc66c1ea91c463fac6334d
            }
            connect_timeout 3
            nb_get_retry 3
            delay_before_retry 3
        }
    }

    real_server 192.168.200.5 1358 {
        weight 1
        HTTP_GET {
            url {
              path /testurl/test.jsp
              digest 640205b7b0fc66c1ea91c463fac6334d
            }
            url {
              path /testurl2/test.jsp
              digest 640205b7b0fc66c1ea91c463fac6334d
            }
            url {
              path /testurl3/test.jsp
              digest 640205b7b0fc66c1ea91c463fac6334d
            }
            connect_timeout 3
            nb_get_retry 3
            delay_before_retry 3
        }
    }
}
tips:
二、keepalived实战操作
安装keepalived
yum -y install keepalivedVIP漂移
机器准备
|-------------------------------------|-------------------|
| ip | 角色 |
| 192.168.252.146 VIP:192.168.252.204 | keepalived-master |
| 192.168.252.148 | keepalived-backup |
编辑配置文件
192.168.252.146:
1.编辑主配置文件
vim /etc/keepalived/keepalived.conf
内容:
! Configuration File for keepalived

global_defs {
   router_id master
}

vrrp_instance VI_1 {
    state MASTER
    interface ens33
    virtual_router_id 80
    priority 100
    advert_int 1
    authentication {
        auth_type PASS
        auth_pass 1111
    }
    virtual_ipaddress {
        192.168.252.204/24
    }
}

2.启动:
systemctl start keepalived


192.168.252.148:
1.编辑从配置文件
vim /etc/keepalived/keepalived.conf
内容:
! Configuration File for keepalived

global_defs {
   router_id backup
}

vrrp_instance VI_1 {
    state BACKUP
    interface ens33
    virtual_router_id 80
    priority 50
    advert_int 1
    authentication {
        auth_type PASS
        auth_pass 1111
    }
    virtual_ipaddress {
        192.168.252.204/24
    }
}


2.启动
systemctl start keepalived
tips:
- 这里主节点的优先级更高为100,从节点的优先级为50,这样子VIP就可以漂移向从节点,并且在重启主节点的时候VIP会自动恢复到主节点
- virtual_router_id 80 这个选项是虚拟路由两个节点的必须一致才能相互通信
- 主从节点的state标识符不能一样route_id也不能一样都是标识这个机子的信息。
测试
没有停掉keepalived之前
192.168.252.146:

有虚拟ip 192.168.252.204
192.168.252.148:

没有虚拟ip
停掉keepalived之后
192.168.252.146:
systemctl stop keepalived
192.168.252.146:

没有了VIP
192.168.252.148:

有了VIP
keepalived+nginx
健康检测nginx
机器准备
|-------------------------------------|-------------------------|
| ip | 角色 |
| 192.168.252.146 VIP:192.168.252.204 | keepalived-master nginx |
| 192.168.252.148 | keepalived-backup nginx |
编写检查nginx脚本
vim /etc/keepalived/scripts/check_nginx_status.sh
内容:
#!/bin/bash
curl -I http://localhost &>/dev/null
if [ $? -ne 0 ];then
        systemctl stop keepalived
fi
编辑配置文件
192.168.252.146:
1.编辑主配置文件
vim /etc/keepalived/keepalived.conf
内容:
! Configuration File for keepalived

global_defs {
   router_id master
}

vrrp_script check_nginx {
   script "/etc/keepalived/scripts/check_nginx_status.sh"
   interval 5
}

vrrp_instance VI_1 {
    state MASTER
    interface ens33
    virtual_router_id 80
    priority 100
    advert_int 1
    authentication {
        auth_type PASS
        auth_pass 1111
    }
    virtual_ipaddress {
        192.168.252.204/24
    }
    track_script {
        check_nginx
    }
}

2.启动:
systemctl start nginx
systemctl start keepalived


192.168.252.148:
1.编辑从配置文件
vim /etc/keepalived/keepalived.conf
内容:
! Configuration File for keepalived

global_defs {
   router_id backup
}

vrrp_instance VI_1 {
    state BACKUP
    interface ens33
    virtual_router_id 80
    priority 50
    advert_int 1
    authentication {
        auth_type PASS
        auth_pass 1111
    }
    virtual_ipaddress {
        192.168.252.204/24
    }
}


2.启动
systemctl start nginx
systemctl start keepalived
tips:
- 从节点脚本可加可不加
- 出现vip不漂移原因:脚本写错、脚本没有执行权限、配置文件错误
- nginx要再keepalived之前启动
测试
没有停止nginx之前
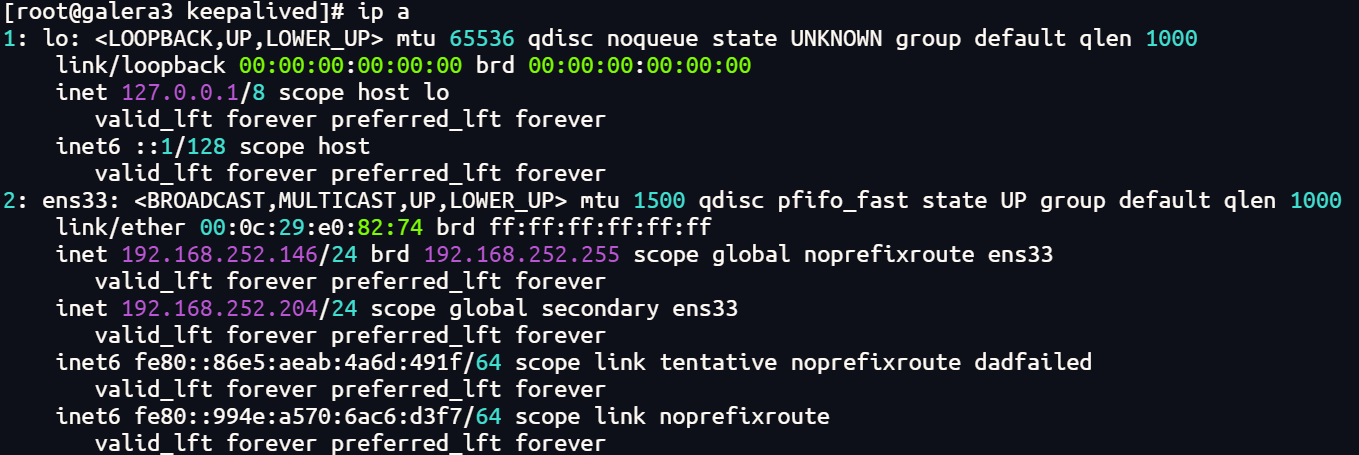

停止nginx之后
192.168.252.146:
systemctl stop nginx

keepalived+ipvsadm+nginx(DR)
机器准备
|-------------------------------------------------|--------------------|
| ip | 角色 |
| 192.168.252.144 VIP[ens33]:192.168.252.200/32 | keepalived ipvsadm |
| 192.168.252.145 VIP[ens33]:192.168.252.200/32 | keepalived ipvsadm |
| 192.168.252.146 VIP[lo]:192.168.252.200/32 | nginx |
| 192.168.252.148 VIP[lo]:192.168.252.200/32 | nginx |
编写检测ipvsadm脚本
vim /etc/keepalived/scripts/ipvsadm.sh
内容:
#!/bin/bash
systemctl status ipvsadm
if [ $? -ne 0 ];then
    systemctl stop keepalived
fi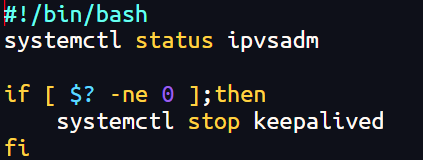
编写配置文件
192.168.252.144:
1.编辑配置文件
vim /etc/keepalived/keepalived.conf
内容:
! Configuration File for keepalived

global_defs {
   router_id lvs-keepalived-master
}

vrrp_script ipvsadm_check {
   script "/etc/keepalived/scripts/ipvsadm.sh"
   interval 5     #五秒执行一次
}

vrrp_instance VI_1 {
    state MASTER
    interface ens33                #VIP绑定接口
    virtual_router_id 80         	 #VRID 同一组集群,主备一致
    priority 100                   #本节点优先级,辅助改为50
    advert_int 1                   #检查间隔,默认为1s
    authentication {
        auth_type PASS
        auth_pass 1111
    }
    virtual_ipaddress {
        192.168.252.200/32         # 可以写多个vip
    }
    track_script {
        ipvsadm_check
    }
}

virtual_server 192.168.252.200 80 {    #LVS配置
        delay_loop 3   #故障切换的时间
        lb_algo rr     #LVS调度算法
        lb_kind DR     #LVS集群模式(路由模式)
        net_mask 255.255.255.0
        protocol TCP      #健康检查使用的协议
        real_server 192.168.252.146 80 {
                weight 1
                inhibit_on_failure   #当该节点失败时,把权重设置为0,而不是从IPVS中删除
                TCP_CHECK {          #健康检查
                        connect_port 80   #检查的端口
                        connect_timeout 3  #连接超时的时间
                        }
                }
        real_server 192.168.252.148 80 {
                weight 1
                inhibit_on_failure
                TCP_CHECK {
                        connect_timeout 3
                        connect_port 80
                        }
                }
}

2.启动
systemctl start ipvsadm
systemctl start keepalived

3.查看指向
ipvsadm -ln
回显:
IP Virtual Server version 1.2.1 (size=4096)
Prot LocalAddress:Port Scheduler Flags
  -> RemoteAddress:Port           Forward Weight ActiveConn InActConn
TCP  192.168.252.200:80 rr
  -> 192.168.252.146:80           Route   1      0          0
  -> 192.168.252.148:80           Route   1      0          0


192.168.252.145:
1.编辑配置文件
vim /etc/keepalived/keepalived.conf
内容:
! Configuration File for keepalived

global_defs {
   router_id lvs-keepalived-backup
}

vrrp_instance VI_1 {
    state BACKUP
    interface ens33                #VIP绑定接口
    nopreempt
    virtual_router_id 80         #VRID 同一组集群,主备一致
    priority 50            #本节点优先级,辅助改为50
    advert_int 1            #检查间隔,默认为1s
    authentication {
        auth_type PASS
        auth_pass 1111
    }
    virtual_ipaddress {
        192.168.252.200/32  # 可以写多个vip
    }
}

virtual_server 192.168.252.200 80 {    #LVS配置
        delay_loop 3   #故障切换的时间
        lb_algo rr     #LVS调度算法
        lb_kind DR     #LVS集群模式(路由模式)
        net_mask 255.255.255.0
        protocol TCP      #健康检查使用的协议
        real_server 192.168.252.146 80 {
                weight 1
                inhibit_on_failure   #当该节点失败时,把权重设置为0,而不是从IPVS中删除
                TCP_CHECK {          #健康检查
                        connect_port 80   #检查的端口
                        connect_timeout 3  #连接超时的时间
                        }
                }
        real_server 192.168.252.148 80 {
                weight 1
                inhibit_on_failure
                TCP_CHECK {
                        connect_timeout 3
                        connect_port 80
                        }
                }
}

2.启动
systemctl start ipvsadm
systemctl start keepalived

3.查看指向
ipvsadm -ln
回显:
IP Virtual Server version 1.2.1 (size=4096)
Prot LocalAddress:Port Scheduler Flags
  -> RemoteAddress:Port           Forward Weight ActiveConn InActConn
TCP  192.168.252.200:80 rr
  -> 192.168.252.146:80           Route   1      0          0
  -> 192.168.252.148:80           Route   1      0          0
192.168.252.144

192.168.252.145

服务端添加回环网卡
192.168.252.146:
ip a add dev lo 192.168.252.200/32
192.168.252.148:
ip a add dev lo 192.168.252.200/32

测试
访问虚拟ip
浏览器中输入http://192.168.252.200


刷新之后页面变换
keepalived+mysql(master1)+mysql(master2)
机器准备
|-----------------|---------------------------------|
| ip | 角色 |
| 192.168.252.146 | keepalived-master mysql-master1 |
| 192.168.252.148 | keepalived-backup mysql-master2 |
做双主复制
此处直接显示结果不做具体详细步骤
192.168.252.146:
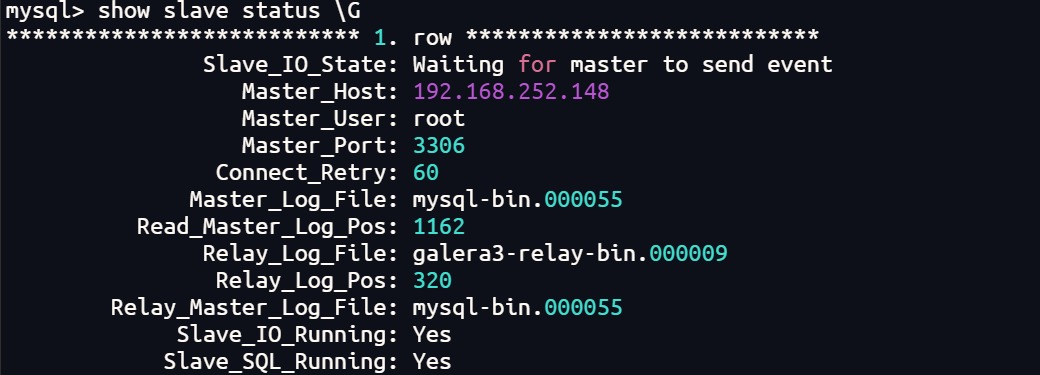
192.168.252.148:

编写检测mysql脚本
192.168.252.146:
vim /etc/keepalived/scripts/check_mysqld_status.sh
内容:
#!/bin/bash
mysql -uroot -p"@Syh2025659" -e "show slave status\G" &>/dev/null
if [ $? -ne 0 ];then
        systemctl stop keepalived
fi

192.168.252.146:
vim /etc/keepalived/scripts/check_mysql_status.sh
内容:
#!/bin/bash
mysql -uroot -p"@Syh2025659" -e "show slave status\G" &>/dev/null
if [ $? -ne 0 ];then
        systemctl stop keepalived
fi

编写配置文件
192.168.252.146:
1.编辑配置文件
vim /etc/keepalived/keepalived.conf
内容:
! Configuration File for keepalived

global_defs {
   router_id master
}
vrrp_script check_run {
   script "/etc/keepalived/scripts/check_mysqld_status.sh"
   interval 5
}

vrrp_instance VI_1 {
    state MASTER
    interface ens33
    virtual_router_id 80
    priority 100
    advert_int 1
    authentication {
        auth_type PASS
        auth_pass 1111
    }
    virtual_ipaddress {
        192.168.252.200/24
    }
    track_script {
        check_run
    }
}

2.启动
systemctl start mysqld
systemctl start keepalived

192.168.252.148:
1.编辑配置文件
vim /etc/keepalived/keepalived.conf
! Configuration File for keepalived

global_defs {
   router_id backup
}
vrrp_script check_run {
   script "/etc/keepalived/scripts/check_mysql_status.sh"
   interval 5
}

vrrp_instance VI_1 {
    state BACKUP
    interface ens33
    virtual_router_id 80
    priority 50
    advert_int 1
    authentication {
        auth_type PASS
        auth_pass 1111
    }
    virtual_ipaddress {
        192.168.252.200/24
    }
    track_script {
        check_run
    }
}

2.启动
systemctl start mysqld
systemctl start keepalived
测试
mysql启动时
192.168.252.146:

192.168.252.148:

mysql停掉时
192.168.252.146:

192.168.252.148:

三、haproxy
概述
简介
软件,主要是做负载均衡的7层,也可以做4层负载均衡,是一款高性能的负载均衡软件。因为其专注于负载均衡这一些事情,因此与nginx比起来在负载均衡这件事情上做更好,更专业。
特点
- 支持tcp / http 两种协议层的负载均衡(支持四层和七层负载均衡)
- 支持8种左右的负载均衡算法(有多种负载均衡算法)
- 性能好,事件驱动的链接处理模式及单进程处理模式(高性能)
- 拥有监控页面
- 功能强大的ACL支持(相当于nginx中的location)
常用算法
roundrobin
基于权重进行轮询,每个服务器处理时间相同
static-rr
基于权重进行轮询,根据权重大小分配服务器处理时间
leastconn
新的连接请求被派发至具有最少连接数目的后端服务器
实战操作
安装
yum -y install haproxykeepalived+haproxy+nginx七层负载均衡
机器准备
|----------------------------------------|--------------------|
| ip | 角色 |
| 192.168.252.144 VIP:192.168.252.205/24 | keepalived haproxy |
| 192.168.252.145 VIP:192.168.252.205/24 | keepalived haproxy |
| 192.168.252.146 | nginx |
| 192.168.252.148 | nginx |
编写检测haproxy脚本
192.168.252.144:
vim  /etc/keepalived/scripts/check_haproxy_status.sh
内容:
#!/bin/bash
curl -I http://localhost &>/dev/null
if [ $? -ne 0 ];then
        systemctl stop keepalived
fi


192.168.252.145:
vim  /etc/keepalived/scripts/check_haproxy_status.sh
内容:
#!/bin/bash
curl -I http://localhost &>/dev/null
if [ $? -ne 0 ];then
        systemctl stop keepalived
fi
编辑haproxy配置文件
两个节点群配置
192.168.252.144:
192.168.252.145:
编辑配置文件
vim /etc/haproxy/haproxy.cfg
内容:
global
    log         127.0.0.1 local2 info
    pidfile     /var/run/haproxy.pid
    maxconn     4000   #优先级低
    user        haproxy
    group       haproxy
    daemon               #以后台形式运行ha-proxy
    nbproc 1                #工作进程数量  cpu内核是几就写几
defaults
    mode                    http  #工作模式 http ,tcp 是 4 层,http是 7 层
    log                     global
    retries                 3   #健康检查。3次连接失败就认为服务器不可用,主要通过后面的check检查
    option                  redispatch  #服务不可用后重定向到其他健康服务器。
    maxconn                 4000  #优先级中
    contimeout              5000  #ha服务器与后端服务器连接超时时间,单位毫秒ms
    clitimeout              50000 #客户端超时
    srvtimeout              50000 #后端服务器超时
listen stats
    bind                        *:80
    stats                       enable
    stats uri                   /haproxy  #使用浏览器访问 http://192.168.246.169/haproxy,可以看到服务器状态>(uri不可改变)
    stats auth                  syh:123  #用户认证,客户端使用elinks浏览器的时候不生效
frontend  web
    mode                        http
    bind                            *:80   #监听哪个ip和什么端口
    option                  httplog             #日志类别 http 日志格式
    acl html url_reg  -i  \.html$  #1.访问控制列表名称html。规则要求访问以html结尾的url
    use_backend httpservers if  html #2.如果满足acl html规则,则推送给后端服务器httpservers
    default_backend    httpservers   #默认使用的服务器组
backend httpservers    #名字要与上面的名字必须一样
    balance     roundrobin  #负载均衡的方式
    server  http1 192.168.252.146:80 maxconn 2000 weight 1  check inter 1s rise 2 fall 2
    server  http2 192.168.252.148:80 maxconn 2000 weight 1  check inter 1s rise 2 fall 2
编辑keepalived配置文件
192.168.252.144:
1.编辑配置文件
vim /etc/keepalived/keepalived.conf
内容:
! Configuration File for keepalived

global_defs {
   router_id director1
}
vrrp_script check_haproxy {
   script "/etc/keepalived/scripts/check_haproxy_status.sh"
   interval 5
}

vrrp_instance VI_1 {
    state MASTER
    interface ens33
    virtual_router_id 80
    priority 100
    advert_int 1
    authentication {
        auth_type PASS
        auth_pass 1111
    }
    virtual_ipaddress {
        192.168.252.205/24
    }
    track_script {
        check_haproxy
    }
}


2.启动
systemctl start haproxy
systemctl start keepalived


192.168.252.145:
1.编辑配置文件
vim /etc/keepalived/keepalived.conf
内容:
! Configuration File for keepalived

global_defs {
   router_id director2
}
vrrp_script check_haproxy {
   script "/etc/keepalived/scripts/check_haproxy_status.sh"
   interval 5
}

vrrp_instance VI_1 {
    state BACKUP
    interface ens33
    virtual_router_id 80
    priority 50
    advert_int 1
    authentication {
        auth_type PASS
        auth_pass 1111
    }
    virtual_ipaddress {
        192.168.252.205/24
    }
    track_script {
        check_haproxy
    }
}

2.启动
systemctl start haproxy
systemctl start keepalived
测试
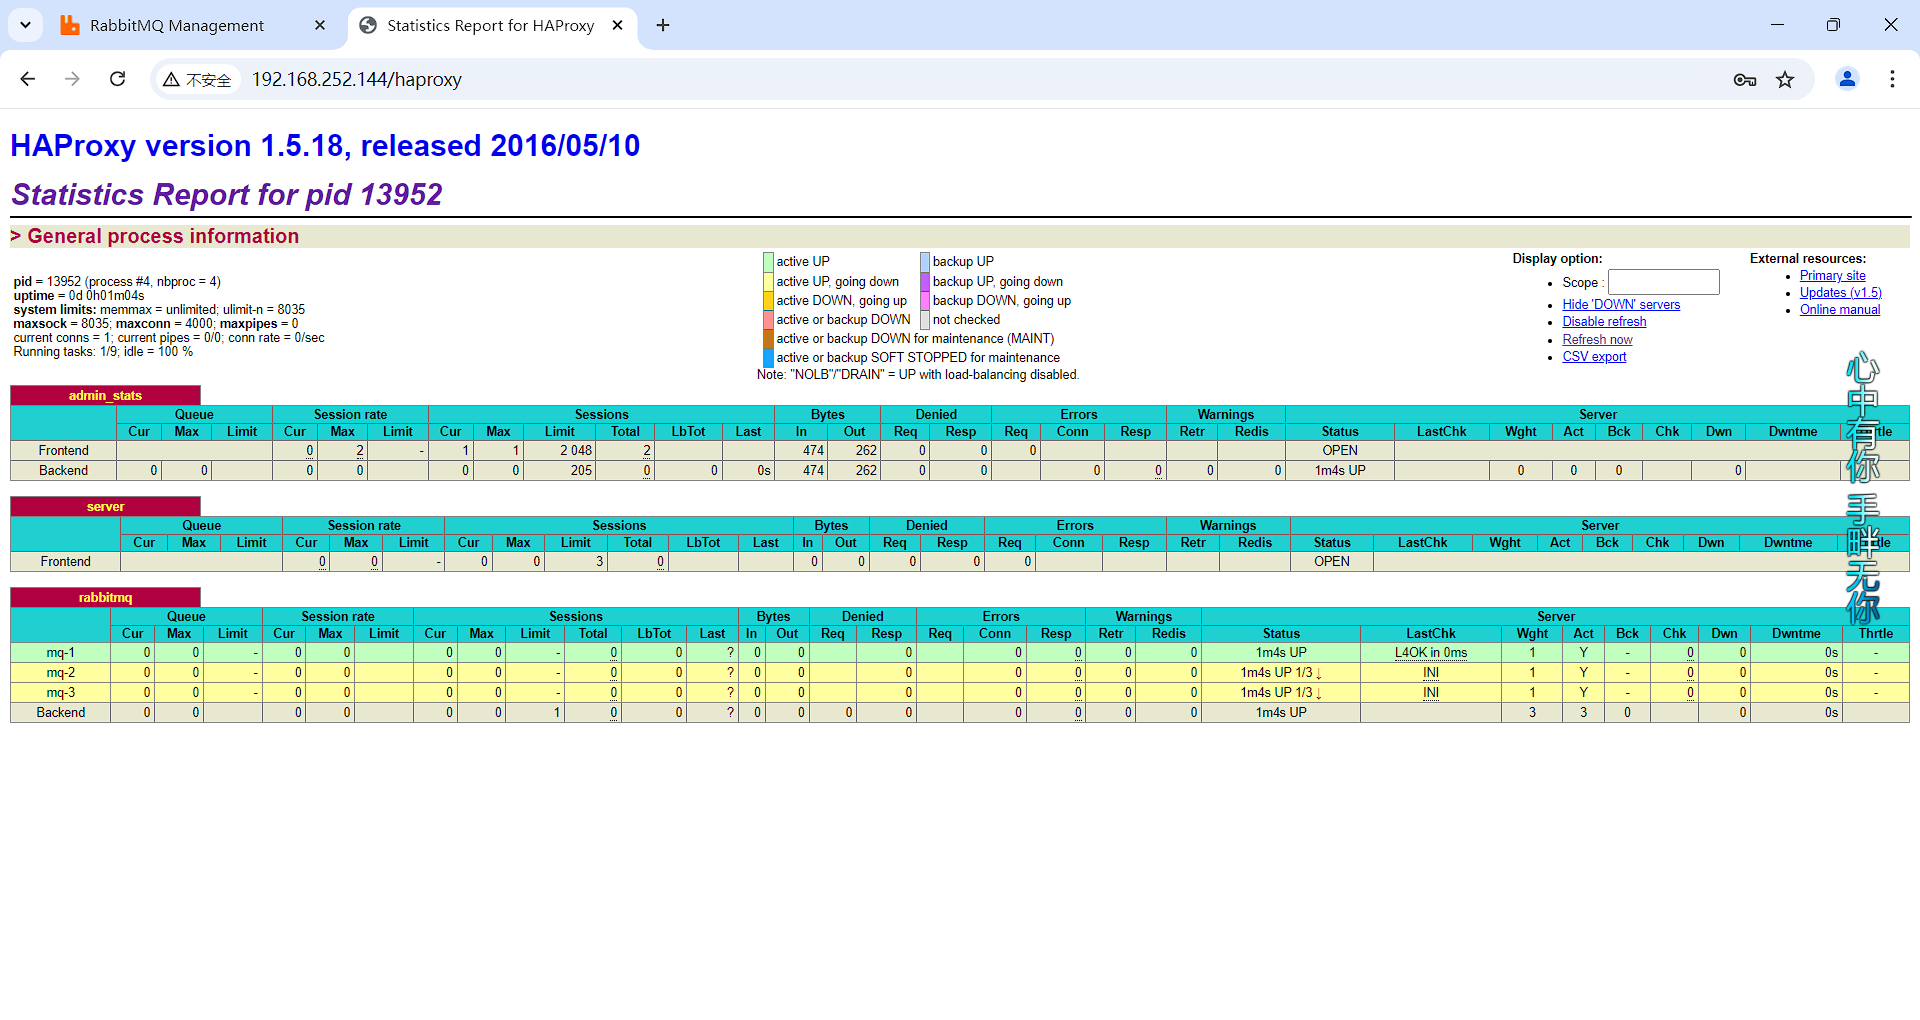


haproxy+mysql四层负载均衡
机器准备
|-----------------|---------|
| ip | 角色 |
| 192.168.252.144 | haproxy |
| 192.168.252.146 | mysql |
| 192.168.252.148 | mysql |
tips:
做haproxy的机器上不能有mysql
加入不同数据库
192.168.252.146:
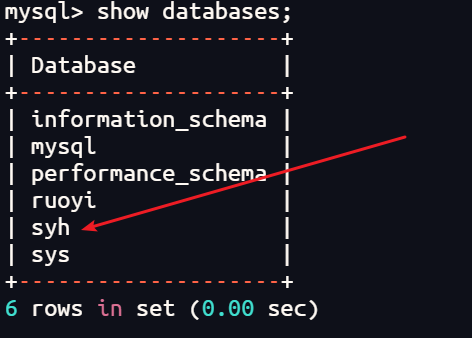
192.168.252.148:
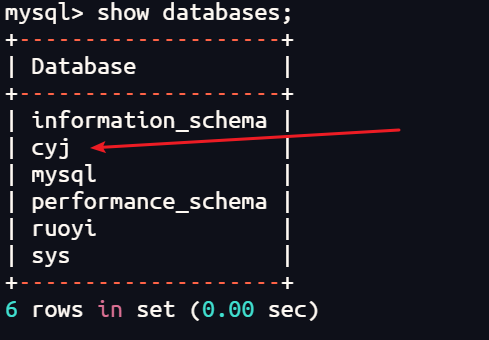
tips:
要想远程访问需要将用户打开所有ip都能访问
编辑haproxy配置文件
192.168.252.144
vim /etc/haproxy/haproxy.cfg
内容:
global
    log         127.0.0.1 local2
    pidfile     /var/run/haproxy.pid
    maxconn     4000
    user        haproxy
    group       haproxy
    daemon
    nbproc      1
defaults
    mode                    http
    log                     global
    option                  redispatch
    retries                 3
    maxconn                 4000
    contimeout              5000
    clitimeout              50000
        srvtimeout                  50000
listen stats
    bind                        *:80
    stats                       enable
    stats uri                   /haproxy
    stats auth                  qianfeng:123
frontend  web
    mode                        http
    bind                            *:80
    option                  httplog
    default_backend    httpservers
backend httpservers
    balance     roundrobin
    server  http1 192.168.252.146:80 maxconn 2000 weight 1  check inter 1s rise 2 fall 2
    server  http2 192.168.252.148:80 maxconn 2000 weight 1  check inter 1s rise 2 fall 2
    listen mysql
    bind *:3306
    mode tcp        #使用TCP四层负载均衡
    balance roundrobin
    server mysql1 192.168.252.146:3306 weight 1  check inter 1s rise 2 fall 2
    server mysql2 192.168.252.148:3306 weight 1  check inter 1s rise 2 fall 2
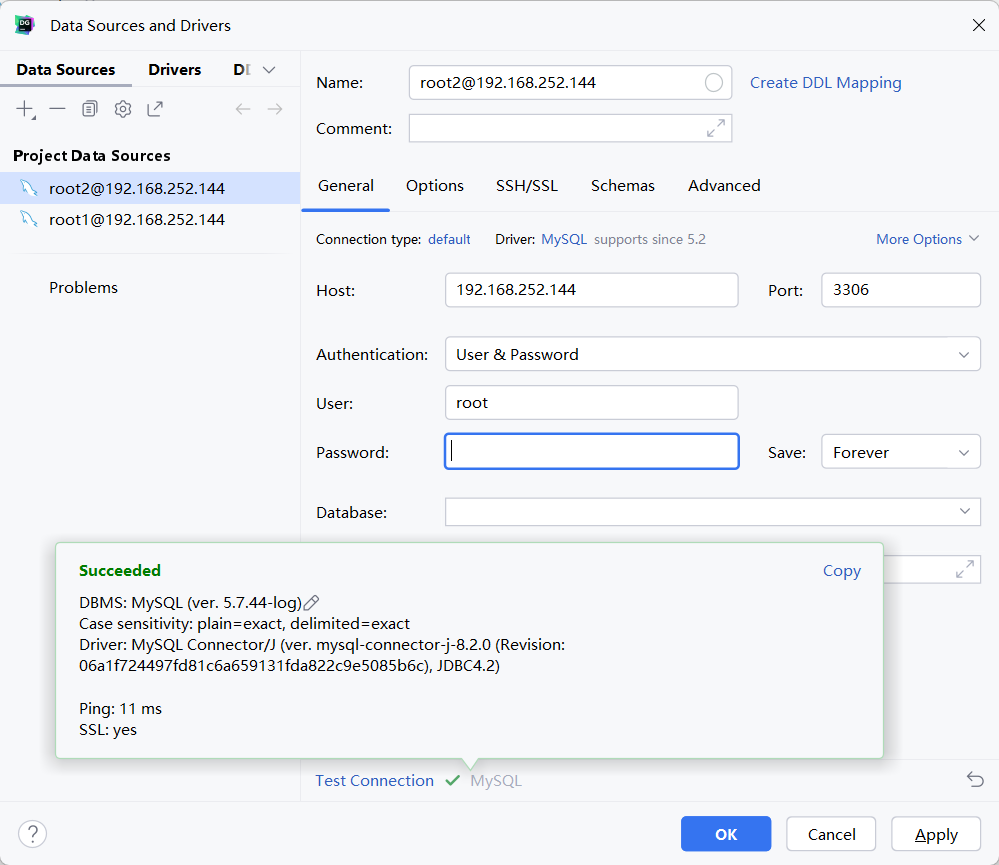
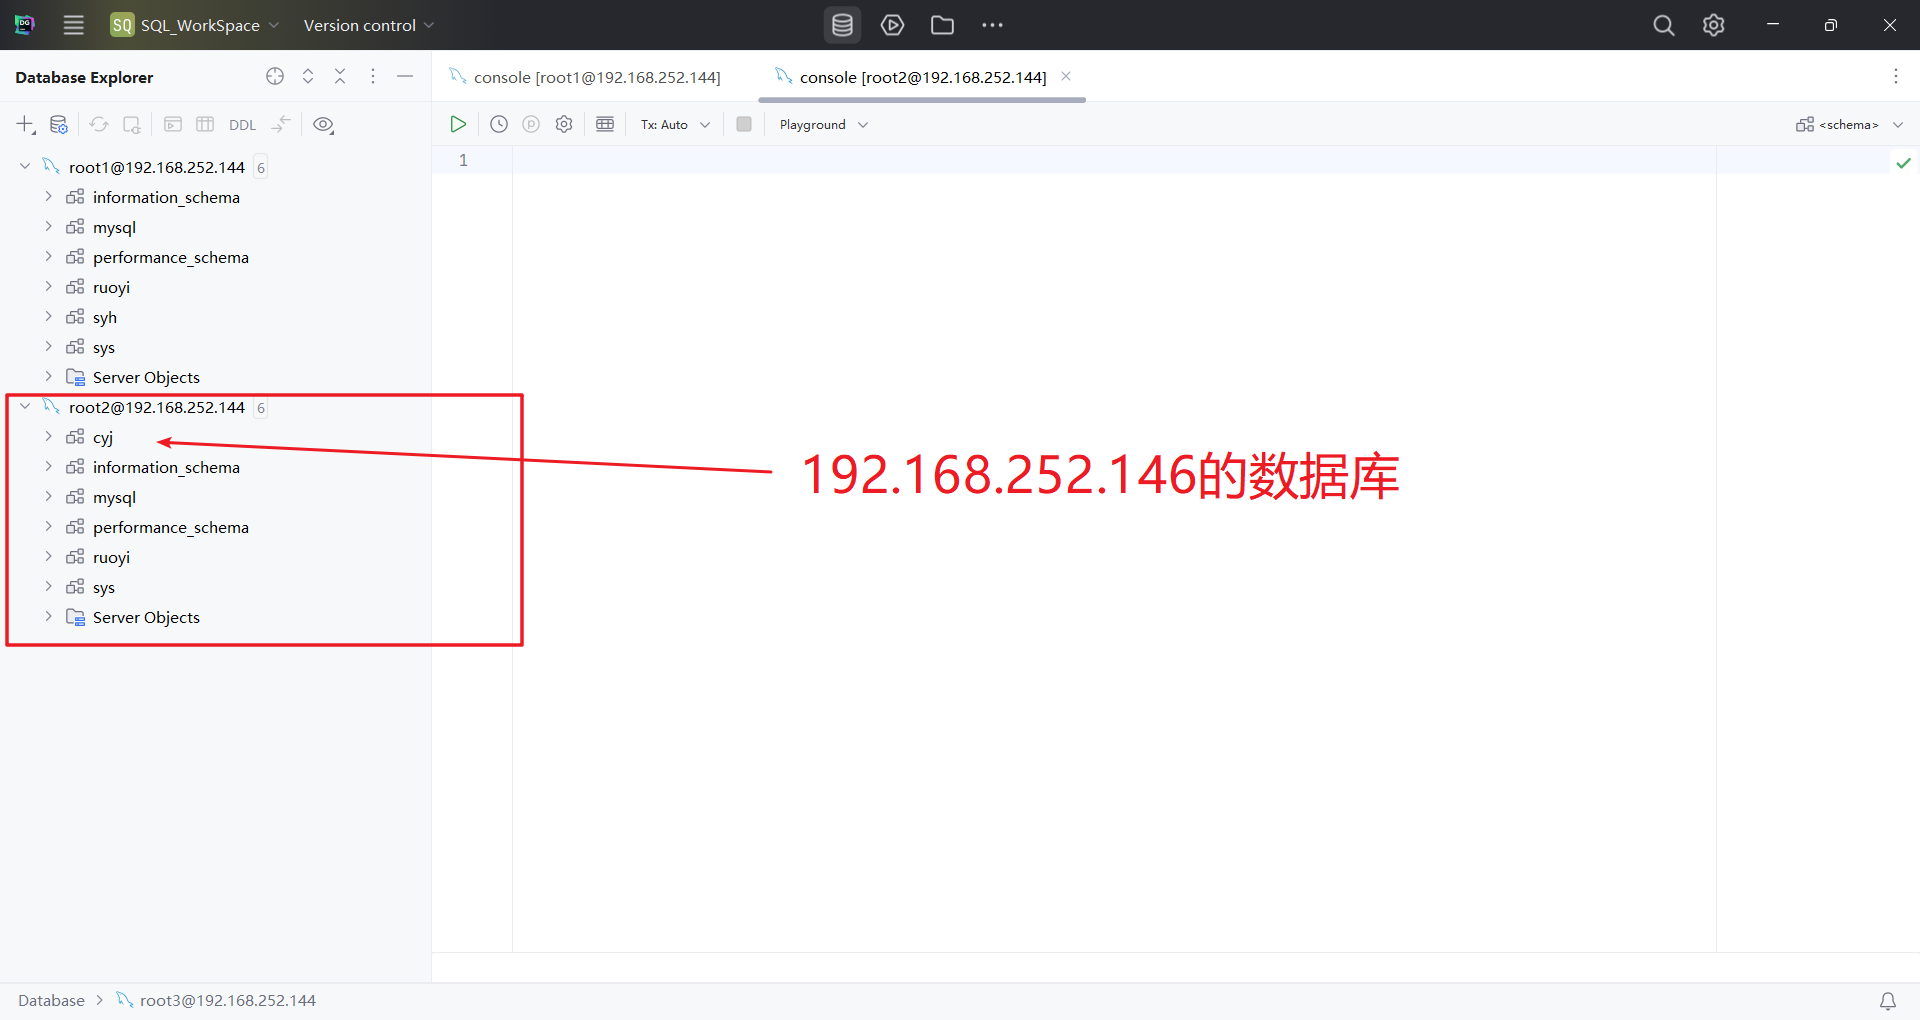
测试
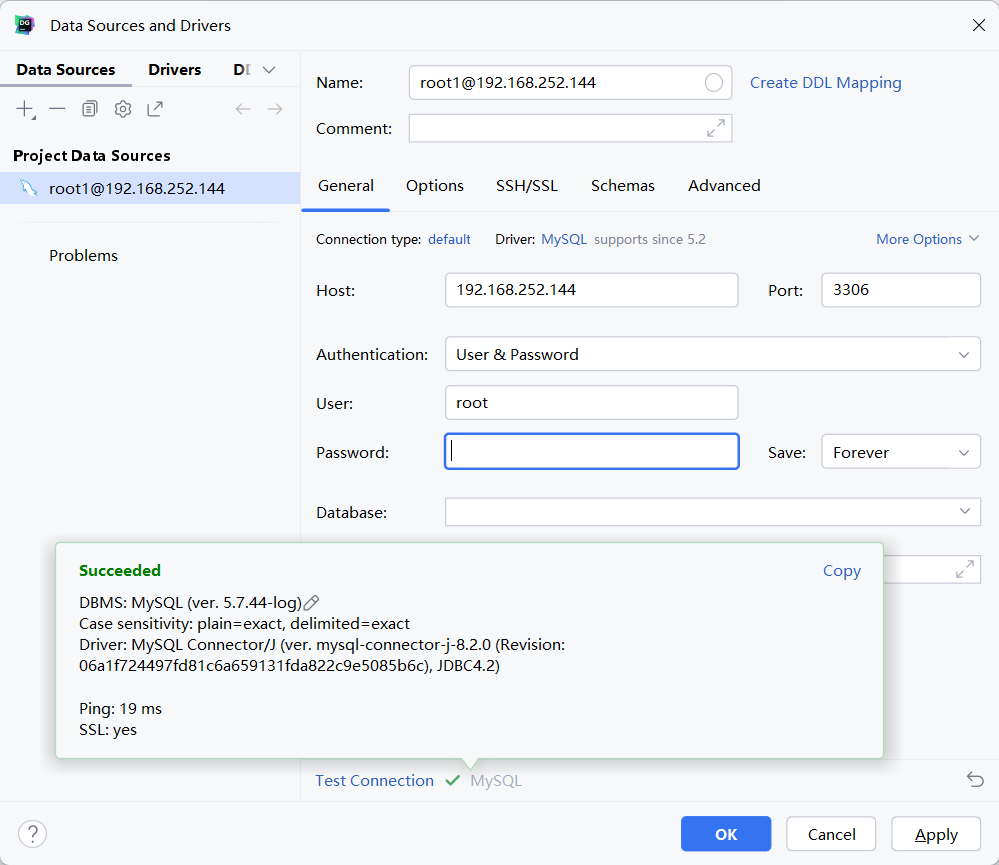
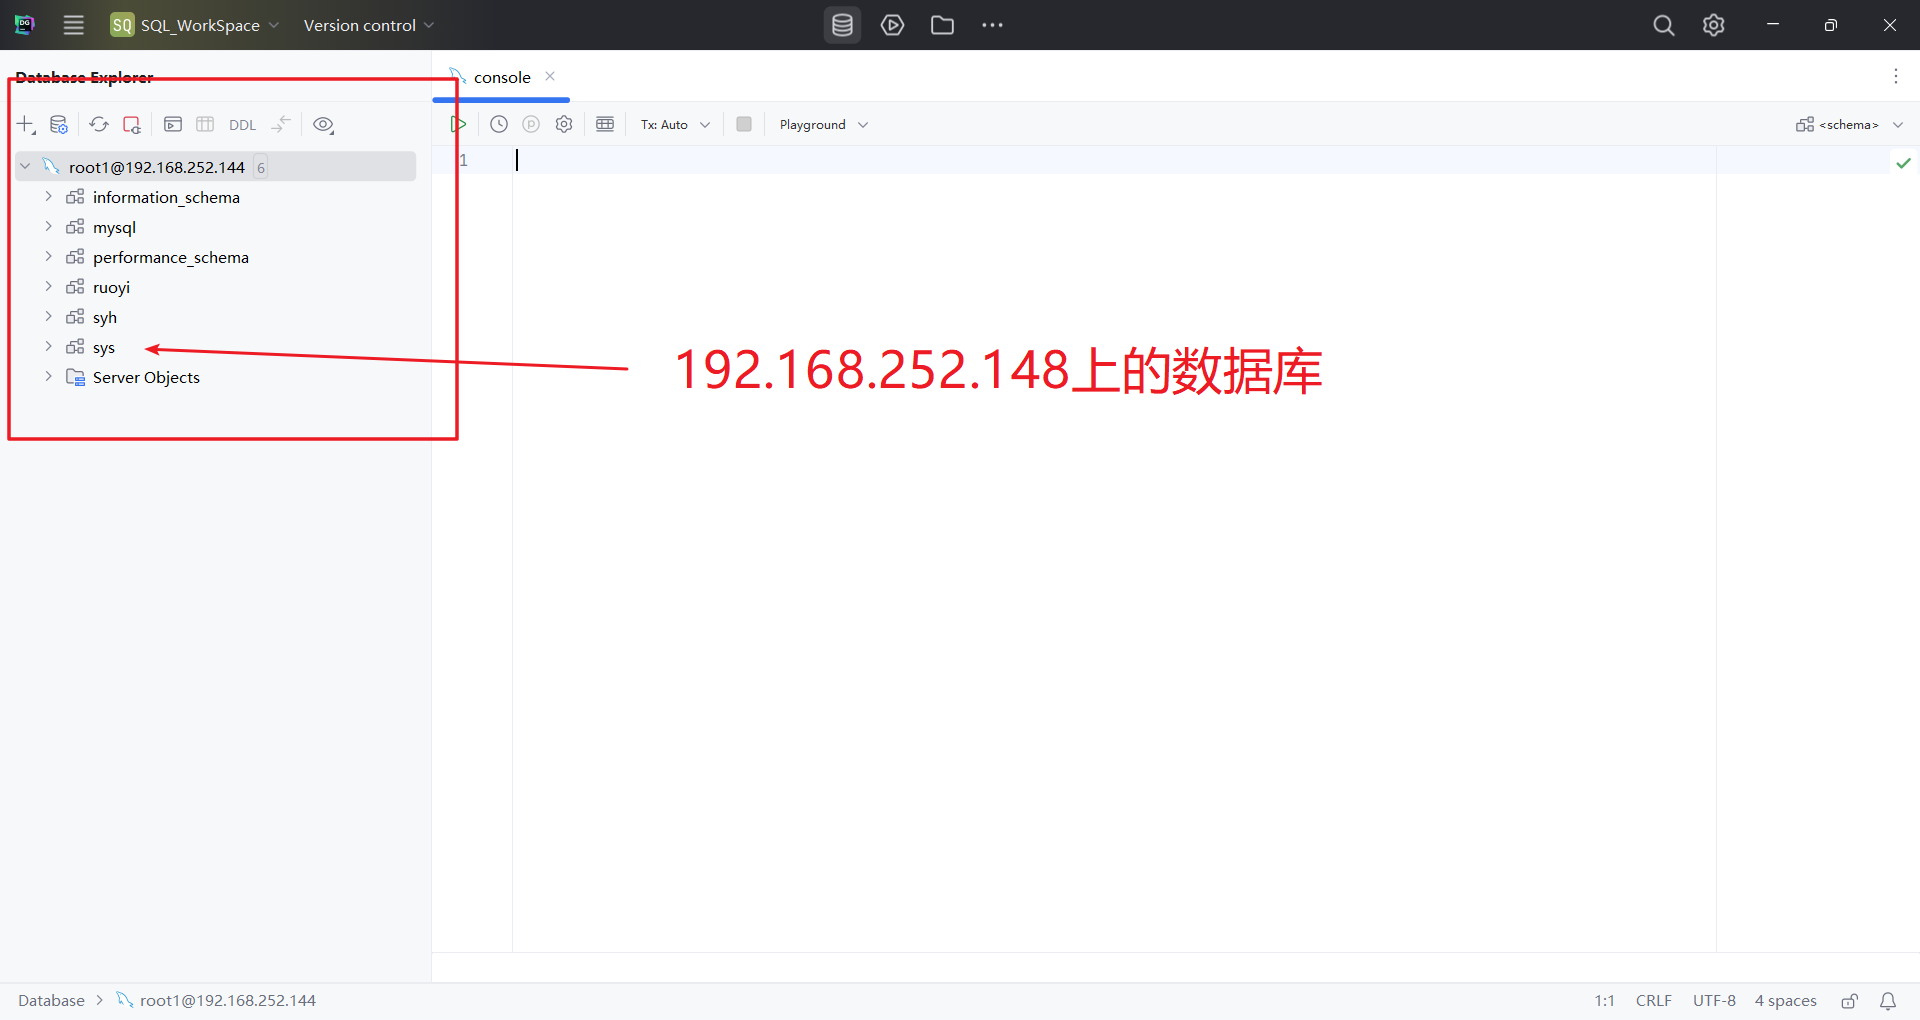
再次登录一个
开启日志
1.打开注释
vim /etc/rsyslog.conf
# Provides UDP syslog reception  #由于haproxy的日志是用udp传输的,所以要启用rsyslog的udp监听
$ModLoad imudp
$UDPServerRun 514
#### RULES ####
local2.*                       /var/log/haproxy.log
2.重启应用
systemctl restart rsyslog
systemctl restart haproxy

