文章目录
- 实时面部情绪识别(一)
- 一、linux
- 二、Windows
实时面部情绪识别(一)
前言:本文包含在linux 和 Windows实现面部实时的情感识别 原项目在GitHub - otaha178/Emotion-recognition: Real time emotion recognition
实时预测需要GUI和相关摄像头,推荐使用Windows进行。
一、linux
一、Tensorflow 安装
在Ubuntu上使用conda来安装TensorFlow的虚拟环境,可以按照以下步骤操作:
1、虚拟环境
创建新的虚拟环境: 如果你想为TensorFlow创建一个全新的虚拟环境,你可以使用以下命令:
bash
conda create -n tensorflow_zhanyong python=3.8激活虚拟环境: 使用以下命令来激活刚才创建的虚拟环境:
bash
conda activate tensorflow_zhanyong安装TensorFlow: 在激活的虚拟环境中,使用以下命令安装TensorFlow:
bash
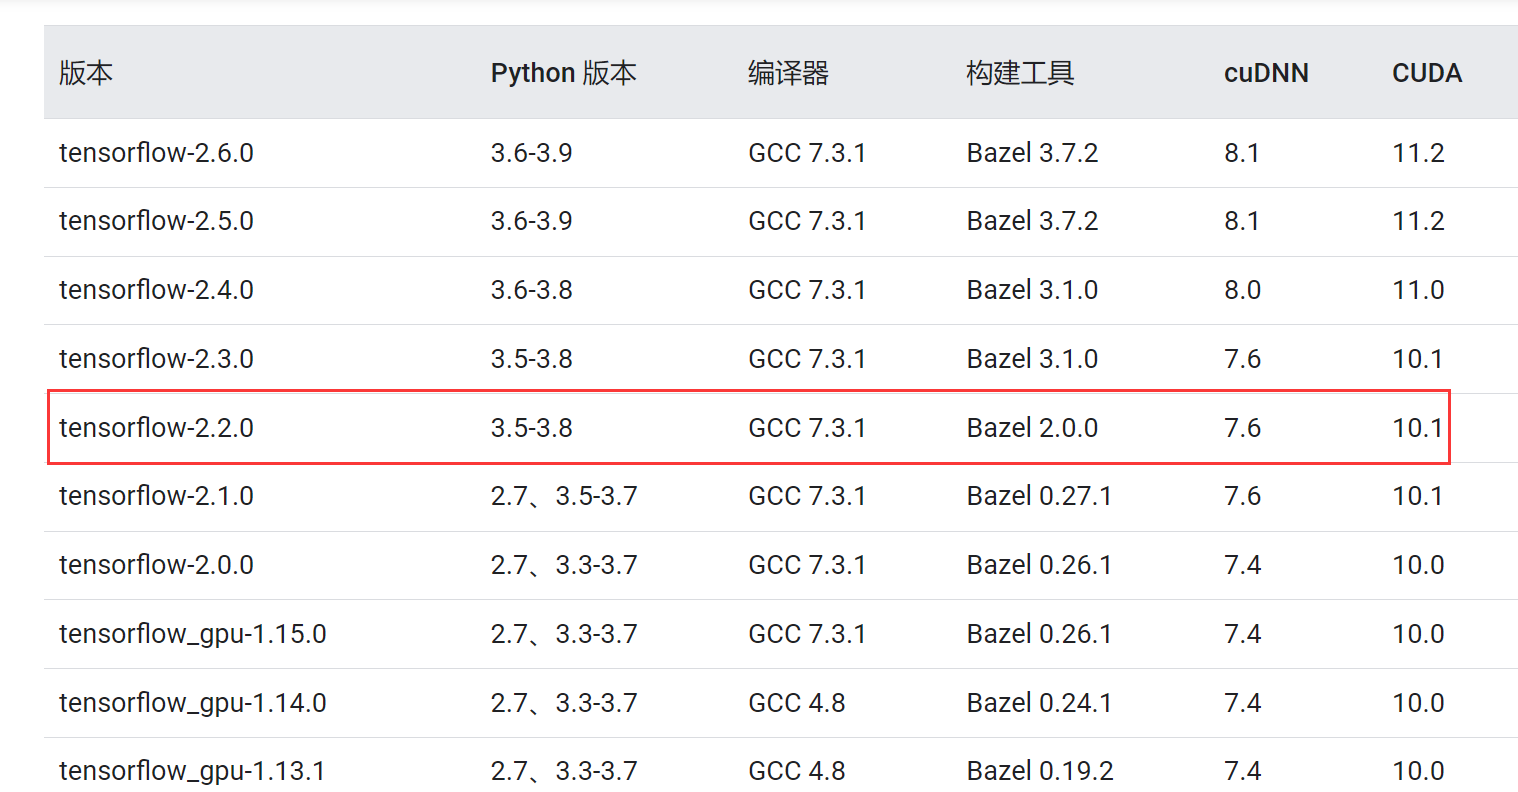
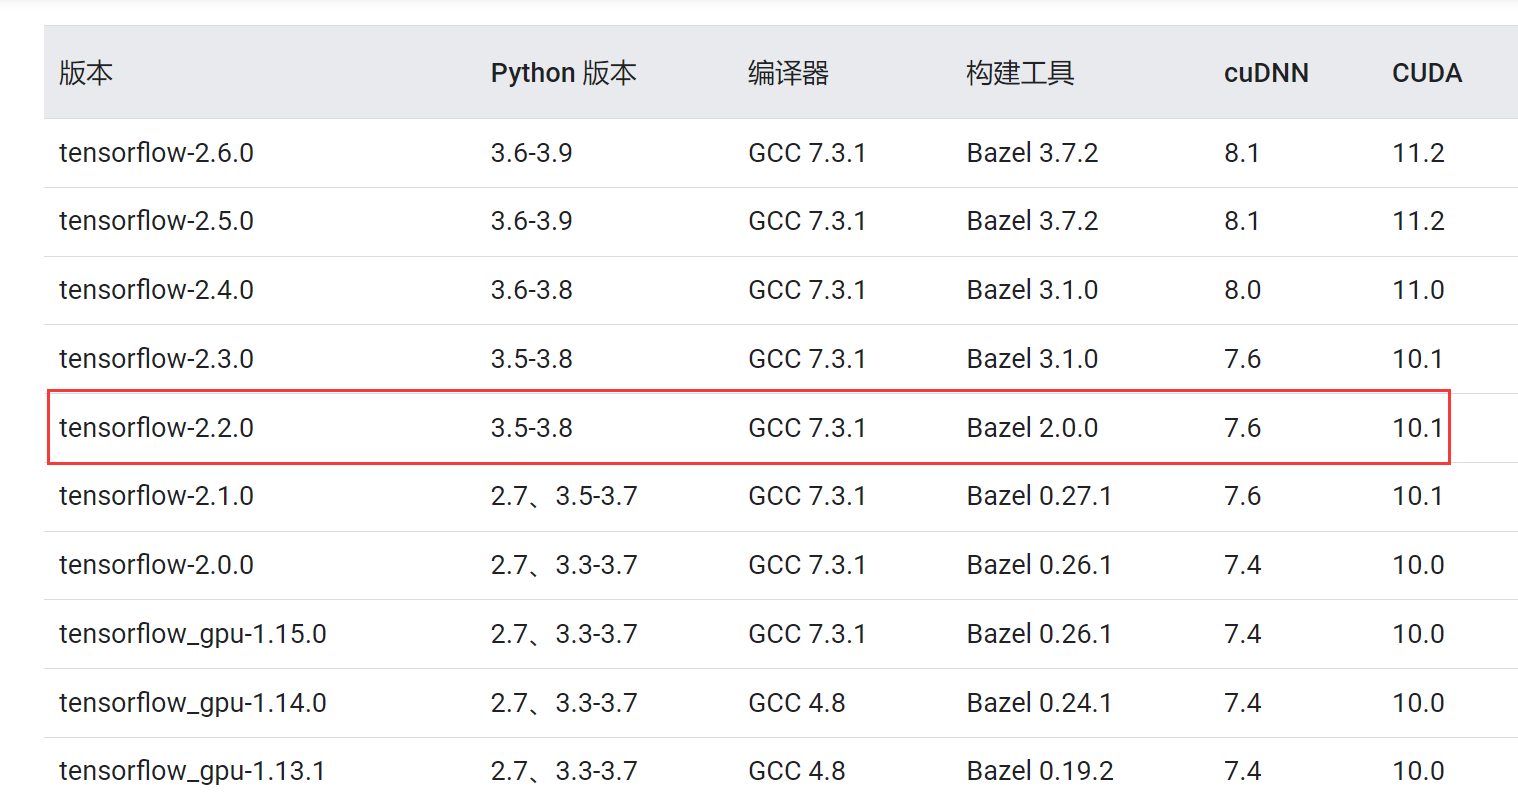
pip install tensorflow==2.2www.tensorflow.org:使用 pip 安装 TensorFlow
(详细整理!!!!)Tensorflow与Keras、Python版本对应关系!!!_tensorflow对应python版本-CSDN博客
由于后续需要安装 Keras 2.3.1的版本,故在这里选择Tensorflow 2.2 进行安装
2、安装cudnn和cuda
Tensorflow安装教程(完美安装gpu版本的tensorflow)(Windows,Conda,cuda,cudnn版本对应)_tensorflow-gpu清华源安装-CSDN博客

bash
conda install cudatoolkit=10.1 cudnn=7.62、校验依赖
验证安装: 安装完成后,你可以进行简单的测试来验证TensorFlow是否正确安装。在Python环境中输入以下代码:
bash
(tensorflow_zhanyong) zhanyong@532lab:~$ python -c "import tensorflow as tf; print(tf.__version__)"
2.2.0
bash
nvcc --version
nvcc: NVIDIA (R) Cuda compiler driver
Copyright (c) 2005-2021 NVIDIA Corporation
Built on Thu_Nov_18_09:45:30_PST_2021
Cuda compilation tools, release 11.5, V11.5.119
Build cuda_11.5.r11.5/compiler.30672275_0
二、复现
1、依赖
bash
git clone https://github.com/otaha178/Emotion-recognition.git
bash
cd Emotion-recognition/
bash
pip install -r requirements.txt
python
Successfully built imutils
Installing collected packages: imutils, opencv_python, joblib, scikit_learn, pandas, keras-applications, Keras
Successfully installed Keras-2.3.1 imutils-0.5.3 joblib-1.4.2 keras-applications-1.0.8 opencv_python-4.3.0.38 pandas-0.25.3 scikit_learn-0.22.1
2、运行
bash
python real_time_video.py
bash
[ WARN:0] global /io/opencv/modules/videoio/src/cap_v4l.cpp (887) open VIDEOIO(V4L2:/dev/video0): can't open camera by index
Traceback (most recent call last):
  File "real_time_video.py", line 29, in <module>
    frame = imutils.resize(frame,width=300)
  File "/home/zhanyong/anaconda3/envs/tensorflow_zhanyong/lib/python3.8/site-packages/imutils/convenience.py", line 69, in resize
    (h, w) = image.shape[:2]
AttributeError: 'NoneType' object has no attribute 'shape'
无法打开摄像头 :警告 [ WARN:0] global /io/opencv/modules/videoio/src/cap_v4l.cpp (887) open VIDEOIO(V4L2:/dev/video0): can't open camera by index 显示 opencv 无法通过索引打开 /dev/video0 设备。这通常是因为没有这样的设备,或设备已被其他进程占用。
尝试操作无效的帧 :当 cv2.VideoCapture(0) 无法打开视频设备时,它的 read() 方法会返回 False 和一个 None 对象。你的代码试图对这个 None 对象执行 resize 操作,这导致了 AttributeError: 'NoneType' object has no attribute 'shape' 错误。
三、常见问题
1、can't open camera by index
bash
[ WARN:0] global /io/opencv/modules/videoio/src/cap_v4l.cpp (887) open VIDEOIO(V4L2:/dev/video0): can't open camera by index
Traceback (most recent call last):
  File "real_time_video.py", line 29, in <module>
    frame = imutils.resize(frame,width=300)
  File "/home/zhanyong/anaconda3/envs/tensorflow_zhanyong/lib/python3.8/site-packages/imutils/convenience.py", line 69, in resize
    (h, w) = image.shape[:2]
AttributeError: 'NoneType' object has no attribute 'shape'
无法打开摄像头 :警告 [ WARN:0] global /io/opencv/modules/videoio/src/cap_v4l.cpp (887) open VIDEOIO(V4L2:/dev/video0): can't open camera by index 显示 opencv 无法通过索引打开 /dev/video0 设备。这通常是因为没有这样的设备,或设备已被其他进程占用。
尝试操作无效的帧 :当 cv2.VideoCapture(0) 无法打开视频设备时,它的 read() 方法会返回 False 和一个 None 对象。你的代码试图对这个 None 对象执行 resize 操作,这导致了 AttributeError: 'NoneType' object has no attribute 'shape' 错误。
由于linux虚拟机上缺少摄像设备,导致出错。
二、Windows
一、环境
1、虚拟环境
bash
C:\Users\ASUS>conda --version
conda 23.3.1检查conda是否安装,没有安装可参考Windows下的Anaconda详细安装教程_windows安装anaconda-CSDN博客进行安装
bash
conda create -n tensorflow_zhanyong python=3.8

conda activate tensorflow_zhanyong
特别注意,这里需要安装tensorflow-gpu
pip install tensorflow-gpu
bash
Downloading and Extracting Packages

Preparing transaction: done
Verifying transaction: done
Executing transaction: done
#
# To activate this environment, use
#
#     $ conda activate tensorflow_zhanyong
#
# To deactivate an active environment, use
#
#     $ conda deactivate
2、设置镜像(可选)
设置全局镜像
bash
pip config set global.index-url https://mirrors.aliyun.com/pypi/simple/
pip config set global.trusted-host mirrors.aliyun.com
bash
(tensorflow_zhanyong) C:\Users\ASUS>pip config set global.index-url https://mirrors.aliyun.com/pypi/simple/
Writing to C:\Users\ASUS\AppData\Roaming\pip\pip.ini

(tensorflow_zhanyong) C:\Users\ASUS>pip config set global.trusted-host mirrors.aliyun.com
Writing to C:\Users\ASUS\AppData\Roaming\pip\pip.ini
3、安装cuda和cudnn
注意两个都需要安装
可以先使用nvcc --version检查版本 判断是否需要更换cuda版本 建议使用10.1
bash
(tensorflow_zhanyong) C:\Users\ASUS>nvcc --version
nvcc: NVIDIA (R) Cuda compiler driver
Copyright (c) 2005-2020 NVIDIA Corporation
Built on Mon_Nov_30_19:15:10_Pacific_Standard_Time_2020
Cuda compilation tools, release 11.2, V11.2.67
Build cuda_11.2.r11.2/compiler.29373293_0
CUDA Toolkit 10.1 Original Archive | NVIDIA Developer
https://developer.nvidia.com/compute/cuda/10.1/Prod/local_installers/cuda_10.1.105_418.96_win10.exe
重装完之后需要重启电脑
bash
(tensorflow_zhanyong) E:\20241024EmotionRecognition>nvcc --version
nvcc: NVIDIA (R) Cuda compiler driver
Copyright (c) 2005-2019 NVIDIA Corporation
Built on Fri_Feb__8_19:08:26_Pacific_Standard_Time_2019
Cuda compilation tools, release 10.1, V10.1.105
cuDNN Archive | NVIDIA Developer

二、复现
1、依赖
bash
git clone https://github.com/otaha178/Emotion-recognition.git
bash
cd Emotion-recognition/
bash
pip install -r requirements.txt2、运行
bash
python real_time_video.py三、常见问题
1、Module 'tensorflow.compat.v2' has no attribute 'internal'
在 TensorFlow 2.x 中,Keras 已经集成在 TensorFlow 中,你不需要单独安装 keras 库。你可以在代码中使用 tensorflow.keras 来代替 keras。
bash
(tensorflow_zhanyong) E:\20241024EmotionRecognition\Emotion-recognition>python real_time_video.py
Using TensorFlow backend.
2024-10-24 18:27:47.106586: I tensorflow/stream_executor/platform/default/dso_loader.cc:44] Successfully opened dynamic library cudart64_101.dll
Traceback (most recent call last):
  File "real_time_video.py", line 1, in <module>
    from keras.preprocessing.image import img_to_array
  File "E:\2024.2.19anaconda3\envs\tensorflow_zhanyong\lib\site-packages\keras\__init__.py", line 3, in <module>
    from . import utils
  File "E:\2024.2.19anaconda3\envs\tensorflow_zhanyong\lib\site-packages\keras\utils\__init__.py", line 26, in <module>
    from .vis_utils import model_to_dot
  File "E:\2024.2.19anaconda3\envs\tensorflow_zhanyong\lib\site-packages\keras\utils\vis_utils.py", line 7, in <module>
    from ..models import Model
  File "E:\2024.2.19anaconda3\envs\tensorflow_zhanyong\lib\site-packages\keras\models.py", line 10, in <module>
    from .engine.input_layer import Input
  File "E:\2024.2.19anaconda3\envs\tensorflow_zhanyong\lib\site-packages\keras\engine\__init__.py", line 3, in <module>
    from .input_layer import Input
  File "E:\2024.2.19anaconda3\envs\tensorflow_zhanyong\lib\site-packages\keras\engine\input_layer.py", line 7, in <module>
    from .base_layer import Layer
  File "E:\2024.2.19anaconda3\envs\tensorflow_zhanyong\lib\site-packages\keras\engine\base_layer.py", line 12, in <module>
    from .. import initializers
  File "E:\2024.2.19anaconda3\envs\tensorflow_zhanyong\lib\site-packages\keras\initializers\__init__.py", line 124, in <module>
    populate_deserializable_objects()
  File "E:\2024.2.19anaconda3\envs\tensorflow_zhanyong\lib\site-packages\keras\initializers\__init__.py", line 49, in populate_deserializable_objects
    LOCAL.GENERATED_WITH_V2 = tf.__internal__.tf2.enabled()
AttributeError: module 'tensorflow.compat.v2' has no attribute '__internal__'

(tensorflow_zhanyong) E:\20241024EmotionRecognition\Emotion-recognition>
这个错误是由于你的 TensorFlow 和 Keras 版本不兼容导致的。具体的错误信息指出 tensorflow.compat.v2 模块没有 __internal__ 属性。这个问题通常出现在 Keras 和 TensorFlow 版本不匹配的情况下,特别是当你使用的 TensorFlow 版本可能是较旧的版本时,而它不完全支持某些 Keras 内部调用。
使用 TensorFlow 内置的 Keras: 自 TensorFlow 2.x 起,Keras 被直接集成在 TensorFlow 中,你可以使用 TensorFlow 内置的 Keras,而不再单独安装 Keras。
2、Can't find filter element
bash
2024-10-24 18:32:37.845901: I tensorflow/compiler/xla/service/service.cc:168] XLA service 0x1969283b700 initialized for platform Host (this does not guarantee that XLA will be used). Devices:
2024-10-24 18:32:37.846237: I tensorflow/compiler/xla/service/service.cc:176]   StreamExecutor device (0): Host, Default Version
2024-10-24 18:32:37.846476: I tensorflow/core/common_runtime/gpu/gpu_device.cc:1102] Device interconnect StreamExecutor with strength 1 edge matrix:
2024-10-24 18:32:37.846538: I tensorflow/core/common_runtime/gpu/gpu_device.cc:1108]
这个问题通常发生在 TensorFlow 初始化 GPU 或其他设备时,由于某些依赖项或硬件设置出现问题,导致不能正确加载必要的过滤器或组件。
大概率是安装tensorflow不是gpu版本,应该采取pip install tensorflow-gpu
3、Cannot dlopen some GPU libraries.
bash
Cannot dlopen some GPU libraries. Please make sure the missing libraries mentioned above are installed properly if you would like to use GPU. Follow the guide at https://www.tensorflow.org/install/gpu for how to download and setup the required libraries for your platform.缺少cudnn或者版本对应错误