OpenCV------图像形态操作
一、图像翻转
python
# 图像翻转示例
import numpy as np
import cv2

im = cv2.imread("../data/Linus.png")
cv2.imshow("src", im)

# 0-垂直镜像
im_flip0 = cv2.flip(im, 0)
cv2.imshow("im_flip0", im_flip0)

# 1-水平镜像
im_flip1 = cv2.flip(im, 1)
cv2.imshow("im_flip1", im_flip1)

cv2.waitKey()
cv2.destroyAllWindows()
执行结果:

二、图像仿射变换
python
# 图像仿射变换
import numpy as np
import cv2

def translate(img, x, y):
    """
    坐标平移变换
    :param img: 原始图像数据
    :param x:平移的x坐标
    :param y:平移的y坐标
    :return:返回平移后的图像
    """
    h, w = img.shape[:2]  # 获取图像高、宽

    # 定义平移矩阵
    M = np.float32([[1, 0, x],
                    [0, 1, y]])
    # 使用openCV仿射操作实现平移变换
    shifted = cv2.warpAffine(img, M, (w, h))  # 第三个参数为输出图像尺寸

    return shifted  # 返回平移后的图像


def rotate(img, angle, center=None, scale=1.0):
    """
    图像旋转变换
    :param img: 原始图像数据
    :param angle: 旋转角度
    :param center: 旋转中心,如果为None则以原图中心为旋转中心
    :param scale: 缩放比例,默认为1
    :return: 返回旋转后的图像
    """
    h, w = img.shape[:2]  # 获取图像高、宽

    # 旋转中心默认为图像中心
    if center is None:
        center = (w / 2, h / 2)

    # 计算旋转矩阵
    M = cv2.getRotationMatrix2D(center, angle, scale)

    # 使用openCV仿射变换实现函数旋转
    rotated = cv2.warpAffine(img, M, (w, h))

    return rotated  # 返回旋转后的矩阵

if __name__ == "__main__":
    # 读取并显示原始图像
    im = cv2.imread("../data/Linus.png")
    cv2.imshow("SrcImg", im)

    # 图像向下移动50像素
    shifted = translate(im, 0, 50)
    cv2.imshow("Shifted1", shifted)

    # 图像向左移动40, 下移动40像素
    shifted = translate(im, -40, 40)
    cv2.imshow("Shifted2", shifted)

    # 逆时针旋转45度
    rotated = rotate(im, 45)
    cv2.imshow("rotated1", rotated)

    # 顺时针旋转180度
    rotated = rotate(im, -90)
    cv2.imshow("rorated2", rotated)

    cv2.waitKey()
    cv2.destroyAllWindows()
执行结果:

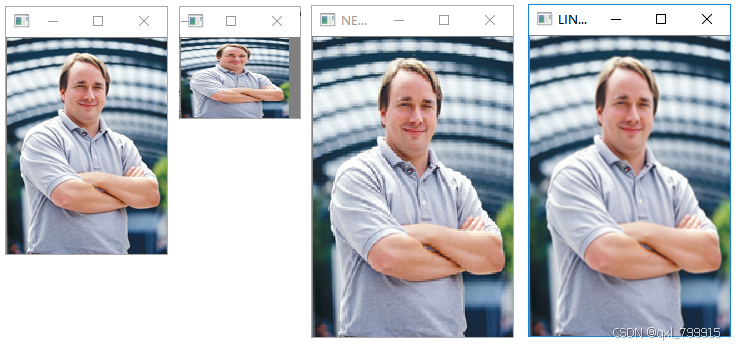
三、图像缩放
python
# 图像缩放示例
import numpy as np
import cv2

im = cv2.imread("../data/Linus.png")
cv2.imshow("src", im)

h, w = im.shape[:2]  # 获取图像尺寸


dst_size = (int(w/2), int(h/2))  # 缩放目标尺寸,宽高均为原来1/2
resized = cv2.resize(im, dst_size)  # 执行缩放
cv2.imshow("reduce", resized)

dst_size = (200, 300)  # 缩放目标尺寸,宽200,高300
method = cv2.INTER_NEAREST  # 最邻近插值
resized = cv2.resize(im, dst_size, interpolation=method)  # 执行缩放
cv2.imshow("NEAREST", resized)

dst_size = (200, 300)  # 缩放目标尺寸,宽200,高300
method = cv2.INTER_LINEAR  # 双线性插值
resized = cv2.resize(im, dst_size, interpolation=method)  # 执行缩放
cv2.imshow("LINEAR", resized)

cv2.waitKey()
cv2.destroyAllWindows()
执行结果:
四、图像裁剪
python
import numpy as np
import cv2


# 图像随机裁剪
def random_crop(im, w, h):
    start_x = np.random.randint(0, im.shape[1])  # 裁剪起始x像素
    start_y = np.random.randint(0, im.shape[0])  # 裁剪起始y像素

    new_img = im[start_y:start_y + h, start_x: start_x + w]  # 执行裁剪

    return new_img


# 图像中心裁剪
def center_crop(im, w, h):
    start_x = int(im.shape[1] / 2) - int(w / 2)  # 裁剪起始x像素
    start_y = int(im.shape[0] / 2) - int(h / 2)  # 裁剪起始y像素

    new_img = im[start_y:start_y + h, start_x: start_x + w]  # 执行裁剪

    return new_img


im = cv2.imread("../data/banana_1.png", 1)

new_img = random_crop(im, 200, 200)  # 随机裁剪
new_img2 = center_crop(im, 200, 200)  # 中心裁剪

cv2.imshow("orig", im)
cv2.imshow("random_crop", new_img)
cv2.imshow("center_crop", new_img2)

cv2.waitKey()
cv2.destroyAllWindows()
执行结果:

五、图像相加
python
# 图像相加示例
import cv2

a = cv2.imread("../data/lena.jpg", 0)
b = cv2.imread("../data/lily_square.png", 0)

dst1 = cv2.add(a, b)  # 图像直接相加,会导致图像过亮、过白

# 加权求和:addWeighted
# 图像进行加权和计算时,要求src1和src2必须大小、类型相同
dst2 = cv2.addWeighted(a, 0.6, b, 0.4, 0)  # 最后一个参数为亮度调节量

cv2.imshow("a", a)
cv2.imshow("b", b)
cv2.imshow("dst1", dst1)
cv2.imshow("dst2", dst2)

cv2.waitKey()
cv2.destroyAllWindows()
执行结果:

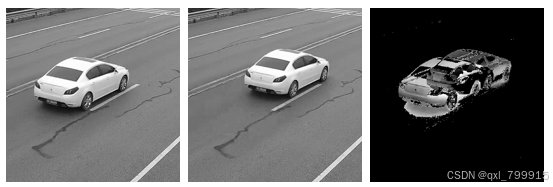
六、图像相减
python
# 图像相减运算示例
import cv2

a = cv2.imread("../data/3.png", 0)
b = cv2.imread("../data/4.png", 0)

dst = cv2.subtract(a, b)  # 两幅图像相减,是求出图像的差异

cv2.imshow("a", a)
cv2.imshow("b", b)
cv2.imshow("dst1", dst)

cv2.waitKey()
cv2.destroyAllWindows()
执行结果:
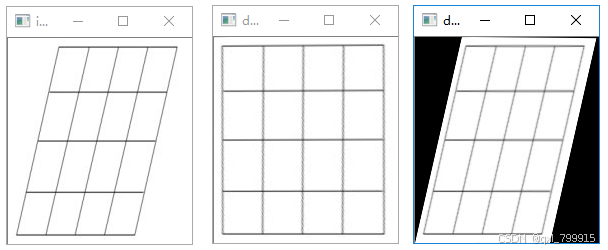
七、透视变换
python
# 透视变换
import cv2
import numpy as np

img = cv2.imread('../data/pers.png')
rows, cols = img.shape[:2]
print(rows, cols)

pts1 = np.float32([[58, 2], [167, 9], [8, 196], [126, 196]])# 输入图像四个顶点坐标
pts2 = np.float32([[16, 2], [167, 8], [8, 196], [169, 196]])# 输出图像四个顶点坐标

# 生成透视变换矩阵
M = cv2.getPerspectiveTransform(pts1, # 输入图像四个顶点坐标
                                pts2) # 输出图像四个顶点坐标
print(M.shape)
# 执行透视变换,返回变换后的图像
dst = cv2.warpPerspective(img, # 原始图像
                          M, # 3*3的变换矩阵
                          (cols, rows)) # 输出图像大小


# 生成透视变换矩阵
M = cv2.getPerspectiveTransform(pts2, # 输入图像四个顶点坐标
                                pts1) # 输出图像四个顶点坐标
# 执行透视变换,返回变换后的图像
dst2 = cv2.warpPerspective(dst, # 原始图像
                          M, # 3*3的变换矩阵
                          (cols, rows)) # 输出图像大小
cv2.imshow("img", img)
cv2.imshow("dst", dst)
cv2.imshow("dst2", dst2)

cv2.waitKey()
cv2.destroyAllWindows()
执行结果:
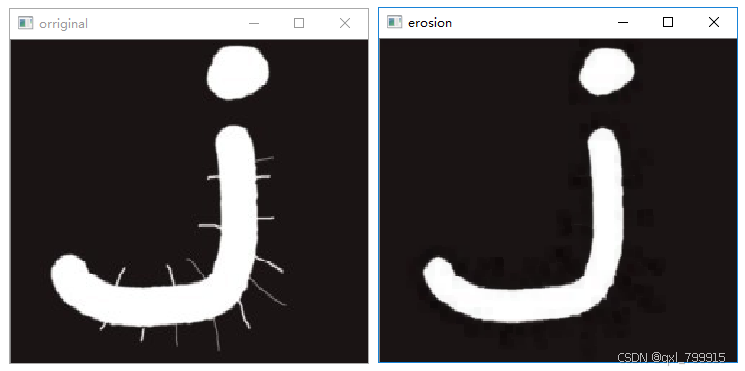
八、图像腐蚀
python
# 图像腐蚀
import cv2
import numpy as np

# 读取原始图像
im = cv2.imread("../data/5.png")
cv2.imshow("im", im)

# 腐蚀
kernel = np.ones((3, 3), np.uint8) # 用于腐蚀计算的核
erosion = cv2.erode(im, # 原始图像
                    kernel,  # 腐蚀核
                    iterations=3) # 迭代次数
cv2.imshow("erosion", erosion)

cv2.waitKey()
cv2.destroyAllWindows()
执行结果:
九、图像膨胀
python
# 图像膨胀
import cv2
import numpy as np

# 读取原始图像
im = cv2.imread("../data/6.png")
cv2.imshow("im", im)

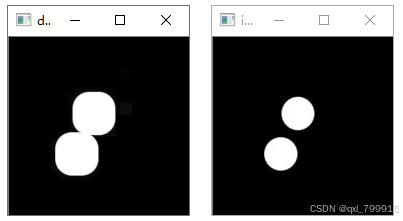
# 膨胀
kernel = np.ones((3, 3), np.uint8)  # 用于膨胀计算的核
dilation = cv2.dilate(im,  # 原始图像
                      kernel,  # 膨胀核
                      iterations=5)  # 迭代次数
cv2.imshow("dilation", dilation)

cv2.waitKey()
cv2.destroyAllWindows()
执行结果:
十、图像开运算
python
# 开运算示例
import cv2
import numpy as np

# 读取原始图像
im1 = cv2.imread("../data/7.png")
im2 = cv2.imread("../data/8.png")

# 执行开运算
k = np.ones((10, 10), np.uint8)
r1 = cv2.morphologyEx(im1, cv2.MORPH_OPEN, k)
r2 = cv2.morphologyEx(im2, cv2.MORPH_OPEN, k)

cv2.imshow("im1", im1)
cv2.imshow("result1", r1)

cv2.imshow("im2", im2)
cv2.imshow("result2", r2)

cv2.waitKey()
cv2.destroyAllWindows()
执行结果:

十一、图像闭运算
python
# 闭运算示例
import cv2
import numpy as np

# 读取图像
im1 = cv2.imread("../data/9.png")
im2 = cv2.imread("../data/10.png")

# 闭运算
k = np.ones((8, 8), np.uint8)
r1 = cv2.morphologyEx(im1, cv2.MORPH_CLOSE, k, iterations=2)
r2 = cv2.morphologyEx(im2, cv2.MORPH_CLOSE, k, iterations=2)

cv2.imshow("im1", im1)
cv2.imshow("result1", r1)
cv2.imshow("im2", im2)
cv2.imshow("result2", r2)

cv2.waitKey()
cv2.destroyAllWindows()
执行结果:

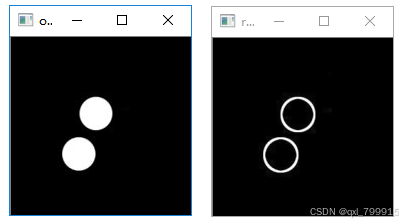
十二、形态学梯度
python
# 形态学梯度示例
import cv2
import numpy as np

o = cv2.imread("../data/6.png")

k = np.ones((3, 3), np.uint8)
r = cv2.morphologyEx(o, cv2.MORPH_GRADIENT, k)

cv2.imshow("original", o)
cv2.imshow("result", r)

cv2.waitKey()
cv2.destroyAllWindows()
执行结果:
