在 Vue3 的世界里,模板语法是我们构建用户界面的基石。今天,让我们一起深入了解 Vue3 的模板语法,我将用通俗易懂的语言和实用的例子,带你掌握这项必备技能。
1、文本插值:最基础的开始
想在页面上显示数据?双大括号语法 {``{ }} 就是你的好帮手!
<!DOCTYPE html>
<html>
<head>
<meta charset="utf-8">
<title>Vue 测试)</title>

<script src="https://lf3-cdn-tos.bytecdntp.com/cdn/expire-1-M/vue/3.2.26/vue.global.min.js"></script>

</head>
<body>

<div id="hello-vue" class="demo">
  {{ message }}
</div>

<script>
const HelloVueApp = {
  data() {
    return {
      message: '你好 Vue!!'
    }
  }
}

Vue.createApp(HelloVueApp).mount('#hello-vue')
</script>
</body>
</html>
运行结果:

2、插入 HTML:v-html 指令
双大括号会将数据解释为纯文本,而不是 HTML。
如果想插入 HTML,需要使用 v-html 指令.
 <p>使用双大括号的文本插值: {{ rawHtml }}</p>
 <p>使用 v-html 指令: <span v-html="rawHtml"></span></p>
</div>

<script>
const RenderHtmlApp = {
  data() {
    return {
      rawHtml: '<span style="color: red">这里会显示红色!</span>'
    }
  }
}

Vue.createApp(RenderHtmlApp).mount('#example1')
</script>
运行结果:

这里看到的 v-html attribute 被称为一个指令。
指令由 v- 作为前缀,表明它们是一些由 Vue 提供的特殊 attribute,它们将为渲染的 DOM 应用特殊的响应式行为。这里我们做的事情简单来说就是:在当前组件实例上,将此元素的 innerHTML 与 rawHtml 属性保持同步。
3 、绑定属性:让元素活起来
双大括号不能在 HTML attributes 中使用。
想要响应式地绑定一个 attribute,应该使用 v-bind 指令。
(1)、常规 v-bind 指令
<div v-bind:id="dynamicId"></div>

<div v-bind:class="{'class1': use}">
测试案例:
<!DOCTYPE html>
<html>
<head>
<meta charset="utf-8">
<title>Vue 测试</title>
<script src="https://cdn.staticfile.net/vue/3.2.36/vue.global.min.js"></script>
<style>
.class1{
  background: #444;
  color: #eee;
}
</style>
</head>
<body>
<div id="app">
  <label for="r1">修改颜色</label><input type="checkbox" v-model="use" id="r1">
  <br><br>
  <div v-bind:class="{'class1': use}">
    v-bind:class 指令
  </div>
</div>

<script>
const app = {
  data() {
    return {
      use: false
    }
  }
}

Vue.createApp(app).mount('#app')
</script>
</body>
</html>
运行结果:

(2)、简写
v-bind 非常常用,简写语法:
<div :id="dynamicId"></div>

 <div :class="{'class1': use}">
开头为 : 的 attribute 可能和一般的 HTML attribute 看起来不太一样,但它的确是合法的 attribute 名称字符,并且所有支持 Vue 的浏览器都能正确解析它。此外,他们不会出现在最终渲染的 DOM 中。
(3)、布尔型 Attribute
对于布尔属性,常规值为 true 或 false,如果属性值为 null 或 undefined,则该属性不会显示出来。
<button v-bind:disabled="isButtonDisabled">按钮</button(4)、类名和样式绑定
<!-- 类名绑定 -->
<div :class="{ active: isActive, 'text-danger': hasError }">
  动态类名
</div>

<!-- 样式绑定 -->
<div :style="{ color: activeColor, fontSize: fontSize + 'px' }">
  动态样式
</div>
(5)、动态绑定多个值
如果有像这样的一个包含多个 attribute 的 JavaScript 对象:
const objectOfAttrs = {
  id: 'container',
  class: 'wrapper',
  style: 'background-color:green'
}
通过不带参数的 v-bind,可以将它们绑定到单个元素上:
<div v-bind="objectOfAttrs"></div>使用案例:
<!DOCTYPE html>
<html>
<head>
<meta charset="utf-8">
<title>Vue 属性绑定示例</title>
<script src="https://cdn.staticfile.net/vue/3.2.36/vue.global.min.js"></script>
<style>
.wrapper {
  padding: 20px;
  margin: 10px;
  border-radius: 8px;
}
.active {
  border: 2px solid blue;
  color: white;
}
.large {
  font-size: 20px;
}
.centered {
  text-align: center;
}
</style>
</head>
<body>
<div id="app">
  <!-- 1. 基础绑定 -->
  <div v-bind="objectOfAttrs">
    基础属性绑定
  </div>

  <!-- 2. 动态修改属性 -->
  <div class="controls" style="margin: 20px 0;">
    <button @click="toggleTheme">切换主题</button>
    <button @click="toggleSize">切换大小</button>
    <button @click="addNewAttr">添加新属性</button>
  </div>

  <!-- 3. 组合绑定 -->
  <div
    v-bind="objectOfAttrs"
    :class="additionalClasses"
  >
    组合属性绑定
  </div>

  <!-- 4. 显示当前属性值 -->
  <div style="margin-top: 20px;">
    <h3>当前属性值:</h3>
    <pre>{{ JSON.stringify(objectOfAttrs, null, 2) }}</pre>
  </div>

  <!-- 5. 自定义属性输入 -->
  <div style="margin-top: 20px;">
    <h3>添加新属性:</h3>
    <input v-model="newAttrKey" placeholder="属性名">
    <input v-model="newAttrValue" placeholder="属性值">
    <button @click="addCustomAttr">添加</button>
  </div>
</div>

<script>
const app = {
  data() {
    return {
      // 基础属性对象
      objectOfAttrs: {
        id: 'container',
        class: 'wrapper',
        style: 'background-color: #42b983',
        'data-custom': 'value'
      },
      // 是否使用暗色主题
      isDark: false,
      // 是否使用大号字体
      isLarge: false,
      // 新属性的输入值
      newAttrKey: '',
      newAttrValue: ''
    }
  },
  computed: {
    // 计算额外的类名
    additionalClasses() {
      return {
        'active': this.isDark,
        'large': this.isLarge,
        'centered': true
      }
    }
  },
  methods: {
    // 切换主题
    toggleTheme() {
      this.isDark = !this.isDark
      this.objectOfAttrs.style = this.isDark
        ? 'background-color: #34495e; color: white'
        : 'background-color: #42b983'
    },
    // 切换大小
    toggleSize() {
      this.isLarge = !this.isLarge
    },
    // 添加新属性
    addNewAttr() {
      this.objectOfAttrs['data-timestamp'] = new Date().getTime()
    },
    // 添加自定义属性
    addCustomAttr() {
      if (this.newAttrKey && this.newAttrValue) {
        this.objectOfAttrs[this.newAttrKey] = this.newAttrValue
        this.newAttrKey = ''
        this.newAttrValue = ''
      }
    }
  }
}

Vue.createApp(app).mount('#app')
</script>
</body>
</html>
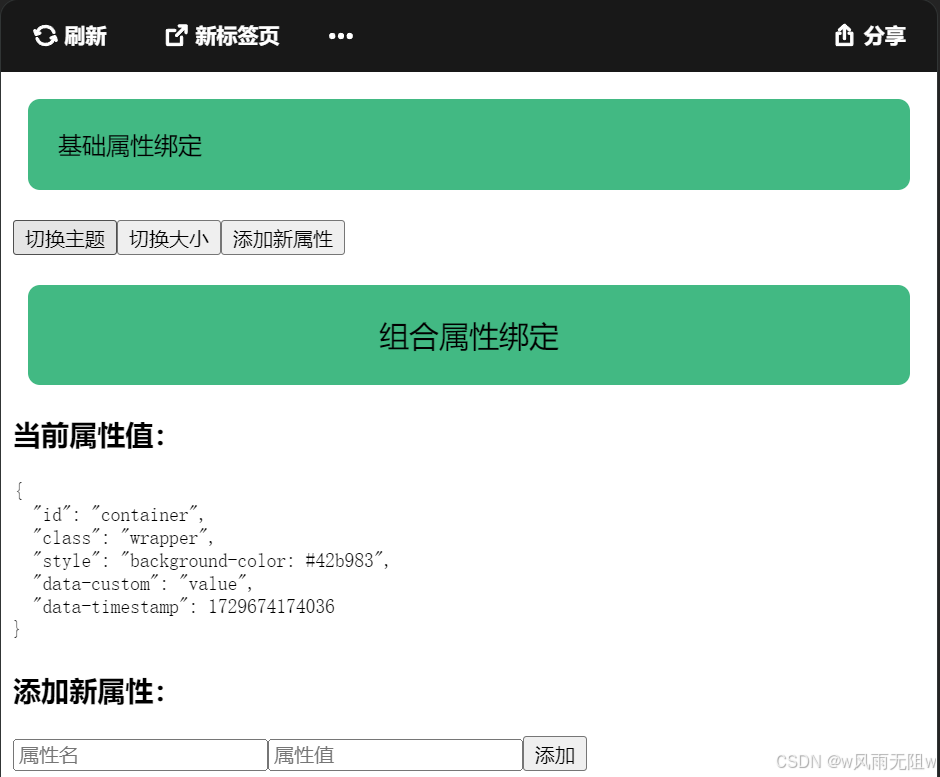
输出结果:

(6)、使用 JavaScript 表达式
Vue 实际上在所有的数据绑定中都支持完整的 JavaScript 表达式:
{{ number + 1 }}

{{ ok ? 'YES' : 'NO' }}

{{ message.split('').reverse().join('') }}

<div :id="`list-${id}`"></div>
这些表达式都会被作为 JavaScript ,以当前组件实例为作用域解析执行。
在 Vue 模板内,JavaScript 表达式可以被使用在如下场景上:
- 在文本插值中 (双大括号)
- 在任何 Vue 指令 (以
v-开头的特殊 attribute) attribute 的值中
仅支持单一表达式
每个绑定仅支持单一表达式 ,也就是一段能够被求值的 JavaScript 代码。一个简单的判断方法是是否可以合法地写在 return 后面。
下面的例子无效:
<!-- 这是一个语句,而非表达式 -->
{{ var a = 1 }}

<!-- 条件控制也不支持,请使用三元表达式 -->
{{ if (ok) { return message } }}
4、调用函数
可以在绑定的表达式中使用一个组件暴露的方法:
<time :title="toTitleDate(date)" :datetime="date">
  {{ formatDate(date) }}
</time>
使用案例:
<!DOCTYPE html>
<html>
<head>
<meta charset="utf-8">
<title>Vue 绑定表达式中的函数调用</title>
<script src="https://cdn.staticfile.net/vue/3.2.36/vue.global.min.js"></script>
<style>
.date-display {
  padding: 10px;
  margin: 10px;
  border: 1px solid #ccc;
  border-radius: 4px;
  cursor: pointer;
}
.highlight {
  background-color: #e8f5e9;
}
.format-switch {
  margin: 10px 0;
}
time {
  display: inline-block;
  padding: 5px 10px;
}
time:hover {
  background-color: #f5f5f5;
}
</style>
</head>
<body>
<div id="app">
  <!-- 基础日期显示 -->
  <time
    :title="toTitleDate(currentDate)"
    :datetime="currentDate"
    class="date-display"
    :class="{ highlight: isHighlighted }"
    @click="toggleHighlight"
  >
    {{ formatDate(currentDate) }}
  </time>

  <!-- 格式切换 -->
  <div class="format-switch">
    <label>
      <input type="checkbox" v-model="useDetailedFormat">
      使用详细格式
    </label>
  </div>

  <!-- 多个日期展示 -->
  <div>
    <h3>日期列表:</h3>
    <time
      v-for="date in dates"
      :key="date"
      :title="toTitleDate(date)"
      :datetime="date"
      :style="getDateStyle(date)"
    >
      {{ formatDate(date) }}
    </time>
  </div>

  <!-- 日期计算 -->
  <div style="margin-top: 20px;">
    <button @click="addDays(1)">添加一天</button>
    <button @click="addDays(-1)">减少一天</button>
    <button @click="resetDate">重置日期</button>
  </div>

  <!-- 自定义格式输入 -->
  <div style="margin-top: 20px;">
    <input
      v-model="customFormat"
      placeholder="输入自定义格式"
      :title="getFormatExample()"
    >
  </div>
</div>

<script>
const app = {
  data() {
    return {
      currentDate: new Date().toISOString(),
      useDetailedFormat: false,
      isHighlighted: false,
      customFormat: 'YYYY-MM-DD',
      dates: [
        new Date().toISOString(),
        new Date(Date.now() - 86400000).toISOString(), // 昨天
        new Date(Date.now() + 86400000).toISOString()  // 明天
      ]
    }
  },
  methods: {
    // 格式化为标题日期
    toTitleDate(date) {
      const d = new Date(date)
      return d.toLocaleString('zh-CN', {
        weekday: 'long',
        year: 'numeric',
        month: 'long',
        day: 'numeric',
        hour: '2-digit',
        minute: '2-digit'
      })
    },

    // 格式化显示日期
    formatDate(date) {
      const d = new Date(date)
      if (this.useDetailedFormat) {
        return this.toTitleDate(date)
      }
      return d.toLocaleDateString('zh-CN')
    },

    // 获取日期样式
    getDateStyle(date) {
      const d = new Date(date)
      const today = new Date()
      const isToday = d.toDateString() === today.toDateString()

      return {
        backgroundColor: isToday ? '#e3f2fd' : 'transparent',
        margin: '0 5px',
        borderRadius: '4px'
      }
    },

    // 切换高亮
    toggleHighlight() {
      this.isHighlighted = !this.isHighlighted
    },

    // 添加天数
    addDays(days) {
      const d = new Date(this.currentDate)
      d.setDate(d.getDate() + days)
      this.currentDate = d.toISOString()
    },

    // 重置日期
    resetDate() {
      this.currentDate = new Date().toISOString()
    },

    // 获取格式示例
    getFormatExample() {
      return `格式示例: ${this.formatDate(this.currentDate)}`
    }
  },
  watch: {
    // 监听自定义格式变化
    customFormat(newFormat) {
      console.log('Format changed:', newFormat)
    }
  }
}

Vue.createApp(app).mount('#app')
</script>
</body>
</html>
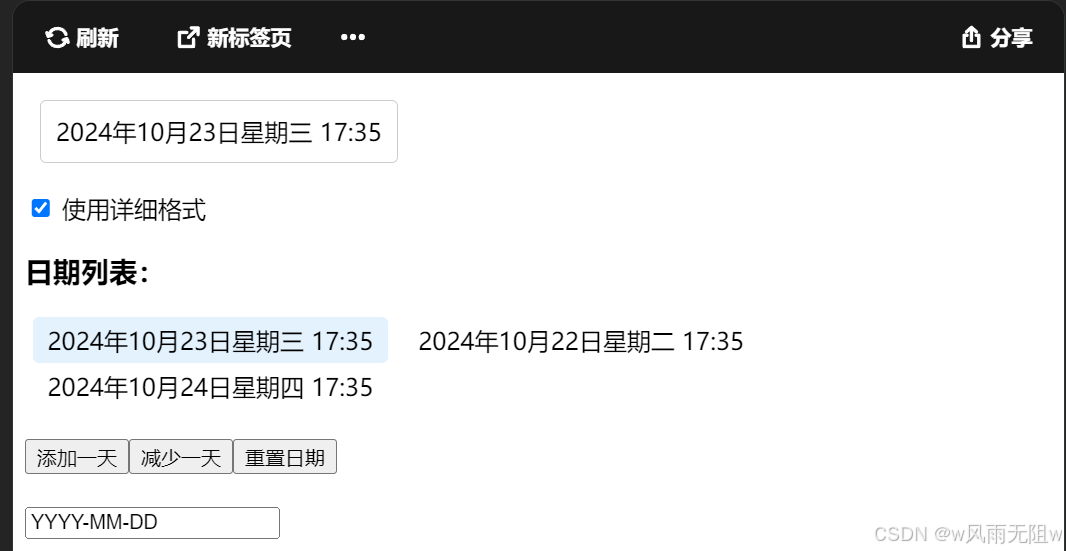
输出效果:
