一、是什么?
Flex 是 Flexible Box 的缩写, 意为 弹性布局, 用来为盒状模型提供更为灵活的布局能力, 它给 Flexbox 的 子元素 之间提供了强大的 空间分布(伸缩) 和 对齐 能力
二、基础概念
2.1 容器
采用 Flex 布局的元素 (设置了 display: flex | inline-flex 的元素) 称之为 Flex 容器 (flex container), 在后面我们统称为 容器, 如下代码: box-block 和 box-inline 元素我们称之为 容器, 其中 box-block 为块级元素 box-inline 为行类元素
html
<style>
  .box-block {
    display: flex;
  }
  .box-inline {
    display: inline-flex;
  }
</style>
<div class="box-block"></div>
<div class="box-inline"></div>
2.2 项目
容器内所有 子元素, 我们称之为 Flex 项目 (flex item), 在后面我们统称为 项目, 如下代码所示: child 元素我们称之为 项目
html
<style>
  .box {
    display: flex;
  }
</style>
<div class="box">
  <div class="child"></div>
  <div class="child"></div>
  <div class="child"></div>
</div>
将容器设为 Flex 布局以后, 容器内的块级元素 (例: display: block) 将不再具有 块级元素 的特性, 有如下演示代码, 图中 item 元素都不再具有块级元素的特性了
html
<style>
  #wrapper {
    display: flex;
    background: #eee;
    padding: 10px;
  }
  .item {
    width: 50px;
    height: 50px;
    text-align: center;
    line-height: 50px;
  }
  .item-1 { background:brown; }
  .item-2 { background:pink; }
  .item-3 { background:orchid; }
</style>
<div id="wrapper">
  <div class="item item-1">1</div>
  <div class="item item-2">2</div>
  <div class="item item-3">3</div>
</div>
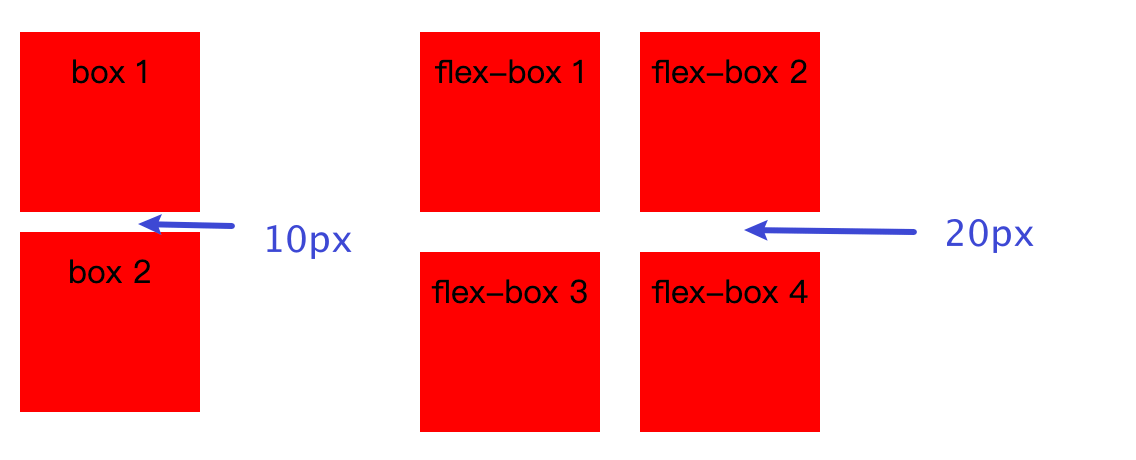
在弹性容器中项目的 margin 在 垂直方向 上的值不会进行合并了, 如下代码: box 容器是常规的布局, 子元素在垂直方向的 margin 发生合并, 但是在 flex-box 中子元素在垂直方向的 margin 则不会发生合并
html
<style>
  #box {
    left: 0;
    position: fixed;
  }

  #flex-box {
    display: flex;
    width: 230px;
    flex-wrap: wrap;

    left: 200px;
    position: fixed;
  }

  .item {
    width: 90px;
    height: 90px;
    margin: 10px;
    background: red;
    line-height: 40px;
    text-align: center;
  }
</style>
<div id="box">
  <div class="item">box 1</div>
  <div class="item">box 2</div>
</div>

<div id="flex-box">
  <div class="item">flex-box 1</div>
  <div class="item">flex-box 2</div>
  <div class="item">flex-box 3</div>
  <div class="item">flex-box 4</div>
</div>
布局重置: 当将容器设为 Flex 布局以后, 容器内的所有项目的 float、 clear 和 vertical-align 属性都将失效, 这里姑且理解为 布局重置
2.3 一维布局
Flexbox 布局, 是一种 一维 布局, 因为它 一次 只能处理 一个维度 上的元素布局, 一行 或者 一列, 作为对比的是另外一个二维布局 CSS Grid Layout, 它可以同时处理 多行 和 多列 上的布局, 当然这里不对 Grid 进行展开
虽然 Flexbox 是 一维模型, 但我们可以通过 flex-wrap 实现多行(列) Flex 容器, 可以将我们的 flex 项目应用到多行(列)中, 在这种情况下我们应该把 每一行(列) 看作一个新的 flex 容器, 任何空间分布都将在该行(列)上发生, 而不影响该空间下的其他行(列)

2.4 主轴和交叉轴
-
容器默认存在两根轴: 主轴 (项目沿主轴进行一一排列)、交叉轴 (垂直于主轴)
-
主轴的开始位置 (与边框的交叉点) 叫做
main start(起始), 结束位置叫做main end(终止) -
交叉轴的开始位置叫做
cross start(起始), 结束位置叫做cross end(终止) -
单个项目占据的主轴空间叫做
main size, 占据的交叉轴空间叫做cross size

三、容器属性
| 属性 | 描述 |
|---|---|
flex-direction |
决定 主轴 的方向 (即项目的排列方向) |
flex-wrap |
决定当一条轴线排不下所有项目时, 要如何进行 换行 |
flex-flow |
flex-direction 属性和 flex-wrap 属性的 简写形式 |
justify-content |
定义项目在 主轴 方向上的对齐方式 |
align-content |
项目一一进行排列必然形成行, 该属性则定义了 行(轴线) 在 交叉轴 上的对齐方式 |
align-items |
定义 行内(单行内) 的所有 项目 在 交叉轴方向上 的对齐方式 |
3.1 设置主轴方向「flex-direction」
flex-direction 属性决定主轴的方向 (即项目的排列方向), 主轴的方向又决定了交叉轴的方向, 因为交叉轴总是垂直于主轴, 该属性具有四个属性值, 对应四个主轴方向, 需要特别注意的是交叉轴只有两个方向要么 从左向右 要么就是 从上到下
| 属性值 | 描述 |
|---|---|
row |
默认值, 从左向右 |
row-reverse |
和 row 属性相反, 即从右向左 |
column |
从上到下 |
column-reverse |
和 column 相反, 即从下到上 |
下图展示了 flex-direction 属性不同取值, 容器内项目的排列顺序

下面是上图演示代码: 通过修改容器 flex-direction 属性的取值, 将得到上图演示结果
css
#wrapper {
  display: flex;
  flex-direction: row;
  width: 200px;
  height: 200px;
  background: #eee;
  padding: 10px;
}
.item {
  width: 50px;
  height: 50px;
  text-align: center;
  line-height: 50px;
}
.item-1 { background: brown; }
.item-2 { background: pink; }
.item-3 { background: orchid; }
html
<div id="wrapper">
  <div class="item item-1">1</div>
  <div class="item item-2">2</div>
  <div class="item item-3">3</div>
</div>
3.2 设置换行「flex-wrap」
默认情况下, 项目都在 一行 上进行排列, flex-wrap 属性决定了当一行内排不下所有项目时, 如何进行换行
| 属性值 | 描述 |
|---|---|
nowrap |
默认值, 不进行换行 |
wrap |
允许换行, 每行 沿着 交叉轴方 向进行排列 |
wrap-reverse |
允许换行, 每行 沿着 交叉轴 相反 方向进行排列 |
如下图, 默认情况 (flex-wrap: nowrap) 下项目都在 一行 内排列着, 即使一行无法排下所有的项目, 也会对项目在主轴方向上的大小进行压缩, 迫使所有项目都能够在一行进行排列, 如下代码所示 item 在主轴上的宽度实际上是被压缩了
html
<style>
  #wrapper {
    display: flex;
    flex-direction: row;
    width: 200px;
    height: 200px;
    background: #eee;
    padding: 10px;
  }
  .item {
    width: 100px;
    height: 50px;
    text-align: center;
    line-height: 50px;
  }
  .item-1 { background: brown; }
  .item-2 { background: pink; }
  .item-3 { background: orchid; }
</style>
<div id="wrapper">
  <div class="item item-1">1</div>
  <div class="item item-2">2</div>
  <div class="item item-3">3</div>
</div>
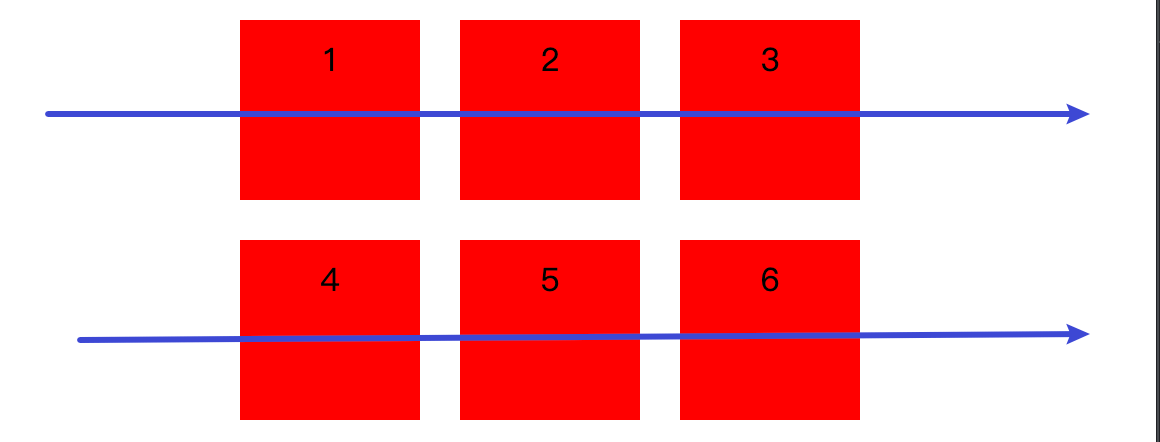
flex-wrap: wrap: 当所有项目无法在一行排列时, 允许进行换行, 并且 每行 的排列顺序为 交叉轴 的 方向, 如下代码所示
html
<style>
  #wrapper {
    display: flex;
    flex-direction: row;
    flex-wrap: wrap;
    width: 200px;
    background: #eee;
    padding: 10px;
  }
  .item {
    width: 100px;
    height: 50px;
    text-align: center;
    line-height: 50px;
  }
  .item-1 { background:brown; }
  .item-2 { background:pink; }
  .item-3 { background:orchid; }
</style>
<div id="wrapper">
  <div class="item item-1">1</div>
  <div class="item item-2">2</div>
  <div class="item item-3">3</div>
</div>
flex-wrap: wrap-reverse: 当所有项目无法在一行排列时, 允许进行换行, 并且 每行 的排列顺序和 交叉轴 的 方向相反, 如下代码所示
html
<style>
  #wrapper {
    display: flex;
    flex-direction: row;
    flex-wrap: wrap-reverse;
    width: 200px;
    background: #eee;
    padding: 10px;
  }
  .item {
    width: 100px;
    height: 50px;
    text-align: center;
    line-height: 50px;
  }
  .item-1 { background: brown; }
  .item-2 { background: pink; }
  .item-3 { background: orchid; }
</style>
<div id="wrapper">
  <div class="item item-1">1</div>
  <div class="item item-2">2</div>
  <div class="item item-3">3</div>
</div>
3.3 简写属性「flex-flow」
flex-flow 属性是 flex-direction 属性和 flex-wrap 属性的简写形式, 默认值为 row nowrap
html
<style>
  #wrapper {
    display: flex;
    flex-flow: row-reverse wrap;
    width: 200px;
    background: #eee;
    padding: 10px;
  }
  .item {
    width: 100px;
    height: 50px;
    text-align: center;
    line-height: 50px;
  }
  .item-1 { background: brown; }
  .item-2 { background: pink; }
  .item-3 { background: orchid; }
</style>
<div id="wrapper">
  <div class="item item-1">1</div>
  <div class="item item-2">2</div>
  <div class="item item-3">3</div>
</div>
3.4 设置项目在主轴对齐方式「justify-content」
如题 justify-content 属性定义了项目在主轴上的对齐方式, 或者说是排列方式, 所有属性值如下:
| 属性值 | 描述 |
|---|---|
flex-start |
默认值, 项目在主轴上向主轴开始方向靠拢 |
flex-end |
项目在主轴上向主轴结束方向靠拢 |
center |
项目在主轴上全部往中间靠拢 |
space-between |
设置主轴方向多余空间的处理方式 (具体看图) |
space-around |
设置主轴方向多余空间的处理方式 (具体看图) |
space-evenly |
设置主轴方向多余空间的处理方式 (具体看图) |
下图演示了 justify-content 所有可选值对应的排列演示

修改下列代码中 justify-content 属性值, 将得到上图对应值的演示效果
html
<style>
  #wrapper {
    display: flex;
    flex-direction: row;
    justify-content: flex-start;
    width: 200px;
    height: 200px;
    background: #eee;
  }
  .item {
    width: 50px;
    height: 50px;
    text-align: center;
    line-height: 50px;
  }
  .item-1 { background: brown; }
  .item-2 { background: pink; }
  .item-3 { background: orchid; }
</style>
<div id="wrapper">
  <div class="item item-1">1</div>
  <div class="item item-2">2</div>
  <div class="item item-3">3</div>
</div>
3.5 设置每行的对齐方式「align-content」
当项目沿主轴排列成一行(列)或者多行(列)时, 可通过 align-content 属性设置这些 行 在交叉轴上的对齐方式, 该属性可选值如下:
| 属性值 | 描述 |
|---|---|
stretch |
默认值, 每行都在交叉轴方法进行均匀伸缩, 企图占满交叉轴上所有剩余的空间 |
flex-start |
每行都向交叉轴起点靠拢 |
flex-end |
每行都向交叉轴终点靠拢 |
center |
每行都向交叉轴中间靠拢 |
space-between |
设置交叉轴方向多余空间的处理方式 (具体看图) |
space-around |
设置交叉轴方向多余空间的处理方式 (具体看图) |
space-evenly |
设置交叉轴方向多余空间的处理方式 (具体看图) |
下图演示了 align-content 所有可选值对应的排列演示

修改下列代码中 align-content 属性值, 将得到上图对应值的演示效果
html
<style>
  #wrapper {
    width: 200px;
    height: 200px;
    background: #eee;
    display: flex;
    flex-wrap: wrap;
    align-content: flex-start;
  }
  .item {
    width: 40px;
    line-height: 40px;
    margin: 1px;
    background: red;
    text-align: center;
  }
  .item-50h { line-height: 50px; }
  .item-70h { line-height: 70px; }
  .item-30h { line-height: 30px; }
</style>
<div id="wrapper">
  <div class="item item-50h">1</div>
  <div class="item item-70h">2</div>
  <div class="item item-30h">3</div>
  <div class="item item-50h">4</div>
  <div class="item item-70h">5</div>
  <div class="item item-30h">6</div>
</div>
3.6 设置行内项目在交叉轴上的对齐方式「align-items」
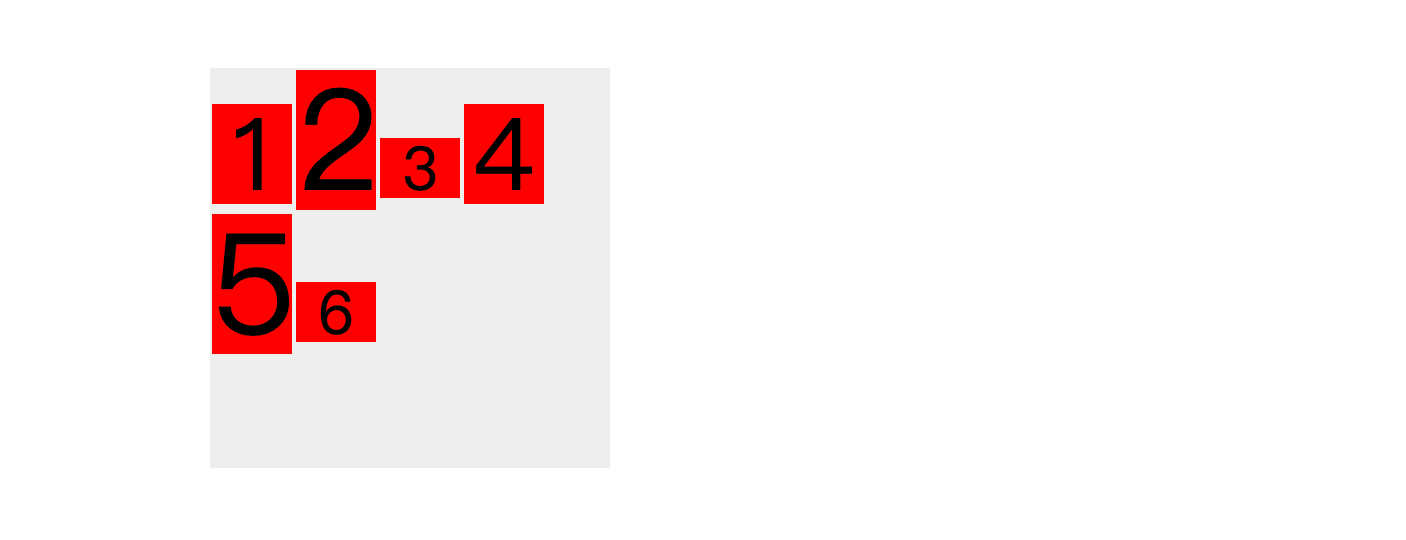
已知项目沿主轴进行排列成 一行 或者 多行, 上文提到我们可以通过 align-content 设置 每行 在交叉轴方向的对齐方式, 那么通过 align-items 我们则可以设置 行内 所有 项目 在该 行内 沿着 交叉轴方法 的 对齐方式, 该属性可能值如下:
| 属性值 | 描述 |
|---|---|
stretch |
默认值, 行内项目(在未给项目设置高度或者设为 auto 情况下)该项目将在交叉轴方法自动撑开, 占满该行在交叉轴上的所有剩余空间 |
flex-start |
行内项目在交叉轴上向开始位置靠拢 |
flex-end |
行内项目在交叉轴上向结束位置靠拢 |
center |
行内项目在交叉轴上向中间位置靠拢 |
basline |
行内项目按照文字基线进行对齐 (用于不同字体大小、行高的文字布局上特别好用) |
下图演示了 align-items 所有可选值对应的排列演示

修改下列代码中 align-items 属性值, 将得到上图对应值的演示效果
html
<style>
  #wrapper {
    width: 200px;
    height: 200px;
    background: #eee;
    display: flex;
    flex-wrap: wrap;
    align-content: flex-start;
    align-items: stretch;
  }
  .item {
    width: 40px;
    line-height: 40px;
    margin: 1px;
    background: red;
    text-align: center;
  }
  .item-50h { line-height: 50px; }
  .item-70h { line-height: 70px; }
  .item-30h { line-height: 30px; }
</style>
<div id="wrapper">
  <div class="item item-50h">1</div>
  <div class="item item-70h">2</div>
  <div class="item item-30h">3</div>
  <div class="item item-50h">4</div>
  <div class="item item-70h">5</div>
  <div class="item item-30h">6</div>
</div>
对比代码和示意图, 会发现 basline 和 center 效果貌似一样, 但实际上是因为所有项目字体大小相同原因导致, 下面例子修改了每个项目的字体大小, 从效果图就能够直观看出 basline 的效果了
diff
<style>
  #wrapper {
    width: 200px;
    height: 200px;
    background: #eee;
    display: flex;
    flex-wrap: wrap;
    align-content: flex-start;
+   align-items: baseline;
  }
  .item {
    width: 40px;
+   line-height: 1;
    margin: 1px;
    background: red;
    text-align: center;
  }
+ .item-50h { font-size: 50px; }
+ .item-70h { font-size: 70px; }
+ .item-30h { font-size: 30px; }
</style>
<div id="wrapper">
  <div class="item item-50h">1</div>
  <div class="item item-70h">2</div>
  <div class="item item-30h">3</div>
  <div class="item item-50h">4</div>
  <div class="item item-70h">5</div>
  <div class="item item-30h">6</div>
</div>
四、项目属性
| 属性 | 描述 |
|---|---|
order |
定义项目的排列顺序 |
flex-grow |
定义项目的放大比例 |
flex-shrink |
定义项目的缩小比例 |
flex-basis |
定义了在分配多余空间之前, 项目占据的主轴空间 |
flex |
flex-grow flex-shrink flex-basis 的简写属性 |
align-self |
允许单个项目有与其他项目不一样的对齐方式, 可覆盖 align-items 属性 (重新设置该项目的 align-items 属性 ) |
4.1 设置项目的排列属性「order」
order 属性定义项目的排列顺序, 该属性值是一个 integer(整型数字) 类型, 数值越小, 排列越靠前, 默认为 0 同时该属性也支持一个 负数, 如下代码: 为每个项目设置了 order, 会发现项目按照 order 的顺序(从小到大)进行排列
html
<style>
  #wrapper {
    display: flex;
    flex-direction: row;
    width: 200px;
    height: 200px;
    background: #eee;
  }
  .item {
    width: 50px;
    line-height: 50px;
    height: 50px;
    text-align: center;
  }
  .item-1 { background: brown; order: 3; }
  .item-2 { background: pink; order: 1; }
  .item-3 { background: orchid; order: -1; }
</style>
<div id="wrapper">
  <div class="item item-1">1</div>
  <div class="item item-2">2</div>
  <div class="item item-3">3</div>
</div>
4.2 设项目增长比例「flex-grow」
- 已知项目是沿着主轴的方向进行排列的, 当项目依次排列后主轴方法存在剩余的空间时, 我们可通过
flex-grow来约定项目在自适应情况下占剩余空间的比例 - 主轴上剩余空间的计算则取决于
flex-basis(下面介绍) - 该属性值是一个
number类型数据,flex-grow属性的默认值则为0即如果存在剩余空间, 也不进行放大, 不进行任何处理 - 如果所有项目的
flex-grow属性值都相等(假如都为1), 则它们将等分剩余空间 - 如果一个项目的
flex-grow属性为2, 其他项目都为1, 则前者占据的剩余空间将比其他项多一倍, 即按2:1的比例来分配剩余空间 - 需要特别注意的是
负值对该属性是无效的

在下面代码中, 可通过修改每个项目的 flex-grow 属性值, 得到上述效果
html
<style>
  #wrapper {
    display: flex;
    flex-direction: row;
    width: 400px;
    height: 200px;
    background: #eee;
  }
  .item {
    width: 50px;
    line-height: 50px;
    height: 50px;
    text-align: center;
  }
  .item-1 { background: brown; flex-grow: 2; }
  .item-2 { background: pink; flex-grow: 1; }
  .item-3 { background: orchid; flex-grow: 1; }
</style>
<div id="wrapper">
  <div class="item item-1">1</div>
  <div class="item item-2">2</div>
  <div class="item item-3">3</div>
</div>
4.3 设置项目缩小比例「flex-shrink」
-
已知在项目沿主轴进行排序时, 当主轴无法容下所有项目, 并且在不允许进行换行的情况下所有项目会被
压缩, 而每个项目被压缩的比例则是由flex-shrink属性进行控制的, 也就是说flex-shrink属性用于定义每个项目的压缩比例 -
该属性值是一个
number类型数据,flex-shrink属性的默认值则为1即当空间不足时, 所有项目等比例缩小 -
如果所有项目的
flex-shrink属性都为1, 当空间不足时, 将等比例缩小(这也是默认情况) -
如果一个项目的
flex-shrink属性为0, 其他项目都为1, 则空间不足时, 前者不缩小, 后者等比例进行压缩 -
如果一个项目的
flex-shrink属性为2, 其他项目都为1, 则空间不足时, 前者和后者按照2:1进行压缩 -
需要特别注意的是
负值对该属性是无效的

在下面代码中, 可通过修改每个项目的 flex-shrink 属性值, 得到上述效果
html
<style>
  #wrapper {
    display: flex;
    flex-direction: row;
    width: 400px;
    height: 200px;
    background: #eee;
  }
  .item {
    width: 200px;
    line-height: 50px;
    height: 50px;
    text-align: center;
  }
  .item-1 { background: brown; flex-shrink: 2; }
  .item-2 { background: pink; flex-shrink: 1; }
  .item-3 { background: orchid; flex-shrink: 1; }
</style>
<div id="wrapper">
  <div class="item item-1">1</div>
  <div class="item item-2">2</div>
  <div class="item item-3">3</div>
</div>
需要注意是的: 默认情况下, 元素不会缩短至小于 内容框尺寸, 若想改变这一状况, 需要设置元素的 min-width 或 min-height 属性
4.4 设置项目基础大小「flex-basis」
flex-basis可用于设置项目在主轴方向的基础大小, 该属性支持所有CSS尺寸值, 值默认为auto取项目自身的大小(width或height)- 上文提到
flex-grow属性会按比例分配主轴的剩余空间, 那么这个剩余空间又是怎么算的呢? 主轴上的剩余空间其实就等于主轴的长度扣除所有项目的基础大小 - 需要注意的是当一个元素同时被设置了
flex-basis和width(height)flex-basis将具有更高的优先级
如下代码所示, 我们为容器设置了总宽度、并且为第一个项目设置了 flex-basis: 400px; 那么剩余项目将会按比例分配 剩余空间(800px - 400px)
html
<style>
  #wrapper {
    display: flex;
    flex-direction: row;
    width: 800px;
    height: 200px;
    background: #eee;
  }
  .item {
    width: 50px;
    line-height: 50px;
    height: 50px;
    text-align: center;
  }
  .item-1 { background: brown; flex-grow: 1; flex-basis: 400px; }
  .item-2 { background: pink; flex-grow: 1;; }
  .item-3 { background: orchid; flex-grow: 1;; }
</style>
<div id="wrapper">
  <div class="item item-1">1</div>
  <div class="item item-2">2</div>
  <div class="item item-3">3</div>
</div>
4.5 简写属性「flex」
flex 属性是 flex-grow, flex-shrink 和 flex-basis 的简写, 默认值为 0 1 auto, 这里我们可以使用一个、两个或三个值来指定 flex 属性:
- 单值语法, 该值满足以下规则:
- 一个无单位的数值: 该值会被作为
flex-grow的值, 同时flex-shrink的值将会被设置为1,flex-basis的值将被设置为0%, 即:flex: <number> 1 0% - 一个有效的尺寸值: 它会被当作
flex-basis的值, 同时flex-grow和flex-shrink都会被设置为1, 即:flex: 1 1 <size> - 关键字
none、auto、initial, 具体取值参考下文表格
- 双值语法, 第一个值必须为一个
无单位数值, 并且它会被当作flex-grow的值, 第二个值满足以下规则:
- 一个无单位数值: 它会被当作
flex-shrink的值, 此时flex-basis会被设置为0% - 一个有效的尺寸值: 它会被当作
flex-basis的值, 此时 ``flex-shrink会被设置为1`
- 三值语法
- 第一个值必须为一个无单位数值, 并且它会被当作
flex-grow的值 - 第二个值必须为一个无单位数值, 并且它会被当作
flex-shrink的值 - 第三个值必须为一个有效的尺寸值, 并且它会被当作
flex-basis的值
在实际开发中我们更 推荐 使用 单值缩写, 而不是完整的 3 个属性值, 因为 CSS 对于单值属性的 flex 从实用角度进行了优化:
| 简写 | 等价于 | 备注 |
|---|---|---|
flex: initial |
flex: 0 1 auto |
初始值, 常用, 适用场景少, 元素会根据自身宽高来设置尺寸, 不增长、自动压缩 |
flex: 0 |
flex: 0 1 0% |
适用场景少, 不设置元素尺寸, 不增长、自动压缩 |
flex: 1 |
flex: 1 1 0% |
推荐, 不设置元素尺寸, 自动增长、自动压缩 |
flex: none |
flex: 0 0 auto |
推荐, 元素会根据自身宽高来设置尺寸, 不增长、不压缩 |
flex: auto |
flex: 1 1 auto |
适用场景少, 元素会根据自身的宽度与高度来确定尺寸, 等比增长、压缩 |
4.6 指定项目在交叉轴上对齐方式「align-self」
还记得在 flex 容器中我们可以通过 align-items 属性来设置 行内项目 在交叉轴上的对齐方式吗? 如果我们需要行内 某个项目 具有鹤立独行的对齐方式时就可以通过, 为项目设置 align-self 来修改(覆盖)行内项目在交叉轴上的对齐方式
| 属性值 | 描述 |
|---|---|
auto |
默认值, 等于为父元素的 align-items 值 |
flex-start |
行内项目在交叉轴上向开始位置靠拢 |
flex-end |
行内项目在交叉轴上向结束位置靠拢 |
center |
行内项目在交叉轴上向中间位置靠拢 |
basline |
行内项目按照文字基线进行对齐 (用于不同字体大小、行高的文字布局上特别好用) |
stretch |
(默认) 行内项目(在未为项目设置高度或者设为 auto 情况下)在交叉轴方法进行伸缩, 占满该行在交叉轴上的所有剩余空间 |

上图演示代码:
html
<style>
  #wrapper {
    width: 200px;
    height: 200px;
    background: #eee;
    display: flex;
    flex-wrap: wrap;
    align-content: flex-start;
    align-items: flex-start;
  }
  .item {
    width: 40px;
    line-height: 40px;
    margin: 1px;
    background: red;
    text-align: center;
  }
  .item-50h { line-height: 50px; }
  .item-70h { line-height: 70px; }
  .item-30h { line-height: 30px; align-self: flex-end; }
</style>
<div id="wrapper">
  <div class="item item-50h">1</div>
  <div class="item item-70h">2</div>
  <div class="item item-30h">3</div>
  <div class="item item-50h">4</div>
  <div class="item item-70h">5</div>
  <div class="item item-30h">6</div>
</div>
五、flex 布局的一些小例子
5.1 文字组合布局
不同大小的文字组合布局, 使用 align-items: baseline; 实现文本的基线对齐

上图演示代码
html
<style>
  body { padding: 50px; }
  #wrapper {
    display: inline-flex;
    padding: 0 10px;
    height: 60px;
    background-image: linear-gradient(120deg, #84fab0 0%, #8fd3f4 100%);
  }
  .no { font-size: 30px; }
  .order { font-size: 60px; }
  .line {
    border-left: 2px solid #333;
    height: 40px;
    margin: 0 10px;
    align-self: center;
  }
  .row-left {
    display: flex;
    line-height: 1;
    align-items: baseline;
  }
  .row-right {
    height: 100%;
    font-size: 18px;
    text-align: center;
    display: flex;
    flex-direction: column;
    justify-content: space-evenly;
  }
</style>
<div id="wrapper">
  <div class="row-left">
    <div class="no">No.</div>
    <div class="order">14</div>
  </div>
  <div class="line"></div>
  <div class="row-right">
    <div>五月</div>
    <div>2023</div>
  </div>
</div>
5.2 单个项目在容器内的各种可能布局

上面的效果实际上是对 justify-content 和 align-items 属性的 flex-start center flex-end 三个属性的组合, 通过依次修改 flex 容器 justify-content 和 align-items 属性值, 将实现上诉布局
html
<style>
  body { padding: 50px; }
  #wrapper {
    background: #eee;
    margin: 5px;
    width: 240px;
    height: 240px;
  }
  .item {
    width: 80px;
    height: 80px;
    background: red;
  }
  .flex {
    display: flex;
    justify-content: flex-start;
    align-items: flex-start;
  }
</style>
<div id="wrapper" class="flex">
  <div class="item"></div>
</div>
5.3 网格布局

为每个项目设置 flex-grow 属性, 来平均分配容器的剩余空间
html
<style>
  body { padding: 50px; }
  #wrapper {
    background: #eee;
    padding: 5px;
  }
  .item {
    height: 50px;
    line-height: 50px;
    text-align: center;
    background: red;
  }
  .grid {
    display: flex;
  }
  .grid-cell {
    /* 推荐使用简写属性 flex: 1 */
    flex-grow: 1;
    margin: 5px;
  }
</style>
<div id="wrapper">
  <div class="grid">
    <div class="grid-cell item">1/2</div>
    <div class="grid-cell item">1/2</div>
  </div>
  <div class="grid">
    <div class="grid-cell item">1/3</div>
    <div class="grid-cell item">1/3</div>
    <div class="grid-cell item">1/3</div>
  </div>
  <div class="grid">
    <div class="grid-cell item">1/4</div>
    <div class="grid-cell item">1/4</div>
    <div class="grid-cell item">1/4</div>
    <div class="grid-cell item">1/4</div>
  </div>
  <div class="grid">
    <div class="grid-cell item">1/5</div>
    <div class="grid-cell item">1/5</div>
    <div class="grid-cell item">1/5</div>
    <div class="grid-cell item">1/5</div>
    <div class="grid-cell item">1/5</div>
  </div>
</div>
5.4 网格布局: 指定项目具有固定宽度

个别子项通过 flex-basis 来设置固定宽度, 其余项目通过 flex-grow 来平均分布剩余空间
html
<style>
  body { padding: 50px; }
  #wrapper {
    background: #eee;
    padding: 5px;
  }
  .grid {
    display: flex;
  }
  .grid-cell {
    height: 50px;
    margin: 5px;
    line-height: 50px;
    text-align: center;
    background: red;
  }
  .grid:nth-child(1) .grid-cell { flex: 1; }
  .grid:nth-child(1) .grid-cell:nth-child(1) {
    flex: 0 0 50%;
  }

  .grid:nth-child(2) .grid-cell { flex: 1; }
  .grid:nth-child(2) .grid-cell:nth-child(1) {
    flex: 0 0 400px;
  }

  .grid:nth-child(3) .grid-cell { flex: 1; }
  .grid:nth-child(3) .grid-cell:nth-child(1) {
    flex: 0 0 20%;
  }
  .grid:nth-child(3) .grid-cell:nth-child(4) {
    flex: 0 0 20%;
  }

  .grid:nth-child(4) .grid-cell { flex: 1; }
  .grid:nth-child(4) .grid-cell:nth-child(1) {
    flex: 0 0 200px;
  }
  .grid:nth-child(4) .grid-cell:nth-child(5) {
    flex: 0 0 200px;
  }
</style>
<div id="wrapper">
  <div class="grid">
    <div class="grid-cell">50%</div>
    <div class="grid-cell">平均分布</div>
    <div class="grid-cell">平均分布</div>
  </div>
  <div class="grid">
    <div class="grid-cell">400px</div>
    <div class="grid-cell">平均分布</div>
    <div class="grid-cell">平均分布</div>
  </div>
  <div class="grid">
    <div class="grid-cell">20%</div>
    <div class="grid-cell">平均分布</div>
    <div class="grid-cell">平均分布</div>
    <div class="grid-cell">20%</div>
  </div>
  <div class="grid">
    <div class="grid-cell">200px</div>
    <div class="grid-cell">平均分布</div>
    <div class="grid-cell">平均分布</div>
    <div class="grid-cell">平均分布</div>
    <div class="grid-cell">200px</div>
  </div>
</div>
5.5 圣杯布局
-
圣杯布局 (
Holy Grail Layout) 指的是一种最常见的网站布局, 页面从上到下, 分成三个部分: 头部 (header)、躯干 (body)、尾部 (footer); 其中躯干又水平分成三栏, 从左到右为: 导航、主栏、副栏 -
同时这里我们满足当屏幕宽度小于
785px时躯干从水平布局变为垂直分布, 从上到下依次是: 航、主栏、副栏。

下面是实现代码
html
<style>
  body { padding: 50px; }
  #wrapper {
    display: flex;
    flex-direction: column;
  }
  .row{ flex-grow: 1;}
  .header, .footer{ background: #eee; line-height: 50px; text-align: center; }
  .body{ display: flex; height: 400px; }
  .left{ flex: 0 0 12em; background: red; }
  .content{ flex: 1;background: brown; }
  .right{ flex: 0 0 12em; background: blue; }
  @media (max-width: 768px) {
    .body{ display: flex; height: 400px; flex-direction: column; }
    .left{ flex: auto; background: red; }
    .content{ flex: auto;background: brown; }
    .right{ flex: auto; background: blue; }
  }
</style>
<div id="wrapper">
  <div class="row header">#header</div>
  <div class="row body">
    <div class="left">#left</div>
    <div class="content">#content</div>
    <div class="right">#right</div>
  </div>
  <div class="row footer">#footer</div>
</div>
5.6 输入框布局

下面代码实现了上图所示输入框, 输入框带有前后缀, Input 区域将自适应撑开
html
<style>
  body {
    padding: 50px;
  }
  #wrapper {
    display: flex;
    border: 1px solid #eee;
    border-radius: 6px;
    line-height: 50px;
  }
  .prefix, .suffix {
    padding: 0 20px;
    background: #eee;
  }
  .input { flex:1; padding: 0 10px; }

</style>
<div id="wrapper">
  <div class="prefix">prefix</div>
  <div class="input">input</div>
  <div class="suffix">suffix</div>
</div>
5.7 图文左右布局

下面代码实现了上图所示图文布局, 图片区域固定大小, 文本居右
html
<style>
  #wrapper {
    display: flex;
    align-items: flex-start;
  }
  .img {
    flex: none;
    width: 50px;
    height: 50px;
    background: red;
    margin-right: 10px;
  }
</style>
<div id="wrapper">
  <div class="img">img</div>
  <div class="">
    Ubuntu Phone has been designed with obsessive attention to detail.
    Form follows function throughout, from the ever-changing welcome
    screen to essentials like messaging and alarms. And the Launcher
    puts it all at your fingertips, whatever you're doing with your phone.
    Canonical is the global software vendor that provides commercial, design
    and engineering support to the Ubuntu project. Today, our hardware
    enablement team supports the pre-installation of Ubuntu on more
    than 10% of all new PCs shipped, worldwide.
  </div>
</div>