本文介绍使用Xcode15 建立快捷指令的Extension,并描述如何修改快捷指令的IntentHandler,带参数跳转主应用;以及展示多个选项的快捷指令弹框(配置intentdefinition文件),点击选项带参数跳到主应用的方法
创建快捷指令
快捷指令是一个项目的extension,所以先要有一个ios项目:

新建扩展
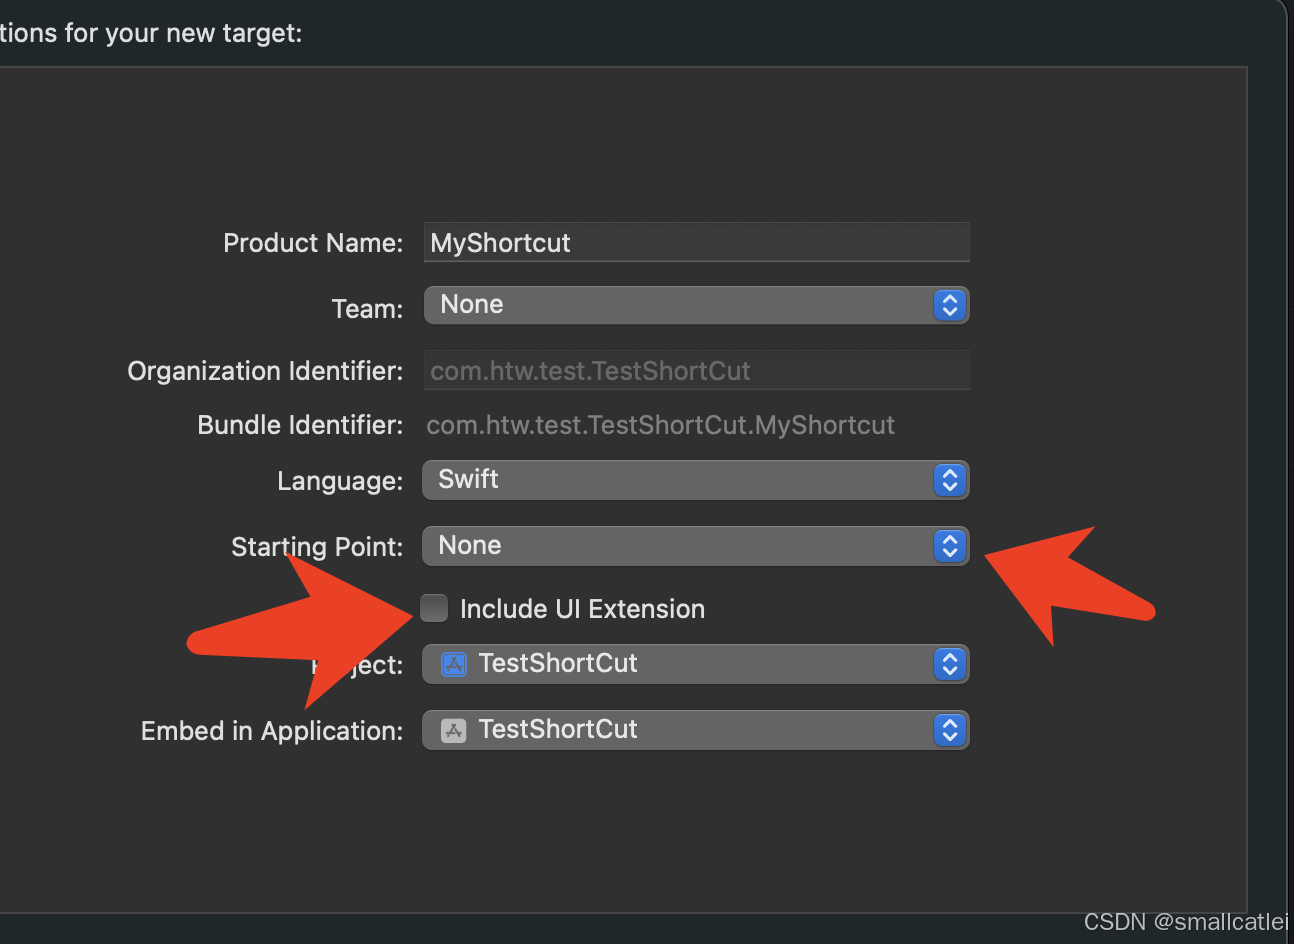
搜索Intent字段,点击下图选中的

左边箭头勾中就会额外自动给快捷指令UI扩展
右边箭头选None 另一个选项是Messaging,选中会使得 自动创建message发送功能的相关代码
选中根目录,新建文件

新建文件类型中搜索Intent,新建唯一搜索结果类型文件

新建文件的target membership需要全部都勾选

在这个新建文件里面定义快捷指令支持的动作(Action),点击加号,点击new intent

新建的Intent按照需要重命名(双击名字重命名) 还有标题描述修改

配置Intent展示的属性

确认主应用和扩展的info.plist文件有配置Intent,没有的话加上build一下

build你的项目,xcode会根据添加的Intent生成对应的如下后缀的代码:Handle类、 intent类、 Handling协议、Response类。
快捷指令逻辑
修改默认生成的IntentHandler,如下划线和框住的都是添加代码,其中response的属性show_name为上面配的属性。
这里的continueInApp枚举,表示快捷指令是打开主应用

主应用获取快捷指令传参
下面是主应用被快捷指令打开,在SceneDelegate获取传过来的参数:
func scene(_ scene: UIScene, continue userActivity: NSUserActivity) {
        if userActivity.activityType == NSStringFromClass(MyIntentIntent.self) {
            var msg: String?
            if let response = userActivity.interaction?.intentResponse as? MyIntentIntentResponse {
                msg = response.show_name
            }
            let alert = UIAlertController(title: "提示", message: "从快捷指令传递的消息:\(msg ?? "")", preferredStyle: .alert)
            alert.addAction(UIAlertAction(title: "确定", style: .default, handler: nil))

            // 显示弹框
            self.window?.rootViewController?.present(alert, animated: true, completion: nil)
        }
    }
展示多项的快捷指令弹窗
这个弹窗在快捷指令中心 点击快捷指令后弹出,点击里面的项,可以带着参数跳到主应用

在 Intents.intentdefinition文件中 新建一个类型Topping(名字随便)

response里面加上这个刚才定义类型的一个参数toping

intent里面也加一个参数 myParamter

需要注意的是快捷指令弹窗标题是这里配置:

build你的项目。会生成对应类还有属性:
出现ToppingResolutionResult类 MyIntentIntentResponse类中会多出属性toping MyIntentIntent类会多出属性myParamter
下面是IntentHandler适配修改:
class IntentHandler: INExtension, MyIntentIntentHandling {


    func resolveMyParamter(for intent: MyIntentIntent, with completion: @escaping (ToppingResolutionResult) -> Void) {
        guard let myParamter = intent.myParamter else {
            completion(ToppingResolutionResult.disambiguation(with: DataManager.allTops()))
            return
        }
        completion(ToppingResolutionResult.success(with: myParamter))

    }


    func provideMyParamterOptionsCollection(for intent: MyIntentIntent, searchTerm: String?, with completion: @escaping (INObjectCollection<Topping>?, Error?) -> Void) {

        completion(INObjectCollection(items: DataManager.allTops()), nil)
    }

    func handle(intent: MyIntentIntent, completion: @escaping (MyIntentIntentResponse) -> Void) {
        let userActivity  = NSUserActivity(activityType: NSStringFromClass(MyIntentIntent.self))
        let response  = MyIntentIntentResponse(code:.continueInApp,userActivity: userActivity)
        response.toping = intent.myParamter
        completion(response)
    }

    func confirm(intent: MyIntentIntent, completion: @escaping (MyIntentIntentResponse) -> Void) {

        let response  = MyIntentIntentResponse(code:.ready,userActivity: nil)
        completion(response)
    }


    override func handler(for intent: INIntent) -> Any {
        // This is the default implementation.  If you want different objects to handle different intents,
        // you can override this and return the handler you want for that particular intent.

        return self
    }


}
数据获取类DataManager:
class DataManager : NSObject {
    static func allTops()-> [Topping] {
        var tops:[Topping] = []
        for i in 0..<3{
            let top = Topping(identifier: "\(i)", display: "啦啦啦\(i)")
            tops.append(top)
        }
        return tops
    }
}
同样在主应用中可以获取传过来的response里的Toping对象,依次来获得传参
func scene(_ scene: UIScene, continue userActivity: NSUserActivity) {
        if userActivity.activityType == NSStringFromClass(MyIntentIntent.self) {
            var msg: String?
            if let response = userActivity.interaction?.intentResponse as? MyIntentIntentResponse {
//                msg = response.show_name
                msg = response.toping?.displayString ?? ""
            }
            let alert = UIAlertController(title: "提示", message: "从快捷指令传递的消息:\(msg ?? "")", preferredStyle: .alert)
            alert.addAction(UIAlertAction(title: "确定", style: .default, handler: nil))

            // 显示弹框
            self.window?.rootViewController?.present(alert, animated: true, completion: nil)
        }
    }
参考文档
官方文档,官方demo也可从此下载: