背景
做这个主要为了发版之前提前发现崩溃,风险前置。适合客户端很重的业务。
优点:你不改动也能用, 维护成本不高。
缺点:容易进入H5页面无法返回,效果有限。
备注:我这边接手别人维护,公司降本把测开工作给到我这边了。
一.Fasbot本地搭建环境
1.定制化修改点:
-
test目录放了相关的各个包定向配置文件(具体查看 push定向配置部分)。需要针对不同的进行定制,对应包的配置值在运行服务器上存放,没有添加git代码中
-
相关的jar需要人工手动的push到 手机的/sdcard 目录中, test目录下的相关配置文件java程序每次安装新包的时候,会重新push到手机/sdcard 目录中
-
fastbot的程序启动是在java 程序中进行启动的。
fastbot源代码地址如下:
https://github.com/bytedance/Fastbot_Android
https://github.com/bytedance/Fastbot_iOS
2.Android手机运行
Push 程序 -手工push
将 framework.jar fastbot-thirdpart.jar monkeyq.jar push 到 /sdcard (官方建议放到该路目下),push libs/* to /data/local/tmp/(实际操作控制都是通过这些 java 程序运行)
java程序中有检测,如果/sdcard 目录中有对应的*.jar 那么就跳过,如果没有会去push对应的*.jar到/sdcard 文件夹。
adb push *.jar /sdcard
adb push libs/* /data/local/tmp/
Push 定向配置
java 程序每次都会强制push Fastbot_Android/test目录到对应的手机中
2.1【有使用】添加限定词,用来提升模型
Mac 本地需要安装aapt的环境变量
➜  build-tools vim ~/.bash_profile
➜  build-tools source ~/.bash_profile
➜  build-tools aapt -v
APPT_HOME=/Users/Library/Android/sdk/build-tools/31.0.0
export APPT_HOME
export PATH=PATH:APPT_HOME
然后根据对应的安装包执行命令,将生成的max.valid.strings 文件push到手机的/sdcard 中( 拉取的项目里有 max.valid.strings 文件,在test目录下)
aapt dump  --values strings  [install_package_path.apk] > max.valid.strings
eg:
aapt dump --values strings "/Users/Downloads/Web_4.6.36(46361011).apk" > max.valid.strings


adb push max.valid.strings /sdcard
**注:**每个新包首次接入fastbot的时,都需要生成一次max.valid.strings文件、
2.2【暂未使用】白名单添加
-
在PC端新建
awl.strings文件(名称固定为:awl.strings)(拉取的项目里有 awl.strings 文件,在test目录下),填写完后即可,注意不是填写白名单就只跑白名单页面,因为测试会建立模型,模型完善后会尽可能对这几个页面进行测试 -
在文件中写入Activity的名称,例如
com.app.live.activity.VideoListActivity com.app.letter.view.chat.LetterChatAct com.app.live.activity.UpLiveActivity com.app.live.boost.view.BoostListActivity
- 将
awl.strings文件push到手机端的sdcard目录下, 目录必须为sdcard
adb push awl.strings /sdcard
- 运行命令时添加以下参数:
--act-whitelist-file /sdcard/awl.strings
adb -s 设备号 shell CLASSPATH=/sdcard/monkeyq.jar:/sdcard/framework.jar:/sdcard/fastbot-thirdpart.jar exec app_process /system/bin com.android.commands.monkey.Monkey -p 包名 --agent reuseq --act-whitelist-file /sdcard/awl.strings --running-minutes 遍历时长 --throttle 事件频率 -v -v
2.3【暂未使用】黑名单添加
-
在PC端新建
abl.strings文件(名称固定为:abl.strings)(拉取的项目里有 abl.strings 文件,在test目录下) -
在文件中输入Activity的名称,同白名单方法一致
com.app.live.activity.VideoListActivity com.app.letter.view.chat.LetterChatAct
- 将
abl.strings文件push到手机端的sdcard目录下, 目录必须为sdcard
adb push abl.strings /sdcard
- 运行命令时添加以下参数:
--act-blacklist-file /sdcard/abl.strings
adb -s 设备号 shell CLASSPATH=/sdcard/monkeyq.jar:/sdcard/framework.jar:/sdcard/fastbot-thirdpart.jar exec app_process /system/bin com.android.commands.monkey.Monkey -p 包名 --agent reuseq --act-blacklist-file /sdcard/abl.strings --running-minutes 遍历时长 --throttle 事件频率 -v -v
注意: 白名单和黑名单不能同时设置,按照非白即黑的原则,即设置了白名单则白名单外的都为黑名单。通过hook 可以监控activity 启动和切换,如果启动的是黑名单中的activity,就拒绝启动该activity,从ui上看就是点了跳转没效果
2.4【有使用】添加屏蔽控件
手动配置需要屏蔽的控件或区域
适用需求: 测试过程中"半路"中途退出登录,屏蔽退出登录按钮
-
在PC端新建
max.widget.black文件(名称固定为:max.widget.black),文件内容配置格式如下: -
匹配条件activity:当activity与currentactivity一致时执行如下匹配
-
屏蔽控件或区域共有三种方式:
-
配置bounds:屏蔽某个区域,在该区域内的控件或坐标不会被点击,bounds 为 0.0~1.0 之间的一个百分比值。
-
配置xpath:查找匹配的控件,屏蔽点击该控件。
-
配置xpath+bounds:查找匹配的控件,当控件存在时屏蔽指定的区域,bounds 为 0.0~1.0 之间的一个百分比值。
-
-
将max.widget.black文件push到手机端的sdcard目录下,目录必须为sdcard。
-
adb push max.widget.black /sdcard
-
剪枝屏蔽


-
在PC端新建
max.tree.pruning文件(名称固定为:max.tree.pruning),文件内容配置格式如下: -
匹配条件activity:当activity与currentactivity一致时执行如下匹配
-
剪枝方式:
- 配置xpath:查找匹配的控件,改变控件属性,从而使控件屏蔽
-
将
max.tree.pruning文件push到手机端的sdcard目录下, /sdcard # 目录必须为sdcard
-
adb push max.tree.pruning /sdcard
[
    {
        "activity":"com.app.live.activity.VideoListActivity",
        "xpath":"//*[@resource-id='com.cmcm.live:id/setting_img']"
    },
    {
        "activity":"com.app.live.activity.SettingAct",
        "xpath":"//*[@resource-id='com.cmcm.live:id/item_logout']"
    },
    {
        "activity":"com.app.live.activity.SettingAct",
        "xpath":"//*[@resource-id='com.cmcm.live:id/item_update']"
    },
    {
        "activity":"com.app.live.activity.SettingAct",
        "xpath":"//*[@resource-id='com.cmcm.live:id/item_clean_data']"
    },
    {
        "activity":"com.app.live.activity.SettingAct",
        "xpath":"//*[@resource-id='com.cmcm.live:id/item_account_safety']"
    },
    {
        "activity":"com.app.live.activity.SettingAct",
        "xpath":"//*[@resource-id='com.cmcm.live:id/layout_social_account']"
    },
    {
        "activity":"com.app.live.activity.SettingAct",
        "xpath":"//*[@resource-id='com.cmcm.live:id/item_about']"
    }
]
2.5 【有使用】自定义输入法(自动输入+屏蔽输入栏)
ADBKeyBoard在输入栏自动输入内容,屏蔽UI输入法
适用需求: 遇到搜索栏乱输入,想要输入指定字符
环境 准备: 下载 ADBKeyBoard,并在手机端中设置为默认输入法 ADBKeyBoard下载地址, 生效后,当遇到输入栏ADBKeyBoard不会弹起ui输入栏,会显示 ADB Keyboard{ON} tarbar
-
随机输入字符串:
-
配置
max.config中max.randomPickFromStringList = false-
在pc端新建
max.config文件(文件名称不可更改) -
输入
max.randomPickFromStringList = false -
通过以下命令将
max.config文件push到手机端
-
-
adb push max.config /sdcard
2.从文件中随机读取字符串输入
- 配置
max.config中max.randomPickFromStringList = true-
在pc端新建
max.strings文件(文件名称不可更改) -
输入想要输入的字符串,字符串结束要换行
-
通过以下命令将文件push到手机端
adb push max.strings /sdcard
-
3.对文本控件输入fuzzing 【new】
- 将项目中 test 目录中
max.fuzzing.strings文件(max.fuzzing.strings文件存在即生效),参考:SecLists/Fuzzing/big-list-of-naughty-strings.txt at master · danielmiessler/SecLists · GitHubSecLists is the security tester's companion. It's a collection of multiple types of lists used during security assessments, collected in one place. List types include usernames, passwords, URLs, sensitive data patterns, fuzzing payloads, web shells, and many more. - SecLists/Fuzzing/big-list-of-naughty-strings.txt at master · danielmiessler/SecLists https://github.com/danielmiessler/SecLists/blob/master/Fuzzing/big-list-of-naughty-strings.txt
-
文件中输入想要输入的字符串,字符串结束换行
-
通过以下命令将文件push到手机端
adb push test/max.fuzzing.strings /sdcard
-
fuzz概率如下:
- 50% 概率输入fuzzing.strings中某个string
- 35% 概率输入被测试 App 历史页面中text/desc文本内容(不存在max.fuzzing.strings文件时概率提高到85%)
- 15% 概率不输入
Android机器运行Fastbot
-s 设备号 多个设备需要指定设备号,单独设备无需此-s参数
-p 包名 遍历app的包名,-p+包名
--agent reuseq 遍历模式,无需更改
--running-minutes 遍历时长(分钟) # 遍历时间:--running-minutes 时间
--throttle 事件频率 遍历事件频率,建议为500-800
可选参数
--bugreport 崩溃时保存bug report log
--output-directory /sdcard/xxx log/crash 另存目录
--act-whitelist-file /sdcard/qwl.strings log/crash 另存目录
拿 FA67LBN00915 设备举例
adb -s FA67LBN00915 shell CLASSPATH=/sdcard/monkeyq.jar:/sdcard/framework.jar:/sdcard/fastbot-thirdpart.jar exec app_process /system/bin com.android.commands.monkey.Monkey -p com.cmcm.live --agent reuseq --act-whitelist-file /sdcard/awl.strings --running-minutes 5 --throttle 600 -v -v -v --output-directory /sdcard/picture-fastbot
意思就是运行monkey 指定提供的jar,指定测试程序,指定白名单列表,运行5分钟,事件间隔为600毫秒 ,指定生成的路径为手机上 /sdcard/picture-fastbot 最后统一将 /sdcard/picture-fastbot 文件夹 pull 到本地。
查看崩溃结果
Crash、ANR 捕获
捕获到Java Crash、ANR、Nativie Crash会以追加方式写入/sdcard/crash-dump.log文件
捕获的Anr 同时也会写入 /sdcard/oom-traces.log 文件
模型文件会自动存储在 /sdcard/fastbot_[包名].fbm,下次进行测试可以经验复用。
3.iOS手机运行
环境设置和运行测试
请按照中文操作手册进行配置,一步一步的配置, 图上每一个设置tab都需要仔细看,就可以手工的通过Xcode执行成功。
https://github.com/bytedance/Fastbot_iOS/blob/main/Doc/handbook-cn.md
通过命令手工执行。 一定要手工运行成功以后,才能用java程序来驱动
cd Fastbot_iOS-main/Fastbot-iOS  #进入到 和Fastbot-iOS.xcworkspace 同一个目录下
BUNDLEID=com.xxxx.xxxx duration=3 throttle=600 xcodebuild test  -workspace Fastbot-iOS.xcworkspace -scheme FastbotRunner  -configuration Release  -destination 'platform=iOS,id=00008101-00141D4102F1003A' -only-testing:FastbotRunner/FastbotRunner/testFastbot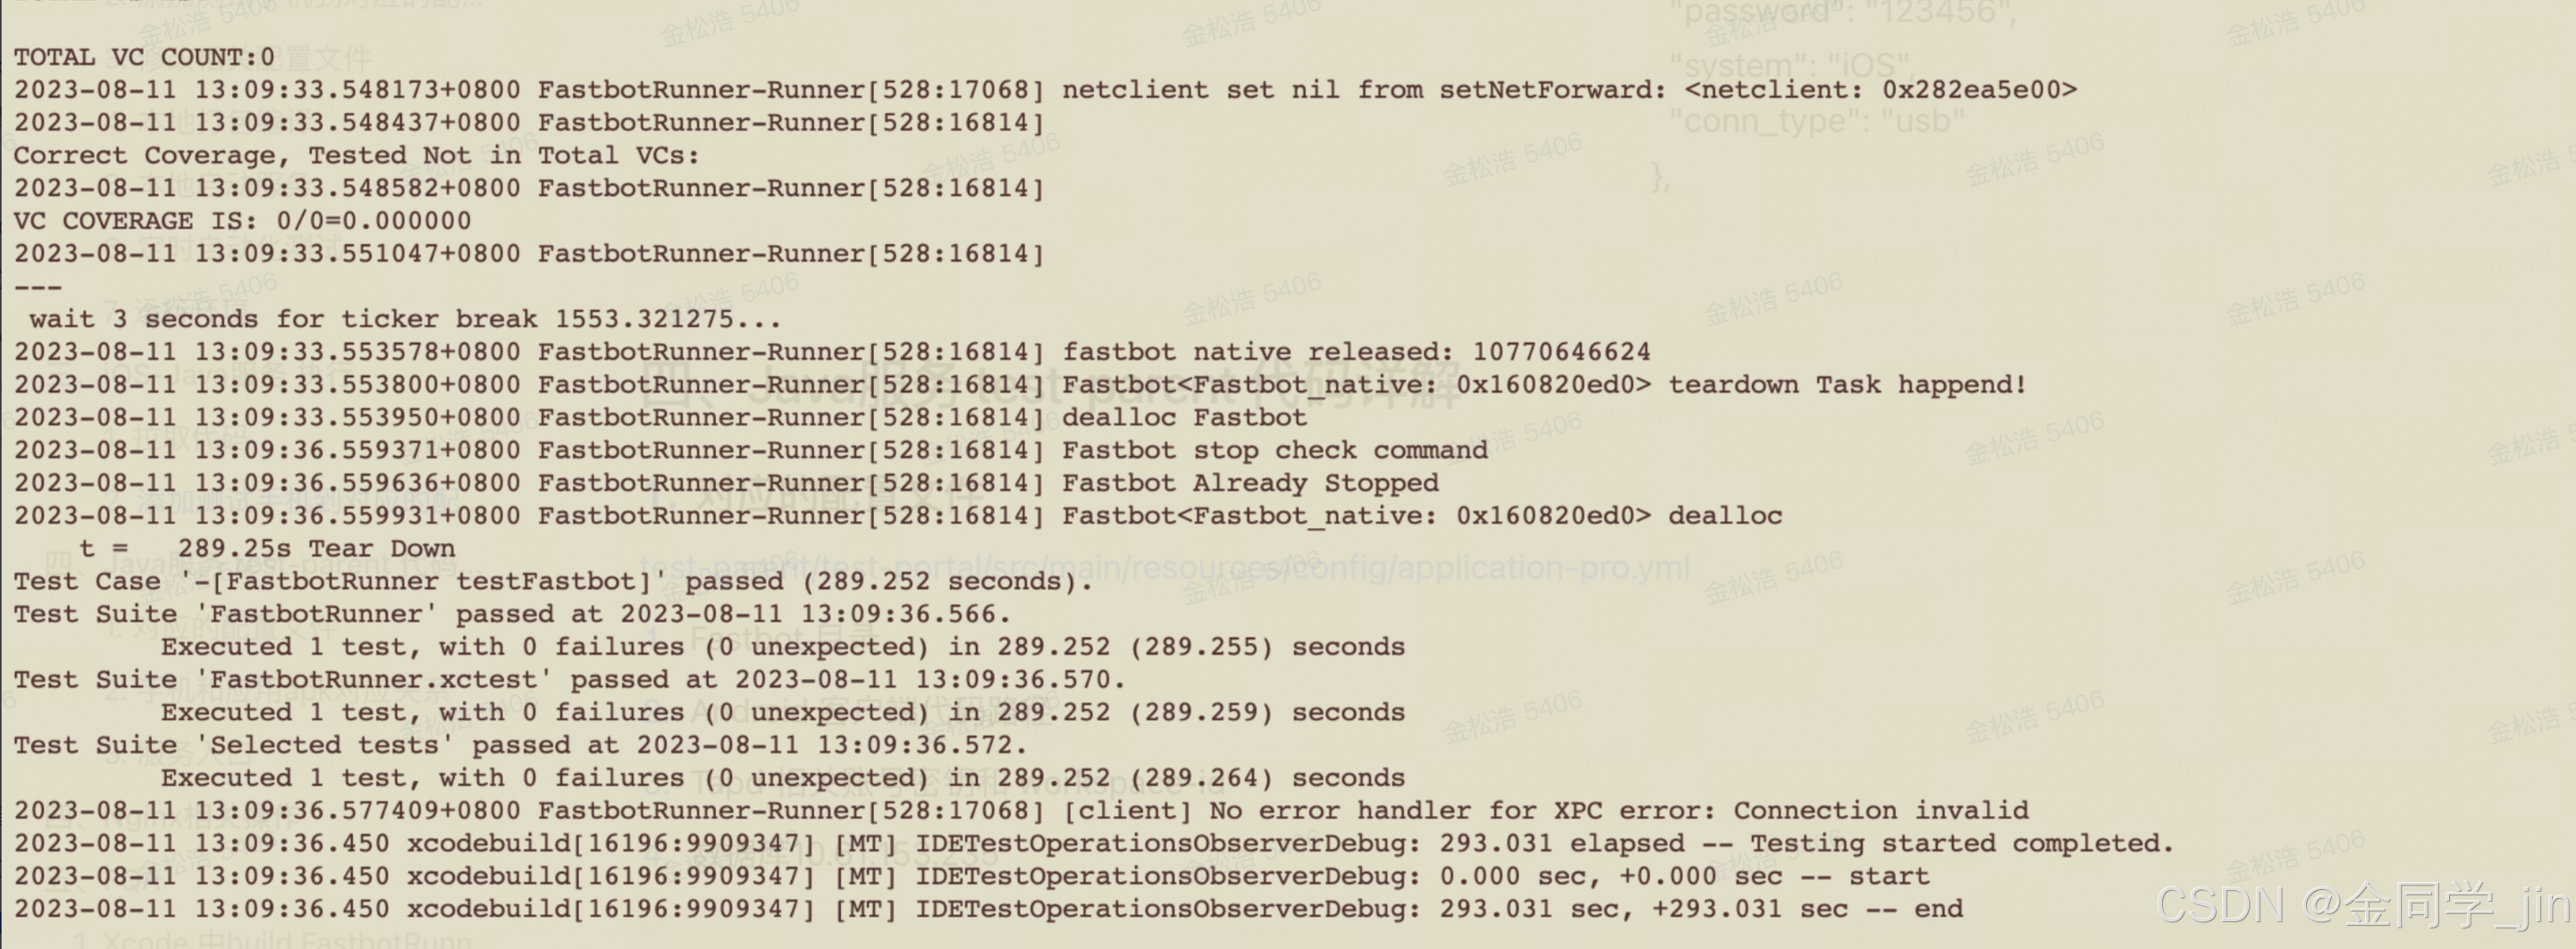
二.Android-Java服务执行
1.拉取代码
Android 端: git checkout master
iOS 端: git checkout ios
2.添加测试手机到对应的配置文件中
test-parent/test-runner/src/main/resources/json 存放着相关的手机配置信息
-
Android web包:android-live-device.json
"LGH990515b53b": {
"uid": "1542786092096241665",
"brand": "lge",
"account": "test26@fluxer.tv",
"model": "LG-H990",
"system": "Android",
"version": "8.0.0",
"name": "elsa_global_com",
"sdk": "26"
}
注:
-
如果手机在对应的文件中,那么就执行对应的手机对应的程序
-
如果连接的手机不在配置的文件中,那么该手机不会跑fastbot
-
如果在json配置文件中的机器,未连接上,代码会跳过,不会报错
-
对应手机需要提前安装对应的apk 和登录对应的liveme账号
3.本地打包编译
使用IntelliJ IDEA 编译工具打开代码
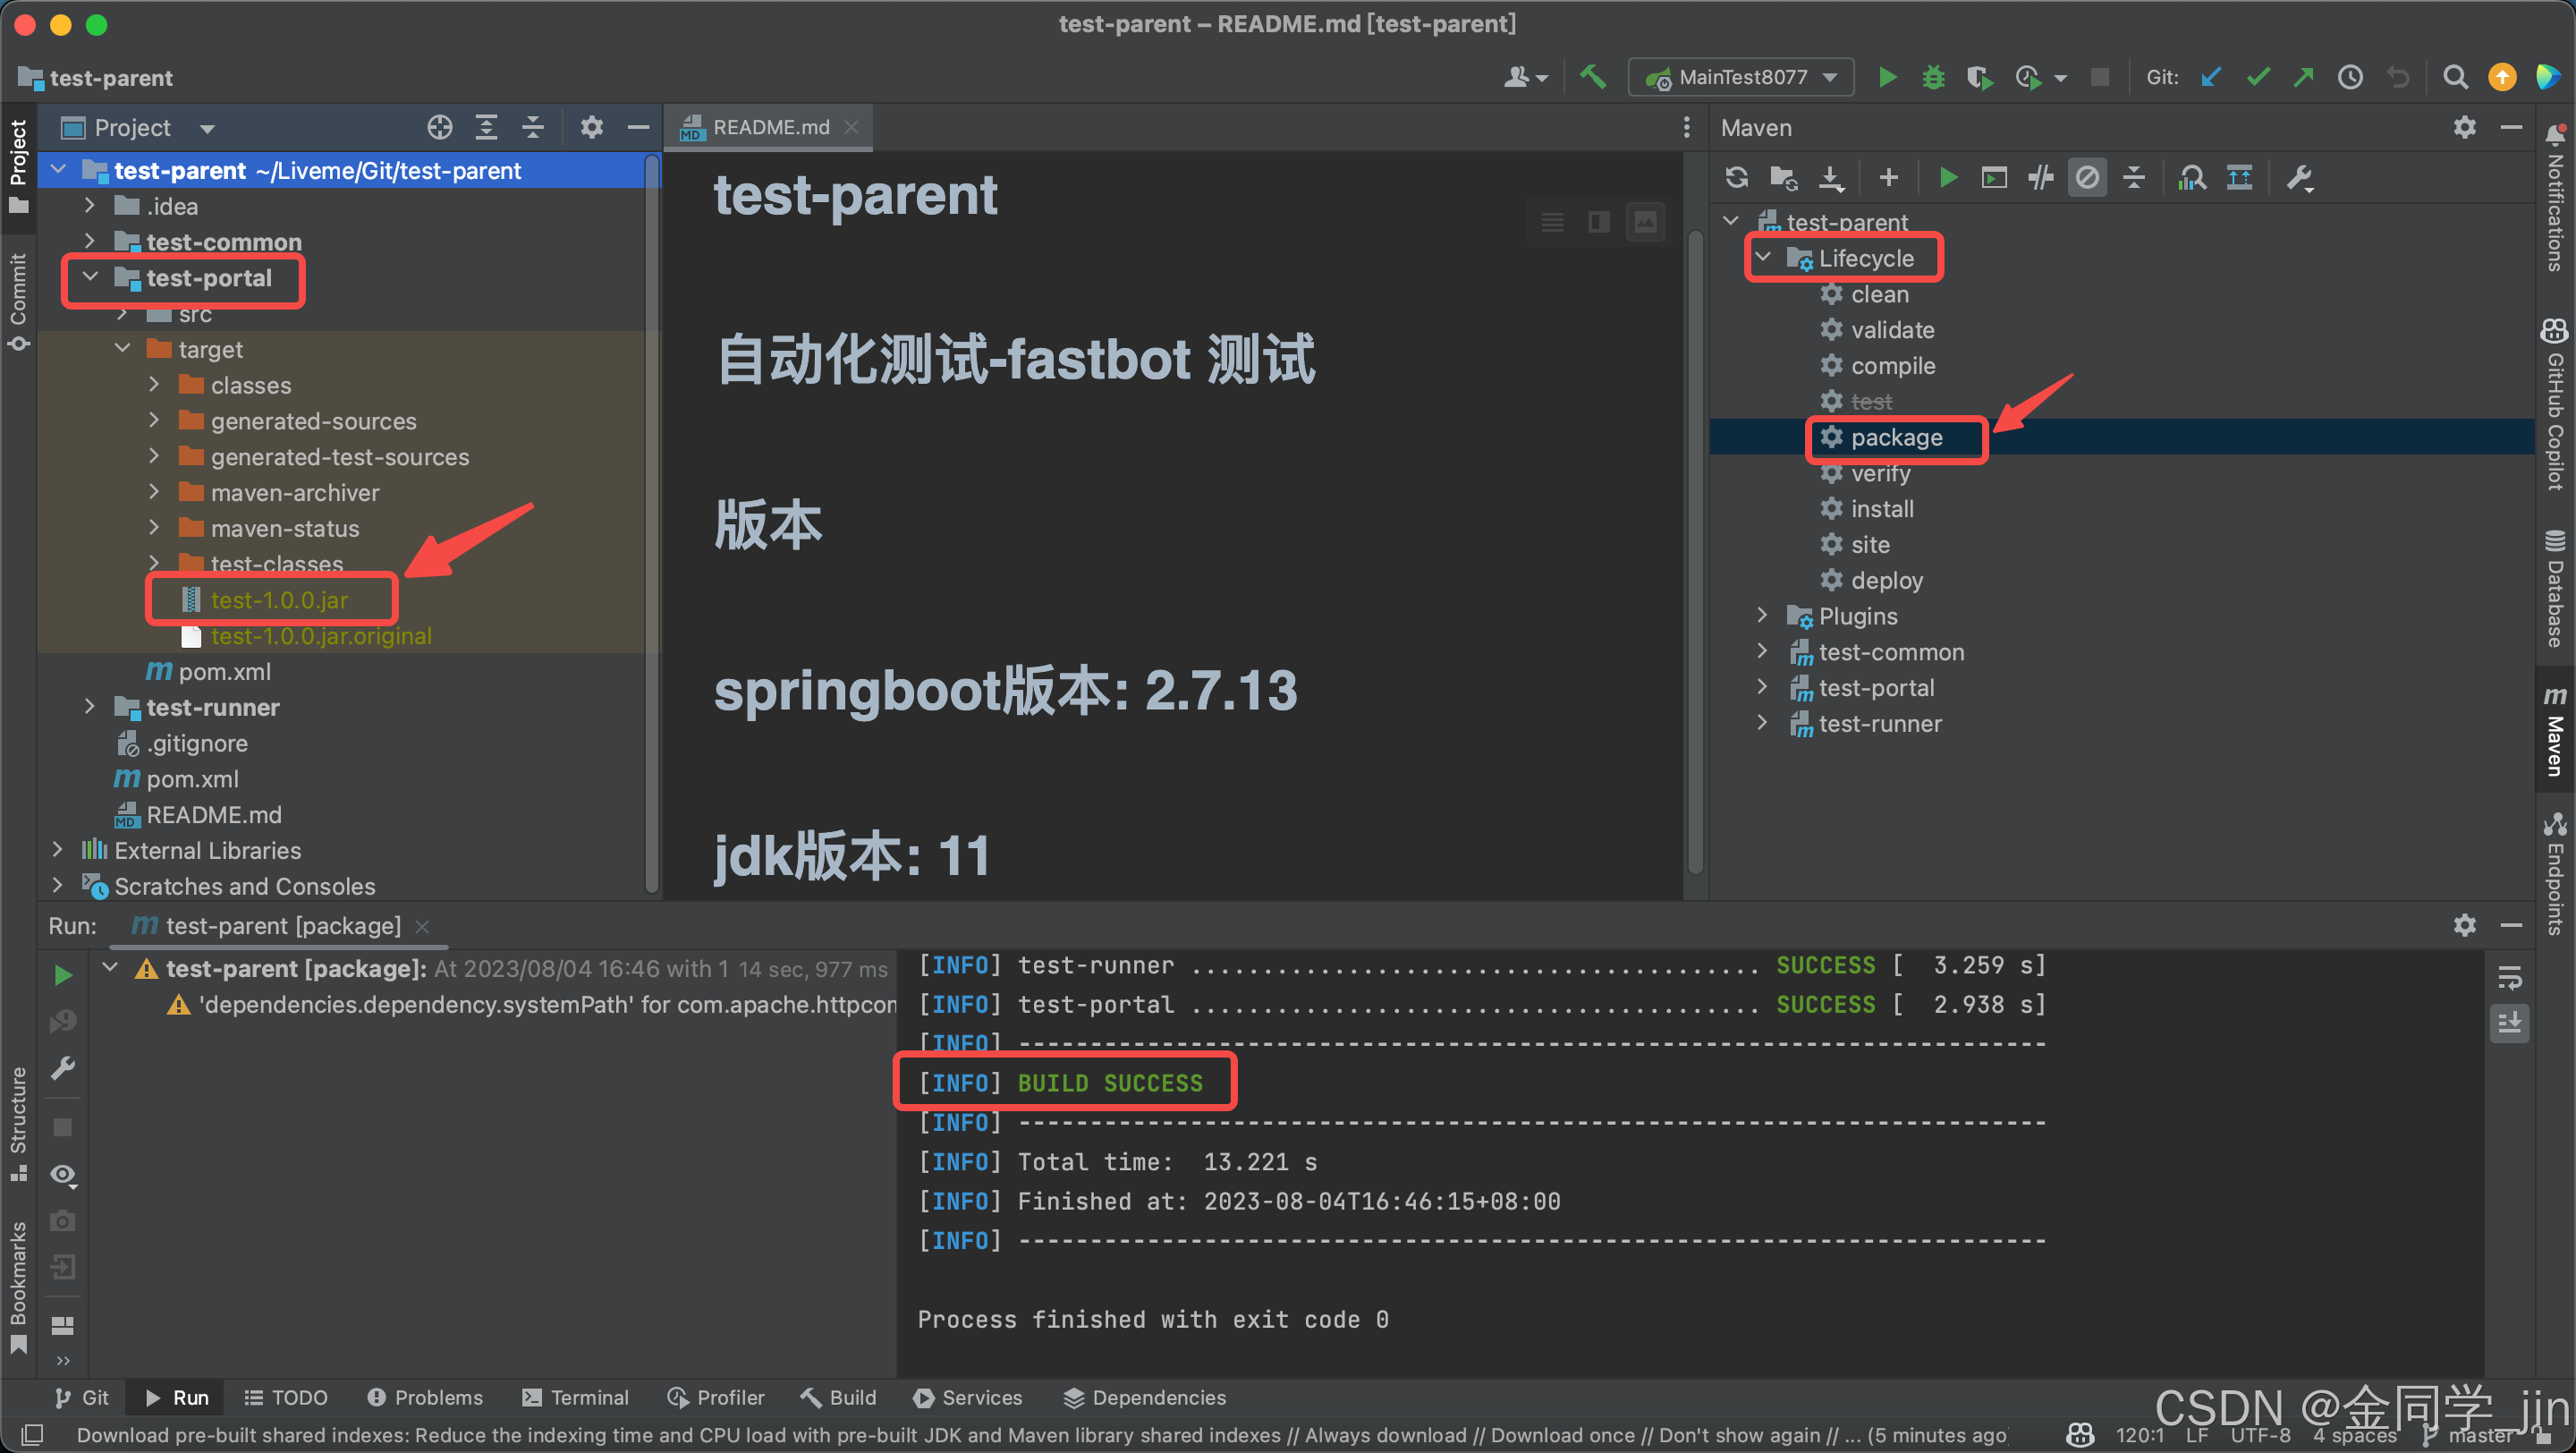
编译以后的jar为 test-parent/test-runner/target/test-1.0.0.jar
4.本地启动服务
同时系统也会开启 8077 端口, linux 上输入 netstat -a 可以查看到,Mac 上输入 lsof -i tcp:8077 可以查看到 该端口是否开启。
# 使用 pro配置文件,正式部署环境
java -jar test-portal/target/test-1.0.0.jar --spring.profiles.active=pro

# 使用 dev配置文件,开发环境
java -jar test-portal/target/test-1.0.0.jar --spring.profiles.active=dev

java -jar test-1.0.0.jar --spring.profiles.active=dev
如果本地调试,可以直接启动。dev 环境启动以后10s开始执行,跑5min
三.Java服务 test-parent 代码详解
简要说明
-
iOS 单独一台机器运行,如果只是自动化测试是可以在 linux 下运行的,问题在于符号化的时候需要执行本地的 CrashSymbolicator.py 脚本,该脚本又与 xcode 挂钩,如果脱离了 mac 系统,符号化失败,所以需要一台Mac笔记本进行测试,如果条件允许,可以改成 Mac mini 进行iOS 自动化测试。
-
设计模式与以前一样,进行 Android 自动化测试的时候,平台会获取 odin 的数据库里获取最新的 bloodeye__ gp_rb 分支 主包(OuterRelease)包,iOS 会获取最新的 release_ 的线下包。所以需要人为在 odin 平台打这三个包。(Android 自动化测试时,有一台 LG 手机声音关不掉,这台手机有问题,不清楚如何关掉,事后如果影响相关工作可以替换该手机)
test-parent/test-portal/src/main/resources/config/application-pro.yml对应的配置文件
test-parent/test-portal/src/main/resources/config/application-pro.yml
-
Fastbot 目录
-
Android 客户端代码路径
-
Tapd 相关账号密钥和 workspace-id
-
数据库10.61.153.235
base:
schedule:
enable: true # 控制定时任务,需要=true才会有定时任务
project:
home: "/home/root/fastbot/live-me-android" #Android 研发的代码路径
test:
android-home:
plus-me: "/home/root/fastbot/android/com.plusme.live/Fastbot_Android" #plus-me Fastbot的路径,因为每个test目录里面的内容是定制的ios-home: live-me: "/home/root/fastbot/ios/com.cmcm.live/Fastbot_iOS" #iOS Fastbot的路径,workspace-id:
plus-me: "22586881" # TAPD 直播 项目id
live-me: "22586881"
td:
username: 'WdchI7Cv' #Tapd 密钥
password: 'A93DD3E1-0230-D282-7A09-D579D9828B48'
res: #从odin 下载即将测试的 应用宝 存放地址
path: '/home/root/test-project/res'
手机和应用apk对应关系
test-parent/test-runner/src/main/resources/json 存放着相关的手机配置信息
-
Android plusme包:android-plus-me-device.json
-
iOS liveme包:ios-live-me-device.json
"LGH990515b53b": {
"uid": "1542786092096241665",
"brand": "lge",
"account": "test26@fluxer.tv",
"model": "LG-H990",
"system": "Android",
"version": "8.0.0",
"name": "elsa_global_com",
"sdk": "26"
}
注:
-
如果手机在对应的文件中,那么就执行对应的手机对应的程序
-
如果连接的手机不在配置的文件中,那么该手机不会跑fastbot
-
如果在json配置文件中的机器,未连接上,代码会跳过,不会报错
-
对应手机需要提前安装对应的apk 和登录对应的账号
test-parent/test-runner/src/main/java/com/joyme/runner/service/impl/DataServiceImpl.java 文件中 对应的配置文件和 相关包程序执行 进行关联。
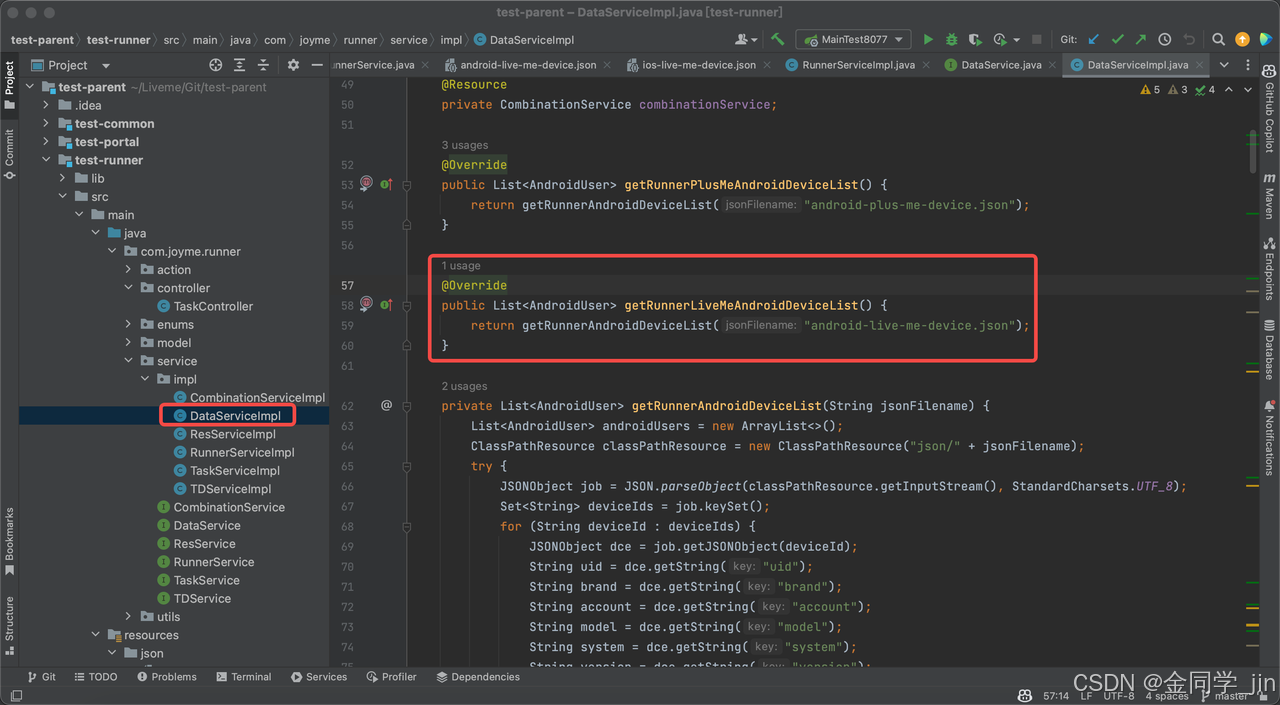
Android Fastbot大体流程:
-
拉取Android研发最新代码,查找当前最新的分支
-
从打包平台获取最新分支的对应apk
-
安装apk -> 初始化运行环境(检查jar, push 配置文件,初始化手机环境,清理历史崩溃信息)-> 跑fastbot
-
收集崩溃信息 -> 和数据库的历史崩溃信息进行对比去重-> 提交Tapd崩溃信息
iOS Fastbot大体流程:
-
拉取iOS 研发最新代码,查找当前最新的分支
-
从打包平台获取最新分支的对应ipa
-
安装ipa -> 杀死liveme 进程-> 跑fastbot
-
对iOS崩溃文件进行格式化 -> 提交Tapd崩溃信息
服务入口
- 入口文件
test-parent/test-runner/src/main/java/com/joyme/runner/service/impl/TaskServiceImpl.java 入口文件
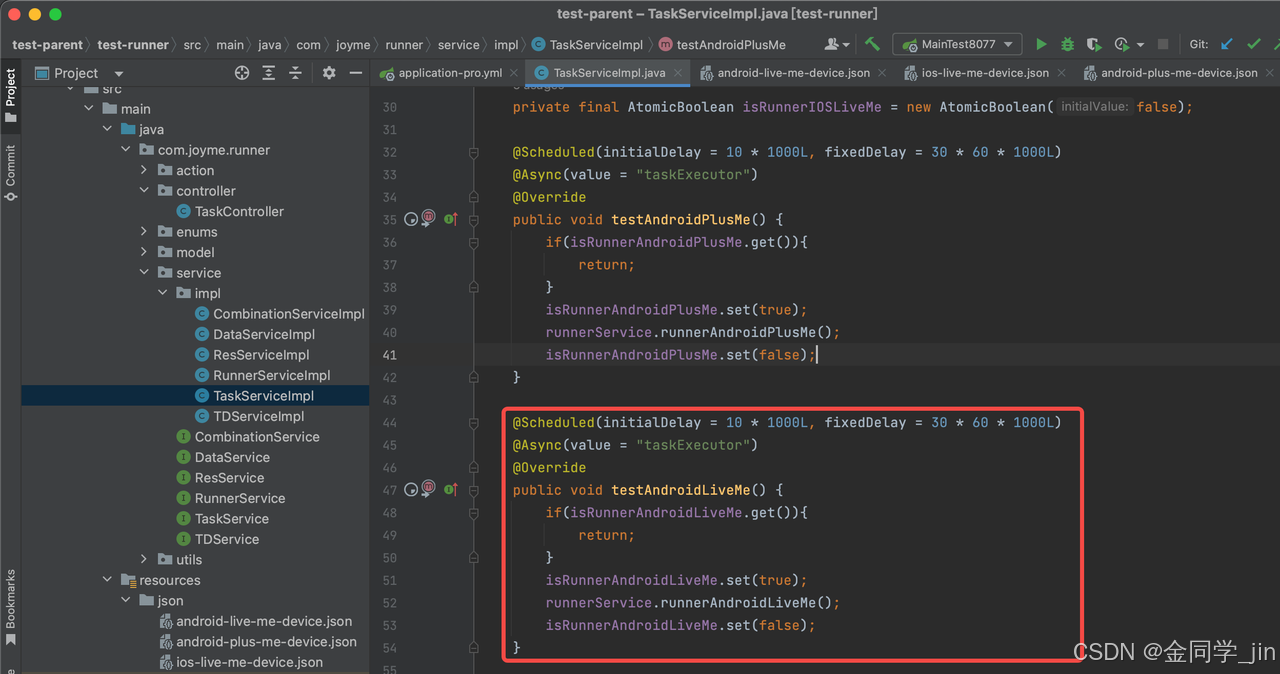
@Scheduled(initialDelay = 10 * 1000L, fixedDelay = 30 * 60 * 1000L)
@Async(value = "taskExecutor")
@Override
public void testAndroidLiveMe() {
    if(isRunnerAndroidLiveMe.get()){
        return;
    }
    isRunnerAndroidLiveMe.set(true);
    runnerService.runnerAndroidLiveMe();
    isRunnerAndroidLiveMe.set(false);
}
运行测试类在 runner 模块下的 com.joyme.runner.service.impl.TaskServiceImpl,使用了 Scheduled 定时和 Async 异步(之前是通过 jenkins 任务进行测试),运行代码里在 RunnerService 方法,里面是具体执行某包的测试方法。
具体函数实现
test-parent/test-runner/src/main/java/com/joyme/runner/service/impl/RunnerServiceImpl.java -> copy 一个 runnerAndroidPlusMe 并进行修改
-
更新本地Android代码,拉取最新的分支
-
根据最新分支去查找测试平台数据库,看是否有打过最新分支的 对应类型的包
-
如果没有则跳过,如果有那么获取对应的apk地址,下载apk包到本地服务器
-
获取对应执行的手机设备,安装最新的apk 包
-
跑fastbot之前检查相关环境
-
隐藏状态栏
-
*.jar 是否存在,如果不存在进行push
-
Push test目录的文件到手机中
-
执行fastbot
-
-
手机崩溃信息,提交tapd
四.Nginx相关操作
nginx服务:显示airtest运行报告。
# 查看nginx是否启动
[root@bogon sbin]# ps aux|grep nginx
root     1018326  0.0  0.0  36572   412 ?        Ss   11:36   0:00 nginx: master process ./nginx
root     1018327  0.0  0.0  66860  4932 ?        S    11:36   0:00 nginx: worker process
root     1018450  0.0  0.0  11808  1196 pts/0    S+   11:36   0:00 grep --color=auto nginx

# 查看nginx进程在哪里
[root@bogon sbin]# whereis nginx
nginx: /usr/sbin/nginx /usr/lib64/nginx /etc/nginx /usr/local/nginx /usr/share/nginx /usr/share/man/man3/nginx.3pm.gz /usr/share/man/man8/nginx.8.gz

# 启动nginx
[root@bogon nginx]# cd /usr/local/nginx/sbin
[root@bogon sbin]# ./nginx

# 暂停nginx
[root@bogon sbin]# ./nginx -s stop

# 重启nginx
[root@bogon sbin]# ./nginx -s reloa

# 查看nginx 配置
[root@bogon conf]# cat /usr/local/nginx/conf
五.FQA
1.Xcode 中build FastbotRunner报错
Failed to register bundle identifier The app identifier "bytedance.FastbotRunner11" cannot be registered to your development team because it is not available. Change your bundle identifier to a unique string to try again.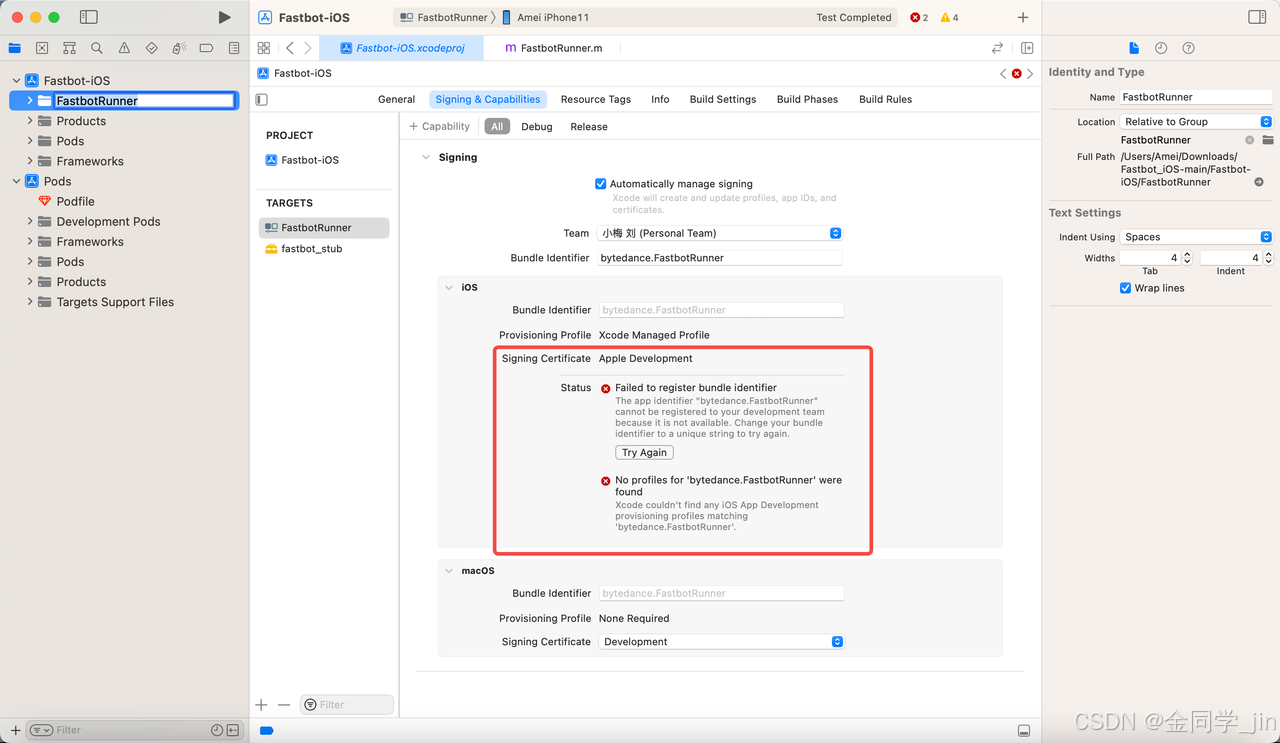
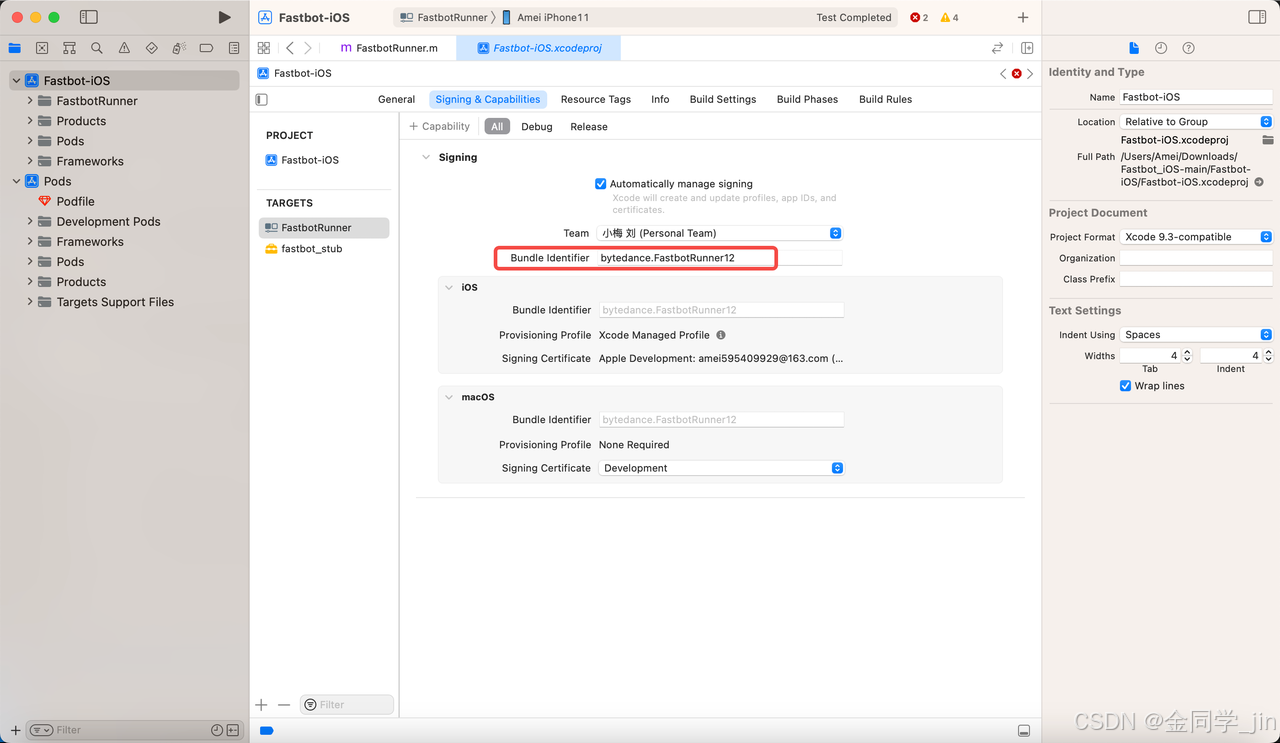
原因:
这个错误通常表示您的Xcode项目的Bundle Identifier与您的开发者账号中已经存在的应用程序的Bundle Identifier重复了。要解决此问题,您可以按照以下步骤操作:
-
在Xcode中,选择您的项目,并在"General"选项卡下找到"Identity"部分。
-
确保您的Bundle Identifier是唯一的,并且与您的开发者账号中已经存在的应用程序的Bundle Identifier不重复。
-
如果您的Bundle Identifier与已经存在的应用程序的Bundle Identifier重复了,请尝试更改您的Bundle Identifier,以确保它是唯一的。
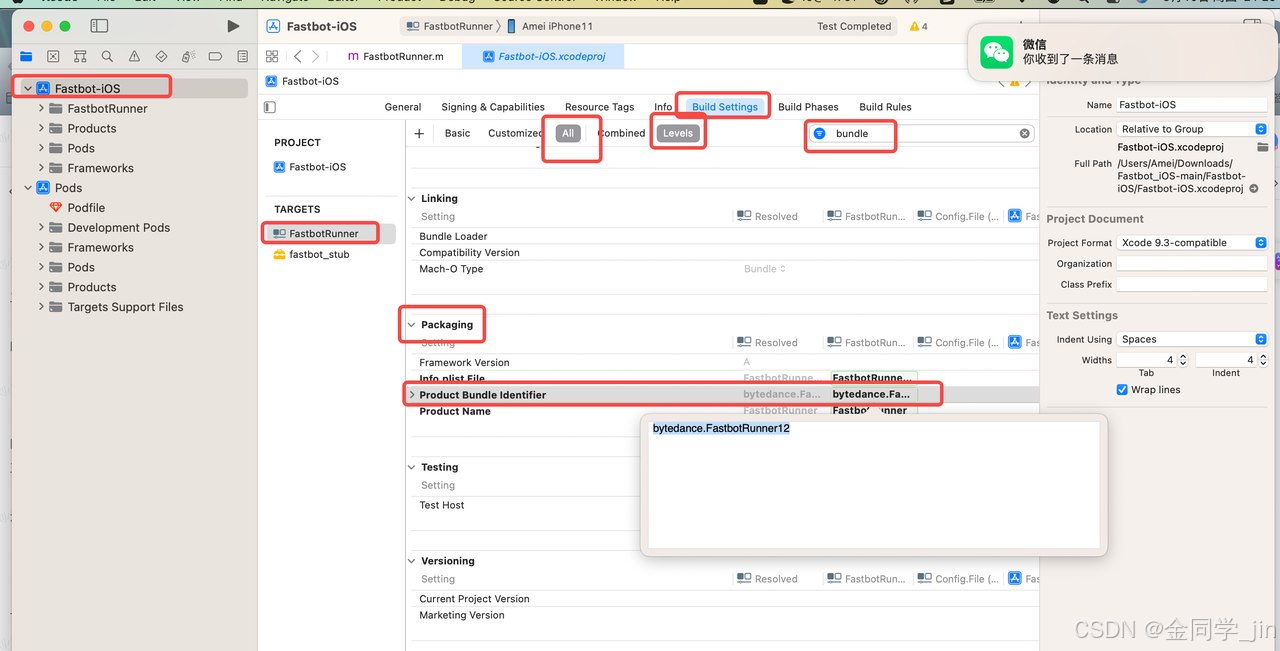
解决方案:
修改 Bundle Identifier换个名称,在重新build 就不咋报上面的错误了
2.iOS java 工程启动报错报错
➜  target git:(ios) ✗ java -jar test-1.0.0.jar --spring.profiles.active=dev
Exception in thread "main" java.lang.UnsupportedClassVersionError: com/joyme/portal/MainTest8077 has been compiled by a more recent version of the Java Runtime (class file version 55.0), this version of the Java Runtime only recognizes class file versions up to 52.0
        at java.lang.ClassLoader.defineClass1(Native Method)
        at java.lang.ClassLoader.defineClass(ClassLoader.java:756)
        at java.security.SecureClassLoader.defineClass(SecureClassLoader.java:142)
        at java.net.URLClassLoader.defineClass(URLClassLoader.java:473)
        at java.net.URLClassLoader.access$100(URLClassLoader.java:74)
        at java.net.URLClassLoader$1.run(URLClassLoader.java:369)
        at java.net.URLClassLoader$1.run(URLClassLoader.java:363)
        at java.security.AccessController.doPrivileged(Native Method)
        at java.net.URLClassLoader.findClass(URLClassLoader.java:362)
        at java.lang.ClassLoader.loadClass(ClassLoader.java:418)
        at org.springframework.boot.loader.LaunchedURLClassLoader.loadClass(LaunchedURLClassLoader.java:151)
        at java.lang.ClassLoader.loadClass(ClassLoader.java:351)
        at java.lang.Class.forName0(Native Method)
        at java.lang.Class.forName(Class.java:348)
        at org.springframework.boot.loader.MainMethodRunner.run(MainMethodRunner.java:46)
        at org.springframework.boot.loader.Launcher.launch(Launcher.java:108)
        at org.springframework.boot.loader.Launcher.launch(Launcher.java:58)
        at org.springframework.boot.loader.JarLauncher.main(JarLauncher.java:65)
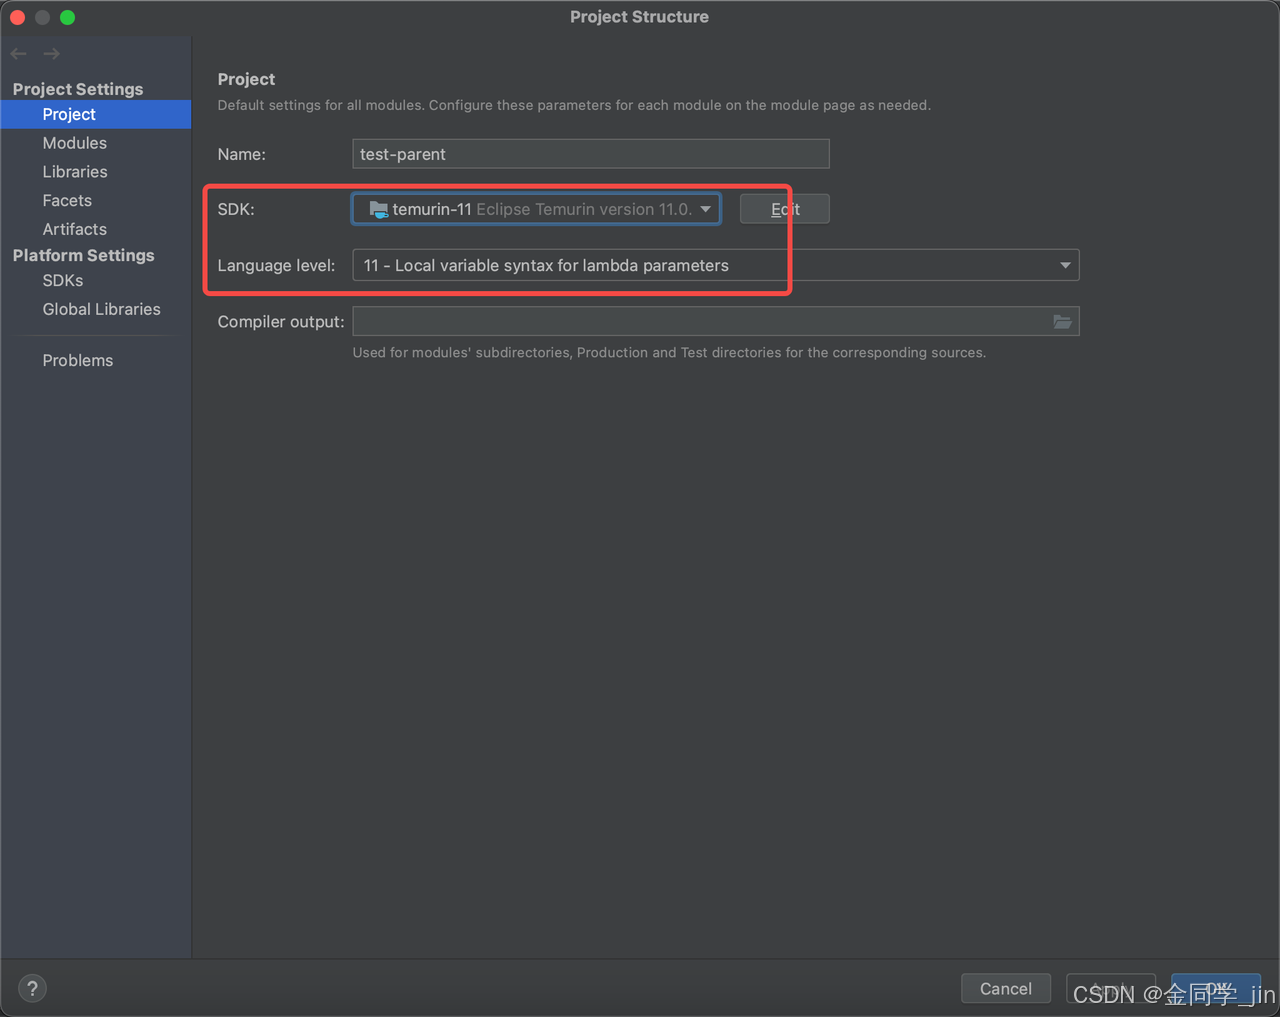
原因:因为jdk版本过低,需要jdk11+
3.iOS Java 工程启动报错:8077 端口被占用
➜  target git:(ios) ✗ java -jar test-1.0.0.jar --spring.profiles.active=dev
2023-08-11 13:20:41,951 main ERROR Unable to locate appender "FileLog" for logger config "root"
.-----..----. .----..-----.              .----..----..---..-.   .-..-..----..----.
`-' '-'} |__}{ {__-``-' '-'     ___     { {__-`} |__}} }}_}\ \_/ / { || }`-'} |__}
  } {  } '__}.-._} }  } {      {___}    .-._} }} '__}| } \  \   /  | }| },-.} '__}
  `-'  `----'`----'   `-'               `----' `----'`-'-'   `-'   `-'`----'`----'
2023-08-11 13:20:42.060 [background-preinit] INFO  org.hibernate.validator.internal.util.Version - HV000001: Hibernate Validator 6.2.5.Final
2023-08-11 13:20:42.172 [main] INFO  com.joyme.portal.MainTest8077 - Starting MainTest8077 using Java 18.0.2.1 on bogon with PID 29041 (/Users/Amei/Liveme/Git/test-parent/test-portal/target/test-1.0.0.jar started by Amei in /Users/Amei/Liveme/Git/test-parent/test-portal/target)
2023-08-11 13:20:42.177 [main] INFO  com.joyme.portal.MainTest8077 - The following 1 profile is active: "dev"
2023-08-11 13:20:44.923 [main] WARN  io.undertow.websockets.jsr - UT026010: Buffer pool was not set on WebSocketDeploymentInfo, the default pool will be used
2023-08-11 13:20:44.965 [main] INFO  io.undertow.servlet - Initializing Spring embedded WebApplicationContext
2023-08-11 13:20:44.966 [main] INFO  org.springframework.boot.web.servlet.context.ServletWebServerApplicationContext - Root WebApplicationContext: initialization completed in 2705 ms
2023-08-11 13:20:46.263 [main] INFO  com.baomidou.dynamic.datasource.DynamicRoutingDataSource - dynamic-datasource - add a datasource named [odin-inner] success
2023-08-11 13:20:46.263 [main] INFO  com.baomidou.dynamic.datasource.DynamicRoutingDataSource - dynamic-datasource - add a datasource named [auto-test] success
2023-08-11 13:20:46.264 [main] INFO  com.baomidou.dynamic.datasource.DynamicRoutingDataSource - dynamic-datasource initial loaded [2] datasource,primary datasource named [odin-inner]
2023-08-11 13:20:48.240 [main] INFO  io.undertow - starting server: Undertow - 2.2.25.Final
2023-08-11 13:20:48.258 [main] INFO  org.xnio - XNIO version 3.8.7.Final
2023-08-11 13:20:48.284 [main] INFO  org.xnio.nio - XNIO NIO Implementation Version 3.8.7.Final
2023-08-11 13:20:48.378 [main] INFO  org.jboss.threads - JBoss Threads version 3.1.0.Final
2023-08-11 13:20:48.473 [main] INFO  io.undertow - stopping server: Undertow - 2.2.25.Final
2023-08-11 13:20:48.479 [main] WARN  org.springframework.boot.web.servlet.context.AnnotationConfigServletWebServerApplicationContext - Exception encountered during context initialization - cancelling refresh attempt: org.springframework.context.ApplicationContextException: Failed to start bean 'webServerStartStop'; nested exception is org.springframework.boot.web.server.PortInUseException: Port 8077 is already in use
2023-08-11 13:20:48.482 [main] INFO  com.baomidou.dynamic.datasource.DynamicRoutingDataSource - dynamic-datasource start closing ....
2023-08-11 13:20:48.503 [main] INFO  com.baomidou.dynamic.datasource.DynamicRoutingDataSource - dynamic-datasource all closed success,bye
2023-08-11 13:20:48.618 [main] ERROR org.springframework.boot.diagnostics.LoggingFailureAnalysisReporter -

***************************
APPLICATION FAILED TO START
***************************

Description:

Web server failed to start. Port 8077 was already in use.

Action:

Identify and stop the process that's listening on port 8077 or configure this application to listen on another port.
解决方案:杀死对应的8077 进程
ps -ef | grep 8077
kill -9 进程号
4. 2台手机运行fastbot报错
原因:因为2台手机是通过2个电脑的xcode进行初始化的,所以会报错
批量执行时,所有手机都必须得 是同一个同一台电脑的 xcode进行初始化。在跑java服务之前, 一定需要先确保手工执行fastbot ios设备可以正常执行成功
BUNDLEID=com.cmcm.live duration=5 throttle=1200 xcodebuild test -workspace /Users/Amei/Downloads/Fastbot_iOS-main/Fastbot-iOS/Fastbot-iOS.xcworkspace -scheme FastbotRunner -configuration Release -destination 'platform=iOS,id=d6f2e764a07599906b6ce4c14a202a3a46e35eb7' -only-testing:FastbotRunner/FastbotRunner/testFastbot六.有用的经验
1.包名的获取方式(需要配置好ADB命令)
aapt dump badging [apk路径]#mac系统直接拖动apk文件到命令行

2.使用 Maxim 获取当前控件所属的Activity
-
解压zip包,将 framework.jar , monkey.jar push 到手机上某个目录中,建议
/sdcardadb push framework.jar /sdcard
adb push monkey.jar /sdcard -
手机连接上mac笔记本,然后打开指定app 想要获取的页面,运行下面的adb命令,就可以获取指定页面的activity
adb shell CLASSPATH=/sdcard/monkey.jar:/sdcard/framework.jar exec app_process /system/bin tv.panda.test.monkey.api.CurrentActivity

3.使用airtestIDE获取对应的控件

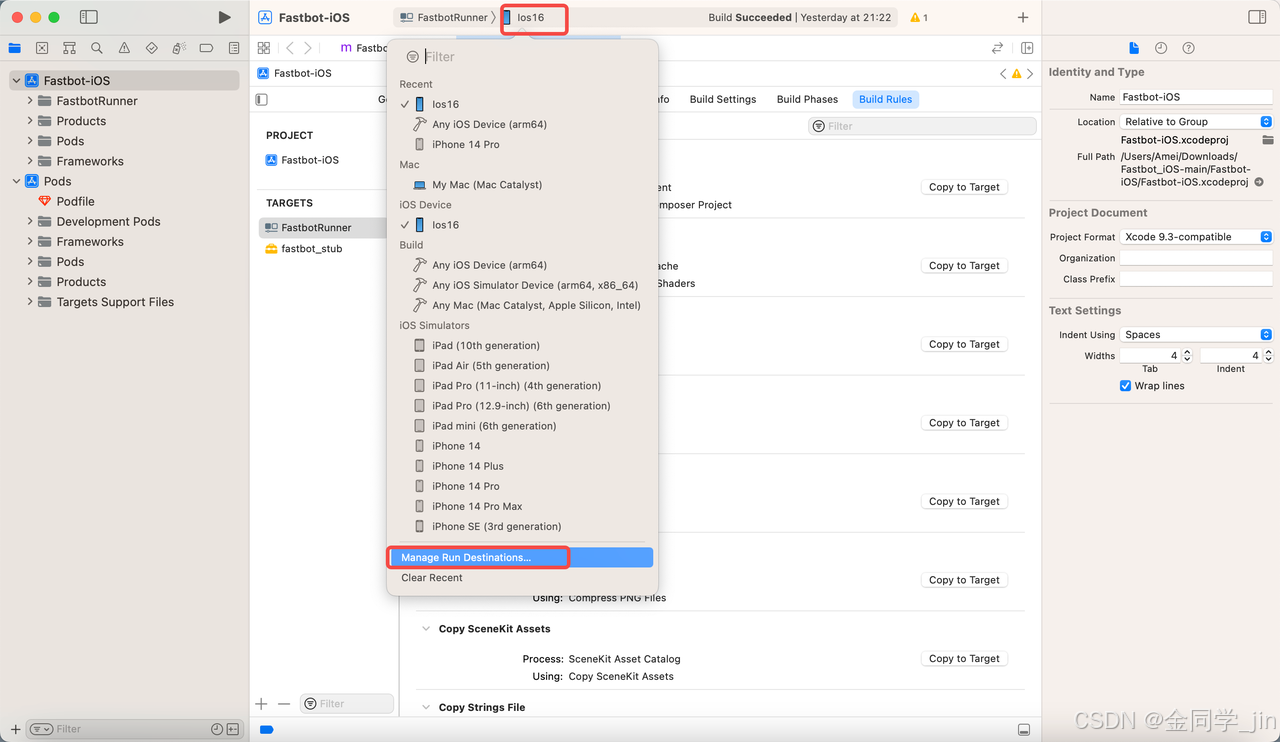
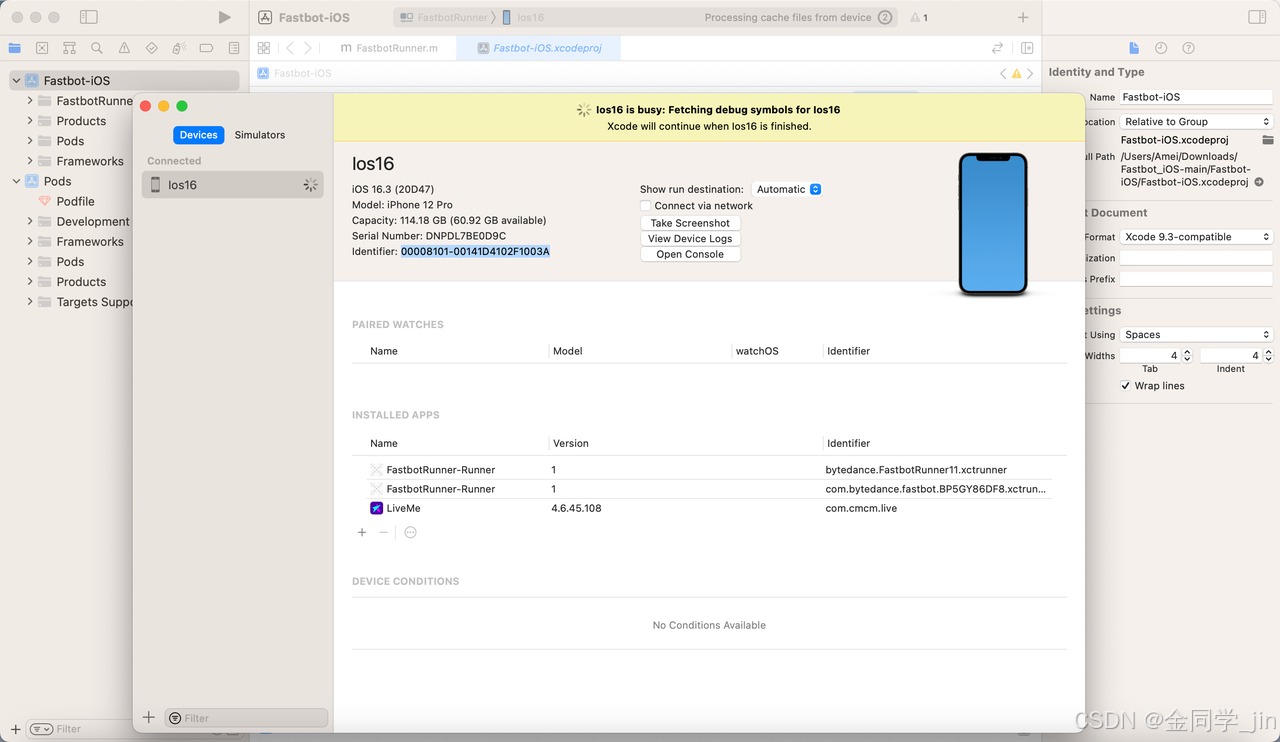
4.Xcode 获取iOS UDID
phone链接上Mac,Mac打开xcode,选择模拟器。具体参见iPhone手机轻松获取UDID的六种方式
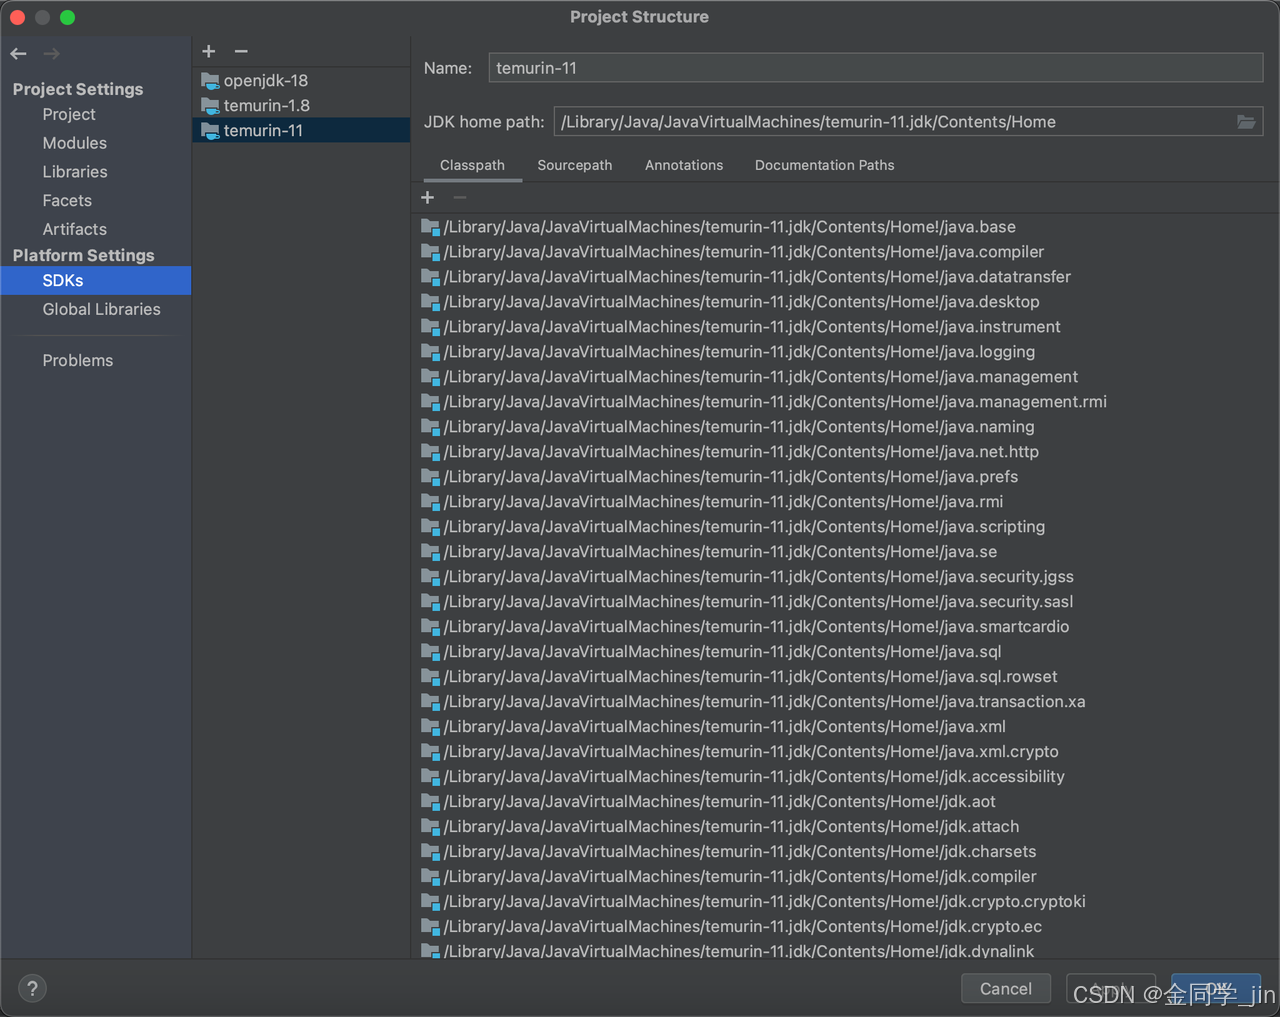
5.IntelliJ IDEA 配置JDK版本
File -> Project Structure 菜单下,详细参见IDEA 配置 JDK 图文教程(超详细) - 犬小哈教程
七.相关文档
1.Fastbot 原理介绍
https://mp.weixin.qq.com/s/QhzqBFZygkIS6C69__smyQ
2.Android Fastbot 中文手册
https://github.com/bytedance/Fastbot_Android/blob/main/handbook-cn.md
3.iOS Fastbot 中文手册
https://github.com/bytedance/Fastbot_iOS/blob/main/Doc/handbook-cn.md