本文主要介绍linux下elasticsearch的部署。通过在一台linux服务器中分别对elasticsearch-6.7.2版本,elasticsearch-7.3.0版本来进行安装,记录在安装elasticsearch-7.3.0版本时出现的异常情况,以及elasticsearch-head的安装。
基础环境
本机已经安装、配置了jdk 1.8 版本的继续环境,nodejs环境(elasticsearch-head安装需要)。
使用以下网盘地址,下载需要版本的elasticsearch包
shell
通过网盘分享的文件:elasticsearch-7.3.0-linux-x86_64.tar.gz
链接: https://pan.baidu.com/s/1hSRQgoOvz-aOj1MqcGgMow 提取码: xiao
通过网盘分享的文件:elasticsearch-6.7.2.tar.gz
链接: https://pan.baidu.com/s/1uoHF70mqxB2o_sjx3WzsUA 提取码: xiao
在github中,下载最新的elasticsearch-head包
shell
源码地址:https://github.com/mobz/elasticsearch-head/
安装包地址:https://github.com/mobz/elasticsearch-head/releases/tag/v5.0.0
启动elasticsearch服务不能使用root账号,所以需要新建一个用户,用来启动elasticsearch服务
shell
adduser es
passwd es
安装6.7.2版本
-
解压压缩文件
shellcd /data2 tar -zxvf elasticsearch-6.7.2.tar.gz -
更改配置文件
elasticsearch.ymlshellpath.data: /data2/elasticsearch-6.7.2/data path.logs: /data2/elasticsearch-6.7.2/logs network.host: 0.0.0.0 http.port: 8099 -
切换es用户启动
shellsu es cd /data2/elasticsearch-6.7.2 # 后台启动elasticsearch服务 ./bin/elasticsearch -d -
查看是否启动成功
-
查看日志
shellcd /data2/elasticsearch-6.7.2/logs # 查看日志是否正常启动 tail -f elasticsearch.log -
查看进程
shellps -ef |grep elasticsearch -
查看api:
http://10.10.87.20:8099/shell{ "name" : "6W3MY3q", "cluster_name" : "elasticsearch", "cluster_uuid" : "Obz1OlM9S4KcLEKN6SYkdg", "version" : { "number" : "6.7.2", "build_flavor" : "default", "build_type" : "tar", "build_hash" : "56c6e48", "build_date" : "2019-04-29T09:05:50.290371Z", "build_snapshot" : false, "lucene_version" : "7.7.0", "minimum_wire_compatibility_version" : "5.6.0", "minimum_index_compatibility_version" : "5.0.0" }, "tagline" : "You Know, for Search" }
-
安装7.3.0版本
elasticsearch 7以上版本开始内置了jdk,如本文中部署的7.3.0版本就内置了jdk 11,如果使用的服务器已经安装配置了jdk 1.8的话,可以直接使用elasticsearch-7.3.0自带的jdk。
-
解压压缩文件
shellcd /data2 tar -zxvf elasticsearch-7.3.0-linux-x86_64.tar.gz -
更改配置文件
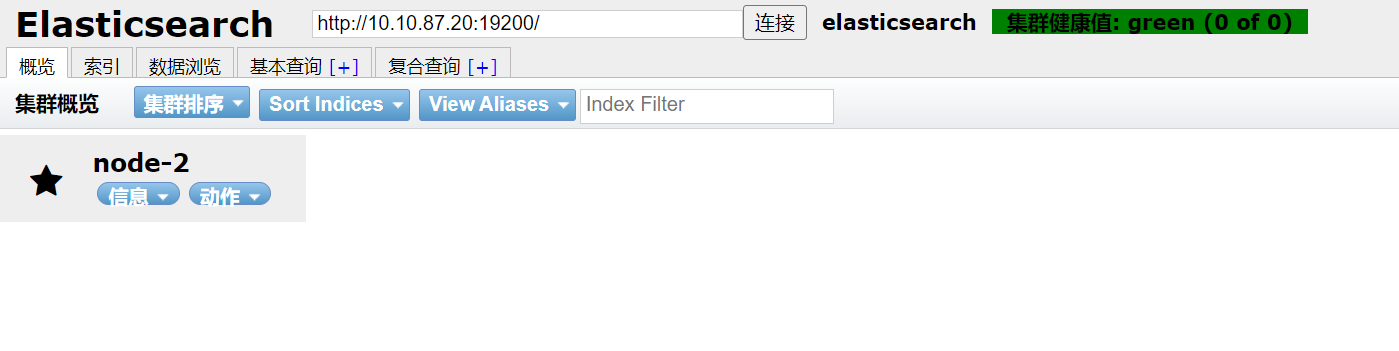
elasticsearch.ymlshellpath.data: /data2/elasticsearch-7.3.0/data path.logs: /data2/elasticsearch-7.3.0/logs network.host: 0.0.0.0 http.port: 19200 # 以下配置都是出现异常后的,新增的配置 一台服务器中部署两个elasticsearch不同版本的服务 # 注:node.name 的值要与 cluster.initial_master_nodes 的值保持一致 node.name: node-2 discovery.seed_hosts: ["127.0.0.1"] cluster.initial_master_nodes: ["node-2"] -
更改配置文件
jvm.optionsshell# 由于在启动时,出现了异常,需要更换GC算法 #-XX:+UseConcMarkSweepGC -XX:+UseG1GC -
更换脚本文件
elasticsearch-envshell#if [ ! -z "$JAVA_HOME" ]; then # JAVA="$JAVA_HOME/bin/java" #else # if [ "$(uname -s)" = "Darwin" ]; then # # OSX has a different structure # JAVA="$ES_HOME/jdk/Contents/Home/bin/java" # else # JAVA="$ES_HOME/jdk/bin/java" # fi #fi # 将以上原始的脚本段注释掉,使用以下内容;JAVA 为 elasticsearch自带的jdk的路径 if [ ! -z "$JAVA_HOME" ]; then JAVA="/data2/elasticsearch-7.3.0/jdk/bin/java" else if [ "$(uname -s)" = "Darwin" ]; then # OSX has a different structure JAVA="/data2/elasticsearch-7.3.0/jdk/bin/java" else JAVA="/data2/elasticsearch-7.3.0/jdk/bin/java" fi fi -
切换es用户启动
shellsu es cd /data2/elasticsearch-7.3.0 # 后台启动elasticsearch服务 ./bin/elasticsearch -d -
查看是否启动成功
-
查看日志
shellcd /data2/elasticsearch-7.3.0/logs # 查看日志是否正常启动 tail -f elasticsearch.log -
查看进程
shellps -ef |grep elasticsearch -
查看api:
http://10.10.87.20:19200/shell{ "name" : "centos74-0.novalocal", "cluster_name" : "elasticsearch", "cluster_uuid" : "_na_", "version" : { "number" : "7.3.0", "build_flavor" : "default", "build_type" : "tar", "build_hash" : "de777fa", "build_date" : "2019-07-24T18:30:11.767338Z", "build_snapshot" : false, "lucene_version" : "8.1.0", "minimum_wire_compatibility_version" : "6.8.0", "minimum_index_compatibility_version" : "6.0.0-beta1" }, "tagline" : "You Know, for Search" }
-
安装elasticsearch异常情况
-
出现以下错误,说明默认走的内置的jdk 11的,便需要更改启动脚本
elasticsearch-env中的配置信息shellbash-4.2$ ./bin/elasticsearch -d future versions of Elasticsearch will require Java 11; your Java version from [/usr/local/java/jdk1.8.0_73/jre] does not meet this requirementshellvim elasticsearch-env # 注释以下 内容 # now set the path to java #if [ ! -z "$JAVA_HOME" ]; then # JAVA="$JAVA_HOME/bin/java" #else # if [ "$(uname -s)" = "Darwin" ]; then # # OSX has a different structure # JAVA="$ES_HOME/jdk/Contents/Home/bin/java" # else # JAVA="$ES_HOME/jdk/bin/java" # fi #fi # 将被注释的配置块,复制一份,将JAVA的信息更给为 elasticsearch自带的jdk的路径 if [ ! -z "$JAVA_HOME" ]; then JAVA="/data2/elasticsearch-7.3.0/jdk/bin/java" else if [ "$(uname -s)" = "Darwin" ]; then # OSX has a different structure JAVA="/data2/elasticsearch-7.3.0/jdk/bin/java" else JAVA="/data2/elasticsearch-7.3.0/jdk/bin/java" fi fi -
出现以下错误,说明需要更换GC算法,便需要更改
jvm.options中的配置信息shellOpenJDK 64-Bit Server VM warning: Option UseConcMarkSweepGC was deprecated in version 9.0 and will likely be removed in a future release.shellcd jvm.options # 从ConcMarkSweepGC切换到G1GC #-XX:+UseConcMarkSweepGC -XX:+UseG1GC -
当启动时出现以下异常信息时,需要更给配置文件
elasticsearch.yml中的配置信息shell[2024-11-04T16:58:51,926][ERROR][o.e.b.Bootstrap ] [centos74-0.novalocal] node validation exception [1] bootstrap checks failed [1]: the default discovery settings are unsuitable for production use; at least one of [discovery.seed_hosts, discovery.seed_providers, cluster.initial_master_nodes] must be configured [2024-11-04T16:58:51,929][INFO ][o.e.n.Node ] [centos74-0.novalocal] stopping ... [2024-11-04T16:58:51,951][INFO ][o.e.n.Node ] [centos74-0.novalocal] stopped [2024-11-04T16:58:51,951][INFO ][o.e.n.Node ] [centos74-0.novalocal] closing ... [2024-11-04T16:58:51,965][INFO ][o.e.n.Node ] [centos74-0.novalocal] closed [2024-11-04T16:58:51,968][INFO ][o.e.x.m.p.NativeController] [centos74-0.novalocal] Native controller process has stopped - no new native processes can be startedshelldiscovery.seed_hosts: ["127.0.0.1"] cluster.initial_master_nodes: ["node-1"]
安装elasticsearch-head
-
解压压缩文件
shellcd /data2 tar -zxvf elasticsearch-head-5.0.0.tar.gz -
编辑
Gruntfile.js,添加hostnameshellvim Gruntfile.js hostname: '*', port: 9100, base: '.', keepalive: true -
更改配置文件
elasticsearch.ymlshell# 进入安装目录 cd elasticsearch-head-5.0.0 # 安装 npm install --registry=https://registry.npmmirror.com/ -
启动服务
shell#前台启动 npm run start # 后台启动: nohup npm run-script start & -
查看是否启动成功,访问
http://10.10.87.20:9100/
安装elasticsearch-head异常情况
当elasticsearch-head启动正常,elasticsearch也启动正常,但是无法通过elasticsearch-head连接elasticsearch服务。

需要更改elasticsearch的配置文件elasticsearch.yml,进行跨域访问。
shell
# 在配置文件末尾添加以下配置
http.cors.enabled: true
http.cors.allow-origin: "*"重启elasticsearch后,访问http://10.10.87.20:9100/