文章目录
- 一、认识串口
- 二、串口应用编程
-
- 2.1、串口API函数
- 2.2、串口应用编程demo1
- [2.3、串口应用编程demo2(GPS 模块)](#2.3、串口应用编程demo2(GPS 模块))
一、认识串口
1.1、串口
串行接口简称串口,也称串行通信接口或串行通讯接口(通常指COM接口),是采用串行通信方式的扩展接口。
串口可以将接收来自CPU的并行数据字符转换为连续的串行数据流发送出去,同时可将接收的串行数据流转换为并行的数据字符供给CPU的器件。一般完成这种功能的电路,我们称为串行接口电路。
1.2、串口通信
串口通信 (Serial Communications)是串口按位(bit)发送和接收字节的通信方式,它是嵌入式物联网领域中常用的通讯方式。
典型的串口通信使用3根线完成,分别是发送、接收、地线 。
由于串口通信是异步的,所以端口能够在一根线上发送数据,同时在另一根线上接收数据。
异步通信和同步通信都要进行发送方和接收方的"同步"。其中异步通信按字符进行传输,利用每一帧的起始位和停止位实现同步;而同步通信采用共同外部时钟来进行同步。

TX(Transmit Exchange)数据发送脚
RX(Receive Exchange)数据接收脚
GND(Ground)底线
1.3、波特率
二、串口应用编程
参考资料:串口编程
2.1、串口API函数
在 Linux 系统中,操作设备的统一接口就是:open/ioctl/read/write。
对于 UART,又在 ioctl 之上封装了很多函数,主要是用来设置行规程。所以对
于 UART,编程的套路就是:

怎么设置行规程?行规程的参数用结构体 termios 来表示,可以参考 Linux
串口---struct termios 结构体:

这些函数在名称上有一些惯例:
tc:terminal contorl
cf: control flag
下面列出一些函数:

具体函数参数使用时,可以查找手册!
函数不多,主要是需要设置好 termios 中的参数,这些参数很复杂,可以参考Linux 串口---struct termios 结构体。
2.2、串口应用编程demo1
程序:
c
#include <stdio.h>
#include <string.h>
#include <sys/types.h>
#include <errno.h>
#include <sys/stat.h>
#include <fcntl.h>
#include <unistd.h>
#include <termios.h>
#include <stdlib.h>

/* set_opt(fd,115200,8,'N',1) */
int set_opt(int fd,int nSpeed, int nBits, char nEvent, int nStop)
{
	struct termios newtio,oldtio;          //行规程的参数用结构体 termios 来表示

	if ( tcgetattr( fd,&oldtio) != 0) {
		perror("SetupSerial 1");
		return -1;
	}//获取驱动程序中的默认参数,保存在oldtio里面

	bzero( &newtio, sizeof( newtio ) );  //清零结构体
	newtio.c_cflag |= CLOCAL | CREAD;
	newtio.c_cflag &= ~CSIZE;
	newtio.c_lflag  &= ~(ICANON | ECHO | ECHOE | ISIG);  /*Input*/
	newtio.c_oflag  &= ~OPOST;   /*Output*/

	switch( nBits )                    //设置数据位
	{
	case 7:
		newtio.c_cflag |= CS7;
	break;
	case 8:
		newtio.c_cflag |= CS8;
	break;
	}

	switch( nEvent )                   //设置校验位
	{
	case 'O':
		newtio.c_cflag |= PARENB;
		newtio.c_cflag |= PARODD;
		newtio.c_iflag |= (INPCK | ISTRIP);
	break;
	case 'E':
		newtio.c_iflag |= (INPCK | ISTRIP);
		newtio.c_cflag |= PARENB;
		newtio.c_cflag &= ~PARODD;
	break;
	case 'N':
		newtio.c_cflag &= ~PARENB;
	break;
	}

	switch( nSpeed )                  //设置波特率
	{
	case 2400:
		cfsetispeed(&newtio, B2400);
		cfsetospeed(&newtio, B2400);
	break;
	case 4800:
		cfsetispeed(&newtio, B4800);
		cfsetospeed(&newtio, B4800);
	break;
	case 9600:
		cfsetispeed(&newtio, B9600);
		cfsetospeed(&newtio, B9600);
	break;
	case 115200:
		cfsetispeed(&newtio, B115200);
		cfsetospeed(&newtio, B115200);
	break;
	default:
		cfsetispeed(&newtio, B9600);
		cfsetospeed(&newtio, B9600);
	break;
	}

	if( nStop == 1 )                 //设置停止位
		newtio.c_cflag &= ~CSTOPB;
	else if ( nStop == 2 )
		newtio.c_cflag |= CSTOPB;

	newtio.c_cc[VMIN]  = 1;  /* 读数据时的最小字节数: 没读到这些数据我就不返回! */
	newtio.c_cc[VTIME] = 0; /* 等待第1个数据的时间:
	                         * 比如VMIN设为10表示至少读到10个数据才返回,
	                         * 但是没有数据总不能一直等吧? 可以设置VTIME(单位是10秒)
	                         * 假设VTIME=1,表示:
	                         *    10秒内一个数据都没有的话就返回
	                         *    如果10秒内至少读到了1个字节,那就继续等待,完全读到VMIN个数据再返回
	                         */

	tcflush(fd,TCIFLUSH);

	if((tcsetattr(fd,TCSANOW,&newtio))!=0){         //上面完成了结构体newtio的配置,现在使用这个函数来设置行规层、驱动、硬件
		perror("com set error");
		return -1;
	}
	//printf("set done!\n");
	return 0;
}

int open_port(char *com)
{
	int fd;
	//fd = open(com, O_RDWR|O_NOCTTY|O_NDELAY);
	fd = open(com, O_RDWR|O_NOCTTY);
    if (-1 == fd){
		return(-1);
    }

	  if(fcntl(fd, F_SETFL, 0)<0) /* 设置串口为阻塞状态*/
	  {
			printf("fcntl failed!\n");
			return -1;
	  }

	  return fd;
}


/*
 * ./serial_send_recv <dev>
 */
int main(int argc, char **argv)
{
	int fd;
	int iRet;
	char c;

	/* 1. open */

	/* 2. setup
	 * 115200,8N1
	 * RAW mode
	 * return data immediately
	 */

	/* 3. write and read */

	if (argc != 2)
	{
		printf("Usage: \n");
		printf("%s </dev/ttySAC1 or other>\n", argv[0]);
		return -1;
	}

	fd = open_port(argv[1]);                 //打开串口设备
	if (fd < 0)
	{
		printf("open %s err!\n", argv[1]);
		return -1;
	}

	iRet = set_opt(fd, 115200, 8, 'N', 1);    //设置波特率为115200,数据位为8,不使用校验位,停止位个数为1
	if (iRet)
	{
		printf("set port err!\n");
		return -1;
	}

	printf("Enter a char: ");
	while (1)
	{
		scanf("%c", &c);
		iRet = write(fd, &c, 1);
		iRet = read(fd, &c, 1);
		if (iRet == 1)
			printf("get: %02x %c\n", c, c);
		else
			printf("can not get data\n");
	}

	return 0;
}
我使用的是imx6ull板子

上机实验:
编译:arm-buildroot-linux-gnueabihf-gcc -o serial_send_recv serial_send_recv.c
复制过去板子上:cp serial_send_recv~/nfs_rootfs/
板子上运行:/mnt/serial_send_recv /dev/ttymxc5
2.3、串口应用编程demo2(GPS 模块)
GPS 模块与外部控制器的通讯接口有多种方式,这里我们使用串口进行通讯,
波特率为 9600bps,1bit 停止位,无校验位,无流控,默认每秒输出一次标准格
式数据。
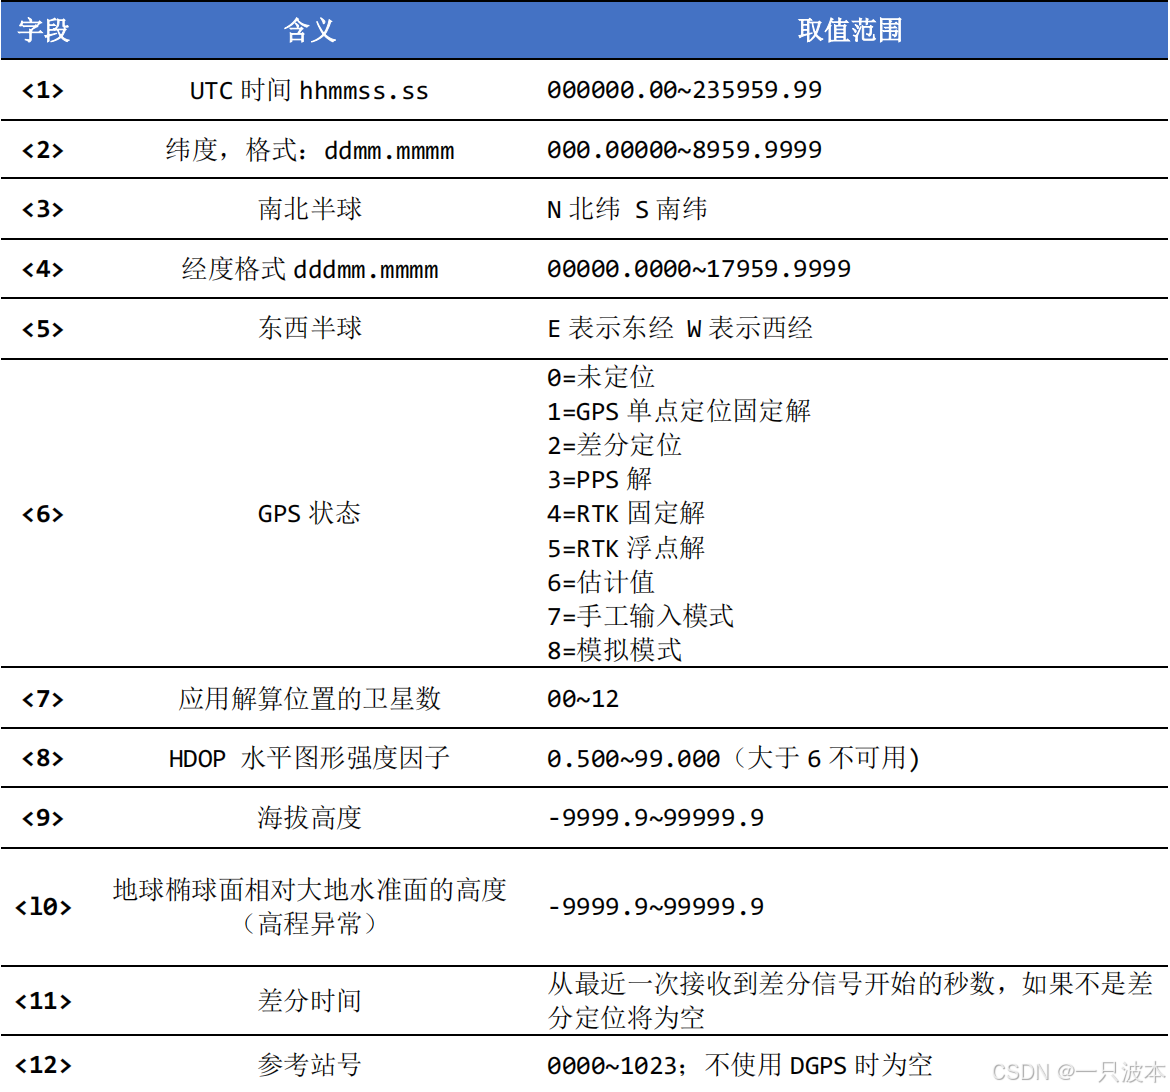
这里我们只分析$GPGGA (Global Positioning System Fix Data)即可,它包含了 GPS 定位经纬度、质量因子、HDOP、高程、参考站号等字段。其标准格式如下:
$GPGGA,<1>,<2>,<3>,<4>,<5>,<6>,<7>,<8>,<9>,M,<10>,M,<11>,<12>*hh
$XXGGA 语句各字段的含义和取值范围各字段的含义和取值范围见下表所示,XX 取值有:
◼ GPGGA:单 GPS
◼ BDGGA:单北斗
◼ GLGGA:单 GLONASS
◼ GNGGA:多星联合定位

例子:$GPGGA,074529.82,2429.6717,N,11804.6973,E,1,8,1.098,42.110,,,M,,*76。
编程:我们只需要在上面的实验代码上修改即可(修改while里面的内容即可)
c
int main(int argc, char **argv)
{
	int fd;
	int iRet;
	char c;
	char buf[1000];
	char time[100];
	char Lat[100];
	char ns[100];
	char Lng[100];
	char ew[100];

	float fLat, fLng;

	/* 1. open */

	/* 2. setup
	 * 115200,8N1
	 * RAW mode
	 * return data immediately
	 */

	/* 3. write and read */

	if (argc != 2)
	{
		printf("Usage: \n");
		printf("%s </dev/ttySAC1 or other>\n", argv[0]);
		return -1;
	}

	fd = open_port(argv[1]);
	if (fd < 0)
	{
		printf("open %s err!\n", argv[1]);
		return -1;
	}

	iRet = set_opt(fd, 9600, 8, 'N', 1);
	if (iRet)
	{
		printf("set port err!\n");
		return -1;
	}

	while (1)
	{
		/* eg. $GPGGA,082559.00,4005.22599,N,11632.58234,E,1,04,3.08,14.6,M,-5.6,M,,*76"<CR><LF>*/
		/* read line */
		iRet = read_gps_raw_data(fd, buf);

		/* parse line */
		if (iRet == 0)
		{
			iRet = parse_gps_raw_data(buf, time, Lat, ns, Lng, ew);
		}

		/* printf */
		if (iRet == 0)
		{
			printf("Time : %s\n", time);
			printf("ns   : %s\n", ns);
			printf("ew   : %s\n", ew);
			printf("Lat  : %s\n", Lat);
			printf("Lng  : %s\n", Lng);

			/* 纬度格式: ddmm.mmmm */
			sscanf(Lat+2, "%f", &fLat);
			fLat = fLat / 60;
			fLat += (Lat[0] - '0')*10 + (Lat[1] - '0');

			/* 经度格式: dddmm.mmmm */
			sscanf(Lng+3, "%f", &fLng);
			fLng = fLng / 60;
			fLng += (Lng[0] - '0')*100 + (Lng[1] - '0')*10 + (Lng[2] - '0');
			printf("Lng,Lat: %.06f,%.06f\n", fLng, fLat);
		}
	}

	return 0;
}
子函数实现:
c
int read_gps_raw_data(int fd, char *buf)
{
	int i = 0;
	int iRet;
	char c;
	int start = 0;

	while (1)
	{
		iRet = read(fd, &c, 1);
		if (iRet == 1)
		{
			if (c == '$')
				start = 1;
			if (start)
			{
				buf[i++] = c;
			}
			if (c == '\n' || c == '\r')
				return 0;
		}
		else
		{
			return -1;
		}
	}
}

/* eg. $GPGGA,082559.00,4005.22599,N,11632.58234,E,1,04,3.08,14.6,M,-5.6,M,,*76"<CR><LF> */
int parse_gps_raw_data(char *buf, char *time, char *lat, char *ns, char *lng, char *ew)
{
	char tmp[10];

	if (buf[0] != '$')
		return -1;
	else if (strncmp(buf+3, "GGA", 3) != 0)
		return -1;
	else if (strstr(buf, ",,,,,"))
	{
		printf("Place the GPS to open area\n");
		return -1;
	}
	else {
		//printf("raw data: %s\n", buf);
		sscanf(buf, "%[^,],%[^,],%[^,],%[^,],%[^,],%[^,]", tmp, time, lat, ns, lng, ew);
		return 0;
	}
}
上机实验:
板子接线(imx6ull):

编译代码:arm-buildroot-linux-gnueabihf-gcc -o gps_read gps_read.c
复制过去板子:cp gps_read ~/nfs_rootfs/
板子上运行:/mnt/gps_read /dev/ttymxc5
实验效果:


