Vue学习笔记
以下内容为黑马Springboot+Vue3中的Vue3教程部分
Vue概述
什么是Vue?
Vue 是一款用于构建用户界面 的渐进式的JavaScript框架。(官方:https://cn.vuejs.org/)
快速入门
-
准备
- 准备html页面,并引入Vue模块(官方提供)
- 创建Vue程序的应用实例
- 准备元素(div),被Vue控制
-
构建用户界面
- 准备数据
- 通过插值表达式渲染页面
vue
<!DOCTYPE html>
<html lang="en">
<head>
    <meta charset="UTF-8">
    <meta name="viewport" content="width=device-width, initial-scale=1.0">
    <title>Document</title>
</head>
<body>
    <div id="app">
        <h1>{{msg}}</h1>
    </div>


    <!-- 引入Vue模块 -->
    <script type="module">
        import {createApp} from 'https://unpkg.com/vue@3/dist/vue.esm-browser.js'
        /* 创建vue的应用实例 */
        createApp({
            data() {
                return {
                    //定义数据
                    msg: "hello vue3"
                }
            }
        }).mount("#app")
    </script>
</body>
</html>
Vue常用指令
-
指令:HTML标签上带有 v-前缀的特殊属性,不同的指令具有不同的含义,可以实现不同的功能。
-
常用指令:

v-for
- 作用:列表渲染,遍历容器的元素或者对象的属性
- 语法:
v-for = "(item, index) in items"- 参数说明:
- items 为遍历的数组
- item 为遍历出来的元素
- index 为索引/下标,从0开始;可以省略,省略index语法:
v-for = "item in items"
- 参数说明:
⭐️注意:遍历的数组,必须在data中定义;要想让哪个标签循环展示多次,就在哪个标签上使用v-for指令。
vue
<!DOCTYPE html>
<html lang="en">
<head>
    <meta charset="UTF-8" />
    <meta name="viewport" content="width=device-width, initial-scale=1.0" />
    <title>Document</title>
</head>
<body>
    <div id="app">
      <table border="1 solid" colspa="0" cellspacing="0">
        <tr>
          <th>文章标题</th>
          <th>分类</th>
          <th>发表时间</th>
          <th>状态</th>
          <th>操作</th>
        </tr>
        <!-- 将来哪个元素要出现多次,v-for指令就添加到哪个元素上 -->
        <tr v-for="(article, index) in articleList">
          <td>{{article.title}}</td>
          <td>{{article.category}}</td>
          <td>{{article.time}}</td>
          <td>{{article.state}}</td>
          <td>
            <button>编辑</button>
            <button>删除</button>
          </td>
        </tr>
      </table>
    </div>

    <script type="module">
      //导入vue模块
      import { createApp } from "https://unpkg.com/vue@3/dist/vue.esm-browser.js";
      //创建应用实例
      createApp({
        data() {
          return {
            //定义数据
            articleList: [
              {
                title: "医疗反腐绝非砍医护收入",
                category: "时事",
                time: "2023-09-5",
                state: "已发布",
              },
              {
                title: "中国男篮缘何一败涂地?",
                category: "篮球",
                time: "2023-09-5",
                state: "草稿",
              },
              {
                title: "华山景区已受大风影响阵风达7-8级,未来24小时将持续",
                category: "旅游",
                time: "2023-09-5",
                state: "已发布",
              },
            ],
          };
        },
      }).mount("#app"); //控制页面元素
    </script>
</body>
</html>
v-bind
- 作用:动态为HTMl标签绑定属性值,如设置href、src、style样式等。
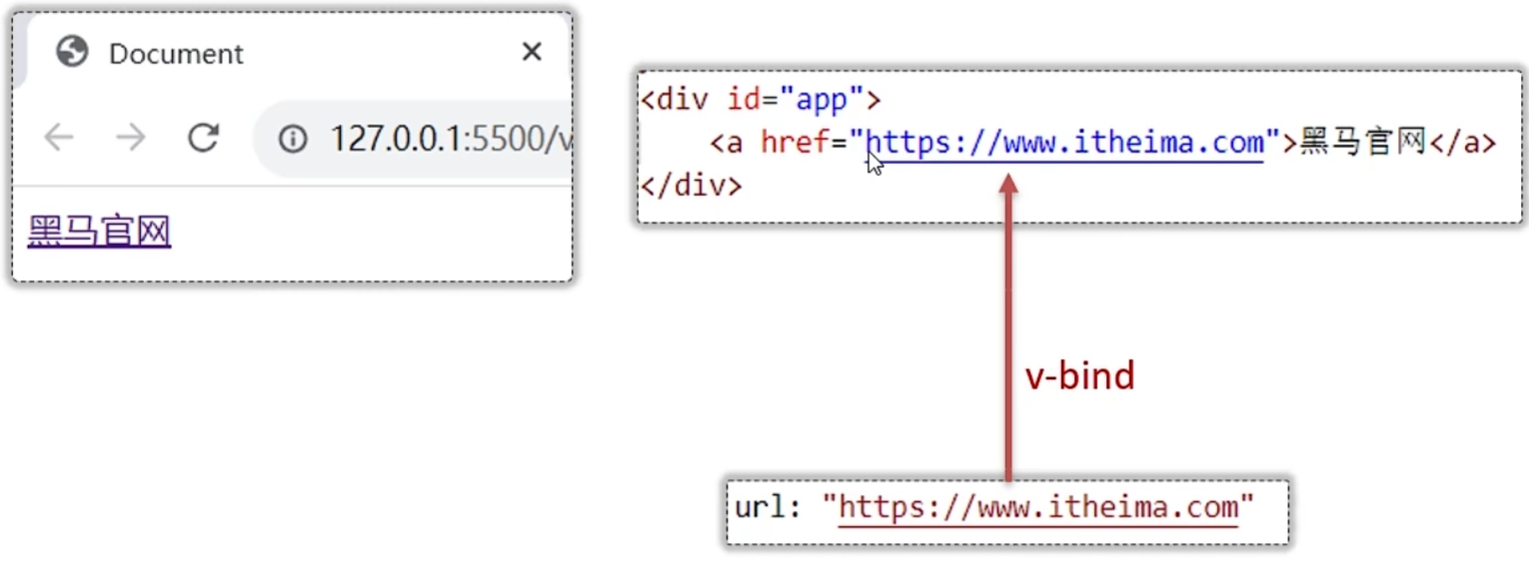
- 语法:
v-bind:属性名="属性值" - 简化:
:属性名="属性值"
vue
<!DOCTYPE html>
<html lang="en">
<head>
<meta charset="UTF-8">
<meta name="viewport" content="width=device-width, initial-scale=1.0">
<title>Document</title>
</head>
<body>
<div id="app">
<!-- <a v-bind:href="url">黑马官网</a> -->
<a :href="url">黑马官网</a>
</div>
<script type="module">
//引入vue模块
import { createApp} from
'https://unpkg.com/vue@3/dist/vue.esm-browser.js'
//创建vue应用实例
createApp({
data() {
return {
url: 'https://www.itheima.com'
}
}
}).mount("#app")//控制html元素
</script>
</body>
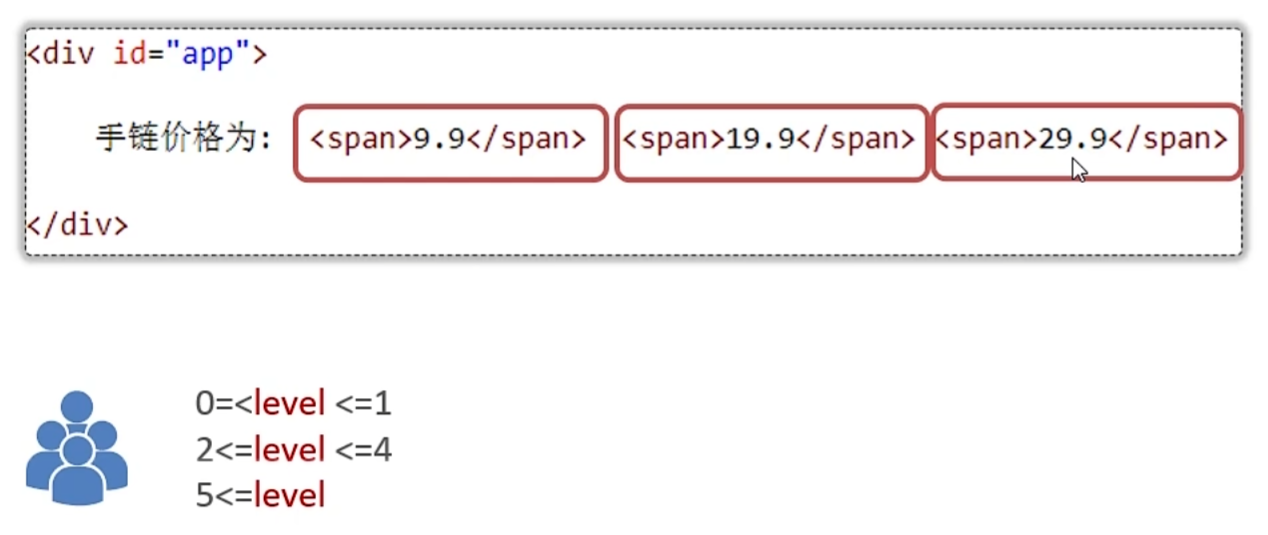
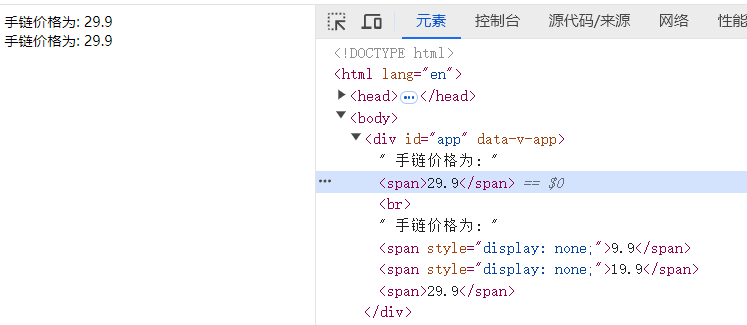
</html>v-if & v-show
- 作用:这两类指令,都是用来控制元素的显示与隐藏的。
-
v-if
- 语法:
v-if="表达式",表达式值为 true,显示;false,隐藏。 - 其他:可以配合
v-else-if/v-else进行链式调用条件判断。 - 原理:基于条件判断,来控制创建或者移除元素节点(条件渲染)。
- 场景:要么显示,要么不显示,不频繁切换的场景。
- 语法:
-
v-show
- 语法:
v-show="表达式",表达式值为 true,显示;false,隐藏。 - 原理:基于CSS样式display来控制显示与隐藏。
- 场景:频繁切换显示隐藏的场景。
- 语法:
vue
<!DOCTYPE html>
<html lang="en">

<head>
    <meta charset="UTF-8">
    <meta name="viewport" content="width=device-width, initial-scale=1.0">
    <title>Document</title>
</head>

<body>
    <div id="app">

        手链价格为:  <span v-if="customer.level >= 0 && customer.level <= 1">9.9</span>
                    <span v-else-if="customer.level >= 2 && customer.level <= 4">19.9</span>
                    <span v-else>29.9</span>
        <br>
        手链价格为:  <span v-show="customer.level >= 0 && customer.level <= 1">9.9</span>
                    <span v-show="customer.level >= 2 && customer.level <= 4">19.9</span>
                    <span v-show="customer.level >= 5">29.9</span>
    </div>

    <script type="module">
        //导入vue模块
        import { createApp} from 'https://unpkg.com/vue@3/dist/vue.esm-browser.js'

        //创建vue应用实例
        createApp({
            data() {
                return {
                    customer:{
                        name:'张三',
                        level:6
                    }
                }
            }
        }).mount("#app")//控制html元素
    </script>
</body>

</html>
v-on
- 作用:为html标签绑定事件
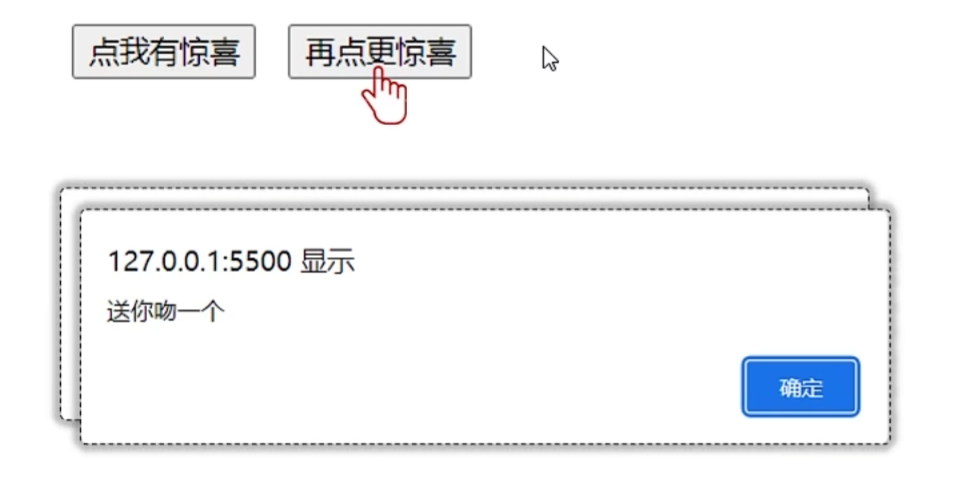
-
语法:
v-on:事件名="函数名"- 简写为
@事件名="函数名"
vuecreateApp({ data(){需要用到的数据}, methods:{需要用到的方法} })
vue
<!DOCTYPE html>
<html lang="en">
<head>
<meta charset="UTF-8">
<meta name="viewport" content="width=device-width, initial-scale=1.0">
<title>Document</title>
</head>
<body>
<div id="app">
<button v-on:click="money">点我有惊喜</button>
<button @click="love">再点更惊喜</button>
</div>
<script type="module">
//导入vue模块
import { createApp} from 'https://unpkg.com/vue@3/dist/vue.esm-browser.js'
//创建vue应用实例
createApp({
data() {
return {
//定义数据
}
},
methods: {
money: function(){
window.alert("送你一百万!")
},
love: function(){
window.alert("爱你一万年!")
}
}
}).mount("#app");//控制html元素
</script>
</body>
</html>v-model
- 作用:在表单元素上使用,双向数据绑定 。可以方便的 获取 或 设置 表单项数据
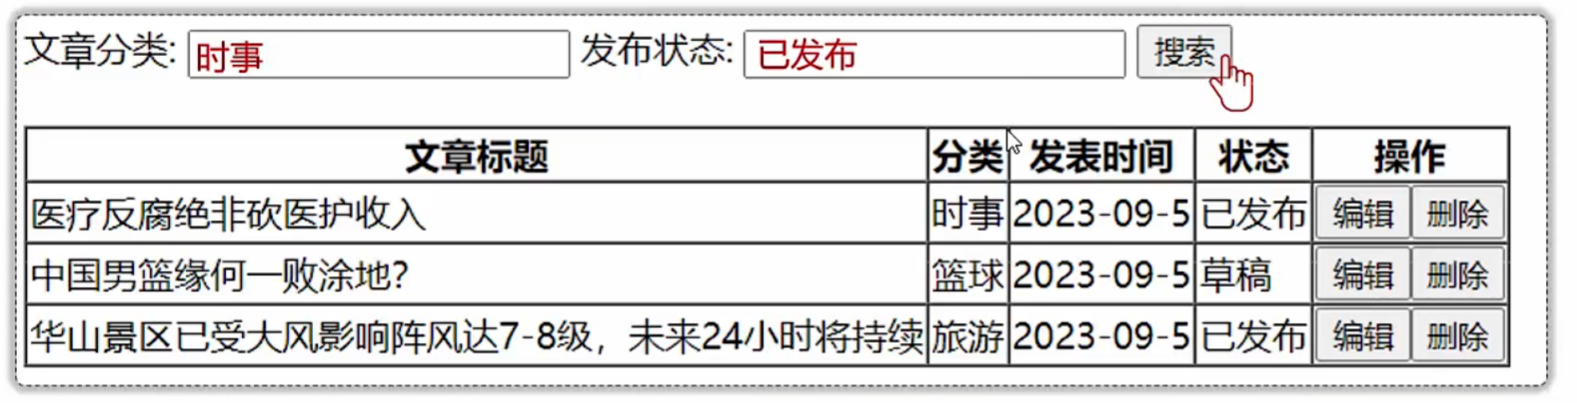
- 语法:
v-model="变量名"
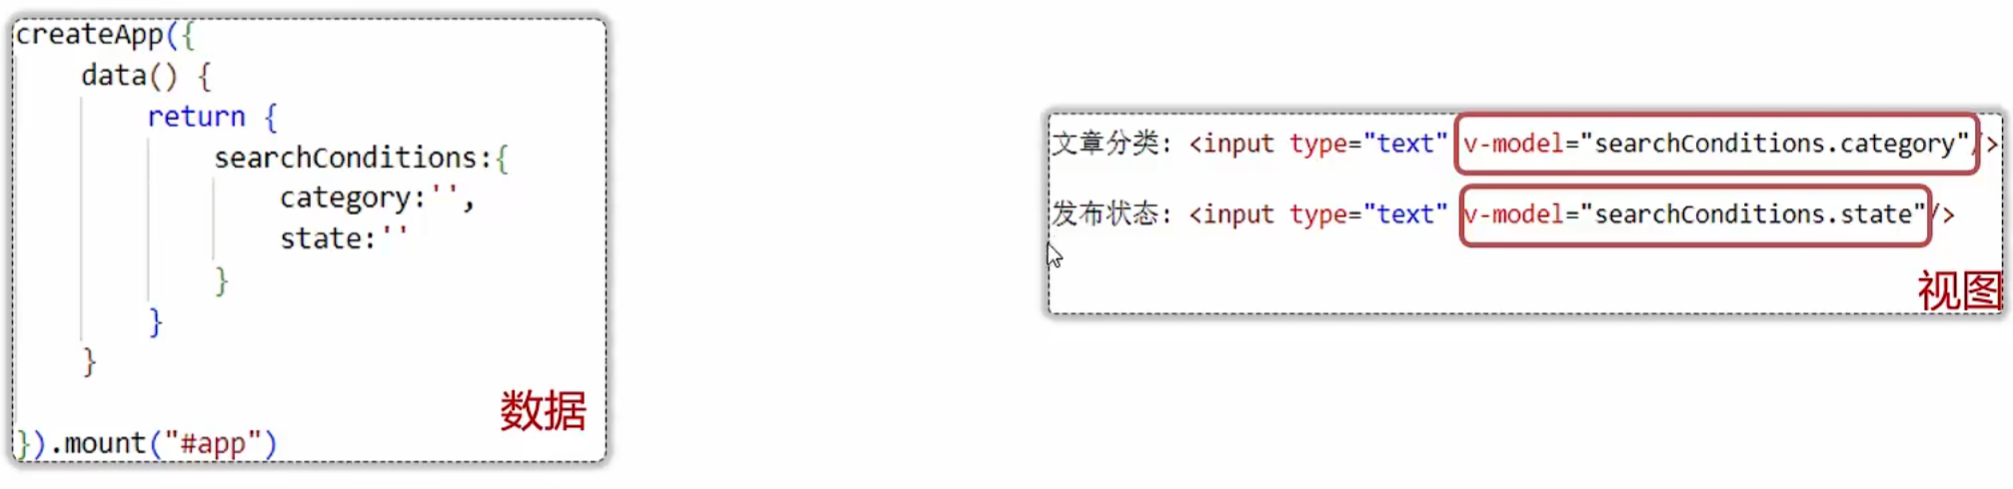
数据和视图会同时发生变化
**注意:**v-model中绑定的变量,必须在data中定义。
vue
<!DOCTYPE html>
<html lang="en">

<head>
    <meta charset="UTF-8">
    <meta name="viewport" content="width=device-width, initial-scale=1.0">
    <title>Document</title>
</head>

<body>
    <div id="app">

        文章分类: <input type="text" v-model="searchConditions.category"/> <span>{{searchConditions.category}}</span>

        发布状态: <input type="text" v-model="searchConditions.state"/> <span>{{searchConditions.state}}</span>

        <button>搜索</button>
        <button v-on:click="clear">重置</button>

        <br />
        <br />
        <table border="1 solid" colspa="0" cellspacing="0">
            <tr>
                <th>文章标题</th>
                <th>分类</th>
                <th>发表时间</th>
                <th>状态</th>
                <th>操作</th>
            </tr>
            <tr v-for="(article,index) in articleList">
                <td>{{article.title}}</td>
                <td>{{article.category}}</td>
                <td>{{article.time}}</td>
                <td>{{article.state}}</td>
                <td>
                    <button>编辑</button>
                    <button>删除</button>
                </td>
            </tr>
        </table>
    </div>
    <script type="module">
        //导入vue模块
        import { createApp } from 'https://unpkg.com/vue@3/dist/vue.esm-browser.js'
        //创建vue应用实例
        createApp({
            data() {
                return {
                    //定义数据
                    searchConditions:{
                        category:'',
                        state:''
                    },
                    articleList: [{
                        title: "医疗反腐绝非砍医护收入",
                        category: "时事",
                        time: "2023-09-5",
                        state: "已发布"
                    },
                    {
                        title: "中国男篮缘何一败涂地?",
                        category: "篮球",
                        time: "2023-09-5",
                        state: "草稿"
                    },
                    {
                        title: "华山景区已受大风影响阵风达7-8级,未来24小时将持续",
                        category: "旅游",
                        time: "2023-09-5",
                        state: "已发布"
                    }]
                }
            },
            methods: {
                clear: function(){
                    //清空category以及state数据
                    //在method对应的方法里面,使用this就代表的是vue实例,可以使用this获取到vue实例中准备的数据
                    this.searchConditions.category='';
                    this.searchConditions.state='';
                }
            },
        }).mount("#app")//控制html元素
    </script>
</body>

</html>
vue生命周期
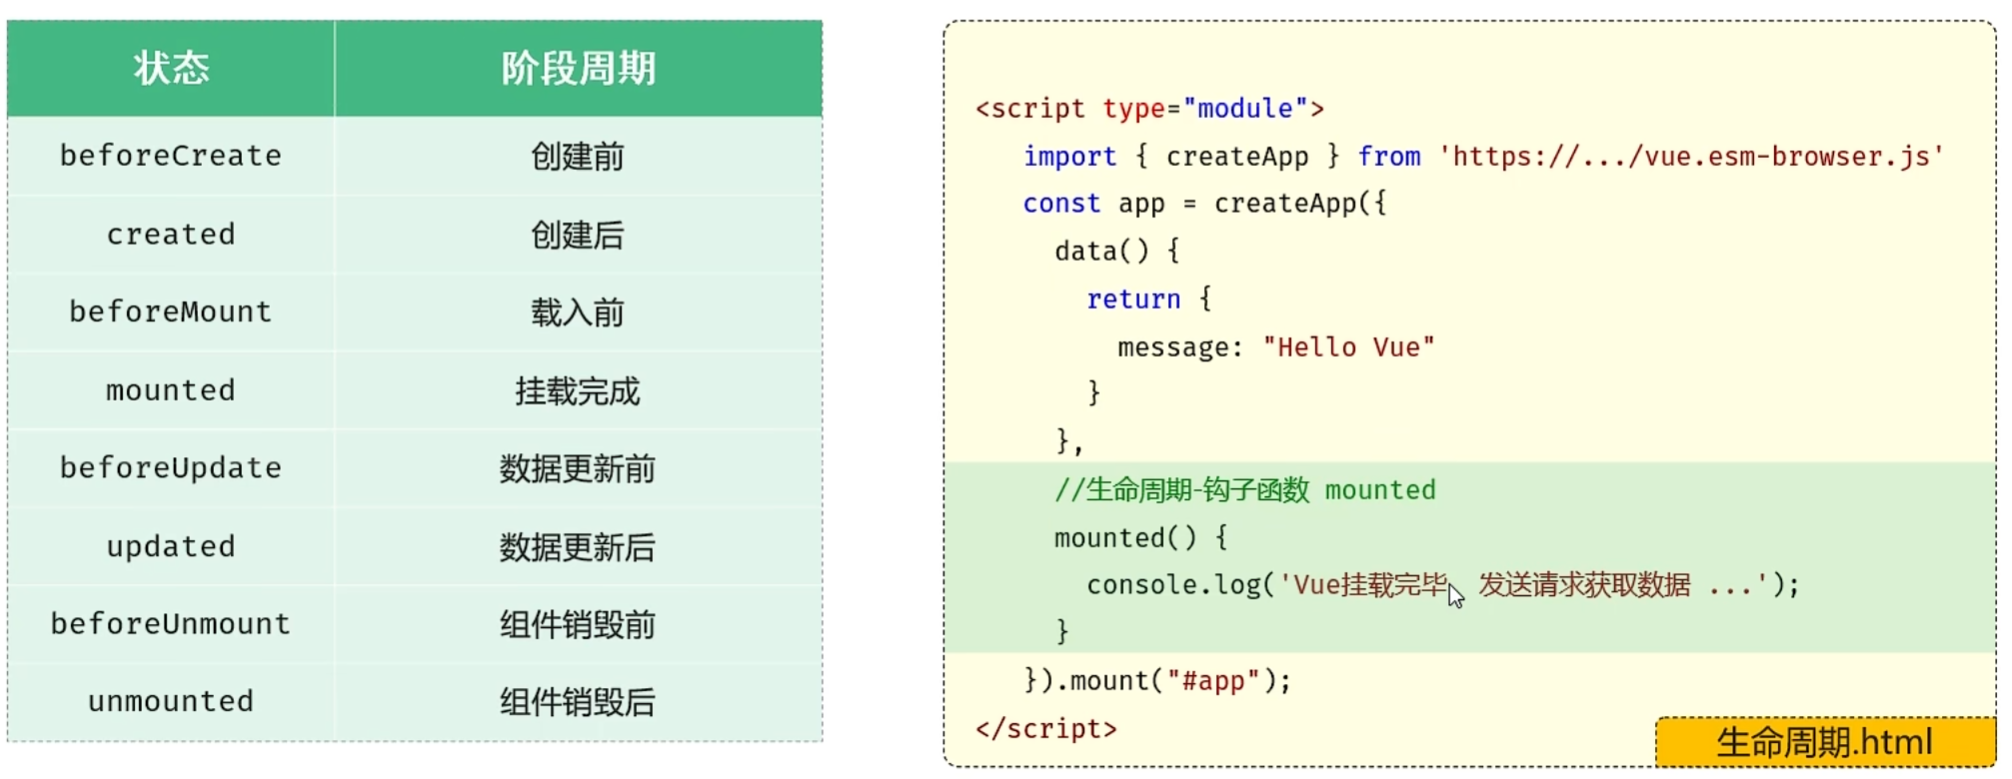
- 生命周期:指一个对象从创建到销毁的整个过程
- 生命周期的八个阶段:每个阶段会自动执行一个生命周期方法(钩子函数),让开发者有机会在特定的阶段执行自己的代码
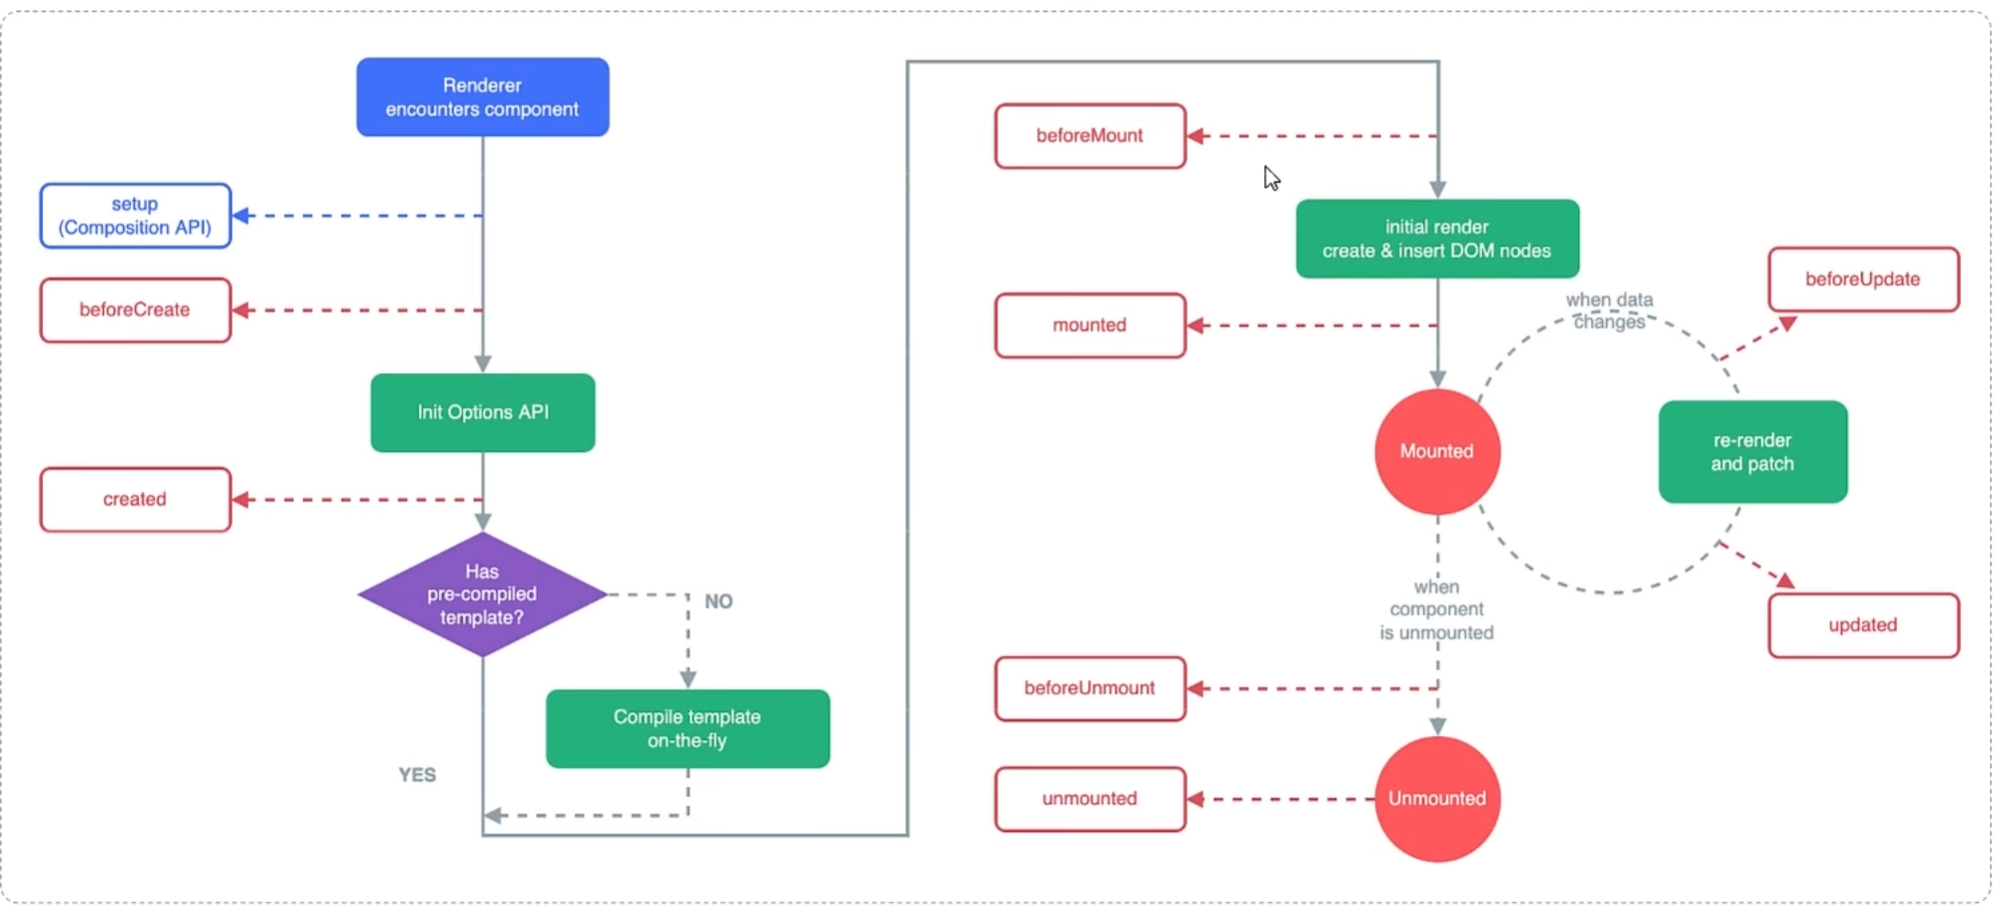
应用场景:
- 在页面加载完毕时,发起异步请求,加载数据,渲染页面。
vue
<!DOCTYPE html>
<html lang="en">

<head>
    <meta charset="UTF-8">
    <meta name="viewport" content="width=device-width, initial-scale=1.0">
    <title>Document</title>
</head>

<body>
    <div id="app">

        文章分类: <input type="text" v-model="searchConditions.category"/> <span>{{searchConditions.category}}</span>

        发布状态: <input type="text" v-model="searchConditions.state"/> <span>{{searchConditions.state}}</span>

        <button>搜索</button>
        <button v-on:click="clear">重置</button>

        <br />
        <br />
        <table border="1 solid" colspa="0" cellspacing="0">
            <tr>
                <th>文章标题</th>
                <th>分类</th>
                <th>发表时间</th>
                <th>状态</th>
                <th>操作</th>
            </tr>
            <tr v-for="(article,index) in articleList">
                <td>{{article.title}}</td>
                <td>{{article.category}}</td>
                <td>{{article.time}}</td>
                <td>{{article.state}}</td>
                <td>
                    <button>编辑</button>
                    <button>删除</button>
                </td>
            </tr>
        </table>
    </div>
    <script type="module">
        //导入vue模块
        import { createApp } from 'https://unpkg.com/vue@3/dist/vue.esm-browser.js'
        //创建vue应用实例
        createApp({
            data() {
                return {
                    //定义数据
                    searchConditions:{
                        category:'',
                        state:''
                    },
                    articleList: [{
                        title: "医疗反腐绝非砍医护收入",
                        category: "时事",
                        time: "2023-09-5",
                        state: "已发布"
                    },
                    {
                        title: "中国男篮缘何一败涂地?",
                        category: "篮球",
                        time: "2023-09-5",
                        state: "草稿"
                    },
                    {
                        title: "华山景区已受大风影响阵风达7-8级,未来24小时将持续",
                        category: "旅游",
                        time: "2023-09-5",
                        state: "已发布"
                    }]
                }
            },
            methods: {
                clear: function(){
                    //清空category以及state数据
                    //在method对应的方法里面,使用this就代表的是vue实例,可以使用this获取到vue实例中准备的数据
                    this.searchConditions.category='';
                    this.searchConditions.state='';
                }
            },
            mounted() {
                console.log('Vue挂载完毕,发送请求获取数据...')
            },
        }).mount("#app")//控制html元素
    </script>
</body>

</html>
Axios
- 介绍:Axios 对原生的Ajax进行了封装,简化书写,快速开发。
- 官网:https://www.axios-http.cn/
Axios使用步骤
-
引入Axios的js文件(参照官网)
-
使用Axios发送请求,并获取相应结果
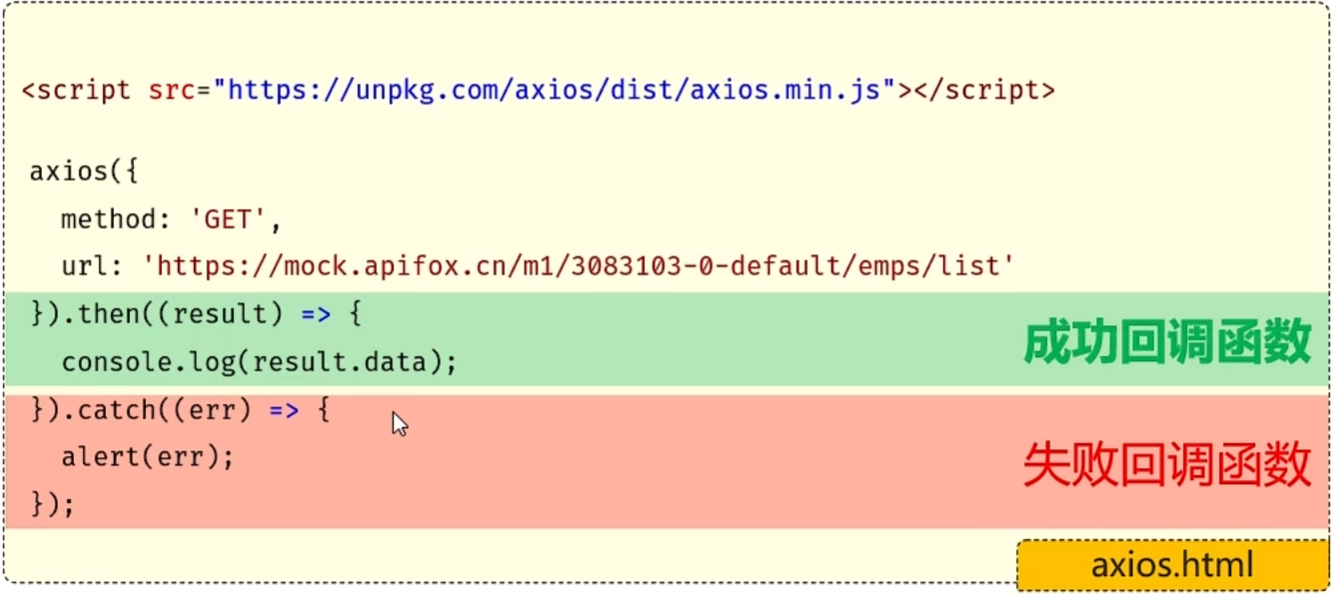
method:请求方式,GET/POST...
url:请求路径(必须指定)
data:请求数据
vue
<!DOCTYPE html>
<html lang="en">
<head>
    <meta charset="UTF-8">
    <meta name="viewport" content="width=device-width, initial-scale=1.0">
    <title>Document</title>
</head>
<body>
    <!-- 引入axios的js文件 -->
    <script src="https://unpkg.com/axios/dist/axios.min.js"></script>
    <script>
        /* 发送请求 */
        /* axios({
            method:'get',
            url:'http://localhost:8080/article/getAll'
        }).then(result => {
            //成功的回调
            //result代表服务器响应的所有的数据,包含了响应头、响应体,result.data 代表的是接口响应的核心数据
            console.log(result.data);
        }).catch(err => {
            //失败的回调
            console.log(err);
        }) */
        let article={
            title:'明天会更好',
            category:'生活',
            time:'2000-01-01',
            status:'草稿'
        }
        axios({
            method:'post',
            url:'http://localhost:8080/article/add',
            data:article
        }).then(result => {
            //成功的回调
            //result代表服务器响应的所有的数据,包含了响应头、响应体,result.data 代表的是接口响应的核心数据
            console.log(result.data);
        }).catch(err => {
            //失败的回调
            console.log(err);
        })
    </script>
</body>
</html>
Axios-请求方式别名(推荐)
-
为了方便起见,Axios已经为所有支持的请求方法提供了别名
-
格式:
axios.请求方式(url [, data [, config]]) -
GET:
vueaxios.get(url).then(res => {...}).catch(err => {}); -
POST:
vueaxios.post(url, data).then(res => {...}).catch(err => {});


vue
<!DOCTYPE html>
<html lang="en">
<head>
    <meta charset="UTF-8">
    <meta name="viewport" content="width=device-width, initial-scale=1.0">
    <title>Document</title>
</head>
<body>
    <!-- 引入axios的js文件 -->
    <script src="https://unpkg.com/axios/dist/axios.min.js"></script>
    <script>
        /* 发送请求 */
        /* axios({
            method:'get',
            url:'http://localhost:8080/article/getAll'
        }).then(result => {
            //成功的回调
            //result代表服务器响应的所有的数据,包含了响应头、响应体,result.data 代表的是接口响应的核心数据
            console.log(result.data);
        }).catch(err => {
            //失败的回调
            console.log(err);
        }) */
        let article={
            title:'明天会更好',
            category:'生活',
            time:'2000-01-01',
            status:'草稿'
        }
        /* axios({
            method:'post',
            url:'http://localhost:8080/article/add',
            data:article
        }).then(result => {
            //成功的回调
            //result代表服务器响应的所有的数据,包含了响应头、响应体,result.data 代表的是接口响应的核心数据
            console.log(result.data);
        }).catch(err => {
            //失败的回调
            console.log(err);
        }) */

        //别名的方式发送请求
        /* axios.get("http://localhost:8080/article/getAll").then(result => {
            console.log(result.data);
        }).catch(err => {
            console.log(err);
        }); */
        axios.post('http://localhost:8080/article/add', article).then(res => {
            console.log(res.data);
        }).catch(err => {
            console.log(err);
        });
    </script>
</body>
</html>
案例
使用表格展示所有文章的数据,并完成条件搜索功能
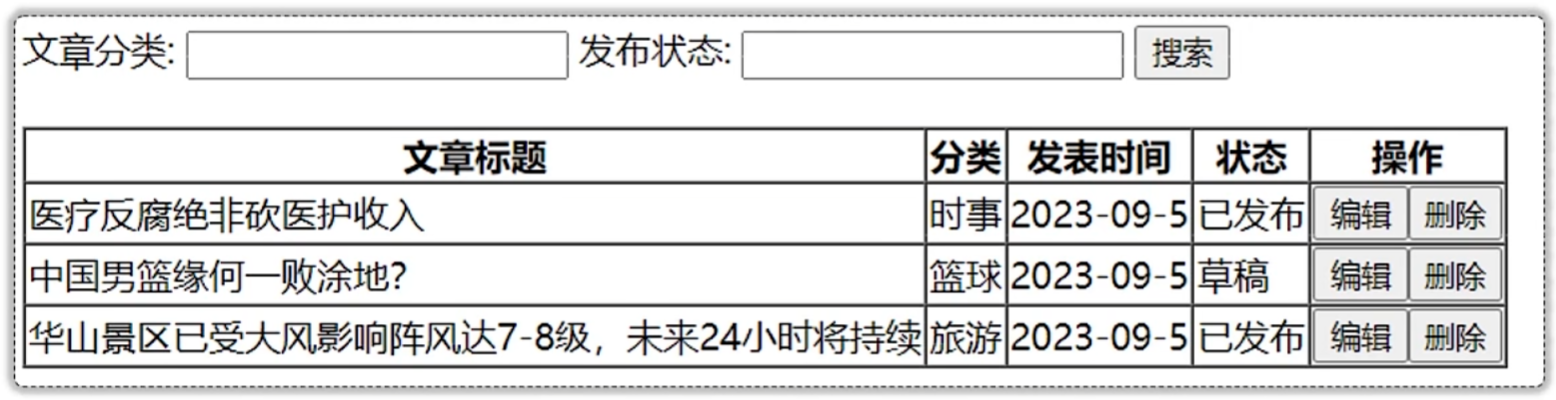
- 钩子函数mounted中,获取所有的文章数据
- 使用v-for指令,把数据渲染到表格上展示
- 使用v-model指令完成表单数据的双向绑定
- 使用v-on指令为搜索按钮绑定单击事件
vue
<!DOCTYPE html>
<html lang="en">
<head>
    <meta charset="UTF-8">
    <meta name="viewport" content="width=device-width, initial-scale=1.0">
    <title>Document</title>
</head>
<body>
    <div id="app">

        文章分类: <input type="text" v-model="searchConditions.category">

        发布状态: <input type="text" v-model="searchConditions.state">

        <button v-on:click="search">搜索</button>

        <br />
        <br />
        <table border="1 solid" colspa="0" cellspacing="0">
            <tr>
                <th>文章标题</th>
                <th>分类</th>
                <th>发表时间</th>
                <th>状态</th>
                <th>操作</th>
            </tr>
            <tr v-for="(article, index) in articleList">
                <td>{{article.title}}</td>
                <td>{{article.category}}</td>
                <td>{{article.time}}</td>
                <td>{{state}}</td>
                <td>
                    <button>编辑</button>
                    <button>删除</button>
                </td>
            </tr>
        </table>
    </div>
    <!-- 导入axios的js文件 -->
    <script src="https://unpkg.com/axios/dist/axios.min.js"></script>
    <script type="module">
        //导入vue模块
        import { createApp } from 'https://unpkg.com/vue@3/dist/vue.esm-browser.js';
        //创建Vue应用实例
        createApp({
            data(){
                return {
                    articleList:[],
                    searchConditions:{
                        category:'',
                        state:''
                    }
                }
            },
            methods: {
                search:function(){
                    //发送请求,完成搜索,携带搜索条件
                    axios.get('http://localhost:8080/article/search?category=' + this.searchConditions.category + '&state=' + this.searchConditions.state)
                    .then(res => {
                        //把得到的数据赋值给articleList
                        this.articleList = res.data;
                    }).catch(err => {
                        console.log(err);
                    });
                }
            },
            //钩子函数mounted中获取所有文章数据
            mounted:function(){
                //发送异步请求  axios
                axios.get('http://localhost:8080/article/getAll').then(res => {
                    //console.log(res.data)
                    this.articleList = res.data;
                }).catch(err => {
                    console.log(err);
                });
            }
        }).mount('#app');//控制html元素
    </script>
</body>
</html>
整站使用Vue(工程化)
环境准备
-
介绍:create-vue是Vue官方提供的最新的脚手架工具,用于快速生成一个工程化的Vue项目
-
create-vue提供了如下功能:
- 统一的目录结构
- 本地调试
- 热部署
- 单元测试
- 集成打包
-
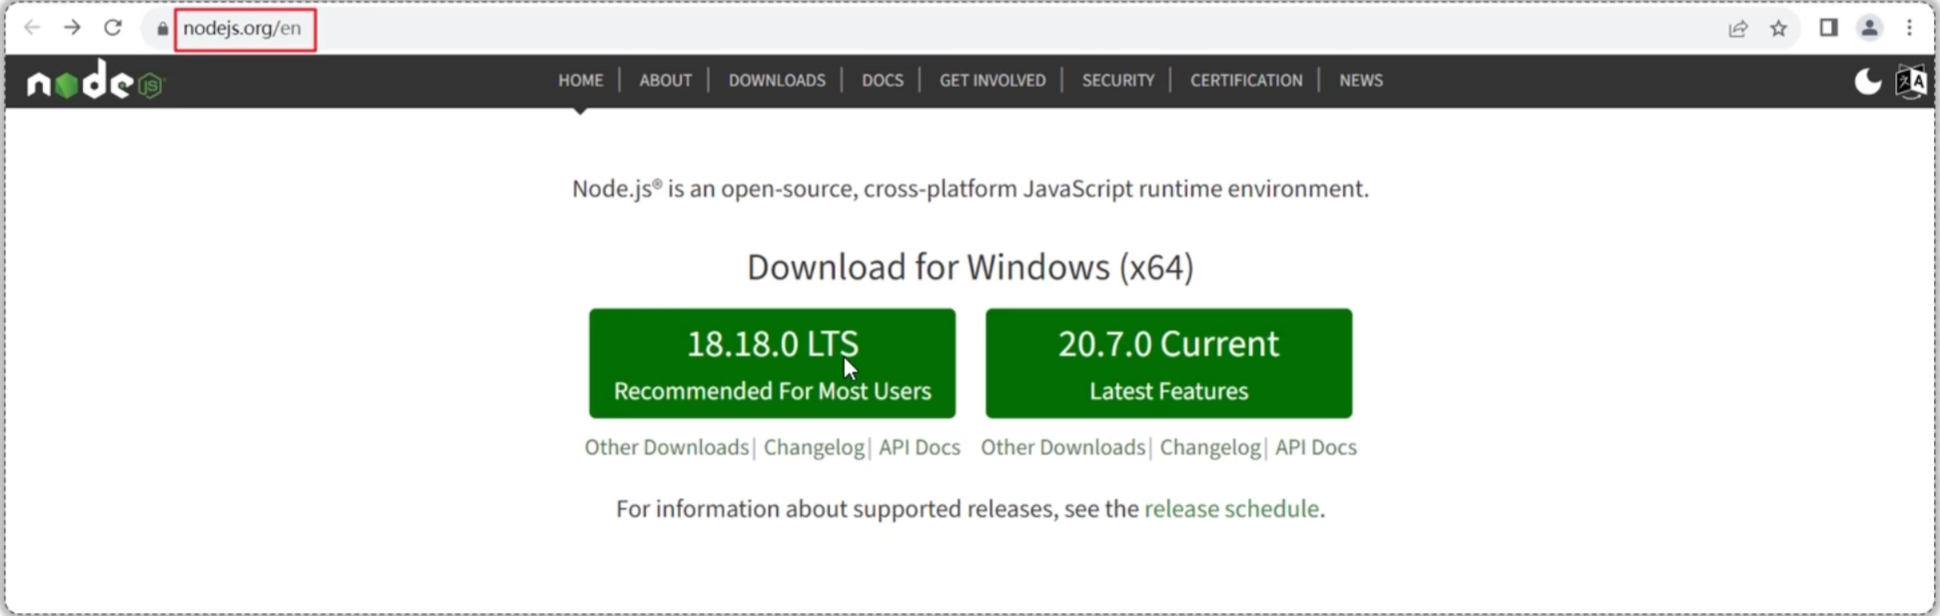
依赖环境:NodeJS
-
安装NodeJS
环境准备
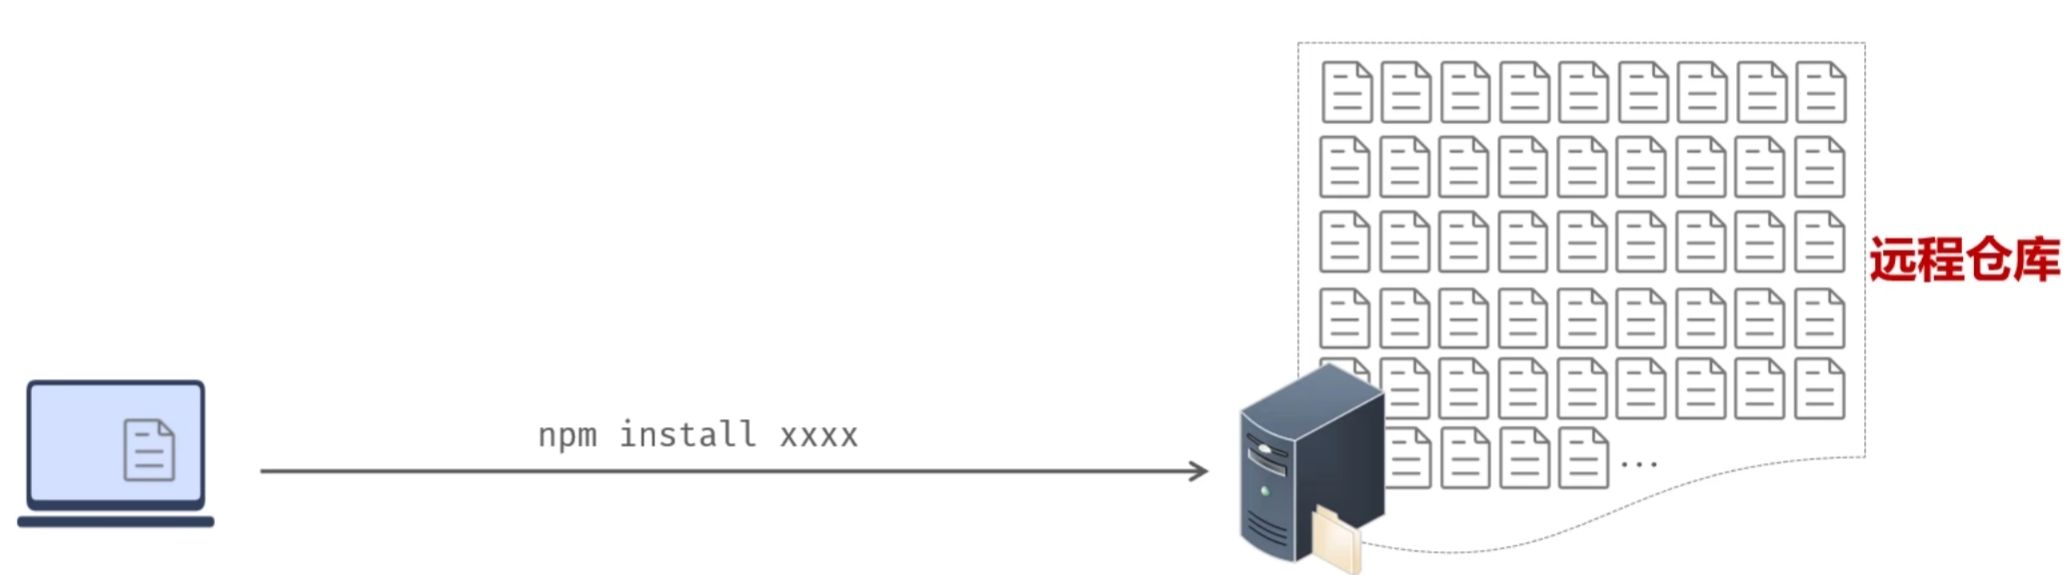
- npm:Node Package Manager,是NodeJS的软件包管理器。
Vue项目创建和启动
Vue项目-创建
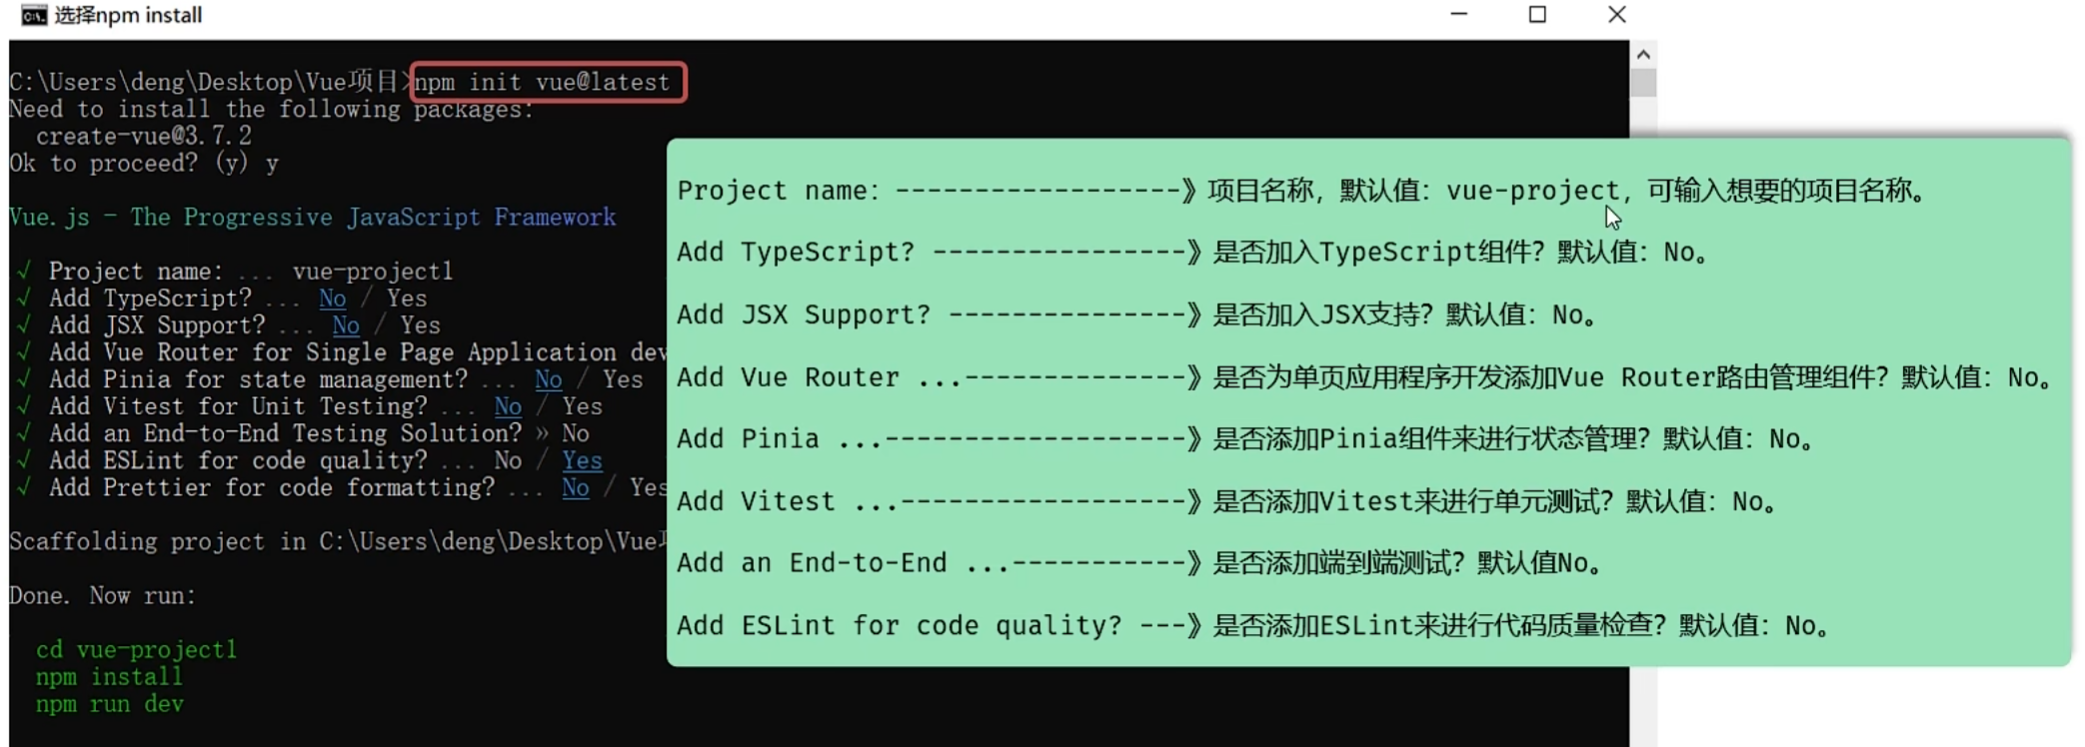
- 创建一个工程化的Vue项目,执行命令:
npm init vue@latest,执行上述命令,将会安装并执行 create-vue,它是Vue官方的项目脚手架工具。
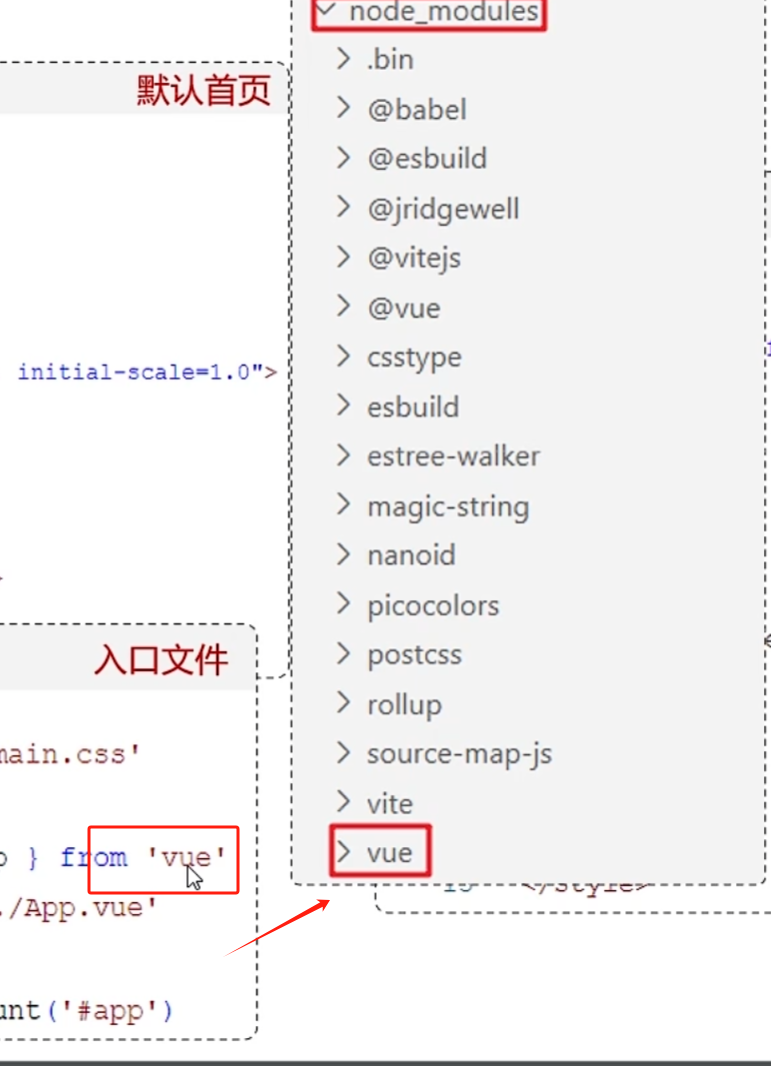
Vue项目-安装依赖
-
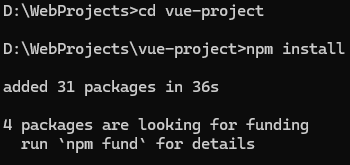
进入项目目录,执行命令安装当前项目的依赖:
npm intsall创建项目及安装依赖的过程,都是需要联网的。

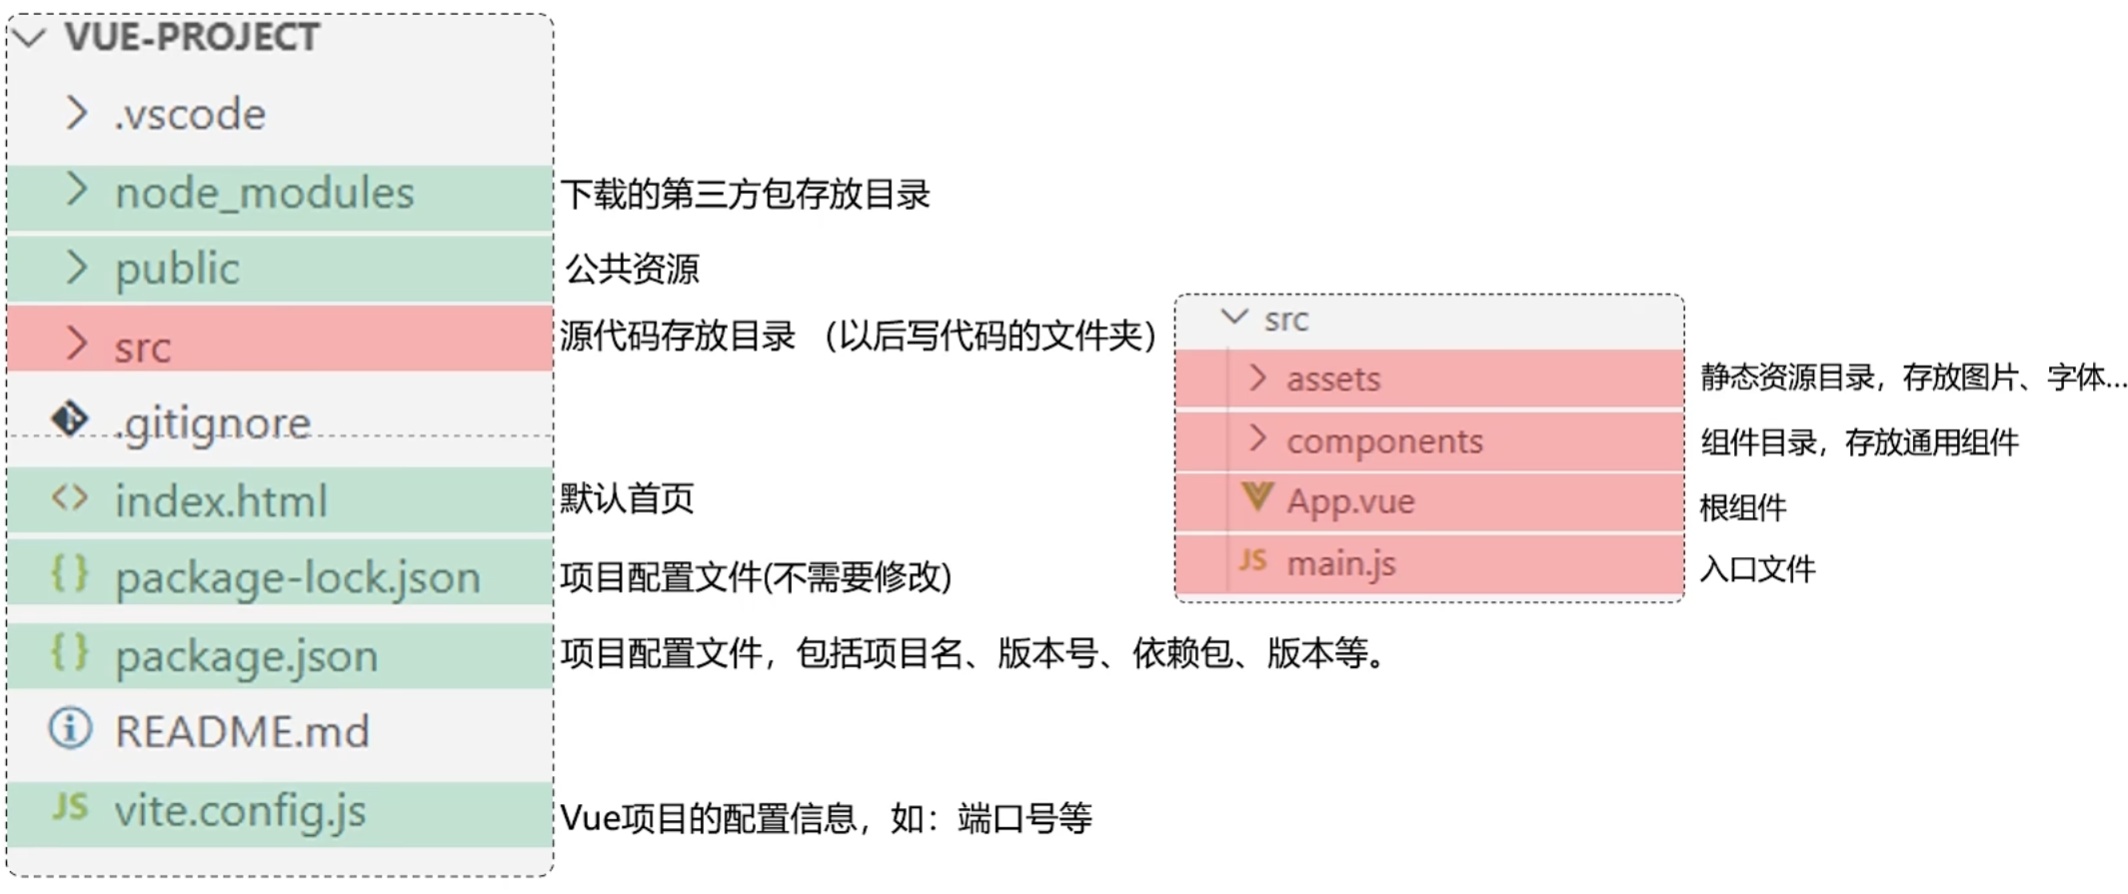
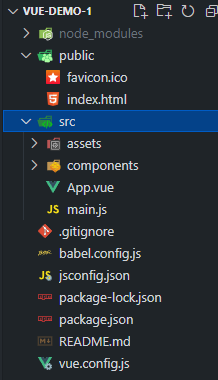
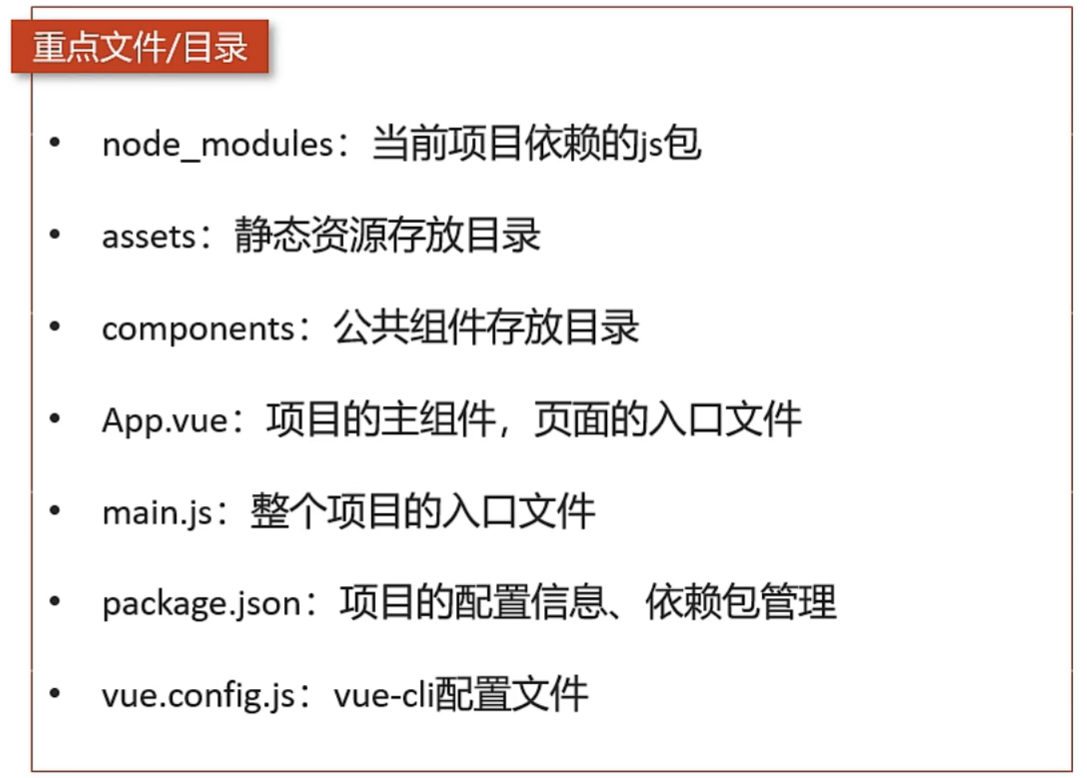
Vue项目-目录结构
Vue项目-启动
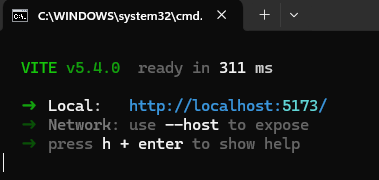
- 命令行执行命令:
npm run dev,就可以启动vue项目了。
-
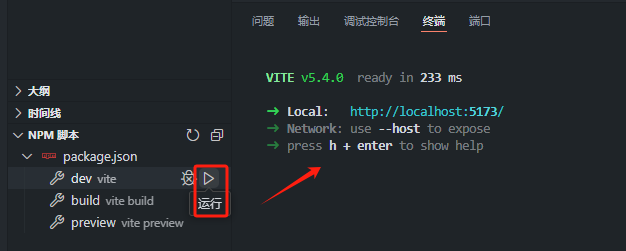
VScode可视化启动项目:
若爆红,查询这篇博客:http://t.csdnimg.cn/3pJ8n
-
访问项目:打开浏览器,在浏览器地址栏访问http://127.0.0.1:5173/就可以访问到vue项目了
Vue项目开发流程
vue
<!-- <script>
  //写数据
  export default{
    data(){
      return {
        msg:'上海'
      }
    }
  }
</script> -->

<script setup>
  import {ref} from 'vue';
  //调用ref函数,定义响应式数据
  const msg = ref('西安')
</script>

<template>
  <!-- html -->
  <!-- <h1>北京</h1> -->
  <h1>{{ msg }}</h1>
</template>

<style scoped>
  /* 样式 */
  h1{
    color:red;
  }
</style>
API风格
- Vue的组件有两种不同的风格:组合式API(推荐)和选项式API
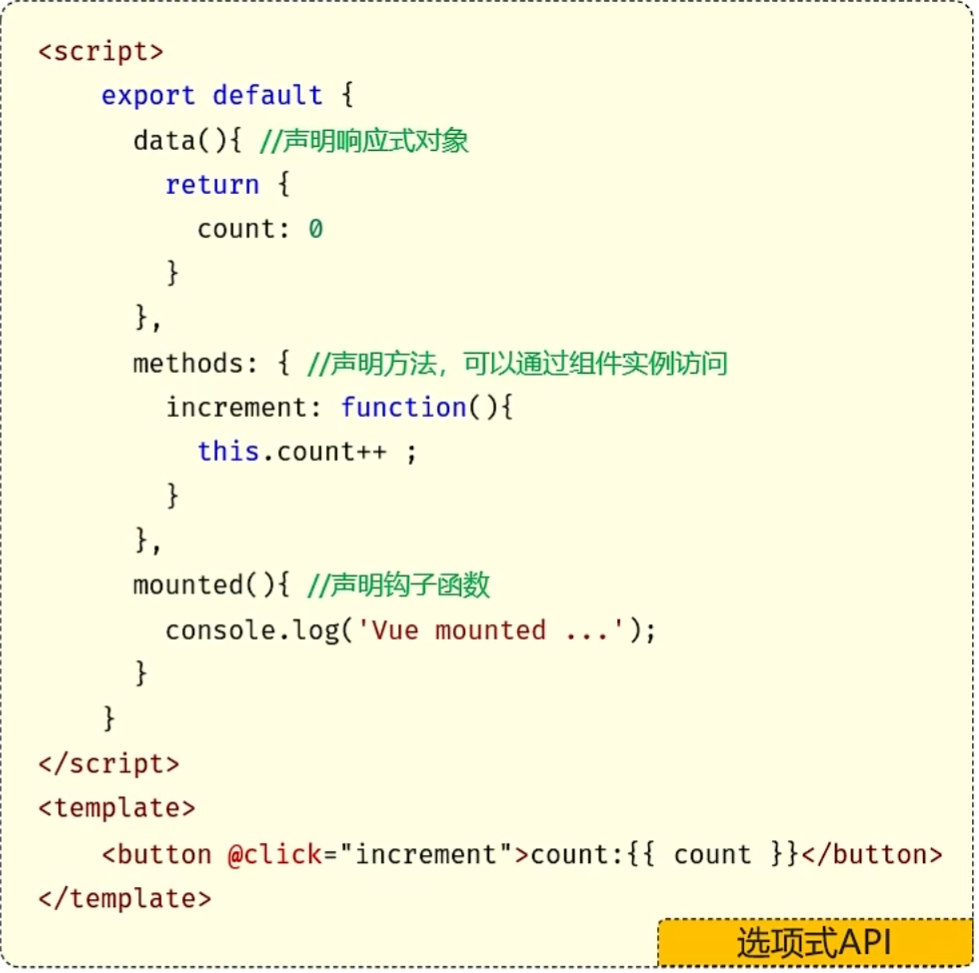
选项式API,可以用包含多个选项的对象来描述组件的逻辑,如:data、methods、mounted等
组合式API
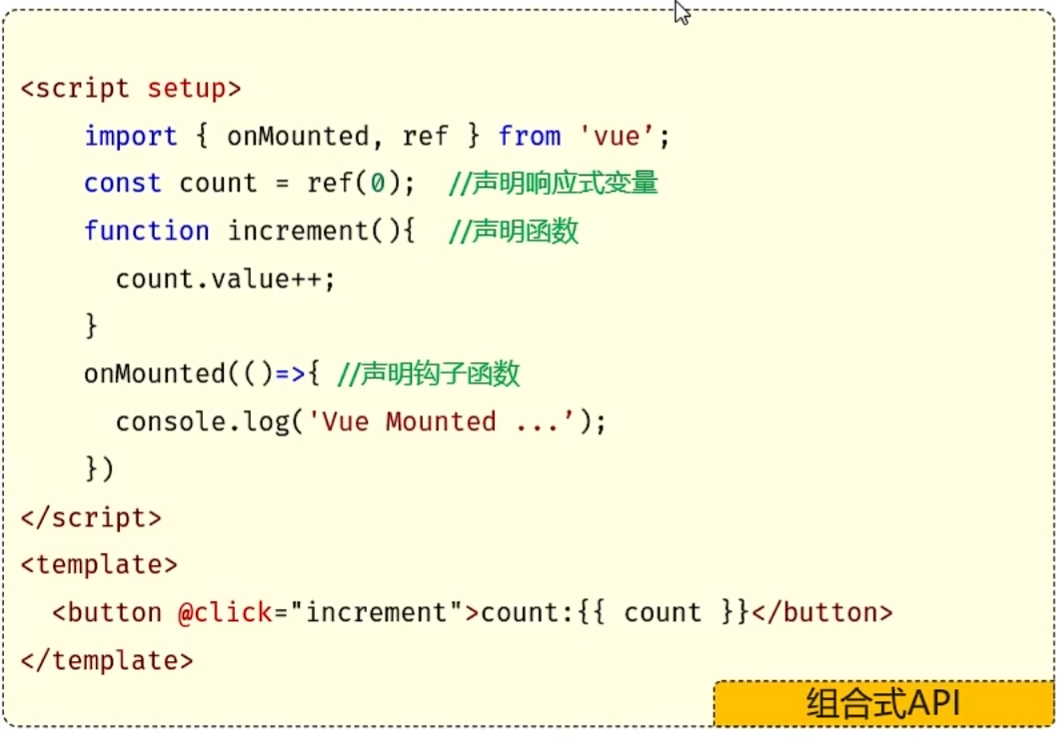
- setup:是一个标识,告诉Vue需要进行一些处理,让我们可以更简洁的使用组合式API。
- ref():接收一个内部值,返回一个响应式的ref对象,此对象只有一个指向内部值的属性 value。
- onMounted():在组合式API中的钩子方法,注册一个回调函数,在组件挂载完成后执行。
APP.vue
vue
<!-- <script>
  //写数据
  export default{
    data(){
      return {
        msg:'上海'
      }
    }
  }
</script> -->

<script setup>
  import {ref} from 'vue';
  //调用ref函数,定义响应式数据
  const msg = ref('西安')

  //导入Api.vue文件
  import ApiVue from './Api.vue'
</script>

<template>
  <!-- html -->
  <!-- <h1>北京</h1> -->
  <h1>{{ msg }}</h1>
  <br>
  <ApiVue/>
</template>

<style scoped>
  /* 样式 */
  h1{
    color:red;
  }
</style>
Api.vue
vue
<script setup>
    import {onMounted, ref} from 'vue'
    //声明响应式数据 ref 响应式对象有一个内部的属性value
    const count = ref(0); //在组合式api中,一般需要把数据定义为响应式数据

    //声明函数
    function increment(){
        count.value++;
    }

    //声明钩子函数 onMounted
    onMounted(() => {
        console.log('vue 已经挂载完毕了...')
    })
</script>

<template>
    <!-- html元素 -->
    <button @click="increment">count:{{ count }}</button>
</template>

<style>

</style>
案例
使用表格展示所有文章的数据,并完成条件搜索功能

- 钩子函数mounted中,获取所有的文章数据
- 使用v-for指令,把数据渲染到表格上展示
- 使用v-model指令完成表单数据的双向绑定
- 使用v-on指令为搜索按钮绑定单击事件
vue
<script setup>
//导入axios npm install axios
import axios from 'axios';
import { ref } from 'vue';
//定义响应式数据 ref
const articleList = ref([])

//发送异步请求,获取所有文章数据
axios.get('http://localhost:8080/article/getAll')
    .then(result => {
        //把服务器响应的数据保存起来
        articleList.value = result.data;
    }).catch(err => {
        console.log(err);

    });

    //定义响应式数据 searchConditions
    const searchConditions = ref({
        category:'',
        state:''
    })

    //声明search函数
    const search = function(){
        //发送请求,完成搜索
        axios.get('http://localhost:8080/article/search', {params:{...searchConditions.value}})
        .then(result => {
            articleList.value = result.data
        })
        .catch(err => {
            console.log(err);
        })
    }
</script>

<template>
    <!-- html元素 -->
    <div>

        文章分类: <input type="text" v-model="searchConditions.category">

        发布状态: <input type="text" v-model="searchConditions.state">

        <button v-on:click="search">搜索</button>

        <br />
        <br />
        <table border="1 solid" colspa="0" cellspacing="0">
            <tr>
                <th>文章标题</th>
                <th>分类</th>
                <th>发表时间</th>
                <th>状态</th>
                <th>操作</th>
            </tr>
            <tr v-for="(article, index) in articleList">
                <td>{{ article.title }}</td>
                <td>{{ article.category }}</td>
                <td>{{ article.time }}</td>
                <td>{{ article.state }}</td>
                <td>
                    <button>编辑</button>
                    <button>删除</button>
                </td>
            </tr>
        </table>
    </div>

</template>
接口调用的js代码一般会封装到.js文件中,并且以函数的形式暴露给外部
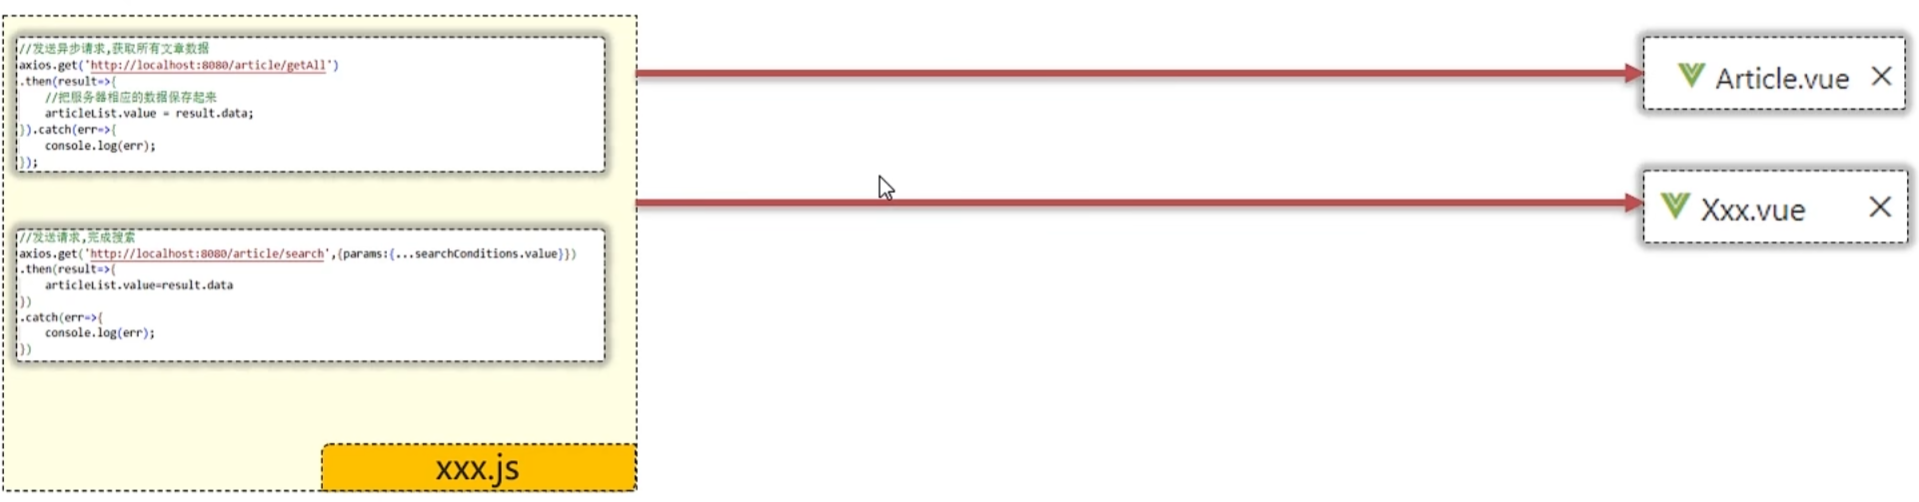
优化后的代码:
首先在src目录下创建api文件夹,然后创建js文件
article.js
js
//导入axios npm install axios
import axios from "axios";

//获取所有文章数据的函数

export async function articleGetAllService() {
  //发送异步请求,获取所有文章数据
  //同步等待服务器响应的结果,并返回 async await
  return await axios
    .get("http://localhost:8080/article/getAll")
    .then((result) => {
      return result.data;
    })
    .catch((err) => {
      console.log(err);
    });
}

//根据文章分类和发布状态搜索的函数
export async function articleSearchService(conditions) {
  //发送请求,完成搜索
  return await axios
    .get("http://localhost:8080/article/search", {
      params: conditions,
    })
    .then((result) => {
      return result.data;
    })
    .catch((err) => {
      console.log(err);
    });
}
Article.vue
vue
<script setup>
import { articleGetAllService, articleSearchService } from '@/api/article.js';
import { ref } from 'vue';
//定义响应式数据 ref
const articleList = ref([])

//获取所有文章数据
//同步获取articleGetAllService的返回结果 async await
const getAllArticle = async function () {
    let data = await articleGetAllService();
    articleList.value = data;
}

getAllArticle();


//定义响应式数据 searchConditions
const searchConditions = ref({
    category: '',
    state: ''
})

//声明search函数
const search = async function () {
    //文章搜索
    let data = await articleSearchService({ ...searchConditions.value });
    articleList.value = data;
}
</script>

<template>
    <!-- html元素 -->
    <div>

        文章分类: <input type="text" v-model="searchConditions.category">

        发布状态: <input type="text" v-model="searchConditions.state">

        <button v-on:click="search">搜索</button>

        <br />
        <br />
        <table border="1 solid" colspa="0" cellspacing="0">
            <tr>
                <th>文章标题</th>
                <th>分类</th>
                <th>发表时间</th>
                <th>状态</th>
                <th>操作</th>
            </tr>
            <tr v-for="(article, index) in articleList">
                <td>{{ article.title }}</td>
                <td>{{ article.category }}</td>
                <td>{{ article.time }}</td>
                <td>{{ article.state }}</td>
                <td>
                    <button>编辑</button>
                    <button>删除</button>
                </td>
            </tr>
        </table>
    </div>

</template>**注意:**使用```async``...await 同步接受网路请求的结果
继续优化代码... -> 优化url
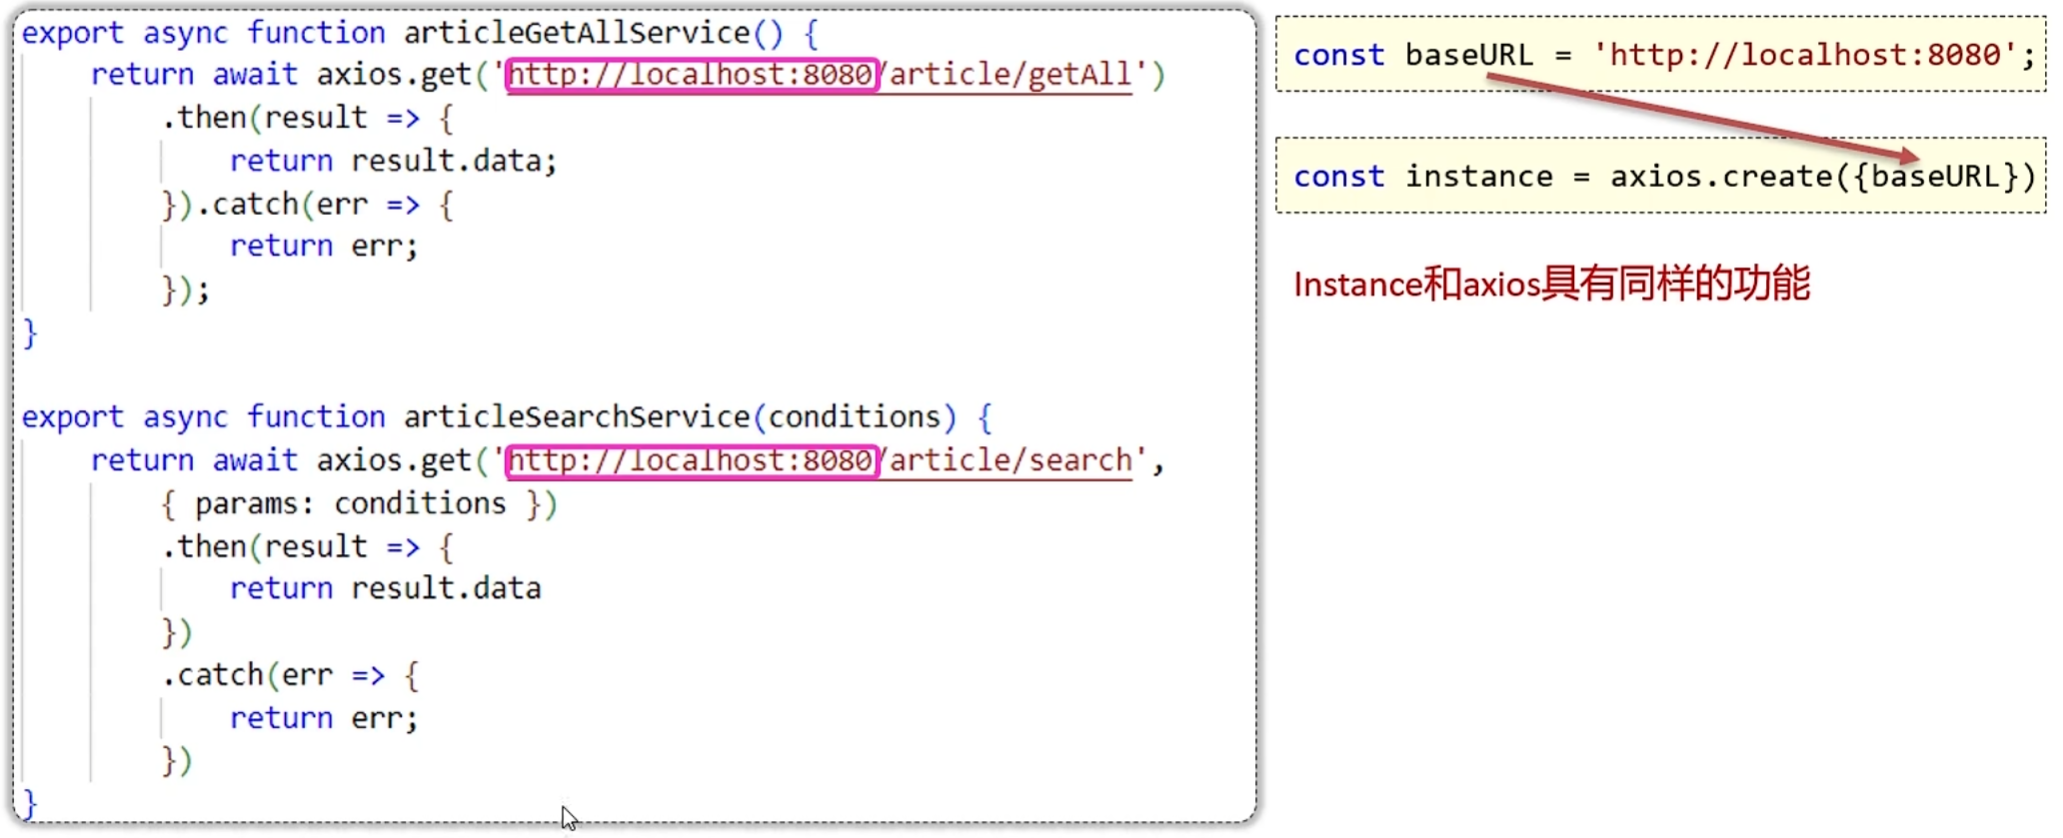
article.js
js
//导入axios npm install axios
import axios from "axios";
//定义一个变量,记录公共的前缀, baseURL
const baseURL = 'http://localhost:8080';
const instance = axios.create({baseURL})

//获取所有文章数据的函数

export async function articleGetAllService() {
  //发送异步请求,获取所有文章数据
  //同步等待服务器响应的结果,并返回 async await
  return await instance
    .get("/article/getAll")
    .then((result) => {
      return result.data;
    })
    .catch((err) => {
      console.log(err);
    });
}

//根据文章分类和发布状态搜索的函数
export async function articleSearchService(conditions) {
  //发送请求,完成搜索
  return await instance
    .get("/article/search", {
      params: conditions,
    })
    .then((result) => {
      return result.data;
    })
    .catch((err) => {
      console.log(err);
    });
}
优化优化再优化...
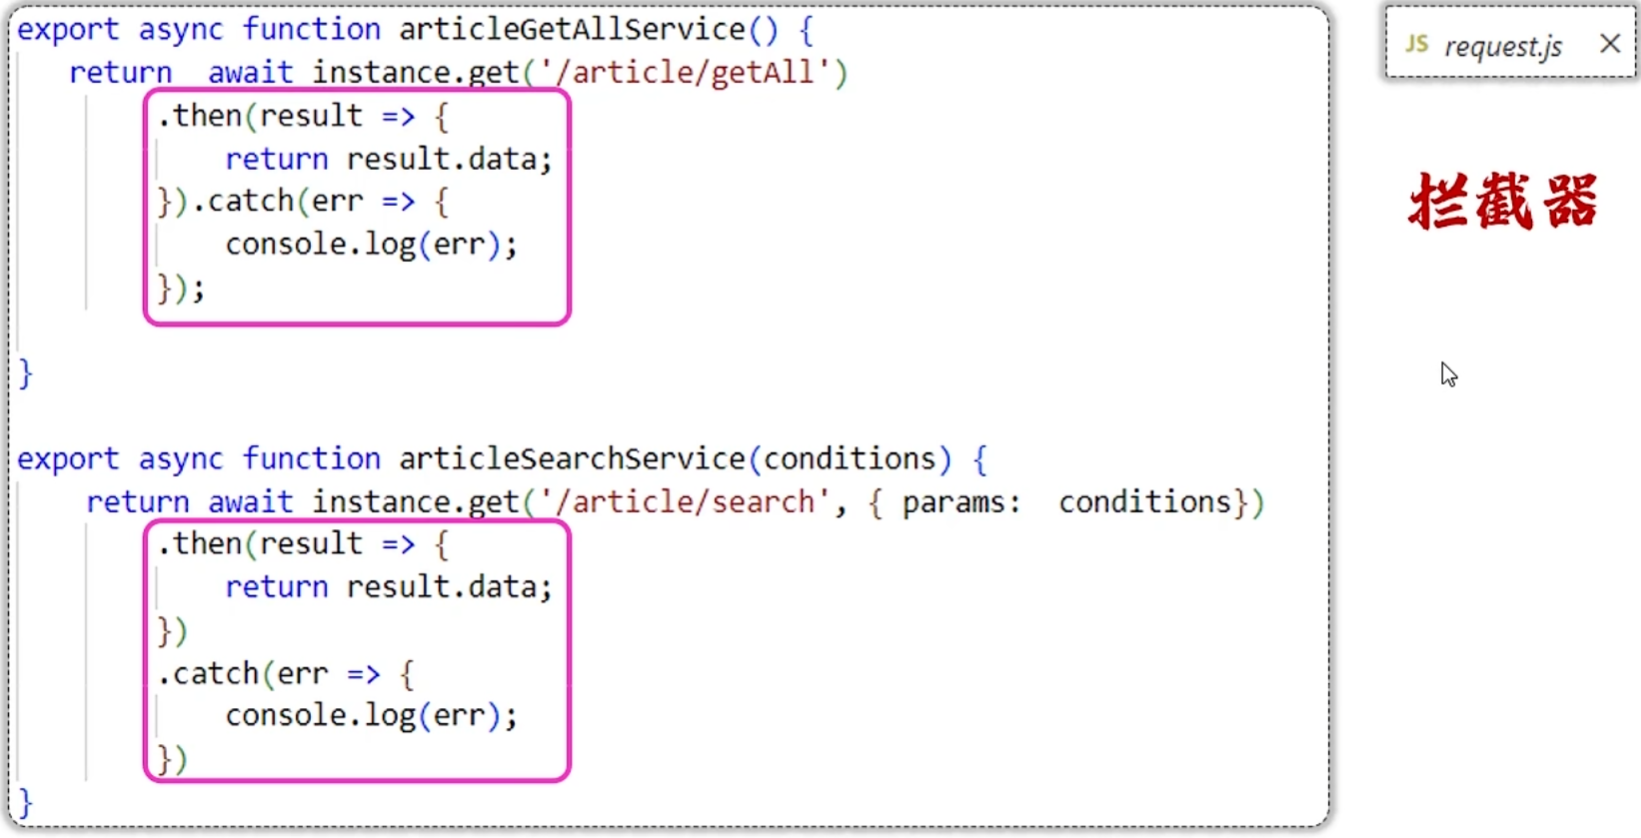
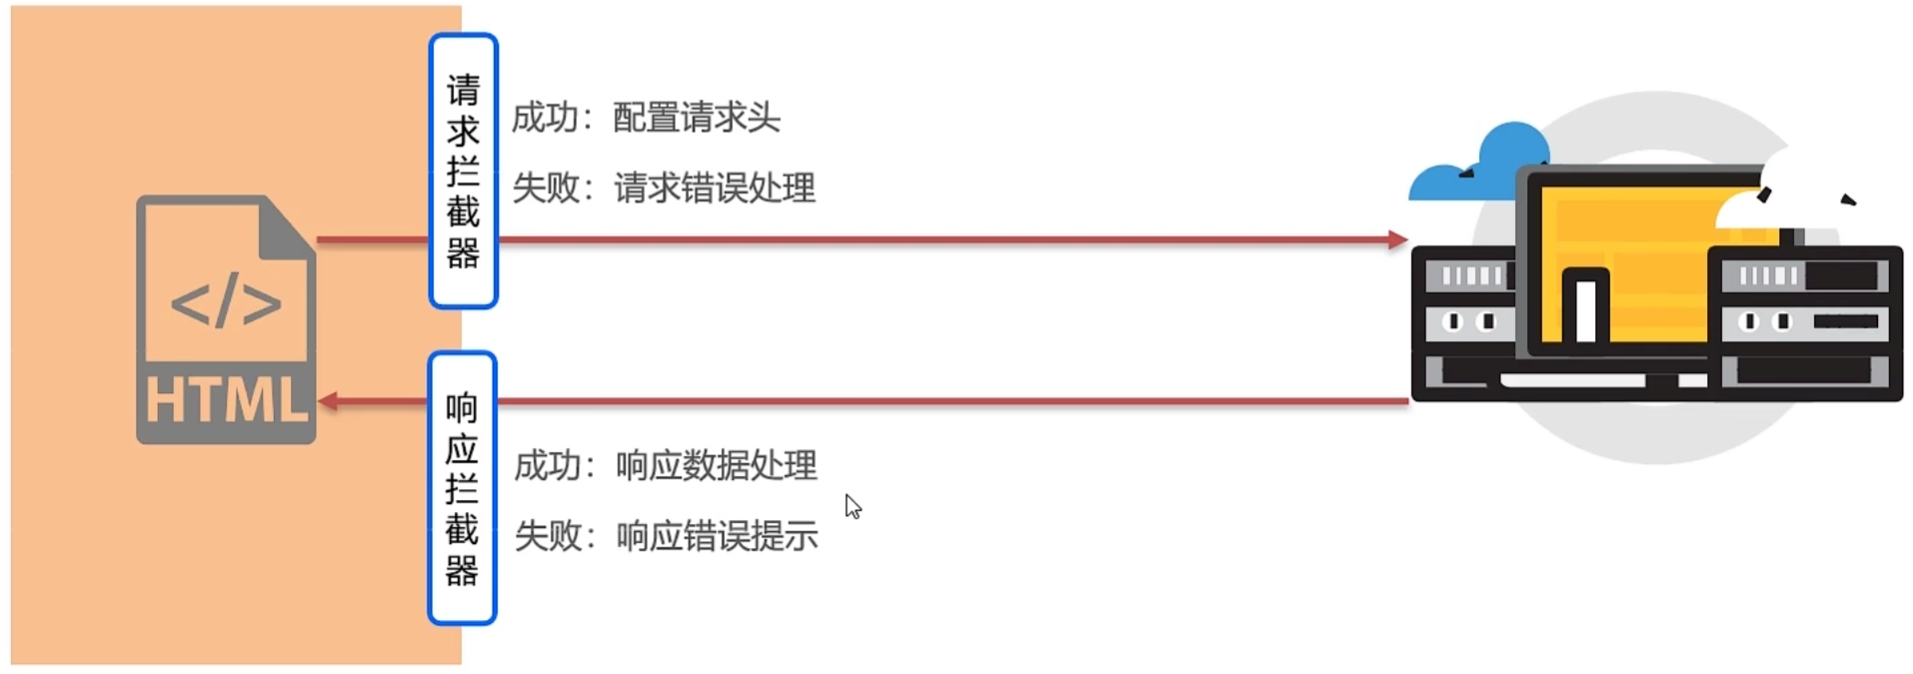
拦截器
在请求或响应被then或catch处理前拦截他们
在src目录下创建util文件夹新建js
src/Article.vue
vue
<script setup>
import { articleGetAllService, articleSearchService } from '@/api/article.js';
import { ref } from 'vue';
//定义响应式数据 ref
const articleList = ref([])

//获取所有文章数据
//同步获取articleGetAllService的返回结果 async await
const getAllArticle = async function () {
    let data = await articleGetAllService();
    articleList.value = data;
}

getAllArticle();


//定义响应式数据 searchConditions
const searchConditions = ref({
    category: '',
    state: ''
})

//声明search函数
const search = async function () {
    //文章搜索
    let data = await articleSearchService({ ...searchConditions.value });
    articleList.value = data;
}
</script>

<template>
    <!-- html元素 -->
    <div>

        文章分类: <input type="text" v-model="searchConditions.category">

        发布状态: <input type="text" v-model="searchConditions.state">

        <button v-on:click="search">搜索</button>

        <br />
        <br />
        <table border="1 solid" colspa="0" cellspacing="0">
            <tr>
                <th>文章标题</th>
                <th>分类</th>
                <th>发表时间</th>
                <th>状态</th>
                <th>操作</th>
            </tr>
            <tr v-for="(article, index) in articleList">
                <td>{{ article.title }}</td>
                <td>{{ article.category }}</td>
                <td>{{ article.time }}</td>
                <td>{{ article.state }}</td>
                <td>
                    <button>编辑</button>
                    <button>删除</button>
                </td>
            </tr>
        </table>
    </div>

</template>
src/api/article.js
js
/* //导入axios npm install axios
import axios from "axios";
//定义一个变量,记录公共的前缀, baseURL
const baseURL = 'http://localhost:8080';
const instance = axios.create({baseURL}) */

import requst from "@/util/request.js";

export function articleGetAllService() {
  return requst.get("/article/getAll");
}

//根据文章分类和发布状态搜索的函数
export function articleSearchService(conditions) {
  return requst.get("/article/search", { params: conditions });
}
src/util/request.js
js
//定制请求的实例
//导入axios npm install axios
import axios from "axios";
//定义一个变量,记录公共的前缀, baseURL
const baseURL = 'http://localhost:8080';
const instance = axios.create({baseURL})
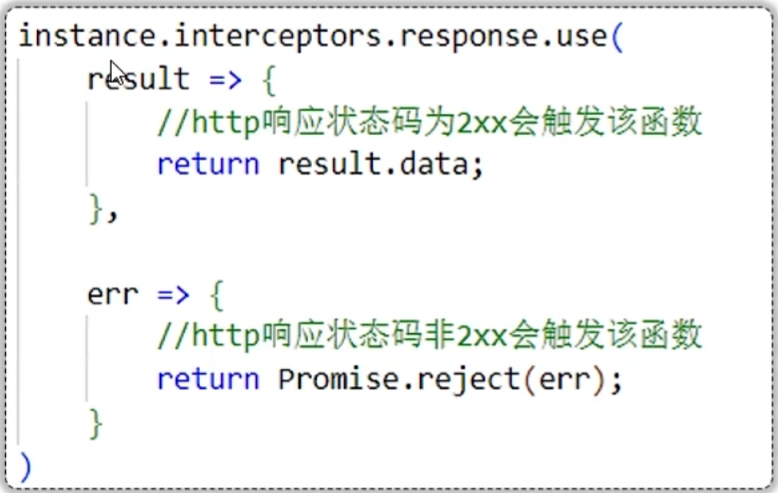
//添加响应拦截器
instance.interceptors.response.use(
result => {
return result.data;
},
err => {
alert('服务异常')
return Promise.reject(err); //异步的状态会转化为失败的状态
}
)
export default instance;Element Plus
- Element:是饿了么团队研发的,基于 Vue3,面相设计师和开发者的组件库
- 组件:组成网页的部件,例如 超链接、按钮、图片、表格、表单、分页条等等
- 官网:https://element-plus.org/zh-CN/
快速入门
-
准备工作:
-
创建一个工程化的vue项目
-
参照官方文档,安装Element Plus组件库(在当前工程的目录下):
npm install element-plus --save -
main.js中引入Element Plus组件库(参照官方文档)
jsimport { createApp } from 'vue' //导入Vue import ElementPlus from 'element-plus' //导入element-plus import 'element-plus/dist/index.css'//导入element-plus样式 import App from './App.vue'//导入app.vue const app = createApp(App)//创建应用实例 app.use(ElementPlus)//使用element-plus app.mount('#app')//控制html元素
-
-
制作组件:
- 访问Element官方文档,复制组件代码,调整
常用组件
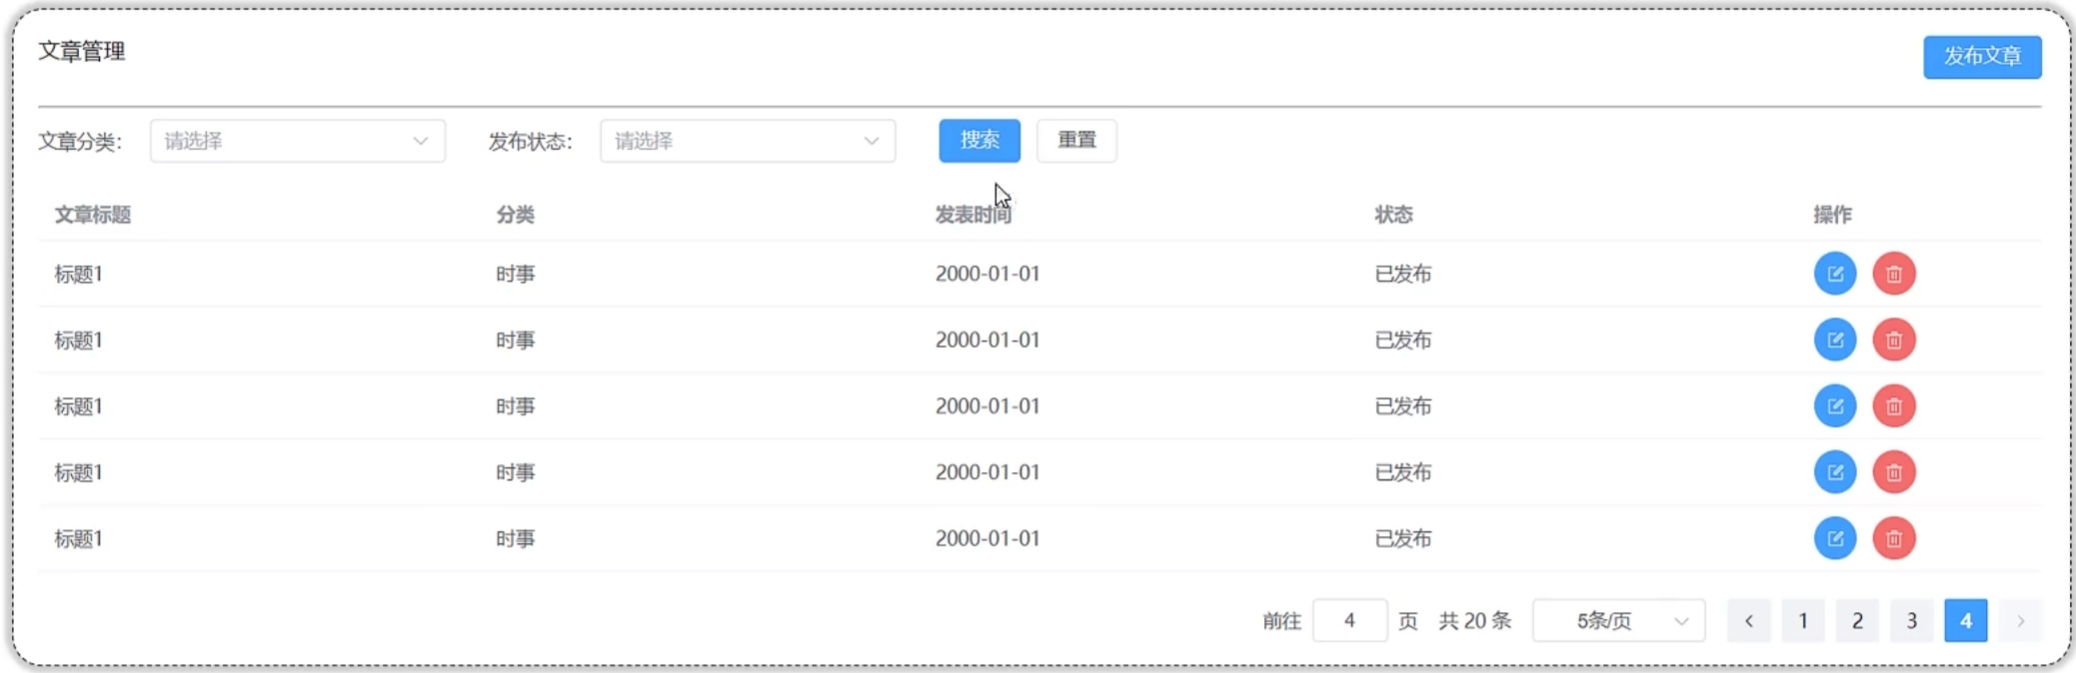
以下图展示为案例
vue
<script lang="ts" setup>

import { reactive } from 'vue'

const formInline = reactive({
    user: '',
    region: '',
    date: '',
})

const onSubmit = () => {
    console.log('submit!')
}

import { ref } from 'vue'

const currentPage4 = ref(1)
const pageSize4 = ref(5)
const size = ref<ComponentSize>('default')
const background = ref(false)
const disabled = ref(false)
const total = ref(20)

const handleSizeChange = (val: number) => {
    console.log(`${val} items per page`)
}
const handleCurrentChange = (val: number) => {
    console.log(`current page: ${val}`)
}

import {
    Delete,
    Edit,
} from '@element-plus/icons-vue'

const tableData = [
    {
        title: '标题1',
        category: '时事',
        time: '2000-10-10',
        state: '已发布',
    },
    {
        title: '标题1',
        category: '时事',
        time: '2000-10-10',
        state: '已发布',
    },
    {
        title: '标题1',
        category: '时事',
        time: '2000-10-10',
        state: '已发布',
    },
    {
        title: '标题1',
        category: '时事',
        time: '2000-10-10',
        state: '已发布',
    },
    {
        title: '标题1',
        category: '时事',
        time: '2000-10-10',
        state: '已发布',
    }
]
</script>
<template>
    <el-card class="box-card">
        <div class="card-header">
            <span>文章管理</span>
            <el-button type="primary">发布文章</el-button>
        </div>

        <div style="margin-top: 20px;">
            <hr>
        </div>

        <el-form :inline="true" :model="formInline" class="demo-form-inline">

            <el-form-item label="文章分类">
                <el-select v-model="formInline.region" placeholder="----请选择----" clearable>
                    <el-option label="时事" value="时事" />
                    <el-option label="篮球" value="篮球" />
                </el-select>
            </el-form-item>

            <el-form-item label="发布状态">
                <el-select v-model="formInline.region" placeholder="----请选择----" clearable>
                    <el-option label="已发布" value="已发布" />
                    <el-option label="草稿" value="草稿" />
                </el-select>
            </el-form-item>

            <el-form-item>
                <el-button type="primary" @click="onSubmit">搜索</el-button>
            </el-form-item>
            <el-form-item>
                <el-button type="default" @click="onSubmit">重置</el-button>
            </el-form-item>
        </el-form>
        <el-table :data="tableData" style="width: 100%">
            <el-table-column prop="title" label="文章标题" />
            <el-table-column prop="category" label="分类" />
            <el-table-column prop="time" label="发表时间" />
            <el-table-column prop="state" label="状态" />
            <el-table-column label="操作" width="180">
                <div>
                    <el-button type="primary" :icon="Edit" circle />
                    <el-button type="danger" :icon="Delete" circle />
                </div>
            </el-table-column>
        </el-table>
        <div class="demo-pagination-block">
            <el-pagination class="el-p" v-model:current-page="currentPage4" v-model:page-size="pageSize4"
                :page-sizes="[5, 10, 15, 20]" :size="size" :disabled="disabled" :background="background"
                layout="jumper, total, sizes, prev, pager, next " :total="20" @size-change="handleSizeChange"
                @current-change="handleCurrentChange" />
        </div>
    </el-card>

</template>

<style scoped>
.el-p {
    margin-top: 20px;
    display: flex;
    justify-content: flex-end;
}

.demo-form-inline .el-input {
    --el-input-width: 220px;
}

.demo-form-inline .el-select {
    --el-select-width: 220px;
}

.card-header {
    display: flex;
    justify-content: space-between;

}
</style>
以下内容为苍穹外卖项目中的前端开发部分
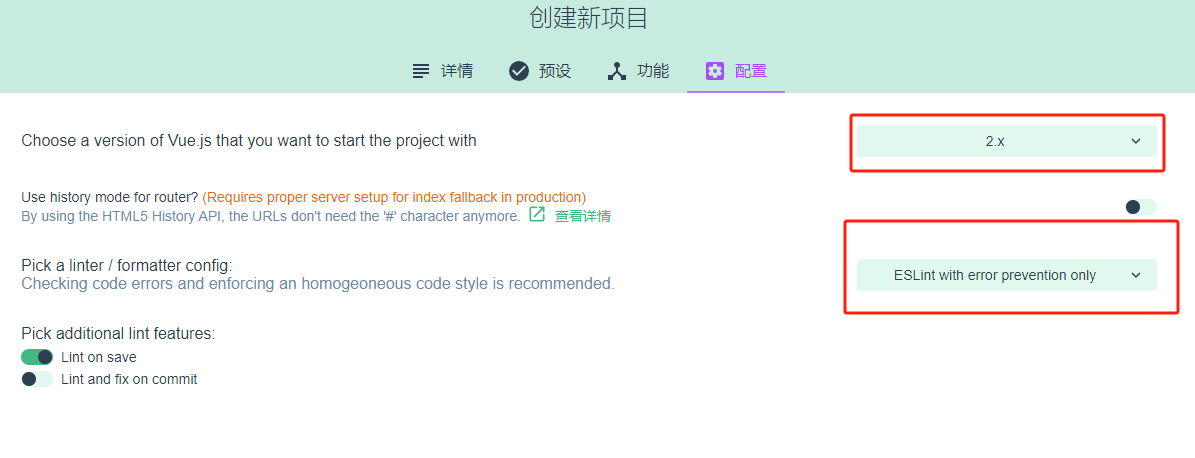
基于脚手架创建前端工程
环境要求:
- node.js 前端项目的运行环境
- npm JavaScript的包管理工具
- Vue CLI 基于Vue进行快速开发的完整系统,实现交互式的项目脚手架
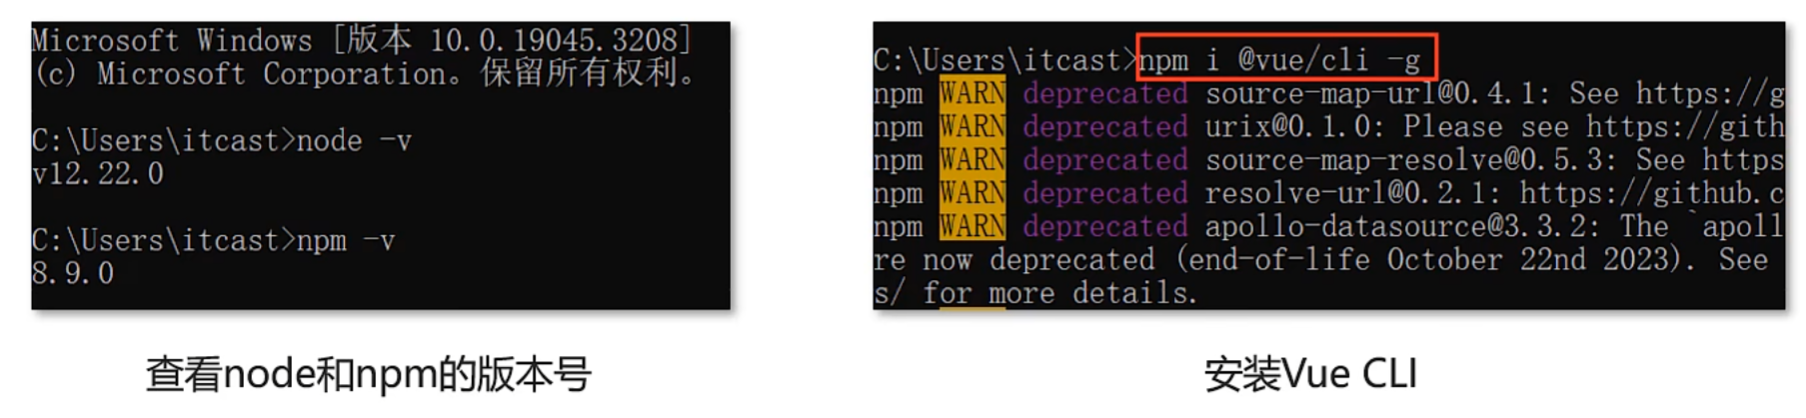
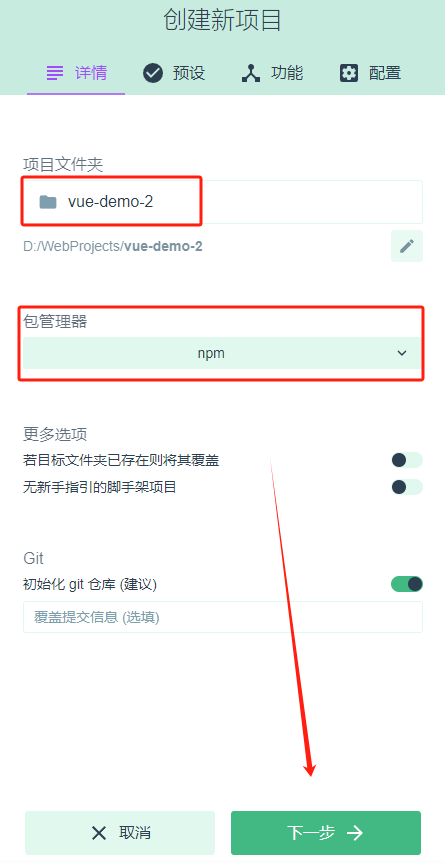
使用Vue CLI创建前端工程:
- 方式一:vue create 项目名称
bash
vue create 项目名称如果版本报错则依次执行以下命令
bash
npm uninstall -g vue-cli
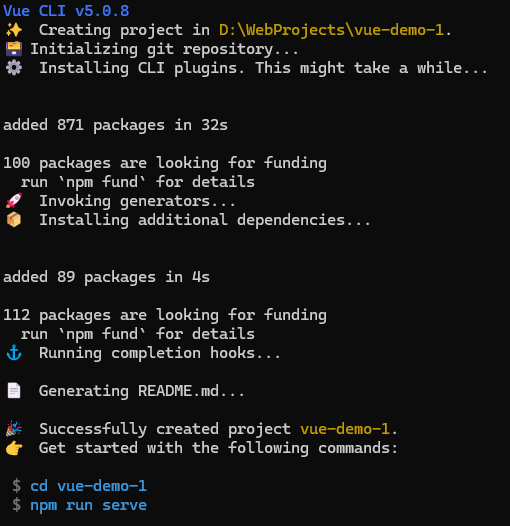
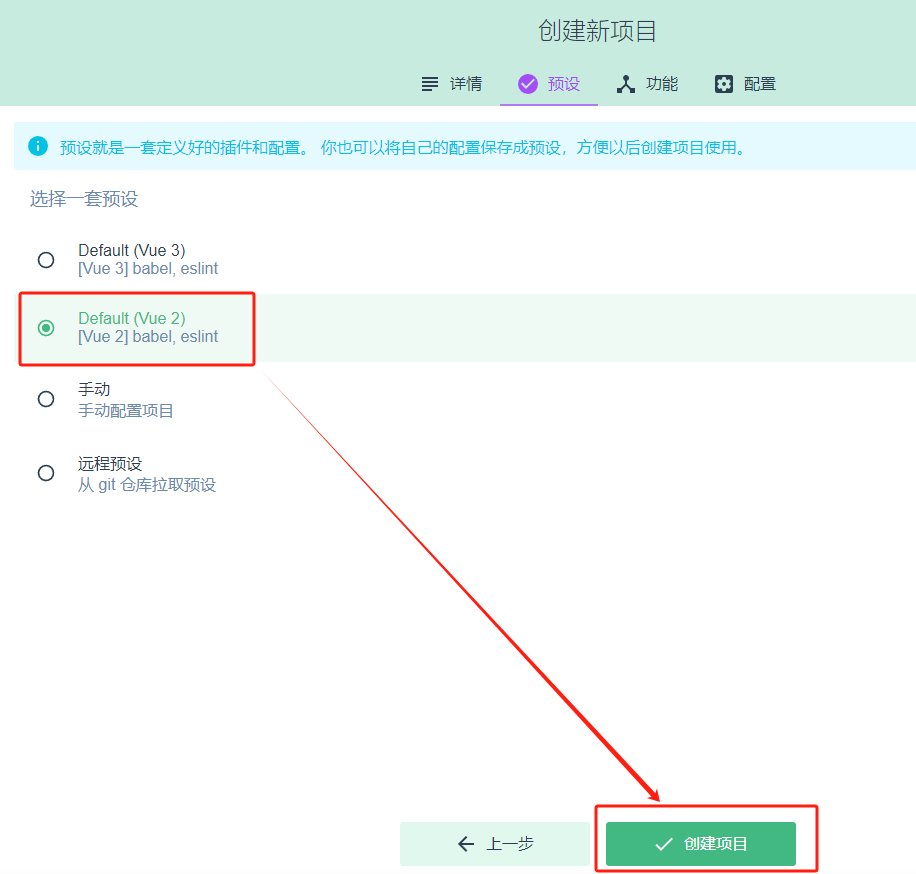
npm install -g @vue/cli正常创建后进入如下界面
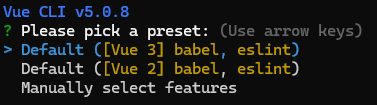
选中vue3后直接回车即可,出现以下界面则创建成功
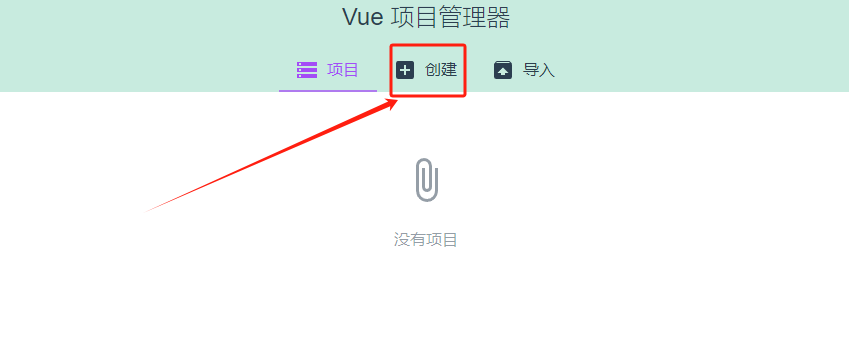
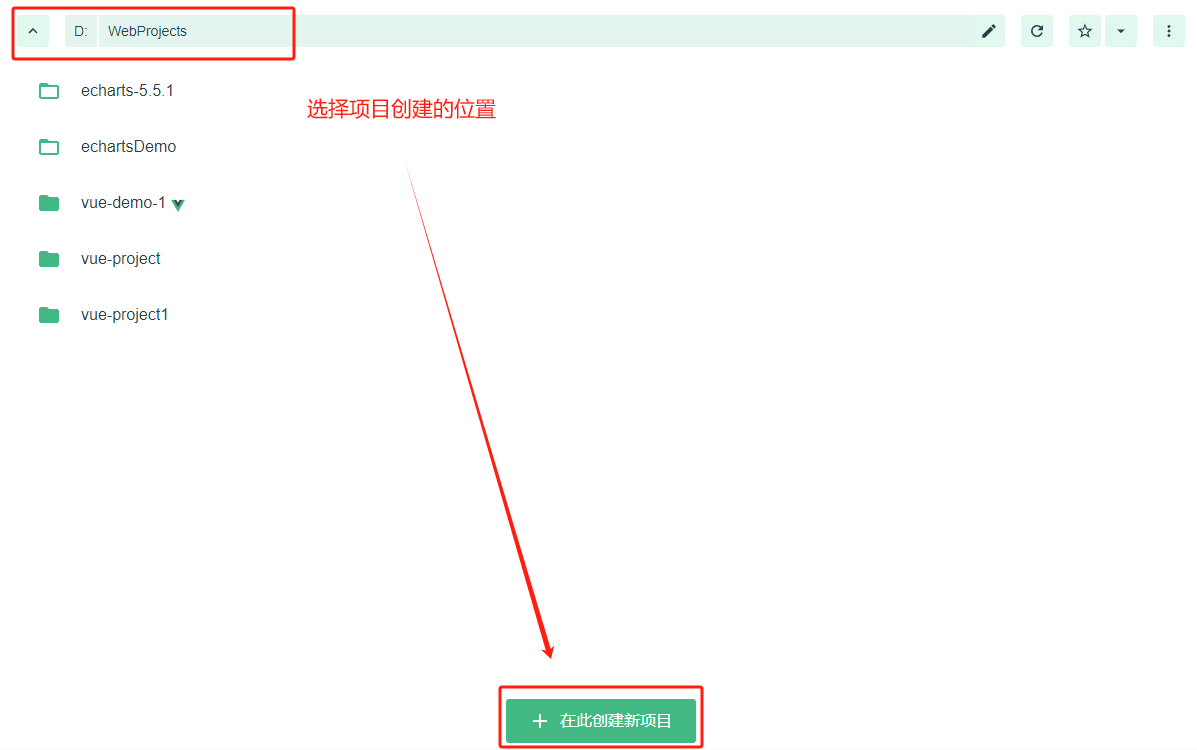
- 方式二:vue ui
bash
vue ui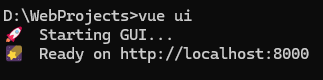
接着弹出一个网页
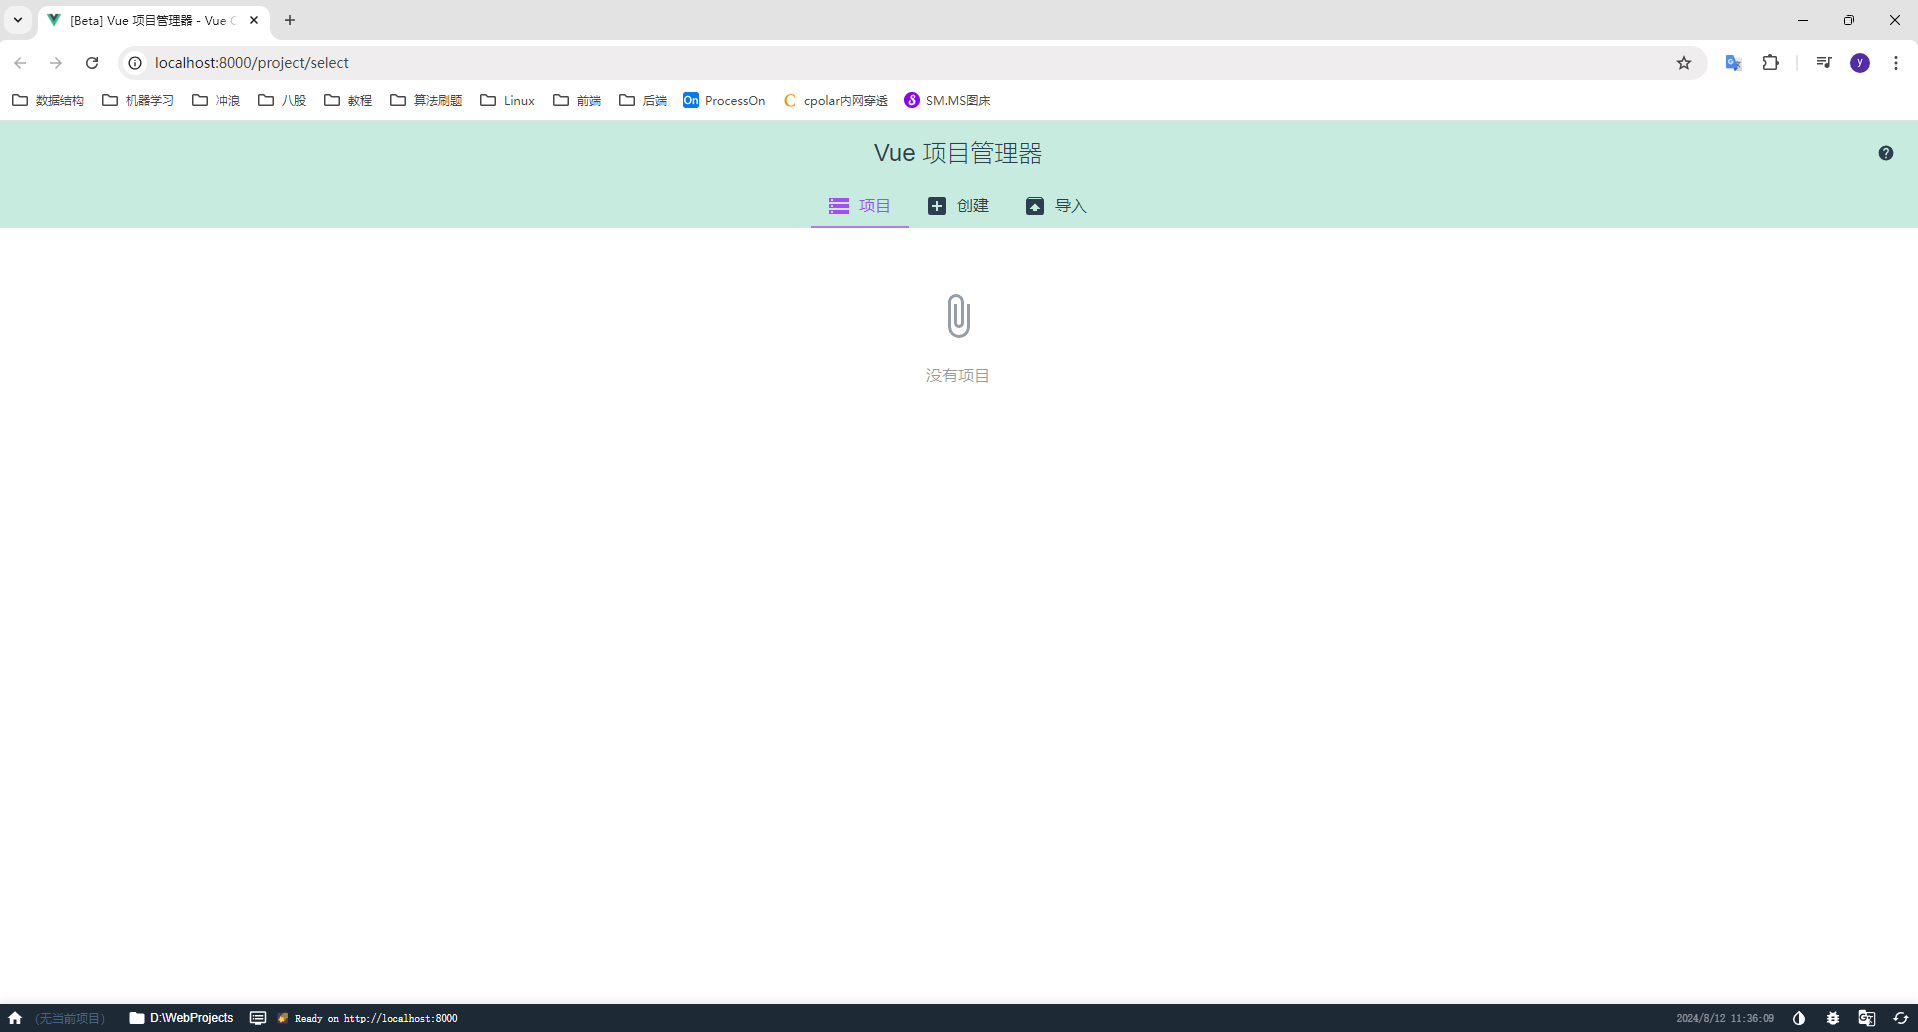
按以下步骤创建项目
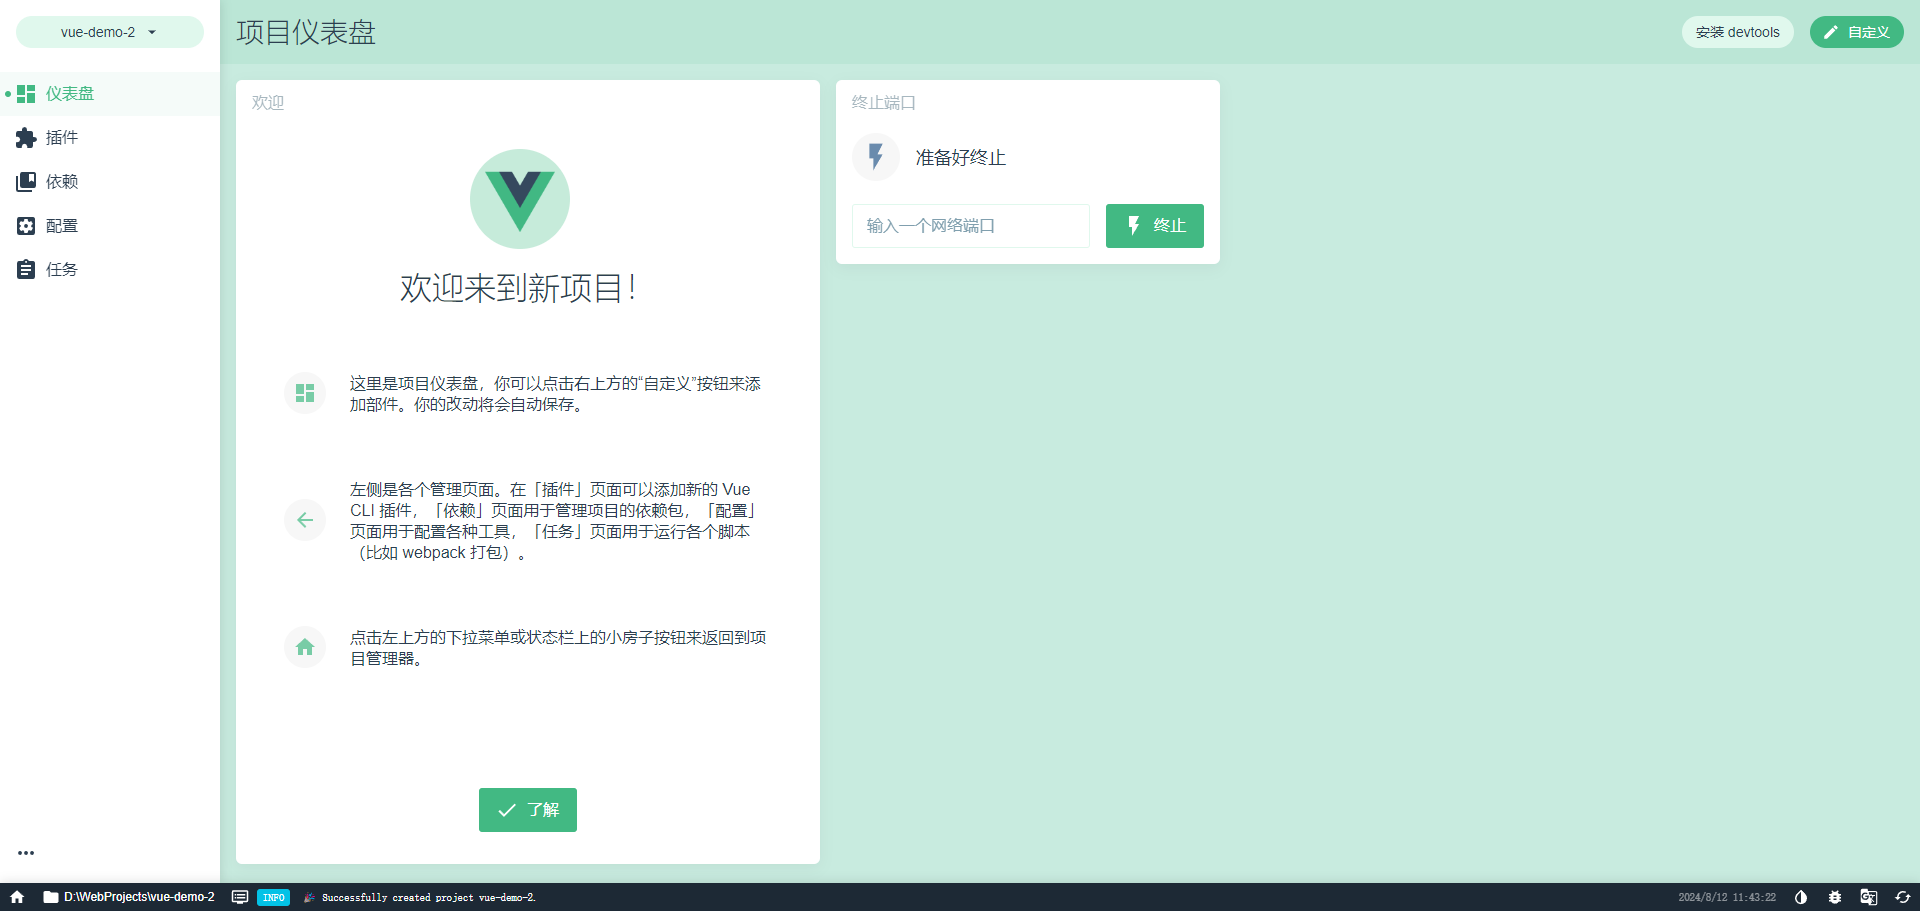
目录结构:
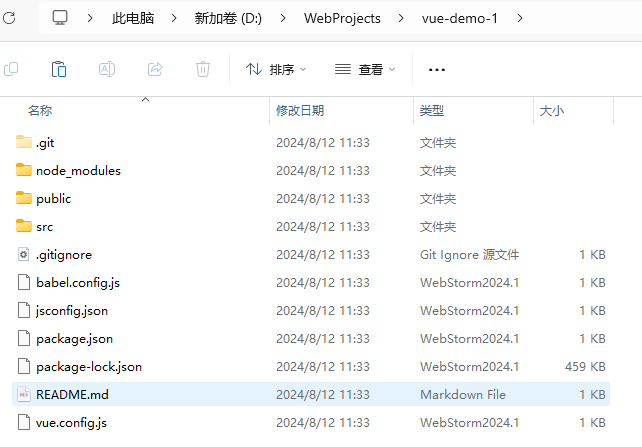
项目结构:
输入以下命令,启动vue服务
bash
npm run serve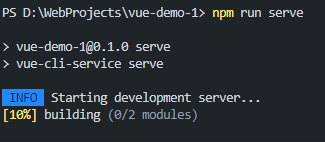
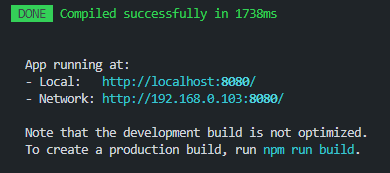
访问http://localhost:8080/即可进入网页
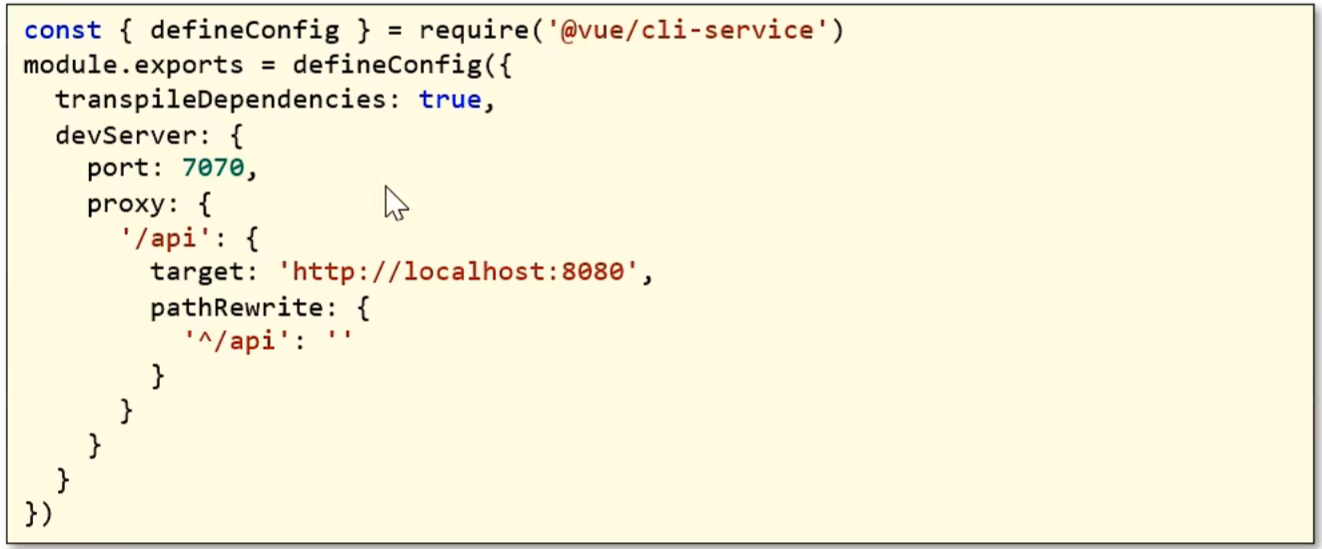
前端项目启动后,服务端口默认为8080,很容易和后端tomcat端口号冲突。如何修改前端服务的端口号?
在vue.config.js中配置前端服务端口号:
js
const { defineConfig } = require("@vue/cli-service");
module.exports = defineConfig({
  transpileDependencies: true,
  devServer: {
    port: 7070,
  },
});
Vue基本使用方式
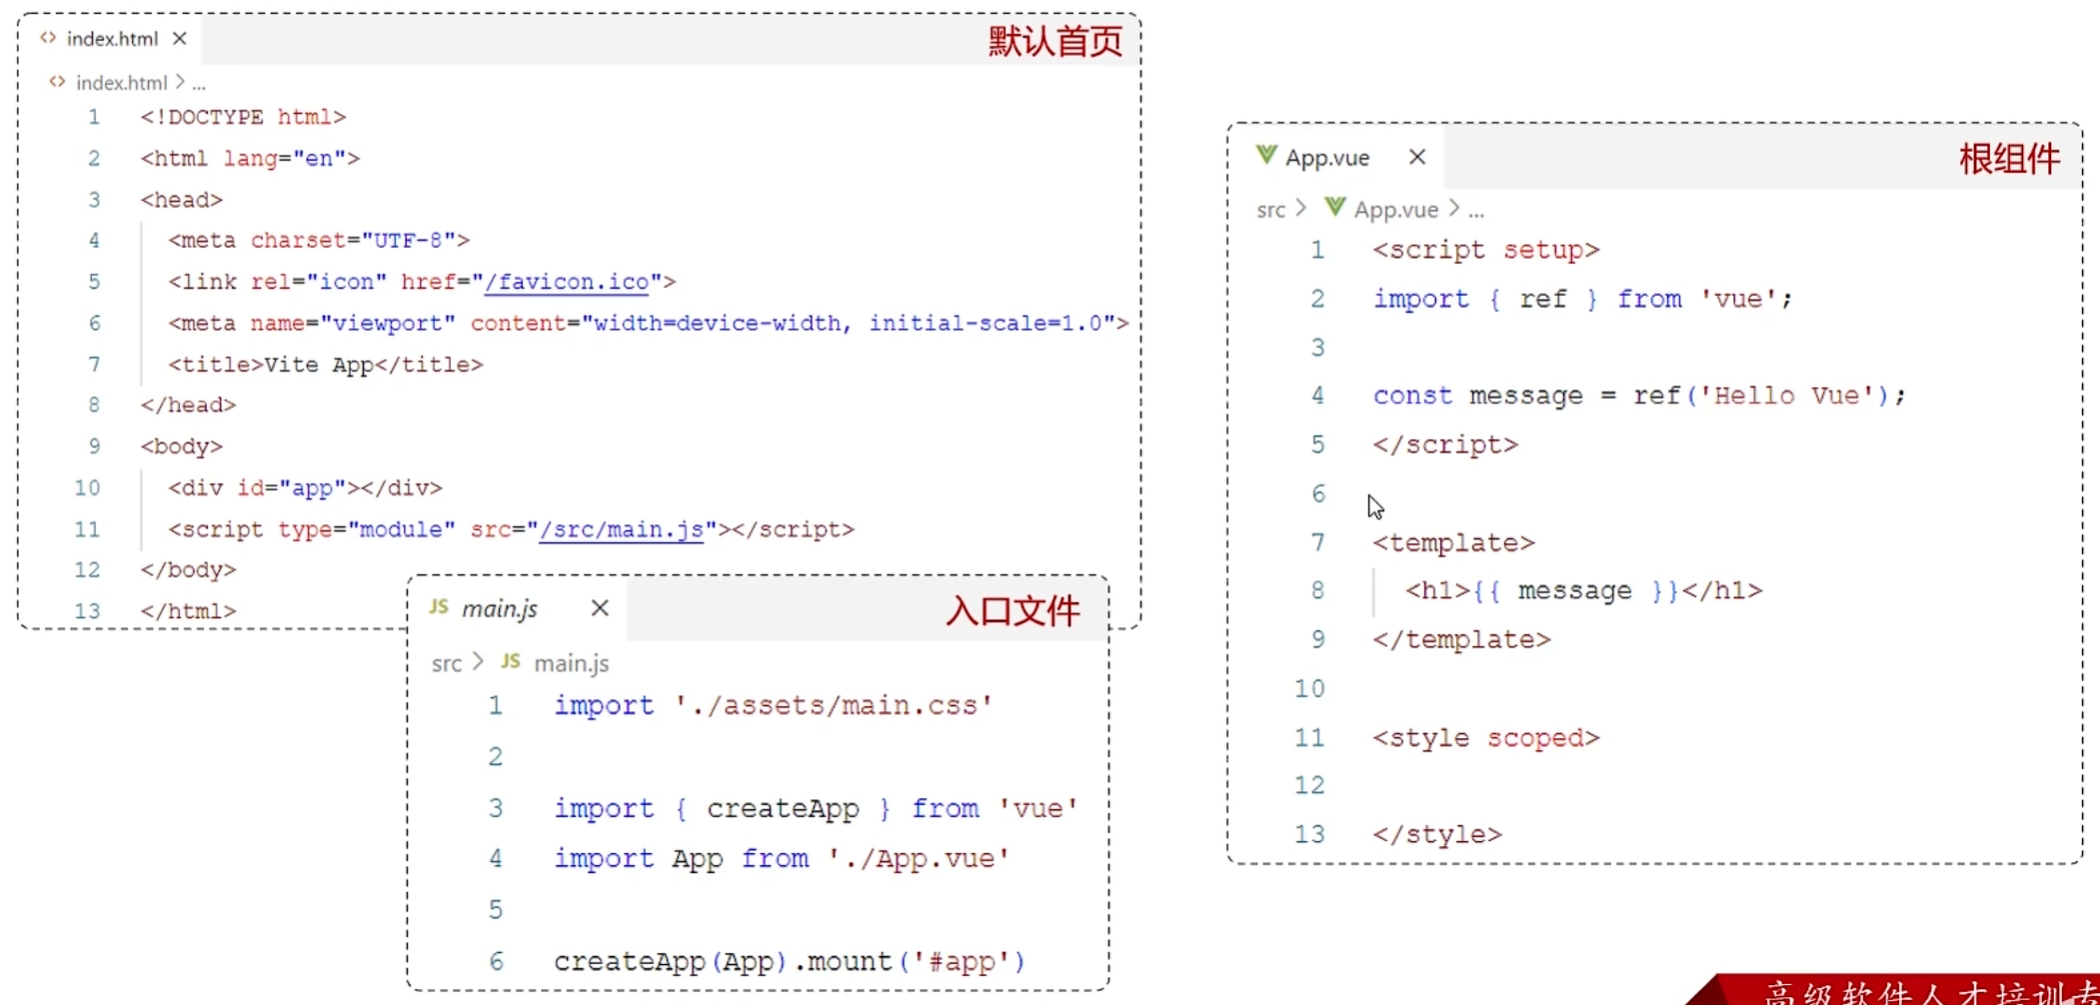
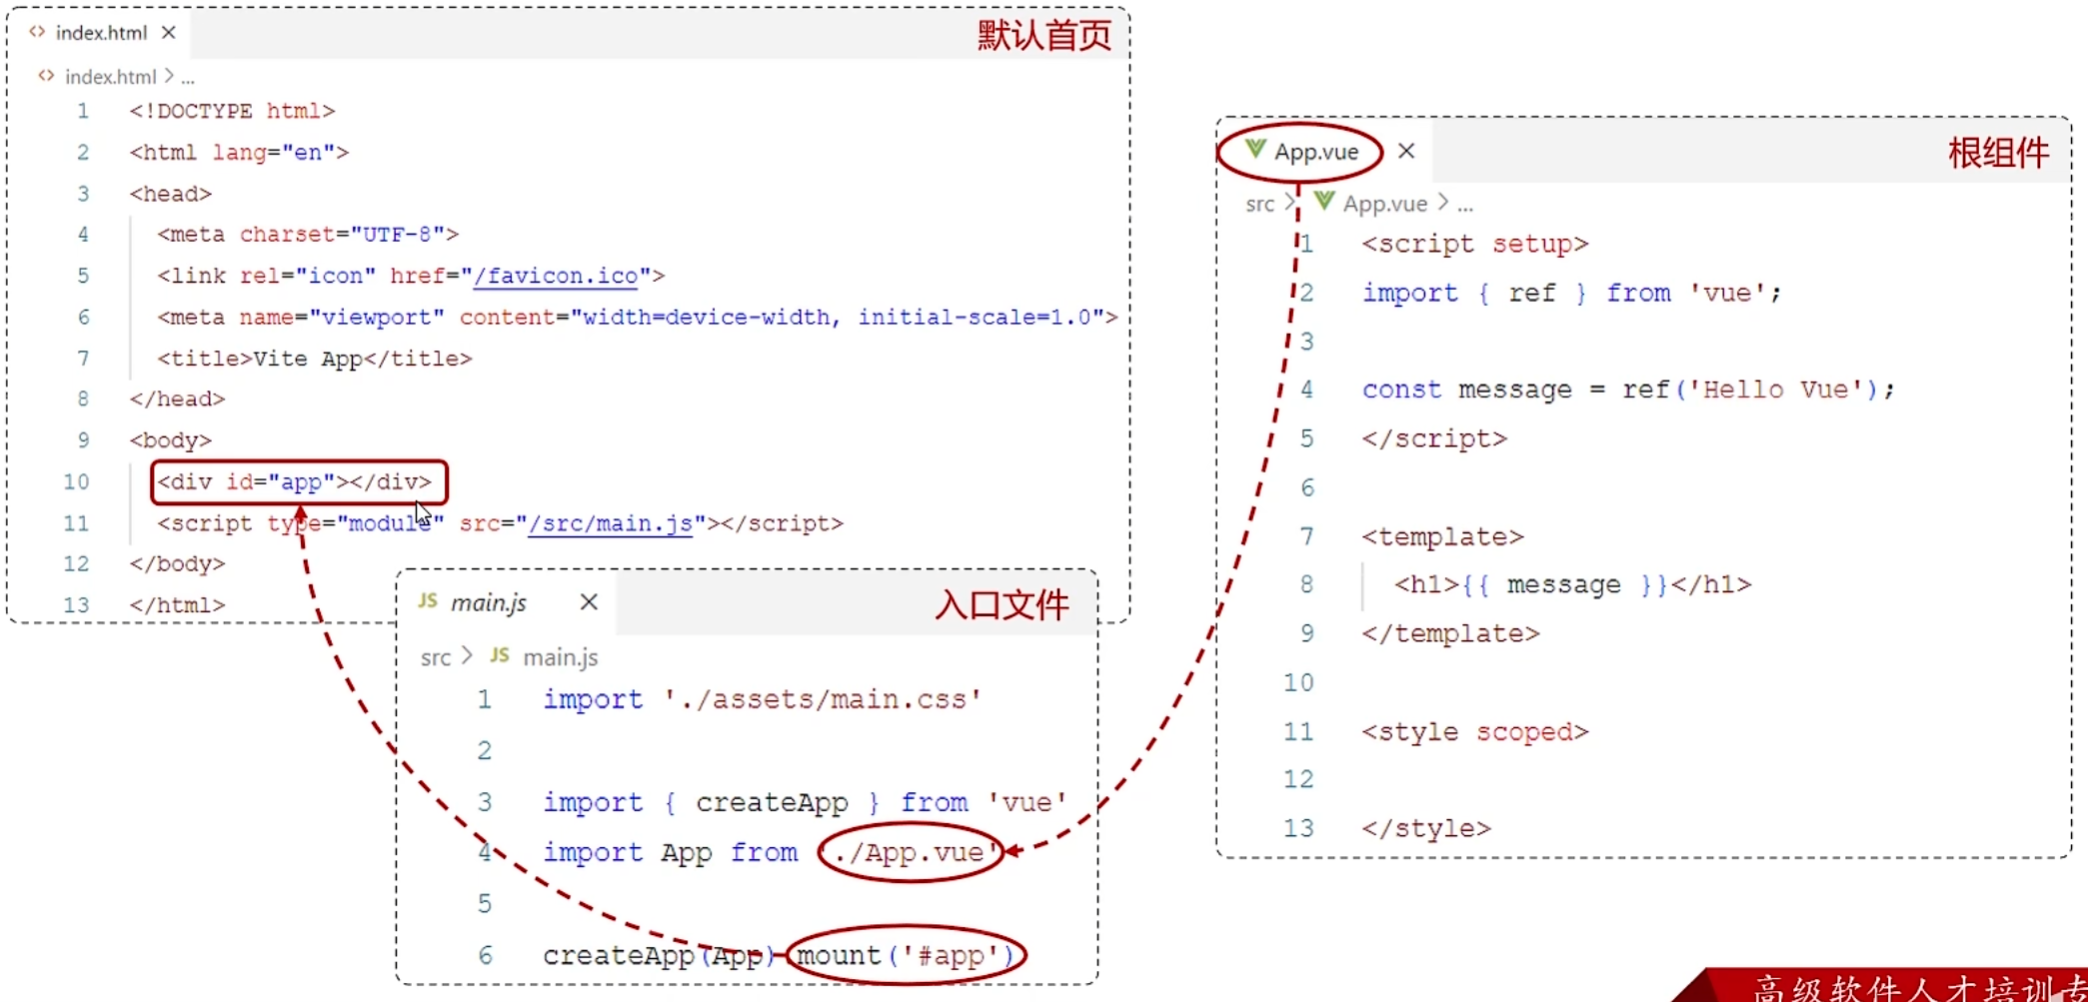
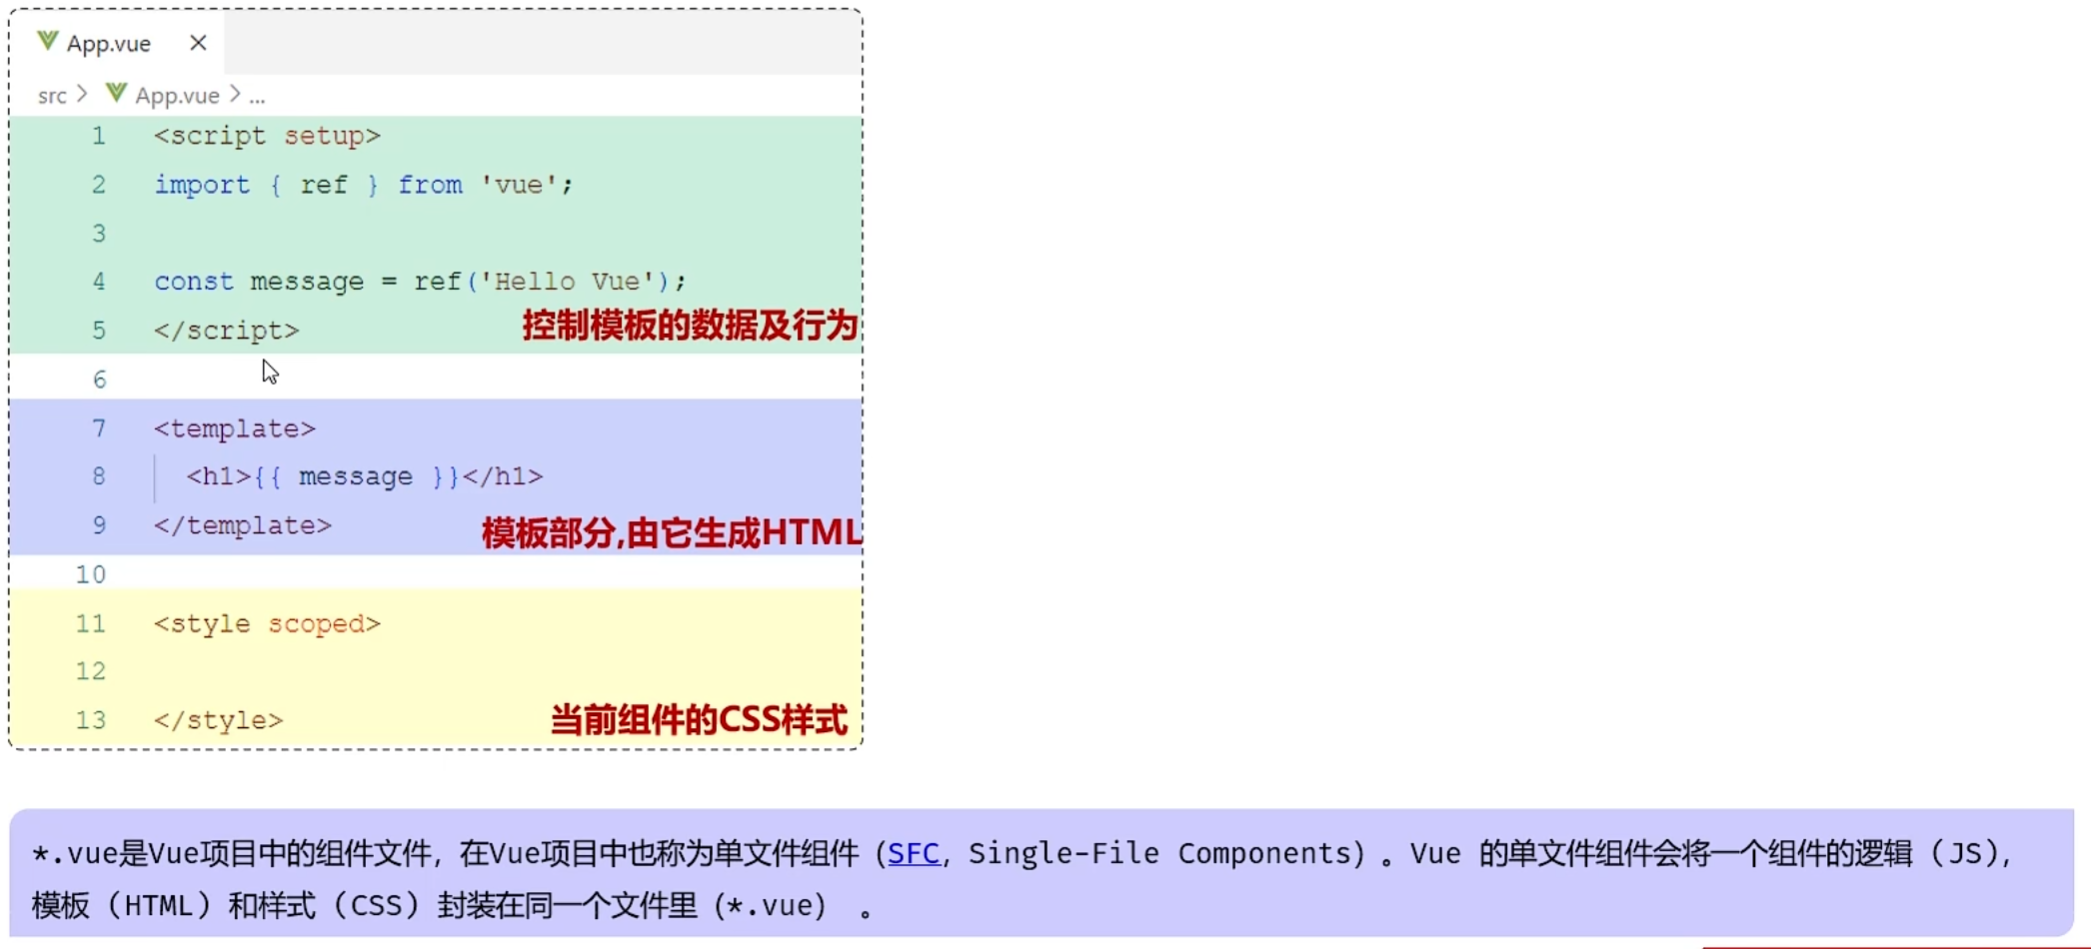
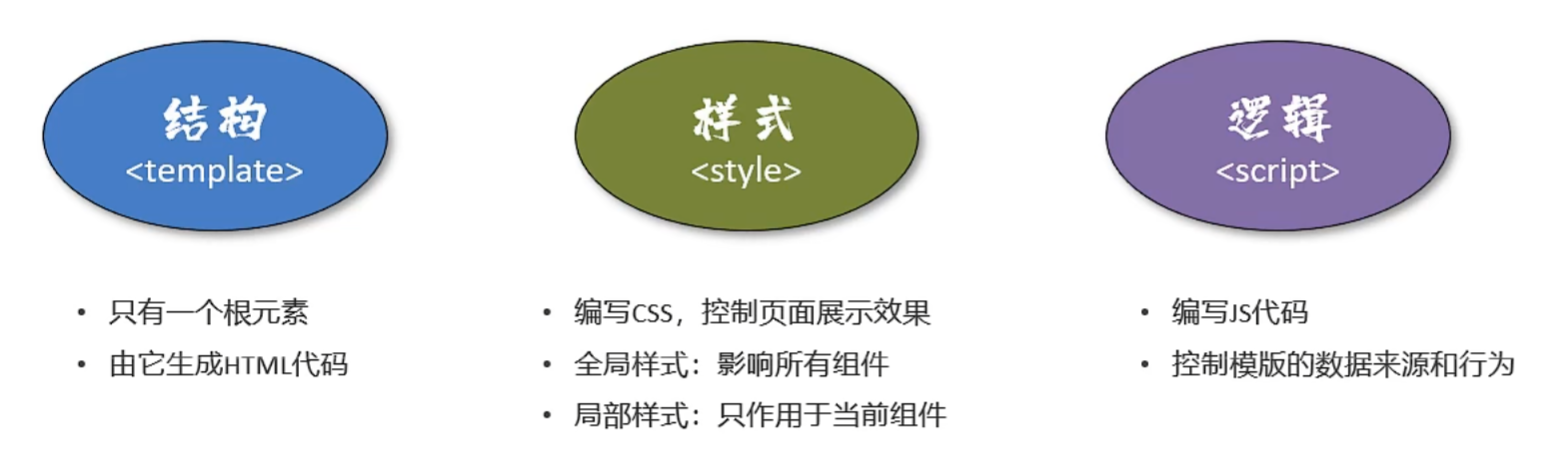
vue组件
Vue的组件文件以.vue结尾,每个组件由三部分组成:
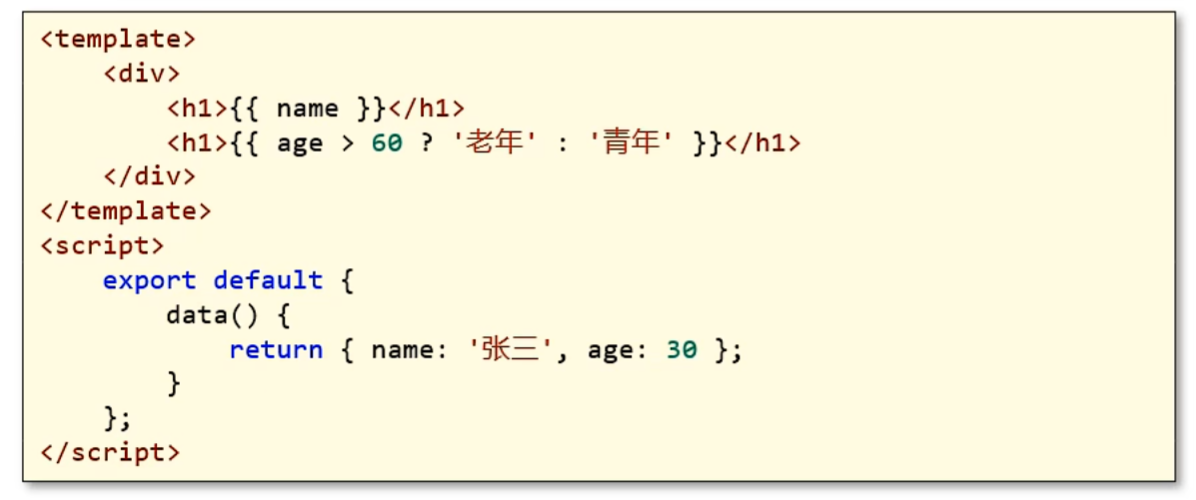
文本插值
- 作用:用来绑定data方法返回的对象属性
- 用法:{{}}
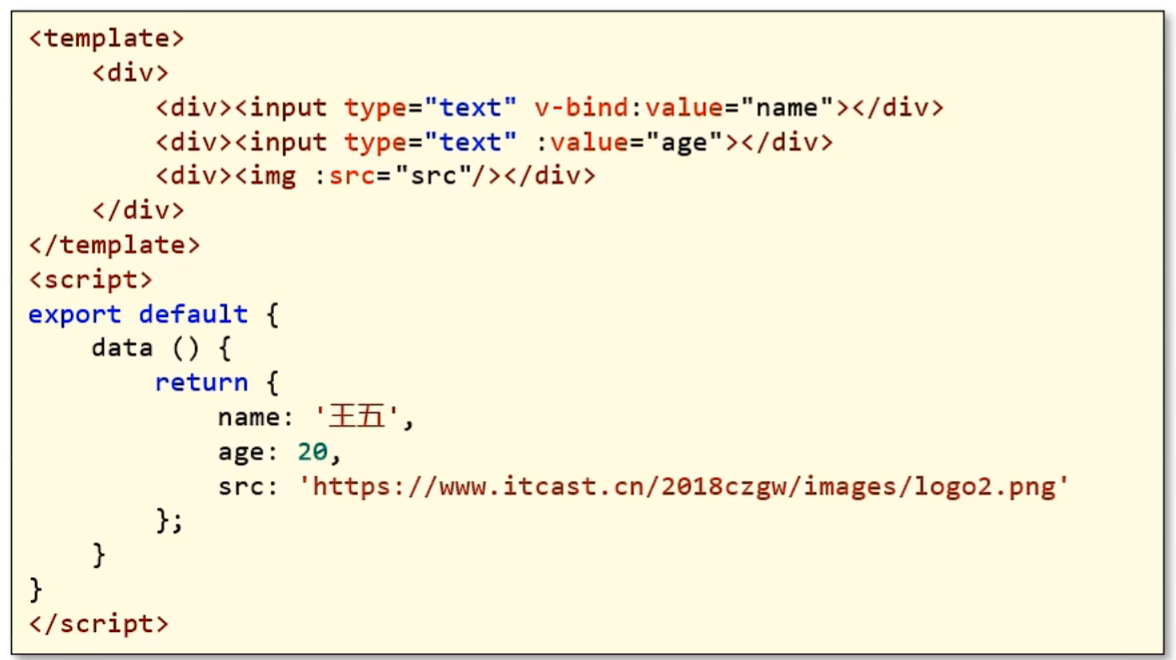
属性绑定
- 作用:为标签的属性绑定data方法中返回的属性
- 用法:
v-bind:xxx简写为:xxx
事件绑定
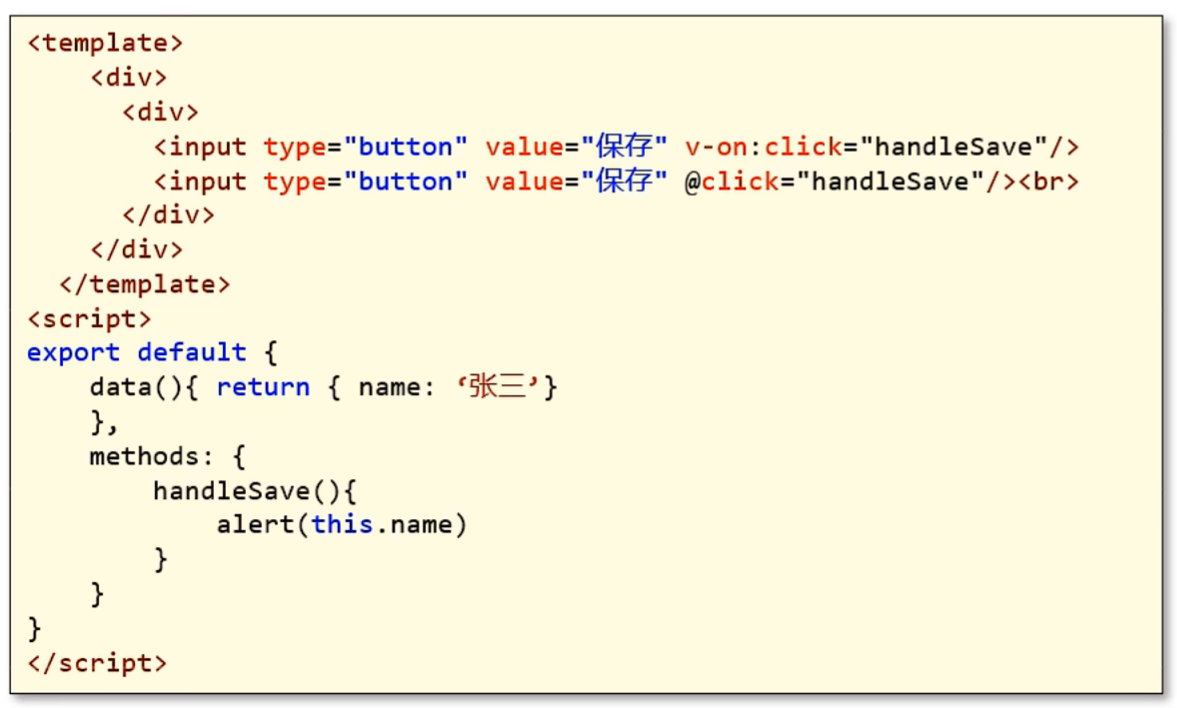
- 作用:为元素绑定对应的事件
- 用法:
v-on:xxx,简写为@xxx
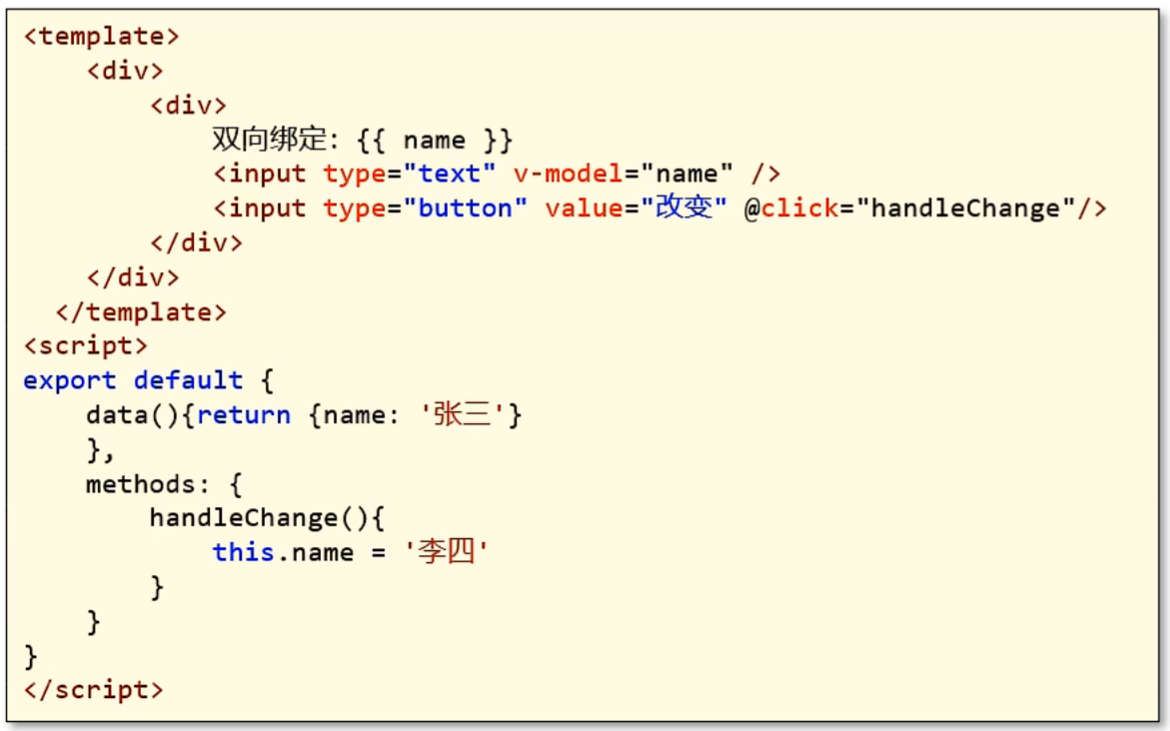
双向绑定
- 作用:表单输入项和data方法中的属性进行绑定,任意一方改变都会同步给另一方
- 用法:
v-model
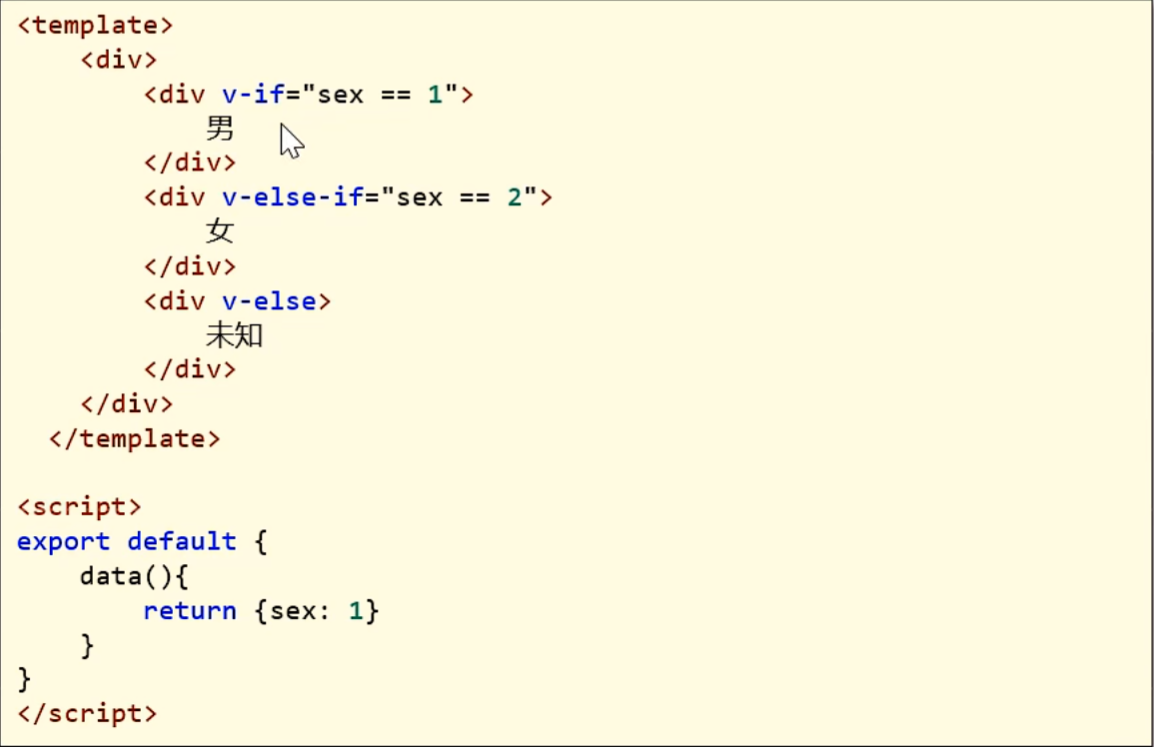
条件渲染
- 作用:根据表达式的值来动态渲染页面元素
- 用法:
v-if、v-else、v-else-if
axios
Axios是一个基于promise 的网络请求库,作用于浏览器和node.js中
安装命令:
bash
npm install axios导入命令:
js
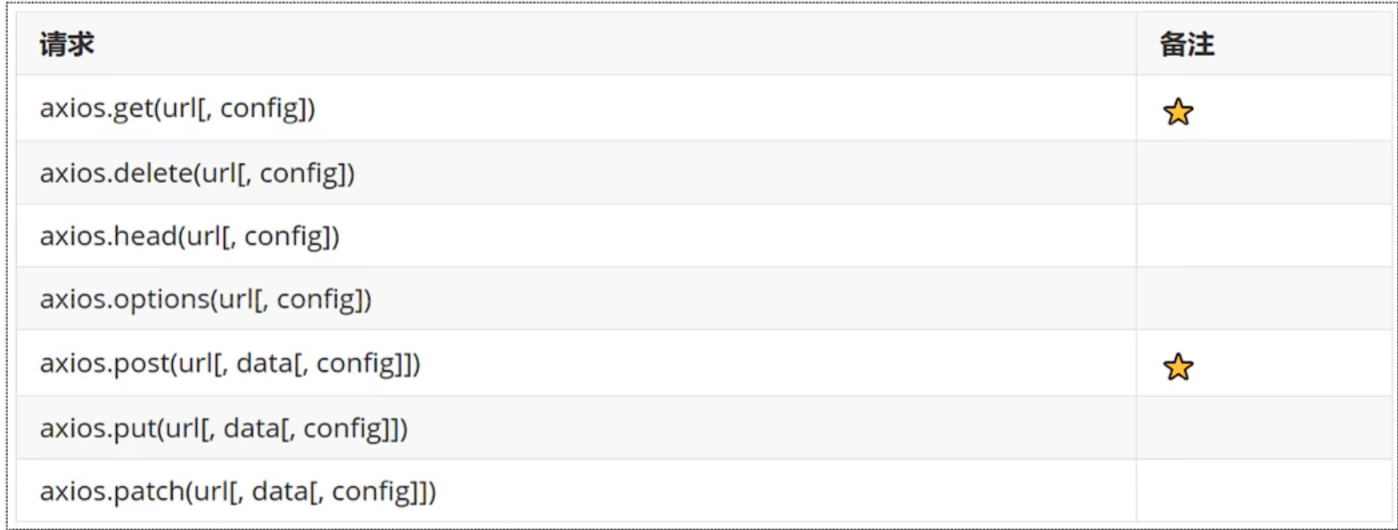
import axios from 'axios'axios的API列表

为了解决跨域问题,可以在vue.config.js文件中配置代理:
axios的post、get方法示例:
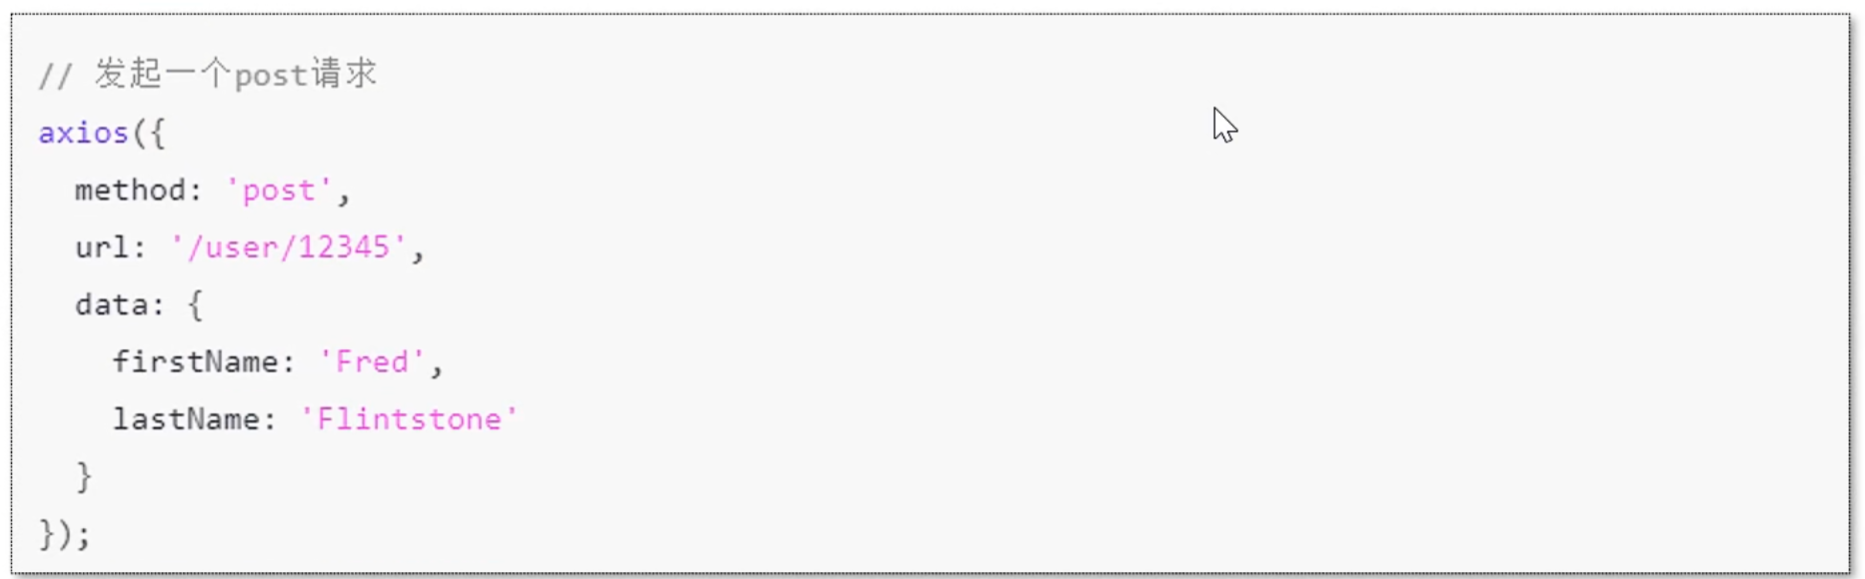
axios统一使用方式:axios(config)
综合代码
vue
<template>
<div class="hello">
<div><input type="text" v-bind:value="name" /></div>
<div><input type="text" :value="age" /></div>
<input type="text" v-model="name" />
<input type="button" v-on:click="handleSave" value="改变" />
<div v-if="sex == 1">
男
</div>
<div v-else-if="sex == 2">
女
</div>
<div v-else>
未知
</div>
<input type="button" value="发送POST请求" @click="handleSendPOST"/>
<input type="button" value="发送GET请求" @click="handleSendGET"/>
<input type="button" value="统一请求方式" @click="handleSend"/>
</div>
</template>
<script>
import axios from 'axios'
export default {
name: 'HelloWorld',
props: {
msg: String
},
data() {
return {
name: '张三',
age: 70,
src: 'https://picsfrompicgo.oss-cn-shanghai.aliyuncs.com/202408032351664.png',
sex: 3
}
},
methods: {
handleSave() {
this.name = '李四'
},
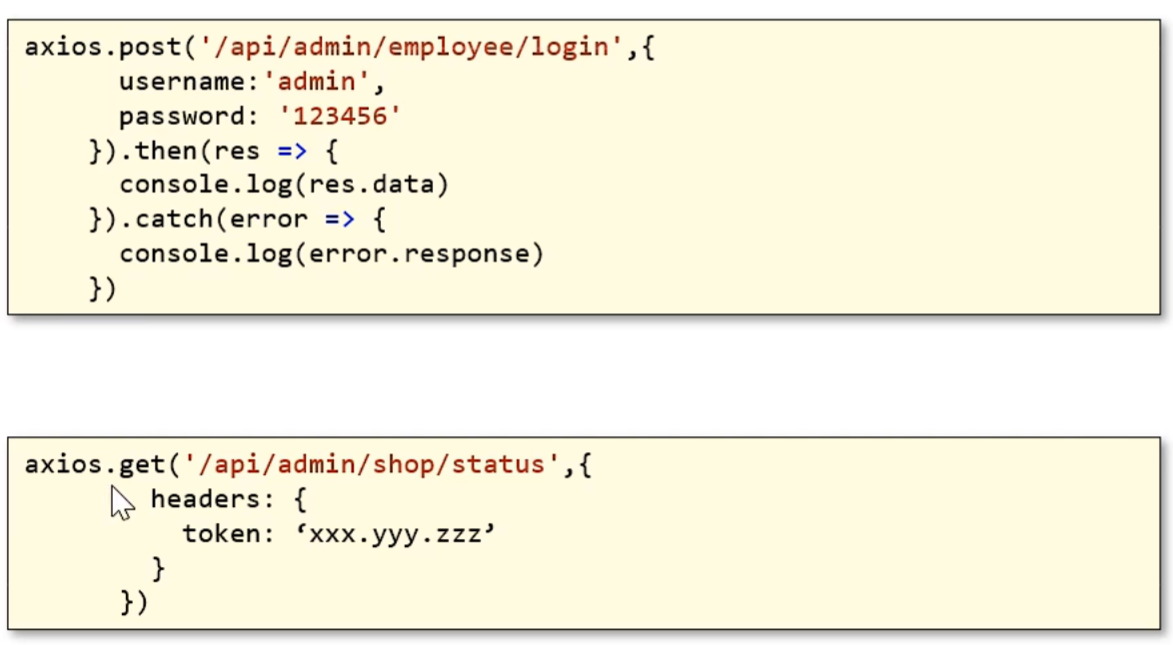
handleSendPOST() {
//通过axios发送http请求
axios.post('/api/admin/employee/login', {
username: 'admin',
password: '123456'
}).then(res => {
console.log(res.data)
}).catch(err => {
console.log(err.response)
})
},
handleSendGET(){
axios.get('/api/admin/shop/status', {
headers: {
token: 'eyJhbGciOiJIUzI1NiJ9.eyJlbXBJZCI6MSwiZXhwIjoxNzIzNDUzMDIxfQ.h7_MyqtSVw1Yn9xkO7BYutV9VFWNloDe5tzekvw4X98'
}
})
.then(res => {
console.log(res.data)
})
},
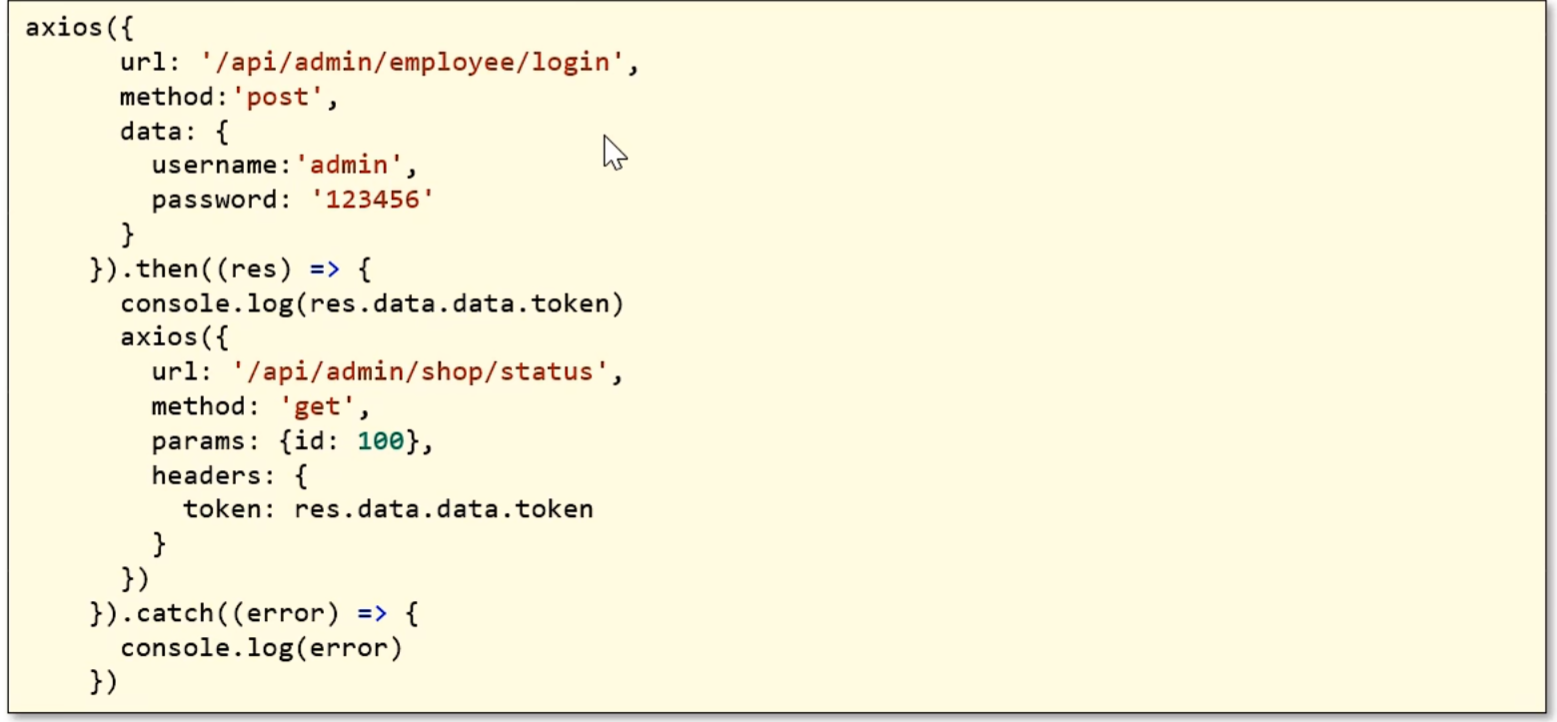
handleSend(){
axios({
method: 'post',
url: '/api/admin/employee/login',
data: {
username: 'admin',
password: '123456'
}
}).then(res => {
console.log(res.data.data.token)
axios({
method: 'get',
url: '/api/admin/shop/status',
headers: {
token: res.data.data.token
}
})
})
}
},
}
</script>
<style scoped>
</style>路由Vue-Router
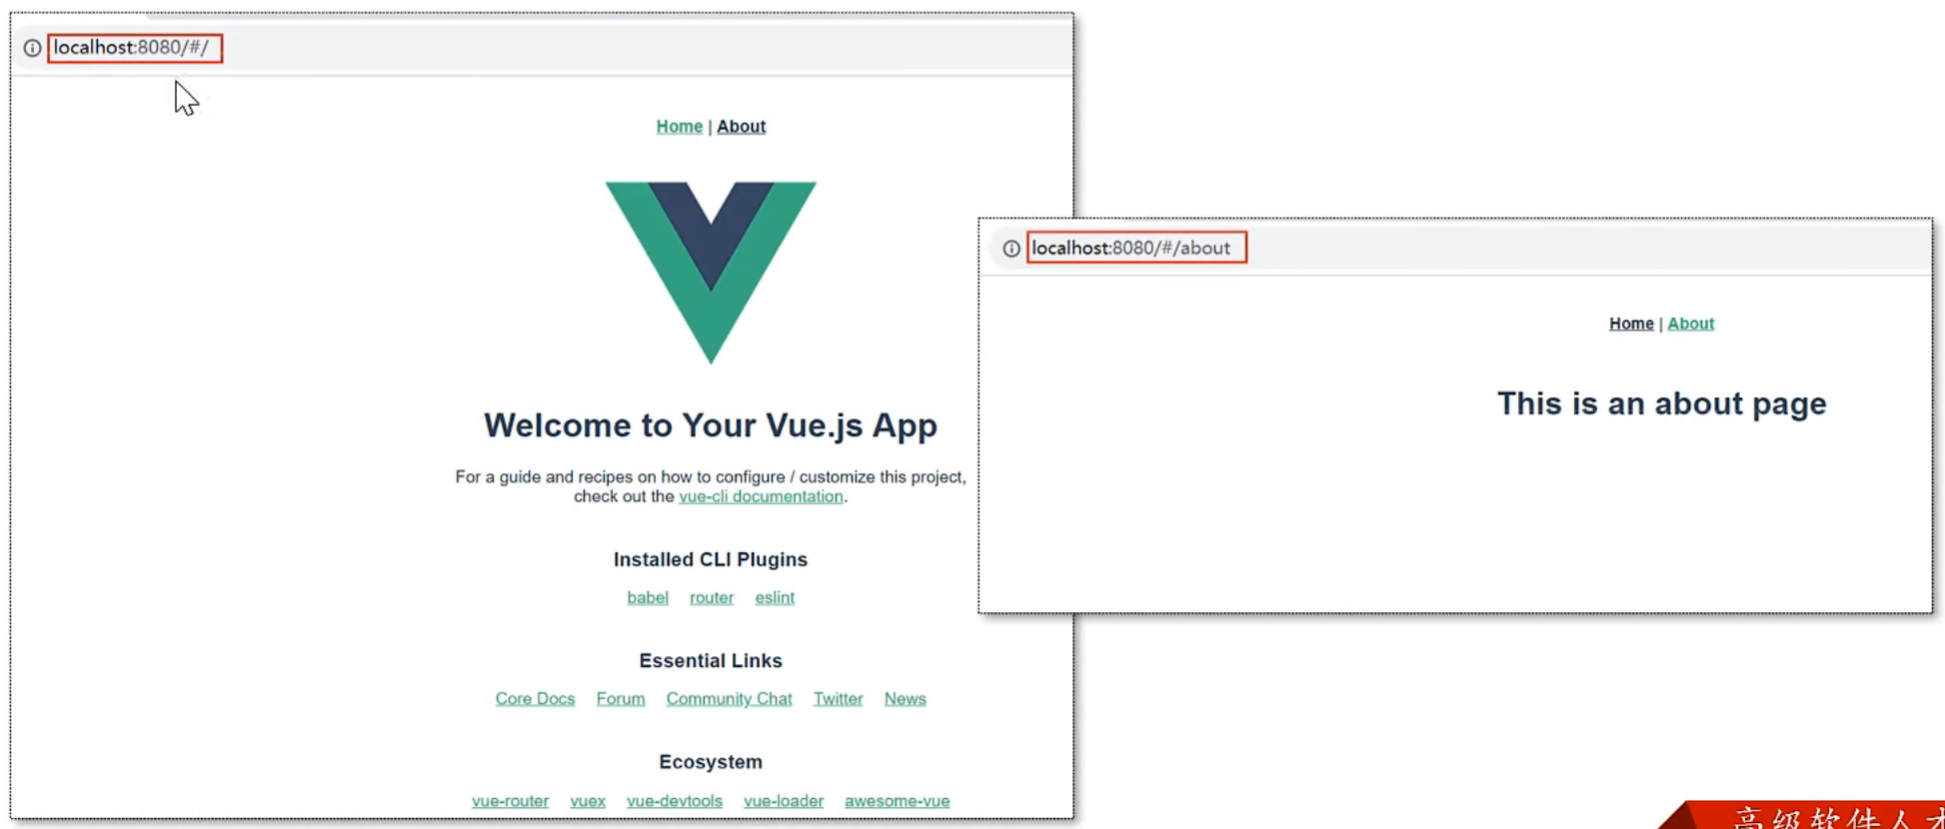
Vue-Router介绍
vue属于单页面应用,所谓的路由,就是根据浏览器路径 不同,用不同的视图组件替换这个页面内容

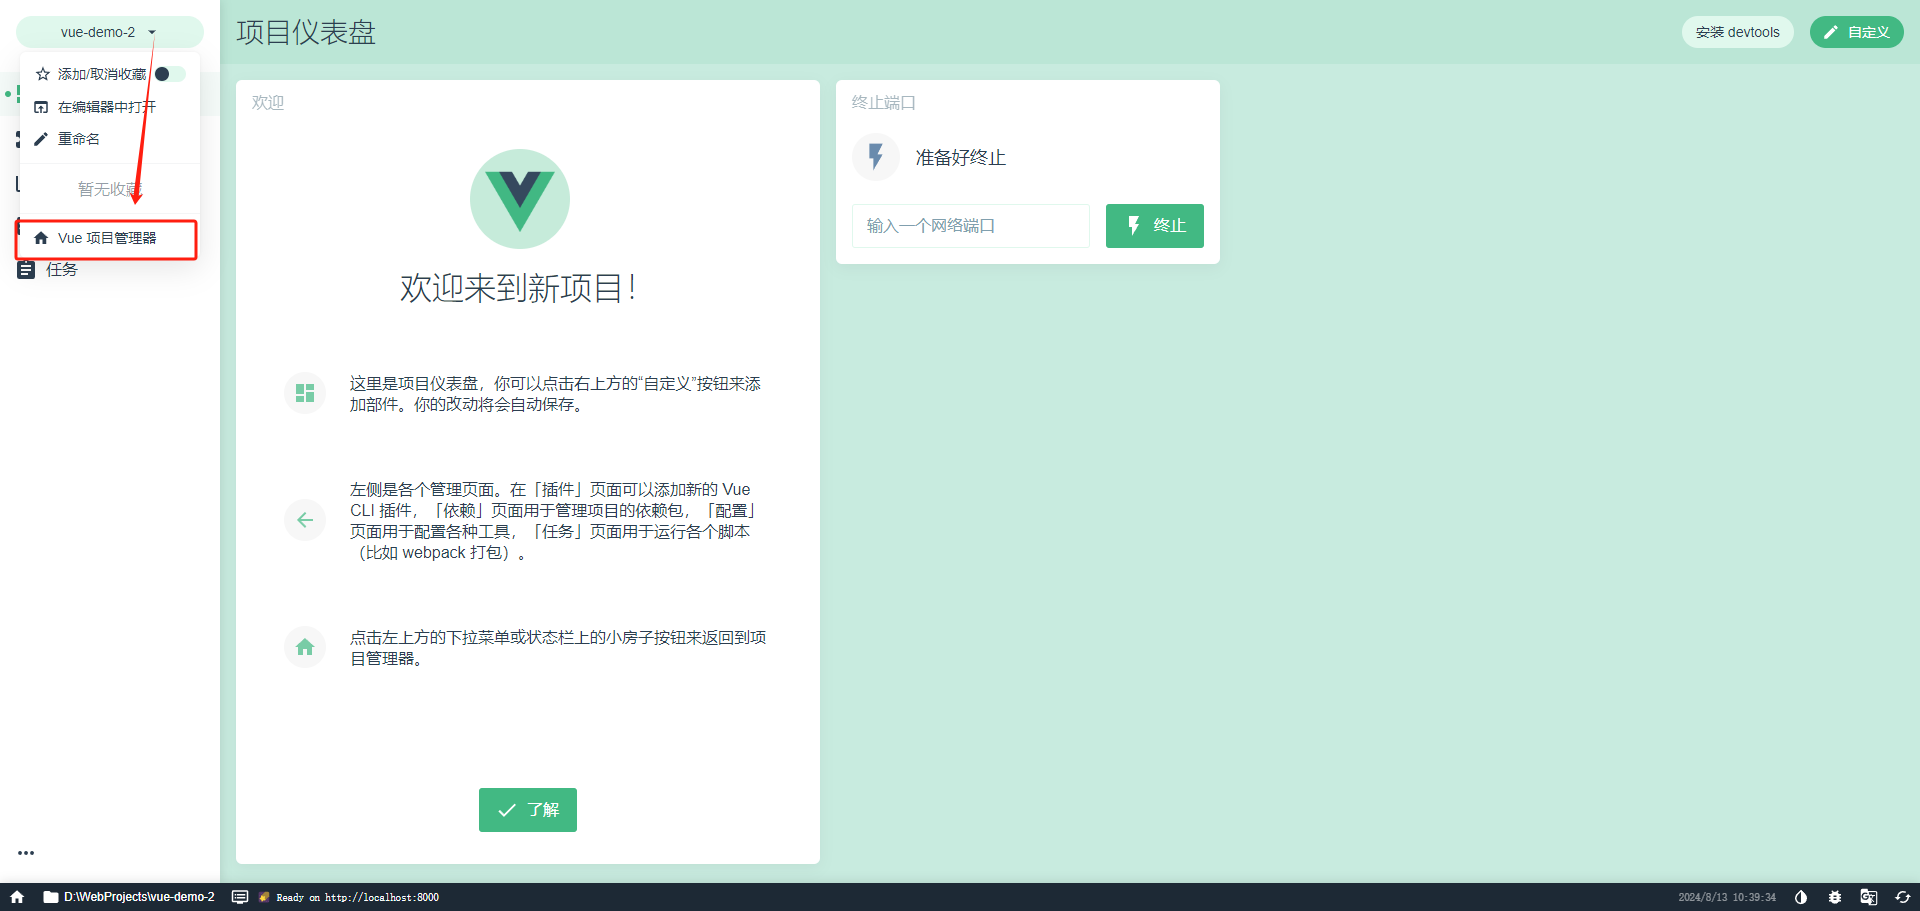
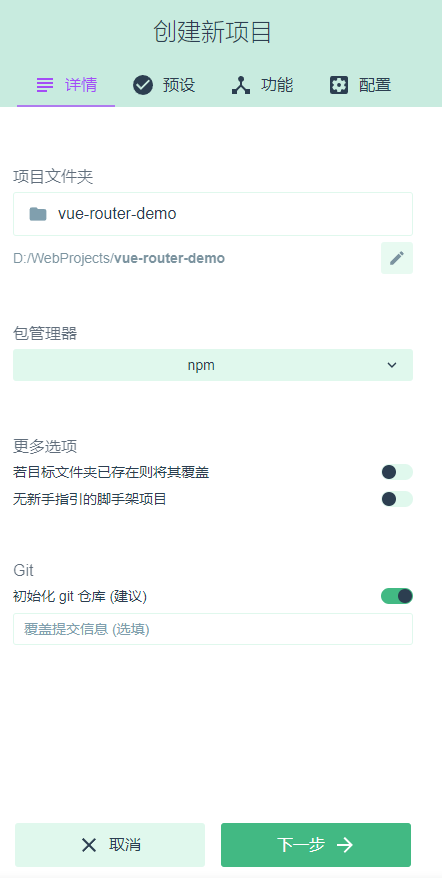
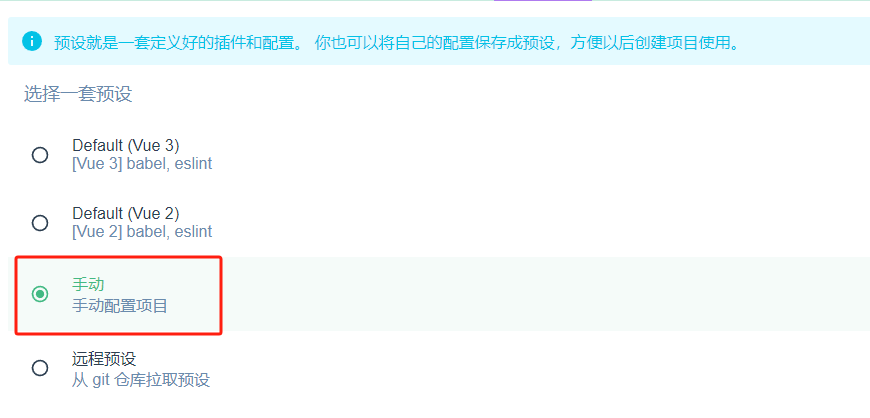
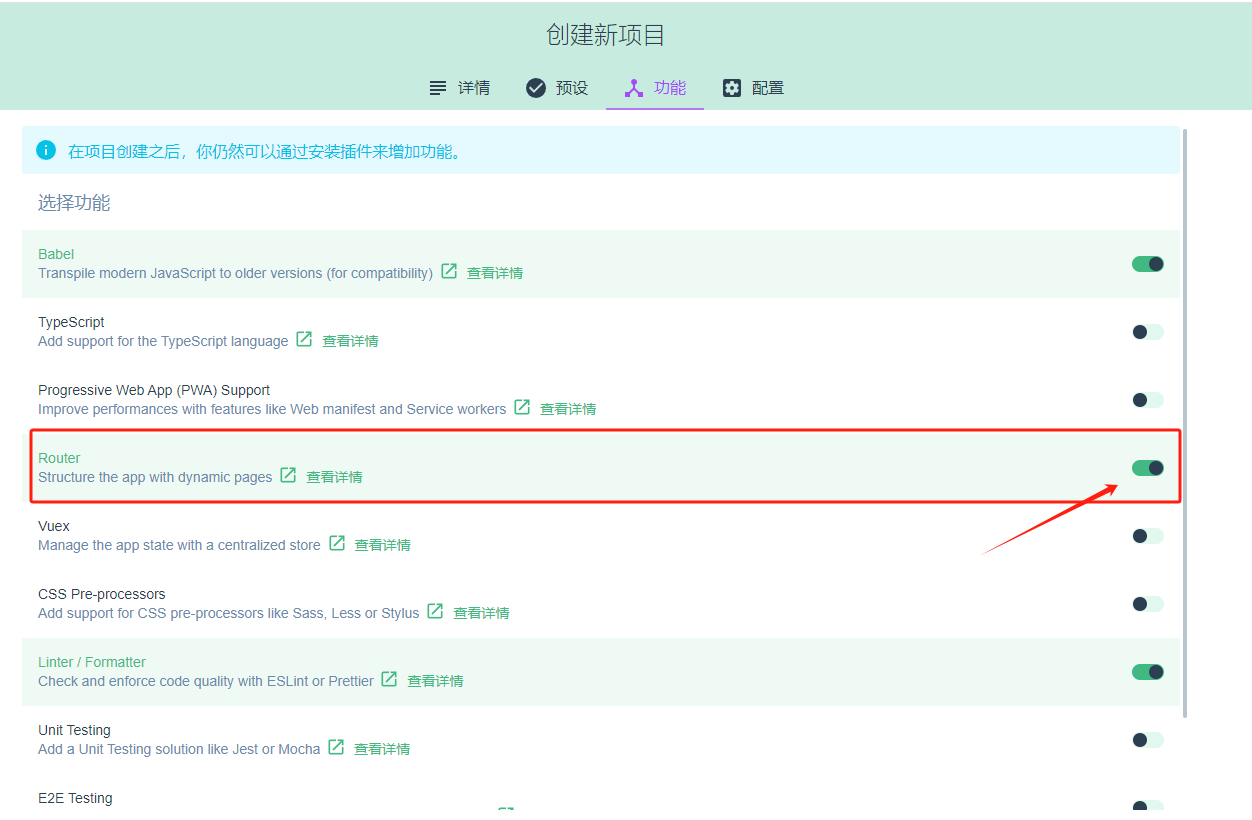
基于Vue CLI创建带有路由功能的前端项目
-
命令
shvue ui
已有项目创建vue-router输入命令
sh
npm install vue-router接下来是创建过程

耐心等待创建即可
- 效果展示
路由配置
- 路由组成
- VueRouter:路由器,根据路由请求在路由视图中动态渲染对应的视图组件
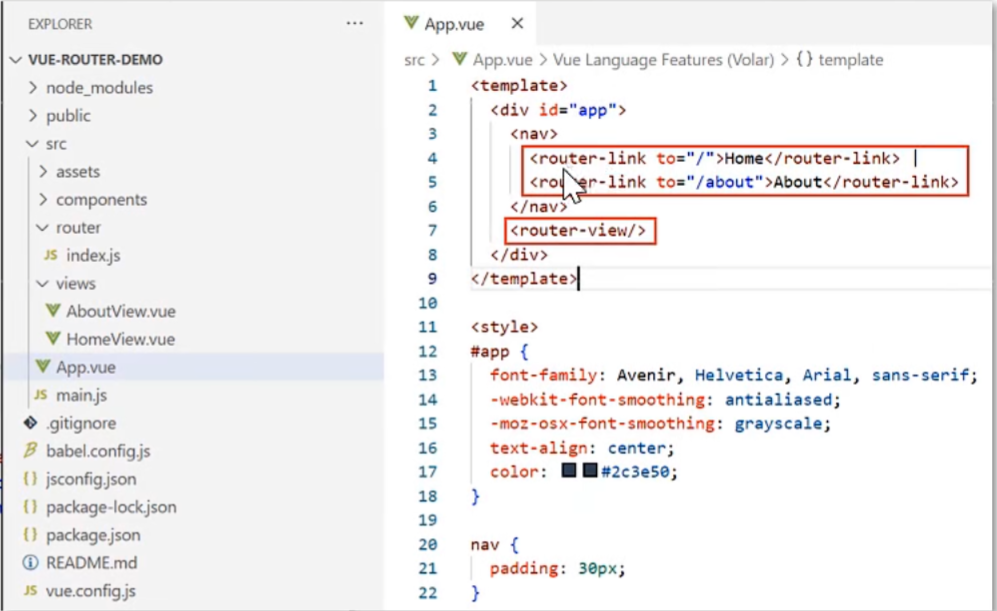
- <router-link>:路由链接组件,浏览器会解析成<a>
- <router-view>:路由视图组件,用来展示与路由路径匹配的视图组件
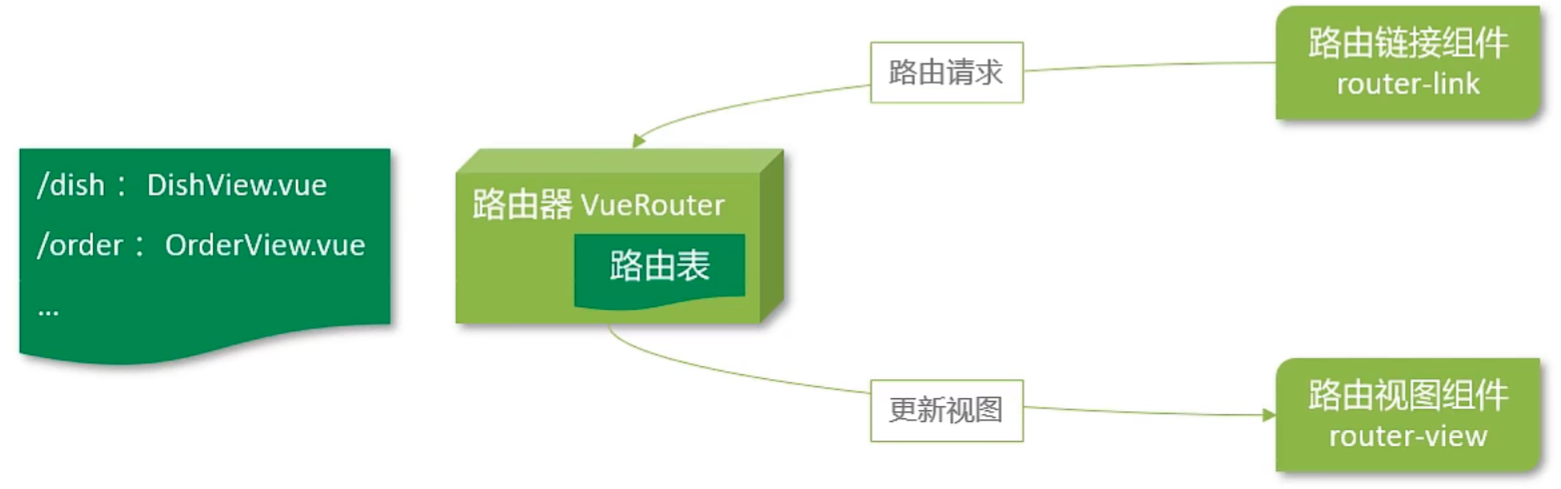
- 路由路径和路由视图对于关系
- <router-link>
- <router-view>
-
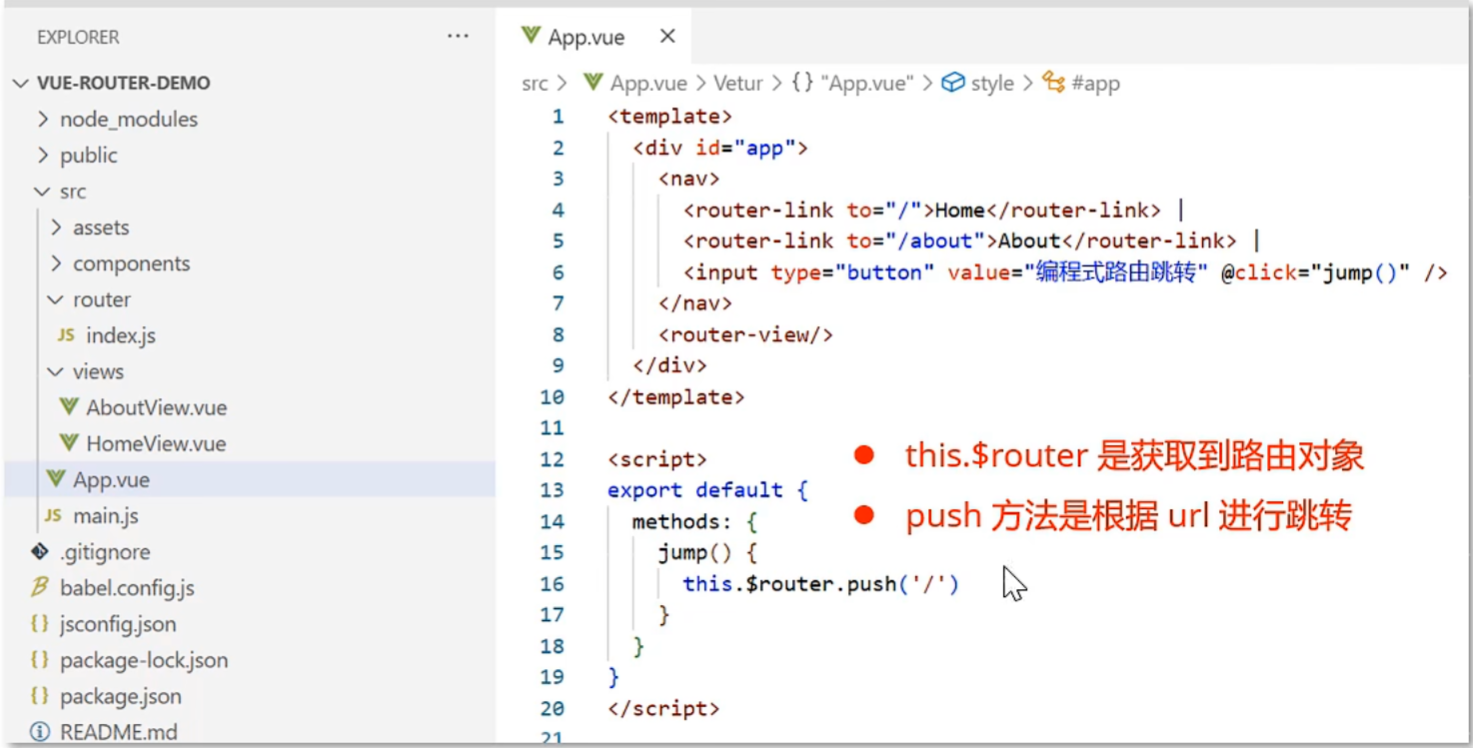
路由跳转
- 标签式
- 编程式
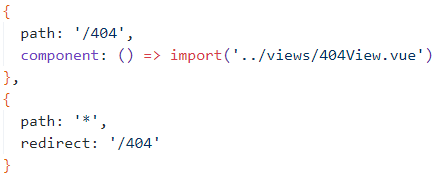
如何用户访问的路由地址不存在,该如何处理?
嵌套路由
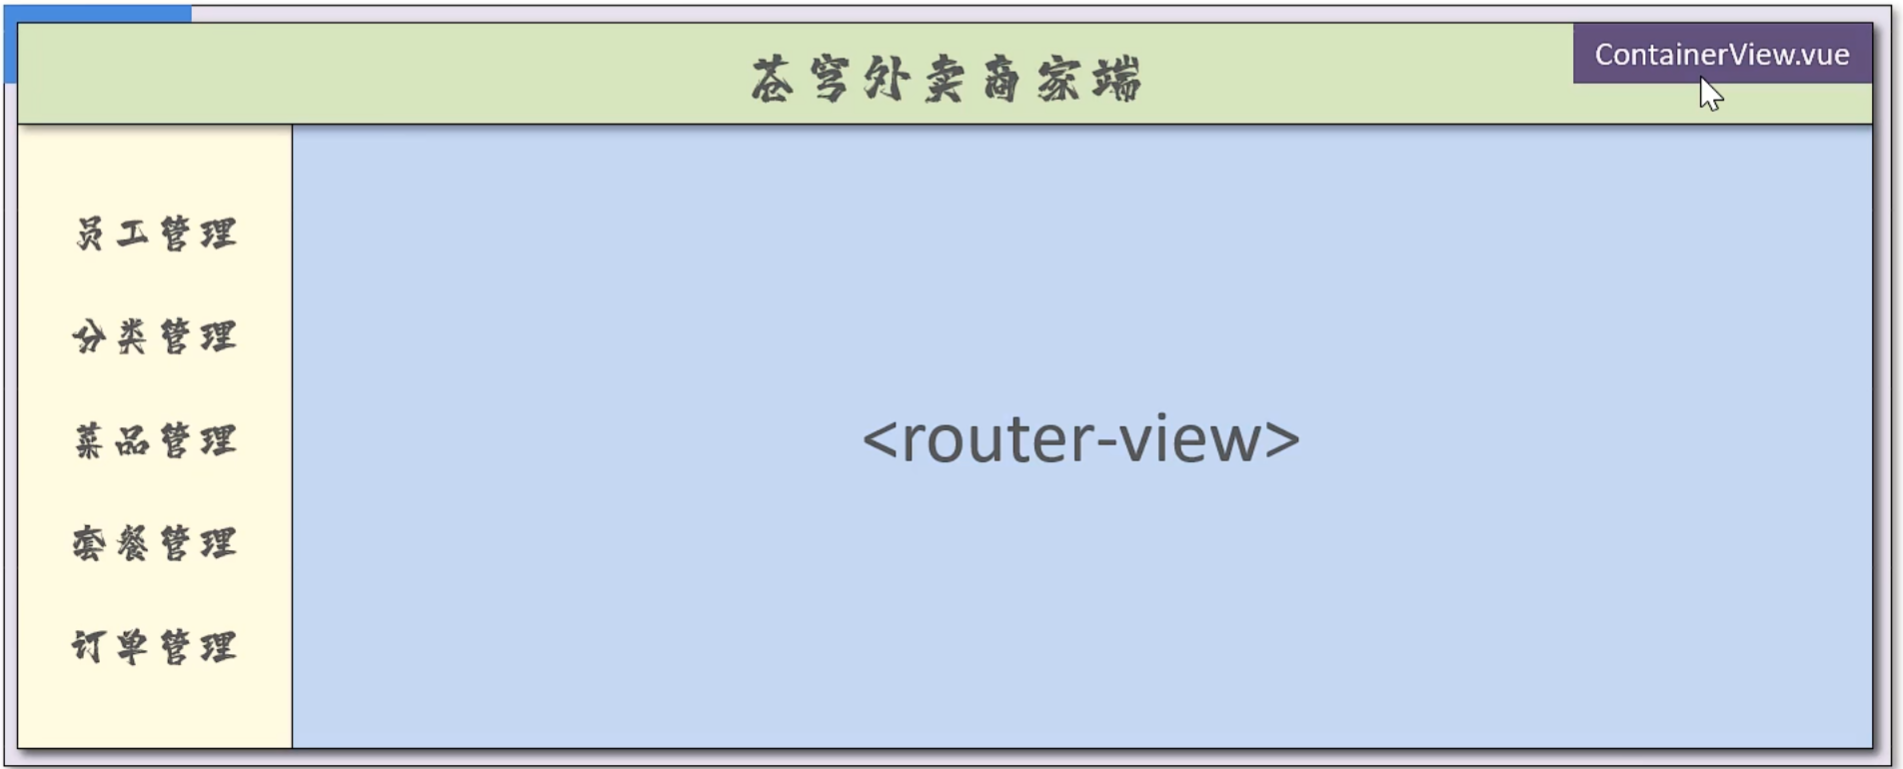
- 嵌套路由:组件内要切换内容,就需要用到嵌套路由(子路由)
-
实现步骤
-
安装并导入ElementUI,实现页面布局(Container布局容器)---ContainerView.vue
shnpm i element-ui -S -
提供子视图组件,用于效果展示 ---P1View.vue、P2View.vue、P3View.vue
-
在src/router/index.js中配置路由映射规则(嵌套路由配置)
-
在布局容器视图中添加<router-view>,实现子视图组件展示
-
在布局容器中添加<router-link>,实现路由请求
-
注意: :子路由变化,切换的是【ContainerView组件】中<router-view\>\</router-view>部分的内容
ContainerView.vue
vue
<template>
<el-container>
<el-header>Header</el-header>
<el-container>
<el-aside width="200px">
<router-link to="/c/p1">P1</router-link><br>
<router-link to="/c/p2">P2</router-link><br>
<router-link to="/c/p3">P3</router-link>
</el-aside>
<el-main>
<router-view />
</el-main>
</el-container>
</el-container>
</template>
<script>
export default {
}
</script>
<style>
.el-header,
.el-footer {
background-color: #B3C0D1;
color: #333;
text-align: center;
line-height: 60px;
}
.el-aside {
background-color: #D3DCE6;
color: #333;
text-align: center;
line-height: 200px;
}
.el-main {
background-color: #E9EEF3;
color: #333;
text-align: center;
line-height: 160px;
}
body>.el-container {
margin-bottom: 40px;
}
.el-container:nth-child(5) .el-aside,
.el-container:nth-child(6) .el-aside {
line-height: 260px;
}
.el-container:nth-child(7) .el-aside {
line-height: 320px;
}
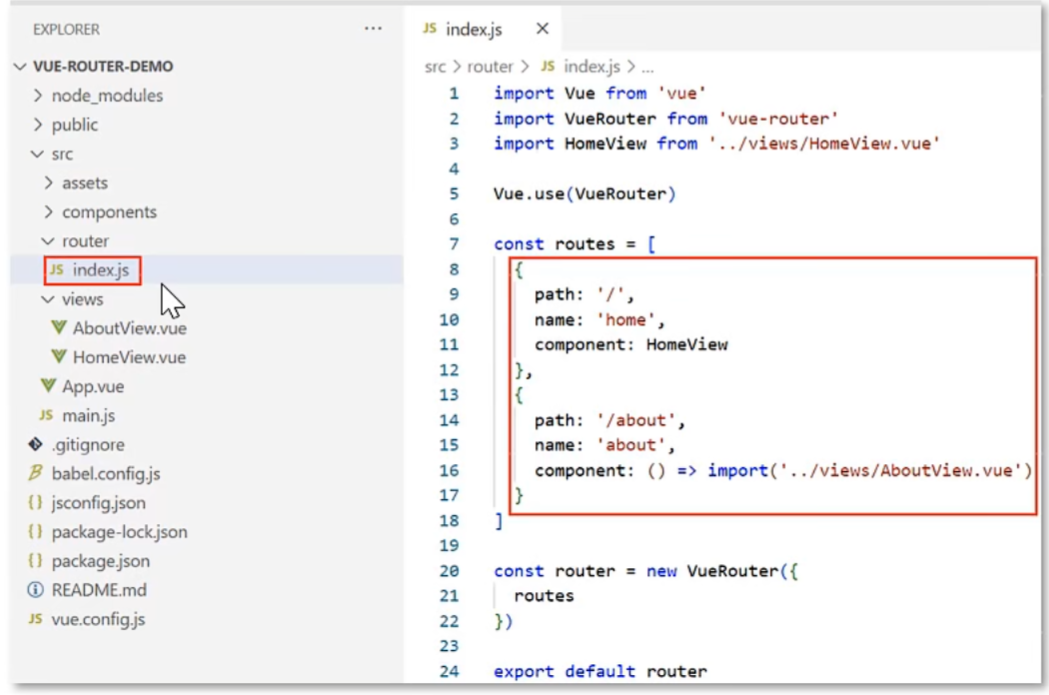
</style>index.js
js
import Vue from "vue";
import VueRouter from "vue-router";
import HomeView from "../views/HomeView.vue";

Vue.use(VueRouter);

//维护路由表,某个路由路径对应哪个视图组件
const routes = [
  {
    path: "/", //路由路径
    name: "home",
    component: HomeView,
  },
  {
    path: "/about",
    name: "about",
    // route level code-splitting
    // this generates a separate chunk (about.[hash].js) for this route
    // which is lazy-loaded when the route is visited.
    component: () =>
      import(/* webpackChunkName: "about" */ "../views/AboutView.vue"),
  },
  {
    path: "/404",
    component: () => import("../views/404View.vue"),
  },
  {
    path: "*",
    redirect: "/404",
  },
  {
    path: "/c",
    component: () => import("../views/container/ContainerView.vue"),
    redirect: '/c/p1', //重定向,当访问/c时,直接重定向到 /c/p1
    //嵌套路由(子路由),对应的组件会展示在当前组件内部
    children: [
      {
        path: "/c/p1",
        component: () => import("../views/container/P1View.vue"),
      },
      {
        path: "/c/p2",
        component: () => import("../views/container/P2View.vue"),
      },
      {
        path: "/c/p3",
        component: () => import("../views/container/P3View.vue"),
      },
    ],
  },
];

const router = new VueRouter({
  routes,
});

export default router;
App.vue
vue
<template>
  <div id="app">
    <nav>
      <router-link to="/">Home</router-link> |
      <router-link to="/about">About</router-link> |
      <router-link to="/test">Test</router-link> |
      <input type="button" value="编程式路由跳转" @click="jump()" />
    </nav>
    <!-- 不同的视图组件展示的位置 -->
    <router-view />
  </div>
</template>

<script>
export default {
  methods: {
    jump() {
      this.$router.push("/about")
    }
  },
}
</script>

<style>
#app {
  font-family: Avenir, Helvetica, Arial, sans-serif;
  -webkit-font-smoothing: antialiased;
  -moz-osx-font-smoothing: grayscale;
  text-align: center;
  color: #2c3e50;
}

nav {
  padding: 30px;
}

nav a {
  font-weight: bold;
  color: #2c3e50;
}

nav a.router-link-exact-active {
  color: #42b983;
}
</style>
P1View.vue
vue
<template>
  <div>
    这是P1 View
  </div>
</template>

<script>
export default {

}
</script>

<style>

</style>
状态管理Vuex
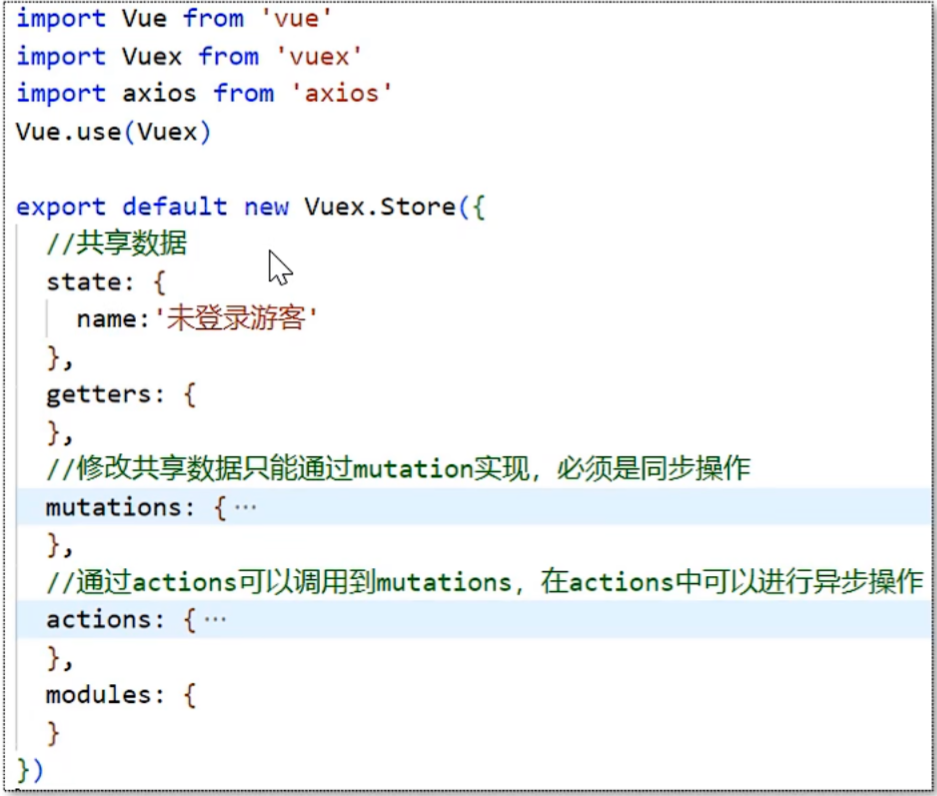
Vuex介绍
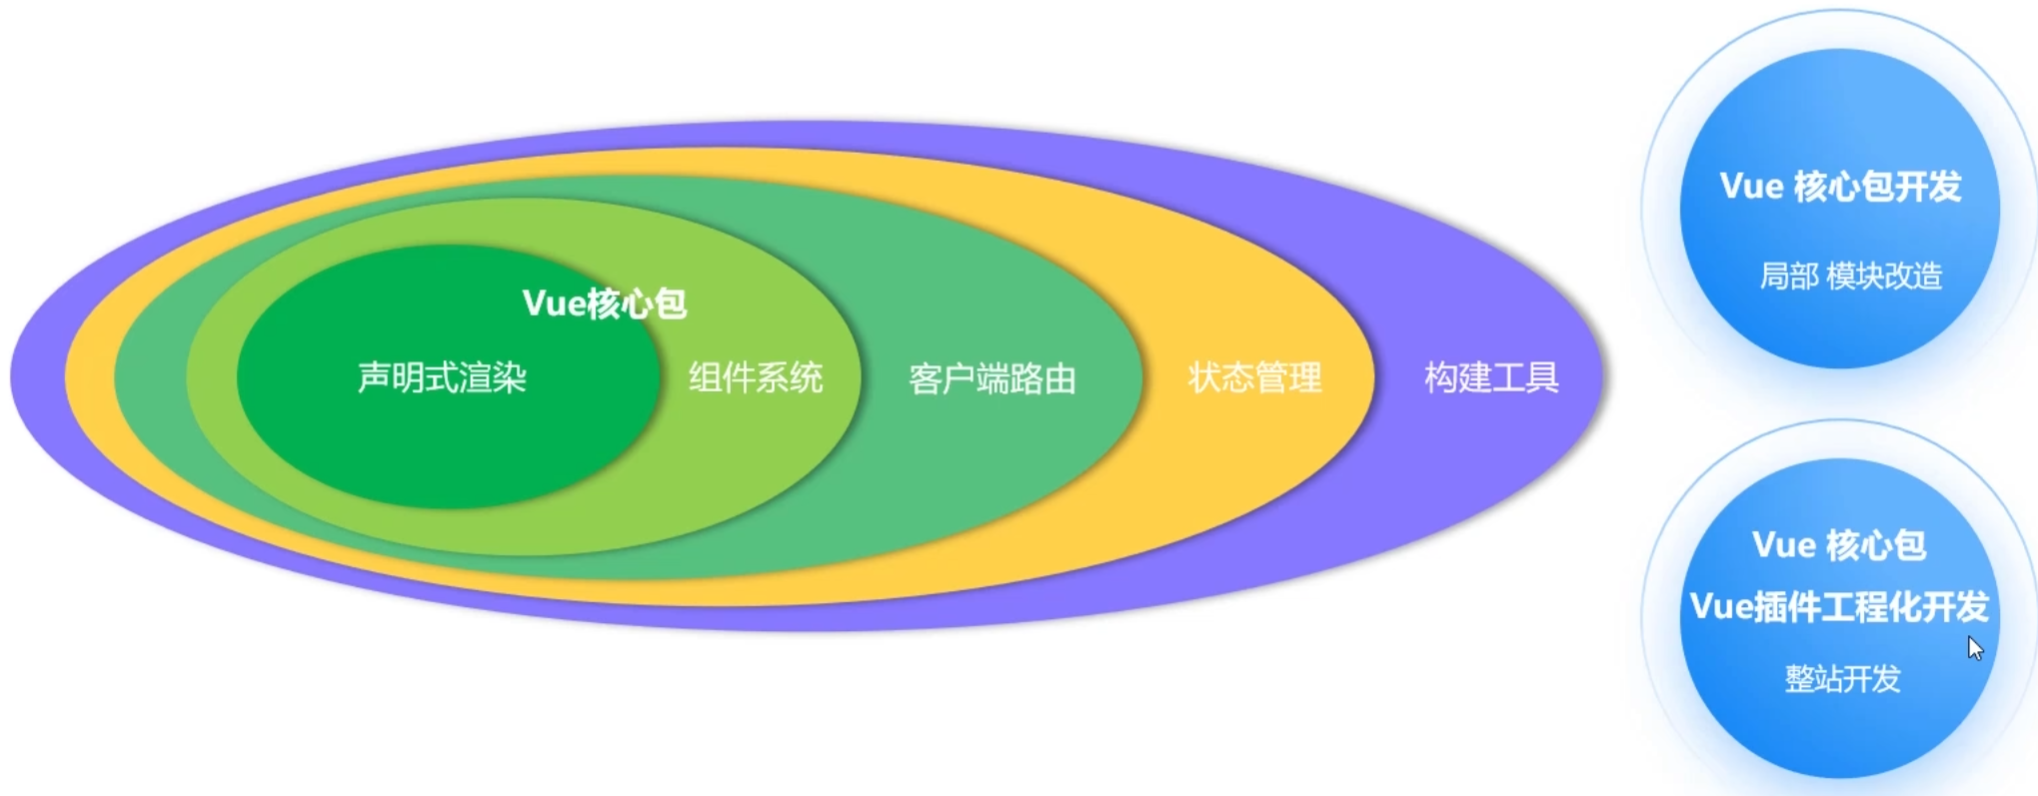
- vuex是一个专为Vue.js应用程序开发的状态管理库
- vuex是可以在多个组件之间共享数据,并且共享的数据都是响应式的,即数据的变更能及时渲染到模板
- vuex采用集中存储管理所有组件的状态
核心概念
- state:状态对象,集中定义各个组件共享的数据
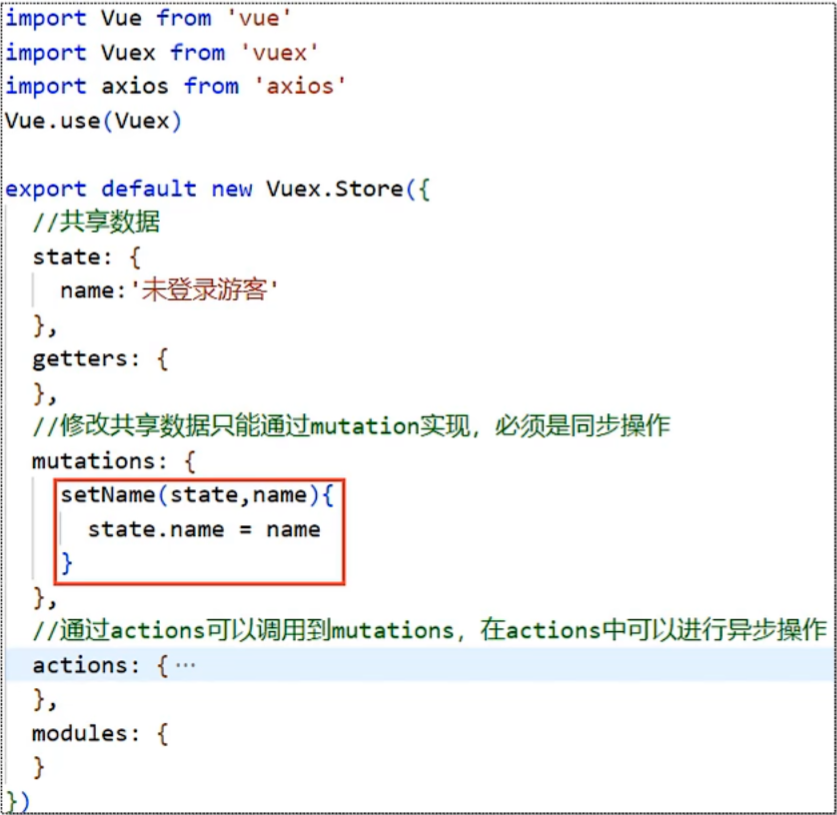
- mutations:类似于一个事件,用于修改共享数据,要求必须是同步函数
- actions:类似于mutation,可以包含异步操作,通过可以调用mutation来改变共享数据
使用方式
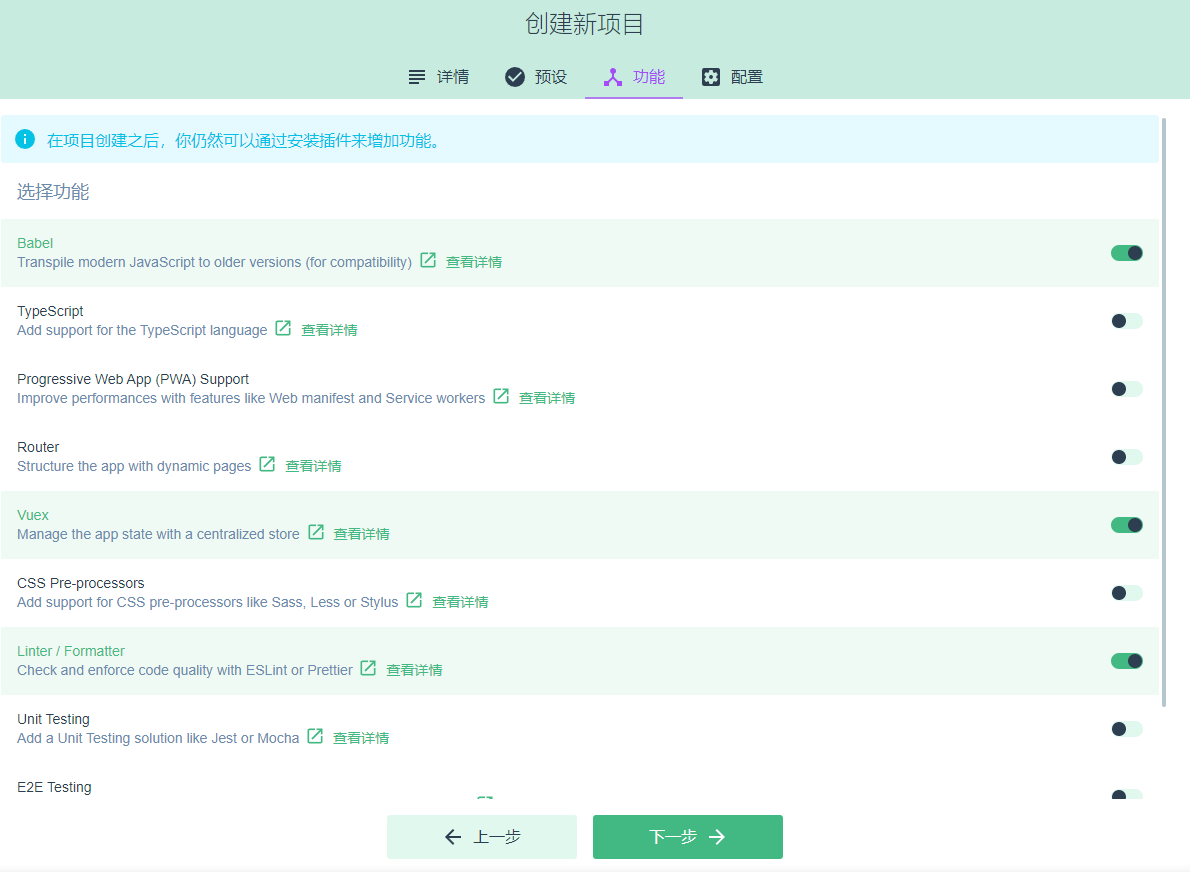
- 创建带有vuex功能的脚手架工程
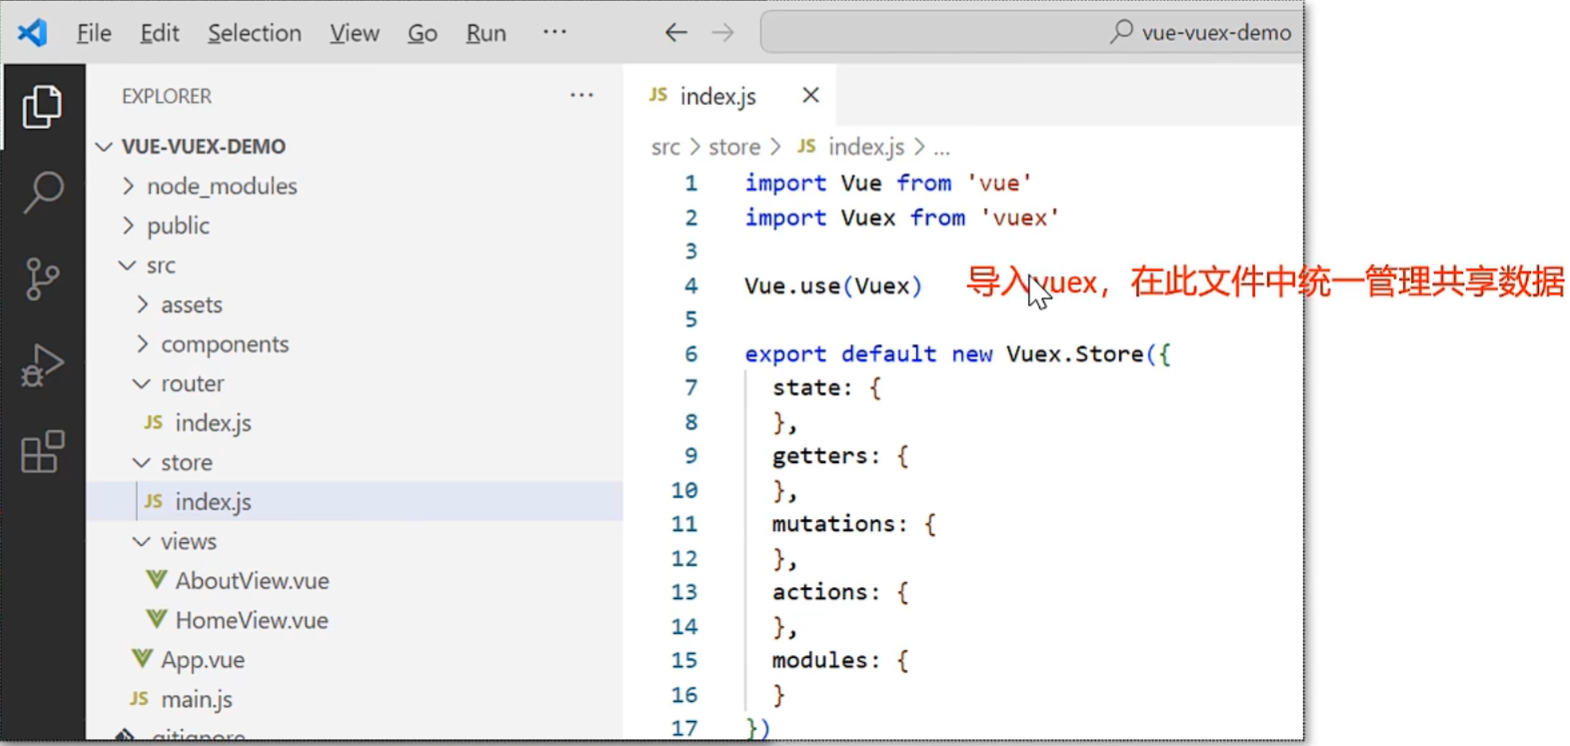
- 定义和展示共享数据
- 在mutations中定义函数,修改共享数据
- App.vue中调用mutations中的函数代码
vue
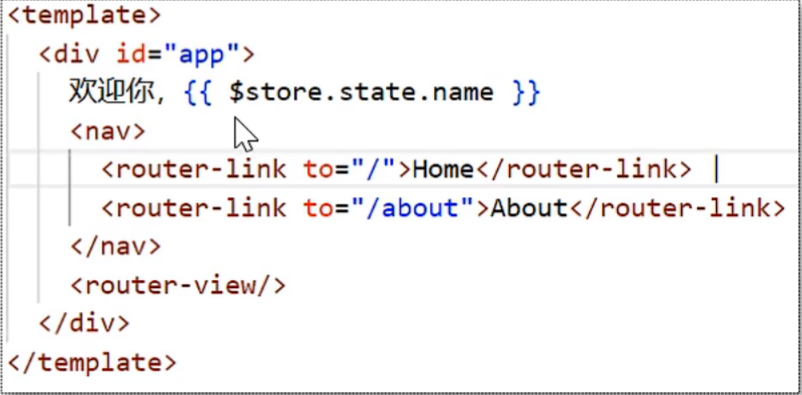
<template>
  <div id="app">
    欢迎你,{{ $store.state.name }}

    <input type="button" value="通过mutations修改共享数据" @click="handleUpdate"/>

    <img alt="Vue logo" src="./assets/logo.png">
    <HelloWorld msg="Welcome to Your Vue.js App"/>
  </div>
</template>

<script>
import HelloWorld from './components/HelloWorld.vue'

export default {
  name: 'App',
  components: {
    HelloWorld
  },
  methods: {
    handleUpdate(){
      //mutations中定义的函数不能直接调用,必须通过这种方式来调用
      //setName为mutations中定义的函数名称,张三为传递的参数
      this.$store.commit('setName', '张三')
    }
  },
}
</script>

<style>
#app {
  font-family: Avenir, Helvetica, Arial, sans-serif;
  -webkit-font-smoothing: antialiased;
  -moz-osx-font-smoothing: grayscale;
  text-align: center;
  color: #2c3e50;
  margin-top: 60px;
}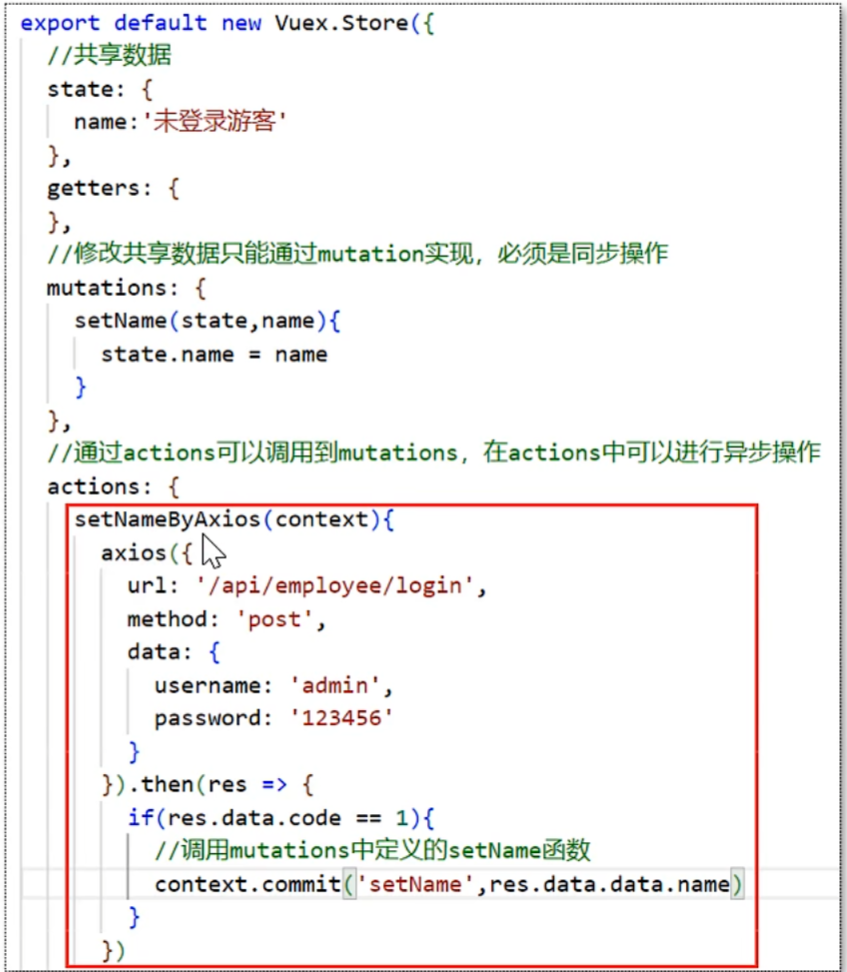
</style>- 在action中定义函数,用于调用mutation
在App.vue中调用actions中的函数代码:
vue
<template>
  <div id="app">
    欢迎你,{{ $store.state.name }}

    <input type="button" value="通过mutations修改共享数据" @click="handleUpdate" />
    <input type="button" value="调用actions中定义的函数" @click="handleCallAction" />

    <img alt="Vue logo" src="./assets/logo.png">
    <HelloWorld msg="Welcome to Your Vue.js App" />
  </div>
</template>

<script>
import HelloWorld from './components/HelloWorld.vue'

export default {
  name: 'App',
  components: {
    HelloWorld
  },
  methods: {
    handleUpdate() {
      //mutations中定义的函数不能直接调用,必须通过这种方式来调用
      //setName为mutations中定义的函数名称,张三为传递的参数
      this.$store.commit('setName', '张三')
    },
    handleCallAction() {
      //调用actions中定义的函数,setNameByAxios为函数名称
      this.$store.dispatch('setNameByAxios')
    }
  },
}
</script>
<style>
#app {
  font-family: Avenir, Helvetica, Arial, sans-serif;
  -webkit-font-smoothing: antialiased;
  -moz-osx-font-smoothing: grayscale;
  text-align: center;
  color: #2c3e50;
  margin-top: 60px;
}
</style>
TypeScript
TypeScript介绍
- TypeScript(简称:TS)是微软推出的开源语言
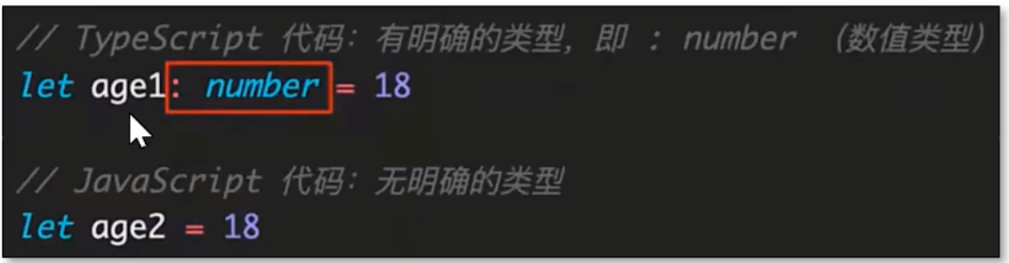
- TypeScript是JavaScript的超集(JS有的TS都有)
- TypeScript = Type + JavaScript(在JS基础上增加了类型支持)
- TypeScript文件扩展名为ts
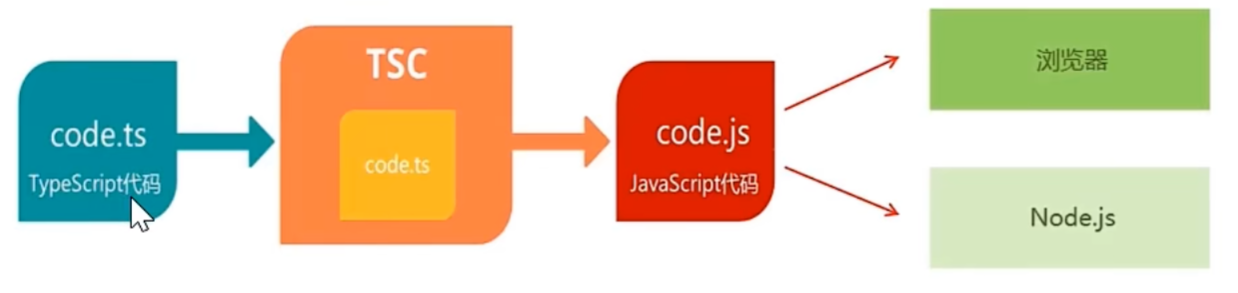
- TypeScript可编译成标准的JavaScript,并且在编译时进行类型检查
安装TypeScript
sh
npm install -g typescript- TypeScript简单体验,创建hello.ts文件,内容如下
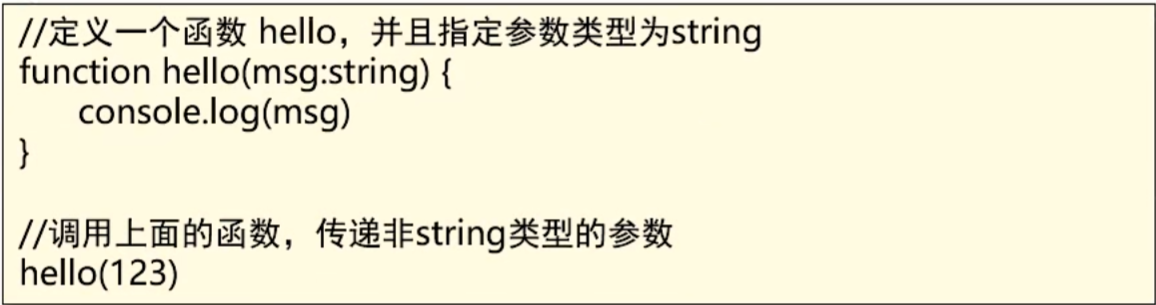

- TS为什么要增加类型支持 ?
- TS 属于静态类型编程语言,JS 属于动态类型编程语言
- 静态类型在编译期做类型检查,动态类型在执行期做类型检查
- 对于JS来说,需要等到代码执行的时候才发现错误(晚)
- 对于TS来说,在代码编译的时候就可以发现错误(早)
- 配合 VScode 开发工具,TS 可以提前到在编写代码的同时就发现代码中的错误,减少找Bug、改Bug的时间
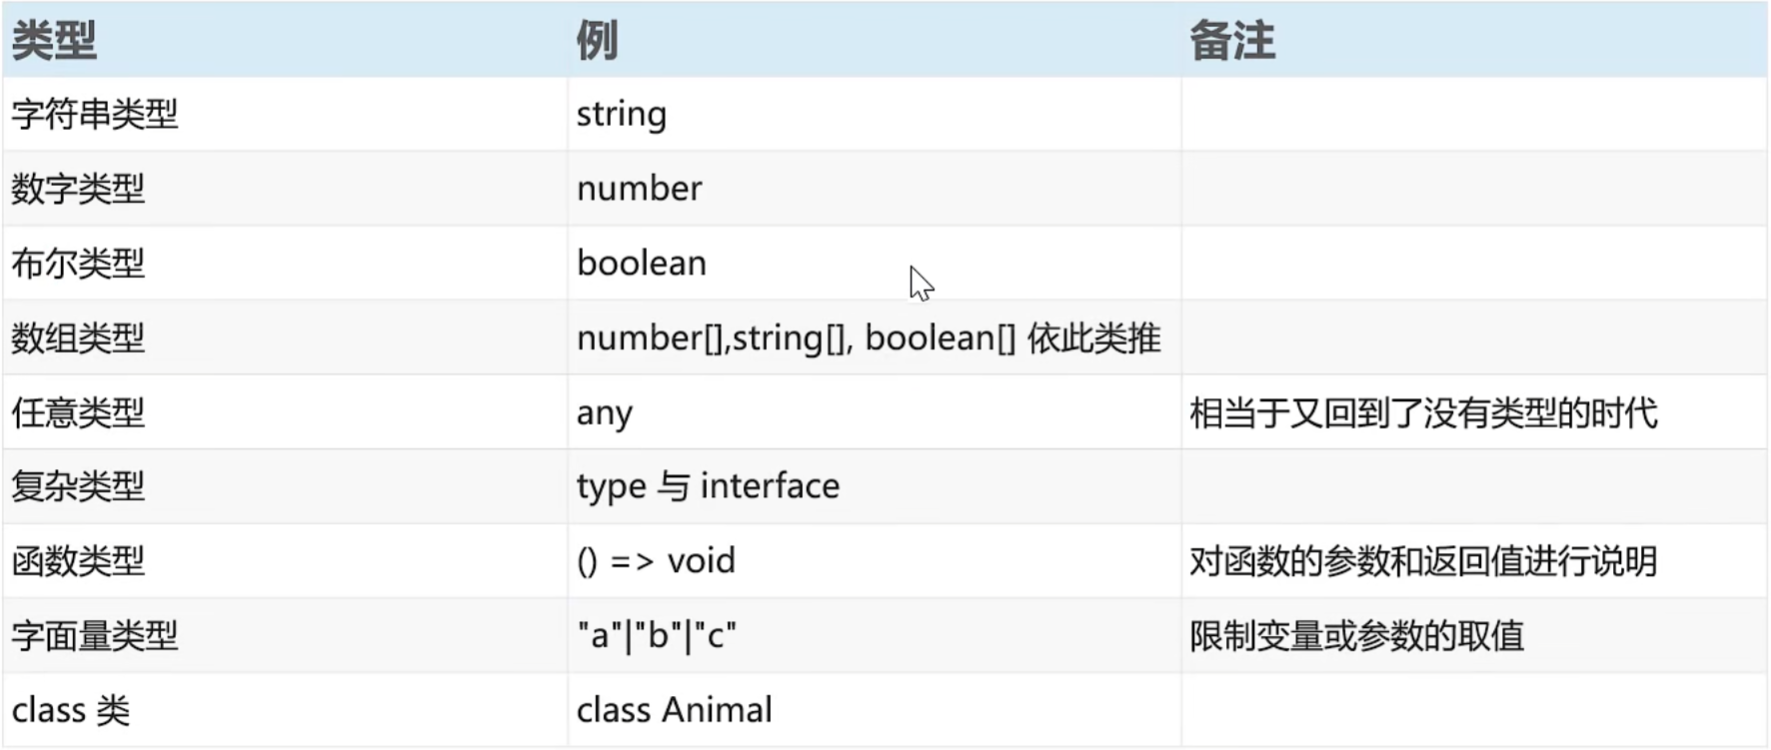
TypeScript常用类型
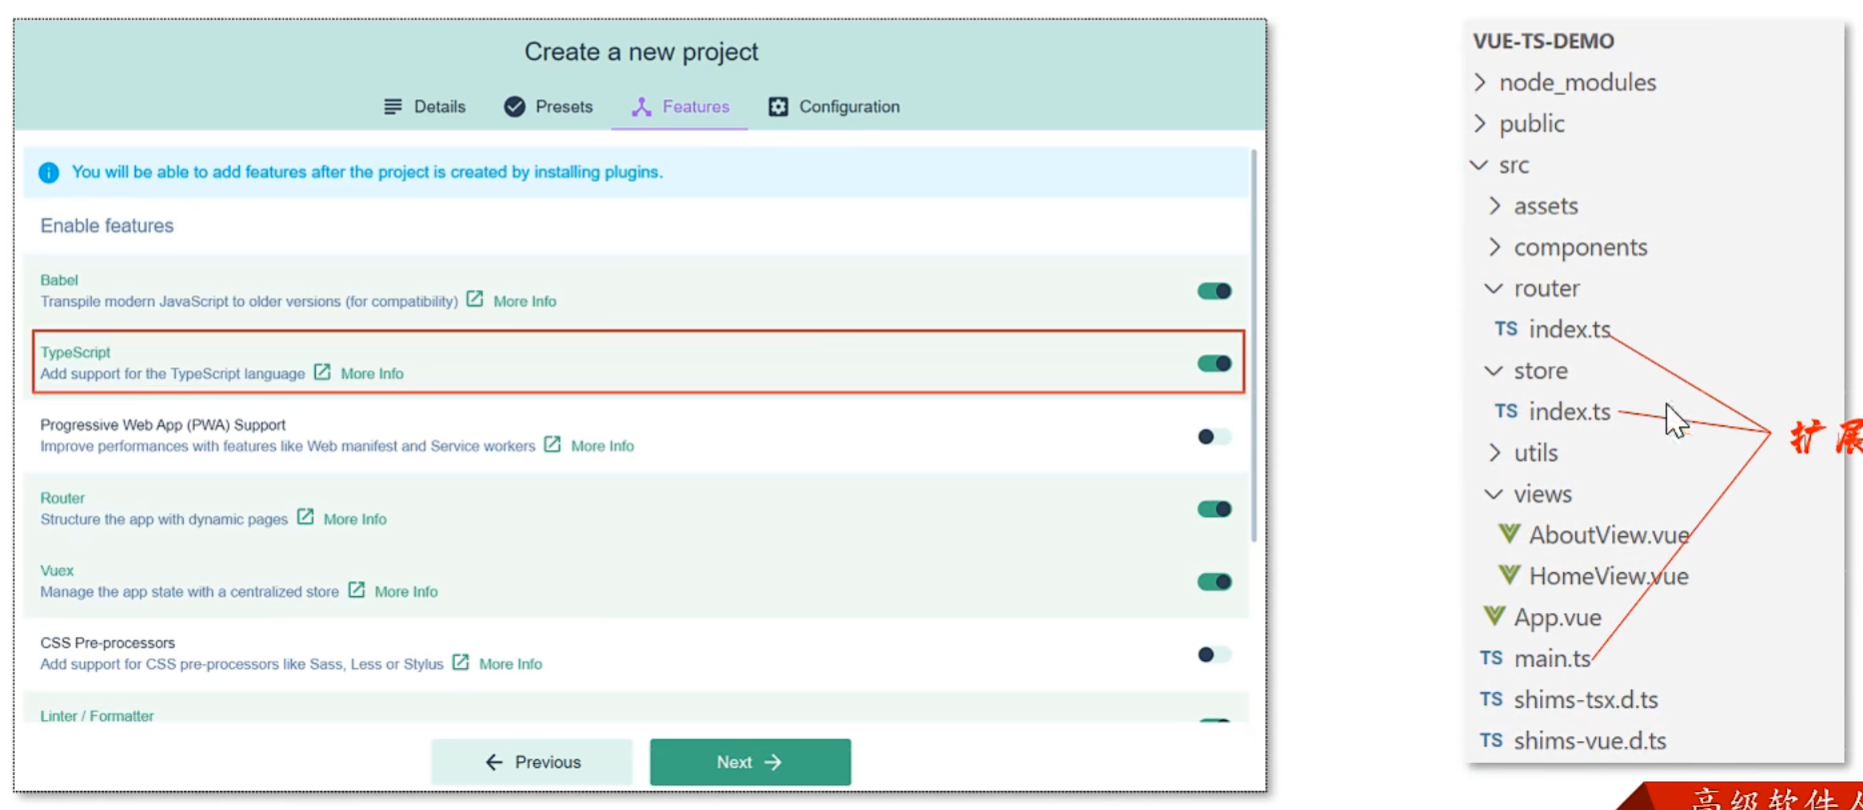
- 创建前端工程,基于TypeScript开发
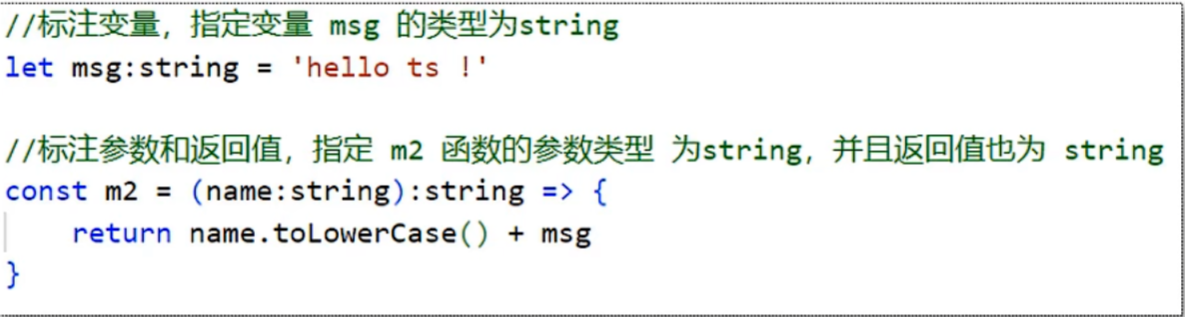
- 类型标注的位置
- 标注变量
- 标注参数
- 标注返回值
- 字符串类型、数字类型、布尔类型
ts
//字符串类型
let username: string = 'itcast'

//数字类型
let age: number = 20

//布尔类型
let isTrue: boolean = true

console.log(username)
console.log(age)
console.log(isTrue)- 字面量类型(类似于枚举)
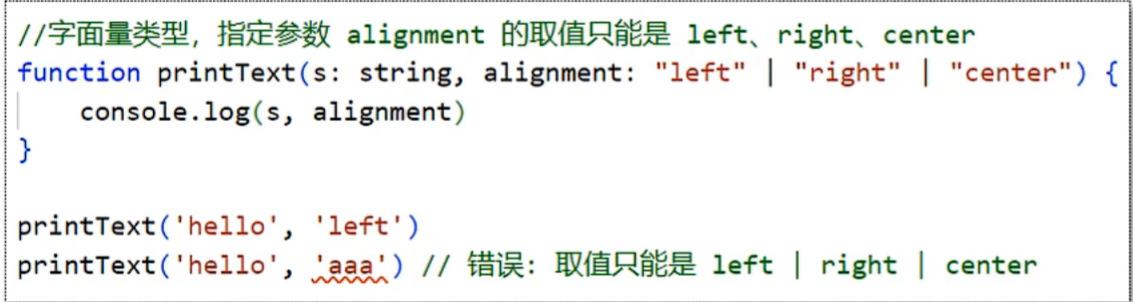
**注意:**字面量类型用于限定数据的取值范围
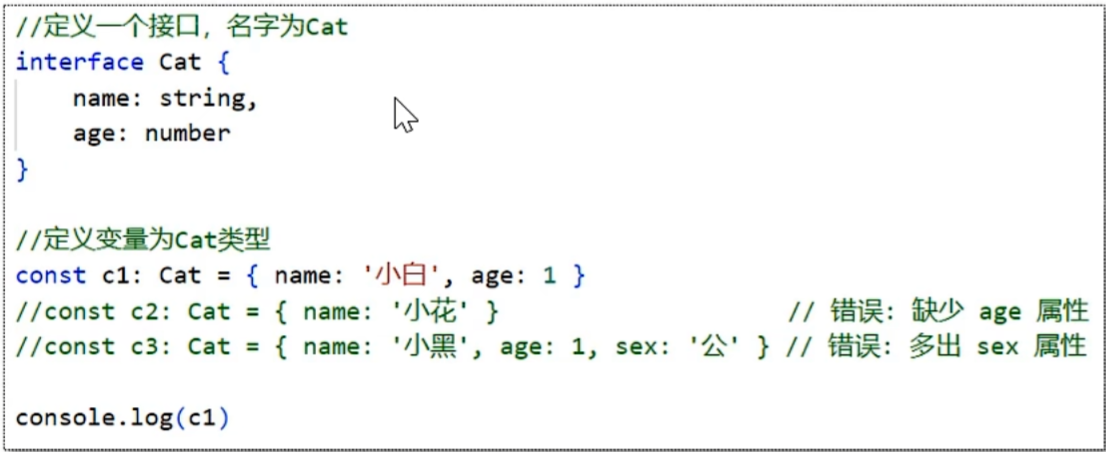
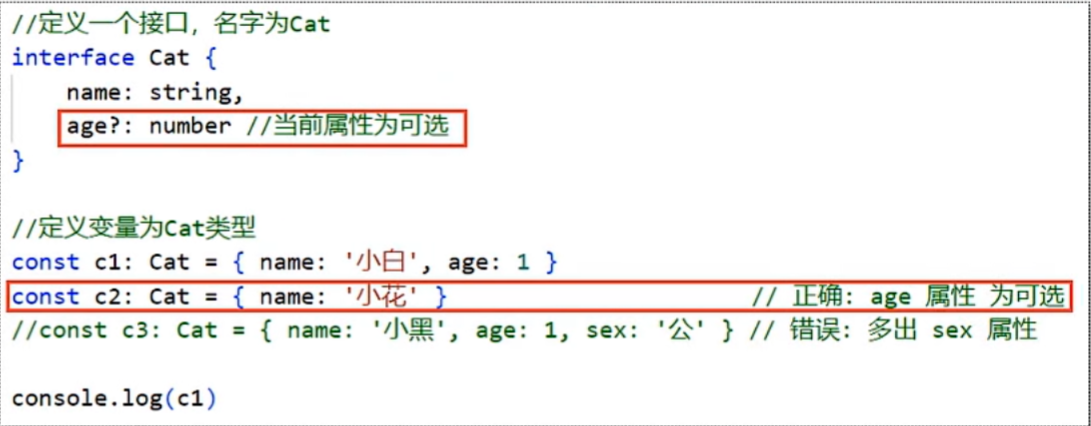
- interface类型
**小技巧:**可以通过在属性名后面加上? ,表示当前属性为可选
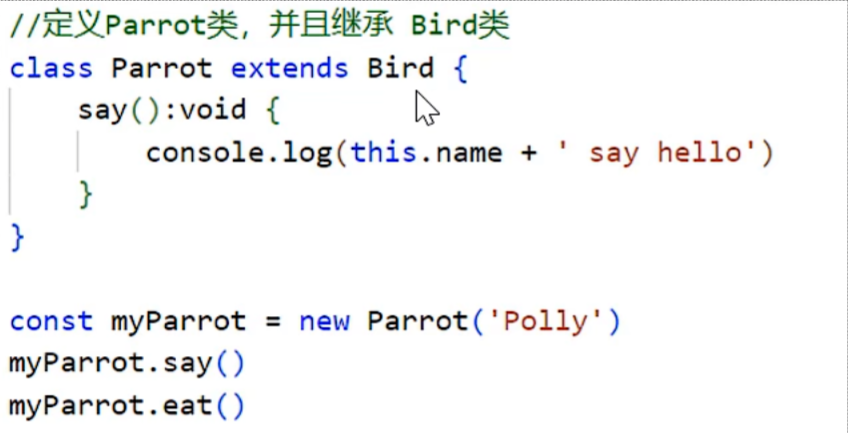
- class类--基本使用
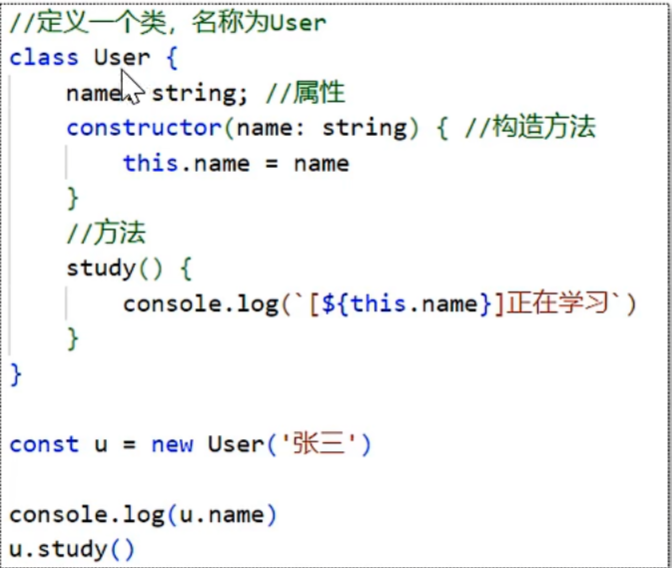
**注意:**使用class关键字来定义类,类中可以包含属性、构造方法、普通方法
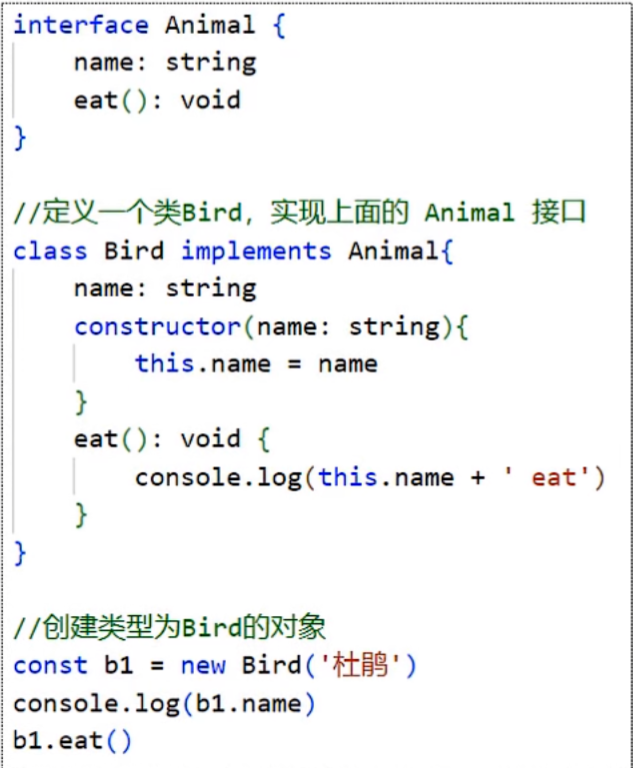
- class类--实现接口
- class类--类的继承