1 LeNet-5基本介绍

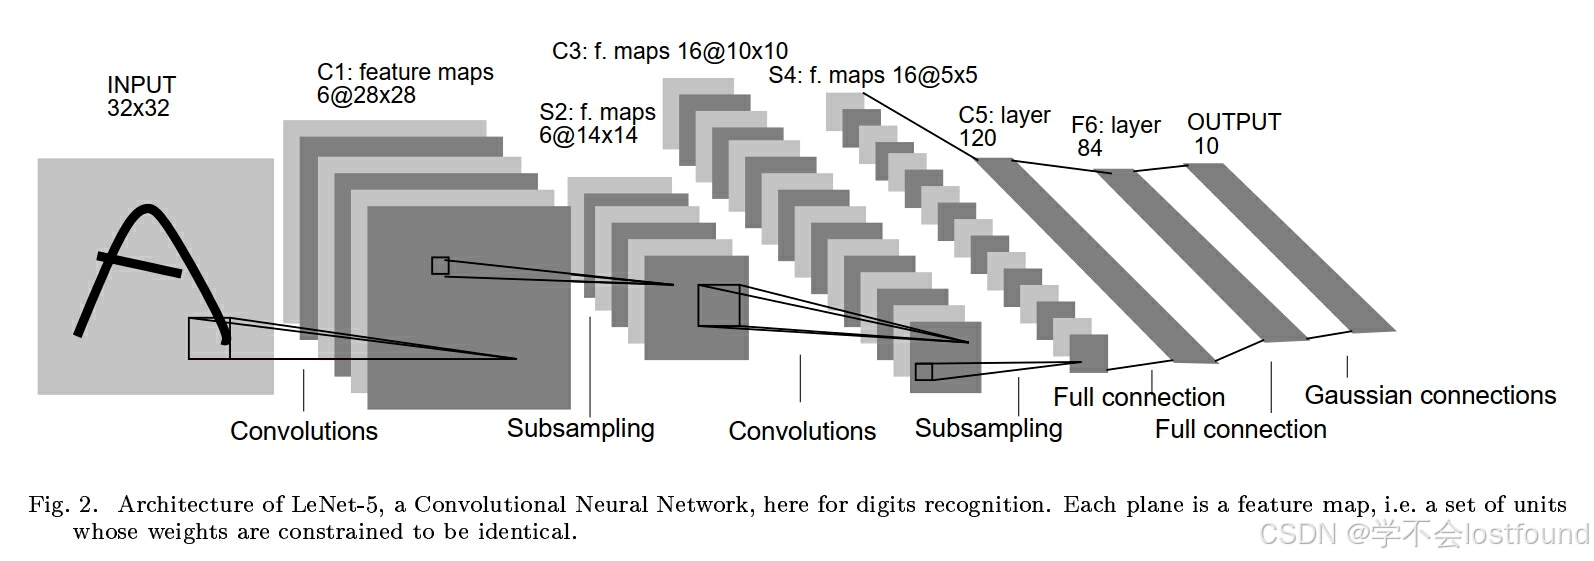
LeNet-5是一种经典的卷积神经网络(CNN)架构,由Yann LeCun在1998年提出,用于手写数字识别,LeNet-5是卷积神经网络的开创性工作之一,它引入了卷积层、池化层和全连接层的组合,为现代深度学习模型奠定了基础
LeNet-5网络结构包括以下几个关键层:
- 卷积层(Convolutional Layer):使用多个卷积核提取图像特征
- 池化层(Pooling Layer):通常使用最大池化(Max Pooling)或平均池化(Average Pooling)来降低特征图的空间维度
- 全连接层(Fully Connected Layer):将特征展平铺并连接到输出层进行分类
LeNet-5的具体网络结构如下:
- 输入层:32x32像素的灰度图像
- 卷积层C1:使用6个5x5的卷积核,输出6个28x28的特征图
- 池化层S2:2x2的最大池化,输出6个14x14的特征图
- 卷积层C3:使用16个5x5的卷积核,输出16个10x10的特征图
- 池化层S4:2x2的最大池化,输出16个5x5的特征图
- 全连接层C5:将16个5x5的特征图展平,连接到120维向量
- 全连接层F6:120维全连接到84维向量
- 输出层:84维全连接到10维,代表10个类别
全连接的图像展平处理:
- 常规图像:[N, C, H, W]
- 图像展平:[N, C * H * W]
- 本质是改变shape,不会改变像素值,也不会改变数据本身的信息;只是为了对口型、为了科学计算、为了矩阵相乘
2 LeNet-5网络搭建
(1)复杂一点的写法(易于理解)
# 引入pytorch和nn神经网络
import torch
import torch.nn as nn

class LeNet5(nn.Module):
    """
        自定义一个LeNet5神经网络
    """
    def __init__(self, in_channels=1, ):
        """
            初始化
        """
        # super(LeNet5, self).__init__()这行代码的作用是调用Model类的父类(即nn.Module)的__init__()方法
        super(LeNet5, self).__init__()
        # 第一层转换(卷积)
        self.conv1 = nn.Conv2d(
            in_channels=in_channels,
            out_channels=6,
            kernel_size=5, # stride=1, w-k+1=28, w=32-->k=5
            stride=1,
            padding=0
        )
        # 第二层转换(亚采样)
        self.mp1 = nn.MaxPool2d(
            kernel_size=2, # stride=2, 28/k=w, w=14-->k=2
            stride=2,
            padding=0
        )
        # 第三层转换(卷积)
        self.conv2 = nn.Conv2d(
            in_channels=6,
            out_channels=16,
            kernel_size=5, # stride=1, w-k+1=10, w=14-->k=5
            stride=1,
            padding=0
        )
        # 第四层转换(亚采样)
        self.mp2 = nn.MaxPool2d(
            kernel_size=2, # stride=2, 10/k=w, w=5-->k=2
            stride=2,
            padding=0
        )
        # 第五层转换(全连接)
        # 1、展平(常规图像:[N, C, H, W],展平:[N, C * H * W])
        # 数据处理的金标准:按维度理解和处理数据,画图和打印是行不通的,高纬度和大量的数据画图和打印会令人自闭!
        # 展平只是改变shape,不会改变像素值,不会改变数据本身的信息!
        # 之所以改变,是为了对口型,为了科学计算,为了矩阵相乘!
        self.flatten = nn.Flatten(
            start_dim=1,    # 第一个维度开始
            end_dim=-1    # 最后一个维度结束
        )
        # 2、全连接
        self.fc1 = nn.Linear(
            in_features=400,    # 上一个图的c*h*w=16*5*5=400
            out_features=120    # 输出是图中标注的120
        )
        self.fc2 = nn.Linear(
            in_features=120,
            out_features=84
        )
        self.fc3 = nn.Linear(
            in_features=84,
            out_features=n_classes
        )

    def forward(self, X):
        """
            前向传播
        """
        print(X.shape)
        X = self.conv1(X)
        print(X.shape)
        X = self.mp1(X)
        print(X.shape)
        X = self.conv2(X)
        print(X.shape)
        X = self.mp2(X)
        print(X.shape)
        X = self.flatten(X)
        print(X.shape)
        X = self.fc1(X)
        print(X.shape)
        X = self.fc2(X)
        print(X.shape)
        X = self.fc3(X)
        print(X.shape)

        return X
(2)简化后的写法
# 引入pytorch和nn神经网络
import torch
import torch.nn as nn

# 简化的写法
class LeNet5(nn.Module):
    """
        自定义一个神经网络
    """
    def __init__(self, in_channels=1, n_classes=10):
        """
            初始化
        """
        super(LeNet5, self).__init__()

        # 1. 特征抽取
        self.feature_extractor = nn.Sequential(
            nn.Conv2d(in_channels=in_channels,
                               out_channels=6,
                               kernel_size=5,
                               stride=1,
                               padding=0),
            nn.MaxPool2d(kernel_size=2,
                                stride=2,
                                padding=0),
            nn.Conv2d(in_channels=6,
                              out_channels=16,
                              kernel_size=5,
                              stride=1,
                              padding=0),
            nn.MaxPool2d(kernel_size=2,
                               stride=2,
                               padding=0)
        )

        # 2. 分类输出
        self.classifier = nn.Sequential(
            nn.Flatten(start_dim=1, end_dim=-1),
            nn.Linear(in_features=400, out_features=120),
            nn.Linear(in_features=120, out_features=84),
            nn.Linear(in_features=84, out_features=n_classes)
        )

    def forward(self, x):
        """
            前向传播
        """
        # 1. 先做特征抽取
        x = self.feature_extractor(x)
        # 2. 再做分类回归
        x = self.classifier(x)
        return x
(3)效果测试
# 实例化对象
m1 = LeNet5(in_channels=1)
# 创建一个随机X对象
X = torch.randn(2, 1, 32, 32)
# 获得预测结果
y_pred = m1(X)
# 查看预测结果的形状
y_pred.shape
# 查看预测结果的内容
y_pred
3 基于LeNet-5的手势识别案例
3.1 原始数据读取
人工智能的数据集很可能很大,要一次性把所有数据都读进内存是不现实的,因此,在本案例中,并不是把所有图像全部读进内存,而是先把所有图像的路径和类别归纳和梳理出来,然后分批次读取
-
img_path
-
img_label
"""
尝试读取 train
"""
import os
train_root = os.path.join("gesture", "train")图片路径的列表
train_paths = []
图片对应的数字列表
train_labels = []
for label in os.listdir(train_root):
label_root = os.path.join(train_root, label)
for file in os.listdir(label_root):
file_path = os.path.join(label_root, file)
print(file_path)
print(label)
train_paths.append(file_path)
train_labels.append(label)"""
尝试读取 test (同理)
"""
import os
test_root = os.path.join("gesture", "test")
test_paths = []
test_labels = []for label in os.listdir(test_root):
label_root = os.path.join(test_root, label)
for file in os.listdir(label_root):
file_path = os.path.join(label_root, file)
test_paths.append(file_path)
test_labels.append(label)
读取数据之后,我们可以构建标签字典
# 构建 标签字典 label dict
labels = ["zero", "one", "two", "three", "four", "five", "six", "seven", "eight", "nine"]
label2idx = {label: idx for idx, label in enumerate(labels)}
idx2label = {idx: label for label, idx in label2idx.items()}

# 打印输出
print(label2idx)
print(idx2label)
3.2 数据的批量化打包
批量化打包数据主要包括以下两个步骤:
-
继承 Dataset,自定义一个数据集
-
实例化 DataLoader
Dataset 类是一个抽象类,它定义了数据集的接口,如果要自定义一个数据集类,则首先需要继承Dataset
from torch.utils.data import Dataset
DataLoader 类是一个迭代器,它封装了 Dataset 对象,并提供了批量加载数据、打乱数据、多进程加载等功能
from torch.utils.data import DataLoader
from PIL import Image
torchvision 是一个与 PyTorch 深度学习框架配套使用的库,专门用于处理图像和视频数据。它提供了许多工具和预构建的模块,旨在简化计算机视觉任务中的数据处理、模型构建和训练流程
transforms 是 torchvision 中的一个模块,它提供了许多实用的图像转换函数(与深度学习模型架构Transformer不是一个东西,不要弄混了)
from torchvision import transforms
import torchclass GestureDataset(Dataset):
"""
自定义手势识别数据集
"""
def init(self, X, y):
"""
初始化
"""
self.X = X
self.y = ydef __getitem__(self, idx): """ 实现:按下标来索引一个样本 __getitem__ 是 python 中的一个魔术方法(也称为特殊方法或双下划线方法),它在对象被用于下标操作时自动调用 这个方法允许对象模拟序列(如列表、元组)或映射(如字典)的行为,使得对象可以通过索引或键来访问其元素 这个方法在 Dataset 类中有一个特定的约定,它只接受一个参数,即索引参数 """ # 获取图像路径 img_path = self.X[idx] # 读取图像 img = Image.open(fp=img_path) # 统一大小 img = img.resize((32, 32)) # 转张量 [C, H, W]------>归一化 # transforms.ToTensor() 是一个预处理操作,它将 PIL 图像或 NumPy 数组转换为 torch.Tensor 对象 # 这个转换包括将图像的像素值从范围 [0, 255] 缩放到 [0.0, 1.0] img = transforms.ToTensor()(img) # [0, 1]减去0.5,除以0.5,得到[-1, 1]------>标准化 img = transforms.Normalize(mean=[0.5, 0.5, 0.5], std=[0.5, 0.5, 0.5])(img) # 读取标签 img_label = self.y[idx] # 标签转 id img_idx = label2idx.get(img_label) # 转张量 label = torch.tensor(data=img_idx, dtype=torch.long) return img, label def __len__(self): """ 返回该数据集的样本个数 """ return len(self.X)训练集加载器
获取训练数据集
train_dataset = GestureDataset(X=train_paths, y=train_labels)
shuffle=True表示每个epoch开始时都随机打乱样本,batch_size=16表示每个批次将包含16个样本
train_dataloader = DataLoader(dataset=train_dataset, shuffle=True, batch_size=16)
测试集加载器(同上)
test_dataset = GestureDataset(X=test_paths, y=test_labels)
test_dataloader = DataLoader(dataset=test_dataset, shuffle=False, batch_size=32)打印看看测试数据集的效果
for X, y in test_dataloader:
print(X.shape)
print(y.shape)
break
3.3 模型搭建
# 引入pytorch和nn神经网络
import torch
import torch.nn as nn

# 简化的写法
class LeNet5(nn.Module):
    """
        自定义一个神经网络
    """
    def __init__(self, in_channels=1, n_classes=10):
        """
            初始化
        """
        super(LeNet5, self).__init__()

        # 1. 特征抽取
        self.feature_extractor = nn.Sequential(
            nn.Conv2d(in_channels=in_channels,
                               out_channels=6,
                               kernel_size=5,
                               stride=1,
                               padding=0),
            nn.MaxPool2d(kernel_size=2,
                                stride=2,
                                padding=0),
            nn.Conv2d(in_channels=6,
                              out_channels=16,
                              kernel_size=5,
                              stride=1,
                              padding=0),
            nn.MaxPool2d(kernel_size=2,
                               stride=2,
                               padding=0)
        )

        # 2. 分类输出
        self.classifier = nn.Sequential(
            nn.Flatten(start_dim=1, end_dim=-1),
            nn.Linear(in_features=400, out_features=120),
            nn.Linear(in_features=120, out_features=84),
            nn.Linear(in_features=84, out_features=n_classes)
        )

    def forward(self, x):
        """
            前向传播
        """
        # 1. 先做特征抽取
        x = self.feature_extractor(x)
        # 2. 再做分类回归
        x = self.classifier(x)
        return x
3.4 模型训练
# 设置训练轮次
epochs = 50
# 设备
device = "cuda" if torch.cuda.is_available() else "cpu"
# 实例化模型
model = Model()
model.to(device=device)
# 优化器
# 创建一个 Adam 优化器实例,Adam 是一种自适应学习率优化算法,它结合了 RMSprop 和 Momentum 两种优化算法的优点。它通常表现良好,并且对许多不同的问题都适用
# params=model.parameters() 用于指定了优化器将要优化的参数,参数值model.parameters() 是一个生成器,它返回模型中所有需要梯度更新的参数(即权重和偏置)
# lr=1e-3:设置优化器的学习率,即每次参数更新的步长为 0.001
optimizer = torch.optim.Adam(params=model.parameters(), lr=1e-3)
# 损失函数
# 创建一个交叉熵损失函数的实例,交叉熵损失函数是分类问题中最常用的损失函数之一,特别是当输出是互斥类别的概率分布时
# 实例化nn中交叉熵损失的计算类,创建损失函数对象
loss_fn = nn.CrossEntropyLoss()

# 准确率计算
def get_acc(data_loader):
    accs = []
    # model.eval() 用于将模型设置为评估(evaluation)模式。这个方法在模型的训练和评估过程中扮演着重要的角色,尤其是在使用某些特定层(如 Dropout 和 Batch Normalization)时
    model.eval()
    with torch.no_grad():
        for X, y in data_loader:
            X = X.to(device=device)
            y = y.to(device=device)
            y_pred = model(X)
            # 获取预测结果中概率最高的类别,argmax(dim=-1) 返回最后一个维度(即概率分布)中最大值的索引
            y_pred = y_pred.argmax(dim=-1)
            acc = (y_pred == y).to(torch.float32).mean().item()
            accs.append(acc)
    # ndigits=5表示保留5位小数,round表示四舍五入
    final_acc = round(number=sum(accs) / len(accs), ndigits=5)
    return final_acc

import time

# 训练过程
def train():

    # 训练集准确率列表
    train_accs = []
    # 测试集准确率列表
    test_accs = []
    # 当前准确率
    cur_test_acc = 0

    # 初始准确率
    train_acc = get_acc(data_loader=train_dataloader)
    test_acc = get_acc(data_loader=test_dataloader)
    train_accs.append(train_acc)
    test_accs.append(test_acc)

    print(f"训练之前的准确率:train_acc: {train_acc},test_acc: {test_acc}")

    # 每一轮次
    for epoch in range(epochs):
        # 模型设置为 train 模式
        model.train()
        # 每一轮的开始时间
        start_train = time.time()
        for X, y in train_dataloader:
            # 0, 数据搬家
            X = X.to(device=device)
            y = y.to(device=device)
            # 1,正向传播
            y_pred = model(X)
            # 2,计算损失
            loss = loss_fn(y_pred, y)
            # 3,反向传播
            loss.backward()
            # 4,优化一步
            optimizer.step()
            # 5,清空梯度
            optimizer.zero_grad()
        # 每一轮的结束时间
        stop_train = time.time()

        # 本轮处理之后的准确率
        train_acc = get_acc(data_loader=train_dataloader)
        test_acc = get_acc(data_loader=test_dataloader)
        train_accs.append(train_acc)
        test_accs.append(test_acc)

        # 保存模型
        if cur_test_acc < test_acc:
            cur_test_acc = test_acc
            # 保存更好的模型
            torch.save(obj=model.state_dict(), f="lenet_best.pt")
        # 保存最好的模型
        torch.save(obj=model.state_dict(), f="lenet_last.pt")

        # 日志监控
        print(f"""当前为第 {epoch + 1} 轮:""")
        print(f"""训练准确率 (train_acc)\t测试准确率 (test_acc)\t运行时间 (elapsed_time)""")
        # 在python的字符串格式化中,:<width用于指定字符串的最小宽度
        print(f"""{train_acc:<18}\t{test_acc:<17}\t{round(number=stop_train - start_train, ndigits=3)}秒""")

    return train_accs, test_accs
调用训练方法,获得优化后的最佳模型(lenet_last.pt)
train_accs, test_accs = train()3.5 Streamlit页面实现
Step1: 将【3.3 模型搭建】中的代码,复制粘贴到一个名为models.py的python文件中进行保存
Step2: 将【3.4 模型训练中获得的】lenet_last.pt文件,与models.py放到同级目录中
Step3: 新建一个modelApp.py的文件,与上面两个文件处于同级目录,复制粘贴以下内容
import streamlit as st
import torch
import os
from PIL import Image
from models import LeNet5
from torchvision import transforms


def predict(img_path, model, device):
    # 判断图像是否存在
    if not os.path.exists(img_path):
        raise FileNotFoundError("文件已丢失")
    else:
        # 读取图像
        img = Image.open(fp=img_path)

        # 预处理及转张量
        img = img.resize((32, 32))
        img = transforms.ToTensor()(img)
        img = transforms.Normalize(mean=[0.5, 0.5, 0.5], std=[0.5, 0.5, 0.5])(img)

        # 添加维度
        # 上面的维度是[height, width, channels],需要增加一个维度,使其变成[batch_size, channels, height, width]
        # 填0,即代表从第0个位置,给这个张量添加一个维度(1),也就是batch_size=1
        img = img.unsqueeze(0)

        # 数据搬家
        img = img.to(device=device)
        # 将模型设为评估模式
        model.eval()

        # 无梯度环境
        with torch.no_grad():
            # 正向传播
            y_pred = model(img)
            # 解析结果
            y_pred = y_pred.argmax(dim=-1).item()
            # 返回结果
            return y_pred

if __name__ == "__main__":
    # 显示当前设备是GPU设备还是CPU
    device = "cuda" if torch.cuda.is_available() else "cpu"
    st.write(f"当前设备是:{device}")

    # 加载模型
    m1 = LeNet5()
    m1.to(device=device)
    # 加载之前训练好的权重
    m1.load_state_dict(state_dict=torch.load(f="lenet_best.pt", map_location=device), strict=False)

    # 上传一张图片
    uploaded_img = st.file_uploader("请上传一张图片", type=["png", "jpg", "jpeg"])
    # 将上传的图像文件保存到临时文件
    if uploaded_img is not None:
        with open(file="temp_img.jpg", mode="wb") as f:
            f.write(uploaded_img.getvalue())
        img_path = "temp_img.jpg"
        if img_path:
            # 加载训练好的lenet_best.pt模型
            pred = predict(img_path=img_path, model=m1, device=device)
            st.write(f"经预测,此图片中对应的手势是:{pred}")
            # 显示上传好的图片
            img = Image.open(fp=img_path)
            st.image(image=img, caption="上传的图片", use_column_width=True)
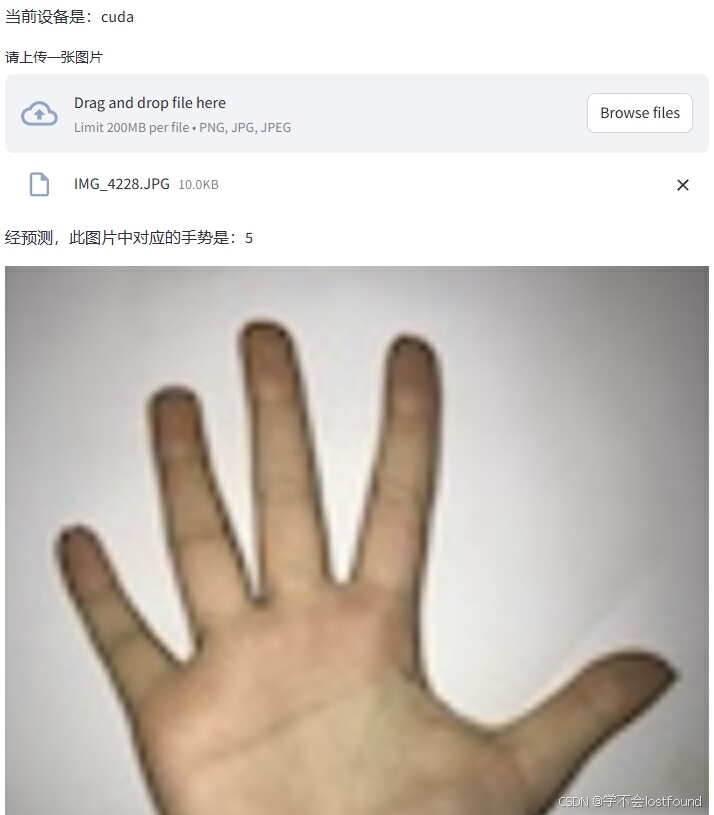
Step4: 使用以下命令运行modelApp.py,通过streamlit页面进行使用
streamlit run modelApp.py效果示例:
