原因:Chrome 不信任 ssc 证书
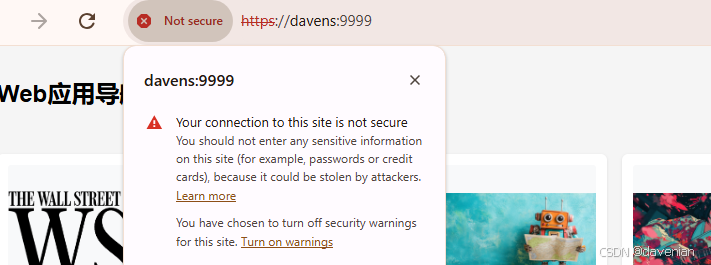
使启用了 HTTPS,即使有使用 自签名证书 (self-signed certificate 非由可信的证书颁发机构 【CA,Certificate Authority】签发的)。浏览器 Chrome 默认不信任自签名证书,也会报 **NET::ERR_CERT_AUTHORITY_INVALID**错误。
准备环境:
1. 要用到 opkg
(以前的文章也有写,今天想起来,这个是第三方工具,来自 Entware)
2. 要用到 vi 编辑器
a. 升级 apt-get
root@15fcc3463ef3:/app# apt-get update
Get:1 http://deb.debian.org/debian bookworm InRelease [151 kB]
Get:2 http://deb.debian.org/debian bookworm-updates InRelease [55.4 kB]
Get:3 http://deb.debian.org/debian-security bookworm-security InRelease [48.0 kB]
Get:4 http://deb.debian.org/debian bookworm/main amd64 Packages [8789 kB]
Get:5 http://deb.debian.org/debian bookworm-updates/main amd64 Packages [2468 B]
Get:6 http://deb.debian.org/debian-security bookworm-security/main amd64 Packages [204 kB]
Fetched 9250 kB in 4s (2265 kB/s)
Reading package lists... Done
root@15fcc3463ef3:/app#
b. 安装 vi (vim)
root@15fcc3463ef3:/app# apt-get install -y vim
Reading package lists... Done
Building dependency tree... Done
Reading state information... Done
The following additional packages will be installed:
...
...
update-alternatives: using /usr/bin/vim.basic to provide /usr/bin/vim (vim) in auto mode
update-alternatives: using /usr/bin/vim.basic to provide /usr/bin/vimdiff (vimdiff) in auto mode
Processing triggers for libc-bin (2.36-9+deb12u9) ...
root@15fcc3463ef3:/app#
解决方法:这里主要介绍 SSC
第一个:浏览器信任自签名证书(自用) 主机名
1. 用于实验的 containter : 31859f34dfc0 15fcc3463ef3

2. Container : 31859f34dfc0 15fcc3463ef3 22e555193e03 6eb329c9609b
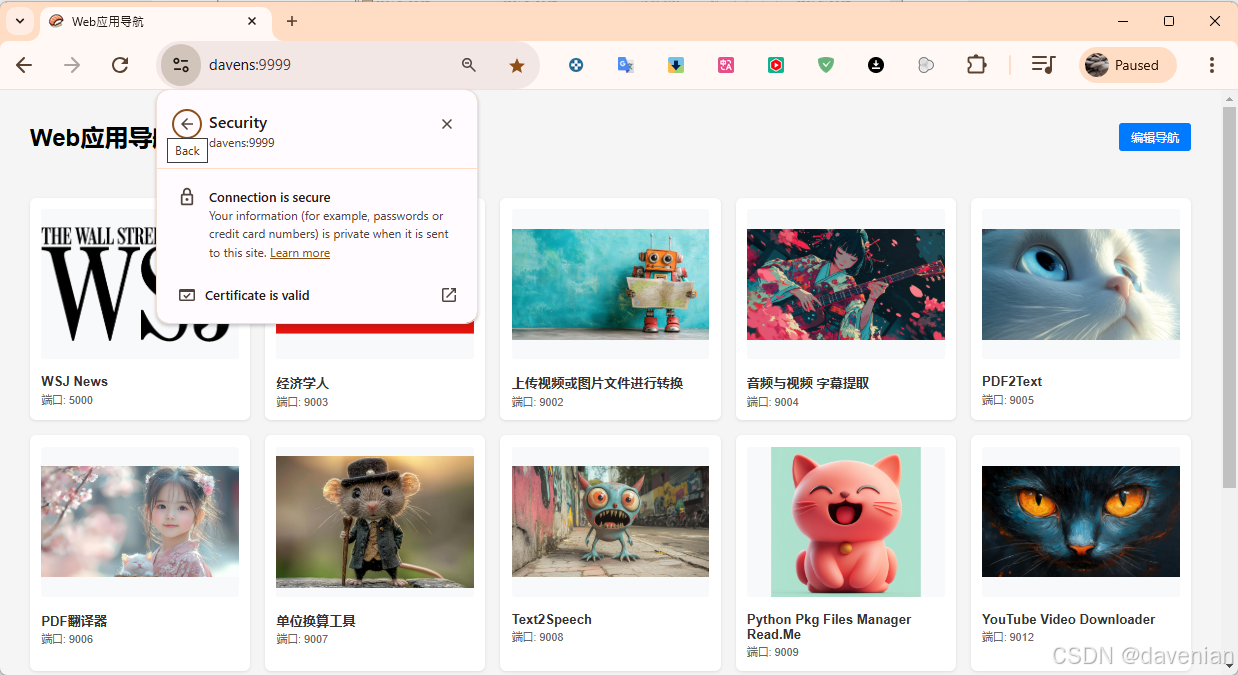
功能: <Project-23 Navigator Portal> 文章链接: <Project-23 Navigator Portal> Python flask web 网站导航应用 可编辑界面:添加图片、URL、描述、位置移动-CSDN博客
3. 生成 自签名证书
a. 进入 containter 修改 /etc/ssl/openssl.conf
[~] # docker exec -it 22e555193e03/bin/bash
root@22e555193e03:/app#
b. openss.conf 文件参考:
[ req ]
default_bits       = 2048
distinguished_name = req_distinguished_name
req_extensions     = req_ext  # 在我的文件里,添加这一行
x509_extensions    = v3_ext   #在我的文件里,添加这一行

#在我的文件里,添加以下:
[ req_ext ]
subjectAltName = @alt_names

[ v3_ext ]
subjectAltName = @alt_names

[ alt_names ]
DNS.1 = localhost
DNS.2 = davens
IP.1 = 127.0.0.1
DNS.2 = davens 使用你自己的名字,或者是 FQDN ,也可以多做几个
c. 生成证书
解释命令:
生成自签名证书 openssl req|x509 证书 | newkey rsa:2048 同时创建一个新的证书并生成 2048 位的 RSA 密钥 | -keyout key.pem 私钥的输出文件名 | out cert.der 证书文件名 | days 365 证书的有效期 | nodes 私钥文件不需要设置密码 | config /etc/ssl/openssl.cnf 指定配置参数文件
root@22e555193e03:/app# openssl req -x509 -newkey rsa:2048 -keyout key.pem -out cert.pem -days 365 -nodes -config ./ssl/openssl.cnf
.......+......+...+.....+++++++++++++++++++++++++++++++++++++++++++++++++++++++++++++++++*.......+......+..+....+.....+...+.+..+...+++++++++++++++++++++++++++++++++++++++++++++++++++++++++++++++++*....+...+...+............+......+.+...+...+............+........+.........+...+......+....+......+..+...+.......+.......................+....+++++++++++++++++++++++++++++++++++++++++++++++++++++++++++++++++
.+.................+.+..+...+.+...............+...+..+......+..........+..+.+.........+......+......+......+.................+.+..............+...+....+.....+...+......+.+......+...+..+...+................+........+......+...................+..+....+.....+++++++++++++++++++++++++++++++++++++++++++++++++++++++++++++++++*...+.+...+........+.............+..+.......+........+...+.......+........+.......+..+.......+......+.....+...+.+........+...+....+.....+......+...+......+....+......+.....+...+......+.+...+.....+.............+..+......+.+......+..+.+++++++++++++++++++++++++++++++++++++++++++++++++++++++++++++++++*......+............+........+..........+...+........+.+...+...........+.......+..+.+......+.........+..+....+...+.....+.............+..+............+...+..........+..........................+....+..+.+...+..+.......+..+....+..............+......+......+...............+......+....+...+...+........+.+...+......+..+...+.........+.+..+...............+..................+.......+.........+......+.........+...+..+......+...+......+.+............+.....+................+.........+.....+.+...........+................+..+...+............+...+......................+...+.....+.........+..........+......+.....+..........+...+......+.....+...+.+......+.....+.+..+.......+.....+....+.....+..........+..+....+...+..+.........+.+...+.....+...+...+.......+.........+........+............+......+...+....+...+...+..+.......+..+..................+.+..+....+.........+......+...+..+...................+......+........+...+...+......+......+.......+.....+.......+...+..+......+....+.........+.....+....+...+..+.+.....+..........+......+........+...+.........+................+.....+.......+...........+..........+.....+....+...........+.......+..+............+...+..........+..+.........+.......+..+...+.......+..+.........+.+......+..................+............+..+...+......................+...+...+..+...................+...+........+....+...+...+...+.....+...............+.........+......+....+..+.+........+.+...+++++++++++++++++++++++++++++++++++++++++++++++++++++++++++++++++
-----
You are about to be asked to enter information that will be incorporated
into your certificate request.
What you are about to enter is what is called a Distinguished Name or a DN.
There are quite a few fields but you can leave some blank
For some fields there will be a default value,
If you enter '.', the field will be left blank.
-----
Country Name (2 letter code) [CN]:
State or Province Name (full name) [Some-State]:Beijing
Locality Name (eg, city) []:
Organization Name (eg, company) [Internet Widgits Pty Ltd]:Freedome China!
Organizational Unit Name (eg, section) []:
Common Name (e.g. server FQDN or YOUR name) []:davens
Email Address []:dave@mail.com
root@22e555193e03:/app#
填写的内容随意, 除了 **Common Name (e.g. server FQDN or YOUR name) \[\]:**davens
c. 证书必须是 PEM 格式
如果使用了 DER, 要转换
root@15fcc3463ef3:/app# openssl x509 -in cert.der -inform DER -out cert.pem -outform PEM
root@15fcc3463ef3:/app#
原因:Werkzeug 只能使用 PEM 格式。在 Flask 加载时,使用 der 格式会报错。
细心的你会发现: container ID 已经变了,试错时毁掉了 31859f34dfc0 15fcc3463ef3 22e555193e03 等,这个是新的容器 6eb329c9609b
这个是 container ID 用你自己的来替换 docker ps 可以看到
d. 提前解释一下 CN 与 SAN
这里,理解为 url 要用的名字(主机名,地址全名FQDN):


Tip:
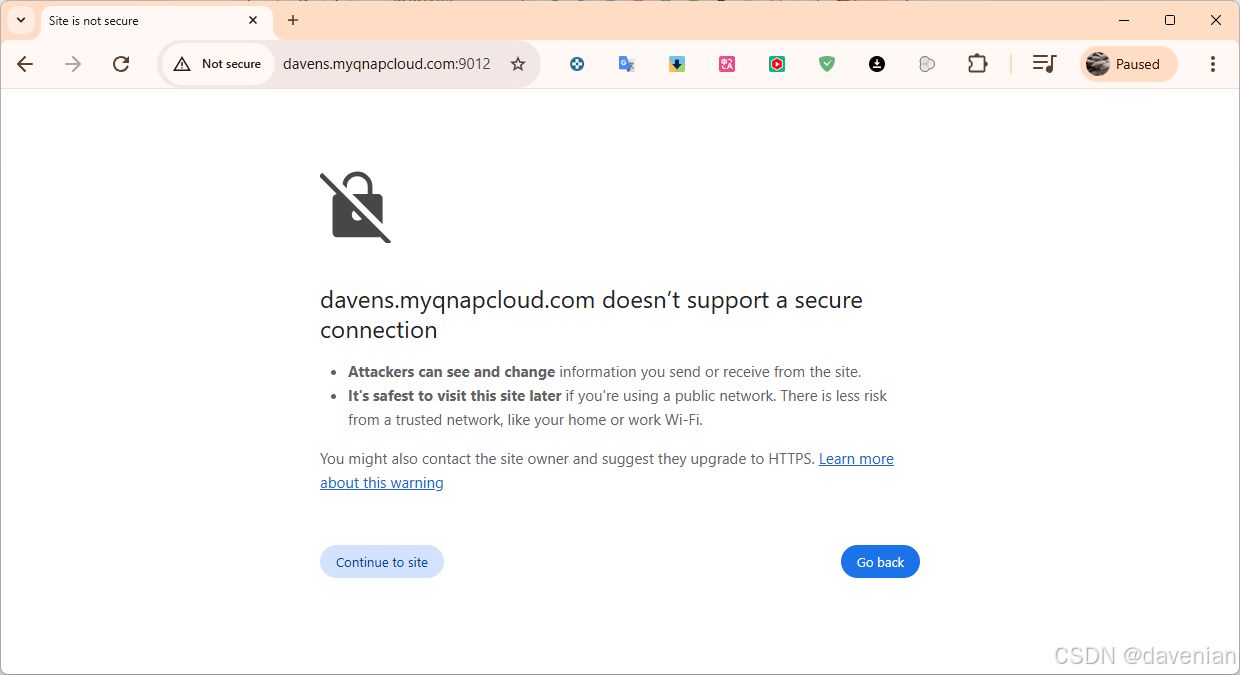
**证书里:SAN**是扩展字段,浏览器会优先验证它。缺少 SAN 是导致浏览器标记自签名证书为 "Not Secure" 的常见问题。您需要确保证书中包含 SAN,并且域名/IP 与实际访问的地址一致。
我花了大都分时间都在不明不白的解决这个问题,直到有文章提到:Chrome 优先验证 SAN,而忽略证书的 **Common Name (CN)**字段。
e. 证书文件:
会在执行 openssl 目录中生成 上面提到的 2个文件:
root@15fcc3463ef3:/app# ls -al
total 48
drwxr-xr-x 1 root root 4096 Nov 17 05:59 .
drwxr-xr-x 1 root root 4096 Nov 17 05:54 ..
-rw-rw-rw- 1 root root 7212 Nov 14 08:05 app.py
-rw-r--r-- 1 root root 1338 Nov 17 05:59 cert.pem
drwxrwxrwx 1 root root 4096 Nov 17 05:54 data
-rw------- 1 root root 1704 Nov 17 05:57 key.pem
-rw-rw-rw- 1 root root   14 Nov 14 09:22 requirements.txt
drwxr-xr-x 1 root root 4096 Nov 17 05:54 static
drwxr-xr-x 2 root root 4096 Nov 17 05:54 templates
4. 挂载到 Flask 容器中
if __name__ == '__main__':
    init_data_file()
    #app.run(host='0.0.0.0', port=9999, debug=True)
    app.run(ssl_context=('cert.pem', 'key.pem'), host='0.0.0.0', port=9999, debug=True)
复制并注释 app.run(host='0.0.0.0', port=9999, debug=True),再修改:
app.run(ssl_context=('cert.pem', 'key.pem'), host='0.0.0.0', port=9999, debug=True)
5. 重启 container
[~] # docker stop 6eb329c9609b
6eb329c9609b
[~] # docker start 6eb329c9609b
6eb329c9609b
[~] #
6. 再次访问要使用 https
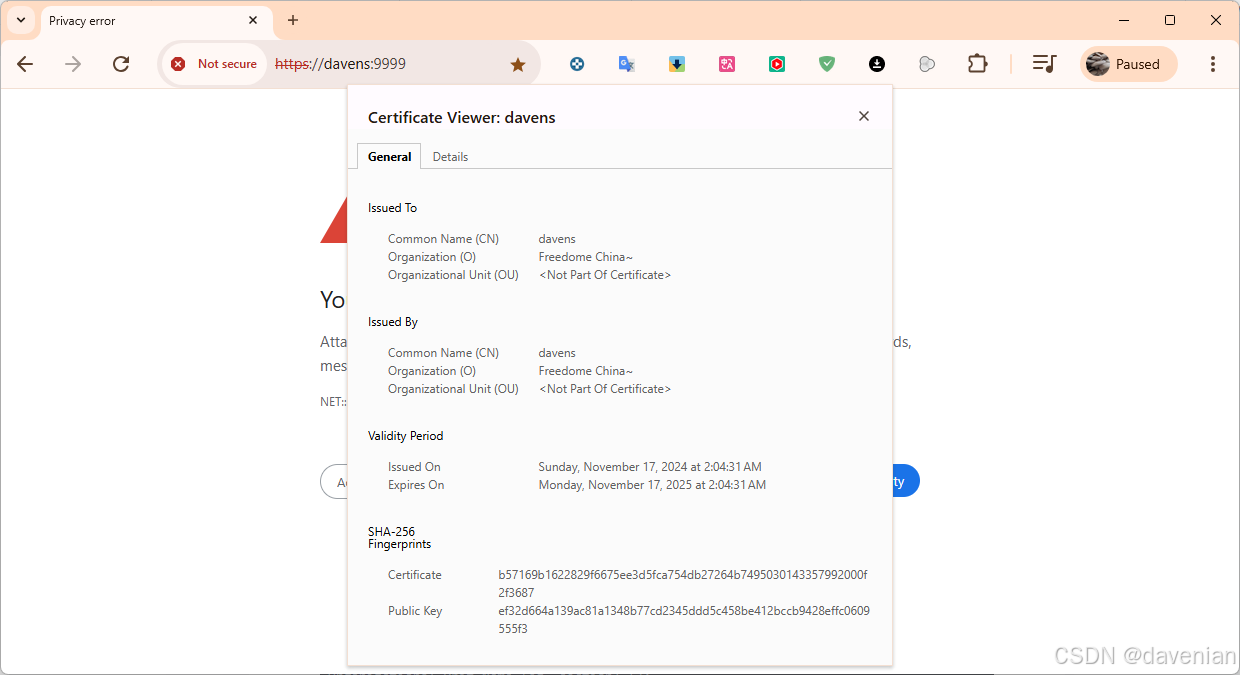
在点开证书信息后,可以看到 Chrome 已经识别到刚才新生成的证书
7. 把证书 cert.pem 下载到 Windows
[/share/Multimedia/2024-MyProgramFiles/23.Navigator_Portal] # docker cp 15fcc3463ef3:/app/cert.pem .
Successfully copied 2.56kB to /share/Multimedia/2024-MyProgramFiles/23.Navigator_Portal/.
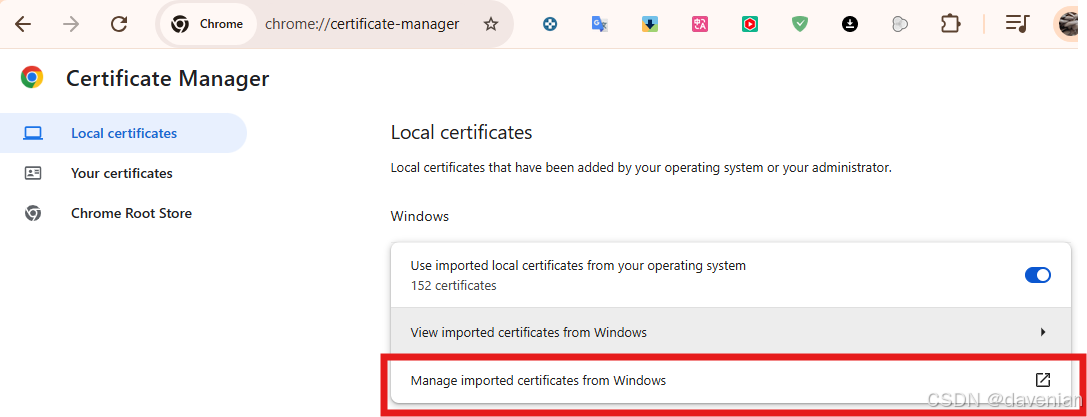
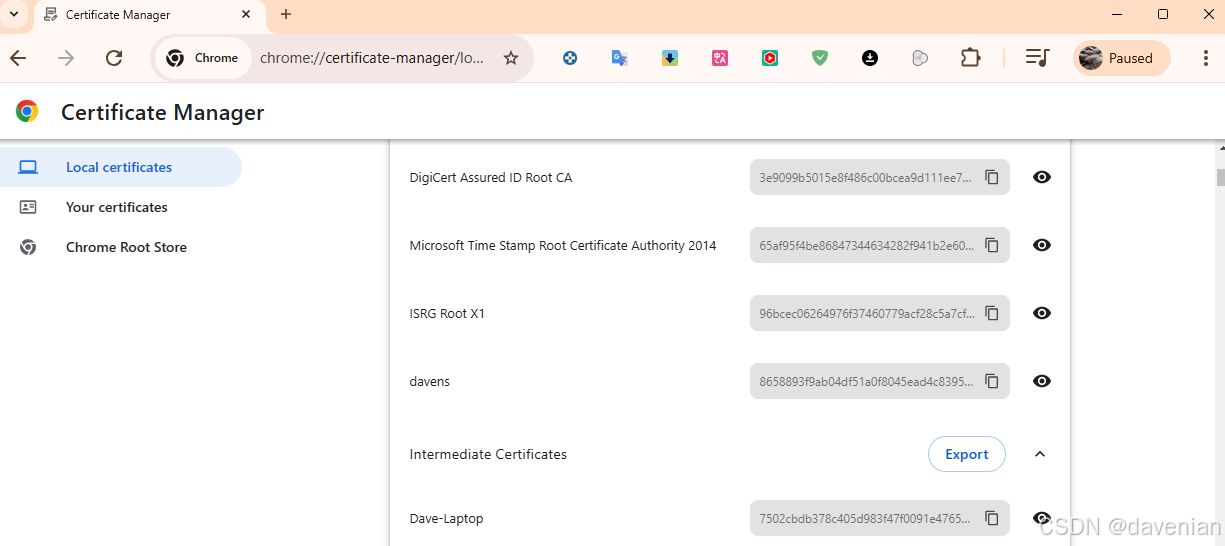
[/share/Multimedia/2024-MyProgramFiles/23.Navigator_Portal] # 8. 向 Windows 导入自签名证书
a. Chrome 导入
浏览器打开这个url: chrome://certificate-manager/localcerts 如下:
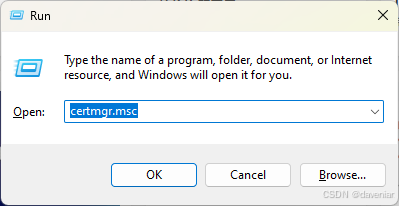
b. 使用 certmgr.msc 证书管理器
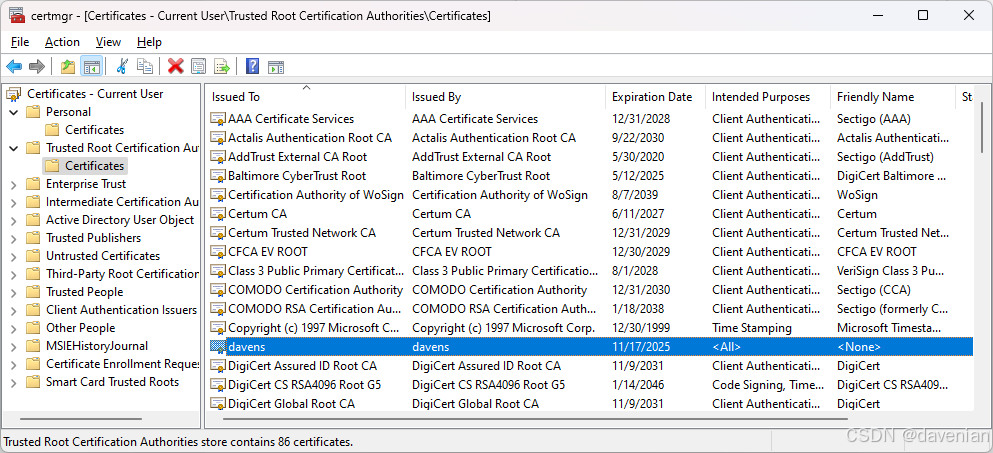
9. 验证 成功
第二个:certbot 使用 FQDN:davens.myqnapcloud.com
1. 用于实验的 container: 49b23380cba5
2. 这个 container 是我唯一在 Dockerfile 里用了:
# Create non-root user for security
RUN useradd -m appuser && \
    chown -R appuser:appuser /app
USER appuser
默认不是以 root 进入:
[~] # docker exec -it 49b23380cba5 /bin/bash
appuser@49b23380cba5:/app$
以 root 进入需要加入 -u root :
[~] # docker exec -u root -it 49b23380cba5 /bin/bash
root@49b23380cba5:/app#
3. 在容器里 安装 certbot
root@49b23380cba5:/app# pip3 install certbot
Collecting certbot
  Downloading certbot-3.0.1-py3-none-any.whl.metadata (8.0 kB)
Collecting acme>=3.0.1 (from certbot)
  Downloading acme-3.0.1-py3-none-any.whl.metadata (1.4 kB)
Collecting ConfigArgParse>=1.5.3 (from certbot)
  Downloading ConfigArgParse-1.7-py3-none-any.whl.metadata (23 kB)
...
...
WARNING: Running pip as the 'root' user can result in broken permissions and conflicting behaviour with the system package manager. It is recommended to use a virtual environment instead: https://pip.pypa.io/warnings/venv

[notice] A new release of pip is available: 24.0 -> 24.3.1
[notice] To update, run: pip install --upgrade pip
root@49b23380cba5:/app#
3. 获取证书
[~] # docker exec -u root -it 49b23380cba5 /bin/bash
root@49b23380cba5:/app# certbot certonly --standalone -d davens.example.com
因为, 它也是使用 Let's Encrypt 与我的 NAS 发证一家,过程忽略~
后面同第一个方法:
flask加载证书 及以后相同 略
结束语:
还可以使用 Nginx 代理