【Ubuntu 22.04+Flask+Gunicorn+Nginx】部署目标检测模型API完整解决方案
文章目录
- [1. 搭建深度学习环境](#1. 搭建深度学习环境)
-
- [1.1 下载Anaconda](#1.1 下载Anaconda)
- [1.2 打包环境](#1.2 打包环境)
- [1.3 创建虚拟环境](#1.3 创建虚拟环境)
- [1.4 报错](#1.4 报错)
- [2. 安装flask](#2. 安装flask)
- [3. 安装gunicorn](#3. 安装gunicorn)
- [4. 安装Nginx](#4. 安装Nginx)
-
- [4.1 安装前置依赖](#4.1 安装前置依赖)
- [4.2 安装nginx](#4.2 安装nginx)
- [4.3 常用命令](#4.3 常用命令)
- [5. Nginx+Gunicorn+Flask](#5. Nginx+Gunicorn+Flask)
-
- [5.1 nginx.config中配置虚拟主机](#5.1 nginx.config中配置虚拟主机)
- [5.2 在sites-enabled目录中配置虚拟主机](#5.2 在sites-enabled目录中配置虚拟主机)
- [6. 性能测试工具](#6. 性能测试工具)
-
- [6.1 使用ab进行测试](#6.1 使用ab进行测试)
- [6.2 使用wrk进行测试](#6.2 使用wrk进行测试)
- 7.参考博客
1. 搭建深度学习环境
1.1 下载Anaconda
Anaconda会根据访问网页所使用的系统,推荐对应的Anaconda版本,用户无需担心版本错误。如果有特定版本需要的朋友,则可以根据需要自行下载对应版本的Anaconda
wget命令安装方式
火狐浏览器搜索Anaconda,下载按钮处copy link
wget -c 'https://repo.anaconda.com/archive/Anaconda3-2023.09-0-Linux-x86_64.sh' -P /home/krisnat/Downloads
wget的参数-c允许断点继续下载、-P指定下载目录
1.下载成功后,安装Anaconda
bash ~/Downloads/Anaconda3-2021.11-Linux-x86_64.sh
2.阅读并接受安装协议
3.确认安装位置
4.初始化Anaconda(包含环境变量的设置)
如果您希望 conda 的基础环境在启动时不被激活,请将 auto_activate_base 参数设置为 false
conda config --set auto_activate_base false
当然这一条命令执行完毕后,想要再次进入conda的base环境,只需要使用对应的conda指令即可,如下:
conda activate base
更换 conda、pip、yum 国内源
# conda ustc源
conda config --add channels https://mirrors.ustc.edu.cn/anaconda/pkgs/main/
conda config --add channels https://mirrors.ustc.edu.cn/anaconda/pkgs/free/
conda config --add channels https://mirrors.ustc.edu.cn/anaconda/cloud/conda-forge/
conda config --add channels https://mirrors.ustc.edu.cn/anaconda/cloud/msys2/
conda config --add channels https://mirrors.ustc.edu.cn/anaconda/cloud/bioconda/
conda config --add channels https://mirrors.ustc.edu.cn/anaconda/cloud/menpo/
conda config --set show_channel_urls yes
# pip ustc源
pip config set global.index-url https://mirrors.ustc.edu.cn/pypi/web/simple
# yum 国内源
mv /etc/yum.repos.d/CentOS-Base.repo /etc/yum.repos.d/CentOS-Base.repo_bak
wget -O /etc/yum.repos.d/CentOS-Base.repo http://mirrors.aliyun.com/repo/Centos-7.repo
yum makecache
yum -y update清华源:
conda config --add channels https://mirrors.tuna.tsinghua.edu.cn/anaconda/pkgs/free/
conda config --add channels https://mirrors.tuna.tsinghua.edu.cn/anaconda/pkgs/main/
conda config --add channels https://mirrors.tuna.tsinghua.edu.cn/anaconda/cloud/conda-forge/
#设置搜索时显示通道地址
conda config --set show_channel_urls yes
中科大镜像源:
conda config --add channels https://mirrors.ustc.edu.cn/anaconda/pkgs/main/
conda config --add channels https://mirrors.ustc.edu.cn/anaconda/pkgs/free/
conda config --add channels https://mirrors.ustc.edu.cn/anaconda/cloud/conda-forge/
conda config --add channels https://mirrors.ustc.edu.cn/anaconda/cloud/msys2/
conda config --add channels https://mirrors.ustc.edu.cn/anaconda/cloud/bioconda/
conda config --add channels https://mirrors.ustc.edu.cn/anaconda/cloud/menpo/
#设置搜索时显示通道地址
conda config --set show_channel_urls yes
pip换源
windows环境下: 比如windows账号是 admin
c:\users\admin\pip\pip.ini
Linux 环境下:同样比例账号为 admin 则需要建立子目录 \home\admin\pip,并在此pip目录下建立内容同上的 pip.conf的位置文件。
# coding: GBK
[global]
index-url = https://pypi.tuna.tsinghua.edu.cn/simple
[install]
trusted-host = https://pypi.tuna.tsinghua.edu.cn
#清华大学:https://pypi.tuna.tsinghua.edu.cn/simple
#阿里云:http://mirrors.aliyun.com/pypi/simple/
#豆瓣:http://pypi.douban.com/simple/
1.2 打包环境
- 打包pip环境
python
pip install conda-pack
conda pack -n env_name-
打包pip环境
pip freeze > requirements.txt 删掉@,和windo相关包 -
在目标主机上解压环境
再envs下创建一个文件夹
tar -xzf env_name.tar.gz -C 目标路径
-
下载pip
pip install -r requirements.txt
1.3 创建虚拟环境
下载vim编辑器,因为我的requirments.txt环境有不兼容问题
打开命令窗口,输入命令 lsb_release -a 查看当前Linux系统版本,根据你的Linux版本,输入对应的如下命令
- ubuntu 系统输入命令:sudo apt-get install vim-gtk
- centos 系统输入命令:yum -y install vim
1.4 报错
CondaHTTPError: HTTP 429 TOO MANY REQUESTS for url https://mirrors.ustc.edu.cn/anaconda/pkgs/main/linux-64/repodata.json Elapsed: 00:26.239663
conda config --show channels
删除ustc相关的源
conda config --remove channels https://mirrors.ustc.edu.cn/anaconda/pkgs/main/
pip._vendor.urllib3.exceptions.ProtocolError: ("Connection broken: OSError(28, 'No space left on device')", OSError(28, 'No space left on device'))
You can undo this by running conda init --reverse $SHELL? yes\|no
选择yes的话,bashrc文件中会添加以下内容,这样在打开终端时自动执行conda activate root命令,这样在终端输入python的时候默认是python3(CentOS7及7以下默认装的是python2)。这样的话,启动虚拟机shell命令前面出现(base)字样,默认python3(当然,conda deactivate这个命令又可以回去)
选择no的话,在安装完anaconda后需手动添加环境变量:
2. 安装flask
pip install flask测试
python3 ./test_app.py3. 安装gunicorn
pip install gunicorn使用gunicorn启动flask项目
gunicorn -w 3 -b 0.0.0.0:5000 test_app:app
-w 表示3个工作进程
-b 0.0.0.0:5000 支持外网通过5000端口访问
test_app:app test_app为应用的py文件名,app为Flask应用实例名给gunicorn添加配置文件
配置文件是一个py文件,常用内容如下:
python
import multiprocessing

bind = '0.0.0.0:5000' #要绑定的socket(配置nginx后,需要把0.0.0.0改为127.0.0.1)
workers = multiprocessing.cpu_count() * 2 + 1 #处理请求的工作进程数,官方推荐(2 * cpu核数 + 1)
reload = True #代码改变后自动重启工作进程
worker_class = 'gevent' #工作进程的类型,分别是sync, eventlet, gevent, tornado, gthread
#threads = 2 #工作类型为gthread时才生效
worker_connections = 1000 #默认1000,每个worker同时处理的最大客户端连接数,gthread\eventlet\gevent模式生效
pidfile = './gunicorn.pid' #进程文件目录,不设置就没有进程文件
accesslog = './gunicorn_acess.log' #访问日志路径
errorlog = './gunicorn_error.log' #错误信息日志路径
loglevel = 'warning' #错误日志级别,'debug'\'info'\'warning'\'error'\'critical'
daemon = True #在后台运行
对于worker_class的选择,可以参考:
sync,默认模式,适用于较小的应用或者不需要处理大量并发请求的应用
gevent和eventlet,基于协程的异步模式,可以处理大量的并发连接,适用于IO密集型应用(pip install gunicorn[gevent]或pip install gunicorn[eventlet]安装)
tornado,适合基于Tornado框架的应用(pip install gunicorn[sync]安装)
gthread,基于多线程的工作模式,每个工作进程可以开启多个线程来处理请求。使用线程而不是进程可以减少Gunicorn内存占用(pip install gunicorn[gthread]安装)使用gunicorn配置文件运行Flask项目
gunicorn -c gunicorn_conf.py test_app:app获取Gunicorn进程树
pstree -ap|grep gunicorn
即主进程就是5137
重启Gunicorn任务
kill -HUP 30080退出Gunicorn任务
kill -9 300804. 安装Nginx
4.1 安装前置依赖
Debian系统:
sudo apt install curl gnupg2 ca-certificates lsb-release debian-archive-keyring
Ubuntu系统:
sudo apt install curl gnupg2 ca-certificates lsb-release ubuntu-keyring
导入官方 nginx 签名密钥,以便 apt 能够验证软件包的真实性
curl https://nginx.org/keys/nginx_signing.key | gpg --dearmor \
| sudo tee /usr/share/keyrings/nginx-archive-keyring.gpg >/dev/null
验证下载的文件包含正确的密钥,输出应该包含完整的指纹573BFD6B3D8FBC641079A6ABABF5BD827BD9BF62
gpg --dry-run --quiet --no-keyring --import --import-options import-show /usr/share/keyrings/nginx-archive-keyring.gpg给apt仓库设置稳定版本的nginx 软件包
echo "deb [signed-by=/usr/share/keyrings/nginx-archive-keyring.gpg] \
http://nginx.org/packages/debian `lsb_release -cs` nginx" \
| sudo tee /etc/apt/sources.list.d/nginx.list如果想要主线的ngnix软件包,用下面的命令
echo "deb [signed-by=/usr/share/keyrings/nginx-archive-keyring.gpg] \
http://nginx.org/packages/mainline/debian `lsb_release -cs` nginx" \
| sudo tee /etc/apt/sources.list.d/nginx.list
设置仓库优先级,以优先选择我们的软件包而不是发行版提供的软件包
echo -e "Package: *\nPin: origin nginx.org\nPin: release o=nginx\nPin-Priority: 900\n" \
| sudo tee /etc/apt/preferences.d/99nginx
4.2 安装nginx
sudo apt update
sudo apt install nginx
nginx -v
查看/lib/systemd/system/nginx.service文件是否存在,否不存在,新建并输入以下内容:
[Unit]
Description=A high performance web server and a reverse proxy server
Documentation=man:nginx(8)
After=network.target

[Service]
Type=forking
PIDFile=/run/nginx.pid
ExecStartPre=/usr/sbin/nginx -t -q -g 'daemon on; master_process on;'
ExecStart=/usr/sbin/nginx -g 'daemon on; master_process on;'
ExecReload=/usr/sbin/nginx -g 'daemon on; master_process on;' -s reload
ExecStop=-/sbin/start-stop-daemon --quiet --stop --retry QUIT/5 --pidfile /run/nginx.pid
TimeoutStopSec=5
KillMode=mixed

[Install]
WantedBy=multi-user.target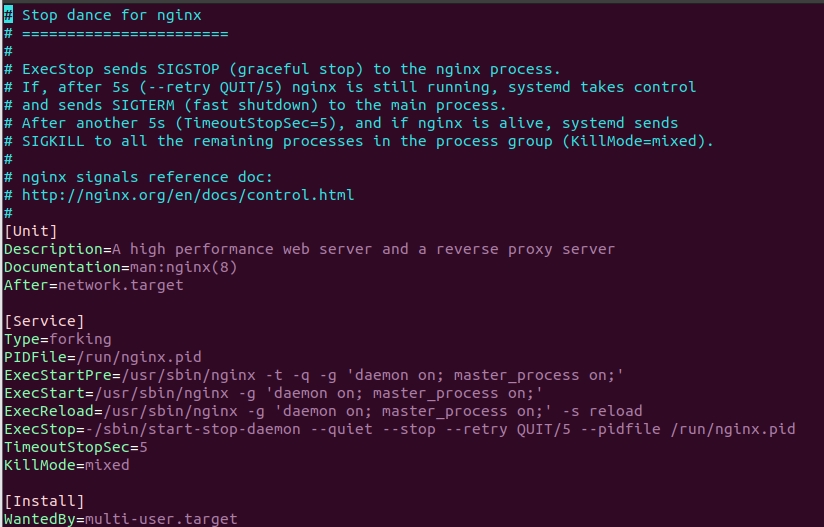
4.3 常用命令
sudo systemctl daemon-reload #重新加载 systemd 配置
systemctl start nginx.service #启动nginx
systemctl stop nginx.service #停止nginx
systemctl restart nginx.service #重启nginx
systemctl enable nginx.service #设置开机自启动
systemctl disable nginx.service #关闭开机自启动
日志一般在/var/log/nginx
nginx主配置文件/etc/nginx/nginx.conf
配置文件的组成:全局块+events块+http块
全局块:从配置文件开始到events之间的内容,主要会设置一些影响Nginx服务器整体运行的配置指令,主要包括配置运行Nginx服务器的用户(组)、允许生成的worker process数,进程pid存放路径、日志存放路径和类型以及配置文件的引入等。
worker_processes 1;
这个是Nginx服务器并发处理服务的关键配置,worker_processes值越大,可以支持的并发处理量越多,但是会受到硬件、软件等设备的制约。

events块:events块设计的指令主要影响Nginx服务器与用户的网络连接,常用的设置包括是否开启对多work process下的网络连接进行序列化,是否允许同时接收多个网络连接,选取哪种事件驱动模型来处理连接请求,每个work process可以同时支持的最大连接数等。下面的例子表示每个work process支持的最大连接数为1024。这部分配置对Nginx的性能影响较大,在实际中应该灵活配置。
events {
worker_connections 1024;
}

http块:Nginx服务器配置中最频繁的部分,代理、缓存和日志定义等绝大多数功能和第三方模块的配置都在这里,http块又包括http全局块和server块。

Nginx服务器配置中最频繁的部分,代理、缓存和日志定义等绝大多数功能和第三方模块的配置都在这里,http块又包括http全局块和server块。

server块:
	这块和虚拟主机有密切关系,虚拟主机从用户角度看,和一台独立的硬件主机是完全一样的,该技术的产生是为了节省互联网服务器硬件成本。
	每个http块可以包括多个server块,而每个server块就相当于一个虚拟主机。
	每个server块也可以分为全局server块,以及可以同时包含多个location块。

全局server块:
	最常见的配置时本虚拟主机的监听配置和本虚拟主机的名称或IP配置。
location块:
	一个server块可以配置多个location块。
	这块的主要作用是基于Nginx服务器接收到的请求字符串(例如server_name/uri-string),对虚拟主机名称(也可以是IP别名)之外的字符串(例如前面的/uri-string)进行匹配,对特定的请求进行处理。地址定向、数据缓存和应答控制等功能,还有许多第三方模块的配置也在这里进行。
5. Nginx+Gunicorn+Flask
5.1 nginx.config中配置虚拟主机
user www-data;
worker_processes auto;
pid /run/nginx.pid;
include /etc/nginx/modules-enabled/*.conf;
events {
worker_connections 768;
# multi_accept on;
}
http {
##
# Basic Settings
##
sendfile on;
tcp_nopush on;
tcp_nodelay on;
keepalive_timeout 65;
types_hash_max_size 2048;
# server_tokens off;
# server_names_hash_bucket_size 64;
# server_name_in_redirect off;
include /etc/nginx/mime.types;
default_type application/octet-stream;
##
# SSL Settings
##
ssl_protocols TLSv1 TLSv1.1 TLSv1.2 TLSv1.3; # Dropping SSLv3, ref: POODLE
ssl_prefer_server_ciphers on;
##
# Logging Settings
##
access_log /var/log/nginx/access.log;
error_log /var/log/nginx/error.log;
##
# Gzip Settings
##
gzip on;
# gzip_vary on;
# gzip_proxied any;
# gzip_comp_level 6;
# gzip_buffers 16 8k;
# gzip_http_version 1.1;
# gzip_types text/plain text/css application/json application/javascript text/xml application/xml application/xml+rss text/javascript;
##
# Virtual Host Configs
##
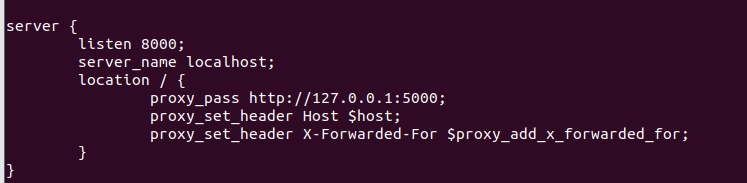
server {
listen 8000;
server_name localhost;
location / {
proxy_pass http://127.0.0.1:5000;
proxy_set_header Host $host;
proxy_set_header X-Forwarded-For $proxy_add_x_forwarded_for;
}
}
include /etc/nginx/conf.d/*.conf;
include /etc/nginx/sites-enabled/*;
}
#mail {
# # See sample authentication script at:
# # http://wiki.nginx.org/ImapAuthenticateWithApachePhpScript
#
# # auth_http localhost/auth.php;
# # pop3_capabilities "TOP" "USER";
# # imap_capabilities "IMAP4rev1" "UIDPLUS";
#
# server {
# listen localhost:110;
# protocol pop3;
# proxy on;
# }
#
# server {
# listen localhost:143;
# protocol imap;
# proxy on;
# }
#}添加部分:
检测配置文件nginx.conf的正确性
sudo /usr/sbin/nginx -t
重新加载Nginx配置文件
sudo /usr/sbin/nginx -s reload查看nginx是否启动成功
netstat -anp|grep 监听端口打开Flask应用py文件,加入以下代码即可,详细解释见官方文档
from werkzeug.middleware.proxy_fix import ProxyFix

app.wsgi_app = ProxyFix(
	app.wsgi_app, x_for=1, x_proto=1, x_host=1, x_prefix=1
)用Gunicorn启动该Flask应用就可以,测试接口使用ip:8000
为什么ip:5000/ip:8000都可以访问到资源?
8000端口是Nginx的监听端口,如果使用ip:8000,nginx会根据配置将请求代理到ip:5000,后端服务处理请求并返回响应,nginx再将后端服务的响应返回给客户端。
如果直接访问ip:5000,相当于请求直接到达后端服务,后端服务处理请求并返回响应,跳过了Nginx的代理过程
这两种方式的区别在于,直接访问5000端口会绕过Nginx反向代理配置,直接与后端服务通信。而通过8000端口访问,则会经过Nginx代理,将请求转发给后端服务。这使得Nginx可以作为前端代理服务器,处理静态资源、负载均衡、SSL终止等功能,同时后端服务仍然可以通过其自身的端口提供服务。
5.2 在sites-enabled目录中配置虚拟主机
在Nginx中,/etc/nginx/sites-enabled 目录和 /etc/nginx/sites-available 目录通常用于组织虚拟主机配置文件,这些文件描述了不同站点的设置,例如域名、目录结构等。
/etc/nginx/sites-available 目录:存放每个虚拟主机的配置文件。您可以将所有可用的虚拟主机配置文件放在这里。
/etc/nginx/sites-enabled 目录:存放已启用的虚拟主机配置文件的符号链接(symbolic links)。Nginx 会读取这个目录下的配置文件来确定哪些虚拟主机是处于启用状态的。
/etc/nginx/sites-available 目录:存放每个虚拟主机的配置文件。您可以将所有可用的虚拟主机配置文件放在这里。
/etc/nginx/sites-enabled 目录:存放已启用的虚拟主机配置文件的符号链接(symbolic links)。Nginx 会读取这个目录下的配置文件来确定哪些虚拟主机是处于启用状态的。
当 Nginx 启动时,它会读取 nginx.conf 中的全局配置信息,然后再按顺序读取 sites-enabled 目录下的符号链接指向的配置文件,并将这些配置整合到运行时环境中。这样就实现了动态加载不同站点的配置,而不必修改主配置文件。
因此,通过使用 sites-enabled 目录,您可以灵活地管理不同站点的配置文件,让 Nginx 能够根据需要动态加载相应的配置,而不必修改主配置文件。
虚拟主机概念:
虚拟主机(Virtual Host)是指在一台服务器上托管多个域名或网站,通过配置不同的虚拟主机来实现多个网站共享同一台服务器资源的功能。使用虚拟主机可以让不同的网站在同一台服务器上运行,每个网站都拥有自己独立的配置和内容,就好像它们在不同的服务器上一样。
通常,虚拟主机有两种类型:基于 IP 地址的虚拟主机和基于域名的虚拟主机。
基于 IP 地址的虚拟主机:每个虚拟主机使用不同的 IP 地址来区分。当客户端通过请求的 IP 地址访问服务器时,服务器会根据请求的 IP 地址来确定提供哪个虚拟主机的服务。这种方式需要服务器拥有多个 IP 地址。

基于域名的虚拟主机:多个域名共享同一个 IP 地址,通过 HTTP 请求头中的 Host 头字段来区分不同的虚拟主机。服务器接收到请求后会根据 Host 头字段中的域名信息来确定提供哪个虚拟主机的服务。这种方式是目前更为常见和广泛应用的虚拟主机方式。
通过配置不同的虚拟主机,您可以在同一台服务器上托管多个网站,并根据访问的域名或 IP 地址来正确路由请求到对应的网站。这样可以节省服务器资源,提高服务器利用率,并且方便管理多个网站。
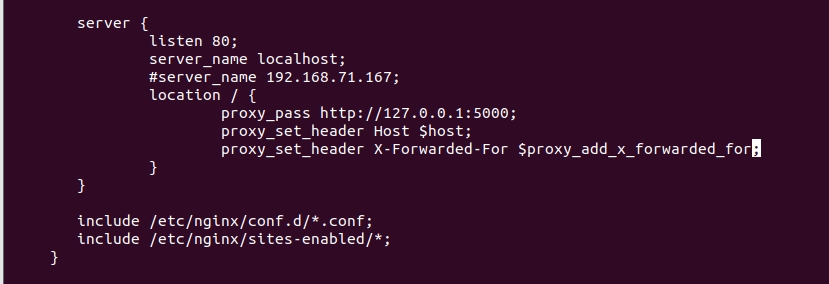
etc/nginx/sites-enabled/default文件内容
##
# You should look at the following URL's in order to grasp a solid understanding
# of Nginx configuration files in order to fully unleash the power of Nginx.
# https://www.nginx.com/resources/wiki/start/
# https://www.nginx.com/resources/wiki/start/topics/tutorials/config_pitfalls/
# https://wiki.debian.org/Nginx/DirectoryStructure
#
# In most cases, administrators will remove this file from sites-enabled/ and
# leave it as reference inside of sites-available where it will continue to be
# updated by the nginx packaging team.
#
# This file will automatically load configuration files provided by other
# applications, such as Drupal or Wordpress. These applications will be made
# available underneath a path with that package name, such as /drupal8.
#
# Please see /usr/share/doc/nginx-doc/examples/ for more detailed examples.
##

# Default server configuration
#
server {
        listen 80 default_server;
        listen [::]:80 default_server;

        # SSL configuration
        #
        # listen 443 ssl default_server;
        # listen [::]:443 ssl default_server;
        #
        # Note: You should disable gzip for SSL traffic.
        # See: https://bugs.debian.org/773332
        #
        # Read up on ssl_ciphers to ensure a secure configuration.
        # See: https://bugs.debian.org/765782
        #
        # Self signed certs generated by the ssl-cert package
        # Don't use them in a production server!
        #
        # include snippets/snakeoil.conf;
        root /var/www/html;

        # Add index.php to the list if you are using PHP
        index index.html index.htm index.nginx-debian.html;

        server_name _;

        location / {
                # First attempt to serve request as file, then
                # as directory, then fall back to displaying a 404.
                try_files $uri $uri/ =404;
        }

        # pass PHP scripts to FastCGI server
        #
        #location ~ \.php$ {
        #       include snippets/fastcgi-php.conf;
        #
        #       # With php-fpm (or other unix sockets):
        #       fastcgi_pass unix:/var/run/php/php7.4-fpm.sock;
        #       # With php-cgi (or other tcp sockets):
        #       fastcgi_pass 127.0.0.1:9000;
        #}

        # deny access to .htaccess files, if Apache's document root
        # concurs with nginx's one
        #
        #location ~ /\.ht {
        #       deny all;
        #}
}

server {
        listen 8000;
        server_name localhost;
        location / {
                proxy_pass http://127.0.0.1:5000;
                proxy_set_header Host $host;
                proxy_set_header X-Forwarded-For $proxy_add_x_forwarded_for;
        }
}


# Virtual Host configuration for example.com
#
# You can move that to a different file under sites-available/ and symlink that
# to sites-enabled/ to enable it.
#
#server {
#       listen 80;
#       listen [::]:80;
#
#       server_name example.com;
#
#       root /var/www/example.com;
#       index index.html;
#
#       location / {
#               try_files $uri $uri/ =404;
#       }
#}
配置虚拟主机新增部分:
6. 性能测试工具
6.1 使用ab进行测试
sudo apt-get install apache2-utils

ab -n 10000 -c 100 http://127.0.0.1:5000/
-n 10000:总请求数。
-c 100:并发请求数。
6.2 使用wrk进行测试
sudo apt-get update

sudo apt-get install wrk

wrk -t12 -c400 -d30s http://127.0.0.1:5000/
-t12:线程数。
-c400:并发连接数。
-d30s:测试持续时间。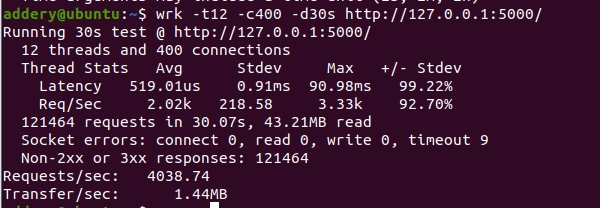
安装wrk如遇以下情况:
Unable to locate package wrk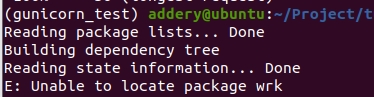
这可能是因为默认的 Ubuntu 仓库中没有包含 wrk 包。你可以尝试从源代码编译和安装 wrk,解决方案:
首先,安装编译 wrk 所需的依赖包:
sudo apt-get update
sudo apt-get install build-essential libssl-dev git
然后,从 GitHub 克隆 wrk 的源代码,并进行编译:
git clone https://github.com/wg/wrk.git
cd wrk
make
最后,将编译好的 wrk 可执行文件复制到 /usr/local/bin 目录,以便系统中的所有用户都可以使用:
sudo cp wrk /usr/local/bin验证安装
wrk --version7.参考博客
Flask+Gunicorn+Nginx在Linux(Debian/Ubuntu)搭建记录(极简教程)
在Linux中部署Flask+Gunicorn+Nginx
Nginx配置详解
(最全篇)nginx.conf配置文件详解